
- First Eagles - WWI and Early Years - Skins
- First Eagles - WWI and Early Years - Add-On Aircraft
- First Eagles - WWI and Early Years - Add On Cockpits
- First Eagles - WWI and Early Years - Object Mods
- First Eagles - WWI and Early Years - Terrain and Environmental Mods
- First Eagles - WWI and Early Years - Missions and Campaigns
-

Tweaked Flight Models and Realism Pack for FE2
By VonS
Hello Fellow Fliers of First Eagles 2,
Version 11.0 of the FM/Realism Package for FE2 contains approximately 220 WWI aircraft types and sub-types, for your (virtual) flying enjoyment. For detailed installation instructions, please check over the main "Read Me First" file that is included, as well as several older (pdf) files and that cover aircraft performance info., tips, etc., across all previous versions of the FM update package.
A great many thanks go out to Peter01 and Ojcar, also TexMurphy, for making most of those flight model files to begin with. Also a great thanks goes out to Stephen1918, MontyCZ and Laton for providing lots of beautiful planes and skins that go with those great flight models, to NBell for the many hitbox improvements provided for the planes, also to VonOben, Mike Dora and Crawford for many helpful suggestions, and to the A-Team by SkunkWorks for allowing me to tweak a few of the FMs for their models too. And of course a very big thanks goes out to Geezer for several fantastic, high-quality models that were produced for FE2.
What I've done is tinkered with the data files further. Modifications in all cases, to a greater or lesser extent, include data under the following sections:
(a) MissionData
(b) FlightControl
(c) AIData
(d) Sound
(e) AircraftData
(f) Engine
(g) Crew
(h) Internal Guns
(i) Control Surfaces
(j) Landing Gears
(k) Fuselage, Nose, Tail, Vertical Tail, LeftStab, RightStab, Rudder, Left/Right/Inner/Middle/Outer/Tip Wing components
Enjoy and happy flying!,
Von S
NOTES: For several of Geezer's latest aircraft and my FMs for those aircraft (Nieuports, Pfalzes, etc.), which are not included in this package, please see the relevant post located towards the bottom of page 25 of the "New Aircraft" thread for FE2, on CombatAce. Also see relevant posts on pages 26, 27, and 28 of that same thread for Geezer's "early beta" collection that contains the Breguet XIV, Junkers J.I, and other updates, including performance info. for some of those aircraft types.
DISCLAIMER: All Von S mods., for FE2, SF2, also WOFFue/pe/bh&h2, as well as for RoF (United Ed.), are subject to the CombatAce "freeware" terms of agreement. Mods. may be shared with others, included on other media devices, also modded further, providing that original documentation and/or credit is included, and providing that the mods. remain free to use. Von S mods. shall not be sold, resold, etc., and Von S takes no responsibility for injuries or fixations that may result from flying heavily tweaked FMs or from attempts to enjoy real flying without aid or instruction from a qualified flight instructor.
918 downloads
- tweaks
- modifications
- (and 6 more)
-
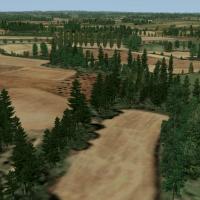
First Eagles seasonal Tiles by Jan Tuma
By Jan Tuma
First Eagles seasonal Tiles by Jan Tuma
-------------------------------------------
This is a set of new seasonal textures together with environmental mod (Trees, Forests, Farms, and new city objects) to enhance the look and feel of default First Eagles "Verdun" terrain; Expansion Pack 1 "Cambrai" terrain and aditional Flanders and Vogesen terrain.
Different textures and environmental for each of 12 months.
Please note that due to things work in the series terrain engine, you cannot destroy nor collide with buildings or trees.
There may be some performance drop on older systems (drop off framerate during flight), you have been warned!
----------------------
Installation:
----------------------
First make backups of your existing terrains folders!!! In case something goes wrong during the install...
A) Installation for all terrain (Werdun, Cambrai, Flanders and Vogesen):
Extract this package to First eagles main directory (not in Terrain folder), if asked, overwrite. So will supplementeds all files in Terrain folder at a time.
B) Custom Installation:
1) Unzip this package and open "Terrain" directory
2) Copy "Seasonal_tiles" folder in Terrain directory
3) For installation new Tiles to Werdun terrain copy "wwiVerdun" directory from installation package to "Terrain" folder, if asked, overwrite
4) For installation new Tiles to Cambrai terrain copy "wwiCambrai" directory from installation package to "Terrain" folder, if asked, overwrite
5) For installation new Tiles to Flanders terrain copy "Flanders" directory from installation package to "Terrain" folder, if asked, overwrite
6) For installation new Tiles to Verdun terrain copy "Verdun" directory from installation package to "Terrain" folder, if asked, overwrite
You may want to change the Ground Objects setting from Medium or High to Unlimited for better look (above all cities tiles)
----------------------
Uninstallation:
----------------------
A) Best would be to restore the directory you BACKED UP, don't tell me you didn't!
or
B)
1) Delete "seasonal_tiles" folder in Terrain directory
2) Delete all *.TOD files in "Terrain\wwiVerdun" folder. Move or copy all files found inside of "Terrain\wwiVerdun\backup" directory to "Terrain\wwiVerdun" folder, if asked, overwrite
3) Delete all *.TOD files in "Terrain\wwiCambrai" folder. Move or copy all files found inside of "Terrain\wwiCambrai\backup" directory to "Terrain\wwiCambrai" folder, if asked, overwrite
4) Delete all *.TOD files in "Terrain\Flanders" folder. Move or copy all files found inside of "Terrain\Flanders\backup" directory to "Terrain\Flanders" folder, if asked, overwrite
5) Delete all *.TOD files in "Terrain\Vogesen" folder. Move or copy all files found inside of "Terrain\Vogesen\backup" directory to "Terrain\Vogesen" folder, if asked, overwrite
----------------------
Credits:
----------------------
This mods was created by Jan Tuma
Vesion: 1.00 13.2.2010
THIS MOD IS ONLY TO BE DISTRIBUTED AS FREEWARE AND IN NO OTHER CIRCUMSTANCE SHALL IT BE USED, EVEN IN PART OF ANYTHING THAT IS PAYWARE. IN ACCORDANCE WITH THE COMBAT ACE MODDERS AGREEMENT. Remember to give me credits and include original readme.
Have fun, again watch that Hun in the sun!
Jan Tuma
http://www.tuma.tenzor.cz
2,180 downloads
-
dogfight 1.0.zip
By Nippy
Dogfight for Thirdwire Simulators (Series 1)
Dogfight is a quick mission generator much like Microsofts Quick Combat and
Ubisofts Quick Mission Builder.
This simple little program is an attempt to add similar facility to Thirdwire products
without editing Mission files by hand, or struggling with a complex Mission Editor.
So, using it you should be up and flying against a selected opponent within a few
seconds (once you're use to the system anyway!).
As a template for the Missions I used a standard 1v1 fighter encounter so the action
begins very close together (2 km seperation for WWI types, slightly further for faster types).
To use you:
1)Start Dogfight.
2)Setup mission.
3)Press the Red GENERATE button.
4)LEAVE Dogfight running.
5)Start the Thirdwire Simulator.
6)Go to the Single Mission page and then Load Mission Menu.
7)Click on the name of the mission that you just created in dogfight(default is "0 Dogfight").
8)When you want to change the mission click on Alt and Tab simultaneously.
9)Select Dogfight, make your changes and then press the red GENERATE button.
10)Return to the Thirdwire Simulator by clicking it on the task bar (or alt tabbing if you prefer).
11)ALWAYS RESELECT THE MISSION from the Single Mission-Load Misiion Menu to update the information.
12)Play the mission!
Repeat 8-12 as many times as you want
This sounds a bit long winded but you do soon get used to it.
Testing
DogFight has been tested with FE1 extensively (with virtually all the add on aircraft from
CombatAce, the Skunkworks and Peter01 fms), SFP1 (chiefly SCW) and WOE1 (chiefly WOR and WOA).
I've also tried it with some early Korean War era jets (SFP1).
I have only briefly tried it with more modern types (WOE) and though it works I'm not too sure
how useful regular fliers of these types will find it (it's the one period that I never really fly).
I have no access to any Thirdwire Series 2 sims so I really don't know if it will work with them.
The program was written using Microsoft Visual Studio Express 2010 C++ and FLTK.
FLTK (Fast Light Toolkit) is a great free package for constructing GUIs really quickly and easily.
Without it I doubt that I would have had time to write this program.
Thanks
Thanks to TK for creating a marvellous set of Sims. I love the way they work with TrackIR.
I would also like to take this opportunity to thank the many add on creators at Combatace and
the Skunkworks who have given me many hours of great gaming.
I hope Dogfight helps to provide some entertainment for Thirdwire Simulator Users.
Gary Ireland
116 downloads
-
Albatros D.II - 2 pack
By Stephen1918
Note - This is a complete revision with new LODs, new skins, and new hangar and loading screens. I recommend you delete the older version and replace it with this one.
The Albatros D.II was identical to the D.I, except that the top wing was mounted lower and farther forward to improve visibility. The fuselage, engine, and guns were the same. Early models had two radiators low on either side of the fuselage, later models had the radiator mounted in the upper wing.
I have created both versions of the D.II. I put both radiators on the skins so the same skin can be used for both versions. The download includes two skins, a light camo and a dark camo, and a full set of personal markings for each plane. I have included my skinning templates for those who wish to make different skins.
Credits
My thanks to Ojcar for making the data file for the Albatros D.II.
My thanks also to Nix for making the sound file for the Mercedes 160hp engine.
Installation Instructions
The two versions can be installed separately or both together.
For FE1 - Unzip the file and move the folders named "AlbatrosD2_Early" and "AlbatrosD2_Late" into the FirstEagles/Objects/Aircraft folder. You also need to move the sound file "mercedes160m2.wav" into the FirstEagles/Sounds folder.
For FE2 - Unzip the file and move the folders named "AlbatrosD2_Early" and "AlbatrosD2_Late" into the FirstEagles/Objects/Aircraft folder. Then in the FirstEagles/Objects/Decals folder, create new folders named "AlbatrosD2_Early" and "AlbatrosD2_Late". Move the folders named "D" from the Aircraft/AlbatrosD2 folders into the corresponding Decals/AlbatrosD2 folder you just made. You also need to move the sound file "mercedes160m2.wav" into the FirstEagles/Sounds folder.
718 downloads
-
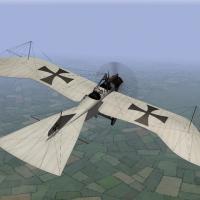
Taube
By Stephen1918
There were many versions of the Taube produced in the years leading up to World War I. When the war began different versions were being used in large numbers, on all fronts for recon missions. This is the Kondor Taube, which I think is representive of the "classic" Taube. It has the typical wing shape, uses wing warping for both the aileron and elevator surfaces, and has a six cylinder 100HP engine.
I have added a rifle for the observer, which he will aim and fire. I have made significant changes to the wires on the front to give the gunner more room to move.
Ojcar has created a fake machine gun for the pilot, which causes the AI plane to be more aggressive in pursuing enemy planes. I have installed that gun on this plane. Ojcar's "DummyMachineGun" data is included with this download, in case you don't already have it.
Some flyers wore simple crash helmets in WWI, especially in the early days. I am using a pilot with a helmet in this plane. The pilot and installation instructions are included in the download, in case you don't already have it.
The download includes my skinning templates, data for the guns and the German pilot with helmet.
Credits
Thanks to Ojcar for making the data file for the Taube, and for greatly improving the gunner. Ojcar also made the data for the dummy machine gun.
Thanks to Crawford for identifying a problem with the elevators.
Installation Instructions
For FE1 - Unzip the file. Move the folder named "Taube" into your FirstEagles/Objects/Aircraft folder.
For FE2 - Unzip the file. Move the folder named "Taube" into your FirstEagles/Objects/Aircraft folder. Then in the FirstEagles/Objects/Decals folder, create a new folder named "Taube". Move the folder named "D" from your Aircraft/Taube folder into the Decals/Taube folder you just made.
You may not need to install the dummy machine gun, it has been used on other planes and you may already have it. If you don't already have it, I have included the gun and instructions for installing in a separate folder included in this download.
You may not need to install the infantry, it has been used on ground units and you may already have it. If you don't already have it, I have included the gun and instructions for installing in a separate folder included in this download.
You may not need to install the pilot with helmet, it has been available for download for some time and you may already have it. If you don't already have it, I have included the pilot and instructions for installing in a separate folder included in this download.
185 downloads
-
Taube (grenade armed)
This version of the Taube is armed with a handful of grenades instead of a rifle. many thanks to all the people who worked on the original Taube and a special thanks to Stephen1918 who was kind enough to make time to alter his model to remove the gunner.All work on this is really the efforts of others and my only contribution was to bundle it up. Any issues please direct to me and I'll do my best to fix them as soon as I can.
97 downloads
-
Rumpler C.I
By Stephen1918
The Rumpler C.I was a general purpose two-seat plane first produced in 1915. It was used on all fronts and served throughout the war. My model is armed with a Parabellum machine gun on a Schneider Ring in the rear cockpit along with a synchronized Spandau mounted on the left side the engine.
I have included two loadouts, one for eight 11 kilo bombs carried under the wings, and another for two 50 kilo bombs carried under the fuselage.
I have also included three skinning options - A plain linen and a light blue paint representing early models, and a green/mauve camouflage for later in the war. I have included my templates for those who want to make additional skins.
This plane uses the national markings that come with First Eagles, so you can change nationalities to fly for Austria, Bulgaria or the Turks.
I have included decals for serial numbers and, on the linen and light blue skins, for flight letters. You can choose the letter in the loadout screen. The numbers will be applied randomly.
Historical Notes:
The serial numbers are fictitious, but in the correct range for the Rumpler C.I.
I don't know if the flight letters are realistic. The plane looked too naked, and I saw one photo of a Rumpler with a letter "J" on the side, so I allowed my imagination to take over.
Credits:
My thanks again to Ojcar for making the excellent FM file for this plane.
Also, my thanks to Nix for making the realistic engine sound file for the Mercedes 6 cylinder engine. (This is the same sound file used with the Albatros C.III so you may already have it.)
Installation instructions:
For FE1: Unzip the file and move the folder named "RumplerC1" into the FirstEagles/Objects/Airplanes folder. You also need to move the sound file "mercedes160m2.wav" into the FirstEagles/Sounds folder.
For FE2: Unzip the file and move the folder named "RumplerC1" into the FirstEagles/Objects/Airplanes folder. Then in the FirstEagles/Objects/Decals folder, create a new folder named "RumplerC1". Move the folder named "D" from your Airplanes/RumplerC1 folder into the Decals/RumplerC1 folder you just made. You also need to move the sound file "mercedes160m2.wav" into the FirstEagles/Sounds folder.
721 downloads
-
Albatros C.III
By Stephen1918
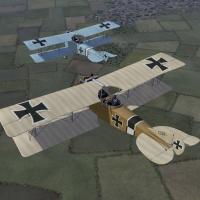
The Albatros C.III was a general purpose two-seat plane and was based on the C.I and C.II models. An improved tail structure made it more agile than its predecessors and it was produced in large numbers.
The plane was armed with a Parabellum machine gun mounted on a pivot in the rear cockpit along with a synchronized machine gun mounted beside the engine. The C.III was used for reconnaissance, aerial photography, and light bombing.
The gun ring had limited movement, especially in the vertical direction, which I have tried to reproduce in my model.
I have included two loadouts, one for four 12.5 kilo bombs carried internally, and another for six 12.5 kilo bombs carried externally under the wings.
I have also included three skinning options - an unpainted standard wood and linen, a light blue paint, and a green paint. All of these are pretty basic so I have included my skinning templates for those who want make their own skins.
This plane uses the national markings that come with First Eagles, so you can change nationalities to fly for Bulgaria or the Turks.
I have included decals for serial numbers and for personal markings. These will be applied randomly. Some of the personal markings include crosses, I don't know if that would be appropriate if you're flying for the Ottoman Empire.
Historical Notes:
The serial numbers are fictious, but in the correct range for the 1916 Albatros C.III.
The personal markings are completely fictious, but I think reasonable for German markings early in the war.
I have not found an example of the Albatros C.III in green paint, but many German planes on the Eastern Front were painted green later in the war, so the color is not unrealistic.
If historical accuracy is important to you, you can delete the offending files.
Credits:
My thanks to Ojcar for making the excellent data.INI file for this plane.
My thanks to Nix for making the realistic engine sound file for the Mercedes 6 cylinder engine.
Thanks also to Sinbad, Whitekinght06604, and Wrench who provided me with valuable resouces and information for the cockpit details.
Installation instructions:
For FE1: Unzip the file and move the folder named "AlbatrosC3" into the FirstEagles/Objects/Airplanes folder. You also need to move the sound file "mercedes160m2.wav" into the FirstEagles/Sounds folder.
For FE2: Unzip the file and move the folder named "AlbatrosC3" into the FirstEagles/Objects/Airplanes folder. Then in the FirstEagles/Objects/Decals folder, create a new folder named "AlbatrosC3". Move the folder named "D" from the Airplanes/AlbatrosC3 folder into the Decals/AlbatrosC3 folder you just made. You also need to move the sound file "mercedes160m2.wav" into the FirstEagles/Sounds folder.
March 12, 2012 - Uploaded a new version with an improved FM by ojcar.
790 downloads
-

Albatros C.III 766/16 Bohme/Lademacher
By sinbad
The Bohme/Lademacher Dragodiles The markings, logos, and numerals are those that appeared on the Alb C.III flown by Lt. Erwin Bohme and his observer Fritz Lademacher. The evidence available (three photos and the text of a letter from Bohme to his girlfriend) strongly indicate that the Dragodiles were white.
When I started this project I thought that the beasts might have been a light green or yellow-green.
It took some time to get it, but after I read the Bohme letter describing the images as “”ghosts” I decided they really were white.
That is why the default is the ghostly white.
I still included the less authentic, but more colorful greenies.
If you prefer the more colorful version, simply delete (or rename) the Decals file, and then copy and rename the"Decals Green Dragodiles" to "Decals".
Both decal sets are in the folder and should be left there. The green and yellow/green beasts should now appear. If you want to switch back, reverse the process. (That's why you didn't dump the original file!)
The Wood and Linen Alternative
This skin set uses the original decals provided by Stephen1918 that generate a varied set of markings derived from original German units and numerals.
None of the part numbers on the struts, elevators, wings, etc. are adjusted. Please back up your original “Wood and Linen files before using these as they will overwrite the originals. The logo on the prop is the earliest version of the Axial logo. Loading, Loadout and Hangar Screens. The loading and hangar screens are in the main file set along with the skins.
The loadout screen is in the Menu folder, and will replace the stock loadout screen for all aircraft. If you prefer the original, just delete it. Thanks to Stephen 1918 for a great model!
All files are set up for use in FE2.
If you need help getting this package to run in FE1, let me know.
sinbad
September 10, 2011
188 downloads
-
Italian Terrain (incl. 1915-1917 campaign)
By gterl
Italian Terrain WW1 V2.0
*******************************
Update (2.0):
- Removed ships that show up on land
- Added fortresses (Austrian & Italian)
- Changed ocean tiles
- Minor corrections
INTRODUCTION
The Italian Front during WW1 refers to a series of battles fought between 1915 and 1918 in northern Italy between the armies of Austria-Hungary and Germany against Italy.
Italy hoped that by joining the countries of the Triple Entente against the Central Powers it would gain Cisalpine Tyrol (today's provinces of Trentino and South Tyrol), the Austrian Littoral, northern Dalmatia and some areas of western Carniola.
Italy had hoped to begin the war with a surprise offensive intended to move quickly and capture several Austrian cities.
Well, the war soon bogged down into trench warfare similar to the Western Front fought in France.
INCLUDED
- Italian terrain/front WW1
- Ground objects
- Italian campaign 1915-1917 (incl. needed skins)
FAQs
Q: Is the scale of the map correct
A: No
Q: Why not the Piave river front, in order to create late 1917/1918 scenarios?
A: Because
Q: Are all the named towns and cities correct (placement and naming)
A: Yes as good as it gets.
Q: Does it include more than one season?
A: No, currently not. Might be released with version 2
Q: Is the frontline correct?
A: Yes as good as it gets, representing late 1917 with certain omissions in order to get targets for the campaigns (like Monfalcone being Austro-Hungarian)
Q: The river Isonzo seems to cut through the mountains, is that correct?
A: To a certain degree, but I had to modify massively the heightmap in order to make things look right (e.g. river not flowing up/down the mountains)
Q: The northern part of the map, e.g. toward Munich, seems without further towns?
A: Correct. All forests and lakes are there but apart from the major cities (Salzburg & Munich) I've not yes included smaller towns.
INSTALLATION
1. Make a backup copy of your First Eagles folder (just in case)
2. Extract the file into a temporary folder (like c:\temp\)
3. Copy all the relevant folders into the respective First Eagles game folders
(example: c:\temp\First Eagles\Terrain\wwiItaly into your c:\Program Files\First Eagles\Terrain folder)
4. Drop the skin folders into the respective aircraft folders and add the included lines into the aircraft ini file
PREREQUISITES
- FE Gold (might work also with FE2, sorry guys don't know), with the latest patch
- Aircraft for the included campaign:
Voisin3_120
Voisin3_150
Nieuport11
Nieuport17
SVA5
MSTypeL
MSTypeLAO
PfalzEV
FokkerD2
HBC1_160
HBC1_200
HBC1_230
oefD3_ba53a
oefD3_ba153a
oefD3_ba253
LloydC2
Hansa_BrandenburgDI
AviatikD1
AlbatrosD3OAW
PhoenixD2
RumplerC1
AviatikC2
Farman MF11c
SP3
Ca3
Dfwci
FokkerM7BI
CREDITS
As usual i want to say thank you to all guys who helped me to create the Italian terrain, to TK, Jan Tuma, Stephen1918, ojcar, Gepard, Heck, geo, quack74, Edward, A-Team (airplanes not included), Guitarclassic55 (for the wonderful menu) and a lot of others.
Sorry guys, at the moment i have forgotten the names. Please contact me if you want to be named at this place.
Thanks for files, suggestions, bug findings etc.
DISCLAIMER
The Italian terrain is freeware.
You are free to modify and share it, BUT Commercial use is prohibited.
If you find bugs please post them in First Eagles section of Combatace.com forum.
Hope you enjoy it.
Sincerely
gterl
679 downloads
- fe
- first eagles
- (and 3 more)
-
AEG C.IV
By Stephen1918
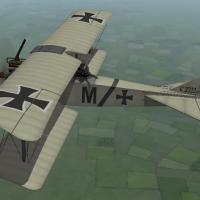
The AEG C.IV was a German 2 seater that was introduced in 1916 and saw service until the end of the war. It served on the Western, Eastern, and Palestine fronts and was operated by Bulgaria and Turkey as well as by Germany. It was primarily a reconnaissance plane, but was also used as a bomber escort, although not very successfully. It had a fixed Spandau machine gun for the pilot, a Parabellum on a ring mount for the observer, and could carry a small bomb load.
I have included two skins, a green and lilac camo, and a green and brown camo. I have also included a full set of number decals. My skinning templates are included in the download.
There are two bomb loadouts, one internal, and one external mounted under the wings. It is doubtful that the AEG C.IV carried external bombs, but I liked the look of it. For historical accuracy, you probably shouldn't use the External Bombs loadout.
Credits
Thanks to Ojcar for making the data file for the AEG C.IV and for providing valuable information, especially for the cockpit details.
Thanks also to Nix, who made the sound file for the Mercedes 160hp engine.
Thanks to Ojcar (again) for pointing out the problem with the decals.
Installation Instructions
For FE1 - Unzip the file and move the folder named "AEGC4" into your FirstEagles/Objects/Aircraft folder. You also need to move the sound file "mercedes160m2.wav" into the FirstEagles/Sounds folder.
For FE2 - Unzip the file and move the folder named "AEGC4" into the FirstEagles/Objects/Aircraft folder. Then in the FirstEagles/Objects/Decals folder, create new folder named "AEGC4". Move the folder named "D" from the Aircraft/AEGC4 folder into the Decals/AEGC4 folder you just made. You also need to move the sound file "mercedes160m2.wav" into the FirstEagles/Sounds folder.
332 downloads
-
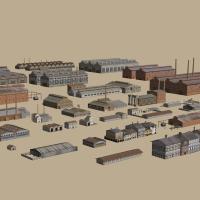
Industrial Objects
By Geezer
This pack contains a variety of large, medium, and small industrial objects - plus two urban housing blocks. They were originally developed at the request of FE map makers so their appearance is typical of WW1. Wrench then pointed out that they could also be used for other maps - 1930s, WW2, and even parts of the Cold War. A modest selection of complimentary 1930s civilian vehicles is in development, and will be added in the future.
THESE MODELS ARE ONLY TO BE DISTRIBUTED AS FREEWARE AND IN NO OTHER CIRCUMSTANCE SHALL THEY BE USED, EVEN IN PART, OF ANYTHING THAT IS PAYWARE, IN ACCORDANCE WITH THE COMBAT ACE MODDERS AGREEMENT.
173 downloads
-
FE2_and_FE1_Dogfightv2.3
By Nippy
Dogfight version 2.3 for Thirdwire Simulators (Series 1 and Series 2)
If you had problems with the previous version not seeing your install this version
is far better at finding the files it needs and will produce a log file to help identify problems
Dogfight is a quick mission generator much like Microsofts Quick Combat and
Ubisofts Quick Mission Builder.
This simple little program is an attempt to add similar facility to Thirdwire products
without editing Mission files by hand, or struggling with a complex Mission Editor.
So, using it you should be up and flying against a selected opponent within a few
seconds (once you're use to the system anyway!).
The action begins at a seperation of 2-4 km.
To use you:
1) Start Dogfight.
2) Select aircraft types, numbers and heights, Pilot training etc.
3) Press the Red WRITE MISSION button.
4) LEAVE Dogfight running.
5) Start the Thirdwire Simulator.
6) Go to the Single Mission page and then Load Mission Menu.
7) Click on the name of the mission that you just created in dogfight(default is "0 Dogfight").
8) When you want to change the mission click on Alt and Tab simultaneously.
9) Select Dogfight, make your changes and then press the red WRITE MISSION button.
10) Return to the Thirdwire Simulator by clicking it on the task bar (or alt tabbing if you prefer).
11) ALWAYS RESELECT THE MISSION from the Single Mission-Load Misiion Menu to update the information.
12) Play the mission!
Repeat 8-12 as many times as you want
This sounds a bit long winded but you do soon get used to it.
Installion
-------------
Unzip Dogfight.zip.
Find the folder called Dogfightv2.3 containing:
templates (folder)
df.cfg
df.exe
readme.txt
COPY Dogfightv2.3 INTO THE TOP LEVEL OF THE DIRECTORY WHERE YOU INSTALL YOUR MODS. There is
an Options.ini file in this directory as well.
i.e Dogfightv2.3 and Objects are at the same level.
OPEN THE Dogfightv2.3 FOLDER AND CREATE A SHORTCUT FROM DF.exe TO YOUR DESKTOP
(or wherever you want to launch if from).
Testing
--------
DogFight has been tested with:
FE1 and FE2 (Viurtually all of the aircraft from CombatAce and the Skunkworks with Peter01 fms)
SF1 (chiefly SCW)
WOE (Principally Wings Over Russia and Wings Over Africa).
SF2, and SFNA2, (Skunkworks PTO) (CombatAce BOB) and with additional aircraft thrown in.
I've also tried it with some early Korean War era jets.
Only briefly tried it with more modern types.
The program was written using Microsoft Visual Studio Express 2010 C++ and FLTK.
FLTK (Fast Light Toolkit) is a great free package for constructing GUIs really quickly and easily.
Without it I doubt that I would have had time to write this program.
Thanks
Thanks to TK for creating a marvellous set of Sims. I love the way they work with TrackIR.
I would also like to take this opportunity to thank the many add on creators at Combatace and
the Skunkworks who have given me many hours of great gaming.
I hope Dogfight helps to provide some entertainment for Thirdwire Simulator Users.
Gary Ireland
137 downloads
-
Albatros DIII (OAW) Factory fresh skins
By Trotski
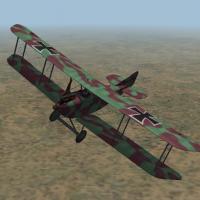
5 skins representing factory finished OAW built Albatros DIII's . OAW built air-frames were finished slightly differently to standard built DIII's no rust brown paint was used , as per a directive from the air ministry in April 1917, so the 2 tone camoflage was applied, also different to the standard Albatri the camouflage was symmetrical, and also hard edged, rather than diffused.
I have tried to represent 2 camouflage in Green/Mauve and Green/Green , the second scheme is speculative, as it seems the Green/Mauve was more prevalent, also on the Green/Green I have made the tail cam lead -trail and not tip - tip as was more common on OAW machines, I have seen pictures of OAW machines with fore aft tail plane schemes, but that may have been a field mod done on the Jastas, but anyhow done them any how. So the Green/Green, and the Green/Mauve are mirror images of each other ( you will see what I mean when you load them up )
Finally I have redone the Lozenge, as I am fed up with seeing the manky dirty lozenge scheme that comes as standard with the in game Albatri, I have utilised a lighter day scheme, re done the rib tapes, etc etc etc.......anyhow, hope these aircraft fit the bill, nice clean, fresh out of the box, so not weathered at all, so if you prefer the dirty used look, please go ahead and dirty 'em up, they are a blank canvas after all.
Oh yeah, just repainted the upper fuselage metal bits, in the standard grey green, also the struts.
Enjoy !!!
71 downloads
-
Vosges
By gterl
Vosges Terrain (inkl. 1916 campaign) 1.2
Re-worked Vosges terrain V2.0
*****************************
New: V2.0 - Including winter season
INTRODUCTION
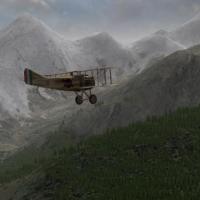
The Vosges Front is a mountainous area ranging from the Donon in the north and the Grand Ballon in the south. The old border between the German Empire and France from 1871 to 1918, now in Alsace and the Lorraine, was the only area of the Western Front to see mountain fighting during the Great War With transportation infrastructure and technology, impacts on the landscape and strategic challenges related to climate and geographic constraints, the Vosges mountains were the scene of numerous battlefields.
DETAILS
- This version of the Vosges front is 'based' on the work of Stephen1918 and Gepard. But virtually everything was modified (height-map to a massive degree, towns, front line, rivers, etc.)
- Existing versions of this map will NOT be overwritten with this version, since the folder is named 'wwiVosges'.
- You'll find a new map within FE called 'Vosges, France'.
- I've tried to include as much as possible into the terrain folder. This means certain object were made 'static'.
- Certain targets are at the very edge of the terrain. This might cause certain issues when flying into the virtual 'wall', e.g. edge of the map.
- To minimize the repetitive feeling of flying over tiles I've added a lot of green fields (fields without trees).
- The included campaign is just a small one with the possibility to fly recon and bombing missions (France/Germany).
NEW STUFF
- Train lines and trainstations (major cities and minor towns)
- 'Waterfalls' and shipping locks
- Small airfields and very large airfields
- Zeppelin airfield
- A rather busy frontline (make sure you've the needed objects)
- Switzerland as neutral country, altough it doesn't work 100% but that's an issue based on the game-engine. Including two Swiss airfields and a border with various gates, flags, bunkers, etc.
INCLUDED
- Vosges terrain/front WW1 (incl. two seasons)
- Ground objects
- German/French reconnaissance campaign set in 1916
FAQs
Q: Is it based on the already existing 'Vogesen' map?
A: Yes, but actually only as a basis. Everything was changed/adapted (heightmap, tilemap, targets, etc.).
Q: Does it include more than one season?
A: No, currently not.
Q: Is the frontline correct?
A: Yes as good as it gets, representing late 1916/early 1917 with certain omissions.
Q: Are all the named towns and cities correct (placement and naming)?
A: Yes as good as it gets. French denominations and German denominations.
INSTALLATION
1. Make a backup copy of your First Eagles folder (just in case)
2. Extract the file into a temporary folder (like c:\temp\)
3. Copy all the relevant folders into the respective First Eagles game folders
(example: c:\temp\Vosges\Terrain\Vosges into your c:\Program Files\First Eagles\Terrain folder)
PREREQUISITES
- FE Gold (might work also with FE2, sorry guys don't know), with the latest patch
- Aircraft for the included campaign:
CaudronG4
RumplerC1
Nieuport10
Nieuport11
Nieuport12
Voisin3_150
Voisin5
AlbatrosC3
AviatikC2
FokkerEIIIa
FokkerD2
AviatikC2
Dfwci
Walfisch
LloydC2
CREDITS
As usual I want to say thank you to all guys who helped me to create the Vosges terrain:
TK, Jan Tuma, Stephen1918 (for the improved Vogesen version from Gepard), Geezer (great ground objects), ojcar, Gepard (for the initial Vogesen version), Heck, geo, quack74, Edward, A-Team (airplanes not included), Guitarclassic55 (for the wonderful menu) and a lot of others. Of course Gerwin's TFD Tool was instrumental in the making of this terrain.
Sorry if I've forgotten someone. Please contact me if you want to be named at this place.
Thanks for files, suggestions, testing, bug findings etc.
DISCLAIMER
The Vosges terrain is freeware.
You are free to modify and share it, BUT Commercial use is prohibited.
If you find bugs please post them in First Eagles section of Combatace.com forum.
Hope you enjoy it.
Sincerely
gterl
411 downloads
-
Farman HF.20 unarmed
By Stephen1918
The Farman HF.20 was developed in 1913 and was being used by most of the air forces in Europe by the time World War I began. It was designed for reconnaissance and had very stable flight characteristics, but it didn't have a very powerful engine and wasn't suitable for fighter or bomber missions, although some pilots made the attempt. The Farman F.20 was withdrawn from front line service as more nimble aircraft became available.
This version does not have a machine gun and places the observer behind the pilot.It can carry a small bomb load, with the bombs being released over the side. This install will not replace the original Farman HF.20, so you can fly both of them in First Eagles.
My skins for Belgian, French, and Russian versions will work for both versions of the HF.20. I have included all three in this download. The Russian version uses the decal.ini posted by Crawford in the forums. Decals and my skinning templates are included in the download.
Some flyers wore simple crash helmets in WWI, especially in the early days. I am using a pilot with a helmet in this plane. The pilot and installation instructions are included in the download, in case you don't already have it.
The Farman HF.20 has a wider wingspan than First Eagles expects so you should install my "Airfields for Large Planes" available in the Combat Ace downloads area. Otherwise, when starting on the runway, your wings may be touching the wings of the planes next to you. This will cause an immediate collision and you or other planes in your flight may lose their wingtips as soon as the game starts.
Credits
Thanks to Ojcar for making the data file for the Farman HF.20.
Thanks also to Crawford who created a more accurate decal.ini for the Russian version and who provided resources for the Farman cockpits.
Installation Instructions
For FE1 - Unzip the file. Move the folder named "FarmanHF20U" into your FirstEagles/Objects/Aircraft folder.
For FE2 - Unzip the file. Move the folder named "FarmanHF20U" into your FirstEagles/Objects/Aircraft folder. Then in the FirstEagles/Objects/Decals folder, create a new folder named "FarmanHF20U". Move the folder named "D" from your Aircraft/FarmanHF20U folder into the Decals/FarmanHF20U folder you just made.
You may not need to install the pilot with helmet, it has been available for download for some time and you may already have it. If you don't already have it, I have included the pilot and instructions for installing in a separate folder included in this download.
89 downloads
-
Cockpit for the SPAD 7
By Stephen1918
This cockpit will repace the SPAD 13 cockpit used until now to make the stock SPAD 7 into a flyable plane. I can't find out who first converted the stock SPAD 7 into a flyable plane by using the cockpit from the SPAD 13. It seems to have been done several times over the years. The most recent version I could find was by Sinbad in 2012.
I have used parts of the cockpits I made for the SPAD 11, SPAD 16, and SPAD A.2 to make a completely new cockpit for the SPAD 7 which fits the fuselage better and has the correct number of guns. The new cockpit features fully functional gauges, throttles, rudder control, and stick. This cockpit should work with all the SPAD 7s (SPAD7_150, SPAD7_180,etc.)
NOTE - About 10 years ago, Gr.Viper made a SPAD 7 by converting the SPAD 13. MY cockpit will not work for that version since it uses the SPAD 13 plane with a revised FM. (If your SPAD 7 has two guns on the fuselage, then you are using GR.Viper's conversion and this cockpit won't fit.)
Installation Instructions for both FE1 and FE2
Do this for each SPAD 7 you want to convert:
If you have already have a flyable SPAD 7 using the SPAD 13 cockpit, delete the "cockpit" folder if it exists, and delete the SPAD7_COCKPIT.ini file. Then open my "SPAD_7" folder and place all the files - 1 folder and 1 ini file - into your folder.
If you still have the stock version, Open my "SPAD_7" folder and place all the files - 1 folder and 1 ini file - into your folder. You will also have to add the following line to the plane's ini file.
CockpitDataFile=SPAD7_cockpit.ini
138 downloads
-

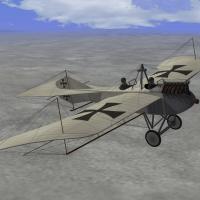
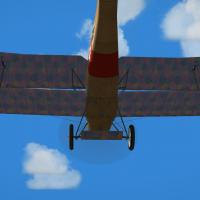
Morane-Saulnier N “Bullet”
By p10ppy
Morane-Saulnier N Monoplane version 1.3
18 May 2007
By Vernon "p10ppy" Bowden
Please read the Installation.txt for other notes and installation instructions
2,935 downloads
-

Jasta 11 Ltn. Eberhardt Mohnicke
By quack74
Blue Tailed Jasta 11 Dr1
Pilot was Ltn. Eberhardt Mohnicke and number is unknown to me
But scheme is historically accurate.
Just change the skin folder to J11 Mohnicke and the Textureset as well in the skin folder. Also change the
Textureset in the fokkerDr1 Configuration Settings from J11 Blue Tail to J11 Mohnicke.
Enjoy, quack74
135 downloads
-

First Eagles stock terrains visual upgrade
By Stary
This is a set of new reworked seasonal textures, together with custom hand placed trees and buildings, created to enhance the look and feel of default First Eagles Verdun terrain and "Expansion Pack 1" Cambrai. For Cambrai sector the large empty grass areas (the so called "rough" textures) have been replaced with new irregular fields.
1,296 downloads
-

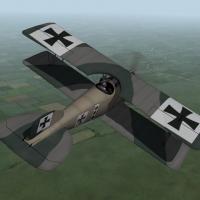
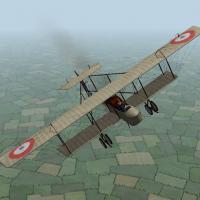
Photorealistic Fokker D.VII OAW
By Hansa
Here it is a "new" fokker with custom sound and cockpit side panels.
Just unzip the folder FokkerD7OAW in your Objects/Aircraft folder and copy BMW.wav to your Sounds folder.
Cockpit graphics by Stephen Honey
It was a dirty war over the front...
Have a good time !!!
P.S. I have included a Fokker Dr.1 skin with the tail fixed.
257 downloads
-
Lloyd C.II
By Stephen1918
This is a complete revision of the Lloyd C.II with all new LODs, new skins, and improved decals. Ojcar has also improved the FM for this plane. Any skins that were made for the original version will not work with this version.
The Lloyd C.II was based on a pre-war Austro-Hungarian airplane but with a slightly shorter wingspan and the addition of a machine gun on a circular mount for the observer. The C.II featured a plywood body and swept-back, tapered wings and was used for reconnaissance and light bombing throughout the war.
The gun ring had limited movement, especially in the vertical direction, which I have tried to reproduce in my model. This will be a challenging plane to fly because you need to move the plane to bring enemy planes into range of the gunner. There is no gun for the pilot.
There are also two bomb loading options for light and heavy bombing runs. (We don't know if the Lloyd ever carried 50kg bombs, but we included the option anyway.)
I have included three skinning options, one with standard Austro-Hungarian markings from early in the war, and two from later in the war. I have included my skinning templates for those who want make their own skins.
I have included a set of serial numbers which will be randomly assigned to each plane. The numbers are fictitious, but in the correct range for the Lloyd C.II.
Ojcar made a new data.ini for this plane. He added the heavy bomb option to the loadout. The 6.5 Schwarzlose gun he created for the original plane is included, along with his instructions for loading the gun data ("DataReadMe.txt")
Credits:
Great thanks to Ojcar, who made the excellent FM and who added some nice features to this plane.
Installation instructions:
This is a complete revision of the original Lloyd C.II. If you have the plane already, begin by deleting the Lloyd C.II from the Aircraft Folder, and (if you run FE2) from the Decals folder. Then install the new plane.
For FE1: Unzip the file and move the folder named "LloydC2" into the FirstEagles/Objects/Aircraft folder.
For FE2: Unzip the file and move the folder named "LloydC2" into the FirstEagles/Objects/Aircraft folder. Then in the FirstEagles/Objects/Decals folder, create new folder named "LloydC2". Move the folder named "D" from the Aircraft/LloydC2 folder into the Decals/LloydC2 folder you just made.
To install the gun:
This is the same gun that was included with the original Lloyd C.II. If you had the original plane, you don't need to install the gun. If this is your first install, follow the instructions below.
For FE1: Follow the instructions in Ojcar's DataReadMe.txt file. You'll have to make changes to the LloydC2_data.ini file.
For FE2: Follow the instructions in Ojcar's DataReadMe.txt file.
598 downloads
-

Anatra DS "Anasal"
By Stephen1918
This version includes a new FM made by ojcar.
The Anatra DS was a two seat Russian plane powered by a Salmson 9 cylinder, water cooled, radial engine. The plane was therefore called the "Anasal", short for "Anatra Salmson". When the Ukrainian city of Odessa was occupied by Austria-Hungary early in 1918, the Anatra factory was found intact and production continued as the "Anatra C.I". Many of the first Austrian versions had the Austrian cross painted over the Russian insignia.
The Anatra was used mostly for reconnaissance, but also as a fighter and light bomber. Many of them survived the war and were used in the fighting in Eastern Europe after the end of World War I.
In version 2 - I have included a loadout for a light bomb load and three skinning options - A generic Russian skin, and skins for two Russian squadrons - the 19th and the 4th squadrons with decals for the squadron tail markings. I have included my skinning templates for those who want make their own skins.
In version 3 - I improved the details around the nose, completely reskinned the plane and cockpit, and corrected several problems with node names in the data file. New templates are included in the version 3 download.
In version 4 - Ojcar has made a new FM for the plane. I have refined the wings and added some details. Old skins will still work with this revision. I have included the old skinning templates with the download.
Historical Notes:
I found several sources which said that Anatras carried a machine gun mounted on the fuselage for the pilot. I couldn't find any details of the mounting, so I guessed where it might be located.
Credits:
My thanks to Ojcar once again for making a new data.ini file for this revision of the plane.
Installation instructions:
This revision replaces previous versions. If you have an older version, please delete it, then install the new version.
For FE1: Unzip the file and move the folder named "AnatraDS" into the FirstEagles/Objects/Aircraft folder.
For FE2: Unzip the file and move the folder named "AnatraDS" into the FirstEagles/Objects/Aircraft folder. Then in the FirstEagles/Objects/Decals folder, create a new folder named "AnatraDS". Move the folder named "D" from the Aircraft/AnatraDS folder into the Decals/AnatraDS folder you just made.
422 downloads
-

Pfalz D.III, D.XII, Roland DVIa package
By ojcar
So you all have the wonderful Pfalz DIII and DIIIa by the A-Team?
And the not least wonderful Peter01 FM for this bird?
Very well, I have tuned a little more the FM because I think it needed to be a little tuned down. The DIIIa in game was faster than an Albatros DVa (180Hp) (just the contrary to pilot
stories about it). No more!
The Pfalz D XII was the contrary case. It was a close competitor for the Fokker VII, but in game was slower than the old DIIIa, so it has a new FM as well.
I have made also an FM for the Roland DVIa, beacuse there is no Peter01 FM for this plane (I think so). It's fast and nimble, but doesn't climb very well. Probably needs more testing...
Besides, reading about the Mercedes DIII engine history I noticed that early Pfalz DIII had the Mercedes DIII engine and late Pfalz DIIIa had the Mercedes DIIIaü (180Hp), but this engine
was in service in March 1918 and the DIIIa were in the units in late 1917, so.....we were lacking an engine!
At the same time, Albatros DIII and DV were given the Mercedes DIIIa (170Hp), so I have made a 170 Hp Pfalz!
502 downloads
-

Airco DH9a "Ninak"
By Stephen1918
The Airco DH9a, called the "Ninak" ("nine a") was introduced in June 1918 to replace the underpowered DH9. The 400hp Liberty engine required changes to the front of the fuselage, otherwise the plane was pretty much the same as the DH9. Although it was introduced late in the war, the DH9a did see service during the war, and was used extensively afterwards.
I have included two skins, a brown and an olive color. Both use the letter decals that come with First Eagles (which you can set in the loadout screen) and I have included a set of serial numbers which will be applied randomly. There are also loadouts for light, medium, and heavy bomb loads.
The skins are rather generic, I have included my skinning templates for those who wish to make better skins.
Credits
My thanks to Ojcar for once again making an excellent data file for the DH9a.
My thanks also to Sinbad for providing a great deal of resource information for this plane.
Installation Instructions
For FE1 - Unzip the file and move the folder named "AircoDH9a" into the FirstEagles/Objects/Airplanes folder.
For FE2 - Unzip the file and move the folder named "AircoDH9a" into the FirstEagles/Objects/Airplanes folder. Then in the FirstEagles/Objects/Decals folder, create a new folder named "AircoDH9a". Move the folder named "D" from the Airplanes/AircoDH9a folder into the Decals/AircoDH9a folder you just made.
April 5, 2012 - Replaced data file with new version to fix problem with take offs and landings and making the plane fly better.
429 downloads
-
Download Statistics