
Leaderboard

Popular Content
Showing most liked content on 05/19/2024 in Posts
-
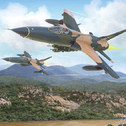
7 pointsP-5iB Mustangs....A dynamic duo...Capt Don Gentile and Capt John Godfrey
-
6 pointswell you see meanwhile, out on the range
-
6 pointsAs soon as the Sharif was outta their hair The jet pilots wailed (1000 internet points if you catch the reference)
-
5 pointsClearly it's a "Rock the Casbah" reference I'd like my 1000 points coverted into skill points for bombing, please
-
4 pointsFinally got caught up over weekend after long travels on this. Added in some details including the industrial fans, propane welding tank racks, and just had to get some ground crew in there...I have to fix a few scaling issues here and there, but for the most part she's on the home stretch. This is one big hangar indeed. Any other suggestions or comments, let me know - thanks.
-
4 pointsTough crowd... The irony of your post, is it's quite interesting and your eye for detail to pick up on that fact quite impressive indeed. And I like the fact that you proposed a more proper option. OK, let's try to make it better! I did some historical research and settled on this; hopefully a more accurate improvement...
-
3 points"I'd gladly pay you Tuesday, for a hamburger today"
-
3 pointsOf course you can map multiple meshes on one image. Instead of creating a new image for every mesh, you can also select the same image, you already used for another mesh. For example "fuselage.jpg" in your screenshot could also be used for the wings if you have enough space left on that image. Look at the picture: OuterWing_Left and Pylon_Inner_Left are 2 seperate meshes, but are on the same texture-image called SimplePlane_LeftWing.jpg You have to export the UV-layout for every mesh, insert it on your texture-file, save it and then reassign it as texture for a mesh, so the changes become visible. I think it's not possible to just view the mapping of all meshes together at once, because you need to be in edit-mode to see the mapping and that only works for single meshes. The general way (for me) is: - create a the texture-image in Photoshop. - map a mesh and select the image in blender as texture-file - place the mesh and export the uv layout (UV/Image Editor"-windows menubar "UV->Export UV Layout") - import the created .png-file with the meshlayout as new layer to the texture-file in photoshop (important: insert to original position, otherwise it is placed on a different position on the texture-file than the actual mesh is) - save the updated texture-file - reassign the updated texture-file on blender to see the meshes, that are already mapped - repeat until done That way, you also create the base for your models skintemplate. You should have something like this, if you have finished mapping all single meshes of a model:
-
3 pointsmore testin
-
1 pointalmost done with active duty. just 3 more skins to go..... then its the ANG. so much Guard Recce.....
-
1 pointinput from the skinner side of house you will get better skins if you have several textures rather than all on one. it doesnt need to be a dozen or even TKs usual 5, but loading all on one means you are making everything smaller to fit on one space. yeah you could go big (2048 or 4096 px)but if you did that why not break things up (say a fuselage/tail grouping and a wings. engines/ various parts grouping) for more detail. sorry, i do not know how you would do that in blender (barely got the hang of it in Maya) but end user wise, all on one can be a pain for anything outside of a weapon or small ground vehicle
-
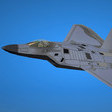
1 pointnow lets see you fly a Marine Scooter through it
-
1 pointsimply amazing!
-
1 point
-
1 pointAfter the difficult weeks over Ypres in autumn 1917 with some injuries my Jasta 8 is more south at Wassigny since a few days between St. Quentin and Cambrai. And the first pilots in our squadron fly the Pfalz DIII now (with some skins from @Jerbear).
-
1 point
-
1 point
-
1 pointOK, nearing final completion - I know it's Overkill with the details but honestly that's part of the work I enjoy the most; recently added in portable diagnostic testing unit, portable arc welding station unit and rolling tool carts. And I packed/optimized nearly all the prop textures into a single 1024 res map with super low poly mesh props so should be minimal impact. Sorry in advance, some last shots are captured right from MAX viewport.
-
1 pointAs previously mentioned, finished up the utility ground tug for hangar eye-candy, looks good to me but let me know of any proposed changes.
-
1 pointHi there, busy lately but making progress here - thanks for those that reached out. Here I have now a utility lift vehicle for some eye candy in the hangar. It is nice and low poly with simple 1024 res map so easy on the frame rates when you hangar in, and obviously I painted it in military style GSE yellow. I plan to do an older style pushback tug/tractor next and have already acquired the assets so I don't have to scratch build, and can focus on more on simple mesh updates and even more on texturing which always takes the longest time. Anyway, just quick update for now and hope you like it.
-
1 pointOK, some weekend progress - first round and start of "interior decorating". Will continue to add more details and interior props soon enough, hope you enjoy for now, thanks!


-
Popular Contributors
-
1
-
2

-
3
-
4
-
5
-
6
-
7

-
8

-
9
-
10
-

Important Information
By using this site, you agree to our Terms of Use, Privacy Policy, and We have placed cookies on your device to help make this website better. You can adjust your cookie settings, otherwise we'll assume you're okay to continue..