
Stephen1918
-
Content count
1,168 -
Joined
-
Last visited
-
Days Won
19
Files posted by Stephen1918
-
Albatros D.II - 2 pack
By Stephen1918 in Albatros
Note - This is a complete revision with new LODs, new skins, and new hangar and loading screens. I recommend you delete the older version and replace it with this one.
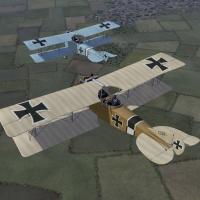
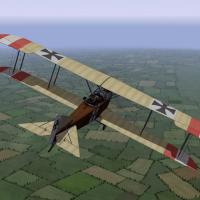
The Albatros D.II was identical to the D.I, except that the top wing was mounted lower and farther forward to improve visibility. The fuselage, engine, and guns were the same. Early models had two radiators low on either side of the fuselage, later models had the radiator mounted in the upper wing.
I have created both versions of the D.II. I put both radiators on the skins so the same skin can be used for both versions. The download includes two skins, a light camo and a dark camo, and a full set of personal markings for each plane. I have included my skinning templates for those who wish to make different skins.
Credits
My thanks to Ojcar for making the data file for the Albatros D.II.
My thanks also to Nix for making the sound file for the Mercedes 160hp engine.
Installation Instructions
The two versions can be installed separately or both together.
For FE1 - Unzip the file and move the folders named "AlbatrosD2_Early" and "AlbatrosD2_Late" into the FirstEagles/Objects/Aircraft folder. You also need to move the sound file "mercedes160m2.wav" into the FirstEagles/Sounds folder.
For FE2 - Unzip the file and move the folders named "AlbatrosD2_Early" and "AlbatrosD2_Late" into the FirstEagles/Objects/Aircraft folder. Then in the FirstEagles/Objects/Decals folder, create new folders named "AlbatrosD2_Early" and "AlbatrosD2_Late". Move the folders named "D" from the Aircraft/AlbatrosD2 folders into the corresponding Decals/AlbatrosD2 folder you just made. You also need to move the sound file "mercedes160m2.wav" into the FirstEagles/Sounds folder.
718 downloads
-
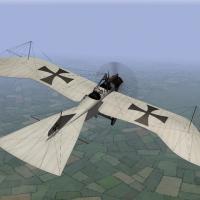
Taube
By Stephen1918 in Other Central Powers Aircraft
There were many versions of the Taube produced in the years leading up to World War I. When the war began different versions were being used in large numbers, on all fronts for recon missions. This is the Kondor Taube, which I think is representive of the "classic" Taube. It has the typical wing shape, uses wing warping for both the aileron and elevator surfaces, and has a six cylinder 100HP engine.
I have added a rifle for the observer, which he will aim and fire. I have made significant changes to the wires on the front to give the gunner more room to move.
Ojcar has created a fake machine gun for the pilot, which causes the AI plane to be more aggressive in pursuing enemy planes. I have installed that gun on this plane. Ojcar's "DummyMachineGun" data is included with this download, in case you don't already have it.
Some flyers wore simple crash helmets in WWI, especially in the early days. I am using a pilot with a helmet in this plane. The pilot and installation instructions are included in the download, in case you don't already have it.
The download includes my skinning templates, data for the guns and the German pilot with helmet.
Credits
Thanks to Ojcar for making the data file for the Taube, and for greatly improving the gunner. Ojcar also made the data for the dummy machine gun.
Thanks to Crawford for identifying a problem with the elevators.
Installation Instructions
For FE1 - Unzip the file. Move the folder named "Taube" into your FirstEagles/Objects/Aircraft folder.
For FE2 - Unzip the file. Move the folder named "Taube" into your FirstEagles/Objects/Aircraft folder. Then in the FirstEagles/Objects/Decals folder, create a new folder named "Taube". Move the folder named "D" from your Aircraft/Taube folder into the Decals/Taube folder you just made.
You may not need to install the dummy machine gun, it has been used on other planes and you may already have it. If you don't already have it, I have included the gun and instructions for installing in a separate folder included in this download.
You may not need to install the infantry, it has been used on ground units and you may already have it. If you don't already have it, I have included the gun and instructions for installing in a separate folder included in this download.
You may not need to install the pilot with helmet, it has been available for download for some time and you may already have it. If you don't already have it, I have included the pilot and instructions for installing in a separate folder included in this download.
185 downloads
-
Rumpler C.I
By Stephen1918 in Other Central Powers Aircraft
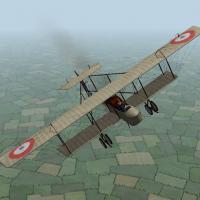
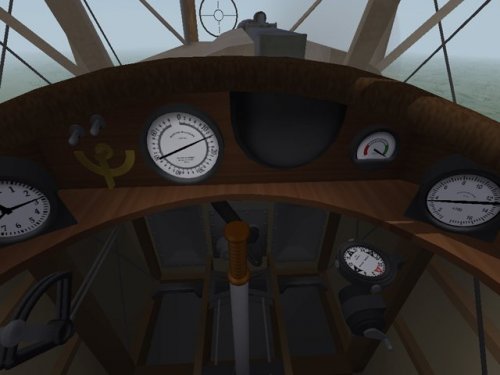
The Rumpler C.I was a general purpose two-seat plane first produced in 1915. It was used on all fronts and served throughout the war. My model is armed with a Parabellum machine gun on a Schneider Ring in the rear cockpit along with a synchronized Spandau mounted on the left side the engine.
I have included two loadouts, one for eight 11 kilo bombs carried under the wings, and another for two 50 kilo bombs carried under the fuselage.
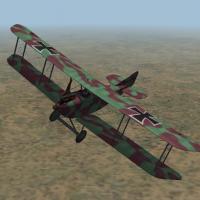
I have also included three skinning options - A plain linen and a light blue paint representing early models, and a green/mauve camouflage for later in the war. I have included my templates for those who want to make additional skins.
This plane uses the national markings that come with First Eagles, so you can change nationalities to fly for Austria, Bulgaria or the Turks.
I have included decals for serial numbers and, on the linen and light blue skins, for flight letters. You can choose the letter in the loadout screen. The numbers will be applied randomly.
Historical Notes:
The serial numbers are fictitious, but in the correct range for the Rumpler C.I.
I don't know if the flight letters are realistic. The plane looked too naked, and I saw one photo of a Rumpler with a letter "J" on the side, so I allowed my imagination to take over.
Credits:
My thanks again to Ojcar for making the excellent FM file for this plane.
Also, my thanks to Nix for making the realistic engine sound file for the Mercedes 6 cylinder engine. (This is the same sound file used with the Albatros C.III so you may already have it.)
Installation instructions:
For FE1: Unzip the file and move the folder named "RumplerC1" into the FirstEagles/Objects/Airplanes folder. You also need to move the sound file "mercedes160m2.wav" into the FirstEagles/Sounds folder.
For FE2: Unzip the file and move the folder named "RumplerC1" into the FirstEagles/Objects/Airplanes folder. Then in the FirstEagles/Objects/Decals folder, create a new folder named "RumplerC1". Move the folder named "D" from your Airplanes/RumplerC1 folder into the Decals/RumplerC1 folder you just made. You also need to move the sound file "mercedes160m2.wav" into the FirstEagles/Sounds folder.
721 downloads
-
Albatros C.III
By Stephen1918 in Albatros
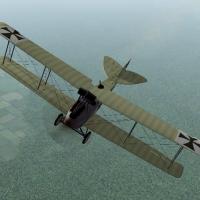
The Albatros C.III was a general purpose two-seat plane and was based on the C.I and C.II models. An improved tail structure made it more agile than its predecessors and it was produced in large numbers.
The plane was armed with a Parabellum machine gun mounted on a pivot in the rear cockpit along with a synchronized machine gun mounted beside the engine. The C.III was used for reconnaissance, aerial photography, and light bombing.
The gun ring had limited movement, especially in the vertical direction, which I have tried to reproduce in my model.
I have included two loadouts, one for four 12.5 kilo bombs carried internally, and another for six 12.5 kilo bombs carried externally under the wings.
I have also included three skinning options - an unpainted standard wood and linen, a light blue paint, and a green paint. All of these are pretty basic so I have included my skinning templates for those who want make their own skins.
This plane uses the national markings that come with First Eagles, so you can change nationalities to fly for Bulgaria or the Turks.
I have included decals for serial numbers and for personal markings. These will be applied randomly. Some of the personal markings include crosses, I don't know if that would be appropriate if you're flying for the Ottoman Empire.
Historical Notes:
The serial numbers are fictious, but in the correct range for the 1916 Albatros C.III.
The personal markings are completely fictious, but I think reasonable for German markings early in the war.
I have not found an example of the Albatros C.III in green paint, but many German planes on the Eastern Front were painted green later in the war, so the color is not unrealistic.
If historical accuracy is important to you, you can delete the offending files.
Credits:
My thanks to Ojcar for making the excellent data.INI file for this plane.
My thanks to Nix for making the realistic engine sound file for the Mercedes 6 cylinder engine.
Thanks also to Sinbad, Whitekinght06604, and Wrench who provided me with valuable resouces and information for the cockpit details.
Installation instructions:
For FE1: Unzip the file and move the folder named "AlbatrosC3" into the FirstEagles/Objects/Airplanes folder. You also need to move the sound file "mercedes160m2.wav" into the FirstEagles/Sounds folder.
For FE2: Unzip the file and move the folder named "AlbatrosC3" into the FirstEagles/Objects/Airplanes folder. Then in the FirstEagles/Objects/Decals folder, create a new folder named "AlbatrosC3". Move the folder named "D" from the Airplanes/AlbatrosC3 folder into the Decals/AlbatrosC3 folder you just made. You also need to move the sound file "mercedes160m2.wav" into the FirstEagles/Sounds folder.
March 12, 2012 - Uploaded a new version with an improved FM by ojcar.
790 downloads
-
AEG C.IV
By Stephen1918 in Other Central Powers Aircraft
The AEG C.IV was a German 2 seater that was introduced in 1916 and saw service until the end of the war. It served on the Western, Eastern, and Palestine fronts and was operated by Bulgaria and Turkey as well as by Germany. It was primarily a reconnaissance plane, but was also used as a bomber escort, although not very successfully. It had a fixed Spandau machine gun for the pilot, a Parabellum on a ring mount for the observer, and could carry a small bomb load.
I have included two skins, a green and lilac camo, and a green and brown camo. I have also included a full set of number decals. My skinning templates are included in the download.
There are two bomb loadouts, one internal, and one external mounted under the wings. It is doubtful that the AEG C.IV carried external bombs, but I liked the look of it. For historical accuracy, you probably shouldn't use the External Bombs loadout.
Credits
Thanks to Ojcar for making the data file for the AEG C.IV and for providing valuable information, especially for the cockpit details.
Thanks also to Nix, who made the sound file for the Mercedes 160hp engine.
Thanks to Ojcar (again) for pointing out the problem with the decals.
Installation Instructions
For FE1 - Unzip the file and move the folder named "AEGC4" into your FirstEagles/Objects/Aircraft folder. You also need to move the sound file "mercedes160m2.wav" into the FirstEagles/Sounds folder.
For FE2 - Unzip the file and move the folder named "AEGC4" into the FirstEagles/Objects/Aircraft folder. Then in the FirstEagles/Objects/Decals folder, create new folder named "AEGC4". Move the folder named "D" from the Aircraft/AEGC4 folder into the Decals/AEGC4 folder you just made. You also need to move the sound file "mercedes160m2.wav" into the FirstEagles/Sounds folder.
332 downloads
-
Farman HF.20 unarmed
By Stephen1918 in Other Entente Aircraft
The Farman HF.20 was developed in 1913 and was being used by most of the air forces in Europe by the time World War I began. It was designed for reconnaissance and had very stable flight characteristics, but it didn't have a very powerful engine and wasn't suitable for fighter or bomber missions, although some pilots made the attempt. The Farman F.20 was withdrawn from front line service as more nimble aircraft became available.
This version does not have a machine gun and places the observer behind the pilot.It can carry a small bomb load, with the bombs being released over the side. This install will not replace the original Farman HF.20, so you can fly both of them in First Eagles.
My skins for Belgian, French, and Russian versions will work for both versions of the HF.20. I have included all three in this download. The Russian version uses the decal.ini posted by Crawford in the forums. Decals and my skinning templates are included in the download.
Some flyers wore simple crash helmets in WWI, especially in the early days. I am using a pilot with a helmet in this plane. The pilot and installation instructions are included in the download, in case you don't already have it.
The Farman HF.20 has a wider wingspan than First Eagles expects so you should install my "Airfields for Large Planes" available in the Combat Ace downloads area. Otherwise, when starting on the runway, your wings may be touching the wings of the planes next to you. This will cause an immediate collision and you or other planes in your flight may lose their wingtips as soon as the game starts.
Credits
Thanks to Ojcar for making the data file for the Farman HF.20.
Thanks also to Crawford who created a more accurate decal.ini for the Russian version and who provided resources for the Farman cockpits.
Installation Instructions
For FE1 - Unzip the file. Move the folder named "FarmanHF20U" into your FirstEagles/Objects/Aircraft folder.
For FE2 - Unzip the file. Move the folder named "FarmanHF20U" into your FirstEagles/Objects/Aircraft folder. Then in the FirstEagles/Objects/Decals folder, create a new folder named "FarmanHF20U". Move the folder named "D" from your Aircraft/FarmanHF20U folder into the Decals/FarmanHF20U folder you just made.
You may not need to install the pilot with helmet, it has been available for download for some time and you may already have it. If you don't already have it, I have included the pilot and instructions for installing in a separate folder included in this download.
89 downloads
-
Cockpit for the SPAD 7
By Stephen1918 in First Eagles - WWI and Early Years - Add On Cockpits
This cockpit will repace the SPAD 13 cockpit used until now to make the stock SPAD 7 into a flyable plane. I can't find out who first converted the stock SPAD 7 into a flyable plane by using the cockpit from the SPAD 13. It seems to have been done several times over the years. The most recent version I could find was by Sinbad in 2012.
I have used parts of the cockpits I made for the SPAD 11, SPAD 16, and SPAD A.2 to make a completely new cockpit for the SPAD 7 which fits the fuselage better and has the correct number of guns. The new cockpit features fully functional gauges, throttles, rudder control, and stick. This cockpit should work with all the SPAD 7s (SPAD7_150, SPAD7_180,etc.)
NOTE - About 10 years ago, Gr.Viper made a SPAD 7 by converting the SPAD 13. MY cockpit will not work for that version since it uses the SPAD 13 plane with a revised FM. (If your SPAD 7 has two guns on the fuselage, then you are using GR.Viper's conversion and this cockpit won't fit.)
Installation Instructions for both FE1 and FE2
Do this for each SPAD 7 you want to convert:
If you have already have a flyable SPAD 7 using the SPAD 13 cockpit, delete the "cockpit" folder if it exists, and delete the SPAD7_COCKPIT.ini file. Then open my "SPAD_7" folder and place all the files - 1 folder and 1 ini file - into your folder.
If you still have the stock version, Open my "SPAD_7" folder and place all the files - 1 folder and 1 ini file - into your folder. You will also have to add the following line to the plane's ini file.
CockpitDataFile=SPAD7_cockpit.ini
138 downloads
-
Lloyd C.II
By Stephen1918 in Other Central Powers Aircraft
This is a complete revision of the Lloyd C.II with all new LODs, new skins, and improved decals. Ojcar has also improved the FM for this plane. Any skins that were made for the original version will not work with this version.
The Lloyd C.II was based on a pre-war Austro-Hungarian airplane but with a slightly shorter wingspan and the addition of a machine gun on a circular mount for the observer. The C.II featured a plywood body and swept-back, tapered wings and was used for reconnaissance and light bombing throughout the war.
The gun ring had limited movement, especially in the vertical direction, which I have tried to reproduce in my model. This will be a challenging plane to fly because you need to move the plane to bring enemy planes into range of the gunner. There is no gun for the pilot.
There are also two bomb loading options for light and heavy bombing runs. (We don't know if the Lloyd ever carried 50kg bombs, but we included the option anyway.)
I have included three skinning options, one with standard Austro-Hungarian markings from early in the war, and two from later in the war. I have included my skinning templates for those who want make their own skins.
I have included a set of serial numbers which will be randomly assigned to each plane. The numbers are fictitious, but in the correct range for the Lloyd C.II.
Ojcar made a new data.ini for this plane. He added the heavy bomb option to the loadout. The 6.5 Schwarzlose gun he created for the original plane is included, along with his instructions for loading the gun data ("DataReadMe.txt")
Credits:
Great thanks to Ojcar, who made the excellent FM and who added some nice features to this plane.
Installation instructions:
This is a complete revision of the original Lloyd C.II. If you have the plane already, begin by deleting the Lloyd C.II from the Aircraft Folder, and (if you run FE2) from the Decals folder. Then install the new plane.
For FE1: Unzip the file and move the folder named "LloydC2" into the FirstEagles/Objects/Aircraft folder.
For FE2: Unzip the file and move the folder named "LloydC2" into the FirstEagles/Objects/Aircraft folder. Then in the FirstEagles/Objects/Decals folder, create new folder named "LloydC2". Move the folder named "D" from the Aircraft/LloydC2 folder into the Decals/LloydC2 folder you just made.
To install the gun:
This is the same gun that was included with the original Lloyd C.II. If you had the original plane, you don't need to install the gun. If this is your first install, follow the instructions below.
For FE1: Follow the instructions in Ojcar's DataReadMe.txt file. You'll have to make changes to the LloydC2_data.ini file.
For FE2: Follow the instructions in Ojcar's DataReadMe.txt file.
598 downloads
-

Anatra DS "Anasal"
By Stephen1918 in Other Entente Aircraft
This version includes a new FM made by ojcar.
The Anatra DS was a two seat Russian plane powered by a Salmson 9 cylinder, water cooled, radial engine. The plane was therefore called the "Anasal", short for "Anatra Salmson". When the Ukrainian city of Odessa was occupied by Austria-Hungary early in 1918, the Anatra factory was found intact and production continued as the "Anatra C.I". Many of the first Austrian versions had the Austrian cross painted over the Russian insignia.
The Anatra was used mostly for reconnaissance, but also as a fighter and light bomber. Many of them survived the war and were used in the fighting in Eastern Europe after the end of World War I.
In version 2 - I have included a loadout for a light bomb load and three skinning options - A generic Russian skin, and skins for two Russian squadrons - the 19th and the 4th squadrons with decals for the squadron tail markings. I have included my skinning templates for those who want make their own skins.
In version 3 - I improved the details around the nose, completely reskinned the plane and cockpit, and corrected several problems with node names in the data file. New templates are included in the version 3 download.
In version 4 - Ojcar has made a new FM for the plane. I have refined the wings and added some details. Old skins will still work with this revision. I have included the old skinning templates with the download.
Historical Notes:
I found several sources which said that Anatras carried a machine gun mounted on the fuselage for the pilot. I couldn't find any details of the mounting, so I guessed where it might be located.
Credits:
My thanks to Ojcar once again for making a new data.ini file for this revision of the plane.
Installation instructions:
This revision replaces previous versions. If you have an older version, please delete it, then install the new version.
For FE1: Unzip the file and move the folder named "AnatraDS" into the FirstEagles/Objects/Aircraft folder.
For FE2: Unzip the file and move the folder named "AnatraDS" into the FirstEagles/Objects/Aircraft folder. Then in the FirstEagles/Objects/Decals folder, create a new folder named "AnatraDS". Move the folder named "D" from the Aircraft/AnatraDS folder into the Decals/AnatraDS folder you just made.
422 downloads
-

Airco DH9a "Ninak"
By Stephen1918 in Other Entente Aircraft
The Airco DH9a, called the "Ninak" ("nine a") was introduced in June 1918 to replace the underpowered DH9. The 400hp Liberty engine required changes to the front of the fuselage, otherwise the plane was pretty much the same as the DH9. Although it was introduced late in the war, the DH9a did see service during the war, and was used extensively afterwards.
I have included two skins, a brown and an olive color. Both use the letter decals that come with First Eagles (which you can set in the loadout screen) and I have included a set of serial numbers which will be applied randomly. There are also loadouts for light, medium, and heavy bomb loads.
The skins are rather generic, I have included my skinning templates for those who wish to make better skins.
Credits
My thanks to Ojcar for once again making an excellent data file for the DH9a.
My thanks also to Sinbad for providing a great deal of resource information for this plane.
Installation Instructions
For FE1 - Unzip the file and move the folder named "AircoDH9a" into the FirstEagles/Objects/Airplanes folder.
For FE2 - Unzip the file and move the folder named "AircoDH9a" into the FirstEagles/Objects/Airplanes folder. Then in the FirstEagles/Objects/Decals folder, create a new folder named "AircoDH9a". Move the folder named "D" from the Airplanes/AircoDH9a folder into the Decals/AircoDH9a folder you just made.
April 5, 2012 - Replaced data file with new version to fix problem with take offs and landings and making the plane fly better.
429 downloads
-
Airco DH4 - 2 pack
By Stephen1918 in Other Entente Aircraft
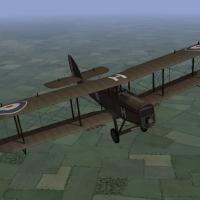
Although best known in its role as a bomber, the Airco DH4 was intended to be a general purpose airplane and was used for recon and ground support as well. Early versions were powered by a 250hp Eagle engine. Later versions were powered with a 375hp Eagle engine, which made them very effective bombers. The biggest problem with the DH4 was the gas tank placed between the pilot and gunner, which made communication between the two almost impossible.
I have uploaded two versions of the DH4 - Ojcar has created two FMs for the plane, one with the early 250hp engine, and one with the later 375hp engine.
Both planes have two skins, a brown and an olive color. Both use the letter decals that come with First Eagles (which you can set in the loadout screen) and a set of serial numbers which will be applied randomly. There are also loadouts for light, medium, and heavy bomb loads. The skins, decals, and loadouts are interchangeable for the two planes.
The skins are rather generic, I have included my skinning templates for those who wish to make better skins.
Credits
My thanks to Ojcar for once again making two excellent data files for the DH4.
My thanks also to Sinbad for providing a great deal of resource information for this plane.
Installation Instructions
The two versions can be installed separately or both together.
For FE1 - Unzip the file and move the folders named "AircoDH4_250" and "AircoDH4_375" into the FirstEagles/Objects/Airplanes folder.
For FE2 - Unzip the file and move the folders named "AircoDH4_250" and "AircoDH4_375" into the FirstEagles/Objects/Airplanes folder. Then in the FirstEagles/Objects/Decals folder, create new folders named "AircoDH4_250" and "AircoDH4_375". Move the folders named "D" from the Airplanes/AircoDH4 folders into the corresponding Decals/AircoDH4 folder you just made.
515 downloads
-
Sopwith Baby
By Stephen1918 in Sopwith
The Sopwith Baby was a British, single seat float plane used for reconnaissance and light bombing. It was built in fairly large numbers and was used by the British, French, Italian, Australian, Canadian, and American navies.
My version carries a Lewis machine gun on the upper wing and a has a loadout for a light bomb load. Some Babys had a Lewis gun mounted at an angle through the upper wing and some had a synchronized Lewis mounted on the fuselage, but the horizontal upper wing mount seems to have been the most common.
Since it's a float plane, the Sopwith Baby works best in the Flanders, Gibraltar or other terrain that has a lot of water. Ojcar has done a great job making this plane take off and land realistically on water.
The plane will actually take off and land from a conventional airfield, but it looks strange to see the floats going under the ground. It would be best to start the missions in the air.
I have included two skins, a generic olive skin for France and Britain, and an Italian linen skin. A full set of decals are included with Italian insignia and (fictitious) serial numbers. My skinning templates are included with the download.
Credits
Thanks to Ojcar for making the data file for the Sopwith Baby.
Thanks to Nix for providing the sound for the engine.
Installation Instructions
For FE1 - Unzip the file and move the folder named "SopwithBaby" into the FirstEagles/Objects/Aircraft folder. You also need to move the sound file "clerget9b2m2.wav" into the FirstEagles/Sounds folder.
For FE2 - Unzip the file and move the folder named "SopwithBaby" into the FirstEagles/Objects/Aircraft folder. Then in the FirstEagles/Objects/Decals folder, create new folder named "SopwithBaby". Move the folder named "D" from the Aircraft/SopwithBaby folder into the Decals/SopwithBaby folder you just made. You also need to move the sound file "clerget9b2m2.wav" into the FirstEagles/Sounds folder.
260 downloads
-

Caudron G.4
By Stephen1918 in Other Entente Aircraft
The Caudron G.4 was a twin engine French bomber. It was introduced late in 1915, it used wing warping for banking and had four rudders. The plane was widely used, and saw service on most of the fronts. After 1916, it was used mostly for night bombing and reconnaissance.
I have included four skins, a French linen, an Italian linen, a Russian grey, and a British brown. I have included some personal markings, but the serial number is so hard to see on this plane, that I only made one. My skinning templates are included in the download.
There are three bomb loadouts, including one internal, and two external bomb loads. I had to make a special pilot, because the stock FE pilot would not fit in the Caudron cockpit. The new pilot is included in the download.
Historical Note
All of the examples I found had linen skins, except for some Russian grey or light blue planes. I have included a British brown skin because it seemed likely that other colors than plane linen were used, although I found no evidence of it.
Credits
Thanks to Ojcar for making the data file for the Caudron G.4.
Thanks also to Whiteknight06604 who originally suggested this plane more than a year ago, and provided some resources at that time. Thanks also to Jeanba, who helped research skins for the Caudron G.4.
Installation Instructions
For FE1 - Unzip the file. Open the folder named "PutInAircraftFolder." Move the folder named "CaudronG4" and the two pilot files into your FirstEagles/Objects/Aircraft folder. The files named "CaudronPilot.lod" and "CaudronPilot.bmp" should be in the Aircraft folder, but not in any other folder. Open the "PutInSoundsFolder" and move the file named "LeRhone9c80hp1m4.wav" into your FirstEagles/Sounds folder.
For FE2 - Unzip the file. Open the folder named "PutInAircraftFolder." Move the folder named "CaudronG4" into your FirstEagles/Objects/Aircraft folder. Move the files named "CaudronPilot.lod" and "CaudronPilot.bmp" into the FirstEagles/Objects/Pilots folder. Then in the FirstEagles/Objects/Decals folder, create a new folder named "CaudronG4". Move the folder named "D" from the Aircraft/CaudronG4 folder into the Decals/CaudronG4 folder you just made. Open the "PutInSoundsFolder" and move the file named "LeRhone9c80hp1m4.wav" into your FirstEagles/Sounds folder.
364 downloads
-
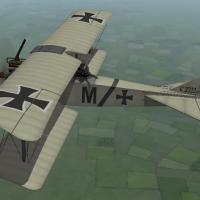
LVG C.II
By Stephen1918 in Other Central Powers Aircraft
The LVG C.II was an early German two seater. It had a ring-mounted Parabellum machine gun for the observer, later versions also had a LMG machine gun mounted on the fuselage for the pilot. It was used mostly for reconnaissance, but could also carry a small bomb load. The LVG C.II was the first plane to bomb London, in November 1915.
My version has three skins (grey, blue, and linen) and two sets of decals. There are two bomb loadouts, one with four light bombs, another with a single large bomb. I have included my skinning templates with the download.
Credits:
My thanks to Ojcar for making the data.INI file for this plane and for resources to help with the shape of the fuselage.
Installation instructions:
For FE1: Unzip the file and move the folder named "LVGC2" into the FirstEagles/Objects/Aircraft folder.
For FE2: Unzip the file and move the folder named "LVGC2" into the FirstEagles/Objects/Aircraft folder. Then in the FirstEagles/Objects/Decals folder, create a new folder named "LVGC2". Move the folder named "D" from the Aircraft/LVGC2 folder into the Decals/LVGC2 folder you just made.
296 downloads
-
Sopwith Triplane
By Stephen1918 in Sopwith
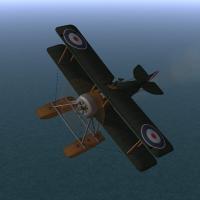
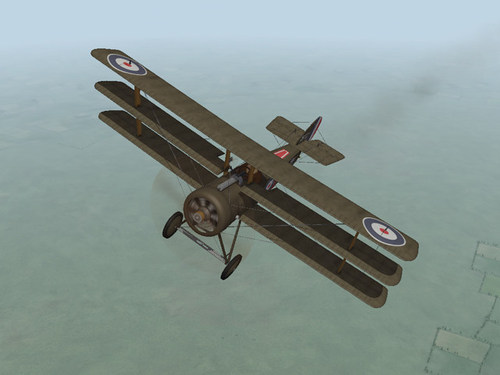
The Sopwith Triplane, also known as the "Tripe" or "Tripehound," was introduced at the end of 1916. By mid 1917, several British and French naval squadrons were equipped with the plane. The narrow chord of the three staggered wings gave the pilot an excellent field of view and gave the plane an exceptional rate of climb as well as outstanding agility. The Triplane was considered an exceptional fighter and stayed in service until replaced by the Sopwith Camel in late 1917. Captured Sopwith Triplanes inspired the development of the more famous Fokker Dr.1.
My model of the Sopwith Triplane has the smaller tail assembly introduced early in 1917. Earlier planes had a larger tail plane nearly identical to the tail of the Sopwith Pup. My plane is equipped with a single Vickers machine gun mounted on the fuselage. A small number of Sopwith Triplanes had two guns.
My Sopwith Triplane has two skins, one French and one British, with appropriate decals. A fully functional cockpit is included, along with my skinning templates. I have included a sound file for the Clerget 130 hp engine, but you may already have it.
Credits
Although he's very busy these days, Ojcar found the time to make the FM. My thanks to him.
The sound file included with this plane came with Sinbad's series of Sopwith Strutters, so you may already have it. I included it with this download in case you don't.
Installation Instructions
For FE1 - Unzip the file and move the folder named "SopwithTriplane" into the FirstEagles/Objects/Aircraft folder.
My Triplane uses the sound file that came with Sinbad's series of Strutters, so you may already have it. If you don't, copy the file named "RotaryEngineClerget130" from my Sounds folder into your FirstEagles/Sounds folder.
For FE2 - Unzip the file and move the folder named "SopwithTriplane" into the FirstEagles/Objects/Aircraft folder. Then in the FirstEagles/Objects/Decals folder, create new folder named "SopwithTriplane". Move the folder named "D" from the Aircraft/SopwithTriplane folder into the Decals/SopwithTriplane folder you just made.
My Triplane uses the sound file that came with Sinbad's series of Strutters, so you may already have it. If you don't, copy the file named "RotaryEngineClerget130" from my Sounds folder into your FirstEagles/Sounds folder.
167 downloads
-

Polish-Russian War - Russian Tachanka
By Stephen1918 in First Eagles - WWI and Early Years - Object Mods
A tachanka was a horse drawn wagon or cart with a heavy machine gun mounted on the back. This made it possible to deploy machine guns quickly, especially on the wide, rapidly changing, Eastern Front. It was used by Russian cavalry in WWI and by Bolshevik, White Russian, Ukrainian, and Polish cavalry in the Russian Civil Wars. Germany used a similar vehicle on the Eastern Front during WWI.
My tachanka is a troika (three horse carriage) with a Vickers machine gun facing the rear. It functions in First Eagles as a Truck; drop it into your Ground Objects folder and First Eagles will assign it to some of your Armed Reconnaissance missions. The machine gun is set for AA and will fire at enemy planes that come within its field of fire.
The download includes three LODs and a destroyed version.
My thanks to Gepard for suggesting this interesting vehicle.
Installation Instructions
For both FE1 and FE2
Unzip the file and open my "GroundObject" folder. Copy the folder named "Tachanka" to your FirstEagles/Objects/GroundObject folder. Then copy the file named "TachankaDestroyed.bmp" into your GroundObject folder. Note that the "TachankaDestroyed.bmp" file should not be inside any other folder.
45 downloads
-
Nieuport 10
By Stephen1918 in Nieuport
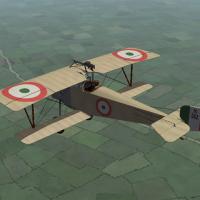
The Nieuport 10 was the first of the classic wing-and-a-half, V-strut Nieuports. Designed in 1914, it combined the visibility of a monoplane with with the strength of a biplane. The Nieuport 10 was designed as a two seater, but was underpowered. Many of them were converted to single seat planes and with the addition of a wing mounted machine gun, the Nieuport 10 became an effective fighter for the early years of World War I. My model is configured as a single seat fighter.
I have included three skinning options, which are identical except for the decals. The Italian Linen uses the Italian insignia and includes the red and green underwing panels. The Russian skin uses the Russian insignia and includes the roundels on the tail planes. The Standard Linen can be used for all the other Entente powers. This plane uses the national markings that come with First Eagles, so you can easily change nationalities (in the Standard Linen skin only.)
I have included decals for serial numbers which will be applied randomly.
Historical Notes:
The numbers are fictious, but in the correct range for most Nieuport 10s. British planes carried a four digit serial number on the fuselage, Italian planes used "Ni" instead of "N" in the serial numbers.
Credits:
My thanks once again to Ojcar for making the excellent data.INI file for this plane.
My thanks to Nix for making the realistic sound file for the Le Rhône 80hp engine.
Thanks also to Nix, Sinbad, Whiteknight06604, and 33Lima who provided suggestions and resources for the Nieuport 10.
Version 2
Revised data file by ojcar improves performance and corrects hit box locations for the fuel tanks - thanks to Panama Red for testing.
Installation instructions:
For FE1: Unzip the file and move the folder named "Nieuport10" into the FirstEagles/Objects/Airplanes folder. You also need to move the sound file "LeRhone9c80hp1m4.wav" into the FirstEagles/Sounds folder.
For FE2: Unzip the file and move the folder named "Nieuport10" into the FirstEagles/Objects/Airplanes folder. Then in the FirstEagles/Objects/Decals folder, create a new folder named "Nieuport10". Move the folder named "D" from the Airplanes/Nieuport10 folder into the Decals/Nieuport10 folder you just made. You also need to move the sound file "LeRhone9c80hp1m4.wav" into the FirstEagles/Sounds folder.
715 downloads
-
Airships
By Stephen1918 in First Eagles - WWI and Early Years - Object Mods
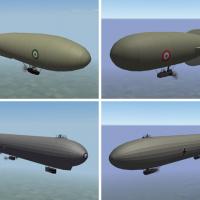
Dirigibles were used by both sides on all fronts during World War I. Early in the war, they were used for recon and bombing, but were soon replaced by aircraft. However, because they could stay aloft for long periods, and their ability to hover, airships continued to be used for naval operations, especially for scouting and anti-submarine patrols.
I have created five different types of airship. They are all identified as "Balloon" and they are all armed with machine guns. Drop them into your Ground Object folder and they will show up over the battlefields for more challenging balloon busting missions. I have included alternate skins for some of them so you can use them for different nations.
Historical Notes
The R23 and L32 are relatively accurate models of actual airships. The Type M, Type PL, and Type VZ are more or less generic representations of popular airship types which were used by different nations. I have averaged out the national and manufacturer variations, but the overall size and shape is relatively accurate.
I have taken liberties with the gondolas and simplified the rigging in order to keep file size down and frame rate up.
Installation Instructions
Unzip the file and copy the folders you want into your FirstEagles/Objects/GroundObject folder.
361 downloads
-
Anatra C.I
By Stephen1918 in Other Central Powers Aircraft
This version includes a new FM made by ojcar.
When the Ukrainian city of Odessa was occupied by Austria-Hungary early in 1918, the Anatra factory was found intact and production of the Anatra DS was continued as the "Anatra C.I". Many of the first Austrian versions had the Austrian cross painted over the Russian insignia.
The Anatra C.I was used mostly for training, but some were used for reconnaissance, as a fighter and light bomber. Many of them survived the war and were used in the fighting in Eastern Europe after the end of World War I.
In version 2 - I have created a separate version for the Austrian plane, with a Schwarzlose machine gun and German bombs in the loadout. There are two Austrian skins, one with crosses painted over the Russian roundels, and one with standard insignia. (I have also included a postwar Yugoslav skin, because I like the insignia.) I have included my skinning templates for those who want make their own skins.
In version 3 - Ojcar has made a new FM for the plane. I have refined the wings and added some details. I created a new cockpit with German gauges and machine gun. I made two Austrian skins for the plane and I kept the Yugoslav skin, because I like the insignia. I have included my skinning templates for those who want make their own skins.
Historical Notes:
The serial numbers are fictitious. I found several sources which said that Anatras carried a machine gun mounted on the fuselage for the pilot. I couldn't find any details of the mounting, so I guessed where it might be located.
Credits:
My thanks to Ojcar once again for making a new data.ini file for this plane.
Installation instructions:
This revision replaces previous versions. If you have an older version, please delete it, then install the new version.
For FE1: Unzip the file and move the folder named "AnatraC1" into the FirstEagles/Objects/Aircraft folder.
For FE2: Unzip the file and move the folder named "AnatraC1" into the FirstEagles/Objects/Aircraft folder. Then in the FirstEagles/Objects/Decals folder, create a new folder named "AnatraC1". Move the folder named "D" from the Aircraft/AnatraC1 folder into the Decals/AnatraC1 folder you just made.
309 downloads
-
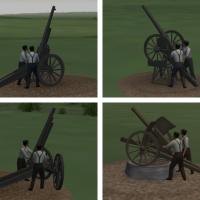
Anti-aircraft Guns
By Stephen1918 in First Eagles - WWI and Early Years - Object Mods
Most of the anti-aircraft guns in World War One were converted field guns, especially during the early years. Some modifications were necessary however to make an effective anti-aircraft weapon. I have created four new anti-aircraft guns for First Eagles.
A French 75mm field gun, mounted on a 120mm gun carriage. This allowed the barrel to be elevated quite high without danger of the breech hitting the ground on the recoil.
A Russian Putilov 76.2mm field gun. The turntable mount and variations of it were common in WWI because the gun could be quickly dismounted and used as a field gun again.
A German Krupp 77mm gun on a special anti-aircraft gun carriage. The axles were hinged and the tail had an anchor to allow the gun to be easily rotated. The gap in the carriage allowed the gun to be elevated higher than a normal field gun.
An Italian Déport 77mm field gun. The recoil mechanism remained horizontal so the breech couldn't hit the ground no matter how high the gun was aimed. An improvised mount gave the gun a higher elevation.
Captured field guns were often used as anti-aircraft weapons. I have left the helmets and tunics off the gun crews so you can easily convert them to whatever nation you want. It wouldn't be unusual to see Austrians using an Italian gun, Germans using a French gun, or Russians using a German gun.
All guns use the stock 75mm gun data from First Eagles.
My thanks to Hansa for providing reference material for World War I anti-aircraft guns.
Installation Instructions
You can install the guns individually or all at once. Unzip the file and move the folders you want into the FirstEagles/Objects/GroundObjects folder. You must also copy the file "DestroyedAAA.bmp" into the FirstEagles/Objects/GroundObjects folder.
Destroyed versions of all the guns use the same skin. The file named "DestroyedAAA.bmp" must be placed in the root level of the GroundObjects folder (not inside any other folders.)
378 downloads
-
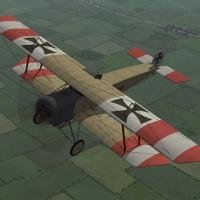
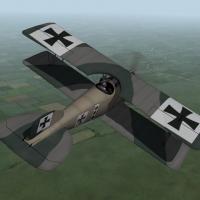
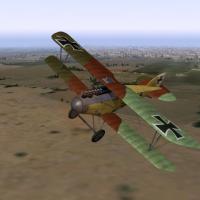
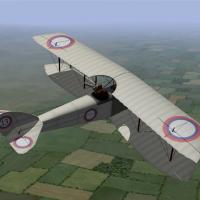
Fokker M.7/B.I
By Stephen1918 in Fokker
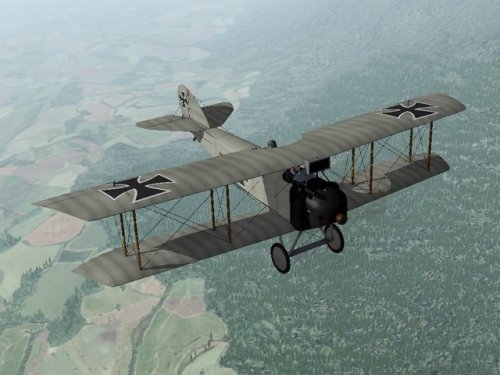
The Fokker Aircraft Company produced several biplanes during the time it was producing it's famous Eindeckers. Two of them, the M.7 and the M.10 were purchased by Austria-Hungary and were both designated the "B.I" My version is the M.7 (I believe Bwf/Bortdafarm's version is the M.10 since it has a wider lower wing.)
The M.7/B.I was a two seater plane for reconnaissance and carried no guns. The pilot was in the rear seat. Later in the war, when the B.I was used for training, some of them were fitted with dual controls.
Mine is unarmed, like most planes used in the early months of the war, but there is a loadout for a couple of handgrenades.
I have included two skins, one Austrian, the other German, with appropriate decals for each. I have included my skinning templates so others can make new skins if they want.
Historical Notes
The serial numbers are fictitious. The cockpit is based on the Eindecker cockpit, since I could find no photo's of the B.I cockpit.
Credits
My thanks to ojcar, who created the FM for the Fokker B.I.
My thanks also to Nix, who provided the sound for the Gnome 80hp engine. (This is the same sound file I uploaded with the Sikorsky. If you already have either of the Sikorsky's you won't need to install the sound.)
Installation instructions
Note: The name uses an "I", not a one. If you type it wrong, the game won't recognize the plane.
For FE1 - Unzip the file and move the folder named "FokkerM7BI" into the "Aircraft" folder in the FirstEagles/Objects folder. You may also need to move the sound file "gnome80m4.wav" into the FirstEagles/Sounds folder.
For FE2 - Unzip the file and move the folder named "FokkerM7BI" into the FirstEagles/Objects/Aircraft folder. Then in the FirstEagles/Objects/Decals folder, create a new folder named "FokkerM7BI". Move the folder named "D" from the Aircraft/FokkerM7BI folder into the Decals/FokkerM7BI folder you just made. You may also need to move the sound file "gnome80m4.wav" into the FirstEagles/Sounds folder.
438 downloads
-
Palestine Terrain
By Stephen1918 in First Eagles - WWI and Early Years - Terrain and Environmental Mods
Palestine Terrain - June 2014
(Summary of the ReadMe file included in the download.)
I highly recommend that you make a new install of First Eagles for this terrain. The ground objects, planes, and nations involved are different from the stock game.
This terrain works best using the Desert.cat file from Strike Fighters. It is possible to run this using the Cambrai.cat file from First Eagles. Instructions for installing either option are in the ReadMe file.
NOTE - In FE2, this terrain has a problem with shadows for some areas. The only solution is to ratchet down the shadow settings until the problem goes away. I have included notes in the ReadMe file which go into more detail.
CREDITS
Gepard made a Palestine terrain for Strike Fighters some time ago. I have kept many of the objects he included in the original, including the Pyramids of Giza.
Wrench made a World War I version of Gepard's terrain. I have kept a lot of his work - you will still find many of Wrench's "Easter Eggs" in my version.
Wingwiner gave me permission to use some of the buildings he made for Strike Fighters.
Geezer gave me permission to use his ground crew and airfield objects, AA guns and balloon winches. Geezer also made the skin for the city buildings.
Everyone whose work is included in this download has given me permission to use their work. I thank them.
Gerwin made a TFD Tool which I used for a lot of the terrain map tweaking and target placement. I thank him for sharing it.
Ojcar shared many resources for the history of WWI in Palestine. I thank him for his help.
I wish to thank Geezer, Panama Red and Ojcar for beta testing. They all did multiple installs and tweaking as we tried to figure out the shadow problem. Geezer and Panama Red installed the game on different computers to see how the game performed on different platforms. I also wish to thank Wrench whose input was helpful during the testing phase.
THIS VERSION
I have made many minor changes to the terrain - I made new terrain tiles, (most based on Gepard's) and I have leveled the airfields and train stations, and smoothed out the height map around cities.
I changed a lot of place names, and I added places that were significant in WWI. I added a lot of (unnamed) small towns and villages to fill out the landscape.
I made a lot of new objects - bridges, trains, tents, trucks, cavalry units, city buildings, etc. I also reskinned some buildings, vehicles, and ships that I made for other terrains.
In my version I used the "ActiveDate/InactiveDate" feature of the target.ini to make airfields and targets change sides as the war proceeds. So different flags, AAA guns, vehicles, and planes will show up in the locations depending on the month and year.
The dates I used match the dates Ojcar uses in his campaigns. You should fly Ojcar's campaigns to get the real benefit of this terrain.
I have included a new title screen for this terrain.
Complete installation instructions are included in the ReadMe file in the download.
I highly recommend that you install Panama Red's sky mods. It adds a whole new level to the experience.
I also recommend that you install Ojcar's Palestine campaigns. This terrain was built for his campaigns and you will get the best gameplay using them.
366 downloads
-
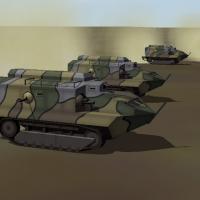
Schneider CA1
By Stephen1918 in First Eagles - WWI and Early Years - Object Mods
The Schneider CA1 was the first French built tank and was used for the first time in April, 1917. Only about 400 were built but they played an important role on the Western Front in late 1917 and early 1918. The Schneider had a short barreled 75mm gun in a turret on the front-right, and two Hotchkiss machine guns in turrets on the sides.
The tank was delivered from the factory painted grey, but a variety of camo schemes were applied in the field. My version includes both a standard grey and a four color camo skin. (You will need to change the ini file in order to change skins - open the ini file and change the TextureSet numbers to make the desired skin number 1.)
In First Eagles, the Schneider takes the role of a tank, drop it into your ground object folder and First Eagles will randomly assign it to some of your Army Co-operation missions.
Installation Instructions
Unzip the file and open my folder named "GroundObject". Copy the folder named "SchneiderCA" to your FirstEagles/Objects/GroundObject folder. The Schneider uses the same skin for damage as my armored cars. If you have already installed any of my armored cars, you may already have the file. If not, copy the file named "DestroyedArmoredCar.bmp" into your GroundObject folder. Note that the "DestroyedArmoredCar.bmp" file should not be inside any other folder.
161 downloads
-
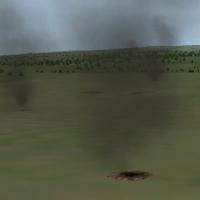
Smoking Craters for Battlefields
By Stephen1918 in First Eagles - WWI and Early Years - Terrain and Environmental Mods
Terrain builders can use these to add some detail to the battlefields in their terrains. Using two of the craters from the First Eagles Objects.cat file, I have created a new smoke effect and made entries for the Types.ini so that these can be added to the Targets.ini of any terrain.
There are two different sized craters, and two different sized smoke effects. I used my Galicia2 terrain for testing. I added craters to the Targets.ini following the Ground_Attack routes from the Movement.ini. Now when I fly Army Cooperation missions I see a pretty active battlefield.
Installation should be self explanatory: Add the two effects to your Effects folder, add the two LOD and the BMP files to your terrain folder, add the types data to your Types.ini, then place the crater positions in your Target.ini.
I want to thank Wrench for his support and encouragement.
85 downloads
-
Anatra D "Anade"
By Stephen1918 in Other Entente Aircraft
The Anatra D was a predecessor to the Anatra DS. It was powered by a Gnome rotary engine and armed with a single machine gun for the observer. The Anatra D was used mostly for reconnaissance, but also as a fighter and light bomber. After overcoming some initial design problems, it entered service in May, 1916 and was produced in relatively large numbers. Many of them survived the war and were used in the fighting in Eastern Europe after the end of World War I.
I have included two skins, a plain linen and a grey paint. A full set of number decals and a loadout for light bombs are included. I have also included my skinning templates for those who wish to make their own skins.
Credits:
My thanks to Ojcar once again for making the excellent data.ini for this plane.
My thanks also to Crowford who provided valuable reference material for the Anatra D.
Installation instructions:
For FE1: Unzip the file and move the folder named "AnatraD" into the FirstEagles/Objects/Aircraft folder.
For FE2: Unzip the file and move the folder named "AnatraD" into the FirstEagles/Objects/Aircraft folder. Then in the FirstEagles/Objects/Decals folder, create a new folder named "AnatraD". Move the folder named "D" from the Aircraft/AnatraD folder into the Decals/AnatraD folder you just made.
156 downloads