
Stephen1918
-
Content count
1,168 -
Joined
-
Last visited
-
Days Won
19
Files posted by Stephen1918
-

Polish-Russian War - Russian Tachanka
By Stephen1918 in First Eagles - WWI and Early Years - Object Mods
A tachanka was a horse drawn wagon or cart with a heavy machine gun mounted on the back. This made it possible to deploy machine guns quickly, especially on the wide, rapidly changing, Eastern Front. It was used by Russian cavalry in WWI and by Bolshevik, White Russian, Ukrainian, and Polish cavalry in the Russian Civil Wars. Germany used a similar vehicle on the Eastern Front during WWI.
My tachanka is a troika (three horse carriage) with a Vickers machine gun facing the rear. It functions in First Eagles as a Truck; drop it into your Ground Objects folder and First Eagles will assign it to some of your Armed Reconnaissance missions. The machine gun is set for AA and will fire at enemy planes that come within its field of fire.
The download includes three LODs and a destroyed version.
My thanks to Gepard for suggesting this interesting vehicle.
Installation Instructions
For both FE1 and FE2
Unzip the file and open my "GroundObject" folder. Copy the folder named "Tachanka" to your FirstEagles/Objects/GroundObject folder. Then copy the file named "TachankaDestroyed.bmp" into your GroundObject folder. Note that the "TachankaDestroyed.bmp" file should not be inside any other folder.
45 downloads
-
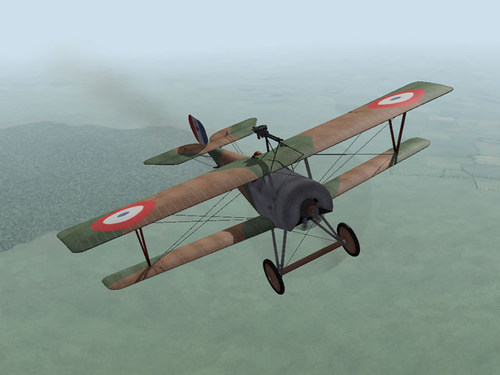
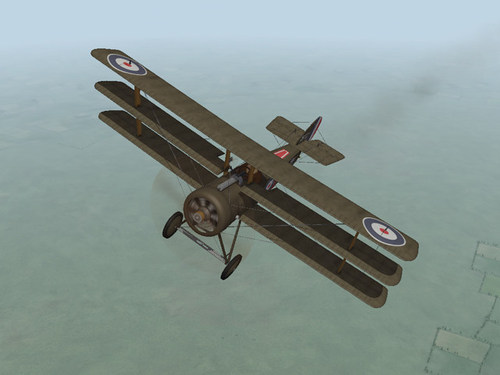
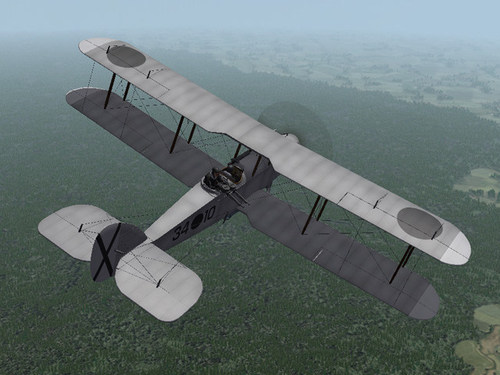
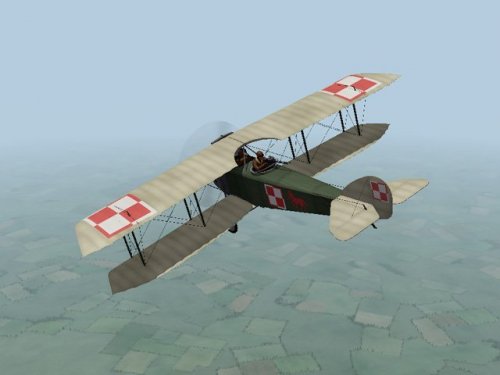
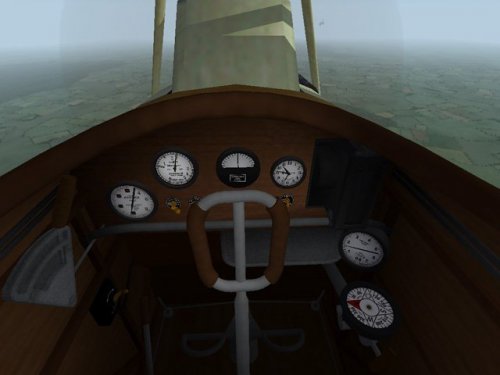
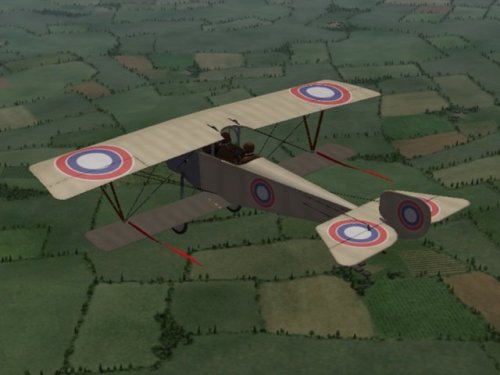
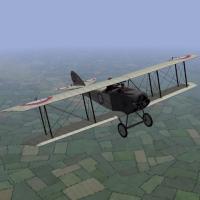
Nieuport 21
By Stephen1918 in Nieuport
The Nieuport 21 was designed to be a long range escort fighter. It used a Nieuport 17 airframe with the smaller Nieuport 11 engine to reduce fuel consumption and extend its range. The lighter weight gave the plane a good climb rate, but the lower power engine reduced its speed.
The Nieuport 21 served along with the Nieuport 17 on the Western Front. It was also licensed to the Dux factory in Russia and large numbers were used on the Eastern Front.
My version of the Nieuport 21 is armed with a single Lewis gun mounted on the upper wing and has a loadout for eight Le Prieur Rockets for Balloon Busting missions. This package features two skins - one French, one Russian - a set of decals, and a fully functional cockpit. My skinning templates are included with the download.
This plane uses the Le Prieur Rockets created by P10ppy and a sound file created by Nixou (included with his Realistic Engine Sounds package). Both of these files are available in the Combat Ace Download section. Both of these files are used by other aircraft, so you may already have them. I have included Nixou's sound file with this package in case you don't already have it.
Credits:
My thanks to Ojcar for making the data file for the Nieuport 21.
My thanks to Nixou for making the sound file for the Le Rhone 80hp engine.
Installation instructions:
This aircraft uses P10ppy's Le Prieur rockets available in the CombatAce downloads section. You may already have it. If you don't, you'll have to download it and install it into your Weapons folder.
For FE1:
Unzip the file and move the folder named "Nieuport21" into your FirstEagles/Objects/Aircraft folder. If you don't already have it, copy the file named "LeRhone9c80hp1m4" from my Sounds folder into yours.
For FE2:
Unzip the file and move the folder named "Nieuport21" into your FirstEagles/Objects/Aircraft folder. Then in your FirstEagles/Objects/Decals folder, create a new folder named "Nieuport21". Move the folder named "D" from the Airplanes/Nieuport21 folder into the Decals/Nieuport21 folder you just made. If you don't already have it, copy the file named "LeRhone9c80hp1m4" from my Sounds folder into yours.
117 downloads
(1 review)0 comments
Updated
-

Polish-Russian War - Ford FT-B
By Stephen1918 in First Eagles - WWI and Early Years - Object Mods
The Ford FT-B (also know as the Ford Tf-c) was a Polish armored car built in Warsaw in 1920. It was built on a Model-T chassis using steel plate left by the Germans. The FT-B had a crew of two and was armed with a single Maxim machine gun in a rotating turret. It had a relatively high speed and a long range. Because it was light weight and easy to maneuver it was an effective fighter, and the Ford's small profile made it difficult to hit.
My Ford FT-B has a four color camo skin. I've made high and low poly LODs as well as a destroyed version. I backdated the data file to before the Polish-Russian War so the car can be used throughout; you can change the Service Start Date to June of 1920 if you want greater accuracy.
In First Eagles, the the Ford FT-B takes the role of a tank. Drop it into your ground object folder and First Eagles will randomly assign it to some of your Army Co-operation missions.
Installation Instructions
For both FE and FE2 - Unzip the file and open my "GroundObject" folder. Copy the folder named "FordFTB" and the file named "FTBDest.bmp" into your FirstEagles/Objects/GroundObject folder. Note that the "FTBDest.bmp" file should not be inside any other folder.
39 downloads
(0 reviews)0 comments
Updated
-

WWI Airfield Vehicles and Objects
By Stephen1918 in First Eagles - WWI and Early Years - Object Mods
Four vehicles and other objects that modders can add to airfields using the target.ini. I have made them rather generic so they should be usable for either side, on any front. I have included the data for the types.ini for each object in the download.
Vehicles include a Starter Truck, a Fuel Truck, a Utility Truck, and a Staff Car. I have also included an Oil Cart and a grouping of miscellaneous Tools used by the ground crews.
Each vehicle has a high and low poly LOD as well as a destroyed version. I have organized everything into folders for convenience, but you'll need to take them out of the folders when you install them.
109 downloads
(1 review)0 comments
Updated
-
Sopwith Triplane - Dual Gun
By Stephen1918 in Sopwith
The Sopwith Triplane, also known as the "Tripe" or "Tripehound," was introduced at the end of 1916. By mid 1917, several British and French naval squadrons were equipped with the plane. The narrow chord of the three staggered wings gave the pilot an excellent field of view and gave the plane an exceptional rate of climb as well as outstanding agility. The Triplane was considered an exceptional fighter and stayed in service until replaced by the Sopwith Camel in late 1917. Captured Sopwith Triplanes inspired the development of the more famous Fokker Dr.1.
My model of the Sopwith Triplane has the smaller tail assembly introduced early in 1917. Earlier planes had a larger tail plane nearly identical to the tail of the Sopwith Pup. Most Triplanes were equipped with a single Vickers machine gun mounted on the fuselage. A small number of Sopwith Triplanes had two guns. This is the two gun version.
My Sopwith Triplane has a skin, with appropriate decals, for the "Black Flight" of the RNAS 10 squadron. Note - these skins are NOT interchangeable with the skins for my other Sopwith Triplanes.
A fully functional cockpit is included, along with my skinning templates. I have included a sound file for the Clerget 130 hp engine, but you may already have it.
Credits
Although he's very busy these days, Ojcar found the time to make the FM for this plane. My thanks to him.
The sound file included with this plane came with Sinbad's series of Sopwith Strutters, so you may already have it. I included it with this download in case you don't.
Historical Note
The Black Flight had five planes, each with its name painted at the cockpit. I have added 15 fictitious names in order to complete the decal set.
Installation Instructions
For FE1 - Unzip the file and move the folder named "SopwithTripe2Gun" into the FirstEagles/Objects/Aircraft folder.
My Triplane uses the sound file that came with Sinbad's series of Strutters, so you may already have it. If you don't, copy the file named "RotaryEngineClerget130" from my Sounds folder into your FirstEagles/Sounds folder.
For FE2 - Unzip the file and move the folder named "SopwithTripe2Gun" into the FirstEagles/Objects/Aircraft folder. Then in the FirstEagles/Objects/Decals folder, create new folder named "SopwithTripe2Gun". Move the folder named "D" from the Aircraft/SopwithTripe2Gun folder into the Decals/SopwithTripe2Gun folder you just made.
My Triplane uses the sound file that came with Sinbad's series of Strutters, so you may already have it. If you don't, copy the file named "RotaryEngineClerget130" from my Sounds folder into your FirstEagles/Sounds folder.
123 downloads
(1 review)0 comments
Submitted
-
Sopwith Triplane - Early
By Stephen1918 in Sopwith
The Sopwith Triplane, also known as the "Tripe" or "Tripehound," was introduced at the end of 1916. By mid 1917, several British and French naval squadrons were equipped with the plane. The narrow chord of the three staggered wings gave the pilot an excellent field of view and gave the plane an exceptional rate of climb as well as outstanding agility. The Triplane was considered an exceptional fighter and stayed in service until replaced by the Sopwith Camel in late 1917. Captured Sopwith Triplanes inspired the development of the more famous Fokker Dr.1.
The first planes produced had a tail plane nearly identical to the tail of the Sopwith Pup. Early planes also had a 110hp Clerget engine. A smaller tail plane was introduced early in 1917. The engine was also replaced with a more powerful 130hp Clerget engine.
This is an early version of the Sopwith Triplane with a wider tail and lower powered engine. It has two skins, one French and one British, with appropriate decals. Note - these skins are NOT interchangeable with the skins for my other Sopwith Triplanes.
A fully functional cockpit is included, along with my skinning templates. I have included a sound file for the Clerget engine, but you may already have it.
Credits
Although he's very busy these days, Ojcar found the time to make the FM for the early Sopwith Triplane. My thanks to him.
I have included a sound file for the Clerget engine created by Nixou. It has been used on other planes, so you may already have it. I included it with this download in case you don't.
Historical Note
The 110 hp Clerget engine was the 9Z. I don't have a sound file for the 9Z so I used a sound for the Clerget 9B instead.
Installation Instructions
For FE1 - Unzip the file and move the folder named "SopwithTriplane" into the FirstEagles/Objects/Aircraft folder.
I have included Nixou's sound for the Clerget engine. It has been used with other planes, so you may already have it. If you don't, copy the file named "clerget9b2m2" from my Sounds folder into your FirstEagles/Sounds folder.
For FE2 - Unzip the file and move the folder named "SopwithTriplane" into the FirstEagles/Objects/Aircraft folder. Then in the FirstEagles/Objects/Decals folder, create new folder named "SopwithTriplane". Move the folder named "D" from the Aircraft/SopwithTriplane folder into the Decals/SopwithTriplane folder you just made.
I have included Nixou's sound for the Clerget engine. It has been used with other planes, so you may already have it. If you don't, copy the file named "clerget9b2m2" from my Sounds folder into your FirstEagles/Sounds folder.
104 downloads
(1 review)0 comments
Submitted
-
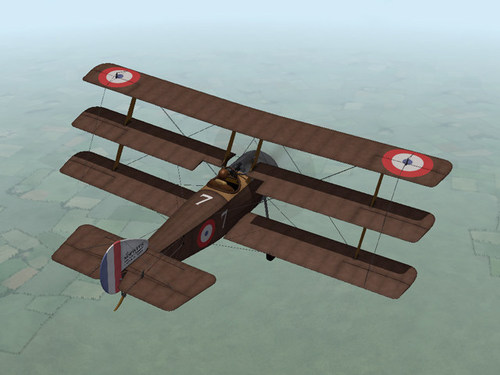
Sopwith Triplane
By Stephen1918 in Sopwith
The Sopwith Triplane, also known as the "Tripe" or "Tripehound," was introduced at the end of 1916. By mid 1917, several British and French naval squadrons were equipped with the plane. The narrow chord of the three staggered wings gave the pilot an excellent field of view and gave the plane an exceptional rate of climb as well as outstanding agility. The Triplane was considered an exceptional fighter and stayed in service until replaced by the Sopwith Camel in late 1917. Captured Sopwith Triplanes inspired the development of the more famous Fokker Dr.1.
My model of the Sopwith Triplane has the smaller tail assembly introduced early in 1917. Earlier planes had a larger tail plane nearly identical to the tail of the Sopwith Pup. My plane is equipped with a single Vickers machine gun mounted on the fuselage. A small number of Sopwith Triplanes had two guns.
My Sopwith Triplane has two skins, one French and one British, with appropriate decals. A fully functional cockpit is included, along with my skinning templates. I have included a sound file for the Clerget 130 hp engine, but you may already have it.
Credits
Although he's very busy these days, Ojcar found the time to make the FM. My thanks to him.
The sound file included with this plane came with Sinbad's series of Sopwith Strutters, so you may already have it. I included it with this download in case you don't.
Installation Instructions
For FE1 - Unzip the file and move the folder named "SopwithTriplane" into the FirstEagles/Objects/Aircraft folder.
My Triplane uses the sound file that came with Sinbad's series of Strutters, so you may already have it. If you don't, copy the file named "RotaryEngineClerget130" from my Sounds folder into your FirstEagles/Sounds folder.
For FE2 - Unzip the file and move the folder named "SopwithTriplane" into the FirstEagles/Objects/Aircraft folder. Then in the FirstEagles/Objects/Decals folder, create new folder named "SopwithTriplane". Move the folder named "D" from the Aircraft/SopwithTriplane folder into the Decals/SopwithTriplane folder you just made.
My Triplane uses the sound file that came with Sinbad's series of Strutters, so you may already have it. If you don't, copy the file named "RotaryEngineClerget130" from my Sounds folder into your FirstEagles/Sounds folder.
168 downloads
-
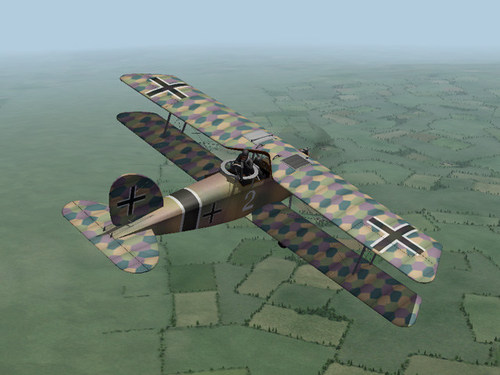
Halberstadt CL.II
By Stephen1918 in Other Central Powers Aircraft
The Halberstadt CL.II was a German, 2 seat fighter/escort plane. The CL.II was designed to be an escort for reconnaissance flights. Its excellent maneuverability made it a match for single seat fighters and its field of fire made it an excellent ground attack plane. It entered service in August 1917 and was used in large numbers until the end of the war.
The Halberstadt CL.II had a plywood fuselage and was powered by a six-cylinder Mercedes D.III engine. It had a 7.92mm Spandau machine gun in the front fuselage for the pilot and a 7.92mm Parabellum gun on a ring mount for the observer. It could also carry a light bomb load. My version has a rack for 10 stick grenades mounted on the fuselage.
My download includes a hex camo skin, appropriate decals, and a fully functional cockpit. My skinning templates are included with the download.
I have included a sound file for the Mercedes D.III engine. The same sound has been used with other planes and you may already have it installed. I have included the sound file with the download in case you don't have it.
Credits
My thanks to Ojcar for making the data file for the Halberstadt CL.II and for making improvements to the guns.
My thanks to Nixou for making the sound file for the Mercedes engine many years ago.
Installation Instructions
For FE1 - Unzip the file and move the folder named "HalberstadtCL2" into your FirstEagles/Objects/Aircraft folder.
If you don't already have it, move the sound file "mercedes160m2.wav" from my "Sounds" into your "Sounds" folder.
For FE2 - Unzip the file and move the folder named "HalberstadtCL2" into your FirstEagles/Objects/Aircraft folder. Then in the FirstEagles/Objects/Decals folder, create a new folder named "HalberstadtCL2." Move the folder named "D" from the Aircraft/HalberstadtCL2 folder into the Decals/HalberstadtCL2 folder you just made.
If you don't already have it, move the sound file "mercedes160m2.wav" from my "Sounds" into your "Sounds" folder. If you don't have a Sounds folder, you can make one.
180 downloads
(2 reviews)0 comments
Submitted
-

Spanish Civil War, Airfield Vehicles
By Stephen1918 in First Eagles - Golden Era - Object Mods
Three vehicles which modders can add to airfields using the target.ini. I have included the data for the types.ini in the download.
Ambulance - based on the 1932 Ford Model A panel truck.
Starter Truck - based on the Soviet AS-1 starter truck, which was a Soviet built version of the Ford Model A.
Crash Response Truck - loosely based on a variety of WW2 era RAF crash trucks.
Each truck has a high and low poly LOD as well as a destroyed version. I have organized everything into folders for convenience, but you'll need to take them out of the folders when you install them.
52 downloads
(0 reviews)0 comments
Updated
-
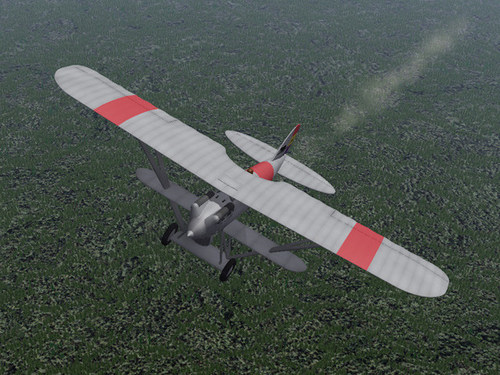
Spanish Civil War, NiD 52 - 2 Pack
By Stephen1918 in First Eagles - Golden Era - Allied Add-On Aircraft
In 1928, Spain purchased a license to produce the Nieuport-Delage NiD 52. The Spanish version was produced at the Hispano-Suiza factory at Guadalajara and was known as the Hispano Nieuport NiD 52. It had an all metal frame with cloth covering over the wings and parts of the fuselage. It was powered by a V12, 500 hp engine, and was armed with two Vickers machine guns mounted in the fuselage.
The Spanish version was slower than expected and was considered difficult to fly. About 125 were produced between 1930 and 1933. 56 remained in service at the beginning of the Civil War; most of them remained in government (Republican) hands, only 11 went to the rebel (Nationalist) forces. Although it was an unpopular plane, the Nid 52 was an important fighter until better planes became available.
I have made two versions of the Hispano Nieuport NiD 52 - one for each side. Each version has a functional cockpit, appropriate skins, and decal sets. My skinning templates are included with the download.
Credits
Thanks to Ojcar for making the data file for the NiD 52.
Ojcar has added a gunsight to the NiD 52. He made a weapon station and loadout to add the gunsight which came with Emld's Nieuport 24 Lewis. I am including the gunsight with this download. Instructions for installing it are included in a separate file.
Installation Instructions
For FE1 - Unzip the file. Move the folders named "NatNid52" and "RepNiD52" into your FirstEagles/Objects/Aircraft folder.
For FE2 - Unzip the file. Move the folders named "NatNiD52" and "RepNiD52" into your FirstEagles/Objects/Aircraft folder. Then in the FirstEagles/Objects/Decals folder, create two new folders named "NatNiD52" and "RepNiD52". Move the folder named "D" from your Aircraft/NiD52 folders into the appropriate Decals/NiD52 folders you just made.
87 downloads
(1 review)0 comments
Submitted
-
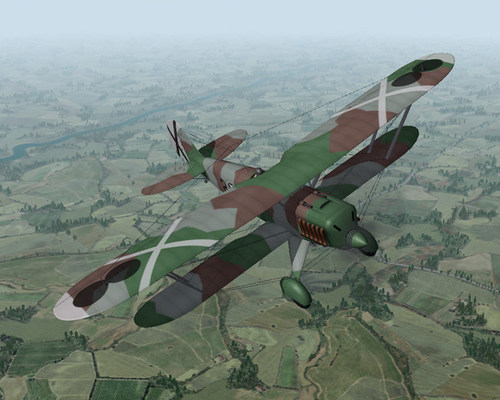
Spanish Civil War, Heinkel He.51
By Stephen1918 in First Eagles - Golden Era - Axis Add-On Aircraft
The Heinkel He.51 was introduced in 1935. It was a German, one man biplane with a V-12, 750 hp engine. It was developed as a fighter and carried two machine guns mounted in the fuselage. The He.51 began serving in the Spanish Civil War in 1936, used by the Nationalists, and was used by both Spanish and German (Legion Condor) squadrons. The He.51 was a superior plane at first, but was soon outclassed by newer Soviet planes. It was then used as a ground attack plane and served in that role until the end of the war.
My Heinkel He.51 includes a basic camo skin, decals, a fully functional cockpit, fuel tank, and a 10kg bomb. Instructions for installing the fuel tank and bomb are included in a separate file. I have included my skinning templates with the download.
Credits
Thanks to Ojcar for making the data file for the Heinkel He.51, and for providing resources and advice, especially for the weapons.
Ojcar has found the data for a more accurate machine gun, we don't know where it came from, but I am including the data for the 7.9mm_MG17 machine gun for your use. Instructions for installing the gun are included in a separate file.
Ojcar has added a gunsight to the He.51. He made a weapon station and loadout to add the gunsight which came with Emld's Nieuport 24 Lewis. I am including the gunsight with this download. Instructions for installing it are included in a separate file.
Ojcar has also taught me how to add controls to jettison the fuel tank (along with other features, like landing gear, flaps, and wheel brakes.) I am including instructions for adding controls to First Eagles in a separate file.
Installation Instructions
For FE1 - Unzip the file. Move the folder named "HeinkelHe51" into your FirstEagles/Objects/Aircraft folder. You will also need to install the bomb, machine gun, and fuel tank, instructions for installing them are included as a separate file.
For FE2 - Unzip the file. Move the folder named "HeinkelHe51" into your FirstEagles/Objects/Aircraft folder. Then in the FirstEagles/Objects/Decals folder, create a new folder named "HeinkelHe51". Move the folder named "D" from your Aircraft/HeinkelHe51 folder into the Decals/HeinkelHe51 folder you just made.
You will also need to install the bomb, machine gun, gunsight, and fuel tank, instructions for installing them are included as a separate file.
138 downloads
-
Spanish Civil War, Spanish DH.9 - 2 Pack
By Stephen1918 in First Eagles - Golden Era - Axis Add-On Aircraft
After World War I, Spain purchased several surplus Airco DH.9's from Britain. In the 1920's a Spanish version was built, under license, by the Hispano-Suiza Company. The Spanish DH.9 was fitted with a 300hp Hispano-Suiza 8 cylinder engine. About 500 were produced during the 20's and at least 25 were still in service when the civil war started in 1936. The Hispano-Suiza DH.9 was used by both sides during the war and some remained in service until the end of the war in 1939.
I have made two versions, one for each side, with appropriate skins, decals, and loadouts. My skinning templates are included.
Each version has two bomb loadouts, one with eight 25kg bombs mounted under the wings, and one with two 100kg bombs carried under the fuselage. One of the bombs was included with the Polikarpov I-15. Two of them were included in Geezer's 1930's bomb pack. I have included all the necessary bombs with this download, but you may not need to install all of them. I have included instructions for installing the bombs in a separate text file.
Credits
Thanks to Ojcar for making the original data file for the DH.9. I have made slight modifications for the Spanish Civil War versions.
Thanks to Geezer for making the two Italian bombs as part of his 1930's Bomb Pack for First Eagles. I have included them in this download in case you don't already have them.
Installation Instructions
For FE1 - Unzip the file. Move the folders named "NatDH9" and "RepDH9" into your FirstEagles/Objects/Aircraft folder.
You will need to install some or all of the bombs. See the Instructions For Installing Bombs, included with this download.
For FE2 - Unzip the file. Move the folders named "NatDH9" and "RepDH9" into your FirstEagles/Objects/Aircraft folder. Then in the FirstEagles/Objects/Decals folder, create two new folders named "NatDH9" and "RepDH9". Move the folder named "D" from your Aircraft/DH9 folders into the appropriate Decals/DH9 folders you just made.
You will need to install some or all of the bombs. See the Instructions For Installing Bombs, included with this download.
71 downloads
(0 reviews)0 comments
Submitted
-
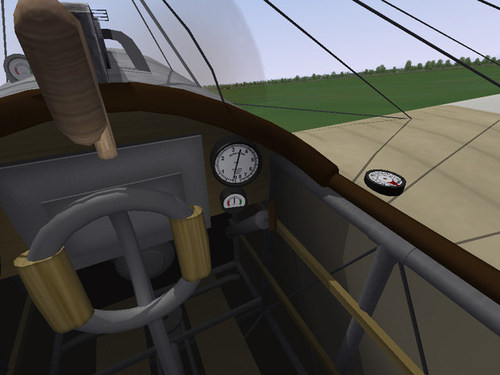
Cockpits for Laton's Fokker E-Types
By Stephen1918 in First Eagles - WWI and Early Years - Add On Cockpits
I modified the cockpit from my Fokker D.II to make new cockpits for all eight of Laton's Fokker Eindeckers. Each cockpit has a fully functional stick, rudder control, throttle, and gauges, including the wing mounted compass. The cockpits are basically the same, but each has been tweaked to make it fit into Laton's fuselage and to reflect differences in the type (like the number of guns in the E.IV planes.)
I have sorted everything into the appropriate folders for easy installation.
My thanks to Laton for having made so many planes that we are still flying today.
Installation Instructions
For both FE1 and FE2- For each plane, delete Laton's original cockpit folder and cockpit.ini file and replace them with mine.
82 downloads
(2 reviews)0 comments
Submitted
-
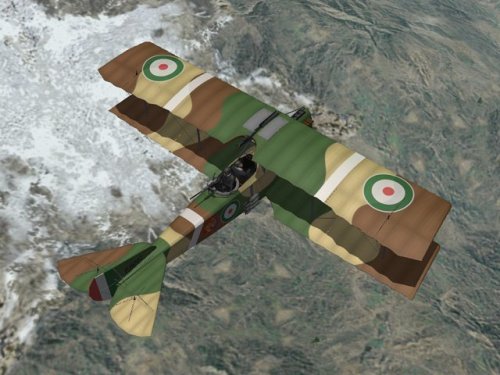
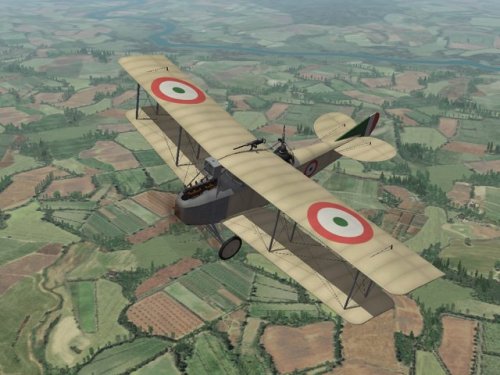
Pomilio PE
By Stephen1918 in Other Entente Aircraft
The Pomilio PE was a two seat, Italian general purpose plane that entered service in 1917. It had a 300hp Fiat 6 cylinder engine with a radiator mounted in the nose of the aircraft. A fin under the fuselage, around the tail skid, helped improve the stability of the plane.
The Pomilio PE was used primarily for reconnaissance and was armed with a fixed Fiat-Revelli machine gun over the wing with a ring mounted machine gun operated by the observer. The Pomilio could carry a light bomb load with 3 bombs mounted on the each side of the plane.
My Pomilio PE includes 2 skins - a green/yellow speckled camo, and a 3 color camo - each with appropriate decals. I have included a small bomb loadout. I have included my skinning templates with the download.
Historical Notes:
- My Pomilio PE uses the later style fuselage with a flatter deck behind the pilot because it allowed me to give greater range to the gunner in the game.
- I have taken extensive liberties with the speckled camo skin version of the plane. When the camouflage was applied at the factory, it usually covered the metal panels around the engine. The speckled camo scheme was not applied to the top of the lower wing. The national insignia on the top wing did not usually extend into the aileron. The 3 color camo version is much more accurate and is the default skin.
Credits:
My thanks to Ojcar for making the data.ini file for this plane.
Installation instructions:
For FE1: Unzip the file and move the folder named "PomilioPE" into the FirstEagles/Objects/Aircraft folder.
For FE2: Unzip the file and move the folder named "PomilioPE" into the FirstEagles/Objects/Aircraft folder. Then in the FirstEagles/Objects/Decals folder, create a new folder named "PomilioPE". Move the folder named "D" from the Aircraft/PomilioPE folder into the Decals/PomilioPE folder you just made.
148 downloads
(2 reviews)0 comments
Submitted
-
SAML S.2
By Stephen1918 in Other Entente Aircraft
The SAML S.2 was an improved version of the Aviatik B.I which was built under license by the Societá Anonima Meccanica Lombarda (known as the SAML S.1.) The S.2 was specifically designed to fly in the mountainous terrain of the Italian Front. Improvements mostly involved the wings, which had a slight sweep and were closer together than the Aviatik design. The biggest improvement was the more powerful Fiat A.12 engine capable of delivering 300hp.
The SAML S.2 was used primarily for reconnaissance and was armed with a fixed Fiat-Revelli machine gun over the wing with a ring mounted machine gun operated by the observer.
My SAML S.2 includes 2 skins with appropriate decals and a small bomb loadout. I have included my skinning templates with the download.
Version 2 - More accurate fuselage and gunner station, corrected wing placement and dihedral, corrected gauges in cockpit - all new LODs, revised skins, revised FM, new cockpit LOD and revised cockpit.ini
Credits:
My thanks to Ojcar for making the data.ini file for this plane and for providing valuable resources and advice on the details of the SAML S.2.
Installation instructions:
For FE1: Unzip the file and move the folder named "SAMLS2" into the FirstEagles/Objects/Aircraft folder.
For FE2: Unzip the file and move the folder named "SAMLS2" into the FirstEagles/Objects/Aircraft folder. Then in the FirstEagles/Objects/Decals folder, create a new folder named "SAMLS2". Move the folder named "D" from the Aircraft/SAMLS2 folder into the Decals/SAMLS2 folder you just made.
178 downloads
-
Polish Anatra DS "Anasal"
By Stephen1918 in Other Entente Aircraft
The Anatra DS was a two seat Russian plane powered by a Salmson 9 cylinder, water cooled, rotary engine. The plane was therefore called the "Anasal", short for "Anatra Salmson". When the Ukrainian city of Odessa was occupied by Austria-Hungary early in 1918, the Anatra factory was found intact and production continued as the "Anatra C.I". Many of the first Austrian versions had the Austrian cross painted over the Russian insignia.
The Anatra DS was used mostly for reconnaissance, but also as a fighter and light bomber. Many of them survived the war and were used in the fighting in Eastern Europe after the end of World War I.
Poland declared its independence in late 1917. The new nation armed itself with whatever was available, including abandoned Russian, German and Austrian planes, and purchased planes from other nations. Several Anatra DS were purchased from the Anatra factory in Odessa.
The Polish Anantra DS was identical to the Russian version, except for slight changes to the cowling, the radiator, and the rudder. The skins to my plane are similar, but not identical to my Russian version. As a resullt, I have included new skinning templates for the Polish Anasal.
Historical Notes:
I found several sources which said that Anatras carried a machine gun mounted on the fuselage for the pilot. I couldn't find any details of the mounting, so I guessed where it might be located.
I don't know how the Poles armed their plane, so I used the guns I used on the Russian version. I also included a small bomb load.
Credits:
My thanks to Ojcar once again for making a new data.ini file for this plane.
Installation instructions:
For FE1: Unzip the file and move the folder named "PolishAnasal" into the FirstEagles/Objects/Aircraft folder.
For FE2: Unzip the file and move the folder named "PolishAnasal" into the FirstEagles/Objects/Aircraft folder. Then in the FirstEagles/Objects/Decals folder, create a new folder named "PolishAnasal". Move the folder named "D" from the Aircraft/PolishAnasal folder into the Decals/PolishAnasal folder you just made.
64 downloads
(3 reviews)0 comments
Submitted
-
Cockpit for the DFW C.V
By Stephen1918 in First Eagles - WWI and Early Years - Add On Cockpits
This cockpit will replace Fokker D7 cockpit used until now to make the stock DFW C.V into a flyable plane. I can't find out who first converted the stock DFW into a flyable plane by using the cockpit from the Fokker D7. It seems to have been done several times over the years. I found a mod to convert the DFW C.V into a C.I uploaded by Christian59 in 2007 which used the Fokker cockpit, and it seems to have already been done before. The most recent version I could find was by JacksonM in 2017 and was included with his Hangar Screen pack.
I have used parts of the cockpits I made for other German planes to make a completely new cockpit for the DFW C.V which fits the fuselage better and has the correct placement for the gun. The new cockpit features fully functional gauges, throttle, rudder control, and stick. This cockpit should work with the DFW in both FE1 and FE2.
NOTE - There is a typo in the stock FM for DFW C.V which causes the Fuselage to disappear in the cockpit view. I have included instructions to correct the typo. If you are using one of the modded FMs, you may need to correct the typo there too, check to be sure. Instructions to fix the Data.ini are included in the download in a separate text file.
Installation Instructions for both FE1 and FE2
If you have already have a flyable DFW C.V using the FokkerD7 cockpit, delete the "cockpit" folder if it exists, and delete the DFWC5_cockpit.ini file. Then open my "DFWC5" folder and place all the files - 1 folder and 1 ini file - into your DFWC5 folder. You will also need to change one word in the DFWC5_data.ini. See the file named "ChangeForDFWC5DataIni"
If you still have the stock version, Open my "DFWC5" folder and place all the files - 1 folder and 1 ini file - into your DFWC5 folder.
You will also have to add the following line to the plane's ini file.
CockpitDataFile=DFWC5_cockpit.ini
You will also need to change one word in the DFWC5_data.ini. See the file named "ChangeForDFWC5DataIni"
NOTE - If the DFWC5_data.ini is not in the folder, you may need to extract it from the ObjectData.cat file using one of the utilities found here at CombatAce.
109 downloads
(2 reviews)0 comments
Submitted
-
Siemens-Schuckert D.I
By Stephen1918 in Other Central Powers Aircraft
The German Siemens-Schuckert D.I was a direct copy of captured Nieuport 17s. The most important difference was in the engine. The Siemens Schuckert Werke (SSW) D.I used a geared Siemens-Halske Sh.I engine which produced 1800rpm. The spinner nose and open bottom cowling were necessary to help cool the engine. A bigger prop required a taller landing gear.
Problems with engine production delayed the release of the SSW D.I. The Albatros D.III was already available by the time the SSW reached the front. The Albatros was a much superior plane, and was less likely to be mistaken for a French plane. The SSW D.I only served for a short time on the Western Front, they served longer on the Eastern front.
My Siemens-Schuckert D.I includes a three color camo skin, a full set of number decals, a fully functional cockpit, and damage nodes for the wings. My skinning templates and a sound file for the engine are included in the download.
Historical Notes:
I do not have a sound file for the Siemens-Halske Sh.I engine, I am using Nixou's sound for the Le Rhône 110 hp engine instead.
Credits:
My thanks to Ojcar once again for making the excellent data.ini file for this plane.
My thanks to Nixou for making the sound file for the Le Rhône 110 hp engine.
Installation instructions:
For FE1: Unzip the file and move the folder named "SiemensSchuckertD1" into the FirstEagles/Objects/Aircraft folder. If you don't already have it, move the file named "Lerhone110m1" from my Sounds folder into your Sounds folder.
For FE2: Unzip the file and move the folder named "SiemensSchuckertD1" into the FirstEagles/Objects/Aircraft folder. Then in the FirstEagles/Objects/Decals folder, create a new folder named "SiemensSchuckertD1". Move the folder named "D" from the Aircraft/SiemensSchuckertD1 folder into the Decals/SiemensSchuckertD1 folder you just made. If you don't already have it, move the file named "Lerhone110m1" from my Sounds folder into your Sounds folder.
155 downloads
(5 reviews)0 comments
Submitted
-
Lebed 7
By Stephen1918 in Other Entente Aircraft
The Lebed 7 was a Russian copy of the British Sopwith Tabloid. It was produced in 1915 and was intended to be used as a fighter. But with an 80hp Gnome engine and wing warping controls, it was quickly outclassed and was used primarily for recon and later for training.
The Lebed 7 was shipped from the factory unarmed. The British plane had a machine gun mounted on the upper wing, so it isn't unreasonable to think that a Russian pilot might have tried mounting a gun on his plane. I have made a (possibly fictitious) version of the plane with a Lewis gun mounted on the top wing.
My Lebed 7 has a fully functional cockpit, three skins - a grey paint and two clear doped linen, and a full set of number decals. My skinning templates are included.
The plane comes with a helmeted Russian pilot; instructions for installing the pilot are included. Or you can change the data.ini to use one of the stock FE pilots.
Many years ago Nixou recorded a a large number of sounds for First Eagles. I have included the sound file for the 80 hp Gnome Monosoupape engine, but you may already have it.
Credits
Thanks to Ojcar for making the data file for the Lebed 7.
Thanks to Nixou for making the sound file for the Gnome 80 hp engine.
Installation Instructions
For FE1 - Unzip the file. Move the folder named "Lebed7" into your FirstEagles/Objects/Aircraft folder.
For FE2 - Unzip the file. Move the folder named "Lebed7" into your FirstEagles/Objects/Aircraft folder. Then in the FirstEagles/Objects/Decals folder, create a new folder named "Lebed7". Move the folder named "D" from your Aircraft/Lebed7 folder into the Decals/Lebed7 folder you just made.
In case you don't already have it, I have included the sound file for the 80 hp Gnome engine. Move the file named "gnome80m4.wav" from my Sounds folder into your Sounds folder.
You may not need to install the pilot with helmet, it has been available for download for some time and has been included with other planes. In case you don't already have it, I have included the pilot and instructions for installing it in a separate folder included in this download.
105 downloads
-
Cockpit for the SPAD 7
By Stephen1918 in First Eagles - WWI and Early Years - Add On Cockpits
This cockpit will repace the SPAD 13 cockpit used until now to make the stock SPAD 7 into a flyable plane. I can't find out who first converted the stock SPAD 7 into a flyable plane by using the cockpit from the SPAD 13. It seems to have been done several times over the years. The most recent version I could find was by Sinbad in 2012.
I have used parts of the cockpits I made for the SPAD 11, SPAD 16, and SPAD A.2 to make a completely new cockpit for the SPAD 7 which fits the fuselage better and has the correct number of guns. The new cockpit features fully functional gauges, throttles, rudder control, and stick. This cockpit should work with all the SPAD 7s (SPAD7_150, SPAD7_180,etc.)
NOTE - About 10 years ago, Gr.Viper made a SPAD 7 by converting the SPAD 13. MY cockpit will not work for that version since it uses the SPAD 13 plane with a revised FM. (If your SPAD 7 has two guns on the fuselage, then you are using GR.Viper's conversion and this cockpit won't fit.)
Installation Instructions for both FE1 and FE2
Do this for each SPAD 7 you want to convert:
If you have already have a flyable SPAD 7 using the SPAD 13 cockpit, delete the "cockpit" folder if it exists, and delete the SPAD7_COCKPIT.ini file. Then open my "SPAD_7" folder and place all the files - 1 folder and 1 ini file - into your folder.
If you still have the stock version, Open my "SPAD_7" folder and place all the files - 1 folder and 1 ini file - into your folder. You will also have to add the following line to the plane's ini file.
CockpitDataFile=SPAD7_cockpit.ini
138 downloads
-
Wing tip streamer ribbons for FE
By Stephen1918 in First Eagles - General Files - Weapons Mods
As requested, I have made five streamer ribbons for First Eagles. The streamers are identified as fuel tanks and can be attached to weapons stations through the load out.
NOTE - Since these streamers are classed as weapons, they are not animated and do not cast shadows.
Installation is a three part process - you will need to install the streamers as weapons in First Eagles - you will need to change the data.ini for each plane to create weapons stations for the streamers - you will need to create a load out for each plane to attach the streamers to the plane.
Full installation instructions for both FE1 and FE2 are included with the download.
65 downloads
(2 reviews)0 comments
Submitted
-
New Cockpit for AEG G.IV
By Stephen1918 in First Eagles - WWI and Early Years - Add On Cockpits
This cockpit will convert the stock First Eagles AEG G.IV from an AI plane into a flyable plane. The cockpit features fully functional gauges, throttles, rudder control, and stick.
Acknowledgement
About 10 years ago, ravenclaw_007 made the AEG G.IV flyable by making a cockpit using the cockpit from the SE5a. My thanks to him for leading the way.
Installation Instructions for both FE1 and FE2
If you have already installed ravenclaw's version, you should delete the two ini files ("AEG_G4.ini" and "AEG_G4_COCKPIT.ini") before installing this version.
If you still have the stock version, this install will replace the original AEG-G4.ini file. You should make a backup in case you want to revert to the original AI version.
Open my "AEG_G4" folder and place all the files - 1 folder and 2 ini files - into your "AEG_G4" folder.
154 downloads
-
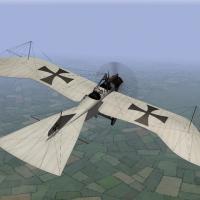
Taube
By Stephen1918 in Other Central Powers Aircraft
There were many versions of the Taube produced in the years leading up to World War I. When the war began different versions were being used in large numbers, on all fronts for recon missions. This is the Kondor Taube, which I think is representive of the "classic" Taube. It has the typical wing shape, uses wing warping for both the aileron and elevator surfaces, and has a six cylinder 100HP engine.
I have added a rifle for the observer, which he will aim and fire. I have made significant changes to the wires on the front to give the gunner more room to move.
Ojcar has created a fake machine gun for the pilot, which causes the AI plane to be more aggressive in pursuing enemy planes. I have installed that gun on this plane. Ojcar's "DummyMachineGun" data is included with this download, in case you don't already have it.
Some flyers wore simple crash helmets in WWI, especially in the early days. I am using a pilot with a helmet in this plane. The pilot and installation instructions are included in the download, in case you don't already have it.
The download includes my skinning templates, data for the guns and the German pilot with helmet.
Credits
Thanks to Ojcar for making the data file for the Taube, and for greatly improving the gunner. Ojcar also made the data for the dummy machine gun.
Thanks to Crawford for identifying a problem with the elevators.
Installation Instructions
For FE1 - Unzip the file. Move the folder named "Taube" into your FirstEagles/Objects/Aircraft folder.
For FE2 - Unzip the file. Move the folder named "Taube" into your FirstEagles/Objects/Aircraft folder. Then in the FirstEagles/Objects/Decals folder, create a new folder named "Taube". Move the folder named "D" from your Aircraft/Taube folder into the Decals/Taube folder you just made.
You may not need to install the dummy machine gun, it has been used on other planes and you may already have it. If you don't already have it, I have included the gun and instructions for installing in a separate folder included in this download.
You may not need to install the infantry, it has been used on ground units and you may already have it. If you don't already have it, I have included the gun and instructions for installing in a separate folder included in this download.
You may not need to install the pilot with helmet, it has been available for download for some time and you may already have it. If you don't already have it, I have included the pilot and instructions for installing in a separate folder included in this download.
185 downloads
-
Anatra D - "Field Mod"
By Stephen1918 in Other Entente Aircraft
The Anatra D was a predecessor to the Anatra DS. The stock plane was powered by a Gnome rotary engine and armed with a single machine gun for the observer.
I have made a "field mod" version with a fuselage mounted machine gun for the pilot. Anades with additional machine guns are known to have existed, but I haven't found any photos of them. I added the gun for the pilot in what seemed to be a logical position.
The Anatra D was used mostly for reconnaissance, but also as a fighter and light bomber. After overcoming some initial design problems, it entered service in May, 1916 and was produced in relatively large numbers. Many of them survived the war and were used in the fighting in Eastern Europe after the end of World War I.
I have included three skins, two linen and a grey paint. A full set of number decals and a loadout for light bombs are included. I have also included my skinning templates for those who wish to make their own skins.
Credits:
My thanks to Ojcar for making the original data.ini for this plane. I have modified Ojcar's file to include the additional gun.
Installation instructions:
For FE1: Unzip the file and move the folder named "AnatraDMod" into the FirstEagles/Objects/Aircraft folder.
For FE2: Unzip the file and move the folder named "AnatraDMod" into the FirstEagles/Objects/Aircraft folder. Then in the FirstEagles/Objects/Decals folder, create a new folder named "AnatraDMod". Move the folder named "D" from the Aircraft/AnatraDMod folder into the Decals/AnatraDMod folder you just made.
79 downloads
(5 reviews)0 comments
Submitted
-

Two Armored Cars for the Eastern Front
By Stephen1918 in First Eagles - WWI and Early Years - Object Mods
Two new armored cars for the Eastern Front. Both cars were produced in relatively low numbers, I'm including them for the sake of variety.
The Russo-Balt Type C was produced by the Russo-Baltique motor car company. About 15 were built. The armored car was built on a automobile chassis and had four gun ports, each with a Vickers machine gun. It had a crew of 4 or 5, had a top speed of 20 kph with a range of about 100km. The Russo-Balt Type C was used throughout the war and was used in the Civil War.
The Junovicz P.A.1 was built on a truck chassis. There were different versions based on different trucks, about 5 were built. The armored car had six gun ports with 3 or 4 Schwartzlose machine guns. It had crew of 5, a top speed of 35 kph, and a range of 350km. The Junovicz P.A.1 was used on both the Galician and Italian Fronts.
In First Eagles, the armored cars take the role of a tank, drop them into your ground object folder and First Eagles will randomly assign them to some of your Army Co-operation missions.
Installation Instructions
Unzip the file and open my "GroundObject" folder. Copy the folders named "AustrianArmoredCar" and "RussBaltCar" to your FirstEagles/Objects/GroundObject folder. Both armored cars use the same skin for damage as my other armored cars. If you have already installed any of my armored cars, you may already have the file. If not, copy the file named "DestroyedArmoredCar.bmp" into your GroundObject folder. Note that the "DestroyedArmoredCar.bmp" file should not be inside any other folder.
65 downloads
(2 reviews)0 comments
Updated