bzhyoyo
-
Posts
13 -
Joined
-
Last visited
About bzhyoyo

bzhyoyo's Achievements
")
Newbie (1/14)
0
Reputation
-
Skinning... A Gentleman's Agreement
bzhyoyo replied to UK_Widowmaker's topic in WOFF 1 2 3 / UE - Skinning / Modeling Help
Some interesting schemes there! Were did you get info on them? I know the first three ones, but the other are unknown to me, and I pretty much have all the books on the SE5 except the Kagero Legends one. Could you tell me where you got them? Cheers! -
gMax on the MS Flight Simulator?
bzhyoyo replied to Hauksbee's topic in WOFF UE/PE - General Discussion
Hauksbee, if you have 3dsmax, don't bother too much with Gmax: it's a simplified 3ds max without some of the modelling tools and the rendering abilities. But the most important to me is that the UVs tools are much better in max than Gmax. So you'd better model in 3DSmax but you will still need Gmax to import your model in the game. But knowing 3dsmax, you'll feel at home with the gmax interface. Go here: http://www.scriptspot.com/bobo/darkmoon/bff/ this plugin allows you to convert your 3ds max file into a format you can export to Gmax with minimal loss. You will have to set up the materials again in Gmax but your geometry and UVs will remain intact. Once you have exported the file in .ms format, go to gmax, run script and click on the .ms file and voila! The only thing is that the exporter doesn't like the object names beginning with R, and another letter I can't remember. It won't export them, don't know why. But that's just a simple matter of renaming them later in Gmax. Hope to see what you'll come up with soon. :) -
As Jedimaster says, it's a completely new engine; and that was the smart move.
-
*HELP* fellow Skinners!
bzhyoyo replied to UK_Widowmaker's topic in WOFF 1 2 3 / UE - Skinning / Modeling Help
Because of the specular/glossiness settings used in the Gmax material editor.the uniform CGI lightning I was referring to is clearly obvious here: it makes objects look like plastic. Otherwise something to notice also on the SE5 pics: the rib tapes on the wing are less reflective than the rest of the wing canvas. So that is also something you can only replicate with a specular texture. So it's not only for metal parts (even if they benefit even more from the use of these textures). -
How to open a Skins.dds document....
bzhyoyo replied to Hauksbee's topic in WOFF UE/PE - General Discussion
If you have photoshop, why use DXTbmp? It often introduces some artefacts when compressing from a bitmap to a dds format. Download the Nvidia plugin for photoshop: it allows you to open dds files and to save in this format. go there: http://developer.nvidia.com/object/photosh...ds_plugins.html As a matter of fact, it's much better to work on bitmaps then convert them to dds to save them: editing and saving a dds format multiple times introduce artefacts eventually. What I do is this: work in photoshop, generally saving the template in psd format. Then I save it as a bitmap (24bits), sharpen it a bit, then save it as a dds. That workflow usually gives the best results quality-wise. -
*HELP* fellow Skinners!
bzhyoyo replied to UK_Widowmaker's topic in WOFF 1 2 3 / UE - Skinning / Modeling Help
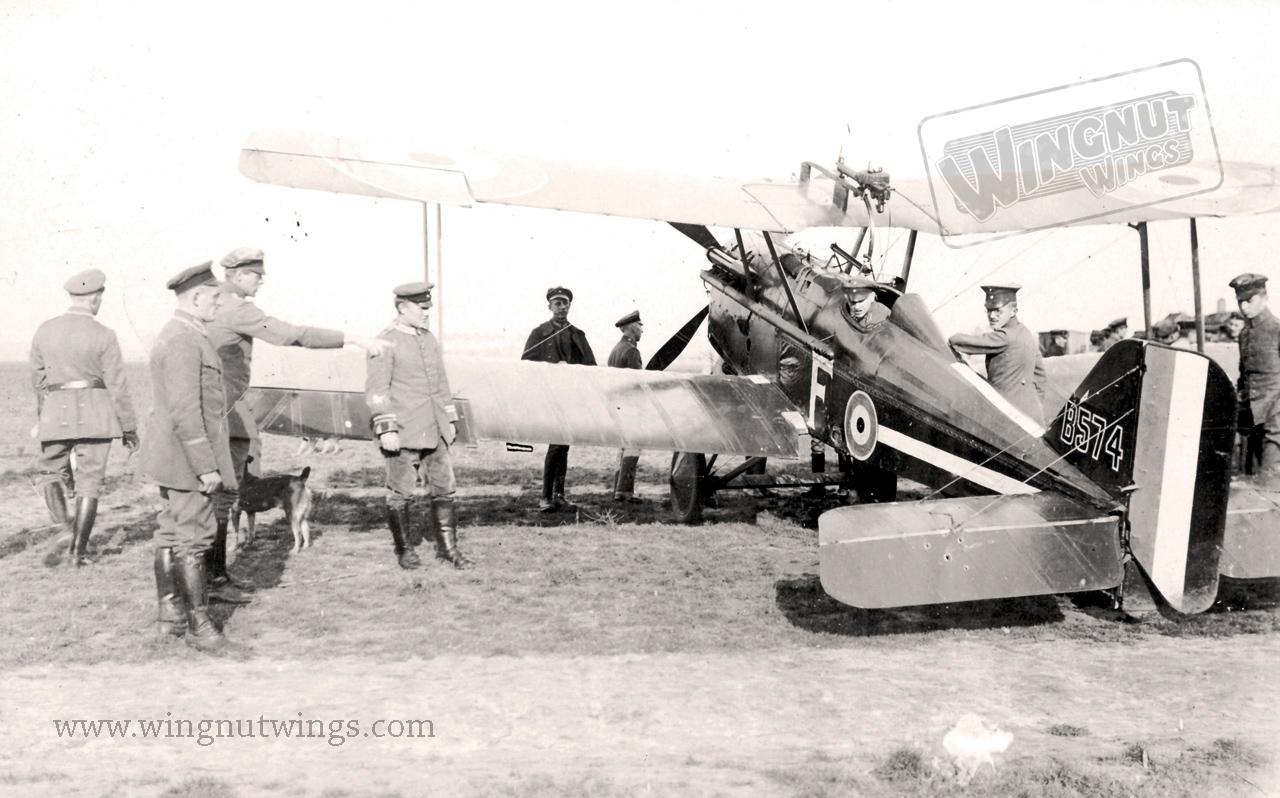
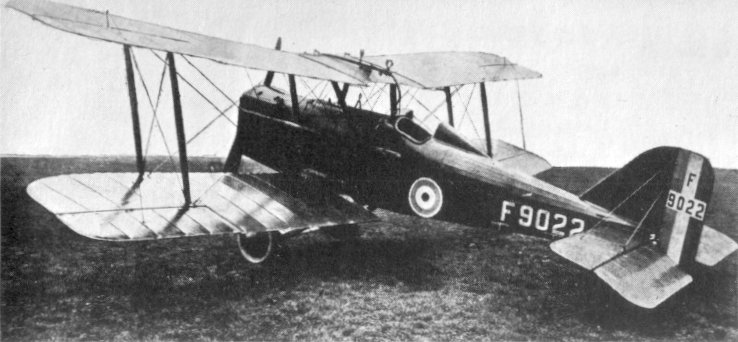
no, they aren't alpha channels. In DDS format, an alpha channel is used to control transparency, not specularity (i.e. shyniness). You use it to make some parts look transparent: that's what I used for the small railway bridges in OFF. Maybe you're using the expression alpha channels because that was how they were called for FS models. The alpha channels of the bitmap files were used to control shyniness if I recall correctly (I may be wrong as I never skinned or modeled for FS). As for their usefulness, I disagree: varnished dope is very reflective and to add some variations to the textures, specular textures are great. Imagine a scratch in the varnish: it will be less reflective and more matte. You can do this thanks to the specular texture, so it's a great tool to weather your textures and break the uniform lightning that looks too CGI on models. Look at these pics: see how the shadows are reflected very precisely on the wings? But on the contrary, there's almost no reflections or shyniness on the tail. There's only one way to replicate that in the sim - to use a specular texture. The second pic shows how reflective varnished dope was: you can clearly see it's almost mirror-like on the elevator where the tail is clearly reflected!

-
*HELP* fellow Skinners!
bzhyoyo replied to UK_Widowmaker's topic in WOFF 1 2 3 / UE - Skinning / Modeling Help
Only the OFF team can do it as they are the ones with access to the source files. Specular textures must be assigned to the model through Gmax before being exported to cfs3/OFF. I suppose they didn't include them to save fps and to save also space on the DVD: imagine a specular texture for each skin type? That would take some space! It's just speculation from me, mind you. I think that's a bit of a shame because specular textures add so much to models in cfs3 but that's the way it is. -
*HELP* fellow Skinners!
bzhyoyo replied to UK_Widowmaker's topic in WOFF 1 2 3 / UE - Skinning / Modeling Help
exactly! -
*HELP* fellow Skinners!
bzhyoyo replied to UK_Widowmaker's topic in WOFF 1 2 3 / UE - Skinning / Modeling Help
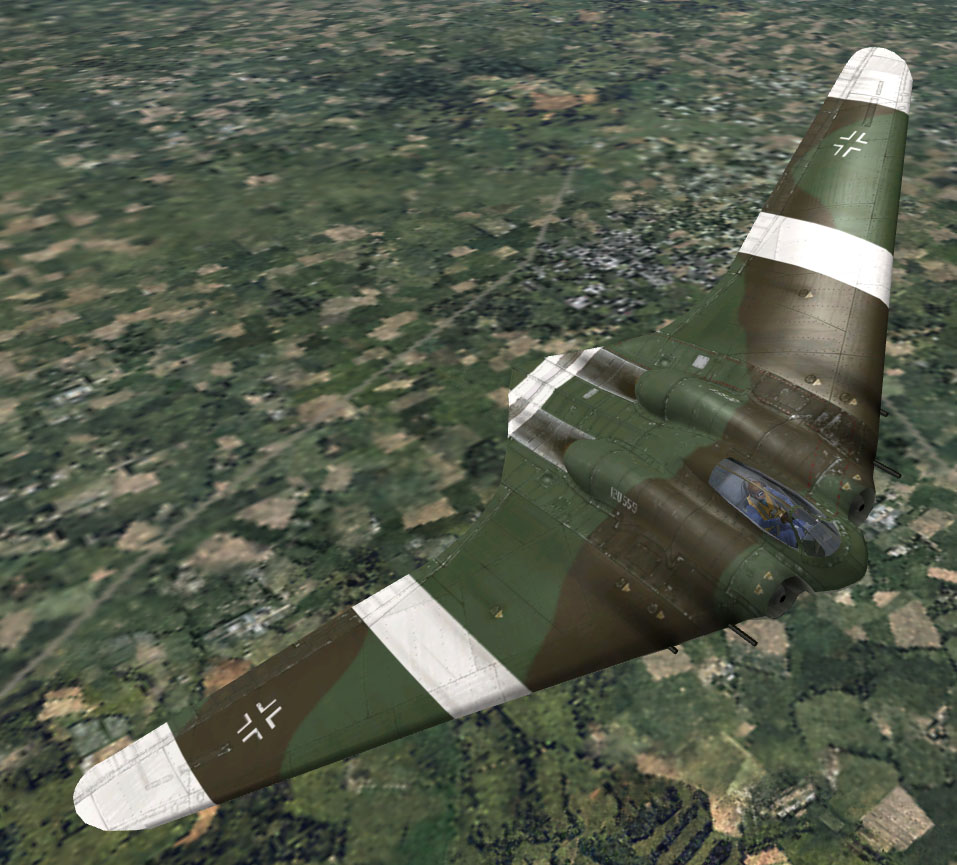
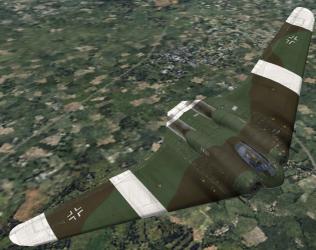
Thanks! Specular textures are textures that control the amount of specular reflection of a model, meaning that you can make parts more shiny than others thanks to this texture. If P3 is like P2, models don't use these maps. I haven't got P3 yet but look in the aircraft folders if there are grey images with the tag xxxxxxxxxxxx_s.dds. If there are, then these are specular maps. from the cfs3 SDK: So here are two shots from stock cfs3, with the Go229. The first one shows the specular effect on the left wing. Compare this wing with the second shot, taken without the specular texture. Notice how it looks flat? That's the beauty of it: it gives a more lively lighting to objects. PS1: contrary to what the SDK says, you can use a reflection map and a specular map for the same model. Of course, it looks better but it also costs fps. PS2: owners of ATI cards don't see this effect because the drivers of the ATI graphic cards don't allow it. That was still true one year ago, but I don't know if that's still the case now. That's why I would advise everybody who's thinking about upgrading their graphic cards for OFF to choose a Nvidia card.
-
*HELP* fellow Skinners!
bzhyoyo replied to UK_Widowmaker's topic in WOFF 1 2 3 / UE - Skinning / Modeling Help
Ooooops, should have checked before: 25/65 gives great results along with Blinn / spec= 30 / gloss = 48 / soften = 0.54 (Robby’s canvas) which are the setting Robby Bruce used for his Biff. These settings make the effect almost unnoticeable. -
*HELP* fellow Skinners!
bzhyoyo replied to UK_Widowmaker's topic in WOFF 1 2 3 / UE - Skinning / Modeling Help
This only can be changed by someone with access to the Gmax source files for the plane models. Modelers assign "materials" to the polygons. Two settings are paramount: the specular and glossiness settings. If you choose the wrong value for these two settings, then you get this "walking shadows" effect. Shame the Netwings website is down otherwise I would have linked to a thread where this is discussed at length. The effect is further reduced when you apply a specular texture on your model. Here are the values I use : specular = 25, glossiness = 65. I think Polovski was using something like 50/50 for both settings on his planes. If I remember from phase 2, some crafts suffered from this problem and others not. I and Polovski exchanged some pms about it some time ago but I don't know if further steps were taken to tackle this issue with some crafts. A note: this effect is more noticeable when you use wrong glossiness and specular settings, but it doesn't disappear completely AFAIK. Or I should make more testing to find THE perfect combination in Gmax. -
3D Plane Tutorial .....
bzhyoyo replied to Womenfly2's topic in WOFF 1 2 3 / UE - Skinning / Modeling Help
Be aware though that this tut is meant for high-poly models that can't be used for real-time applications such as games. Good food for thought but many things aren't related to low-poly modelling, which is the aim of everybody planning to make a model for OFF. -
OFF Advanced skinning tutorial
bzhyoyo replied to Gous's topic in WOFF 1 2 3 / UE - Skinning / Modeling Help
I think the title is a bit misleading: "advanced" is not really appropriate. I think the tut is good to cover some basics, but I was expecting something different because of the title. Just my 0.2 cents. A tip to finish : when you add stripes and such to an original paint, I would recommended to lower the opacity of your new paint layer to show some of the details underneath (such as ribs, rivets, etc...). Something like 80% opacity should do but it really depends on the colours of the base paint and of your new paint. Play also with the layer blending mode to achieve this effect. If you don't do this, your stripe will not integrate well with the base paint.