


33LIMA
-
Content count
3,749 -
Joined
-
Last visited
-
Days Won
7
Everything posted by 33LIMA
-

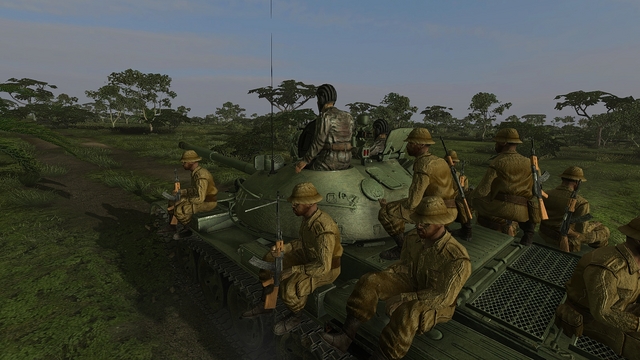
Steel Armor Blaze of War - Sept 2015 update - tank riders mission
33LIMA posted a gallery image in Member's Albums
From the album Combat Sims
-
From the album Combat Sims
-
From the album Combat Sims
-
From the album Combat Sims
-
From the album Combat Sims
-
Well, I hope you like it! Maybe let us know, what you think of it? Edit - I just had a first stab at setting up a carrier action, using the Japanese Chitose-class light carrier Chiyoda with a destroyer escort against a convoy escorted by a PT Boat. The 'just outside gun range' starting setup of a custom battle is really too close for a carrier attack; so it's just as well your planes launch very quickly. I expect carrier action is better suited to Victory at Sea's campaign games, which seem to range over wider areas. In the pic below, you can see my airstrike - a pair of Vals, I can also deploy Zeros and have some control over numbers - making shallow dive attacks on a merchantman. With the labels turned off, you have some visibility of aircraft via the faint trails they leave. You can also see the flak bursting in their wake, which may have been coming from the PT Boat escort...not sure if the merchant ships pack any defensive armament. Looks very easy to pick up, in part reflecting the very simplified approach to carrier ops, but not without appeal and an added dimension to the purely surface action.
-
Thanks for the feedback! Reminds me, starshells is something I haven't found out if VaS does, possibly not unfortunately. Yes night actions were/are rather good in FS, especially with the FSP mod. I'll maybe follow up this review later, with a mission report or two, featuring custom battles in VaS based on some or other of the Gaudalcanal actions; maybe also a wolfpack battle or something like Coral Sea, to see how VaS handles the sort of stuff that FS didn't do.
-
On campaign with Victory at Sea This is I suppose where we see the other side of VaS, the Real Time Strategy element. Indeed, some would see the game as primarily an RTS rather than as I would, as a WW2 naval combat simulation with RTS elements in its campaign mode. The latter is firmly my view and as I'm not a player of RTS games, be aware that consciously or otherwise, I'm judging VaS according to my view of it, rather than as an RTS, seen from the standpoint of an RTS player. The developers actually hedge their bets, describing VaS using both labels. And no, I definitely do not rate VaS as an arcade game; I've played a few of those and this is a step or two above that, simplified though the simulation may be. It's also maybe worth pointing out that for all my love of Fighting Steel, I don't think I have ever played its campaign. This is partly because I was quite happy fighting its single battles, but also because that's how I define WW2 naval combat - as a succession of single battles or patrols, often quite long periods and distances apart. Quite different from your average combat flight sim campaign, which is a series of missions flown in fairly quick succession, often from the same base. You sign up with a squadron and fly its missions. In a naval sim, sign up with the Bismarck and after working up, you get to go on one mission. Even if you manage to re-write history, you're not going on another mission for months, probably, with the intervening period spent laid up refitting somewhere while being bombed by the RAF. My idea of a WW2 naval campaign would be something like you see in Silent Hunter - a succession (if you're lucky) of single patrols or missions. For example for the Kriegsmarine, your campaign would be a sort of surface commerce raider's version of the Silent Hunter campaign patrols. Instead, Fighting Steel's campaign gives you (to quote the manual) '...an exercise in fleet management.' An RTS of sorts, in other words. Like VaS, in its different way. Anyway, it's time to take a look. You start a VaS campaign by choosing from one of three theatres - Atlantic, Pacific or Mediterranean. I'm assuming that your campaign will be fought out in the chosen theatre, without moving on to others. On the same screen, you are prompted to choose a nationality and an avatar for your captain, and asked to give him a name. For the Med, the playable sides are the Royal Navy and the US Navy (the Kriegsmarine is playable in the Atlantic campaign and the Regia Marina only in historical or custom battles). You then choose a difficulty level - options are Normal, Hard or Expert, the latter two offering increasingly numerous or dangerous enemies. You then get an introductory message from your commanding officer, and told what your first command will be - in this case, HMS Nerissa. Nerissa was an N Class destroyer better known for her distinguished post-1940 service as the Piorun with the Polish navy in exile. Note the single funnel, not the two in the VaS model (which is shared between several of the RN destroyers). EDIT - I think what I was taking to be a second, squatter funnel is actually the searchlight platform, so the destroyer model is correct, in that respect. Next you click your way through or past a couple of tutorial elements, first describing basic ship controls and then a couple of little animated clips about the 'World View' in which your campaign missions will start. This is a sort of animated aerial view in which warships appear much larger than life and which has a little globe view of the planet, top right, to show you where you are. My start location is the white dot; friendly ports are blue (Gibraltar, in this case) and enemy (Italian) ports, red. Here's how the mission starts in this World View. It's 12 December 1941 and I am to hit ('sink' or 'intercept and sink' would be a better term!) an Italian destroyer, the Carrista, which I'm told, and can see from the map, is off Gibraltar. There's a Queen Elizabeth Class battleship nearby but it's not clear whether it will have a role in the mission; I'm not sure what the white line means, that's leading up to the top left from the battleship. I soon found out it's the ship's intercept course, so evidently I'm not on my own. This sort of presentation is perhaps how Real Time Strategy players like to see things set out, but as a simmer not an RTS player, I would have much preferred to see things presented on a conventional map, Silent Hunter-style. There is a fair bit of info on screen if you care to check it out, including distances to nearest ports and to the target - a mere 4 Kilometres away! I should perhaps have paused the action and taken a bit of time to settle in and make a plan but instead I made a start, panicking initially to avoid my over-sized ship avatar from colliding with the similarly over-sized battleship avatar, and sending Narissa/Piorun off in the direction of the enemy destroyer, which in the meantime had turned north. Somewhat disconcertingly, I next got a screen inviting me to choose which ship to enter the battle with. This game mechanic - which cuts in when a campaign battle is imminent and VaS decides it's time to switch view modes - is obviously designed for situations when you're commanding a squadron or fleet. It's a bit out-of-place, though, when you've got Hobson's Choice. If you're paying close attention, you'll see that Carrista is already in a damaged state, which is presumably how she let herself get caught in an exposed position. Having made the only choice of ship possible, I found myself in familiar territory, in the Combat View, with my destroyer closing head on with my target, the Carrista; and the friendly battleship, HMS Warspite, on my starboard bow. What followed was by now familiar enough, having played myself into VaS surface combat via historical and custom missions. As the Battle of Samar at Leyte Gulf proved, fast-moving destroyers are not an easy target for battleships and Nerissa had ample opportunity to show her mettle. I let her run under AI control for a while and watched the fun, before taking over, making both gun and torpedo attacks. It was quite engaging, manoeuvring my little ship, and I had a jolly old time of it. My first torpedoes were evaded but by the time my second salvo was ready, the Carrista was smoking and pretty well dead in the water. Even so most of my torps missed, but the one that didn't was enough to finish the action in satisfactory style. The mission now ended and my success was confirmed. In VaS, success earns you 'Experience Points' and 'War Bonds', which you can apparently use to obtain better kit, later on during the campaign. Continuing the campaign, the next mission now appeared, resuming in this case pretty well where the first one left off. Apparently, further enemy warships (described as 'fleets', but listed by names which I think represent more Italian destroyers) are nearby and we must go get them, too. That's as far as I have got with the VaS campaign so far and while it's only scratching the surface of what VaS provides by way of campaign gameplay, I hope it's enough to give you the gist of it. I'd have preferred a less RTS style to campaign content and presentation - specifically, a proper map as an intro, and for the missions to be presented as a series of longer, more open-ended patrols - say commerce raiding for the Kriegsmarine, convoy escort moving on to commerce raider search and destroy, then naval gunfire support for real life landings, for the Allies. However, the missions so far seem short but quite engaging, and that's before I've seen different mission types, like capturing enemy ports and convoy attack or defence and without seeing anything of carrier warfare, a whole new dimension. While the current approach is more RTS than simulation - and I'm quite happy to play VaS via its custom and historical battles, as I did with FS - I think these well-presented campaigns deserve a serious try-out, something Fighting Steel didn't mamage to persuade me to do. ...and the verdict... While I rate Victory of Sea highly as a simulator of WW2 naval combat, it's hard to be sure from a few hours play and without a lot more info about what's going on 'under the hood' just where it lies on the 'simplified -vs- sophisticated' scale. In terms of the main headings - AI, ship & fire control, physics, damage and systems modelling and command interface - it certainly seems more towards the 'simplified' end of the scale; a 'sim lite', as another reviewer described it - compared to my 'gold standard', Fighting Steel. On the other hand, VaS has (I'm pretty sure) a significantly greater variety of warships - and it simulates planes, subs and land, which FS doesn't. Despite the crude ship models, the visuals and sounds are mostly considerably better, the former to be expected in a more modern game of course. And there are some signs of sophistication in VaS - like torpedoes only arming after they have run a certain distance. Some torps can also be duds - in the Battle of the Java Sea mission, I saw an Allied destroyer turn into a fan of three Japanese torpedoes, only to take one in the bow - which didn't go off. And AI tactics are varied - they can make sensible decisions on which targets to engage given a choice and they will not just blindly close the range every time. And I have seen more than one example of ships which have obviously spotted incoming torpedoes turning into or away from them to 'comb' their tracks. Radar and spotter planes can increase the range at which enemes are spotted and aid spotting in darkness or poor visibility. Ships can and will deploy smoke screens. I'm happy to leave it to the AI to handle stuff like ammo type selection and don't feel cheated if I can't fiddle with every variable; in fact it's better that as ship's captain I don't have to, as that's what my (AI) subordinates are for. Most of all, by and large the results look, feel and sound like convincing sea battles from the Second World War. Things I really like about VaS include: - the scope - Fighting Steel was ships only, 1939-42; Victory at Sea includes planes, subs and land, and it covers the full war; - the very good range of navies and ships included; - the inclusion of both a modest set of historical missions and a very easy-to-use custom battle generator; - the ability to pause time while issuing orders; - the AI, which if not stellar, appears in many respects to be quite solid; - the visuals and the general ambience; - the clean, comprehensive and easily-picked-up interface (though some elements are a bit 'gamey' in presentation); - the neat & pretty comprehensive 'help' facility, accessible during battles; - the developer's continued work on the product, including additional ships and features. Things I think could be better are: - while by no means the wildly manoeuvrable speedboats I have seen in some other games (eg Navy Field 2 video clips), ships respond to orders and change course too quickly (and seem to turn too tightly) and turrets traverse (and heavier guns/torpedoes reload) too fast - all of this I think needs slowed down somewhat, while maintaining collision avoidance (which is good, now); - ship tracks (over time) should be marked up on the Tactical View and a compass rose/north arrow marker should be provided on this and on the Combat View; - the camera in the Combat View should be able to go a little lower, closer to the sea, and be able to zoom in a little closer to ships; - ship models are crude - in particular, some gross errors need fixing eg not enough forecastle ahead of 'A' Turret on many ships, funnels badly positioned or shaped (eg too tall, round rather than oval in X-section); - when under manual control, designated targets (for each level of armament) should continue to be engaged until fire orders are changed or cancelled, regardless of any other orders eg speed, course; - some on-screen aids that are permanent should be capable of being toggled off, notably the text labels for torpedoes, the coloured 'turn in progress' indicators and the 'rising text damage labels'; - spotter aircraft should not be deployed unless and until ordered (now, they seem to start in the air, by default); - the ability to save custom battles, and to specify their location (eg 'The Slot' at Gaudalcanal), would be very useful; - some simulated audio messages would be nice, like the voice of a bridge crew member reporting a sighting or a sinking (FS has some of these); - the interface could be made less 'gamey' eg the dreaded 'Health' bar re-labelled as 'Damage', the delta jet spotter plane icon replaced with a straight-winged aircraft - and campaign missions could start with a proper map, rather than the very gamey, RTS-style 'World View'. Of course, more ship types would also be great: adding one or two of the pre-war USN & IJN battleships, another fleet carrier each for the USN and IJN, a pre-war German destroyer and torpedo boat, and a ship capable of acting as a commerce raider/armed merchant cruiser, would leave little left to be desired. All in all, on this scale... 5 - Must Buy - Delivers a consistently outstanding experience with minimal flaws that do not detract from the gameplay in any significant way. 4 - Highly Recommended - Delivers a fun and enjoyable experience well worth your time and money, despite some room for improvement. 3 - Recommended - Delivers a solid gameplay experience with a few irritations that occasionally disrupt enjoyment. 2 - Difficult to Recommend - Delivers some of the promised fun, but not without significant problems in the gameplay experience. 1- Not Recommended - Delivers a sub-par gameplay experience; doesn't fulfill its promises; offers more bugs than fun. ...this reviewer's final score is: 4 - Highly recommended. Victory at Sea hasn't entirely knocked Fighting Steel off its throne but it is a very worthy, more modern, better-looking, generally better-equipped consort and will be my platform of choice for WW2 naval combat on my current PC, which for too long has been without a decent sim in this genre.
-
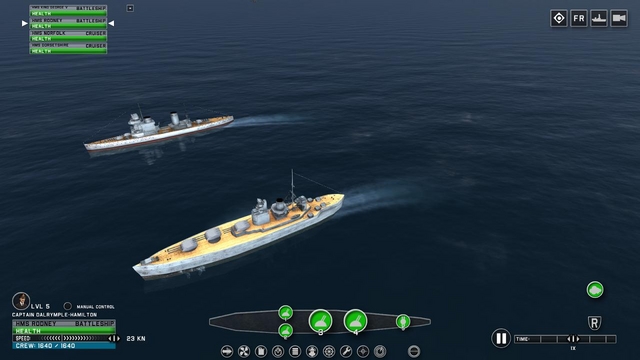
Custom Battles Before we go on campaign with Victory at Sea, it's worth describing the Custom Battle option. In fact, there being plentiful help but no tutorial mission, creating a custom battle is probably the best way to familiarise yourself with sailing and fighting your ship or ships, in VaS. You don't get to choose a theatre - it's all at sea so that doesn't matter much, right? From the Custom Battles setup screen, you do get to choose: - the points limit for each side - 'unlimited' is one option; - which nation's ships you play with and against (options being USA, Japan, Britain, Germany, France (Free or Vichy), Netherlands, Italy); - which ships and how many of each, are on each side (depending on the chosen nationality); ...and under 'Battle settings': - what type of battle you want to play (options being 'regular' [meeting engagement], port attack or defence, convoy attack or defence, blockade attack or defence). - the weather (options being clear, cloudy, rain or snow); and - time of day. For familiarisation, it's best to pick 'Convoy Attack' which auto-generates a small convoy of merchantmen for you to use as live targets. You must choose at least one enemy warship though, but it can be something relatively inoffensive, like a Flower Class corvette or two! My favourite Fighting Steel missions were the two variants of the Battle of the Barents Sea, when Admiral Hipper and Admiral Scheer with some destroyers tried to destroy a lightly-escorted Arctic Convoy. In the setup screen below, I have selected forces based on one of these actions, with Hipper and three of the big German destrovers against four of the smaller but more seaworthy British J/K/M Class destroyers. For a pure practice mission, I'd definitely suggest replacing the escorting destroyers with Flower Class corvettes - you don't want to catch a torpedo while training! When you start the battle, you get a deployment screen like this, which I think is common to campaign missions, although in this case the ability to drag your ships about is limited to the bottom edge of the large deployment box (brighter blue border). I don't know what the distance the smaller grid squares represent, nor the meaning of the arrows on the left. A sensible addition to this deployment screen - and to the Tactical and Combat Views - would be a compass rose or at least an arrow to indicate north, for orientation. Clicking 'Next' to end deployment and start the battle takes you to the same Tactical View, with action paused, seen earlier for the Historical Mission option. By default, your force is in 'Attack' mode (other options being 'Move', 'Defend' or 'Retreat'); so when you un-pause, your ships move to engage the enemy (you start by default just outside maximum range). In the screenshot below, taken in the Combat View as the battle starts, my heavy cruiser - the sim has chosen Prinz Eugen for me, from the Hipper Class - is on the move, with full icon details turned on. The mission has started with my spotter aircraft airborne and nearby, highlighted by the little group of red diamonds; there may be a way to start with it stowed, the use of these planes being very limited in WW2, except for the Pacific or South Atlantic. The next screenshot, taken soon after (with FRAPS, there being no screenshot facility built into VaS, AFAIK), shows two of my destrovers, with labels turned off. Note the text at top of screen is displaying progress towards mission objectives. The mission will end automatically when victory or defeat has been achieved. Playing some custom battles for training purposes, I'm finding that ship and weapon control is perhaps not quite up to Fighting Steel standards. For one thing, the interface is a bit more 'gamey' whereas FS tried to make things look and feel more 'naval' eg no labelled 'Health' bar and steering in FS is by reference to a compass rose with headings displayed. And while you can fire torpedoes, VaS doesn't let you control their spread, which FS did. The biggest difference seems to be that in VaS, your ship is either 'full AI' or 'full manual'. In FS, you could designate a target (or targetting mode) and your AI crew would continue firing until you ordered otherwise. Issuing a steering command, for example, or ordering a change in speed, would not interrupt any of this. In VaS, things work differently. Under AI control, you do have some overall say: you can order an attack posture (amongst others) but once you start issuing steering or fire control orders, everything switches to manual control. Apart from steaming on, it appears that as a general rule your ship will then do nothing, except by specific player command. So far, the big negative with this seems to be that when under manual control, fire control is very manual. You have to order every salvo and its target, for every weapon system (generally main armament, secondary armament or torpedoes; AA guns seem to be the exception that proves the rule, engaging planes automatically). A 'semi-automatic' facility would be much better - as in FS, order a target for each weapon then the AI executes that order until told to do something else, even if you are in the meantime ordering changes to speed or heading. As things stand, once you take over manual control, it seems to me that you have to call every shot or salvo. I hope I'm missing something here; if not, this would really benefit from an update. While AI control in VaS seems reasonably effective and gives the player some 'oversight' control via choice of posture (Attack/Defend/Move/Retreat) there are times when you will want to intervene (eg change course or speed) and change one thing, without suddenly finding yourself having to do everything. Micro-managing a ship can be hard enough in a small action, but is likely going to be a real pain in a bigger fleet action. I need to spend more time in VaS before I've really got the hang of ship handling in battle, and I daresay I'll become more accustomed to and at ease with the VaS way of doing things. While I would like a more 'naval' and less 'gamey' interface and a 'less manual' form of manual control - and improved ship models! - I must say that I remain highly impressed with the sim's excellent capabilities, scope and design. And yes - simplified as it is, I do think VaS merits the 'simulation' tag - as designers of good wargame rules know, you can simulate something effectively, without necessarily reproducing it in every detail. I'm still getting the measure of the AI, which seems generally competent. I have seen ships which are manoeuvring close together get onto collision courses then 'jiggling' to avoid each other; and it may be that there is a tendency to close the range a bit too enthusiastically, although I have also seen damaged ships decide enough is enough and withdraw. In general, so far the VaS AI is looking to be up to the job. Earlier, I used the Custom Battle option to set up a recreation of the Battle of the River Plate, with a pocket battleship against a pair of Leander Class 6-inch cruisers and a York Class 8-inch cruiser. As in the real battle, I paired off my Leanders (just like Ajax and Achilles) and operated my York (Exeter, in the real battle) independently. I'm already getting used to deciding when to allow 'supervised AI' control and when to step in myself and the result was an exciting and engaging little fight, which I was able to leave mostly to the AI. The sounds of gunfire, engine noise, hits and other intermittent audio effects backed up most effectively the excellent visuals, with shells splashing, tracers arcing and torpedoes lancing as the ships fired and manouevred pretty convincingly. In the end, I lost one heavy and one light cruiser, but we got the pocket battleship. Marvellous stuff! For what I want most from a WW2 naval sim, Victory at Sea fits the bill with just the Historical and Custom Battles, alone. And that's just from the surface action standpoint - remember, VaS can do submarine and aero-naval action, as well! I don't think you can save and reload a Custom Battle but they can be generated really quickly. And they are a great way both to find your sea legs and to fight any action you fancy, whether re-creating a real fight or generating one of your own imagining. I haven't tried them yet but the 'Port Attack/Defence' options are probably also good practice for campaigns, as this type of action seems to be a feature of the campaigns in Victory at Sea...which is where we are headed, next. ...to be continued!
-
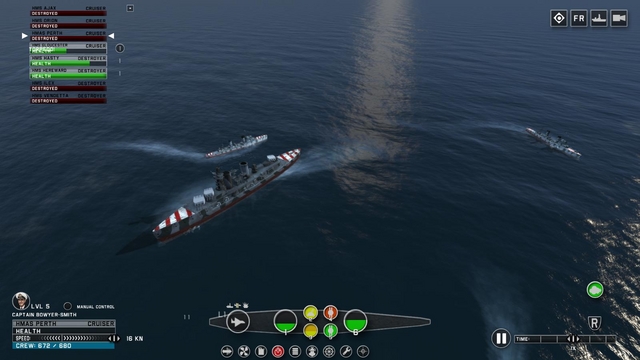
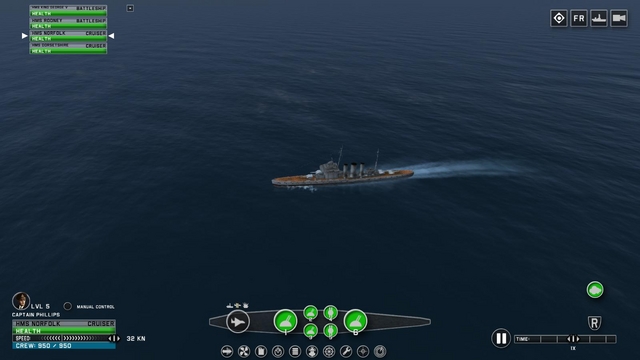
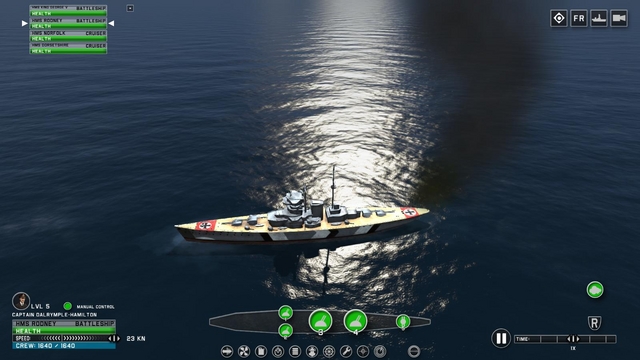
Enemy in sight! - Battle of the Denmark Straits For my combat try-out with a Victory at Sea Historical Battle, I decided to go for the famous fight in May 1941 when Hood and Prince of Wales, directed onto their prey by the shadowing cruisers Norfolk and Suffolk, intercepted Bismarck and Prinz Eugen in the Denmark Strait, trying to break out into the North Atlantic. I opted to play the German side. When launched, the battle opens in the 'Tactical View', which has the appearance of a map, but is actually a zoomed-out 'satellite' view. The action is paused by default and VaS therefore enables you to give orders to your ships, while paused; so you have plenty of time to think and make a plan. Here's how this looks: This is where you first make the acquaintance of the screen icons that are the main means of exercising control, with some also having hotkey equivalents. Top left, you have a fleet list, just two in this case. Here you can mouse click to select the ship you want to control directly. Top right, are icons which control mainly camera mode and which unit icons are displayed next to each ship - options being none, flags or flags+ship ID. Bottom left is another block for the selected ship, with a mouse-dragable 'throttle' and radio buttons which enable you to turn your selected ship over to AI control and to elect to control all your ships manually, both of which are useful options. Bottom right is a variety of icons for various orders including posture (attack, move, defend, retreat), formations (just column and circle are available), smokescreens and time compression. Bottom centre is the main control icon for your currently-selected ship, from which you can select weapons, launch your spotter planes and view damage, with the little row of icons beneath going red as systems suffer damage. Interestingly, if you click the 'Help' icon over on the lower right, you get a pretty comprehensive clicakable version of the 'Captain's Guide' manual, which covers its content section by section, possibly also with some additional stuff. It's a great little resource, at your fingertips in-game, which you can pause the action to review. Neatly, each section is presented in the format of a short training film, with an animation and voice-over. Now that's what I call thoughtful, thorough design - top marks, Evil Twin! In the real battle, the RN cruisers Norfolk and Suffolk were present but took no part in the battle and they're not represented in VaS's rendition [Edit - the two heavy cruisers did show up when I replayed this battle from the RN side, so maybe I just missed them]. What you do get, though, are the participating warships' spotter planes, in the air from the start. They are the things indicated by the little diamond-shaped groups of red (German) or blue (British) dots, which you can see on the Tactical View, near the ships. I believe the real battle was seen from a nearby British maritime patrol aircraft - a Sunderland I think - but the ships' spotters played no part. Switching to the Combat View with the action still paused, I got my first view of my ships. As you can see, Bismarck is my currently-active ship, displaying the Baltic recognition markings (including prominent black and white stripes and [here de-swastika-ed] deck markings) that were painted out before the Germans made for the Atlantic. Bismarck isn't one of the worst VaS ship models but her stern is heavily flared, her 15 inch turrets look a bit small and some of her 5.9 inch secondary turrets are in odd positions. Still she makes an impressive sight even in the dull conditions, with her heavy cruiser consort ahead (I had ordered column formation before leaving the Tactical View; if there is a way to decide the order of ships in a column, I don't know what it is). You have quite a lot of camera control in VaS, reminiscent of Fighting Steel, but the view above is about as close or low as you can get. It would be good to be able to go a bit lower in the Combat View (so as to see a decent distance from your ship, without having to zoom out) and to zoom in a little closer. We're still out of range so when the action is unpaused, there's still no shooting. In the zoomed-out view below, you can see that one of our spotter planes is flitting about, just off Bismarck's stern. I should perhaps have tried to order him to spot for us but it didn't ocurr to me; with the British ships charging straight at us, I was under a certain amount of pressure, though I could have paused again at any point. You can just about see Hood and Prince of Wales in the next screenshot, at the very top edge of the screen, in the centre. As with Fighting Steel, the 2-d view (Tactical View in VaS) is more useful for keeping general tabs on a battle, although it's a great pity that you do not see the tracks of ships plotted, which Fighting Steel does. Introducing track plotting to VaS would be a big improvement. Using the camera controls in the Combat View; it's possible to track the camera where you want. In the pic below I have tracked over to Hood (right) and Prince of Wales (left). You can see one of their spotters in the foreground; it looks to be a biplane with floats, which is about right. When close enough, you can hear the buzzing of the aircraft engines or the 'thrumm' of the moving warships. My mission being hunting convoys not risking a fight with enemy capital ships, I should have refused combat and considered a successful escape a victory. But I decided to fight it out as per the historical battle. I would try to 'cross the enemy's T', turning to cross his path and hoping he would continue towards us in his anxiety to bring us to battle, much as in real life, where the British didn't 'open their 'A' arcs' (turn to bring their rear turrets to bear) until it was too late. Changing to my lead ship Prinz Eugen, I checked the range, which was displayed via a light blue arc. The enemy were just about to come into range so I ordered Prinz Eugen to engage Hood and Bismarck to take on Prince of Wales. Soon after that, the shooting started. I decided to let the AI take it from there and turned off 'Manual control' (you can see the icon, bottom left, is no longer illuminated green). You can also see that Prinz Eugen has turned to starboard while Bismarck is shooting ahead with turrets Anton and Bruno. Our shell splashes indicate that we have already straddled Hood and you can see some of Bismarck's rounds in flight. There are accounts of crew looking along the line of flight catching sight of outgoing rounds but this isn't really realistic, though commonplace in video games. I do like it, though, and it's fairly unobtrusive in VaS. In the next pic, things have begun to happen very fast. Prinz Eugen is operating independently under AI control, and is off screen, to the right. Bismarck, also AI-handled because I have turned off Manual Control, has sensibly turned to open her 'A arcs'. Enemy rounds are falling nearby and getting some hits. The green wedge under my port bow indicates a turn being executed - as you can see this from a ship's wake, it would be better not to have these indicators, or at least, to be able to disable them. The enemy ships have also started to operate independently, one seemingly tracking Bismarck, the other Prinz Eugen. At this point it became apparent that Bismarck was targetting the ship that was after Prinz Eugen, ignoring the more immediate threat. Before I could resume manual control, we received some serious hits, indicated by red and yellow damage text displays, rising from my ship. There really should be an option to disable these rather obtrusive messages, because the 'Health' bar (yuk, 'Damage' would be a better, non-gamey label) and the bottom row of damage icons tell you what's happening, already, on your own ship (and you should not get this kind of read-out for enemy vessels). Replacing the animated text damage messages with an audio damage report, as if from a crew member on your bridge, would be a good move (Fighting Steel has some such audio reports). It would be fine, just to eliminate them. Further damage quickly followed and Bismarck was described as 'Destroyed' (a bit of an unsatisfactory description for a warship, unless suffering a catastrophic explosion). By this time, Prinz Eugen had also been hit and was sensibly beating a retreat under continual fire. I took manual control of the heavy cruiser and continued to steer her away, trying to lay smoke, though it was hard to tell if it worked or was just smoke from my own damage. However, behind me, Hood had also been hit hard and was smoking, too. Prince of Wales, seen below, looked to be in better shape; but suddenly, both British ships turned away and broke off the action. So, there'd been no repetition this time, of the result of the real battle! At least my heavy cruiser had escaped destruction, though it was a long way back to the nearest friendly port. Well, so what did I make of this? Does it compare with the WW2 surface combat gold standard set (IMHO) by Fighting Steel? Well it's hard to say, as I haven't been playing for long enough. Some things could be better, as I have indicated above, like better ship models, a minimum camera height closer to sea level and drawing of ships tracks in the Tactical View. I have the impression that things could usefully be slowed down a little, for a less frantic and more realistic pace - like the rate at which damage is done, guns reload, or ships respond to the helm under player or AI control. I tried some zig-zags when retreating with Prinz Eugen, chasing the enemy shell splashes as they did to put off the aim of the next salvo, and I don't know if this affected the enemy's aim. The AI has been improved from the original release but I'm not yet sure how good it is. It would be good to factor in reliability; drill mistakes or technical issues can slow down reloads or even put guns or turrets out of action temporarily (as with the brand-new Prince of Wales's 14 inch guns in the real battle). I don't think VaS currently simulates ammo or fuel limits, though for many historic sea fights, this is not a critical omission. However, I have to say that so far, on the basis of its ability to reproduce individual surface actions, I am mightily impressed. With the stated reservations, Victory at Sea really is a most impressive package, potentially and perhaps already a worthy successor to Fighting Steel, with the added advantage of featuring land, subs and planes. If my impressions survive sustained play, I'll have found my long-awaited WW2 naval combat sim. And that's before we get into its capabilities on campaign. If Victory at Sea's campaign and sub and air capabilities are up to the same standard as I've seen in single missions - a big ask - I will be in naval WW2 hog heaven, a Nirvana undreamt of in Fighting Steel, good as it was/is at gun and torpedo action. Time to find out! ...to be continued!
-
Installation and basics Victory at Sea - henceforth, VaS - comes on the usual single DVD in the usual soft plastic case, whose only other contents are a publisher's (Excalibur) advertising leaflet and the aforementioned mini-manual with the three aforementioned short sections - multi-lingual installation instructions (for Windows and Mac); multi-lingual tabular hotkey list; and illustrated 'Ship Categories' section in English (which as mentioned, doesn't cover all included ships; there's a listing here, on the dev's website, which complement may have been added to since). As I said before, the ship models are not great, more 'tabletop wargame quality' representations than detailed miniatures, but the little para of text on each class seems to have been written by someone who has a feel for the subject, which is a good sign. Installation installs the Steam client application, if it's not already on your system. As I'd temporarily forgotten my Steam password, I had to go through the Steam authentication rigmarole until my memory improved just short of a password re-set. Installation was otherwise painless. VaS dates from mid-2014 and its stated system requirements are Windows XP, Vista, 7 or 8 (or Mac OSX 10.8 or above); Core 2 duo 2.4 or higher; min 2 Gb RAM; GF 9500GT 512 Mb or above; and 4 GB or more of free HDD space. As far as I know, the game is only available via Steam, whether via shop DVD or direct download. There have already been several updates, with the developers evidently interested in player feedback and in improving the sim; my installation is 1.3.1 so I think I have the current version, with 1.4 reportedly coming soon, per discussions on the Steam VaS forum. A previous update added the ability to facilitate mods and a few are already available, details of which can also be found on the forum. On starting VaS, you'll find the interface is neat and uncluttered. Here's the home screen. Appropriately enough, menu options are superimposed on an animated and nicely-rendered seascape, to the accompaniment of a somewhat mournful, drumbeat-backed theme. Options are actually quite limited, as the screenshot below illustrates. Within each sub-option, there are only a few things you can tinker with. For example, under 'Gameplay', you can 'Restrict purchasable ships by nationality' (which whatever it means, sounds like how it should be, by default); 'Show individual batteries'; or have 'No night flying'. If there's a full VaS manual installed somewhere amidst all the multi-foldered material in my Steam installation, I have yet to find it; but there's one online here, a 'Captain's Guide'. From a quick perusal, you will quickly see that like Fighting Steel, VaS presents a fairly simplified approach to the two main things you need to get the hang off, namely ship handling and fire control. Simplified, but accessible, and in fact fairly powerful, in putting a lot of stuff at your fingertips and/or on your screen. However, you can forget about manning a Fire Director or a rangefinder, scanning the horizon with your binos from the bridge and hearing the Firing Gongs or the ship's telegraph ringing in speed changes. Nor will you be able to take to the air in your spotter planes, if you have any shipped. But it seems that as captain you have what you need to exercise full control of your ship and its facilities at your disposal, like a crew on your virtual bridge, laid out in a sensible manner I found happily reminiscent of Fighting Steel - and that is a very good thing, in my experience. But more of that shortly. I mentioned earlier that the ability to handle user-made mods was added in one of the game updates. There appear to be just a few mods available at time of writing, most concentrated on improving realism. Currently, the best place to find out about all this seems to be the VaS Steam community forum, which the developers also use eg to announce updates. I haven't tried the mod facility yet and have none installed so far, but here's the VaS mods screen, which looks like a built-in mod enabler, a neat feature which should help keep the game alive and evolving: As an indication of the ships available and their appearance, the screenhots below were taken via the 'Custom Battle' option, from the screen you use to select ships for each side, up to your chosen points limit. In all cases I have scrolled over to the right, so as to display the capital ships available. The top pic, I've set to display British and German ships; the lower pic, US and Japanese. The UK-based developers may release additional ships and it would be nice to see the likes of the distinctive Japanese battleships Ise and Fuso and some other famous capital ships or cruisers. The displayed models rotate on this screen, hence their appearance below. You can see what I mean, about the models being somewhat crude; it would be good to see some improvements here too, whether from the developers or modders. Gameplay OK I've got VaS installed and looked over the options, such as there are of them, and read the full(er) manual, such as there is of it. Time to put to sea and see [sic] how it works, in practice. There are three ways you can play VaS: campaign mode; historical battles mode; and custom battles mode, whereby you can create opposing forces up to a variable points limit (including 'unlimited'), wargame style, and then fight the resulting battle. What I want most from a WW2 warship game or sim is the option in the middle of the list above - the ability to re-fight real actions from World War 2. Like the Battle of the Denmark Straits, Bismarck and Prinz Eugen against Hood and Prince of Wales. Or the Battle of the Barents Sea, with German destroyers and heavy cruisers trying to destroy a convoy escorted by outgunned but brave British destroyers and light cruisers. Or some of the fights between the Regia Marina and the Royal Navy in the Mediteranean, like Matapan. Or some of the vicious and deadly night battles between the USN and the IJN's 'Tokyo Express' over and around 'Iron Bottom Sound' during the Gaudalcanal campaign, launching or dodging 'Long Lance' torpedoes in the dark. Just the sort of thing Fighting Steel did so well - and still does if you can get past the dated graphics and have a machine old enough to run it. So, how does VaS measure up, in the historical action department? Well, the first point is that there are currently just eight 'historical battles' available. Some obscure titles make it less clear what these actually are, but the list is as follows: Battle of the Denmark Straits - RN -vs- KM, May 1941 - Hood and Prince of Wales against Bismarck and Prinz Eugen The Final Battle - RN -vs- KM, May 1941 - Rodney and King George V against Bismarck Clash of Giants - RN -vs- KM, April 1940 - Renown against Scharnhorst and Gniesenau Arctic Skirmish - RN -vs- KM, December 1943 - Duke of York and cruisers against Scharnhorst Matapan - RN -vs- RM, March 1941 - featured as three separate battles, following successuve phases in the action. Battle of the Java Sea - mixed allied force -vs- IJN, February 1942. Compared to Fighting Steel with its additional user-made missions, this is a pretty short list. However, I find that naval battles have high re-playability, in part because you or the enemy can try different tactics each time, so that only the initial set-up is the same. Besides, with VaS's 'Custom Battles' mode, you can recreate historical fights for yourself. In the next part, we'll take a look at how a sea fight looks and plays out, using one of the above historical battles, before moving on to the custom battle and campaign features. ...to be continued!
-
Good show! Here's to the Brylcreem Boys!
-
An uncertain turn of events in a later round in my Iran-Iraq War campaign! My first M60 campaign in SABOW is proving to be something of a roller-coaster ride. And an expensive one! Back in daylight after the opening mission during the hours of darkness, we seemed to be doing quite well in mission #2, playing our part in the Iranian counter-offensive against the invading Iraqis. The culmination of my plans in that mission was a combined tank-infantry attack on a Iranian defended locality. With no artillery support and therefore no chance of a smokescreen, the risky part was a final dash over a stretch of open ground, to reach the objective. We had got about half-way across, when a tracer round zipped in from our right. Next thing you know, our little force is being torn to bits by fire from an enemy T-55 platoon, which had decided to flank attack our flank attack. No matter how many times you have read accounts of battles like Operation Goodwood, it's still shocking just how fast a formation of tanks can be converted to scrap metal, But that's what happened. Most of the APCs survived the subsequent fire-fight, but most of our tanks didn't. Though the surviving Iraqi tanks withdrew and our objective was gained, it was at considerable cost. Despite all that, the next mission, also in daylight, started promisingly enough. Overall, it seemed that our Iranian counterattack was going well and my formation, the 3rd Armored Brigade, was playing its part. The next battle was a bit of a teaser, though. Intelligence apparently indicated that the enemy had decided to counterattack our counterattack, which of course they are perfectly entitled to do. This intention is shown by the large, triangular ,blue enemy arrow, pointing north-north-east. However, from the red, friendly arrow going the other way, it seemed we were also expected to attack, in the opposite direction, towards the enemy position marked 'Babylon1' - generating a meeting engagement. The smaller red and blue (more rectangular) arrows to the right apparently denote pre-battle moves, during the prior 'operational' phase, though why there are both enemy and friendly moves starting and ending in my territory, I do not know. Anyhow I decided to try to box clever, resulting in the dispositions you can see above. I would stand on the defensive first, and destroy by fire from covered positions the anticipated enemy attack as it crossed the relatively open ground to the north of the central irrigation channel. After that - or if the enemy didn't attack, after all - I would then go over onto the offensive. This plan seemed more sensible than driving forward to meet an advancing enemy somewhere in 'no-man's land'. I always like to start a battle with a plan, even if it may be a bad plan and even if it doesn't survive contact with the enemy. They say that a bad plan is better than no plan at all. I tend to agree. I had just three platoons, two of tanks and one of mech infantry. I put the latter in the woods to the west, to cover my right flank where the battle lines ran north-south. A tank platoon with three M60s I set up in the same woods, further east, placed so as to fire out over the open ground towards the expected enemy advance. Not very subtle but we had a key point, 'Xerxes 2' in that spot and I was determined not to lose that. The more subtle part of this plan was the placement of my other platoon - which had five M60s - in a strip of wood over to the east. Their position had an irrigation channel to its rear whose banks might provide them with cover to move north or south if need be; but above all else it had a good overlapping field of fire with the other tank platoon, covering the open ground in front of 'Xerxes 1'. An enemy force attempting to advance across that ground would be destroyed by concentric tank fire from 'Xerxes 1' and from its right flank. As usual I had no artillery or air support, so this battle would be won or lost by the marksmanship and battle drills of my eight tanks. I felt reasonably confident that the combined fires of eight 105mm guns would make life very difficult for any Iraqis who ventured into my chosen killing ground. I had made my plan and deployed my troops. Now, it was time to wait and see what the other guy had in mind. ...to be continued!
-
Thank you - my pleasure!
-
On campaign with the new release of Graviteam’s Cold War wargame/tanksim! These days, Ukrainian developers Graviteam are famous principally for their PC wargames. These started life on World War 2’s Eastern Front as Achtung Panzer - Kharkov 1943 and morphed into the Graviteam Tactics series, ranging into other theatres and periods in the process. However, as many of us will know, Graviteam have also developed tanksims, not least one of my current favourites, Steel Fury – Kharkov 1942. While the latter lacks some of the more sophisticated features of tanksim classic Panzer Elite, it has some nice touches of its own and with the support of a talented modding community, still provides a top-notch first or third person simulation of fighting WW2 tanks in an all-arms battle, at platoon-to-company level. Combining the wargame and tanksim genres is Steel Armour – Blaze of War (SABOW), dating from 2011 and now re-released with the game engine of the Graviteam Tactics wargame. I recently updated my GamersGate SABOW to the latest version - patches are available on the Graviteam SABOW forums as well as via GG and now Steam - and decided to give it a go. I have had SABOW for some time, but confess that I had previously been put off by its rather complex-seeming interface and somewhat difficult documentation, both of which received some attention in the upgrade. This being a combination of a wargame and a tanksim - more about how this mix works for me, later - there's a lot to learn. And I'm still somewhere along the early part of that big learning curve. So while nominally a mission report, this piece is more of a tanksimmer's first impressions of SABOW, after playing it on and off over the last few weeks. The setting SABOW is set in the later stages of the Cold War. The action itself centres on three single-player campaigns, following the Iran-Iraq War (1980-88), the Soviet intervention in Afghanistan (1979-89) and the middle years of the long Angolan Civil War (MPLA & Cuba vs UNITA & South Africa, 1975-2002). There is also an easy-to-use ‘quick mission builder’ with which you can in a couple of minutes plonk tanks and other units from each side onto a map and kick off the fighting, largely by-passing the ‘wargame’ element. To this, the new version has now added an ‘instant action’ option – click a main menu icon of either a T-62 or an M60A1 and you are pitched straight into a pre-set battle; no setting up involved. The tanks Two of the tanks featured in SABOW are playable, for the tanksim component of the game. First, there’s the Soviet T-62. This is used by the Iraqi Army in the (first) Gulf War campaign, by the Soviets in Afghanistan, and by the MPLA’s Cuban ‘advisors’ in the Angola campaign. Second, there’s the US M60A1, used by the Iranian Army in the Gulf War campaign. Yes that’s right – there are no playable units for the anti-Soviet forces in Afghanistan or for the UNITA/South African side in the Angolan campaign – for those campaigns, you can only fight in the T-62. Which was quite a tank, in its day, despite famously taking a hiding from Israeli Centurions in the ‘Valley of Tears’ during the 1973 Yom Kippur War. The T-62 introduced smoothbore guns firing fin-stabilised discarding sabot AP rounds to mainstream tank warfare and with decent armour and a low, ballistically-well-shaped profile, it was a tank to be reckoned with, in its day. The M60A1 needs little introduction to any tank enthusiast. The successor to the post-WW2 M47 and M48 Patton tanks and still in widespread service a half-century after the original version appeared, the tall but sleek M60A1 boasts the famous British L7 105mm rifled tank gun, a stereoscopic rangefinder and a good combat record...not least with the Iranian Army, as featured in this sim and seen in the screenshot at the top of this post, in one of the several paint schemes you can select. The playable SABOW tanks have excellent animated interiors, to which the new release has made some improvements (including more readable internal signage!) Below is the M60A1 turret interior, seen from the loader's position. Standing to the right is the Tank Commander. Seated to the left, ahead of him, is the gunner. You can just about see the driver, lower down, below and left of the breech of the 105mm main gun. All crew figures are nicely animated. Below is the first-person view of the Tank Commander, hands on the controls of his rotating, machine-gun-armed cupola. The sights and view ports you can see here are all usable, as are those for the other crew members. To the TC's right, you can see the back of the gunner and to the left, you can just about see the loader. To the far left are the tubes in the turret rear bussle which hold the ready-use main gun rounds. The T-62 is just as nicely done. Below is the TC's closed-up view, looking across at the loader (autoloaders in Soviet tanks didn't put this guy out of a job until the T-64 series appeared). In the pic below that, is the TC's view with both crew unbuttoned, the loader dutifully manning the formidable 'Dushka' 12.7mm machine gun. There's a goodly selection of AI-manned kit in the sim, in addition to the two playable tanks. AFV-wise, this includes the Olifant (South African Centurion) and the same army's Ratel wheeled Infantry Fighting Vehicle, both seen below somewhat the worse for wear... ..and as well as infantry, sundry APCs and IFVs and various crew-served weapons, there's my fave tank, the British Chieftain, here in Iranian service... Personally I would have preferred a ‘Cold War gone hot’, central European setting for all this nice kit and a couple or so more playable tanks, but SABOW's well-replicated tanks and three featured theatres are something of a novelty and the latter replicate real rather than imaginary conflicts, which is no bad thing. So, how does it all come together in practice? Let's find out how I got on! ...to be continued!
- 24 replies
-
- 6
-

-
- sabow
- steel armour blaze of war
- (and 1 more)
-
Battling the Red Army in Steel Fury – Kharkov 1942 This is another instalment in the stock German campaign from Graviteam’s excellent WW2 tanksim. Well, not quite stock. First, I’m playing with ‘mods on’; and while the STA mod I use doesn’t affect the vanilla campaign, I’m also using two other mods which do – the STA variant of ‘early spring weather’ which improves the landscapes, and the ‘grey color’ mod which - as its name suggests - reverts German vehicle schemes from the varied mid-war colours of the STA mod, to the ‘Panzer Grau’ used from the start of the war up to the period of the stock game – early summer 1942. Panzer III J, STA European camouflage scheme (header pic above is in 'Grey color' mod) And yes, I know some experts tell us panzers were brown and grey (low contrast supposedly hiding the pattern, on most B&W photos) till the summer of 1940. But I’m with those who believe plain grey was the norm before officially being so ordered during the 1940 Battle of France. Anyway, despite some exceptions like Afrika Korps vehicles being diverted to the Ostfront for the German summer 1942 offensive, it seems grey is best for the Summer 1942 Battle of Kharkov that the sim is built around. The second non-stock aspect of this campaign is that I’m using the variant that’s been modded to use the Panzer III, rather than the Panzer IV. At this time, the ‘Mark 3’ (as the British called it) was still the standard German medium tank, with the later ‘Mark 4’ only beginning to lose its original ‘support tank’ role as more of them appeared with a long 75mm gun in place of the original low velocity, short-barrelled original. Panzer VI F2, with longer-barrelled, 43-calibre 75mm KwK 40 Apart from that, I believe the campaign is the same as the stock ‘Fredericus 1’ Wehrmacht campaign – same maps, same objectives, just different tanks in the player’s platoon. As usual in Steel Fury, you start with the mission map, but can’t zoom out far enough to see the whole battlefield and must scroll about a bit, to see what’s what. Also as usual, the narrative briefing is structured in a format which may be authentic (for the Soviet side?) but is a bit discursive for someone used to the (to my mind) better-presented NATO format for orders (the British WW2 system was functionally identical). As for the content, you need to look at the map to find out what sort of force you’re operating with, because the briefing doesn’t go much below Regimental level. That’s fine as background but doesn’t tell you much at platoon or company level, which is what you need most, when playing as a platoon commander. At any rate, I can see that our objective is to attack and clear a series of enemy defensive positions, these being strung out in a rough line, over to my right. Then, we must stave off any Soviet counterattack. We have some pre-programmed artillery support – a mere platoon commander, I have no say in this – and the Luftwaffe is to drop supplies to some friendly forces besieged in the village of Ternovaya, nearby (tho not near enough to see on the map, although I'm told to advance in its general direction after fending off the counter-attack). You can see the situation a bit more clearly below, with the briefing text suppressed. We are mounting concentric attacks (the blue arrows) on the enemy defensive positions (red markings, specifically the 'dead hedgehog' graphics). My 'blue arrow' is the one coming in from the left. Historically, this is all part of a series of vicious battles near Kharkov in the Ukraine where a Red Army offensive knocked the Germans back on their heels, until the latter re-instated their own offensive plans and threw back the Soviets after much hard fighting. Looking at the map to get a better picture of our operation, I could see that my three-tank platoon - though said to be on the right – is on the left of a company-sized mixed (tank-infantry) force. With me are some panzergrenadiers, in SPW armoured half-tracks. Over to our right – rather far away, for mutual support – is another platoon of tanks – Panzer IVs as I will later discoverare and beyond them, some more SPWs. There is no ‘headquarters unit’, which should have been there to represent the company commander and his immediate entourage, who would be on the ground and in command of a group of several platoons like ours. Though long included in the ‘Army lists’ used by wargamers and having an important role in Wargame: European Escalation and the like, many tanksims omit important HQ units, in terms of their physical presence on the battlefield and not really simulating their exercise of command and control during a mission (mission designers can and should try to represent the latter with mission triggers which prompt radio messages like fresh orders, exhortations or excoriations). To help formulate my platoon plan, I spent a bit of time working out the lie of the land. SF’s maps are quite good but this can be tricky, with few spot heights, a limited zoom-out and no ability (added to Steel Armor Blaze of War in a recent update, but absent from SF) to view the ground in 3 dimensions, before you actually start the mission. I nevertheless noted that the enemy defensive positions seemed to be in a line, with little depth. This suggested we should ‘roll them up’, from left to right, pretty well straight from where we were starting. As to how, my platoon was deployed with an SPW platoon. I well knew how vulnerable the latter usually proved in SF attacks, having a tendency to advance fearlessly when discretion might be the better part of valour. So I decided to keep it simple and work closely with our grenadiers. In the absence of information or instructions on routes and formations in the briefing, I expected that the SPWs would drive directly towards the nearest enemy. So that’s what I would do, trying to keep ahead of them. The ground was fairly open, and in such country, it seemed best for the tanks to lead. I kicked off the mission and in the map view - whose icons are the main command and control tool, as there are few hotkeys usable from the 3d world – I ordered my tanks into line formation, close order and to ‘Do as I do’. As usual I switched to the gunner’s position, from where (as in most tanksims, presumably for playability’s sake) you can also do some tank commander stuff like select ammo types and give commands to the driver. Ordering an HE round into the breech, I oriented myself in the external view and off we went, uphill but directly towards the enemy’s right flank positions. Looking around, I could see the SPWs deploying and then moving off in the same direction, just behind and to my right. As usual in SF, our light armour seemed to be in a big hurry and I had to go flat out, to stay ahead of them. This left my two other tanks lagging behind on either side. And there was no time for me to scan ahead from the halt, for possible enemy positions. I’ve come to like and enjoy SF’s stock campaigns, but I do wish the attacking missions were scripted to allow a more tactical advance, with regular halts to observe ahead and time to apply a bit of ‘bounding overwatch’. If you try that in SF, the party could be over by the time you get there. And the lighter armour will likely have rushed ahead and been badly knocked about. With SF attacks, it’s often a bit of a mad charge. This mission was turning out to be no exception: get stuck in, worry about the finer points when it hits the fan. Which it did, soon enough! ...to be continued!
-
Die Bolshevisten kommen! 'The Bolshevists are coming!' - a piece of background chatter regularly heard in Steel Fury At this point - up to which, our attack had been going tolerably well - things started to go rather badly awry. I was scanning about from the gunsight view, and had rather lost situational awareness. Thus it came as quite a shock, to see one of my Panzer IIIs had been knocked out, close by. As it happened, he'd been clobbered by a 37mm AA gun in a field position, further down the enemy line of trenches. I had little time to dwell on this, or even have a good look around to assess the situation. Suddenly, my tank commander was calling in a tank target. I swung my gun in the direction indicated. To digress, SF doesn't make this easy. Most tank sims sensibly use the clock code to indicate targets, as indeed did the German Army in WW2. Panzer Elite and T-34 -v- Tiger follow this pattern, for example. In my day, British infantrymen were trained to uee the clock code, to indicate a target to a tank, from the outside. The key point is, these methods use the direction the main gun is pointing, as twelve o'clock. Steel Fury's AI tank commanders use the clock code to indicate targets, and even if like me, your German is very limited, it's quite easy to pick it up, for an Anglophone. So what's the problem, then? Well, the problem is that SF uses compass north as twelve o'clock. This is plain daft. If the barrel were used, and you're playing as gunner, responding as you would to a target indication on the intercom from your TC, it's quite instinctive, to know whether you need to traverse right or left, and roughly by how much - even if you have the visual aids turned off. But using north as the datum, you have to turn on the on-screen 'HUD' display, if it's not already active; refer to the on-screen compass and determine where north is in relation to the direction your barrel and sight are pointing; then adjust accordingly. This is neither fast nor instinctive. It's possibly needed for the Soviet system, where the gunner's sight is often a rotating periscope (which SF replicates) which was not permanently fixed to the alignment of the gun. The only really workable option is to enable the on-screen target markers. These place a little orange diamond over your target if it's in your field of view; if it's not, you instead see little orange arrowheads at the left or right edge of the screen. It's quite neat and not too conspicuous, but really, it's a poor substitute for just using the barrel as twelve o'clock. Tellingly, Graviteam replaced this system in their next tank sim, SABOW - it still doesn't use the clock code the usual way but it's much more instinctive once you have it figured out. And it's supported by a neater 'turret position indicator' graphic. Despite having the orange target markers disabled - I'm a glutton for punishment, evidently - I managed to pick up a tank target in my gunsight. To my surprise, it was a Valentine, supplied by the British under lend-lease and apaprently not unpopular with the Soviets. He was a crossing target, closing but also moving right to left. Range was short but it didn't help that as well as crossing, he was partly hull-down. It also doesn't help that German AI TCs in SF seem consistently to over-estimate range. So if you set your sight as indicated - and you have to do this in the zoomed out view, as the range scale is mostly hidden, zoomed in, as you can see below - you may find your round zipping over your target. It also didn't help that I had an HE round 'up the spout'. Realistically, SF won't unload this if you order a switch to Armour-Piercing - the new round will be loaded next. When you're being rushed by an enemy tank, this can't happen fast enough. Grenadiers milling about in my line of sight was another issue. Nevertheless, I put several AP rounds into the Valentine, some after it had halted. He might only have a relatively poor 2-Pounder (40mm) gun but his low silhouette and thick, infantry tank armour made him a hard target to kill. And at close range, I was taking no chances. I had no intendion of sharing the firey fate of my comrades, there for all to see. Things got a bit hazy after that. I started to change position but more Valentines appeared. All I had time to do was orient my tank to face them and shoot, shoot and shoot again. Shamefully, any thought of leading my diminished platoon went completely out of my head. Leaving my surviving platoon-mate to his own devices - which in SF, often seems to result in them charging to death or glory, unless you click sundry icons in map view, to rein them in - I fought for my own virtual life. Somehow the Valentines were halted and fell silent. No sooner had the last of them been dealt with, than we faced another counterattack, this time by T-60 light tanks. Any smug sense of superiority was stilled by the discovery that I had used up all my AP rounds. Reluctant to use my small store of tungsten-cored 'special AP' rounds on light armour, I started hitting them with HE, to which the little tanks seemed quite resistant. So I let them have some of my precious tungsten rounds, even thought these were likely to overpenetrate. They did the trick, but only after one of the little devils, coming up on my right while I was otherwise engaged, had thoroughly peppered the side of my panzer with his 20mm cannon. Or maybe they were hits from a Soviet A/T rifle - note they seem to have been aiming for my vision slits, a common tactic for such weapons. By this time, apart from some half-tracks still in action, I was on my own. At some point duing this vicious little firefight, my second platoon mate had gone down. Drat! I consider it a priority to bring my men through the battle, unlike some players who, with some justification, consider their often feckless AI comrades a hopeless case, mere cannon fodder. This time, I'd failed in the objective of preserving their AI skins, regardless of the overall mission's result. Moving on again, I passed a solitary T-34 which had come from somewhere. I think one of the other panzer platoon must have got him. The only targets left now seemed to be scttered Soviet infantrymen. These we duly engaged, mopping up alongside the remaining grenadiers and SPWs. The enemy casualties included one of the emplaced 37mm AA guns which I later discovered had got one of my own panzers. At about this point I got the 'Mission completed' message. Fortunately for me this time, and sensibly, Graviteam's Steel Fury is not one of those sims which unrealistically determines mission success or failure purely according to the player's actions. My platoon and I had played our part to be sure, but at heavy cost and in the end, it was a team effort for the force involved - as it should be. Here are two of the knocked-out Valentines, together with one of the T-60s, which came to grief right next to them. Most if not all of this trio were credited to me. As usual our light armour had suffered pretty heavily, though most of the damaged SPWs looked recoverable, not a total loss. And some had survived unscathed, for which I could claim some of the credit, having decided to lead them into action, at some cost to my own platoon. This had been a slightly frustrating mission, in that I'd lost control and been rather overwhelmed; and in that the climax had come early, with the subsequent success feeling particularly anticlaimactic. However, it had certainly not been routine, with the fast pace of the developing counterattack providing a decent adrenaline rush. And one of the good things about SF missions is that they can play out somewhat differently each time, plus you can adjust the force balance so you may meet more or less numerous or powerful enemies. I'd originally had limited interest in the stock Steel Fury campaigns and was reluctant to go up against possible T-34s and KV-1s in a Panzer III or early Panzer IV. But playing them has taught me to appreciate them, both the missions and the mid-war panzers. For all my quibbles over soft spots in the AI, the non-intuitive target indication system and the lack of simulated radio traffic between vehicles on the same radio net, Steel Fury - modded - is in my books still a top-notch tank simulator and my own current favourite, of the breed. In particular, it is a feast for ears and eyes, bringing to life the familiar pictures of tanks sweeping over the sun-kissed steppes at the height of the Blitzkrieg, sweeping all before them until the dream finally crumbled, at that city on the Volga which bore the name of the feared Soviet leader. But that's another story!
-
Flying World War 1 from the start, with some new campaigns for Il-2's CUP mod! The recent Combined User Patch (CUP) for Il-2 1946 now has four modules: Dawn of Flight for World War 1, Golden Age for the inter-war period, Wings at War for WW2, and the Jet Age for the post-war era. For the first of these, SAS's Monty, of The Full Monty fame - the Il-2 mod, not the movie! - has just released a set of scripted-mission campaigns. And naturally, being long interested in the air war of that period, this was one that I wasted no time in trying out. So far, the first part of an eventual 32 'mission set campaigns' is available, and you can find the details over at the SAS forum, here. Most unusually for a WW1 sim, what this first part gives us is the ability to fly from the very start of the First World War, in August 1914. The first mission set - 'Demarcation' - kicks off in the Vosges, where the demarcation line ran between the French and German empires or that period. Up to now, the earliest WW1 flight sim missions have flown have been from the era of the Fokker Scourge in the summer of 1915. So while I knew not to expect too much in the way of air combat at a time when most aircraft were unarmed and those that were, generally relied on carbines or pistols carried aloft by their crew, I was keen to try out something new, with the option of jumping ahead any time I wanted; in particular, the 1916 Verdun campaign tickled my fancy, with the opportunity it seemed to fly as the famous Jean Navarre, whose Nieuport Bébé, painted red before von Richthofen copied him, was the terror of the Boches and the hero of the Poilus. The 'Demarcation' campaign is the first mission-set in the series and sees the player flying a Nieuport N4 monoplane. This famous French company is of course more famous for their V-strutted fighters starting with the Nieuport 10 and 11. But pre-war, Nieuport was noted for its racing or sports planes including a line of neat monoplanes, from which comes the aircraft I’ll be flying on this campaign. There’s some more info about the type on Wikipedia, here; evidently the type was quite widely used, albeit in small numbers, notably by the Russian Air Service. For this campaign I’m with the French air service, which was probably the biggest and best of the combatant air forces at the start of the war and in the thick of it from start to last. In the early months of WW1, aircraft were purely for visual reconnaissance and were not routinely armed. Rare exceptions included the Farman of Louis Strange, 5 Squadron Royal Flying Corps, who contrived to fit a Lewis Gun, only to be ordered to remove it after the extra weight resulted in the aircraft failing to get high enough to intercept a snooping German warplane. Thereafter, pistols and carbines remained the only (generally ineffectual) option for aircrew who fancied having a crack at their opposite numbers in the air. The first air-to-air ‘kill’ came in October 1914, when Sergeant Joseph Frantz and Corporal Louis Quénault brought down a German Aviatik; Quénault reportedly had to finish the job with a rifle after his Hotckhiss MG packed it in. As I was soon to discover, my single-seater Nieuport is armed from the get-go, with what looks like a Danish Masden mag-fed LMG. The real catch is that it’s mounted to fire upwards to clear the propeller arc, this being before the introduction of deflectors or interrupter gear. Lanoe Hawker had some success in 1915 in a Bristol Scout with a Lewis gun mounted to fire left and ahead so this arrangement isn’t entirely untypical of the sort of lash-ups early aviators made from early in the war, to get a decent crack at the enemy in a single-seater, with no observer to man a flexibly-mounted gun. Here’s the mission brief. It's just as well I've got the MG, because apparently, the enemy fliers have been activer over our territory. While my patrol zone is marked as a recce objective (eye graphic on a yellow triangle) our aims are offensive in nature. It's a defensive patrol, for two of us, though by the sound of it, my companion’s dodgy motor means that I might be alone. We don’t have far to go, in the horizontal sense anyway. But this is the Vosges and elevation will be a different matter, as I will soon find out. Typically for these new missions, you can forget about one of IL-2's most useful navigational map aids - there's no minimap path. This is 1914 after all, just over ten years from Kittyhawk and Orville and Wilbur's first successful flights in a heavier-than-air flying machine. Intrigued to find out how my first venture into virtual 1914 military aviation will work out, I wasted no time launching the mission, having made sure that in the difficulty settings, I had turned off flutter and wind effects (which the WW1 flight models can’t cope with – IIRC they result in planes having regular attacks of ‘the wobbles’). And this is what I saw. Truly, our airfield is a veritable diorama, packed with people, vehicles and other aircraft. While the people aren’t animated, it’s still an impressive spectacle, packed with interest. My number two tried a couple of times to get his engine running but each time it spluttered to a stop; possibly just as well as the bloke in front of him seemed disinclined to get out of his way. My motor showed no such reluctance and after a quick look around I decided to take off straight ahead, without worrying about runways. This worked out just fine, my lightweight aircraft lifting off at a speed which didn’t seem much faster than some of the trucks motoring around the airfield. Sitting roughly at mid-chord above a broad wing, it was obvious I wasn’t going to see much from the cockpit. The Voisins and Farmans parked around the airfield would have made much better reconnaissance machines, and indeed they served on after Nieuport monoplanes had disappeared from the front lines. Flying from the external view, I got a much better view of both my aircraft and its surroundings. And fine surroundings they were. Our airfield turned out to be on a little plateau set into the side of an impressive mountain, which comprised a series of peaks with lower ‘saddles’ in between. I resisted the temptation to play that song from that musical, but the hills, if not alive with the sound of music, certainly looked worth the trip. After a bit of sight-seeing, orienting myself with the help of the map, I realised that my reconnaissance objective had been rather inconveniently sited at the top of the highest peak. As my rate of climb seemed to be rather close to the ‘imperceptible’ end of the scale, this presented me with a bit of a problem. Throttle fully open, I settled into the best climb I could manage on a course parallel to the long side of the ridge or peaks. Compared to the WW2 planes I’m used to flying in Il-2, it felt like I was in a powered glider, and a nose-heavy one at that. Heck, this ‘racing’ plane felt slow, compared to the WW1 planes I’d flown in other sims. Slow...but not too sedate, with a tendency to dive away or begin a roll to either side, if I didn’t concentrate on keeping things level. With little dihedral, a small unbalanced rudder and wing warping for lateral control, this seemed to make sense. Quite an interesting experience in itself, the flight was shaping up to be. Realising that I was not going to gain enough height on one leg, I could not resist the temptation of turning right and crossing the ridgeline over one of the saddles. Even getting high enough to do this, took a certain amount of time and effort and I just scraped across. Having gone over the mountain to see what I could see, like the bear in the song the result was not unexpected – the other side of the mountain. I now flew a long leg away from the objective to gain sufficient height. That done, I turned around - gently, so as not to lose any of my precious height - and made my way back, aiming for the top of the correct peak. Finally I was right over the summit. I should have over-flown my objective to one side or the other, but I was quite keen for my track on the map to intersect the centre of the target marker, lest such precision was needed for mission success or to trigger some necessary mission event. In fact it worked – I got the ‘mission completed’ text so that was it. And I didn’t get shot at, or even see a single enemy aircraft. They were there, though, but I only realised that later, when I noticed an enemy aircraft icon on a screenshot which I had taken with the mini-map view briefly turned on!!! To be honest, I'd sort of forgotten the briefing, having been so taken up with the actual flying side of the challenge. And I had become rather fixated on overflying that big marker, as if I were genuinely on a recce flight. Anyway, the top of that mountain was about as bare as a mountain-top can be. Giving up on earlier ideas about putting in a flypast at the castle I’d seen on a lower peak nearby, I decided that honour had been satisfied; it was time to go home. A nice hot brandy in the Mess would help me recover from the rigours of flying amongst the mountains in my little powered glider. Down we went. The early aviators were in the habit of turning off their motors during a descent but I just cut the throttle to idle and experimented a bit with diving angle and airspeed. The unfamiliar flight model I found quite convincing; I have no idea at all how a real Nieuport 4 handled but this one felt just about perfect, for such an aircraft. It wasn't long before I was turning onto my final approach...although to the wrong airfield I believe, a deceptively-similar one on a similar mountainside plateau. I must have had my mind firmly set on that brandy! For a sortie on which I'd missed my opportunity to have my first air fight, I'd actually found the experience surprisingly absorbing. I think I'll try at least one more campaign mission in the Nieuport 4, before moving on to something more warlike. There's just something about the mission which seemed to capture so well the experience of stooging around in an aircraft that is little more than a docile but ungainly powered glider..albeit one with a sting. ...to be continued!
- 3 replies
-
- 2
-
-
- dawn of flight
- il-2 ww1
- (and 1 more)
-
Yes it's a bit of a mixture. Some nice planes and very some nice presentation including the campaign intros. However, there are also big compromises like routinely-MG-armed aircraft and formation flights (close formation at that) in August 1914. The Gallipoli campaign seems to use a 'Frankenplane' (as a seaplane). German planes with observers in the rear, armed with an MG, should not be present at all. It's probably better suited to representing Fokker Scourge and later, so I was disappointed that the dense city features killed my FPS, albeit I have a dated system (which copes with DBW - and much of what I have tried in CUP - with few or no problems). With CUP the reduced start-up smoke effect helps, and there's era-specific air,ini files which can reportedly help, tho I haven't tried these yet.
-
Charge of the Light Panzer Brigade... My platoon of Panzer IIIs raced our grenadiers in their SPWs, up the hill and out of the depression where we'd formed up. We were all going full tilt and our speed began to pick up, as the slope eased off and we emerged onto an area of more level ground which stretched away ahead of us. Up there somewhere, I knew, lay the enemy, dug in and ready for us...although our assault group, coming in on the right flank of a line of enemy positions which lay along our axis of advance, would hopefully catch them at a disadvantage. Looking ahead from the tank commander's cupola on the move, I could see nothing of the enemy as yet, even though the fairly level ground wasn't bouncing us around too badly. To my right was the grenadier's platoon commander, recognisable from his SdKfz 251/10 variant, with 37mm A/T gun mounted atop the driver's cab. He must have been on the hunt for a medal, because he seemed determined to be first into action. Equally determined that he should not be, I urged my driver on. I was not going to see our grenadiers' thinly-armoured Hanomags getting into serious trouble, if I could possibly help it. We came to a ploughed field and sped across it, our tracked vehicles trailing brown plumes of dirt. Somewhere up ahead, the sounds of firing began. At least one of the other two prongs of our three-pronged attack were obviously seeing some action; likely the tank platoon in the centre, which had the unenviable task of making a more or less frontal assault. Hopefully they would at least succeed in distracting the enemy from the forces which were about to fall upon their flanks...including, not least, our own good selves. Coming to the straggling line of trees at the far side of the ploughed field, I could still not make out the enemy. But reasuringly, I could see the bursts of friendly artillery fire falling on the foeman, a few hundred metres to our direct front. Not long now! And so far, things seemed to going pretty well according to plan. Without serious mishap, at any rate, and that would do, for now. At this point, I switched back to the gunner's position and let my AI tank commander take over that role. Amongst other things, he is quite good at deciding when to duck. If you stay in the 'TC unbuttoned' view too long - which it is tempting to do, for the better view - it's very easy to get zapped. And if your tank commander is dead or badly wounded, it's 'game over', there and then. My AI boss quickly got to work, calling out some infantry targets. But rather than halt to engage them, I closed the range, as they seemed no big threat to armoured vehicles, until we were much closer. In fact we ended up practically on top of the first enemy positions, before I finally halted and started shooting. This worked out tolerably well, for at the same time the SPWs ground to a halt and the grenadiers began to debus, before making a final assault on foot. Classic tank-infantry work, really, and nice to behold. The SF AI displays some rather prominent rough edges at times, but it can often be quite convincing. So far, so good. I did what I could to help, by shooting up sundry surviving Soviet troops, lurking in and around nearby trenches, in ones and twos. Meanwhile, our brave grenadiers fought through the enemy positions, closely supported by their SPWs and making pretty good use of fire and movement to overcome and clear the remaining enemy opposition. Well, this had been a bit of a mad charge, but the Charge of the Light Brigade, it wasn't. Far from running into a re-entrant ringed by enemy gunners, we had crashed into the right shoulder of their position, thoroughly dislocating it. But the rest of the enemy line, up ahead, remained to be rolled up. Our other attacking platoons were certainly piling into the enemy up there somewhere and we needed to maintain our own momentum. This was no time to rest on our proverbial laurels. ...to be continued!
-
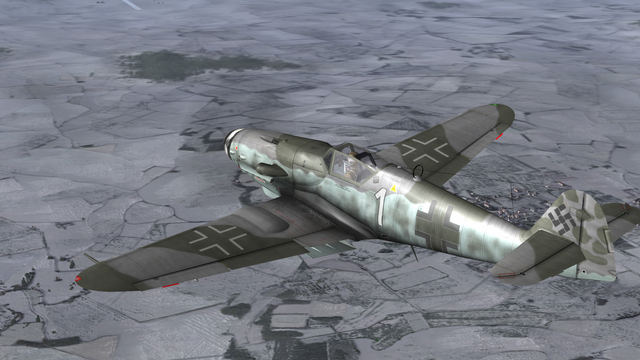
From the album Combat Sims
-
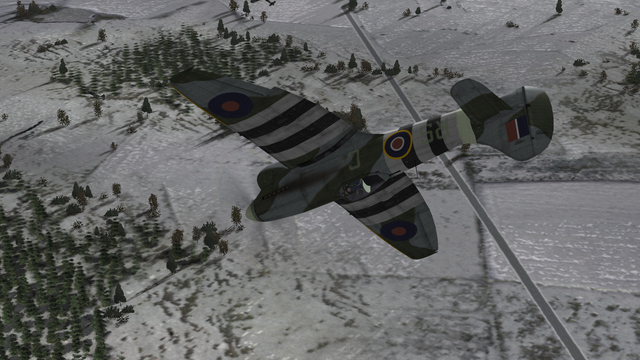
From the album Combat Sims
-
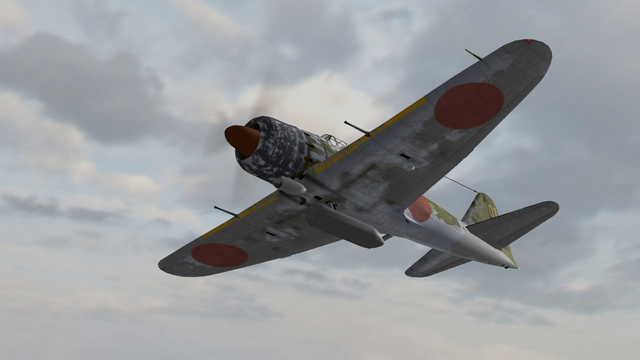
From the album Combat Sims
-
From the album Combat Sims
-
From the album Combat Sims