


33LIMA
-
Content count
3,749 -
Joined
-
Last visited
-
Days Won
7
Everything posted by 33LIMA
-
It does now; has done since Aldo's new .exe. It's quite scary seeing enemy tracers arcing towards you. I believe it also reduced the tendency of your platoon tanks to turn their backs to the enemy. I'm sure in real life if you haven't recced the positions in advance, it also takes a bit of time and effort to find hull down fire positions for a whole platoon, rather than just a single tank. As in the above mission, I get them in close then drive us all in line abreast, at right angles up to a suitable linear feature which I've chosen in advance. Worked fine this time. If it doesn't, I don't find it a massive chore to jump to any exposed tank (click on # behind the mousetank and Ctrl+J works more or less instantaneously for me) and guide him into position. Sure, the AI isn't entirely up to SB standards but it's okay now. Sometimes platoon commanders need to get a grip of the less experienced crews :)
-
Alles kaput? At this point, things started to happen fast. Just ahead, a squad of infantry appeared from a dip in the ground and started moving right. A split second later, a second squad broke cover, just behind the others. I hosed the first group with tracer from the co-ax and let loose an HE round. The troops went to ground immediately. They looked to have distinctive British field equipment, perhaps because I hadn't disabled the British infantry mod before enabling PP2-X. The second squad disappeared again, into another fold in the ground. My tank commander called in a fresh target and traversing slightly left, I quickly picked it up - an escaping half-track, heading for a gap between a two-storey brick house and a smaller building with an ivy-covered wall. At that point, as I was in the act of clobbering the half-track, the infantry clobbered me. At least I think it was them, a bazooka (or PIAT) most likely. All I know is, there was a loud bang, one of my crew gave a grunt, and my tank was dead. As is the way with PE, I was almost immediately transferred to the command of my first platoon-mate, back on the other side of Pirou. It happens a little fast but it's good that PE (in effect) assumes you have survived and taken over one of the other tanks in your platoon, as a platoon leader would do in real life, instead of just ending the mission when your command tank is knocked out. I checked out the map and mission results screen and while I was doing ok, I hadn't done enough to win the mission, which generally involves achieving a specified main mission goal. As this goal was (per the briefing) to hold la Croix de Pirou, and we were still doing so, I wasn't sure what else I had to do. The US attack seemed to have petered out. Perhaps I just needed to sit tight a while longer for the mission script to recognise my success. Perhaps because I had by-passed Pirou on the way in, some mission triggers hadn't fired and something necessary for mission success hadn't happened. After waiting a little longer, I decided I would count this mission as accomplished, whatever the OC (Officer Commanding, ie company commander) might think or say at debrief - and in PE, they can give you a fair old tongue-lashing at the debriefing, if you don't succeed. However, I thought I might as well get my money's worth, as it were, so - my platoon commander persona having evidently escaped from his own tank and taken over one of the other Panzers - I led the others out of our fire position and around the back of Pirou. I'm not a vindictive person, as a rule, but payback is payback. Arriving at the scene of my first tank's demise, I found that the enemy infantry had unwisely advanced from their cover and were now in the open. Perhaps they were mad at us for destroying their half-tracks. More likely, they had regrouped and were following their original orders, to seize Pirou. They didn't make it. I still got a right royal rollocking from the OC for failing the mission. There's just no pleasing some people. I admit, I did lose a tank, and a couple of others got slightly bent. But we had stopped the Amis and chalked up a decent tally of AFV kills. A good day's work, in my book. Apart from a few 'Instant Action' missions, this was my first serious outing with PP2-X and I'm delighted with the mod. It's still a beta, the most (only real?) noticeable sign of which is that many AFVs are still stock, like this M4A1(76)... ...while some which were added by the original PP2 mod are also not up to the latest standards, like this E-100 super-heavy tank... However, the new models are excellent and I gather more of the Shermans (there's already a new Firefly) are next in line for an upgrade, doubtless to the high standards set by the Panzer IVs as featured in this report, not to mention the different Panthers versions and the King Tiger: Even playing with the stock (or early modded) AFV models, the new sounds, environments and ballistics provide a real shot in the arm for this classic sim. Panzer Elite was and remains a top-notch WW2 tanksim with a great set of vehicles and campaigns, first-rate tank and platoon command and control, and other immersive and/or useful features which you just don't seem to get in sims these days. Between the new .exe and the latest mods designed to make good use of it, the old girl is still capable of showing the 'newer models' plenty of tricks. No question, PP2-X is highly recommended!
-
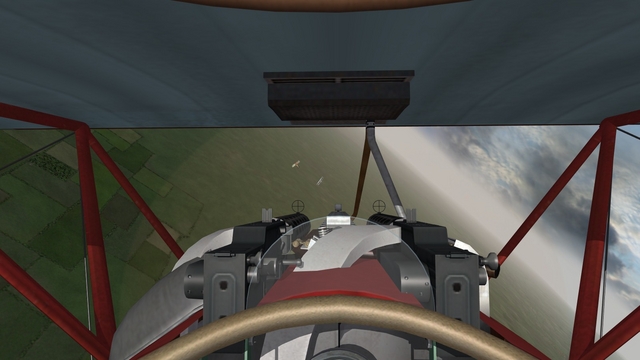
Wo sind noch die Amerikaner? Ok, now what? What are the Amis up to? Where have they gone? The longer it stayed quiet, the more concerned I got. They're up to something...I can feel it in my hydraulic fluid! Probably creeping around a flank, over there on the other side of Pirou... For a while I resisted the temptation. I was in a good position, four Panzers side by side, with decent fields of fire, out over the relatively open ground in front of Pirou. My mission was to hold that town. We had done exactly that. If they came again, we would beat them again. But in the end, impatience got the better of me. I compromised, though. I would do a bit of a recce over to the other flank, in my own tank. But my platoon would stay put, ready to clobber the Amis if they repeated their attack. So I gave the boys the order to sit tight and in the approved fashion, backed out of my own fire position, knowing that to drive forward out of it was to invite disaster. Then, far back enough to be out of sight to any Amis, I turned left and rolled along behind my numbers one and three. Turning right, I then trundled across the southern, friendly side of Pirou, swinging my turret to face the enemy and watching for targets, to my front and to my right. From time to time I stopped in such cover as there was, and had a good scan though gunsight or binos. But there was nothing to be seen, except the occasional knocked-out enemy vehicle and some SPWs* lurking in Pirou. I rolled across a field of cut corn and turned half right towards a small group of buildings on the western outskirts of Pirou. Now, I was taking a big chance, likely beyond the ability of my platoon to support me and approaching some cover, behind which anything might be lurking. I should have turned back. But I thought to myself, well, just a little further, I'll check out what I can see from the other side of these buildings. If the Amis are lurking there and there aren't too many of them, I'll consider calling up the platoon and putting in an attack. If it's all clear I'll conclude my reconnaisance and rejoin the others, knowing the left flank isn't threatened and that we can continue to defend Pirou from our original position on the right flank. Halting for observation amidst some shrubbery at a safe (I hoped!) distance from the buildings, I went to the gunsight and scanned to my front, left to right and back again. With all that cover it was hard to see what was what. Suddenly, there it was...a green, angular thing between two small buildings.., and it was marked with a white star! I could see little of it but from its flat-sided appearance, I judged it to be a US half-track. I had an AP round up the spout so I put that into him, then another, at which point he started to burn. Rolling forward to open up some more lines of sight and scanning again, I suddenly came under attack, bursts of automatic weapons fire. This seemed to be coming from a second half-track, which suddenly came into view half right, as I drove forward, rather frighteningly close. Where there were half tracks, likely there were infantry, and where there were infantry, there were bazookas... I had switched from AP to HE rounds and let the second half track have a couple of these, which had the desired effect. My little reconnaisance was turning out to be quite a profitable venture. But I had the feeling that maybe sitting out here on my own, driving into goodness knows what, in such close country, was perhaps pushing my luck just a bit too far... ...to be continued! * SPW - SchutzenPanzerWager - the Wehrmacht's term for their half-tracked armoured APCs, aka Hanomags or SdKfz 251s.
-
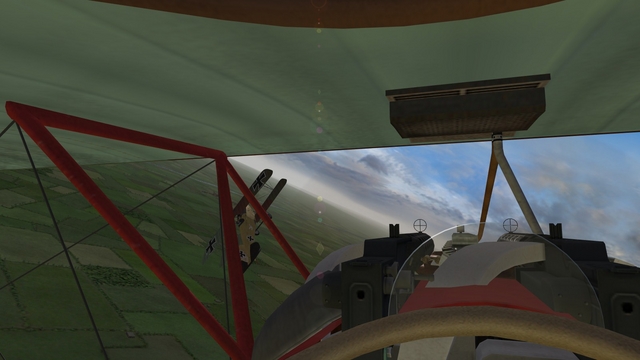
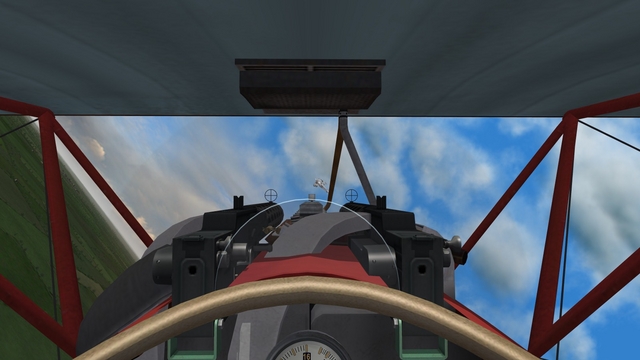
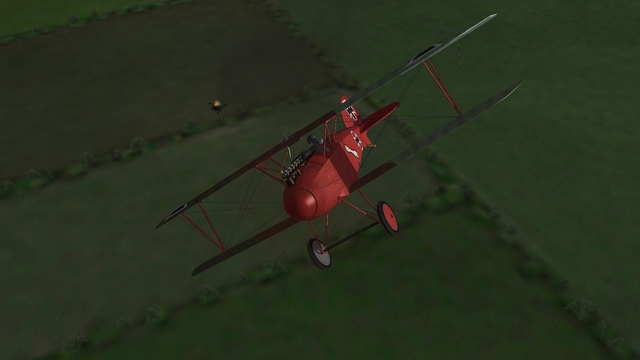
Es braust unser panzer in sturmwind dahinn! * Out onto the right flank I took my Panzer IV, at the head of my platoon column. I had ensured all of us were fully fitted with spaced armour - solid plate hull skirts in the case of the H models, mesh for the single Ausf. J. The new PP2-X Panzer IVs are big improvements on the rather crude originals. A neat touch is the unbuttoned tank commander. I think only the Soviets routinely fought closed down. While the PP2-X TC's aren't animated, they certainly make your tanks look less like robotic machines in an arcade game. Having passed Croix de Pirou on my left and reached an area of slightly higher ground, I swung left and, facing west, ordered the platoon into line formation. I slowly trundled forward until we were just short of the edge of a little plateau which overlooked the approaches to the village and halted amongst the bushes. I judged we should be at least partly hull-down to anyone crossing the lower, open ground to our direct front, which I had selected as a likely kill zone for the expected Ami attacks. I could have further adjusted the positions of individual tanks; you can mouse-click on a spot on the ground and order them to go there but for precise control it's best to take over the other tank and drive it into position yourself. But I was reasonably happy with the positions we had stopped in and rather than risk getting caught out by a sudden appearance of the enemy, I left it at that. After a minute or two's comparative silence, the fun began. My platoon-mates started reporting enemies, more or less straight ahead, at about 5-600 meters if I recall right. I had the text panel at the bottom of the screen turned off and my German isn't great but I've played PE enough to be up-to-speed on the sim's first-class radio and intercom traffic - 'Ziel gesichtet - zwolf uhr - sechs hundert meter!' The text panel would vave identified the vehicle too but I knew from having played this mission before - from both sides - what to expect: a 3-platoon company of US Shermans attacking more or less in line of platoons, with half-tracked infantry later following up from the enemy's left flank, the other side of Pirou from my position. I scanned ahead through the gunsight but saw nothing. Note that PE gives you a pretty good representation of the standard German tank gun sight reticle, which you can adjust for range, the scales providing for different projectives - on the right the standard AP round, Panzergranate 39, and the tungsten-cored APCR/HVAP shot, PzGr40; and on the left, the co-axial MG and the HE round, Sprengranate 34. Note also the 'mouse-tank', which I have downsized and dragged over to bottom right; this gives you an on-screen commnand tool, a visual guide to what your other tanks are doing, and (perhaps must importantly) a compass rose and a turret position indicator. My platoon-mates were making good shooting though, so I let them get on with it. By hanging back amongst the bushes we were deliberately sacrificing wide arcs of fire for better concealment and I was quite content if only some of us had enemy in sight at any one time...and vice versa. Especially the vice versa. My number 2 was damaged by return fire but from the plumes of dark smoke out in the kill zone, we were hitting the enemy pretty hard. At this point I spotted an angular green shape moving across my front from right to left, close by and mostly out of sight in the dead ground just the other side of the dip in the ground to my direct front. I managed to put a round into him and he stopped and smoked but didn't burn. From the commander's position, through my binos, I could see that he was in fact a US M8 armoured car. His scouting days were over! Beyond him, on the edge of a cornfield, was one of my comrades' victims, a Sherman tank with a column of dark smoke climbing up from its turret-less hull. Things seemed to go quiet. I scanned left and right, then hard left, in case we were now being by-passed. But there were no more enemies to be seen. Next to me, one of my Panzers lurked, watchful for any further sign of the Amis. The tension of the last few minutes began to ease, to be replaced by a sense of mounting elation. Our Panzers seemed to have stopped the enemy attack in its tracks - literally! ...to be continued! * from the famous 'Panzerleid' - 'Our tank thunders in the wind of the storm'
-
The 'calibre' can mean 'length in calibres' eg the German 7.5cm Pak 40 was IIRC 'L/46' meaning barrel length was 46 times 7.5 cm while the tank mounted KwK derivatives were first L/43 later L/48.
-
C'est 'EEE-pruh', n'est-ce pas?
-
'Heavy-handed Hans flies Halberstadts' * The fight didn’t begin immediately. I lost a bit of height in my turn and the Halbertstadts, though turning too, kept their height advantage, rather than dropping down after me. I kept turning into them to deter an attack from the rear. After a while, one of them disappeared somewhere, how or where I have no idea. I kept turning and watching, toggling padlock on and off, deliberately trying to drag the other Halberstadt down with me, down over my own side of the Lines. And down he came! He dropped right down to my level in an attempt at a firing pass; and a proper dogfight developed. He was nimbler but I happily accepted losing altitude in my turns and my big BE12 refused to stall out, giving me several shots at the Hun. That big airscoop on my nose, the lack of a proper centre-line gunsight and my single Vickers's low rate of fire inhibited my shooting but I still got some hits. The Halbertstadt's movements became more sluggish and he started layng a fine trail of white smoke or vapour. Switching to the side-mounted gunsight view for better accuracy at the expense of field of view - and keeping bursts short to avoid a stoppage - I managed to stay behind him longer and get closer each time I fired. Fortunately the second Hun never showed up again because I was by now fairly well target fixated, knowing I should look behind but totally determined to get my man, despite the friendly AA fire that was now bursting around the both of us. At one point my target climbed up away from me and extended the range further when I pulled up too hard and lost airspeed - and ground. But a slower climb put me back on his tail as he fled east and once again I had him. A few more bursts and he lost much of his forward airspeed and began a steady but wings-level descent. I broke away and watched from above, finally clearing my own tail. I expected the Hun to force land. But about a hundred feet up, he suddenly nosed down into an ever-steepening spiral and hit the ground near a hedgerow. Got him! I wasn't in the mood for a long flight back to my own airfield so after checking the map, I decided to land on a nearby base which lay just to my west, south of a nearby river. I turned away from the smoking remains of my foe and within a few minutes I was slipping down to land. I taxied up to the sheds and switched off, hopeful of a hot drink in my host's officers' mess and that they would have seen and could thus confirm my recent splendid triumph. Mission over, I filled in a victory claim form and gave a pretty good description of the fight, lacking only the time. When I submitted the claim, a message warned me my named witness wasn't flying at the time, which was strange, as he was definitely up there with A Flight - who admittedly weren't around anyway. The full debrief shows no sign of A Flight having been in action, so perhaps that 'fighting 19 Squadron' label indicated the Huns were actually hunting (rather than fighing) me. Evidently, through the wondrous powers of AI vision, they had spotted me from way beyond the distance that their aircraft (as opposed to labels) became visible to me, for they appeard to have been making a bee-line for me the whole time. I haven't a clue what happened to the second Hun. Perhaps our AA fire had damaged him or scared him away, for it was firing all around us, friend and foe, for much of my dogfight. If so, I forgive the gunners for not alerting me to the presence of the enemy aircraft, earlier. The debrief wrongly records me as landing on my home airfield but hopefully, the Powers That Be will at least get the victory confirmation right! * from the RFC song: Heavy-handed Hans flies Halberstadts In handy Halberstadters for a flight our Hans does start. His C.O. says 'Oh dash it! For I fear that he will crash it!' See how heavy-handed Hans Ham-handles handy Halberstadts!
-
It's a long way to Tipperary the objective Gaining height with my single-aircraft B Flight, I looked around for A Flight. I quickly spotted them forming up and scudding around just above the deck. AI-led flights in WOFF, having taken off, spend rather a long time flying around rather aimlessly at low level like this, before something finally triggers them to climb up and head off on the mission itself. Avoiding this rather tedious routine is one reason I prefer always to lead a flight. In this unusual case, I was in a flight on my own, to which the others were to provide top cover. So I spent a while following them around while slowly climbing to my own assigned 5,000 feet. In the end, I got fed up waiting for them to come out of their 'take off, form up and potter around' routine and headed off down to the south-east, towards the Lines near the town of Albert, whose chuch tower's tottering Virgin Mary's fall was supposed to herald the end of the war. I had selected 'historical weather' and wasn't surprised to find it rather murky, with lots of low cloud and generally poor visibility in most directions at any one time. Despite this, as is my wont I kept the Tactical Display set to short range (to avoid the AWACS radar effect). It can be hard to spot other planes in WOFF at the best of times with visual aids off or minimised and today seemed unlikely to be an exception. While following A Flight around, I had tried to pick up and set a recognisable vector to a genuine mission waypoint on the Tactical Display. But I cycled too far ahead and couldn't get back so having spashed out on my own, I relied instead upon the in-flight map, to navigate. With no 'warp' facility, I went onto 2x time acceleration to cover the long leg to my objective area - I can fly this without autopilot and besides, any faster, it's a stutter-fest. I popped back into real time every so often, to double-check my surroundings, but I saw no flak and no other aircraft, A Flight included. Nearing the limit of my patrol, things were still quiet and I began to fear that this was going to be one of the rather high percentage of my WOFF missions that encounters no enemies. In some frustration, I turned on labels. At least I might discover if A Flight was looking likely to join the party. Instead, the labels which now appeared were for a Halberstadt scout, from Jasta 4. He was about 5 miles away, at ten o'clock and slightly high. I mentally kicked myself for not switching first to 'dot mode' labels and avoiding this unrealistic revelation. The Hun was the other side of some clouds and with labels off, quite invisible. No friendly flak bursts in sight over there either, despite being well on our side of the Lines…where incidentally, Hun scouts should not often be. Maybe he was lost in the bad weather! I continued on my course for a while, turning the labels on and off. The range seemed to be winding down, but slowly. Had the enemy detected me via some from of superior AI vision? Hard to say, but likely, if as seemed possible, he was now heading unerringly my way, despite the intervening clouds. I decided I would do what I would have done, had I not seen the enemy aircraft - continue to the limit of my patrol, then if A Flight didn't show, break off and fly north, just my side of the lines, looking for trade. Another flick of the labels revealed that the Hun, steadily drawing closer, was 'fighting 19 Squadron' (or words to that effect). That was the limit of my patience! I was not going to fly another boring 'milk run' while the others had all the fun! So I turned towards the enemy and impatiently closed with him, flicking labels on and off again. Then, there they were - two Halberstadts, not one, to my direct front, slightly higher and on a reciprocal course. No sign of 19 Squadron...except for me... They flashed past above me and then turned, even as I turned into them. ...to be continued!
-
Into battle in one of WW1's least successful fighters! Perhaps only the much-maligned Royal Aircraft Factory could have imagined that they could make a fighter out of the BE2, a low-powered and badly-armed reconnaisance machine renowned for its inherent stability...and as 'Fokker Fodder', vulnerable to the little Eindekkers, let alone later German fighters. In fact the Factory seems to have had no such illusions. The BE12 was designed originally for single seat longer-range reconnaisnce and light bombing. BE2s often left the observer behind when carrying bombs - and the pilot operated the camera on a recce - so a single-seater BE with a more powerful engine and more fuel doubtless seemed like the proverbial good idea at the time (mid-1915). The resultant BE12 had a more powerful engine but wasn't even intended to be armed, at first. By the time it was ready for service, though, the situation at the front had changed and - a forward-firing Vickers gun having been fitted in place of early efforts at synchronised and unsynchronised Lewis guns - the BE12 was pressed into service as a fighter, serving in the Royal Flying Corps with No.s 19 and 21 Squadrons on the Western Front from the summer of 1916. Within a few months their unsuitability as a fighter seems to have become obvious and they were back at their designed job as a (rather vulnerable) light bomber. Later, they moved onto rather less hazardous duties on Home Defence. So, why would I want to chance my virtual life in such a machine? Well, what better reason than the fact that a BE12 is one of a series of new planes released for First Eagles and FE2, by prolific modder Stephen1918 http://combatace.com/files/file/15121-raf-be12/? Not only that, but the later BE12a version is also available: http://combatace.com/files/file/15124-raf-be12a/ ; note the different wings with shorter span below, as also fitted to the BE2e: And having checked out the BE12 in First Eagles, I was minded to savour the same experience in Wings Over Flanders Fields, which has featured the BE12 from release. So that I could fly the BE12 in an FE2 campaign, after installing the aircraft, I hand-edited Ojcar's Armchair Aces Flanders month-by-month campaigns for the summer and autumn of 1916, substituting Stephen's BE12 for the previous mount of 19 Squadron, up to the time it moved onto SPAD VIIs. This is a simple Wordpad job, changing a single entry in two files for each campaign (FlandersFrontxx.ini and FlandersFrontxx_data.ini, starting at xx=12 and ending at xx=16). That done, I created a new pilot and off we went! My chosen campaign based us as Cappy, starting on 1 September 1916. Our first mission was to escort some 2 Squadron BE2s to Marcoing, just over the Lines near the big town of Cambrai. Our assigned altitude was a mere 1700 feet. I chose two pilots from the bottom of the squadron roster to accompany me. Before launching the mission itself, I had a good look at the map, which is a zoomed-out but exact replica of what you can see in the 3d world. But I forgot to apply my usual practice of moving the last waypoint further back from our objective area. This is a good idea because it gives you a longer run-in and thus more time to suss out the situation, ahead. The other thing I forgot to do had more serious consequences, later. Some modder-made FE planes have a very restricted horizontal field of vision for the virtual pilot from the cockpit, often giving you no view much aft of directlty sideways. Invariably, I hand-edit the relevant data file to increase this wherever I find it, so I can look over my shoulder and past my tailplane. A restricted rearward arc isn't too bad in most 2-seaters, where your observer, sitting right behind you, blocks your view in that direction. But in a fighter, it's potentially catastrophic. The padlock is also blocked, beyond this same arc. Unfortunately for me, the BE12 has one of these restricted arcs of rearward vision. But such things were far from my mind as I left Cappy behind, pleased with the superior pulling power of my 150hp motor - superior, that is, to the bog-standard BE2 - and levelled off with the throttle back while my two flight-mates caught up. So far, so good... ...to be continued!
-
My luck really runs out! Down we went at the Huns. Having drawn somewhat ahead of my other two BE12s but relying on them to follow suit, I padlocked the nearest Fokker and took a deflection shot at long-ish range. I had little expectation of doing any real damage but I was determined to distract him from the BE2 he was pursuing, even if that meant sacrificing the element of surprise. This part of my plan worked quite well, for the Fokker broke off his attack. After that, not so good. As I whizzed past, carried on by the momentum from my power dive, my padlock hit the BE12's rearward view limit - not much past 45 degrees - and my situational awareness promptly went down the toilet. I pulled up from my dive and tried to convert speed for height, but my big, two-bay BE12, all struts and bracing wires, seemed to lose energy rather faster than I was used to. In no time at all, I was struggling badly, back in the virtual cockpit but blind behind, unable to padlock, unable even to see in that direction. Which, of course, is where the Huns were. I had a short crack at one of the Fokkers who carelessly crossed my path but within seconds, another one had popped me off from behind. Pilot kill! Mission over. For me anyway, but not for the others. No need to pause the action, my now-pilotless BE12 was doomed regardless. Again I tabbed through the nearby aircraft, now a mere spectator to the continuing action. I followed one of the two surviving BE12's for a while, as he fought with another Fokker. Round and round they both went, with the Fokker slowly gaining ground. However, the BE cleverly put in a low yo-yo, pulling up just above the ground and causing the Fokker to break away. The BE now managed to get behind the Hun and get in some bursts before the faster German machine got away. Seconds later, there was a bang and the BE12 was falling in flaming pieces from the skies, seemingly a victim of a mid-air collision which appeared to have left the Fokker still flying. I didn't see the fate of the third BE12. The results screen afterwards told me that of the three of us, two were KIA and one wounded, so maybe he glided home. The action wasn't over, though. The Fokkers had resumed their attacks on the BE2 bombers. For a while, it looked like my flight's sacrifice was going to be in vain. But the day was saved by one of the silver Nieuports, who swung in towards the Huns. As the Frenchman bored in, one of the Fokkers broke off from chasing the BEs and turned into the Nieuport for a head-on pass. The Frenchman didn't turn after the Hun but kept on, drawing off another Fokker. This time the two fought and the Fokker was the loser, going down with a dead motor, at first under control, then rolling into a vertical nose-dive, pulling out at the last moment to make a dead-stick landing in a field. At least I had the satisfaction of seeing my charges make it back, in part thanks to our own flight's costly intervention, but mostly thanks to the plucky Frenchman in that silver V-strutter. But for my own virtual pilot, the campaign was over. No kills and just one MG round hit, for three BE12s lost along with two of their pilots. Next time I venture into the skies in one of these machines in First Eagles, I will at least make sure I have restored my rearward vision, beforehand! As usual, the combination of First Eagles (FE2 in this case), Ojcar's Armchair Aces campaign and planes & other mods by Stephen1918 and his fellow modders delivered an intense, immersive and convincing WW1 air combat experience. Next up, I'll be flying a similar campaign mission in WOFF's BE12, to see if we can do any better, second time around!
-
My luck runs out! Our base at Cappy fell slowly astern as I led our three BE12s northeast, towards our rendezvous with the BE2s of 2 Squadron. Referring to the inflight map, I oriented my track against the prominent landmark afforded by a small and then a large U-bend in the river north of our airfield. You may have noticed that I'm flying in my virtual shirt-sleeves. This is because of an install issue I need to correct with Geezer's excellent Martinsyde 'Elephant', whose desert pilot as a result has taken to flying all my British aircraft. Meanwhile, back at the mission...I hadn't been told what our charges would be doing at the objective, Marcoing, but from the low altitude we were assigned, I guessed they must be tasked to bomb an important target. And so it proved! One of the neat features of First Eagles, inherited from the base Strike Fighers sim, is the 'next encounter' key (Alt+N). It's a real time-saver and I use it often, especially, as in this case, where I have quite a long leg to fly, over friendly territory. As usually happens, when I hit the magic key combo on this mission, I was 'warped' to the last RV (Waypoint in modern terminology) before the objective. I'd neglected to drag this back in mission planning - and now I think of it, many waypoints are locked, when you fly an escort mission in FE. I 'came out of warp' and saw the area of the objective right away, maybe a mile off, straight ahead. Below and to my right, on the same heading as my own flight, were two BE2s, their clear doped linen finish standing out against the scenery below. Clearly, these must be the machines from 2 Squadron who were entrusted to my care. The bridge up ahead of us - or the supplies commonly stacked near these bridges, in FE - I judged to be the mission target. We were maybe one minute out, by my estimation. Archie burst around us. Looking ahead, I could see the gunflashes of at least one of the AA guns doing the shooting, as well as some yellow tracers zipping up from the same general area, near that prominent river bridge. It's another neat feature of FE that you can often spot the AA guns firing at you; they are actual weapons placed in the 3d world and they are destructible, if you care to get low enough and take a crack at them. Nervously scanning the skies again, I quickly realised that our little armada was not the only force in the air on this stretch of the front. Slightly ahead and above, also headed towards the bridge, was a pair of large 'pusher' biplanes, a type little used by the Huns and thus almost certainly friendly. Deeper into Hunland, I could see what looked like a small swarm of midges or similar insects, whirling around - an air fight in progress, for sure. Further away, a series of dark smudges in the sky marked German AA fire directed at what must be other friendly aircraft. There wasn't much I could do but press on after my charges. So that is what I did. I would have liked to have gained a bit more height but I quickly gave up the attempt, once I saw how much I fell behind the two BE2s, who were by now nearing the bridge. Instead I pushed my nose down and led my flight ahead of them, thinking that I might at least be able to draw off the Archie. As we arrived over the bridge, the latter erupted into a clound of smoke and debris. But this wasn't the work of 2 Squadron; too soon for that. At this point I decided to pause the action and invoke another of FE's excellent features - its view system, which enables you to 'tab' around the other aircraft in the sky. I don't like to do this in the middle of a mission, preferring not to have a magic eye in the sky and to remain with a more realistically limited view of what’s going on around me. But this being flown for a mission report - and because it wasn't going to change my tactics anyway - I gave it a go. And this is what I saw. The bridge had been bombed by the two big 'pushers' I saw earlier. They were French Maurice Farman MF11s, known as 'Shorthorns' or 'Rumpeties'; rather out-of-place on operations in September 1916. In fact I thought I had hand-edited Ojcar's campaigns to replace these with Voisins; maybe I lost this loading a campaign update, tho the newer Caudron G.IV might be a better substitute now. But I digress. Obsolete they may be but the Farmans had done a good job on the bridge. Not too far away were some Huns in Halberstadts, probably the best German fighters, until the imminent arrival of the new Albatros D-types. Fortunately for us, they were being engaged by some very helpful people in FE2s. The dogfight I had seen was between some silver French Nieuport 17s and a bunch of Huns in the rather un-loved Fokker D-types which had replaced the Eindekkers, pending the availability of better types. The bad news here was that some of the Fokkers had apparently broken through and were making straight for us! These weren't the only aircraft in the area. Two other BE2c's, bombing targets amongst the trenches, were under attack by yet another Fokker while over the lines, two Aviatiks were receiving similar attention from a Nieuport. Un-pausing the action, I swung around to orbit the objective while the BE2s below ran in. It wasn't long before they had added their own bombs to those of the Farmans, producing a most satisfactory series of explosions on the far bank of the river adjacent to the bridge, hopefully obliterating anything Hun-like waiting to make the crossing towards the front. I levelled out of my turn facing roughly west, towards home, and looked down for the BE2s, whom I expected would now do the same. And sure enough, there they were, heading west, now somewhat further below. But they were not alone. One of the BEs was straggling slightly behind the other, and there were two Fokkers on his tail, seemingly vying to see who would get the first kill. Crikey! How did they get here so quickly and without my spotting them? Paying too much attention to the pyrotechnics, I was. But no time for self-recrimination now! I stuffed down my nose and went for the Huns, leaving my throttle wide open and doing my very best Bat out of Hell impression. As I dived down - without at the time noticing that the Archie had holed my wings - I signalled my two flight-mates to get stuck in also. Time we got busy! …to be continued!
-
As I've said before, what FE needs most now, along with a Famman F-40, is a 1918 German 2-seater like the LVG C VI or Halberstadt C V, or perhaps a Rumpler C IV like the excellent WOFF version. The Junkers J I is interesting and would be welcome and a useful AI foe even if not popular player-flown but its slot could be filled by an AEG J I which, with an angular, armoured nose, would be an easy adaption of the C IV. The AEG is a great new addition; with its arrival, we will have plenty of 1915-17 German 2-seaters. A general purpose model that's really suitable for the last year or so of the war is arguably the last biggish gap in the FE planeset, along with the very common F-40 from the mid-war period. Next most important would be some of the many other French 2- or multi-seat aircraft like the Dorand AR 1 and the Caurdon R XI, and an AW FK-8.
-

First Eagles 2, Armchair Aces campaign, Jasta 11, March 1917 - enemy observation balloon destroyed!
33LIMA posted a gallery image in Member's Albums
From the album First Eagles & Voisin LA
-
First Eagles 2, Armchair Aces campaign, Jasta 11, March 1917 - setting course for the lines
33LIMA posted a gallery image in Member's Albums

From the album First Eagles & Voisin LA
-
From the album First Eagles & Voisin LA
-
From the album First Eagles & Voisin LA
-
From the album First Eagles & Voisin LA
-
From the album First Eagles & Voisin LA
-
From the album First Eagles & Voisin LA
-
First Eagles 2, Armchair Aces campaign, Jasta 11, March 1917 - finally I get behind a well-flown RFC Nieuport
33LIMA posted a gallery image in Member's Albums
From the album First Eagles & Voisin LA
-
First Eagles 2, Armchair Aces campaign, Jasta 11, March 1917 - the RFC Nieuport is downed after a stiff low level fight
33LIMA posted a gallery image in Member's Albums
From the album First Eagles & Voisin LA
-
First Eagles 2, Armchair Aces campaign, Jasta 11, March 1917 - back at Brayelles
33LIMA posted a gallery image in Member's Albums

From the album First Eagles & Voisin LA
-
Lovely job! 1916 in FE is about to get more interesting. RNAS markings would be appropriate, too.
-
Weird, never saw that in any Third Wire sim. Graphics card overheating maybe? Does your card play other demanding apps (reasonably modern games) ok? Are drivers up-to-date? Maybe re-install DirectX in case that's the problem If all else fails maybe download FE2 over again, uninstall and re-install the new d/l. Does look more like a graphics card issue tho, rather than a problem with the sim.
-
Problem installing separate install of FE2
33LIMA replied to deanklef's topic in Thirdwire - First Eagles 1&2
Strange...when you ran the copied & renamed .exe, it did create the additional mods folder, right? IOW if your copy was North Sea.exe, when you look in [your user name]/Saved Games/ThirdWire, in addition to a subfolder there called FirstEagles2, you now also have one called North Sea? Did you next install the North Sea campaign and all the necessary extras (aircraft etc) as described in the readme? Installing into that 'mods' folder in Saved Games, and not in the main install folder in Program Files or whatever? Creating manually the additional subfolders, beyond the basic set created at the start? Until you install the mod/campaign, into the 'mods' folder and not the main game's location, your copy of FE2 is exactly that, a copy of FE2 and no more, which will look and run just the same. That's all I can think of, apart from - open the file options.ini with Wordpad, the one in your north sea install mods folder, and check that mods are enabled - check the last couple of entries look like this, which is from my north sea install, which uses the exe name FE2 North Sea.exe: [Mods] ModsEnabled=TRUE Directory=C:\Users\Ivor\Saved Games\ThirdWire\FE2 North Sea Editors=FirstEagles2 [screenShots] Directory=C:\Users\Ivor\Saved Games\ThirdWire\FE2 North Sea\ScreenShots Format=JPG
