


33LIMA
-
Content count
3,749 -
Joined
-
Last visited
-
Days Won
7
Everything posted by 33LIMA
-
From the album WOFF
-
From the album WOFF
-

From the album WOFF
-
From the album WOFF
-
From the album WOFF
-
From the album WOFF
-
From the album WOFF
-
From the album WOFF
-
From the album WOFF
-
From the album WOFF
-
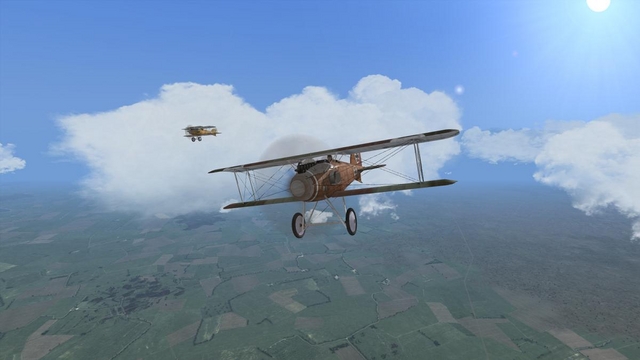
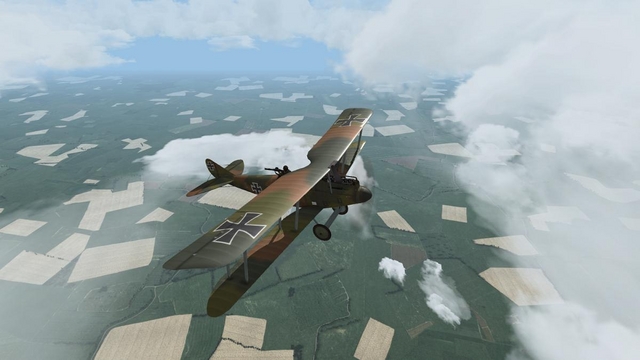
Recreating the career of Canada's most famous ace in Wings Over Flanders Fields! The man and the book 'I dived at him from the side, firing as I came...I pulled my machine out of its dive just in time to pass about 5 feet over the enemy. I could see the observer evidently had been hit and had stopped firing. Otherwise the Hun machine seemed perfectly all right. But just after I passed I looked back over my shoulder and saw it burst into flames. A second later it fell a burning mass, leaving a long trail of smoke behind as it disappeared through the clouds. I thought for a moment of the fate of the wounded observer and the hooded pilot into whose faces I had just been looking - but it was fair hunting, and I flew away with great contentment in my heart.' So wrote William Avery Bishop in his book 'Winged Warfare', written while on duty with the British military mission to Washingron DC after home leave in Canada in late 1917. He was describing the first machine he shot down in flames, on 20 April 1917. Billy Bishop arrived in France in 1915 as an officer in a Canadian mounted unit but, frustrated with '...the particular brand of mud that infests a cavalry camp', he applied for the Royal Flying Corps and was trained as an observer. He spent four months 'on ops' in France in that role, from early 1916 with No. 21 Squadron, operating the RE7, a multi-purpose biplane whose speciality seems to have been daylight bombing. Recovering from a knee injury in a crash-landing, he was able to learn to fly and after a short period flying the BE2c on Home Defence duties, he returned to France in March 1917, posted to No. 60 Squadron flying Nieuport Scouts in the fighter role. The squadron converted to the much-superior SE5 over the summer and Bishop flew on until the autumn, mixing conventional patrols with 'lone wolf' missions and steadily increasing his score. After his leave and service in the USA, he returned briefly to the front as CO of No.85 Squadron and before being posted home again, raised his total of victory claims to 72, including five on his last patrol, another solo effort. Nowadays, Bishop's record is a source of controversy, due mainly to the to high number of claims that were accepted without witness confirmation. In particular, in June 1917, still flying the Nieuport, Bishop staged a solo dawn raid on a German fighter airfield, claiming to have shot down three aircraft attempting to take off. Controversially, he was awarded the Victoria Cross for this attack, despite the fact that the VC was generally never awarded unless the act of valour was confirmed by witnesses. The belief in many quarters - including some of his comrades and contemporaries - seems to be that Bishop's squadron commander actively promoted his protégé who also had some influential friends in English high society; and as his fame mounted, his value as a national hero fed a tendency to unquestioning acceptance on the one hand and exaggeration on the other. However, whatever the truth, Bishop was undoubtedly a very brave man, having more than once pushed to get to the front when he could have lived out a safer existence on other, less dangerous duties. As for 'Winged Warfare' , it covers the whole of his combat career and is full of many accounts of the operations and air fights in which Bishop and his comrades participated. It's very much a product of its wartime origins, often extolling the courage and virtues of his own side while disdaining the enemy for trickery or implied cowardice. His openly-expressed preference for shooting down enemies in flames - because the sight made the victory certain - is also rather distasteful, particularly to modern readers. However, he does credit the Germans with ability and courage when he recognises it - for example, when a single enemy two-seater skillfully repells an attack by an entire flight of Nieuports. And as a forceful and vivid account of the career of one of the most famous of World War One's aces, 'Winged Warfare' deserves a place on any enthusiasts bookshelf. I would strongly recommend reading it in conjunction with Alex Revell's history 'No. 60 Sqn RFC/RAF', published by Osprey, which adds much valuable and interesting detail, in covering the fascinating story of one of the most successful British fighter squadrons, including the period when Bishop served with the unit. Bishop's memoir itself is available online here. The air war in spring 1917 Bishop arrived at the front just before the Battle of Arras and 'Bloody April', when the damage wrought upon the RFC by the German Jastas and their sleek Albatros scouts reached its peak. The arrival of better aircraft in subsequent months - not least the SE5 that replaced 60's Nieuports, but also the Camel and the RE8 - meant that better times lay ahead for the British. The leader of the RFC in France, General Hugh 'Boom' Trenchard, knew perfectly well that the inability of the British to supply aircraft which would close the gap with the German Albatrosses meant that a high price would be paid, but his job was to support the Army whose lot was no better, and he did not shrink from asking his aircrew to risk all in support of the troops for the offensive at Arras. For the Germans, this was the hey-day of pilots like the von Richthofen brothers, Wolf, Voss and Schaefer, who racked up many kills, cutting a swathe through the under-powered and poorly-armed BE's and the obsolete 'pusher' fighters like the DH2 and FE8. In the Nieuport Scout, 60 Squadron were flying one of the few planes that, though under-armed, could even hope to compete with the best of the German fighters. Even so, the squadron suffered heavily during 'Bloody April', according to Alex Revell losing eighteen pilots during the month- a loss rate of 100%! The mission For this 'Winged Warfare' themed mission, I could have chosen the summer of 1917 or spring 1918, flying the SE5/SE5a. But I've always particularly enjoyed flying the Nieuport scouts in First Eagles, coping well with the Huns (except when outnumbered!) and I was keen to fly the sleek little French machine in WOFF; not least as most of the book features Bishop's experiences flying this type. So 'Bloody April' it was! Naturally, 60 Squadron is included in the WOFF order of battle for this period. Here's the squadron's 'enlistment screen' for April 1917, which shows us correctly based at Filescamp farm. Note that the squadron roster includes historical aces from the time, although at 1 April, Billy Bishop had yet to score, and neither he, nor 'Grid' Caldwell nor 'Moley' Molesworth had yet made Major (the rank generally held by the squadron leader, alone). Although I neglected to save a screenie of the mission briefing, it was a patrol up to the Lines, to the north-east. I'm leading one flight - just the two of us! - but the rest of the squadron is along for the ride, flying 'top cover'. I wondered if me and 'Jock' Scott are providing the bait on this mission! Here's the loadout screen for my little two-plane flight; this provides the facility to select flight formation, though that's hardly worthwhile on this trip, as there's just the two of us! And here we are, lined up on the grass at Filescamp. If I recall right, the aircraft next to me is the machine of 'Moley' Molesworth, no less, who's leading the second flight. I let most of the others take off first, intending to formate on the other flight rather than go hareing off on my own with my own solitary flight-mate. Once airborne, I throttled back to allow Scott to catch up. Soon he was tucked in, to my right rear. The weather was fair, with quite a lot of low cloud but bright and dry. A good day for an air fight! I orbited above and behind the other flight, then followed them as they climbed up along our route to the north-east and the Lines near the town of Lens. About half-way there, they veered off to the left. As far as I was concerned, this wasn't in the plan. If they had been distracted by some enemies, I didn't see them and there was no sign of friendly AA fire. Perhaps they had decided to orbit to gain height, before getting any closer to the Lines. Impatient with trying to guess the un-guessable, I decided, sod it, I'll carry on and trust them to find their way to the patrol zone later. So on we went, up towards 9,000 feet, leaving most of the scattered cloud below us. Soon, we were over the shelled area, which was getting a fairly regular pasting from artillery fire, although the start of our offensive was still several days away. It wasn't long before the anti-aircraft gunners were also in action; the first black bursts of Archie appeared around us, exploding with a 'crump' that I could hear above the buzzing of my le Rhone rotary engine. On the ground ahead of us lay a large town, which I took to be Lens. Much of the place was a wasteland, devastated by shellfire, with only its eastern margins looking to be relatively intact. At this point, happening to look around, back towards my flight-mate, I saw a rather strange thing. One moment Scott was in formation to my right rear, then he swung suddenly off to the left. For a second I watched him, thinking perhaps that he had decided to go off hunting on his own, and looking in his direction of travel, to see where the Hun might be. Seeing none, the penny dropped and I broke hard right, after Scott. The Hun was obviously behind us. One look confirmed I was right. ...to be continued!
-
From bad to worse! I nosed down and tightened my turn, but it didn't save me. I should have got some practice in the WOFF Nieuport 17 before taking to the campaign skies; not having done so, I was rather caught out by my plane's tendency to roll out of a tight left-hand turn, whether down to adverse yaw of the gyroscopic effect of my rotary engine. A burst of fire whacked into my machine, then another one. Blood spattered my goggles as I looked back at the red nosed Hun. I didn't fancy my chances against the more powerful Albatros in a climbing fight so in an effort to turn inside him I put my nose down and tried a yo-yo-type manoeuvre. This of course cost me altitude but at least it got me out of the beggar's line of fire. A turning fight developed in which I was gradually able to get the upper hand, despite feeling that something, somewhere wasn't quite right with my machine's handling, having taken those rounds in his first attack. Finally, profiting from my my Nieuport's ability to turn better to the right, I got in a couple of good bursts at long-ish range. I may or may not have got any hits but the Albatros decided enough was enough and ran for it at full throttle, heading back into Hun-land. I chased him for a bit but he gradually drew away from me and so I gave up. There was no sign of Scott - apparently he was engaged with some other Albatrosses I didn't see - but looking around, I did see something on which I might usefully take out my frustration. There, slightly right and just below, was a German observation balloon. You'll do, I said to myself. Archie started up again as I approached the gasbag so I swerved first left then right, climbing as I drew level with the balloon, preparatory to winging over and diving on him. I knew fine well that injured and in a damaged machine, this was not really a very good idea. But I was still annoyed at having let myself be surprised by the Hun in the Albatros and was out for whatever revenge I could exact in exchange. So I rolled left, chopped the throttle and went for him, with Archie still bursting around me. I saw my rounds raise dust on the balloon's flanks, and held down the trigger. At this low level, I was not going to risk a second pass, so I was determined to keep firing to the last moment, if necessary. Necessary, it was. At the last moment, with the gasbag filling my forward vision, I pulled back on the stick. Actually, it was after the last moment. My plane lurched and there was a flash of orange fire. Then it all went quiet. My machine nosed down, near to the vertical. I pulled back on the stick, to no avail. Whether I had collided with the balloon or was caught by its explosion, I will never know. I'd learned a lesson or two on this mission, but it was too late, for this campaign, anyway. Injured and with a damaged plane, I hadn't done too badly to see off the Albatros. But I should have left it at that, instead of tackling a balloon, especially at such low level. The debrief confirmed my demise, although the detailed results screen showed that my flight-mate, Scott, had been more successful, despite being on his own, with two victories claimed. A stout fellow! As for the other flight, they had been of no assistance to us, not having been engaged, apparently. In the real world, 60 Squadron had suffered heavily at the hands of the Albatrosses and in my recreation in Wings Over Flanders Fields, I had nearly myself fallen foul to one of the Huns, being lucky to have driven him off. I should have got out while I was ahead, or at least, in one piece! Coming next in CA-WW1 - 'No Parachute' by Arthur Gould Lee
- 1 reply
-
- 1
-

-
- wings over flanders fields
- woff
- (and 1 more)
-
Lovely plane, great pics, excellent report!
-
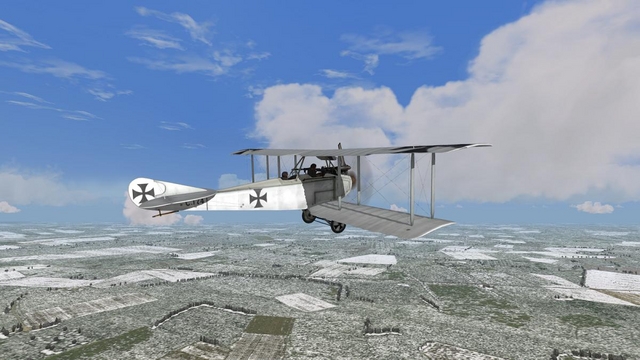
Recreating the Red Baron's early career in Wings Over Flanders Fields! The man and the book 'When he had come down to about three hundred feet he tried to escape by flying in a zig-zag course... That was my most favorable moment. I followed him at an altitude of from two hundred and fifty feet to one hundred and fifty feet, firing all the time. The Englishman could not help falling. But the jamming of my gun nearly robbed me of my success. My opponent fell, shot through the head, one hundred and fifty feet behind our line. His machine gun was dug out of the ground and it ornaments the entrance of my dwelling.' Such is the description in 'Der Rote Kampfflieger' of the end of the famous air fight on 23 November 1916, in which Rittmeister Manfred Freiherr von Richthofen brought down the DH-2 flown by foremost Royal Flying Corps ace Major Lanoe Hawker VC. Their dogfight heralded the start of a long period of German technical superiority in the skies over the Western front, culminating in 'Bloody April' the following year, when the RFC was made to pay a high price for its support of the Army in the Battle of Arras. Manfred von Richthofen, the renowned Red Baron - probably the most famous fighter pilot, then and always - personified that superiority and 'Der Rote Kampflieger' is his wartime account of those days long ago. Well, sort of. According to William E. Burrows,* the book was mostly written during von Richthofen's extended leave after 'Bloody April', at his East Prusssian home, with the help of a female stenographer. Sent in sections to the Air Ministry for editing and censorship, The Red Battle-flier was essentially a propaganda effort for public consumption. How much is in his own words, or how accurately it conveys his own thoughts and feelings, is debatable. Burrows says von Richthofen's family '...insisted privately that Manfred's writing had been re-worked and made into the diary of a killer' and that Jasta 11's Hans Georg von der Osten '...says emphatically that Richthofen did not write any of the finished product, but he has no idea who did.' Compared to similar works by Billy Bishop and James McCudden, the book is certainly lacking in technical detail. However, it's still a fascinating and oft-cited picture, painted at the time, of the career of one of the world's greatest fighter pilots. * 'Richthofen - a true history of the Red Baron' by William E Burrows The book starts with early days in military academies and, once the war begins, cavalry service on eastern and western fronts. There, frustrated at the immobility of trench warfare, von Richthofen applies for the air service and flies as an observer on both fronts. He develops a taste for air combat and inspired by the successes of early aces Boelcke and Immelman, trains as a pilot. His big break comes in the late summer of 1916 when he is chosen by Boelcke as a founder-member of the newly formed Jagdstaffel 2. Operating the deadly new Albatros D I and D II fighters under the keen eyes of master tactician Boelcke, the new fighter squadron is soon reversing the tide of British air superiority, despite the death of their leader in a mid-air collision in late October. Von Richthofen scores steadily, his victories including Lanoe Hawker. In January 1917, he's posted to command Jasta 11, flying the V-strutted Albatros D III, although he reverts to an older Halberstadt for a time, while lower wing failures on the new aircraft are sorted out. By this time awarded the 'Blue Max' - the Order Pour le Mérite - his own Albatros is soon painted in the Baron's trademark red. Under his leadership, Jasta 11 builds up a first-class combat record and soon has a bevy of aces. Jasta 11 - in cockpit: Manfred von Richthofen; standing, left to right: Allmenroeder, Hintsch, Festner, Schaefer, Wolff, Simon, Brauneck; sitting, left to right: Essler, Lothar von Richthofen, Krefft. The story continues through 'Bloody April' and on to early July 1917, when von Richthofen is shot in the head, temporarily paralysed and blinded, in a fight with FE2s of No. 20 Squadron. Spinning down, thinking 'this is the way it looks just before death' he recovers just enough to make a forced landing, before clambering out of his red-nosed and red-tailed Albatros D V (seen below after the event) and collapsing into a thorn bush. 'I had quite a respectable hole in my head', his account of the fight ends, 'My thick Richthofen head once again proved itself. The skull had not been penetrated.' There were apparently plans to update the book to cover von Richthofen's subsequent career but his death in action in April 1918 left such possibilities in limbo until after the war. I'd recommend the 1933 edition, which includes some of von Richthofen's letters home, a little material he apparently wrote for a second edition, and post-war contributions by brothers Lothar and Bolko. While the preface to a 1918 English wartime translation (available online here) described it as giving '...the general impression of the writing of a gentleman prepared for publication by a hack journalist', 'Der Rote Kampfflieger' can't help but convey something of the essence of the experiences and feelings of the great fighter pilot. The air war in autumn 1916 Flying for the German side in the last few months of 1916, as the Battle of the Somme ran its course, is surely one of the classic scenarios for a simulated WW1 fighter pilot career. The best French or British fighters - the Nieuport scouts, the DH-2 'pusher' and later the superb Sopwith Pup - can turn tighter. But flying the Albatros D II, you can mostly out-run, out-climb and out-dive your opponents; and you have two machine guns to their one. As for your natural prey, the two-seater 'working aeroplanes', these were vulnerable enough to the indifferent Fokker monoplanes of 1915-16; compared to the much-superior Albatros, one can really speak of predator and prey. And it was at this time that Oswald Boelcke established and taught systematically the basic principles of air combat and squadron tactics, setting the pattern for years to come. 'Der Rote Kampfflieger' vividly conveys the excitement of 'Boelcke's Cubs' as they take to the skies and cut a swathe through the ranks of the RFC and it's an experience I was looking forward to re-creating in Wings Over Flanders Fields. The mission Sure enough, Jagdstaffel 2 is in the WOFF order of battle for the Luftstreitkrafte and I opted to begin a career at the start of October 1916, by which time the Halberstadt has disappeared from the WOFF squadron line-up and we are fully equipped with the sleek, twin-gunned Albatros. Here's the enlistment screen, showing we are correctly based at Lagnicourt. Note that the squadron's roster not only includes our real-life Commanding Officer, the famous Oswald Boelcke, but the man who was his most famous pupil, Manfred von Richthofen himself. And here's the briefing for our mission. It's a defensive patrol, up to and behind our own lines, fully in keeping with our defensive strategy, whereby we let the enemy come to us! Having de-selected 'Always lead' for this campaign in the WOFF 'Workshop', I'm pleased to find that today, I'll be flying in the flight - 'Schwarm zwei' - led my the great man himself, the illustrious Boelcke! There are four of us in the flight, with another six pilots providing 'top cover'. Woe betide the Tommies today! And here we are, lined up on the grass at Lagnicourt. I'm in the middle of the line, in the Albatros with the darker, reddish finish and a white hoop painted on the nose, aft of the spinner. This is the 'skin' for the machine flown by Manfred von Richthofen himself, which I had taken the liberty of selecting for my own plane during the briefing phase. This was the period when the Germans had adopted camouflaged finishes, but before it became fashionable for units or individuals to paint their aircraft with prominent or brightly-coloured markings. Taking off promptly so as not to be left behind, I sped off with the others and (using the labels to confirm the plane of my leader) slotted into position on the right of our vee formation. Boelcke is second from the left; you can perhaps just make out the black and white quartered wheel hubs on his otherwise factory-finish Albatros. Soon, we were climbing steadily, flying a loose orbit just to the north of our airfield, presumably to gain a respectable altitude before turning for the run south and up to the German reserve trenches. Above and behind us, our comrades kept watch and my confidence soared, buoyed up by the impressive spectacle of this pahlanx of German hunting machines sweeping the skies for the enemy! ...to be continued!
-
Into action! Finally, having reached about 2500 meters, our leader swung us slowly around to the right and we settled onto the long leg to the south-south-west, down towards the Lines. Our four Albatrosses were still shadowed protectively by the staffel's other flight, above and behind. My dislike of the chore of formation-keeping, bereft of peripheral vision, is part of the reason I fly as patrol leader and never as a wingman, given a choice. But on this occasion, I found that I was managing to hold my place fairly well without undue hassle, albeit at the expense of keeping a good look-out, especially up-sun in the mostly clear skies. I turned on the Tactical Display ('TAC') briefly, noting the very thorough navigational and formation-keeping assistance it offered, but as I was managing ok, I turned it off again. Instead, I turned on the WOFF autopilot and let that take care of formation-keeping while I scanned around us. I looked in particular in the direction of the sun and, all around, kept an eye out for the tell-tale black puffs of German AA fire that would signify the presence of enemy aircraft on our side of the Lines. But the skies remained obstinately clear of any signs of the enemy, so I tried out a bit of time compression, going up to 4x. I soon turned it off, unwilling to 'fast forward' past the moment that contact with the enemy was made. This was my first time flying as a wingman in WOFF and I was keen to get the most from it, not least the better to recreate and savour the experience of von Richthofen flying behind the famous Boelcke. Just as WOFF was enabling me to do, on this very mission! The flight down to the Lines was uneventful, and I was beginning to wonder if the the patrol would be a wash-out. But suddenly, Boelcke's Albatros dipped into a dive, dropping straight ahead, down towards the German reserve trenches. We followed, falling a little behind as Boelcke swooped on ahead of us and with my own aircraft still in autopilot. For a second or two, I could not make out what had caused our leader to dive, but soon noticed the black German AA bursts a few hundred feet above the eastern extremities of the shelled area. Obviously, our experienced leader's keen eyes had spotted this sign of English aerial activity well before I had! I looked beyond the flak bursts, and soon picked out a pale brown aircraft wheeling around, not far above the ground. An enemy! He seemed not to have seen us, perhaps pre-occupied with strafing our troops. But, unfamiliar with the keystrokes, I fluffed switching off the autopilot - no way was I going to let him fight the upcoming battle, that was my job! By the time I'd hit the correct key combination to end autopilot, I was somewhat disoriented and had lost sight of my intended target. Looking around, I soon saw him again, in a turn not far to my rear. It was a DH-2 'pusher' - a fighter aircraft, and there were two of them! Furthermore, no sign could I see of my own flight-mates, though I had little time to spare looking around for them, with two English fighters in my immediate vicinity. For a moment, I was rattled. Thanks to my bungled autopilot turn-off, I was now low down and with two DH-2s for company. Quickly, I made my plan. I would quickly go onto the offensive, going all-out to get one of the De Havillands - or Vickers single-seaters, as the Germans called them. If I could grab a quick kill, or even badly damage one of the English packing-cases, the score would be even and I could afford to tackle the second enemy in a more leisurely fashion. If some of my comrades turned up to help, or kept the second DH-2 off my neck, so much the better. But I had no idea where they were and could not rely on any assistance. This, it seemed, was going to be down to me, and me alone. Time to get busy! Throttle fully open, I found myself in a low level, close quarter turning fight with the two Englishmen. Time and again they turned into me and I was unable to get my nose around fast enough to get the nimble De Havillands into my sights, before they flashed past. So I started trying to gain a little height as I turned, and was soon able to acquire a slight height advantage. This I used to pick my moment to dive down onto one of the DH-2s, while the other one was a little way off and unable to intervene quickly enough. Swoop down, line him up, fire a few short bursts, and then pull back up in a climbing turn, to regain my position. This seemed to work - not only did the second Englishman fail to get a bead on me, but I was able to repeat my short, swooping attack. The second time, finding myself in a good position below and behind my target, I took a chance and stayed with him, pressing my attack instead of climbing back up. I noticed that he seemed to be manouevring less briskly, now. Sensing a kill, I closed rapidly, squeezing off several short bursts as he grew larger and larger in my sights. Finally, just as I broke off to avoid a collision, his prop spun to a halt and the very next moment, a trail of black smoke tinged with flame licked back from his engine. The elation I felt was exactly the same as that described by von Richtofen in The Red Battle-Flier, when in a similar attack from behind and underneath the enemy, he knocked down his own first kill, also a pusher, an FE2. So far, so good - one down, one to go! I continued my break, just in time to avoid a burst from the second DH-2. And still no sign of anyone else! But that's fine, I thought to myself. Now, it's just me in my big, beefy two-gunned Albatros against the remaining Englishman in a plane exactly like the one I had just sent down burning. There's no reason at all why I shouldn't be well able to deal with this gentleman in a similar fashion. And that's exactly what I set out to do. Throttle wide, I evaded the DH-2 in a series of climbing turns, choosing my moment to wing over and drop down onto him. Then round and round we went some more, but I was able to make better use of the vertical and put in a series of 'boom and zoom' attacks. Again, I was finally able to get behind and below him - and stay there, snapping out burst after burst. The end came suddenly. The second De Havilland burst into flames under the fire of my twin Spandaus from close behind and like the first machine, fell to earth streaming fire and black smoke. This time, with the skies around me seemingly clear, I watched him all the way down to a firey end in the vicinity of the German reserve trenches. My first mission with the Jasta and I had knocked down two English fighters in dramatic and unquestionable fashion! I felt sure the boss would be proud of me…wherever he, Boelcke (and the others) had got to. I climbed up in a wide spiral, still at full power, checking the air was indeed clear of further enemies and seeking any sign as to where the rest of the staffel might have gone. I also noted the time and, checking the map, my location, for the victory claims I would make when I returned to base. The large town nearby, with its westernmost side mostly wrecked by shelfire, looked to be Bapaume. As far as timing was concerned, I reckoned my two kills had been scored within minutes of each other, shortly after 08:50. My immediate desire now was to rejoin the staffel. I turned on the TAC briefly and tried labels, but with the former's range set at under half a mile (I use the TAC only to select or padlock targets I have already identified visually, so I keep its range short to avoid the 'AWACS effect') I saw no sign of other aircraft. The TAC did show a red line which seemed to indicate that to regain formation, I needed to fly out into No-Man's Land or beyond. On my own and low down, and reluctant to accept the TAC's assistance in reacting to something I could not see, I was unwilling to do that. So I orbited on our side of the Lines, gradually regaining some height and waiting to see if the Jasta would return. But they did not; the skies around me remained obstainately empty of other aircraft, as far as I could see. I still had adequate fuel and about 700 rounds left for my guns and I contemplated flying the patrol route on my own. After debating the pros and cons, I decided instead to go home. If I met a foe en route, I would consider an attack, but otherwise, honour was satisfied and I was content to bank my successes and live to fight another day. I had lost track of the others, but felt it wasn't entirely my fault if the rest of the boys had left me in the lurch and gone chasing after some other enemies towards the wrong side of the Lines! But I didn't feel miffed - they had their reasons and I had two kills! The flight back to Lagnicourt proved uneventful and I was soon turning into my approach, then touching down, rolling to a stop just in front of our canvas hangars. I switched off the motor and briefly enjoyed the quiet of the countryside and the sudden release of built-up tension before exiting the mission. While I forgot to check the screen which would have listed the outcomes for the flight as a whole, I didn't forget to fill in claims for my two victories! Here's the page of my logbook which records my claims, and you can see I've expanded one of the entries to show what I recorded in my combat report. The note WOFF has added about my chosen witness seems to augur well for my claims being confirmed, but time will tell! My reports are actually longer than those generally submitted by von Richthofen (these are reproduced in 'Under the Guns of the Red Baron') but I like to make good use of the facility to record a concise but descriptive report about each successful air fight. In doing so, I also like to use appropriate language - for example the Germans tended to refer to a manouevring battle or dogfight as a 'curvenkampf' or turning/curving fight (by WW2 anyway) and they often described RFC pushers as 'Vickers' types, presumably inherited from the 1915 Vickers FB5 'gunbus'. This was a classic Jasta operation which nicely recreated the sort of missions and fights recounted in 'The Red Battle-flier'. The mission profile was exactly as usually flown by the Jastas, in this case in full strength, with our own flight supported directly by the others, in an impressive show of aerial force. It felt great to find myself flying as one of 'Boelcke's Cubs' with the great man himself out in front and to see him leading us down and into the fray. My own air fight was exciting and dramatic, while the results seemed to reward my attempt to exploit the advantages of my more powerful and better-armed machine, just like von Richthofen himself did in his battle with Lanoe Hawker. As for the aftermath, it was not at all unusual for the skies to be filled with planes one moment then for a flier to find himself seemingly alone in an empty sky, the next. Back at base, the ability to complete decent combat reports - which distinctive feature has been improved significantly since OFF - added to both the enjoyment of the experience and to the immersion, the sense that you have just participated in the recreation not only of an air fight, but also of the whole experience of flying with Boelcke and Jasta 2 in the hostile skies of the 'Great War for Civilisation'. Magical stuff, another classic aviation memior brought to life by Wings Over Flanders Fields. And after previous CA-WW1 missions flying two-seaters, it was both a step up in pace and a welcome change, to be flying again with the hunter rather than the hunted! Coming next in CombatAce-WW1 - 'Winged Warfare' by Billy Bishop
- 1 reply
-
- 1
-
-
- der rote kampfflieger
- wings over flanders fields
- (and 1 more)
-
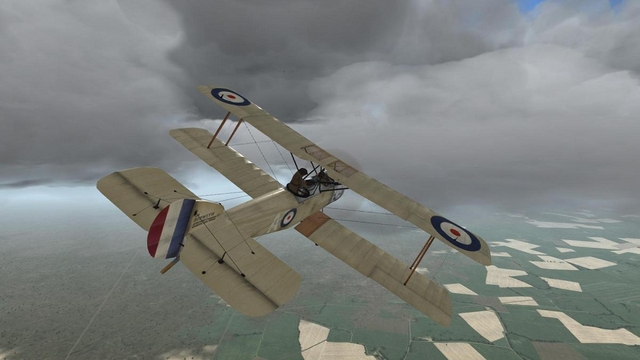
Bringing another Great War classic to life in Wings Over Flanders Fields! The man and the book '...air fighting required a set steely courage, drained of all emotion, fined down to a tense and deadly effort of will. The Angel of Death is less callous, aloof and implacable than a fighting pilot when he dives.' So wrote Cecil Lewis in his classic aviation memoir, 'Sagittarius Rising'. First published in 1936, this book - by the man who later became a founder of the British Broadcasting Corporation - is one of those 'must read' pilot autobiographies that's often quoted in other histories for its many dramatic accounts. Lewis enlisted directly into the RFC in late 1915 and trained intitially on the inevitable Marucie Farman 'longhorn', moving on to the Avro 504. Posted to 22 Squadron flying the relatively-new FE2b 'pusher', on arrival in France he finds plans have changed. While he's able fo get in some extra flying time, mostly on the BE2c, he's posted ultimately to No.3 Squadron after a short introduction to its mount, the Morane Type L Parasol. This aircraft he describes as '...one of the recognised death-traps which pilots in training prayed they might never have to fly...Pilots trained on ordinary Avros and 2c's, when turned loose on Moranes killed themselves with alarming regularity.' The main problem was apparently the lack of a fixed tailplane, resulting in an incredibly sensitive elevator: '...the least movement stood you on your head or on your tail.' Nevertheless, Lewis says that he '...did come to love the Morane as I loved no other aeroplane...Good old Parasol!' Lewis flies the type throughout the dreadful Somme battle, on whose first dread day the British Army suffered approaching 60,000 casualties, including nearly 20,000 killed, devastating in particular many communities whose young men had signed up to fill the ranks of the 'Kitchener's Army' battalions which bore the brunt of the fighting. In the air, Lewis flies the new infantry contact patrols as well as photo recce missions and artillery spotting, and has some inconclusive air combats. By this time, Lewis has seen trials of a captured Fokker monoplane which have shown it to have little or no advanatge over most RFC types, beyond its synchronised machine gun. Posted to 'Home Establishment' after winning the Military Cross, Lewis has a spell as a test pilot. Spring 1917 finds him joining 56 Squadron, formed to introduce the potent new SE5 fighter to combat. Back in France, he sees much action, including the fight during which the great ace Albert Ball is lost. Wounded after narrowly escaping being shot down by '...one of the latest Pfalz scouts: the SE was no match for that machine', he's posted back to England on Home Defence duties. His last operational posting is to a new night fighter unit, designed to operate in France to intercept enemy tactical night bombers in modified Sopwith Camels, but sees no action before the Armistice brings the war to an end. Lewis's book is sprinkled with insights and anecdotes aplenty. These include an air combat demonstration with the great French ace Guynemer, not long before the latter was killed: 'In his hands the Spad was a marvel of flexibility...nothing I could do would shift that grim-looking French scout off my tail.' 'Sagittarius Rising' is currently in print and deserves a place on the bookshelf of anyone with an interest in WW1 in the air. The air war in mid-1916 By this time, the 'Fokker Scourge' had already been eclipsed by more modern French and British aircraft dedicated to the air-to-air role, like the Nieuport 11, De Havilland DH2 and RAF FE2b. By the time of the Battle of the Somme, the aerial boot was firmly on the other foot and the British and French air forces were enjoying a period of increasing ascendancy, which would last only until the autumn, when the arrival of the Jastas and the Albatros D-types marked the start of another German resurgence. The mission As expected, Wings Over Flanders Fields allows me to fly with Cecil Lewis in No.3 Squadron in the fateful Battle of the Somme. I opted to start on 1 July, the opening day, and here's the squadron 'Duty Room' which shows our roster, aircraft strength and disposition. And here's 'B' Flight, which I'll be leading. As well as the author of 'Sagittarius Rising', another notable pilot is no less than 'HK' himself - Hubert Harvey-Kelly, the first RFC pilot to arrive in France in 1914, who as CO of 19 Squadron was shot down and killed by Kurt Wolf in a disastrous fight with Jasta 11 during 'Bloody April', 1917. And here's the briefing screen for our mission. It's another bombing raid, this time to a railyard just behind the German front lines. 'A' flight is not involved in this mission (there's no 'C' flight on WOFF missions, I believe) but perhaps to make up for it, there are no less than six Moranes along for this particular ride. And here we are lined up on the grass in front of the sheds at la Houssuoye, each carrying four small bombs down between the wheels. The weather is fine with only scattered clouds, mostly clear blue skies. I was soon up and away, leaving our airfield behind. It seemed quite well-equiped and sensibly-located, on a nice clear area of open ground, the only hazard some stands of trees on the airfield boundaries that would have been better cut down. But I managed to miss these and off I went, slowly getting the hang of my unfamiliar mount, whose elevator was quite sensitive but whose rudder needed quite a bit of deflection to effect any kind of a decent turn. Settled onto my course, I levelled off and throttled back, to let my flight catch up. They did so slowly, about as fast as you could expect on their 80 hp Le Rhone engines. Finally the formation was complete and I opened her up again. Climbing as hard as we could, we came up to the Lines. Zero Hour for the offensive was past but there was still a certain amount of shelling going on, well underneath our clear doped linen wings. I levelled off at four thousand and in the clear conditions, was able to pick out our target visually, just the far side of the shelled area. As the range wound down, I called up the tactical display, selected a series of targets in the railway complex and issued 'Attack' orders. Leaving my flight to get on with it in their own way I then made my own bombing run. Everyone's bombs seemed to hit at about the same time so I wasn't sure which were mine, But overall, we seemed to have had much the desired effect. A good start! Sure enough, a certain amount of damage had been done. Not bad at all, considering that out bombs were so small. I banked around for home, porpoising a bit while trying to balance the turn in the awkward big parasol. Rolling out with plenty of coarse rudder, I levelled her off and headed for home, gratifled to see that the flight seemed to be losing little time in getting back into formation. It was only at this point that Archie showed up. There was a muffled 'crump!' and then another, as the black bursts of German AA fire started unrolling in our wake. A bit late there, you Huns! Well, you can do your worst, now. We have knocked about your little railway station and we're already well on our way home! My confidence was a little premature, as it turned out. The Huns hadn't finished with us yet! ...to be continued!
-
Roaring into battle with the famous Tiger tank in 'Steel Fury - Kharkov 1942'! 'Tyger, tyger burning bright In the forest of the night What immortal hand or eye Dare frame thy fearful symmetry?' William Blake, 'The Tyger', 1794 And now, for something completely different. No, not a Monty Python sketch, but a change of pace and scenery: from the clear blue skies and snarling aero-engines of combat flightsims to the solid earth and thundering heavy weapons of perhaps the best available tanksim, from Ukrainian developers Graviteam - 'Steel Fury Kharkov 1942'. The sim My first tank sim was back in the early 1980s, believe it or not. It was played on my younger brother's Sinclair Spectrum and compared to 'Pong', 'Rommel's Revenge' was a revelation, albeit the wire-frame graphics were perhaps not quite what we're used to these days. Fun, though; I was pleased to see that it's been preserved for posterity on Youtube: Turn the clock forward about 15 years, and my first modern tanksim was Ultimation's 'Panzer Commander'. Graphics had come a long way and despite simplified (but very usable) targeting, odd bunker-based anti-tank guns and no infantry at all, this was a great product, with a dramatic musical theme and varied and engaging single-player campaigns covering US, British, Soviet and German tanks and AFVs. It was soon joined on my hard drive by another classic, Microprose's 'M1 Tank Platoon 2', showcasing the US Army's formidable M1A2 Abrams. This also had its vicissitudes, like near-instant deluges of lethal artillery fire which usually killed off any attached APCs early on and a tendency to over-rely for successful gameplay on the simulated IVIS real-time tactical display, where, as one reviewer put it, you could spend the whole battle watching little blue and red squares firing pixels at each other. Still, with high production values (including newsreel-style video intros from 'MPS News' to each of the campaigns) it was a great sim, a classic that, with a bit of fiddling, can be played on modern PCs and is still great fun: Tanksim fans were rather spoiled back in those days. There were other less capable but still fun modern tanksims like Novalogic's 'Armoured Fist 2' and 3 and Interactive Magic's 'Spearhead', soon joined by the original 'Steel Beasts' from eSim, which simulated the mechanics of tanking with unpredecented accuracy. For World War 2 fans, as well as 'Panzer Commander', there was Interactive Magic's 'iPanzer 1944', but the best of all came with Wings Simulation's 'Panzer Elite'. Modders soon appeared who tweaked the original rather cartoonish graphics and by the time the Special Edition arrived, this was clearly the premier WW2 tanksim, and I think still is, in many respects. This is not least due to the continued work of the mod community, notably Aldo and other members of the PE Development Group and BobR and the Ostpak team. PE is still playable on modern systems and well worth it, too, as seen in this 'playthrough' of the Beresov mission from Ostpak: And so to modern times. 'Steel Beasts' is now a grapically-improved professional military training tool with a spun-off version for simmers, and if you want something simpler and cheaper there's IDDK/Crazy House's 'T-72 Iron Warriors/Balkans on Fire'. Although you're often just a single tank driving around and clobbering stuff with little opportunity to co-operate with fellow AI, this looks good, has plenty of detail and plays well: http://store.steampowered.com/app/1670/ For World War 2, there was 'T-34 -vs- Tiger'. Like the same developer's 'T-72', this is a pretty good simulation of the operation of the featured vehicles. Again, you're essentially on your own in missions, with the other AI, friendly and enemy, acting out their scripted functions. Looks and sounds great though: https://www.youtube.com/watch?v=kmyM-WLyd8U Which brings us to Ukranian developer Graviteam's 'Steel Fury Kharkov 1942', which at last puts you in the role of the leader of a platoon/troop of tanks and pitches you right into company-sized combined arms operations on the Eastern Front. While the original release featured a decent set of German and Russian tanks (including the Lend-Lease British Matilda infantry tank, of all things!) it was limited, as the title suggests, to the mid-1942 era. While the sim's mostly still Eastern Front only, the modders have been at work, making AI AFVs playable and adding new missions and vehicles. And unlike other Graviteam titles like the 'Achtung Panzer/Graviteam Tactics' series which are essentially wargames, or 'Steel Armour - Blaze of War' which is an unusual sort of tanksim within a 'strategy' game, SF'42 is a proper tanksim, through and through SF'42 was hard to come by for a while but is now available at GamersGate: http://www.gamersgate.co.uk/DD-SFURY/steel-fury-kharkov-1942 The mods are now de rigeur for anyone wanting to get the best of this sim and the best place to start is I think over on Tanksim.com: http://www.subsim.com/radioroom/showthread.php?t=178218 Edit - since writing this I've discovered that the best place for SF mods is Gaviteam's on forum for the sim: http://graviteam.com/forum/index.php?board=1.0 Use of Jonesoft's Gerneric Mod Enabler is essential and many mods seem set up to use it. Install order is important and as with most sims there are some aspects of modding with which you need to have a bit of patience. But most or all of what you need to know is there on Tanksim.com. And most of the stuff you'll want seems to be on Mediafire, here, courtesy of Godzilla1985: http://www.mediafire.com/?q38nkzaginphq Edit, August 2014 - the SPM mod was used for this mission; the later NTA mod has been discontinued, but its successor, the STA Mod, is now available and I think it's fair to say STA is the latest and most comprehensive mod for Steel Fury: http://stasf2008.eph...d-on-steel-fury Fancying a slice of tank action for a change, I dusted off my old modded install of SF '42 and knowing that it is better to give than to receive - especially if the 'present' is a solid round of 'Armour-Piercing Capped, Ballistic Capped' travelling at over 2,000 feet per second - I decided to start with my favourite tank - the German Tiger. Which by all accounts, is pretty good at both giving and receiving. The tank The Panzerkampfwagen VI Tiger I needs little introduction. Its unsloped armour reflects the fact it was designed more for superiority over the likes of the British Matilda and French Somua than the T-34 or KV-1 which so shocked the Germans on meeting them in the summer of 1941. But the Tiger proved an excellent antidote to the superb Soviet tanks and indeed, to the Shermans, Cromwells and Churchills it would meet in the Mediterranean and North-West European Theatres. 'Nuff said, except that I count myself privileged to have met the mighty Tiger 131, now restored to running order and authentic appearance by the Royal Armoured Corps Tank Museum at Bovington Camp, Dorset, having been captured, abandoned, from Schwere Panzer Abteilung 504 at Medjez el Bab, Tunisia in April 1943 after being damaged by Churchills of 48 RTR: The mission Here's the mission briefing; the tail end of it, anyway. It's preceded with other sections which help set the scene, telling me that my platoon of three Tigers is part of a Kampfgruppe of Panzer Regiment 201, 23rd Panzer Division, tasked with following up a successful counterattack. Our Kampfgruppe appears to be a combined arms force of reinforced company size, with artillery and air support. Our mission is in two phases - first to destroy enemy defensive positions along a low crest then to swing left and clear the village of Nepokrytoe. While the briefing has the semblance of military orders it could still be rather better presented. The current NATO format for 'orders' like these - Ground (technically a preliminary to the orders), Situation, Mission, Execution, Service/Support and Command and Signal - would be better. Not unrealistic either, as it is essentially the same as the British WW2 format (with detail differences, eg 'Situation' was 'Information') adopted also by the Americans. Convergent evolution being what it is, the German WW2 format wasn't much different. The SF'42 format doesn't give me as much info as I'd like on the operation, eg the composition of the other subunits my platoon's operating with. And the attack itself could have been better described, more clearly broken down into its two constituent and distinct phases, with the detailed tasks given for each subunit for each phase stated, including my own. As it was, while the narrative didn't provide a clear picture of the composition of our force this was apparent from the map, which showed unit type symbols - diamonds are tanks, the 'pointy rectangles' are infantry in APCs. In our case the APCs are SPWs (Schutzenpanzerwagen) as the Germans called their Hanomag half-tracked armoured personnel carriers. The map itself isn't bad but despite the presence of contours and the occasional spot height, it doesn't make the lie of the land very clear (a vital consideration in ground ops) and it doesn't zoom out enough, so you have to pan around to try to orient yourself properly. The map screen is also were you can issue orders to your platoon, which you can do 'in game' only by calling up and clicking on this map - there are no hotkeys to order (eg) a formation change. The scope for giving orders is pretty low, perhaps better suiting Soviet tanks where radios were limited and hand or flag signals were the norm. The most useful orders are 'do as I do! and basic formation commands, options being line (abreast), column/single file, a sort of 'blob' (as near as you'll get to the common arrowhead or wedge formation) and the ability to order 'spread out!' or 'close in!' I probably need to spend a bit more time on this map/briefing screen to better appreciate its facilities. One other issue is that the map is from the original sim which is for operations in the Kharkov area in mid-1942. While this wasn't the only period when there was fighting around this town, even my mission's date is in May 1942, some months before the Tiger first appeared in action, in the Leningrad sector in September 1942. But this is a modder-made tank in a modder-made single mission which makes the best use of what's available, and I for one am most grateful for the opportunity to fight in a Tiger in a modern sim. From the map, I could see that my platoon was sited to the centre rear of the mission's Start Line, which was a track running across our front. You can see this more clearly below, with the briefing panel minimised. We are the three blue diamonds, roughly bottom centre. To our right are some Panzergrenadiers in their SPWs. To our left are some more SPWs with more tanks, all still in column formation until they reach the Start Line clear of the woods. The latter will evidently be our Kampfgruppe's left-hand boundary. So I will be in the centre, as ordered, with a Panzer Grenadier platoon each side, with some other tanks for a bit of extra firepower. Enough of the preliminaries! Time to get the show on the road. I started the mission, the loading screen helpfully giving me a snippet from a German tanker's manual, this one a warning that stopping after spotting an AT gun close by was suicidal and that only a fast-moving attack with all weapons would do. I'd try to remember that! Soon, I found my virtual self standing tall, hatch open, in the commander's cupola of my Tiger, looking up at the Start Line, which I could make out in the form of a line of trees interspersed with telegraph poles, maybe a hundred meters ahead. Here we go! ...to be continued!
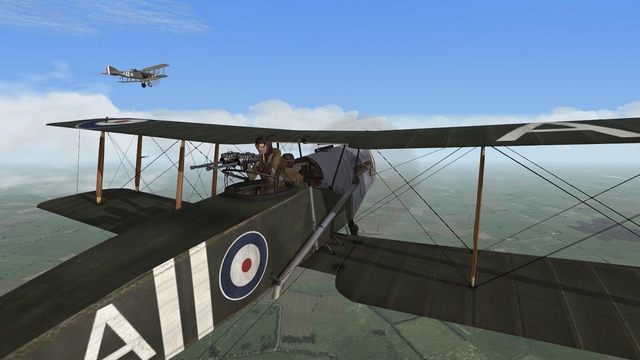
-

Wings Over Flanders Fields - the CombatAce Review, part 3
33LIMA replied to 33LIMA's topic in Game Reviews
Thank you! Part 4 from the other reviewers is now up; sorry about the delay: http://combatace.com/topic/82135-wings-over-flanders-fields-the-combatace-review-part-4/ -
Another well-known use of the External View in WW1 was for changing a sticky drum on a Lewis Gun.
-
-
Ditch the bombsight view and bomb from the external view while flying the plane, looking directly down, from 2-4 thousand feet. Having lined up your target in your direction of flight, keep her level, throttled slightly back and let 'em rip in a couple of closely-spaced salvoes to get a 'bracket', once you estimate you're close enough for the 'forward throw' of the bombs to reach the target. Approach along the longest line of your target, eg a railyard or a row of hangars. Works surprisingly well - see the first two CA-WW1 mission reports here and is how Duncan Grinnell-Milne did it for real during the big raid on Don railway station. He gave up on the fancy bombsight they'd been issued and went down to two thousand and bombed by eye, actually getting some hits.
-
At this point, homeward bound from a successful bombing raid, the newly-awoken German Archies were light but apparently bang on target, for their rounds seeemed to be bursting right on top of me. I had no desire to take any risks at this point and commenced mild evasive action. Better safe than sorry! My little formation was back together now, roughly half way across the wide stretch of No-Man's Land and soon to be back at la Housouye. Or so I thought. At this point there was a rattle of machine gun fire as my observer, sitting just behind me, cut loose. Ooops! I fish-tailed and looked back. The problem wasn't hard to see. A small flock of Fokkers had appeared from goodness knows where and was closing determinedly. Lower down, something caught my eye - a Morane was falling from the sky in a vertically-banked spiral that might or might not be under control. As I watched, a second Morane went steeply down, this time with a lighter-coloured Fokker dropping after him like a hawk. This was getting worse by the second. So far, those on the left of my Vee formation seemed to be bearing the brunt. Looking right, two Fokkers were closing in on my other Moranes, who kept their height and began to edge slightly right and away from me. Decisions, decisions! My flight was now well and trully split into two elements, one low and behind, already fighting for their lives, and the second to my right, which soon would be. I could not be in two places at once, and rather than diving down and losing height I'd never be able to regain, I decided to rejoin the Moranes on my right, as the Fokkers closed on them. This was easier said than done. I throttled up but my flightmates were already going flat out for friendly territory and were a little way above. Rather than fall behind trying to regain their level I opted to slip across and come in below and behind them, hopefully giving my observer a crack at the trailing Fokkers. My tactic seemed to work quite well. My observer's fire took the lead Fokker by surprise and the Hun broke off his attack on my flight-mates. My trusty back-seater gave him another burst as he slipped away across my tall from right to left and dived away. I didn't see what became of the second Hun but when I looked up and right again, my two Moranes were going strong and Fokker-free. I now determined to do what I could for whatever might be left of the other half of my flight; those who had been forced down right at the start of the air fight. I banked down and looked around, back to towards the Lines. I was relived to see at once a sandy-coloured monoplane flitting into open countryside from the shelled area, very low down but still going strong. Less encouraging was that close behind him - close enough to have been in formation - was a second, paler monoplane - one of the Fokkers had chased him over and was not letting go! I chopped my throttle and spiralled down after them as the pair slipped below me. This seemed to have the desired effect, for the Fokker broke off and turned east for Hun-land. I chased after him for a bit but he was too fast for me. Satisfied that he was going, I turned again for home. It wasn't long before I realised that I wasn't done yet. Whether the Fokker I'd chased off had 'rediscovered honour' or it was one of his comrades, I could see the distant but distinctive outline of a mid-winged monoplane closing slowly from behind. And I was now on my own. Clearly this impertinent fellow needed to be reminded that he was now on our side of the Lines. With that in mind, I steered towards a likely source of some ground fire, in the shape of an observation balloon which I could see glinting in the summer sunshine, low and slightly left. The friendly AA gunners duly sprang to life and the Fokker quickly took the hint, banking left and swinging back towards the Lines. This time, there was no repetition, and I sailed sererenly on, waggling my grateful wings at the balloon site as I passesd. Another few minutes and I was safely back at La Houssoye, glad to be back on terra firma but anxious to find out who had made it back, and who hadn't. I was fairly sure that I had managed to save a couple of likely casualties but I was equally sure that at least one Morane must have been lost. The big surprise was that I seemed to have got one of the Fokkers. I duly completed a combat report claiming the one we'd shot off the tails of the Moranes to my right but I didn't see him crash so we'll have to see if that one is confirmed or not. Alas, casualties had been heavy, with three Moranes destroyed. Amongst the crews, we had three dead and one mortally wounded. The three enemy aircraft claimed destroyed and the damage our bombs had wrought was some consolation. The boys on the ground are not the only ones paying a high price for whatever ground may be gained in this offensive! Well that concludes the second mission in this book-based series and it was certainly an eventful one. Flying the two-seaters whose vital work made them the primary target for the faster 'scouts' was obvously no sinecure. I'm glad that the next mission in the series puts me back on the side of the hunter rather than the hunted! For that report, we'll be flying with Imperial Prussian Jagdstaffel Nr. 2 later in 1916, recreating the air combats described by no less than Manfred von Richthofen in 'The Red Battle-flier'.
- 3 replies
-
- 1
-
-
- sagittarius rising
- wings over flanders fields
- (and 1 more)
-
A CombatAce and OBD Software special... Bringing classic WW1 memoirs to life in Wings Over Flanders Fields! This year marks the hundredth anniversary of the outbreak of the First World War. To help mark this centenary - and to recall the courage and sacrifice of those who fought in the skies of WW1, for real - CombatAce, in partnership with OBD Software, will feature a unique series of mission reports. Each article will take a look at one of the classic pilot autobiographies of the First World War and will then report on a campaign mission inspired by the book and flown to bring it to life. For this, we'll be using OBD Software's great new sim, Wings Over Flanders Fields, whose realistic orders of battle make it particularly well suited to this particular mission! The books and the aeroplanes featured will be chosen to illustrate both the development of combat aircraft and the progression of the air war, from 1915 through to 1918. The titles and the planes we currently plan to cover are: - Duncan Grinnell-Milne's 'Wind in the Wires' (BE2c, 1915); - Cecil Lewis's 'Sagittarius Rising' (Morane parasol, mid-1916); - Manfred von Richthofen's 'The Red Battle-flier' (Albatros DII, late 1916); - Billy Bishop's 'Winged Warfare' (Nieuport Scout, early 1917); - Arthur Gould Lee's 'No Parachute' (Sopwith Pup, mid-1917); - James McCudden's 'Flying Fury' (SE5a, late 1917); and - Rudolph Stark's 'Wings of War' (Pfalz D IIIa, mid-1918). To accompany the series, we are pleased to announce that OBD Software will be offering a prize to the winner of a competition based on the reports; details will be announced soon. We plan to begin the series in early April, so watch this space!
-
Right, first installment is up, slightly ahead of shedule and incorporating some words from the Developers: http://combatace.com/topic/82229-ca-ww1-wind-in-the-wires/?do=findComment&comment=660207
-
Hi Jim My edition of Die Rote Kampflieger includes a chapter by Lothar 'Memories of my Brother' which covers an air fight in Spring 1918 ('Last Flight with Manfred') and even an account of the shoot-down purported to be by A Roy Brown! But on reflection, yes I'll switch to the Albatros DII in Autum 1916 - it'll bring a German plane into the mix sooner and better address the secondary objective of illustrating the development of aircraft during the war. What are your own thoughts on how much of the book represents Manfred's own words and thoughts? For example the section 'Thoughts in a dugout', which looks to have been a later add-on, possibly early 1918, reads to me like an officially-inspired attempt to tone down the 'gay hussar' tenor of the rest of the book, for the benefit of a more war-weary public. But even if the actual writing was that of a 'hack' writer, I like to think that we must be seeing something genuine of the Rittmeister's recollections, thoughts and feelings in that book.