


33LIMA
-
Content count
3,749 -
Joined
-
Last visited
-
Days Won
7
Everything posted by 33LIMA
-
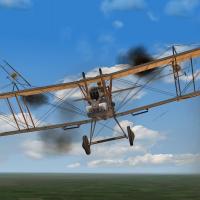
Onward and upward! I called up the in-flight map and oriented myself. Clearly, the wide brownish line weaving north to south marked the shelled area around the trenchlines. The big grey splodge east of our airfield was evidently the substantial town of Valenciennes. The smaller one to my west was Douai, with Cambrai down to the south, just over half-way to my objective, Bonvais. The latter was a village barely visible as a meeting point of several roads, south again of Cambrai. Still climbing, I switched back to the external view, corrected my course, and started blipping my engine to enable my flight, which was together but left and below me, to close up. The A Team's SSW runs either full power or throttle off, so blipping - either by using the 'B' key or just pulling the throttle back from full power - is the only power control you have. I'd have expected fuller throttle control on a late-war rotary engine; it may take only a simple Wordpad edit to the plane's data file to change this. But it's no big deal, and it certainly didn't stop me from climbing rapidly in the fashion I'd expect for a plane with the SSW DIII's reputation. FE2 doesn't include seasonal terrain by default but I have FEG as well and copied across the seasonal terrain textures; hence the dull terrain shades. If you can't do this, there are user-made seasonal terrain textures available here at CombatAce, in the FE downloads secrion. Here's the view from the DIII cockpit. The later SSW DIV's reduced-chord upper wing will have improved pilot visibility, whatver other benefits it conferred. From photographs I've seen, this cockpit is quite an accurate representation. FE/FE2 supports head tracking but I'm quite happy to make do with mouselook, panning and padlock, which are all supported and work well in this sim. Having quickly climbed up to about five thousand feet - rather above the briefed mission height - and very glad I'd defied Mother Nature and improved the weather and hence the visibility - I looked around. On the climb out, I'd noticed a pair of inoffensive and undoubtedly German two-seaters pottering about low down and close to another nearby airfield. But now the skies seemed clear - no planes, no flak bursts. So I decided to 'warp' (=Ctrl+N, 'next encounter'). As it usually does if there's no enemies en route, this brought us out at the 'initial point', at the briefed mission height of a couple of thousand feet, closer to the front and a mile or so short of our objective area, Bonvais. I began another climb, the better to tackle whatever might lie ahead. I hadn't got very far when there was an explosion nearby, then another, each accompanied by a flash which quickly faded to a large puff of grey smoke. Enemy AA fire, and quite accurate. We were still some way on our side of the Lines, a sign that all was not well below. But in FE, flak often fires a short way over into enemy territory, so I thought no more of it. Continuing my climb, I looked for any sign of enemies in the air, concentrating ahead, in the direction of our objective. That way, the skies looked clear…but not behind us. Finally looking around, I saw the black German flak bursts immediately, cursing myself for not having checked behind us sooner. They seemed fairly close, and they were definitely above us. I turned into them without further ado, followed by my flight-mates. ...to be continued!
-
Taking on the RAF in the Fokker DVII's Bavarian competitor This campaign report is designed to do two things. Primarily, it's intended to showcase the Rise of Flight Pfalz DXII, flown in career mode using (almost) the latest version of Pat Wilson's Campaign Generator (PWCG). I found out after flying this mission that PWCG's now up to Version 15.6, but the changes since my version (15.3) seem mostly cosmetic. The second reason for this report is to celebrate the miraculous recovery of my trusty 8800GT graphics card, which had started displaying artifacts but was restored to health - I hope for some time - by literally 'baking' it in an oven to re-solder possible decayed connections. I'm not making this up - Google it and see for yourself! To digress a little, the recent PWCG improvement of greatest interest to me is the increased flak. In First Eagles/FE2, fairly often, you get warning of the presence of other flights when you see flak bursts tracking them. So I find it is quite often possible to spot other planes at a respectable range, without resorting to visual aids like 'radar screens', target boxes/pointers or labels. Combined with decent rendering of more distant planes, this has two big benefits. First, I often see aircraft I might otherwise have missed. Second, I see them far enough away to make a plan to deal with them, following Mick Mannock's advice that all aircraft should be assumed to be enemies until proven otherwise. In OFF, the flak is also a good indicator of other aircraft, althoigh the planes themselves are not visible as far away as they generally should be. In RoF, a big issue for me, flying 'aids off', has been how often enemies in the vicinity remained invisible unless our flight more-or-less blundered into them. If I didn't miss them altogether, I'd come upon them suddenly, with no opportunity to do any of that interesting patrol-leading stuff: stalking them, getting my flight into a good position, then timing and leading my attack. PWCG not only enables you to select a rank high enough to lead patrols regularly, turning the player from drone to tactical decision-maker; recent versions have increased levels of flak, so that it can now provide the patrol-leading player with the target indicator that flak so often was, in real life. At least, that was what I was hoping I'd find out, flying this mission! The plane As for the Pfalz itself, though a competent design, the DXII inevitably suffered from being compared to the contemporary Fokker DVII. The sturdy, agile and easily-flown Fokker was the plane the German fighter pilots wanted, to replace their outnumbered and increasingly-inferior Albatros DVs or Pfalz DIIIs. Anything less was regarded with suspicion. In 'Wings of War', Baviarian Rudolph Stark - by then in charge of Jasta 35 - told it like this: '1 September 1918. We are to have more new machines. Everyone is pleased...but their joy is soon damped down, for the machines...are not Fokkers, but Pfalz DXIIs. What is a Pfalz DXII? No one has ever heard of such a machine, no one knows anything about it. We decline to take these machines...we are told...there are no more Fokkers to be had. All right; we'll have the Pfalzs...the sight of them does not inspire confidence...with a multitude of bracing wires...the whole thing looks like a harp. We are spoilt for such machines. No one wanted to fly those Pfalzs except under compulsion. Later their pilots got on very well with them. They flew quite decently and could always keep pace with the Fokkers; in fact they dived even faster. But they were heavy for turns and fighting purposes, in which respect they were not to be compared with the Fokkers. The Fokker was a bloodstock animal that answered to the slightest movement of the hand...the Pfalz was a clumsy cart-horse that went heavy in the reins and obeyed nothing but the most brutal force.' My own references on the type are the old but valuable Profile Publication and - highly recommended - the more recent Osprey 'Pfalz Aces of WW1' which features other types like the DIII of 'Blue Max' movie fame. If I recall right, Pat Wilson's Western Front Patch for Red Baron 3d added a Pfalz DXII but if you want to fly one in a modern WW1 sim the choices are First Eagles or Rise of Flight. The FE Pfalz is from the A Team Skunkworks and it's a fine rendition, a great bird that looks the part (seen here with the fix that corrects the slightly offset wheel hubs and a great skin, by Quack I believe) Having read Rudolph Stark's book many years back, I was keen to add this plane to my Rise of Flight hangar and take her for a spin…literally, as it happened. While the Pfalz seemed a tractable enough mount, I found she was a bit more prone than , say, the albatros, to spin out of a tight turn...and to keep on spinning, all the way down, until stopped by something solid. I have to admit that spin recovery is a bit of a bugbear for me in RoF, generally. The classic advice for a WW1 pilot on spin recovery was to centralise all controls and pray. This doesn't work so well in RoF. For the DXII, even the classic modern technique - power off, opposite rudder, nose down - seemed not to work, quickly or at all, for the DXII. Happily, RoF pilot's notes are available on the sim's website and these include spin recovery. As described in the notes for the DXII, this is counter-intuitive - rudder (and aileron) INTO the direction of the spin. Practicing this in 'free flight' mode is recommended, before entrusting your virtual life to a campaign. Though PWCG by default renders your pilot less liable to be killed, best not to take chances, eh? Anyway here's that handbook: http://www.777studios.net/ROF_Guides/P12_Hanbook.pdf The man, the unit and the mission First challenge is actually getting to fly a DXII. Unlike FE/FE2, RoF models mixed squadron establishments and in Beta Career, starting as a lowly NCO pilot, I was liable to get allocated a Pfalz for a mission or two, then get moved onto a Fokker. In real life this would have been most welcome, of course...but not for this mission! Using PWCG, I decided to transfer my Jasta 11 Fokker triplane pilot, Richard Satchel, to Jasta 32b. Pfalz being a Bavarian firm, its products tended to go to Baviarian units such this. I opted to fly with it in August 1918, at which point Jasta 32b was based at Roucourt/Bohain airfield, between Cambrai to the south and Lille to the north. We seemed to be entirely equipped with the Pfalz so it was a simple matter to use PWCG to generate a mission. I was allocated a patrol up to the Lines, then north for a stretch. I was the leader and was allocated my preferred three flight-mates - Leutnants Wolf, Borngen and Balmer. So I accepted the mission and picked it up in RoF, in the usual PWCG fashion. There seem to be few skins available for the DXII so I just went with the default one and here were are, lined up and ready to go, with my machine bearing the blue leader's streamers. I don't bother with 'complex engine management' so it was a simple matter to check the controls and start up, at which point my virtual pilot gave a hand signal for the flight to do likewise. Once all props were turning I opened up the throttle and after an initial swing, my Pfalz bumped and rocked over the grass airfield and was soon airborne and climbing away. Our base was quite close to the front and for safety's sake, I climbed away from it initially, to gain some height. All seemed peaceful so I swung around and set course on the first leg of our patrol, which would take us west and into the thick of whatever might be waiting for us there. ...to be continued!
-
'Those who flew the Pfalzs did so because there were no other machines for them. But they always gazed enviously at the Fokkers and prayed for the quick chance of an exchange' Rudolph Stark, CO Jasta 35b, in Wings of War' My speed in the dive swept me past my intended victim and I carried on for a bit, to take myself out of range of retaliation, even though the SE looked to be in serious trouble. But not fatal; I next saw him heading past me in the opposite direction, slightly above and still going strong. This would not do! I lost a bit of ground from having to swing around after him but was soon closing impatiently. A quick glance behind revealed what looked like other Plalzs not far behind. I pressed on at full throttle and opened fire as I came into range, ignoring the 'friendly' flak bursts still trailing my foe. As I closed right in, firing steadily in short bursts, I saw a flicker of orange fire from the cowling behind his engine. Got him! The SE reared up and his speed fell off. I pushed the stick gently forward, just enough to avoid crashing into him. Behind this little drama, the sky was filling up rapidly. Two of my flight-mates were now close behind me...but beyond them was a line of other aircraft, all undoubtedly Englishmen and certainly headed our way. I hurriedly gave the signal for an attack and turned into the rapidly-approaching enemy phalanx. Evidently, this was the lower flight of SE5s and they had left the Sopwiths, the better to attend to us and avenge their comrade. Despite the tight turn, my trusty Plalz showed no sign of spinning out and I rolled into a head-on pass at the onrushing SE5s. I quickly lined up the one on the right-hand edge of the formation, then hesitated...there was another SE more or less directly below him and also coming at me. Turning away was out of the question...as Biggles himself wisely observed, 'It's just not done.' I kept my sights on my original target, the higher of the two SEs. The lower one quickly slipped out of sight somewhere under my nose. I was nervous about losing sight of him but the die was cast. Hopefully he could see me, and do whatever was needed to avoid a collision. I hosed my oncoming target with tracers as he rapidly grew in my sights. Bang! My machine lurched drunkenly. I knew instantly that the lower SE had crashed into me, the idiot! The engine noise was suddenly gone and my nose swung up and around as my forward momentum drained rapidly away. The main damage was evidently to my prop and motor. The Englishman looked to have come off a good deal worse, not that it was much consolation. For a moment, we both seemed to hang nearly motionless in the sky, close together, like a pair of insects frozen in a block of blue ice. Then, slowly but inexorably, my nose swung around and down I went. I wrestled desperately with the controls, to no avail. As the speed built up, pieces started to depart from my battered Pfalz. First, my left lower mainplane broke off, taking the left elevator with it. I hoped even so to be able to regain some control and ease her out of this deadly nose-dive. But then, all but the centre section of my upper wing wrenched off and my machine rolled over onto its back. She quickly steadied herself but there was now clearly no arresting my downward plunge. Ironically, now that I no longer needed it, the skies seemed fairly filled with flak bursts! Down I went, to join the remains of what was possibly the SE I'd shot down, which was burning in No Man's Land. All that remained was to fire up PWCG again and review the mission results. I filed claims for two SE5s, knowing that my collision victim must have crashed too. Its destruction seemed to have been recorded, but I was only credited with one kill. Here's the excellent PWCG mission replay screen: However, on viewing the various tabs in the debrief summary screens, I discovered that I had, after all, been credited with the second SE, and that one of my flight-mates had got credit for knocking one down, too. Though you can change settings so that 'dead is dead', by default and intention PWCG is fairly lenient with your virtual pilots' lives. Looking at the other debrief screen tabs, I fould out that not only had I been awarded the Wound Badge, but that I had been 'merely' injured and would be out of action for some weeks. Overall, and despite the collision, this was a pretty satisfactory mission. The Pfalz is a nice change from the usual Albatros or Fokkers, and seems to be a reasonable match for the likes of the SE5; well worth adding to your RoF hangar. PWCG adds a lot of good stuff to the single player campaign experience and is looking better than ever - and sounding better too, with the addition of some background music from Matt Milne of OFF/WOFF fame. The significant negative for me is that flak is still too infrequent and too hard to see when it is there - certainly compared to FE2 and OFF anyway, and to the impression I have of real life, from the accounts I've read. This may be down to several issues. Perhaps enemy flights 'spawn' at rather close range, leaving little time for flak to engage them and/or for you to notice. I gather that some practical RoF limitations on ground objects means that flak coverage is not as extensive as it could be. With the latest versions of PWCG, there IS certainly more flak than there used to be, both in terms of the frequency of barrages and their intensity, which is great. But if recent missions are anything to go by, flak is still not as frequent as it should be and/or as visible as it should be (for gameplay, if not also for realism). Granted, I was above these particular enemies and looking down - but even so, they got really close without any flak, which only started after they were right below us. Still, the flak is significantly better than it was and this was an enjoyable and engaging mission in another aircraft brought to life as only RoF can do it.
-
First blood! We flew north over our reserve trenches. Still the skies around us seemed obstinately empty of other aircraft. As we neared the northern limit of our patrol leg, I decided to use the RoF view system to check if - as often seemed to happen before - there were enemies about, but not easily seen. If this revealed any foe-men, I would do my best to ignore my discovery and fly on as if I was unaware they were there. I wanted only to confirm whether there was still a dearth of flak, leading to enemies escaping observation who might otherwise have been spotted. It didn't take me long to discover the answer. Unbothered by AA fire, there was an SE5 low down roughly over trenches. From the look of river behind him, he was just ahead and below us. And he wasn't alone. In fact, there seemed to be a flight of Camels, some bomb-laden, with a flight of SEs apparently in close escort and another lot who seemed to be nosing up towards us. They were flying south, on a more or less reciprocal course; and despite being roughly over the German reserve trenches, they were not being engaged by flak, nor had they been before I had 'unoficially' spotted them. Not good. This looked like getting awkward. I flew on as if I had not seen them - which I hadn't, officialy. I planned to fly up to the end of the leg, then turn 180 degrees and fly back south...unless I legitimately spotted the enemy. This seemed likely at some point, as the SE5 -top cover' - if that's what it was - seemed to be climbing up to meet us. One way or another, it looked like the crunch would come, sooner rather than later. I carried on scanning, seeing nothing in any direction. Not even behind me; where my flight had been, the sky was now empty. Where the Devil had they gone, and what were they up to? Banking around to get a better view, I caught a glimpse of one of my comrades, spiralling down, as if in attack. And that's exactly what they were doing; they were attacking the lower-flying RAF machines, which they must somehow have spotted. The screenie below shows the fellow I saw, and you can make out one of the lower-flying SE5s ahead of him, between the Pfalz and the little circular pond. This isn't the first time I've seen flight-mates in RoF, of their own volition, break off and go for a distant enemy who's not an immediate threat. In other sims, your AI flight-mates usually won't do this, but will only attack either in pretty immediate self-defence or on your order as flight leader. The latter is, I think, preferable and more realistic. Flight-mates have to spend more time keeping formation than their leader so are less likely to see a 'bogey' before he does. And if they DO see something first, they should never, ever just hare off after it - they should alert the leader, typically by pulling ahead, waggling wings (or making some other pre-arranged signal) and pointing. Anyway, from the (mis-)behaviour of my flight, I now knew that, despite the lack of flak, there were very likely enemies down there somewhere. I wheeled down and around in a tight spiral after my flight and sought them out. I picked out an aircraft, apparently alone, flying straight and level a short distance over our side of the Lines and heading roughly west, back home. I rolled out of my spiral into a shallow dive and onto an interception course, pushing the throttle fully open. You can just about see my target in the screenie below, as a light speck with the sun glinting off his wings, just below the little town I'd flown over on the way in. At this point, the German flak finally opened up, firing on my quarry! Better late than never; at least, this now confirmed that the other aircraft was indeed an enemy! With the speed I'd built up in my dive, the range rapidly wound down, to the point the lagging flak bursts seemed more a danger to me than to the Englishman at whom they were aimed. I ignored the danger, bored on in and started shooting. The SE, caught by surprise, lurched sideways in the air as one of his ailerons came off. ...to be continued!
-
All quiet on the Western Front...? I throttled back briefly, to allow my flight to catch me up, then resumed my gradual climb west, to the front. Conditions seemed a little gusty as my machine bucked and swayed somewhat, but at least I no longer needed constant forward pressure on the stick to stop her trying to loop. I had discovered that you can use the RoF control profile facility to 'trim out' the usual tail-heaviness, and had done this for the Pfalz, in a previous test flight. Formation-keeping can be a little variable in RoF but today, everybody was behaving themselves nicely. As usual, RoF did a great job of creating the feel, sight and sounds of flying a WW1 plane, in a way that sets it above other sims. And the RoF DXII is beautifully rendered inside and out, including the 'lozenge' pre-printed fabric camouflage on the wings and the distinctive flat windscreen and central gun sight. RoF lets you order a decent variety of formations but as usual, I left the flight in the default echelon right, as we flew on past the town of Douai then onto the front over the German reserve trenches, where a smaller town marked the point where we were due to swing north and fly up the Lines. I had been keeping a careful lookout, watchful in particular for the flak bursts which - I hoped! - would soon reveal the presence of other aircraft. I switched between external and cockpit views, mouselooking all around while holding my machine steady. Our climb-out to the Lines had been uneventful and now, throttled bacl slightly and cruising north, there was still nothing to be seen, except some shellbursts amongst the trenches far below. 'Wo ist der Royal Air Force?' I asked myself, mimimicking that line in the Battle of Britian movie where the Heinkel bomber leader cheekily notes that the 7 September 1940 switch to attacking London appears to have wrong-footed the opposition. But in this case, I was actually hoping for some contact with the enemy, not least as recent enhancements to PWCG incorporated changes to increase this possibility. Was this going to be another uneventful mission, with enemies either absent or unseen? ...to be continued!
-
Into action! I 'warped' across the intervening distance to our objective, and came out at several thousand feet with our target, Buka airfield, directly ahead. At this point, I suddenly regretted not having made a plan, while I was able to study the recce photo at my leisure. There was no sign of enemy aircraft, but ahead and below, the first flak was bursting in the sky near our bombers. Clearly, there was no time to hang around trying to think of something clever. We were briefed to strafe Buka and it was high time to make a start. I switched the TAC to display ground targets and selecting one, tapped the 'A'/attack key once, then after a pause, again for good measure. I rolled over and dived in to make a pass of my own but could not pick out the source of the ground fire. Rather than waste my firing pass, I put some MG and cannon rounds into one of the two ships moored offshore. I must have hit something vital - or perhaps one of the bombers hit her just after - for she seemed to start settling in the water. I made a mental note to check afterwards if CFS2 weapons are innately overpowered against shipping and re-check that my game and campaign settings were not over-modelling anything. I banked around and dived in for another pass, this time attacking the second vessel from nearly head on. This time I left her smoking but still on the surface. As I pulled up and around for another pass, I could see that the skies were criss-crossed with tracers and that the 'Val' dive bombers were apparently exiting the target area, still intact and in good formation. This time I was determined to do something about that AA fire, so I began making runs at the little polygonal emplacements dotted around the runway. Most seemed empty, but one looked like it was occupied by some troops manning a pom-pom type weapon or a heavy MG. Other, more rectangular emplacements protected some aircraft, though I didn't notice at the time! I ended up making a pass at what turned out to be an empty emplacement. To make matters worse, after my second run, the luck I was pushing - in making repeated passes over an alert target - finally ran out. There was a bang as an AA round burst close by and I noticed that my Zero now had some holes in the wings, tail and fuselage which had definitely not been there previously. Enough was enough, I decided; the bombers had cleared off so it was time we, too, gave up providing those nasty people on the ground with live target practice. Time to go home. I turned away and ordered my flight to form up, which they acknowledged; at least I think that's what they did - I had subtitles turned off and my Japanese doesn't extend beyond what little I remember from watching 'Shogun' on TV many moons ago. Off we went, over the jungle and out to sea again. I vaguely remembered that 'warping' in a damaged state might or might not have a tendency to end badly, so I flew on for a bit, testing my controls and checking my instruments. Nothing nasty seemed to be happening...except that my roll rate had fallen sharply. I made a mental note to install Nibbio's 'rollfix', which I now recalled was designed to stop a tendency for CFS2 flak to clobber your rate of roll every time. Then I warped home. Coming out quite near our home base without mishap, my wingmen broke off to make their approaches without needing any bidding for me. I carried on with the airfield on my right and then turned right onto a base leg, before turning right again onto final approach. I should have joined a more conventional left-hand circuit because this one brought me uncomfortably close to a b***dy great hill which some clot had put rather close to the seaward end of our runway. It was a bit like that infamous approach to the old Kai Tak airport at Hong Kong, from what I can tell...interesting. I somehow managed to avoid ramming the scenery and settled down onto a fairly straightforward final approach. I was quite glad to get back on terra firma; landings - in one piece, anyway - are not really my strong point. Unfortunately, at the debriefing, I got the cartoon graphic which shows you being bawled out by a very unhappy CO. We were credited with doing some damage, but one of the results screens showed that although we had met the 'Survive' goal - usually a good starting point - we had not also met the second goal - concerned with giving the target 'a good shoeing' - through not scoring sufficient hits on our objective. 'Must try harder', basically. Overall, this was an enjoyable and visually attractive reprise of a stock CFS2 campaign. My Zero looked rather good outside and the virtual cockpit was also pretty decent, as were the terain visuals and effects. I'm now looking forward to re-installing some more of the Pacific Theatre add-ons and mods (which I fortuately still have on CD; though many are likely still available online) and getting down to some serious CFS2 action. She's still a great little sim.
-
Outward bound At this point, I turned on the CFS2 'radar'/Tactical Display/TAC, to pick up my course to the next waypoint, which was our rendezvous with the bombers. In the screenie below, you can just about make out the latter, another little vic of three green arrowheads on the TAC display at roughly 11 o'clock to me (the yellow plane icon at the centre). The aircraft themselves are just right of the tip of the volcanic-looking peak, on the left. My wingmen weren't long in closing up and we sped after the bombers, which seemed to be in no mood to wait around for us and carried right on. I've never flown over (or been to) the Pacific Ocean but I have seen the CFS2 visuals described as being a good likeness. There are alternative textures available but I like the stock ones; to me, they convey very well the impression of lush green vegetation, barren hilltops and blue lagoons. Flying in the external view - as I generally do, pre- and post-combat - I was able to spend a little time admiring my nicely-textured mount. The subtly-weathered CFS2 textures were pretty well top of the heap when the sim was released and to my eye, they are still first class. I made another check of my TAC display. A further course correction turned my heading line green and showed I was on course for the next waypoint, slowly gaining ground on the nearest vic of bombers, now at about 1 o'clock. Gradually, the land slipped behind us and we settled onto the long leg across open ocean to the western Solomons, where lay the airfield we were to attack. ...to be continued!
-
'...a light sports plane with a 1,300hp engine' (one US verdict on the Zero, neat but overstating her engine power somewhat!) The stock CFS2 A6M2 Pearl Harbour-era Zero is still a neat and pretty accurate representation of the 'Zeke', to give her the US reporting name. Recent research suggests that her 'ame iro' overall colour was a slightly green or brown-tinted shade rather than the pure, very light grey featured on CFS2's machine, but that's probably still fair enough for a service-weathered example. I'm pretty rusty on my Zero carrier group markings but believe the stock CFS2 A6M2's 'A-111' may not represent any real-life unit. I remember that 'AI' was the code for the carrier Akagi's air group, AI-154 being Takeshi Hirano's Zero, which was one of the first obtained relatively intact, after the pilot crashed at Fort Kamehameha on 7 December; there's an interesting account of this here: http://www.j-aircraft.com/research/jimlansdale/japanese_losses_ph/Japanese_losses_Pearl_Harbor.htm Back at the mission, and hoping for better luck on my own briefed strafing of our target, I checked my Zero's controls. started up, and opened my canopy, as seemed to be a common Japanese practice for takeoff and landing. Behind me, were the two other Zeros in my flight. Apparently, emphasising an individualistic, warlike and aggressive samurai spirit, Japanese tactics did not follow the Western practice of flying and fighting in pairs and fours, so a three-aircraft 'vic' was fine. Off to my left, across the lagoon, was another airfield and I could see some other planes wheeling over it, evidently from the unit I was to escort on the raid to Buka in the Solomons. Without further ado, I opened the throttle and forgetting about flaps, sped down the sandy runway, past some large wooden hangars of mixed design. The ground rose sharply not far beyond the end of the runway but I managed to unstick in good time, as did my two wingmen. Gear up, I swept past a little landing stage at the water's edge and gained height, before turning onto course for the target. ...to be continued!
-
Flying the Lancaster in Just Flight's venerable 'Dambusters' add-on for CFS2 There can't be many missions more famous than that flown in May 1943 by RAF Bomber Command's 617 Squadron to attack dams in the Ruhr, Germany. And justly so, for the mission was a triumph of technical ingenuity and airmanship, immortalised in the film named after the Dambusters. Flown with real Lancasters, some of the most impressive footage in the film was shot in daylight and recreated the squadron's low-flying practice over Derwent reservoir, with the mighty Lancs seen from above wheeling over the water as they made their practice runs. The Just Flight CFS2 add on 'The Dam Busters' was officially licensed by the RAF and like most of the company's add-ons, comes in a nice, solid little box with a decent printed manual. It's far from a one-horse wonder. Subtitled '617 Squadron's Greatest Raids', as well as Operation Chastise, the dams mission, it provides many others, including raids on the Tirpitz, the Dortmund-Ems canal, the Bielefeld railway viaduct and the attack on Hitler's mountain-top lair at the Berchtesgaden. There's a variety of Lancaster variants, including the basic bomber and types adapted to carry the dam-busting 'Upkeep' mine and the Tallboy and ten-ton Grand Slam bombs; plus a pathfinder Mosquito, a late-model BXVI. There's even a Wellington bomber, included so you can fly one of the trial missions flown at Chesil Beach to try out the 'bouncing bomb' in daylight. I believe the add-on is still available: http://www.justflight.com/product/the-dam-busters Despite CFS2 not being built to handle bombers, the package does a rather good job, featuring such neat touches as the twin spotlights used for over-water height-finding and the 'wood and nails' rangefinder sight, both as developed for the dams raid. I believe the add-on was used as the basis for a TV documentary a few years back, which featured a crew drawn from current RAF personnel who were trained up and then attempted to re-fly the mission in a specially-made Lanc simulator. As for the real thing, while we're lucky (in the UK anyway) to be able to see (and hear!) a real Lanc flying with the Battle of Britain Memorial Flight, you can get no better than this documentary, which features superb authentic wartime footage in colour: https://www.youtube.com/watch?v=eqQAA2rcBno Having recently once again watched and enjoyed the Dambusters movie, I thought I'd spool up Just Flight's add-on and fly one of the training missions, followed by at least some of the others. While the Dams raid and some others are in darkness, the package lets you fly them in daylight, if you wish. As I plan on doing it in the dark, there's little point in a screenshot-illustrated mission report on the dams raid itself so I thought I'd provide this short one of the training mission, as a little taster. Here's the brief, using some of the custom screens that come with the add-on: There's also a 'recce photograph, which shows the 'scenery' Derwent Dam that comes with the package, along with various RAF bases including Scampton and Woodhall Spa. The dam is crude but effective, and is neatly dressed up to look like a real-life RAF oblique recce picture. For me, the star of this show is the Lancaster itself. The Just Flight version is nicely rendered by the standards of the time. And it has one outstanding feature - the engine sound. The roar and din of four Merlins at full throttle is an absolute joy and by far the best I've heard in any sim for any plane. And here she is, sitting at the end of the runway at RAF Scampton. She's a standard BI bomber, not the modified version cut away below to hold the drum-like dams weapon. From the caption to the first screenie, you can see another of the add-on's nice touches - the pilot's injunction to the ground crew to remove the chocks. Neither can be seen but the accompanying audio is neat. Looking right, I could see the airfield's buildings, a good selection including hangars and Nissen huts. Beside me was a tractor with some bomb tailers. Without further ado, I checked the controls, set the flaps down three notches, and started up. The engines fired up from left to right, bursting into life with a very satsfactory though muted roar. Ahead to the left you can see the controller's trailer, and beyond that a pair of parked Lancs. To the right, there's another parked aircraft, this time an RAF Dakota. Now, came the mission's highlight - opening the throttles, and soaking up the din as the Merlins responded in full song. A bit of differential braking was needed to keep her on or near the centre line as we gathered speed, the rudders seeming ineffective, possibly as they are masked by that mighty Lancaster wing. Taking off in a crosswind is an even more interesting experience! Past the parked Lancs we went. As the speed increased I got the tail up and held her there until takeoff speed was reached. A gentle tug on the stick and we were airborne. I quickly retracted the undercart - the animation is a bit fast - and we were on our way! ...to be continued!
-
'Maintain proper speed and altitude'…Derwent Dam Airborne from RAF Scampton, I started a gentle, left-hand climbing turn which brought me slowly around onto my heading for the training area, out at Derwent Dam. For the cruise, I cut the throttles to about three-quarters and trimmed the elevator for level flight. My Lanc was equipped with a standard bombload, not the 'mine' (as the bouncing bomb, codename 'Upkeep', was officially described). At this weight, the Lanc was responsive but sluggish, with a fairly ponderous rate of roll which quickly reminded me that I was not flying one of the fighters to which most of us are accustomed! This add-on was produced at the time when the 'virtual cockpit' 3-dimensional view, supporting panning, could not provide the detail of a fixed, 2-dimensional cockpit/instrument panel view, and so you got both. And here they are, including the side views from the 3d virtual cockpit, complete with some of the Lanc's unusual instrumentation like the radio beacon direction indicator, up top. The add-on's manual includes annotated instrument panel pictures for the Lanc, Mossie and Wimpy (Wellington). Looking out the side windows, the flattened tips to the propeller spinners are a little crude but overall the the view conveys most effectively the sense that you're sitting up there in the distinctly open, lightly-framed cockpit that graced this ruggedly-handsome big black bird. No co-pilot, just a seat for the flight engineer beside me…and the sweet music of those engines in my ears. As with take-off, the sense of 'being there' in Just Flight's Lancaster is immensely enhanced by the roar from the four Merlins, a real treat. Outside, it's noticeable that the twin Browning MGs in each turret lack breeches, but in flight, this is hidden by the arms and gauntleted hands of the air gunners. These little chaps are invisible before takeoff but they pop into position afterwards, another nice touch (as FallenPhoenix already noticed!). Likewise, the bomb aimer appears in a businesslike pose over his sight, in the dome under the front turret. He's obviously one of those keen types, as he sits there most assiduously, throughout your trip. Preserved Lancs are generally a glossy finish but the JF version nicely portrays the stark, flat black of the wartime original. The upper surface Dark Green and Dark Earth shadow-shading is nicely rendered, complete with panel and rivet detail and suitably weathered with exhaust stains. Naturally, she's rather lower-polygon and therefore more angular than we'd expect to see in a more modern sim, but she still just 'looks right'. The only (minor) negatives are the rather hi-vis aerial wires and the fact the camouflage pattern is mirrored left and right, not as it should be, 'handed', with the patterns basically reversed. Overall, it's a nice rendition and with authentic squadron codes in red. AJ-A was carried on the dams raid by 2ic (2nd in command) Sqdn Ldr Henry 'Dingy' Young, who caused the first breach in ther Moehne dam but was shot down and killed with his crew over the Dutch coast on the way home, having nearly made it back to safety; the real AJ-A was actually ED887, but the Just Flight serial number DV385 was apparently carried by a conventional BI Lancaster used later by 617, bearing the codes KC-A. Back to the mission; I knew I was going to 'warp' to the objective to save the long cross-country flight over the pleasant but bland CFS2 European terrain textures. But I could not resist flying on for a bit at a couple of thousand feet - no point in climbing higher, only to descend again - to soak up the sight and sound of my Lanc in flight, from inside and out. There aren't many sim aircraft I enjoy just taking off and flying but the JF Lanc is certainly one of them. Before hitting the magic key, I thought again about what I was going to do, on arrival. The aim, I remembered, was to practise a steady approach to a dam, at right angles and coming in over the reservoir, flying at a set height and a set airspeed, within a small margin - 1130 feet and 195 Knots, to be precise. I decided that - first time, anyway - I would fly this in the external view (for better peripheral vision) and using the 'Z' key to display, top left of screen, height and airspeed. Not as realistic as flying in the cockpit view of course but there you go. As for using the 'Z' key display, there's something to be said for a digital display over dials and I rationalised this as asking the flight engineer to call out the readings while I concentrated on flying the aircraft. Plan made, I hit the 'W' key, watching the CFS2-style short animated sequence of my machine whizzing past and on to the objective. I kept a firm hold on stick and throttle, ready to resume control the instant that we came out of 'warp'. No messing about, there...'warp' exited with my Lanc right at the start of our approach. Just ahead of me, the land fell gently away, down to Derwent Water. At the other end of the artificial lake, I could see the darker grey line of the dam itself, a rectangular tower towards either end. Time to get busy! I quickly hit the 'Z' key to turn on the flight info display and chopped the throttle back to near idle, knowing without looking that I would be too fast and too high...and that the dam was rapidly drawing closer. Time, tide and dams wait for no man. 'Maintain proper speed and altitude!', an English-accented crew voice gently but firmly reminded me…or maybe it was speaking my own simulated thoughts for me? In case I'd forgotten what these numbers were, a text display at the top of the screen on my initial approach had helpfully reminded me - 1130 feet, 195 Knots. Naturally, pushing the stick down to put me 'on the money' as regards height initially pushed up my airspeed again, but it soon fell back. Gentle aileron and rudder inputs kept my nose lined up roughly between the dam's towers while I juggled throttle and elevator controls to get and keep the numbers right. What was my margin for error? I didn't know but the occasional reminder to 'Maintain proper speed and altitude!' made me think I was edging in and out of the comfort zone. In those long few seconds as we ran in to the dam, I was certainly made to concentrate and work hard enough…if it was like this at 1100 feet, what would it be like at the real mission height of 60 feet…and in the dark? And this was just a sim! Working the controls all the way in and with one eye on the flight info readout, I seemed to be managing to avoid any crass errors in this comparatively relaxed daylight try-out. Soon I was on top of the dam, then roaring over it. With a mix of relief and satisfaction, I heard the same crew voice telling me we'd made it, albeit with a reminder that further practice would be required! As I banked away, I contemplated making another run, but was deterred by another mission announcement. This time it seemed to be my pilot's voice, telling the radio operator to advise Scampton that were were homeward bound, followed by a burst of Morse as the required signal was tapped out. I dare say there's no reason I couldn't have flown as many circuits as I wished, but I decided I'd go with the flow and 'warped' home. This brought me out neatly lined up for my approach. The little but well-produced Just Flight add-on manual may give you some numbers for the Lanc but I just flew her in by the seat of the pants, gradually putting in maximum flap then dropping the undercart. Juggling throttle and evevator to keep my rate of descent aimed at the runway threshold and my airspeed at about 120-130, I was again flying from the external view and using the flight information display. While this is one of those planes l also much enjoy flying from the cockpit, on this occasion at least I was very happy to enjoy the CFS2 'spot' view - which zooms in fixed steps but thankfully lacks the horrible wide-angle lens effect of CFS3 - as my big aeroplane slipped down and gracefully settled onto the concrete after a short flare as I pulled the throttles all the way back. Home sweet home, now back to the apron and then off to the Mess for a beer and a natter with the virtual chaps! And here's the debrief screen: For someone who's not much into flight sims where you don't get to 'blow stuff up', I found this non-combat mission quite a lot of fun, even if it didn't involve doing much more than takeoff, a single run, and then landing. I suppose this is a sign of how much I enjoyed the experience of Just Flight's Lancaster, compared to others I've flown (Screamin' Demons over Europe, CFS3/Firepower, CFS3/ETO Expansion). I'm certainly tempted to fly some of the other missions again now, even if a Mission Report on the night raids is unlikely to see the light of day, if you see what I mean. Two of this add-on's raids feature the attacks on the battleship Tirpitz with adapted Lancasters and Tallboy bombs - the second being the raid which capsized the 'Lonely Queen of the North' in her Norwegian fjord lair. I think I'll have a crack at these and some of the other daylight raids, or maybe take up the option of flying the night raids at a more civilised time of the day. The roar of those four virtual Merlins is calling me away! Edit - just found this clip on Youtube which, though rather low resolution and the night raids are evidently flown in the daytime option, gives a good idea of the scope of this neat little add-on. And in case anyone found this mission report a tad dull, don't worry - next time, it'll likely be back to blowing stuff up! Dusk takeoff in the Tallboy Lanc included with the Just Flight patch for ''The Dam busters':
-
Low-level precision raids in the 'Wooden Wonder', CFS2-style Why a mission report on a sim released way back in 2000, you may ask? Well, there are three reasons for this, which go beyond a mere trip down memory lane. Firstly, there's the relative dearth (in number, sometimes also in quality) of sim releases since then; such that many older sims still compare favourably, in features, if not graphically. IL-2 was released the year after CFS2 and it remains well worth playing. CFS2's graphics may be noticeably more dated but they're still quite serviceable and the sim itself benefited from a tremendous amount of additional freeware and payware content, extending its scope from the Pacific to Europe, Korea and even Vietnam. Secondly, this report was intended to be first in a series comparing the 'Mossie' in different sims - at least, in CFS2, CFS3 and IL-2. I say 'was'...which leads me onto the third reason for a CFS2 mission report... …which is that my dated but effective 8800GT graphics card gave up the ghost at the weekend, leaving me having to make do with the budget card it replaced (a 9300GS!). So for the next few months or so, it looks like I'll be dusting off some older sims…which is not entirely a bad thing. Or so I'm telling myself! The add-on, the mission and the plane A little while ago on another forum, Hauksbee posted about some famous Mosquito precision bombing missions, which included Operation Jericho, the raid on Amiens Prison designed to aid the escape of French Resistance captives believed to be facing execution. This brought to mind the Just Flight add-on for CFS2 called 'Mosquito Squadron' which I recalled featured this very mission, as well as the Gestapo HQ raids which had prompted Hauksbee's original post. You can find out more about the package, which I believe is still available, here: http://www.justflight.com/product/mosquito-squadron …and here: http://www.flightsim.com/vbfs/content.php?1180-Mosquito-Squadron I already had CFS2 installed on my (Vista 64) PC - I still enjoy firing up some of the historical missions for a rattle in a Zero or a Corsair - so I installed the add-on, spooled her up, created a new British pilot and kicked off the Mosquito campaign. Sure enough, the campaign mission set included Op Jericho, along with many other representative or historical Mosquito raids. And though these are arranged in date order, to create the semblance of an operational tour or career, you can start the sequence with any mission you choose. So it was that I found myself at the planning screens for Operation Jericho, on 18 February 1944, leading a strike force of eight aircraft. All were Mosquito FBVIs, the fighter-bomber version packing four .303' machine guns and a similar number of 20mm cannon. Despite the latter taking up a good bit of space including the front half of the internal bomb bay, the FBVI still had a room in the rear half for a couple of 500lb bombs, less than the contemporary BIV glass-nosed bomber but capable of being supplemented by bombs or rockets carried under the outer wings. The famous 'Mossie' will need no introduction to anyone with any interest in WW2 aviation; she had a blistering performance for her day and was the envy of her enemies, excelling as day bomber, fighter-bomber, night fighter, anti-shipping and photo-recce aircraft. The 1960s film '633 Squadron' may (or may not!) be rather clichéd by modern standards but it was a feast of roaring Merlins and low-flying Wooden Wonders, with the odd bit of wooden special effects to match but totally free of the contrived Star Wars-style CGI which seems to blot most flying films nowadays. Anyhow, back to our raid on Amiens Prison...the CFS2 planning screens, as usual, allowed me to switch crews between flight positions, inspect a map, check mission goals...and view a 'recce photo' of the target. This latter was most useful - it was a render of the target building, annotated to highlight the guard towers, walls and barracks that wanted bombing, as well as the jail block itself, which did not. This was useful, both to help me get 'eyes on' the target during the run in, and to make sure we attacked the right bits of it, only! The default armament for my machine was rockets and I stuck with these as more accurate weapons (in my unpracticed hands, anyway!) than the HE bombs which I think were actually used on the real raid. Having quickly run through the planning phase - too quickly to take a screenshot, but you'lll be able to see the map at the debriefing stage, later - I kicked off the mission. And here we are, lined up on the runway at RAF Methwold: Experienced CFS2 players will understand that this sim dates from the time when Microsoft flight sim landscapes were basically barren, apart from placed sets of 'scenery' objects, like the RAF airfield provided with 'Mosquito Squadron'. Despite being Pacific-based, CFS2 does at least include reasonably topographically accurate terrain for much of NW Europe and (as far as I know) the rest of the world, even if it is covered with nothing more than bland (but reasonably effective) textures and odd spots of scenery objects created and placed for specific missions. Looking at our mounts, the Just Flight Mossie is a nice representation. The canopy framing looks a little slender but the machine's outline looks quite accurate; unlike the CFS3 Mossie, which was a BIV bomber with distinctive split (instead of flat-fronted) windscreen and glass nose painted over for the FBVI and FBXVIII variants, and had a rather poorly-shaped fin. One negative about this CFS2 version is that the upper surface camouflage pattern is mirrored, whereas in real life the green 'shadow shading' on the upper surfaces was different on left and right sides. Otherwise, it is a reasonable representation of the mid-war Mossie scheme, which used the RAF fighter Command scheme of the day, later modified to use the same, lighter shade of grey above and below. Inside, you get the old-fashioned fixed cockpit graphic and the less detailed virtual cockpit, the former only supporting snap view, the latter panning as well. Neither are up to IL-2 standards but CFS2 virtual cockpits are not bad, some considering them generally better than the CFS3 versions, though the Just Flight Mossie's is rather dark. In the external view, I set the flaps to down one notch, checked the controls worked, and started engines, my two Merlins firing up one after the other. One of the highlights of this package - as with the Just Flight 'Dambusters' add-on - is the engine sounds, which are noisy, dramatic and effective, worthy of any current sim. Brakes off and throttle briskly up to the limit, and I was on my way. Rudder was needed to keep her straight; with the rapid acceleration from my fast application of full throttle, it was easy to overcorrect and some care had to be taken to prevent my kite ground-looping. The CFS2 Mossie's wheels are not animated in rotation but they and the undercart look the part, unlike the undernourished articles on the CFS3 version. I was soon off the ground and retracting my gear. Flaps up, I called up the 'radar'/Tactical Display/TAC - retained in CFS3, but changed from rectangular to an even more radar-like circular display - and checked the orientation of my first leg with the blue track line to the next waypoint. I climbed slowly and turned gently onto my course, at which point the track line turned green. Throttling back for a bit to enable my squadron to catch up, I looked around. Apart from the scenery objects representing RAF Methwold and the nearby village of that name, there was not much to be seen - open country with summer-like field textures, the odd beige-grey patch denoting an urban area, the flat landscape reasonably appropriate for the low-lying county of Norfolk in eastern England. Settled on course and into formation, I set the TAC to display ground targets and used the 'warp' feature to avoid the long flight over Norfolk, across the Thames Estuary, over SE England then the English Channel and overland to Amiens in north-western France. CFS2 campaign missions being scripted rather than 'dynamic', I was confident that unlike CFS3, warp would bring me out at a sensiblly low level, appropriate for this mission, not the 'one-size-fits-all' tens of thousands of feet of the later sim. And so it came to pass. ...to be continued!
-
'The first bomb blew in all the doors and breached one of the outer walls' (Martin Bowman, 'Aircraft of the Aces - Mosquitos of World War 2', Osprey/DelPrado) Up and around for another pass. I got off four rockets this time, noticing that my first pair seemed only to have cratered the vicinity of the wall I was firing at. On the R/T, I could head my squadron was taking some losses but also making some attacks of their own. On my last pass, heading now in the direction of home, I loosed off the last of my eight rockets. By that time, I could see that the prison wall, which had seemed to be coming apart on the last pass, was now missing a large section, both where I had been attacking it and in another area! Yesss! My final personal contribution to the mission was a risky firing pass at a couple of the AA guns nearby. Not good life insurance but it might mean the difference between life and death for some of my mates still attacking the target, and perhaps also for the virtual prisoners down below whom we were trying to save, albeit at the risk of hastening their demise. That was enough for one day. I could have stooged around until I was sure all of my squadron had made their attacks. I think the only way to do this is maybe selecting targets and hitting the 'A'/attack key until the only acknowledgements you get are people telling you they could not comply. But I decided to call it quits and avoid more losses in that flak-infested area; I had seen at least two Mossies go down and that was enough. I circled the objective in a wide arc and gave the recall command…and home we went. Yes I know the pic below shows us fully loaded but I didn't take a screenie on the way home, partly through the release of tension after some tricky flying. Time was short so I skipped the rest of the flight home and just went for the debriefing. The damage we'd wrought was credited to us - or mine was anyway, not sure how to view individual wingman results in CFS2 or if they're just taken into account overall, in resolving the mission goals - but it wasn't enough to count the mission as a success. CFS2 missions are very goal-oriented, but in this sort of mission that's not a bad thing. We'd missed the guard accomodation, whose destruction on the real mission was deemed important to helping the prisoners escape. This is more realistic than the stock CFS2 campaigns, whose objectives typically set you unrealistic fixed goals like destroying at least a certain number of enemy aircraft, and fail you if you don't. Daft. Overall, this was an engaging and enjoyable mission and - though I'll miss the more modern sims for the time being, -I'm now looking forward to playing further missions in this and/or in some of the other CFS2 expansions I picked up 'back in the day', as well as some other classic sims. I gather there's a new .exe of European Air War a-coming, for one. And plenty more where that came from...Screamin' Demons Over Europe, M1 Tank Platoon 2 and Panzer Elite, anybody?
-
'At precisely 12.01 pm, with the guards sat down to eat their lunch, bombs from 11 Mosquitoes hit the prison.' (Martin Bowman, 'Aircraft of the Aces - Mosquitos of World War 2', Osprey/DelPrado) We exited 'warp' over the western fringes of a town which must be Amiens, at perhaps two or three thousand feet. Peering ahead, I began to see buildings take shape out of the bland mass of CFS2 urban textures (they emerge from the general blur rather close, perhaps, but without the rather obvious 'pop-up' of IL-2). We seemed to have rather a lot of Canadian pilots in the squadron, from the accents of the voices warning me that the target lay ahead and that flak was coming up to meet us...either that or these were the stock CFS2 aircrew voices. The flak needed no such announcement; I could see for myself from my virtual cockpit the black busts appearing in the sky ahead, soon joined by yellow pencil lines of tracer fire. Looking behind, two aircraft of the second flight were already going down, though from the lack of flak bursts in that particular piece of sky, it could have been a mid-air collision. This was where that recce photo came in handy, as I was soon able to identify the target building amongst a cluster of smaller structures, more or less dead ahead. The moment of truth had arrived! It was at this point that I realised I had made no plan at all for the attack. In fact I had rather got out of the CFS2 flight-leading habit. Air-to-air I was used to, from flying a lot in CFS3 derivative Over Flanders Fields and the occasional CFS2 Pacific fighter mission. But here, the task was a bit more complicated. A certain amount of precision bombing (or rocketing) was called for, against a very specific target. And I knew that my wingmen had likely not been pre-programmed by the mission designer to attack anything, and would be relying on my orders, on arrival…as in, now. My original, large-box version of CFS2 came with a large printed manual, but I was loath to pause the game while I retrieved and read this. So, recalling my experience with OFF and with ground targets selected on the rectangular CFS2 TAC, I started tabbing through these targets. I was relieved to see the 'gamey' but rather useful yellow 'target selected' brackets appear on the ground, with my first tap of the key. Watching what they picked up as I tabbed, I could see that the target brackets appeared to be cycling through the things we needed to destroy: the prison's walls, guard towers, and guard accommodation. As all this was happening, my speed was carrying me up to the flak-laced sky around the target, so I had to act quickly. First, I needed to make a rapid choice between going straight in, or pulling to the side while I organised things at leisure. I decided to carry on. Each time the target brackets picked up something I reckoned needed whacking, I gave an 'Attack' command - the 'A' key, no nested menus needed for CFS2's short command set! As I remembered would happen, with each command, a pair of aircraft peeled off to attack the designated target. Not entirely realistic, but reasonable enough, as I had no way of saying on the radio - 'Red Section, target - guard tower, northeast corner of prison, go!' I roared past the target at about seven hundred feet. The need to issue this flurry of commands had left me with no opportunity to make an attack of my own, but I could at least distract some of the flak and set myself up for a firing pass with my rockets, on the way back. And that's what I did. I jinked then throttled back, pulled her up, around and over, nosing back down at the target in a 30 degree dive and edging the throttles fully open as I came in. I 'armed' (selected) the rockets and lined up my target - a section of wall with a guard tower at each end - in my reflector sight. Allowing for the drop in the rockets' trajectory, I let the centre of the sight reticule move up and through my target and fired when it I judged it was sufficiently far above my mark. Fire! With a loud whooshing sound, a pair of HE rockets streaked away, their oversize tracers leaving a trail of grey smoke. No time to ripple off a second pair. I pulled up and flashed over the target, narrowly missing crashing into it. I was only vaguely conscious of gouts of dark smoke around my aiming point and more aware now of the angry bangs of flak and the tracer slashing past my canopy. Crikey, this is b***dy dangerous, I thought to myself. ...to be continued!
-
My pleasure!
-
Version Version 1.1
586 downloads
Stock AI RE8 made player-flyable, for FEG & FE2. See readme for installation etc. Loadout screen locks up in FE2; will upload fix if/when found. OFF has a Harry Tate already, RoF is about to get one. Couldn't find an RE8 for FE so made this myself. -
Flying a classic Western Front campaign...in a classic Eastern Front flight sim! I don't know about you, but the sim that came closest to my ideal of a WW2 flight sim was (and in some key ways, still is) European Air War. For one thing, EAW had - in spades - many little but oh-so-immersive touches that later sims seem to omit or neglect. There was something resembling a decent pilot logbook; basic but effective verbal campaign briefings; and a between-mission representation of your bunk in a Nissen Hut complete with creaking bedsprings, coughing (but invisible) companions, and a radio set which you could tune into renderings of appropriate popular music of the day. Break off from the campaign and you got an on-screen day pass complete with tickets to an appropriate show and a picture of your 'floosie'! Not only that, but EAW featured the two aerial campaigns that defined the European Theatre of Operations air war and always interested me most: the Battle of Britain in 1940, and what might be called the Battle of Germany, 1942-45, where the tables were turned and it was the Luftwaffe's turn to defend the Homeland against swarms of marauding bombers. In EAW, I could escort Stukas or Heinkels in 109s or 110s or try knocking them down in a Hurri or a Spit. And I could take to the skies over the Reich in my favoured German mount, the venerable 'Gustav' or Bf109G, and lead my staffel into deadly firing passes on huge combat box formations of B17s or B24s, braving swarms of tracers and watching my kills go slipping or spinning out of formation trailing smoke. If I fancied something different, I could slip into an FW190A or D, a later Bf110, or even a jet Me262. Or I could swap sides and take on the Luftwaffe in a P47, a P38 or a P51. My idea of sim heaven! When CFS2 came out, I enjoyed the better graphics and the change of scenery to the Pacific, as well as the opportunities afforded by many add-ons that enabled you to experience Pearl Harbour, fly with the Dambusters and all the rest. I spent a lot of time back in the ETO with CFS3, which failed to add better ground control and seemed worse in the air-to-air department, tho it was reasonably good in its declared aim of simulating tactical air ops, albeit in a weird version of WW2 where German shipping traffic plied the English Channel in daylight and an invasion could have been mounted in either direction. Battle of Britain 2 'Wings of victory' I played as well, loving its superior AI tho ultimately finding its odd combination of wargame and flight sim not quite to my taste. For the Battle of Germany, 'B17 the Mighty Eighth' was a really superb bomber sim but its fighter capabilities were much more limited. As for IL-2...well I bought and played, on and off, just about all the successive versions and some add-ons but while the rather dry single-player campaigns were jazzed up somewhat over the years, the Eastern Front never really floated my boat. Despite the 'Battle over Europe' add-on, coverage of the ETO remained very limited, while IL-2's drive to the Pacific seemed to me to have many fine aspects like the ability to defend Singapore in Buffaloes or later, take the fight back to the Japanese in a Beaufighter, but ultimately, to fall somewhat short, not least due to a hopelessly inadequate set of ship types. I longed for the tussles with the fleets of bombers that EAW brought to my screen, especially the missions against the 'Amis' in their 'viermots', the big, four-engined Flying Fortresses and Liberators, with their attendant swarms of 'little friends', the Thunderbolts, Lightnings and later, the Mustangs. EAW was still in business, but I wanted to experience its massive battles with the graphics, AI, damage and flight models of a modern sim. IL-2 Battle of Stalingrad might be an interesting diversion to the East, and DCS-1944 might get there one day, but what of the present...? Having rediscovered the delights of IL-2 in the form of the excellent Dark Blue World mod - surely, the ultimate single-player add-on for IL2 - and found there existed a version of Boelcke's "Defense of the Reich" campaign just for DBW, I thought it was time to revisit the virtual skies over the crumbling Thousand Year Reich. I wanted to see if I could rediscover the thrill of sailing, cannon blazing, into a combat box which filled the skies around me with tracers from dozens of .50 cals. Would IL-2, DBW and Boelcke's campaign hit that spot? ...to be continued!
- 12 replies
-
- 1
-

-
- il-2
- defence of the reich
- (and 1 more)
-
I think that's the one that starts with a transit flight in a 109E? Didn't finish it for some reason; must dig it out again and see if it'll work in DBW or in 4.12!
-
'Fini' - the final act! As my flight-mates latched onto the last Messerschmitt, he swerved towards me. I slipped in behind him, thinking to distract his gunner from the pursuing French planes. This worked a bit too well, because the cochon actually hit me! So I pulled up and kept a watchful eye on proceedings, and let them get on with it. This went on for some time. Thankfully, the two attacking Curtisses didn't seem to get in each other's way. One stayed on the Messerschmitt's tail, while the other hung back. Several times, the leading Frenchman looked to be in a good position, but there seemed to be no shooting. Was he out of ammunition? I gave this a while longer, then decided enough was enough. At one point the 110 slipped below us, heading back east. Taking the opportunity, I pulled up and headed west, ordering a recall as I did so. As my comrades rejoined, I swung around to the north-west and home at full power, keeping a watchful eye behind in case the German decided to come after us. But he too seemed to have decided that it was time to call it quits. The flight home was uneventful. As we neared our airfield, my three surviving squadron mates broke off and I made my own approach. As I turned onto finals, I realised my flaps would not extend. Combat damage from that rear gunner! Then I realised my undercarriage would not go down, either. Bon Dieu de mille bons Dieux! I executed a hasty go-around. I opted to make the now-inevitable belly-landing at an adjacent airfield with a grass landing area, thinking perhaps this would give me a better chance of avoiding a crack-up. Unlike IL-2, in my experience CFS3 is VERY unforgiving in the event of a wheels-up landing on ground or water. In my anxiety not to fall foul of this, I somewhat overdid holding her off just before touching down. The lack of shadows didn't help me, in judging my height - I think CFS3 'turns them off' in cloudy conditions, although the cloud cover was intermittent today so I may have turned them off by accident somewhere. My worst fears were duly realised. The debriefing was typical CFS3. Listing my mission goals - which unhelpfully, I don't think CFS3 spells out at the briefing! - I was told that I had succeeded in reaching my mission goal. The goals I had failed were listed as 'visit all waypoints, survive, and return to final destination' (the middle bit of the latter presumably being the issue there) and 'destroy Hs123 formation'. Thanks, CFS3 campaign system, for not telling me at the briefing that I had to do that. On the positive side, I was credited with two Bf110s brought down. I knew that the mission had cost my squadron four aircraft. But unless I've missed something, there is no way of finding out whether your shot-down squadron mates survived or not, or what success they had - I knew they had shot down at least one, probably at least two, but unless I've missed it or forgotten, CFS3 is very much focussed on you the player and doesn't seem to care much about your mates, or to encourage you to do so, either. If I recall right there is a (very long) list of pilot names in a squadron roster but I don't think this helps much, unless there's some facility I've forgotten which lets you review it after each campaign mission to see losses and kills. If it is there, it's not very well presented. Nevertheless, and despite air-to-air not in my experience being CFS3's strong point, this was a challenging and enjoyable mission and the terrain, planes and effects were very good. Although I'm rather spoiled by the fact you can fly, patrol-lead and fight in First Eagles with no visual aids, I soon got used to using the CFS3 'radar' as a reasonable way of being able to get reasonably realistic reports from an imaginary ground control and organise my wingmen's activities in a reasonably realistic way which would have been much more difficult without a very capable set of radio commands. As for my plane, the Curtiss Hawk was a nice mount and I only stalled and spun out once, recovering without too much fuss. Flying the H75 in the ETO Expansion gave me some insight into why it was that such a high percentage of the Armée de l'Air's kill claims against the Luftwaffe were made in these aircraft. Definitely recommended!
- 23 replies
-
- 3
-
-
- cfs3
- eto expansion
- (and 3 more)
-
'Notre patrie est en peril de mort. Luttons tous pour la sauver!' ('Our motherland is in danger of dying. Let us all fight to save her!' - General Charles de Gaulle in his famous 1940 appeal 'Á tous les Francais') There was at least one other Messerschmitt in the air, and I was soon after him, firing as I came. But not for long! My rounds had evidently damaged his starboard engine which was trailing a thin whitish whisp of what looked like escaping Glycol coolant or fuel. But I ran out of ammunition, just as I thought I had him. He went down in a descending turn, as I watched in frustration, squeezing my triggers in the vain hope that my weapons would magically spring back into life. No such luck...away he went! Well, if I can't finish him off, maybe somebody else can, I thought. The airwaves seemed to have settled down and apart from this German, the combat seemed to have fizzled out. So I issued the order to attack my target. The first response was 'No can do!' (the voices are all the original US English, incidentally) but the next two acknowledged their compliance. This was good, but also a bit of a worry. Were there only four of us left? Not so good, if so. ...to be continued!
- 23 replies
-
- 2
-
-
- cfs3
- eto expansion
- (and 3 more)
-
'il nous faut de l'audace, et encore de l'audace, et toujours de l'audace!' ('We need audacity, more audacity, always audacity!' - French Revolutionary leader Danton, in response to the Duke of Brunswick's Prussian invasion in 1792) As I swung around in an effort to dive down behind the formation of Henschels, I went slightly wide, but soon managed to padlock a target at lower level. Only problem was, he was moving very fast and even at that range, he did not look much like a biplane close support aircraft. I had to keep my throttle open and pull a lot of Gs to get onto him. Despite the G-induced blackness giving me tunnel vision as I pulled out after him, I quickly realised that the Boche was in fact a Messerchmitt 110...and he was not alone. Oh, merde! In for a centime, in for a franc, I thought. No going back now. I concentrated on the nearer 110 and went for him. His rear gunner didn't seem to be able to get onto me and although my shooting was initially a bit wild, I managed to get some good hits. There was a sudden gush of bright orange flame from somewhere between his fuselage and his starboard engine, and down he went Now, where was that second Messerschmitt? A look behind...there he was! I banked tighly and pulled hard back on the stick. The German disappeared somewhere behind and below me and instead, I latched onto another 110 whom I could see up ahead of me. After a few ineffective exchanges of fire between myself and his rear gunner, he made the mistake of reversing his course in front of me and I got in another good burst, with similar results. I watched him go for a bit. Though he seemed in no hurry to make the final plunge to earth, I was fairly sure he was finished. Conscious of the Golden Rule, never to fly straight and level for long in a combat zone, I turned and looked around to see how the air fight was going. During my attacks I was conscious of some radio chatter, with my comrades announcing both serious damage and some kills of their own. One of these I saw for myself. As I watched, one of my friends latched onto the tail of another Messerschmitt. I swung over, ready to help, but there was no need. He followed the 110 through its evasive manoeuvres and a short burst saw the enemy machine break up and tumble earthwards in pieces. So far, soo good! ...to be continued!
- 23 replies
-
- 2
-
-
- cfs3
- eto expansion
- (and 3 more)
-
'Ils ne passeront pas!" ('They shall not pass!' - famously, the rallying cry of General Pétain against the German WW1 Verdun offensive) The ETO Expansion's H75 is a fine plane. The tailwheel fairing under the tailplane is possibly a bit angular at the rear but she really looks well, resplendent in her multicolour Armée de l'Air camouflage scheme and markings; nice cockpit, too: By now assembled in formation, we completed our climb to height and settled on our assigned interception course to the south-east. The showers eased off somewhat as we sped on. Things seemed quiet en route, so I decided to 'warp', to save time on the long and likely uneventful transit flight over friendly territory. We automatically exited 'warp' just short of our objective area, a sign that enemies were not too far off. I looked around, and was surprised to see a formation of single-engined biplanes, which, without the 'radar', had been hard to pick out against the ground until they were quite close. They suddenly came into view on a reciprocal course, ahead and somewhat below us, and just as quickly slipped under us. What were they? Fiat CR42s was my first thought, not likely Italian but I seemed to recall that our Belgian allies flew some of these. Just as they slipped out of view below us, something clicked in my head and I recognised their familiar shape: radial engine, big upper wing, much smaller lower one...Henschel 123 ground attack aircraft - I was sure of it! I turned on the 'radar' so as to be able to padlock targets for myself and to allocate them to my comrades, tapped the 'A' key several times to give the order to attack and banked around hard into a 180 degree turn. Our formation promptly disintergated as my escadrille broke up, swung around and went for the Boches. ...to be continued!
- 23 replies
-
- 1
-
-
- cfs3
- eto expansion
- (and 3 more)
-
Hi Viggen this was discussed here, may help: http://combatace.com/topic/75108-new-to-this-game/ Of course there's more since then. It's a fair bit of work to get a modded install with all the goodies set up and running but it's very worthwhile and nothing to the work the modders put in. What I'd suggest is go for broke - install Ojcar's Armchair Aces Redux campaigm; look at the readme and get/install all the planes and mods needed for it. Apart from a handful of new planes like the new BE2c from Stephen1918, that will bring you up to snuff in one go. Most of what's needed is here at CombatAce; the rest is at the A Team Skunkworks (which has its own, distinctive email registration request process and download rules you need to be careful to observe). That will give you a WW1 sim covering the air war from 1915 to the end with a planeset nothing else can match. Zip and save your 'mods folder' to disc and you're ready for anything. From there it's a short step to creating a second FE2 install and adding a few extra planes for Gterl's Italian Theatre and another one for Ojcar's Unsung Heroes floatplane campaign.
-

Color of British tracer rounds?
33LIMA replied to DukeIronHand's topic in WOFF UE/PE - General Discussion
'None' may be the answer to that. In 'No Parachute', in a letter to his fiancée in May 1917, Arthur Gould Lee describes tracers for her benefit, and this is what he says: 'Tracers, I should explain, are special bullets, mixed one to three with ordinary, which contain phosphorous, and leave a white trail as they whizz through the air, so showing where your bullets are going, more or less - they're not all that accurate.' On a quick read, I can't see him describing tracer in terms of colour. Several times he describes seeing tracer fire, and several times, smelling it. The crucial thing in his description seems to be that the visible effect tracer produced was the white smoke trail. He makes no reference to any glow, of any colour, that I can see. It was the white smoke trail that he says permitted observation and correction of your fire, not seeing the burning phosphorous. This is also how Rudolph Stark portrays tracer fire in his paintings of his air combats in 1918, that are featured in his book 'Wings of War'. Tracer fire may have looked quite different in daytime anyway. As I recall it, NATO 7.62mm tracers where a bright pinkish-red in dark, but were a washed-out version of that in daylight, more pink than red. They didn't leave smoke trails though, not that I ever recalled seeing anyway. So I'm inclined to think that in WW1 air combat, the smoke trail was generally the visible effect of tracer, and that the burning compound may not necessarily have had any particular colour, that was apparent to the firer. -
109F questions ...
33LIMA replied to Wrench's topic in Thirdwire: Strike Fighters 2 Series - World War II Forum
About the oil cooler, the bottom one (older) is a much better shape. Just a little deep for a 109F but a better shape. Couple of other suggestions: - move the wings down slightly, so that their undersurface is flush or level with the lower fuselage; - from the front, the canopy should be angular, not rounded (the only rounded area is the top section of glass in the little piece behind the section that opens); - move the tailplane/horizontal stabiliser and elevators down - they are much too high - and further forward; - make the propeller spinner a bit less bulbous/a bit more streamlined; - flatten the exhaust stubs - make them more rectangular in cross section, less round; - reduce the width of the cowling MG troughs; - make sure the sides of the rudder are flat - there seems to be a 'fold' in your rudder following the line of the upper fuselage backwards (the Bf109 rudder is slightly triangular, looked at from ahead or astern, but its sides are flat); - hard to be sure, but in the top view, the rear fuselage looks too long, out of proportion to the nose; check against drawings and maybe make the nose a little longer or the rear fuselage a little shorter; - and yes as ndicki said, smooth out the upper rear fuselage (and the lower, though it needs less) to hide the visible 'kinks'. -
Wow! First Eagles meets Train Simulator! Brilliant work! Soon, hopefully, it'll be 'Chuga chuga choo choo rat-tat-tat boom!'