33LIMA
-
Posts
3,749 -
Joined
-
Last visited
-
Days Won
7
Content Type
Profiles
Forums
Gallery
Downloads
Store
Everything posted by 33LIMA
-
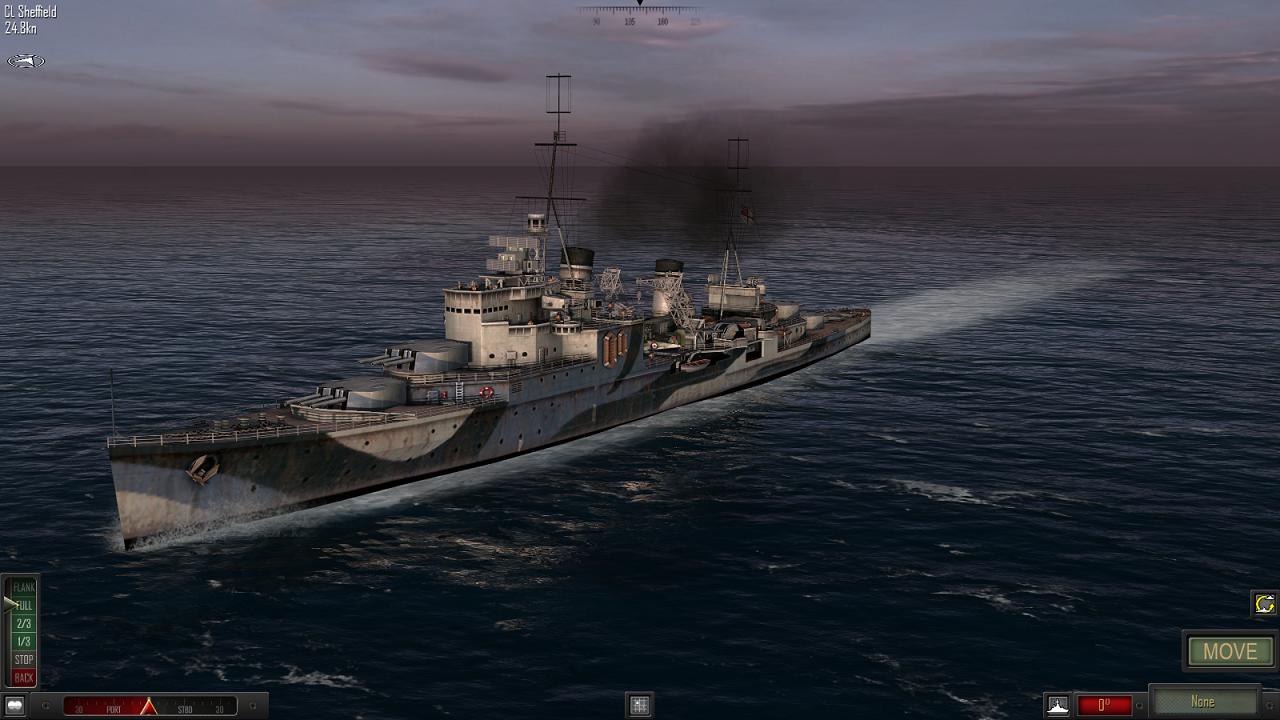
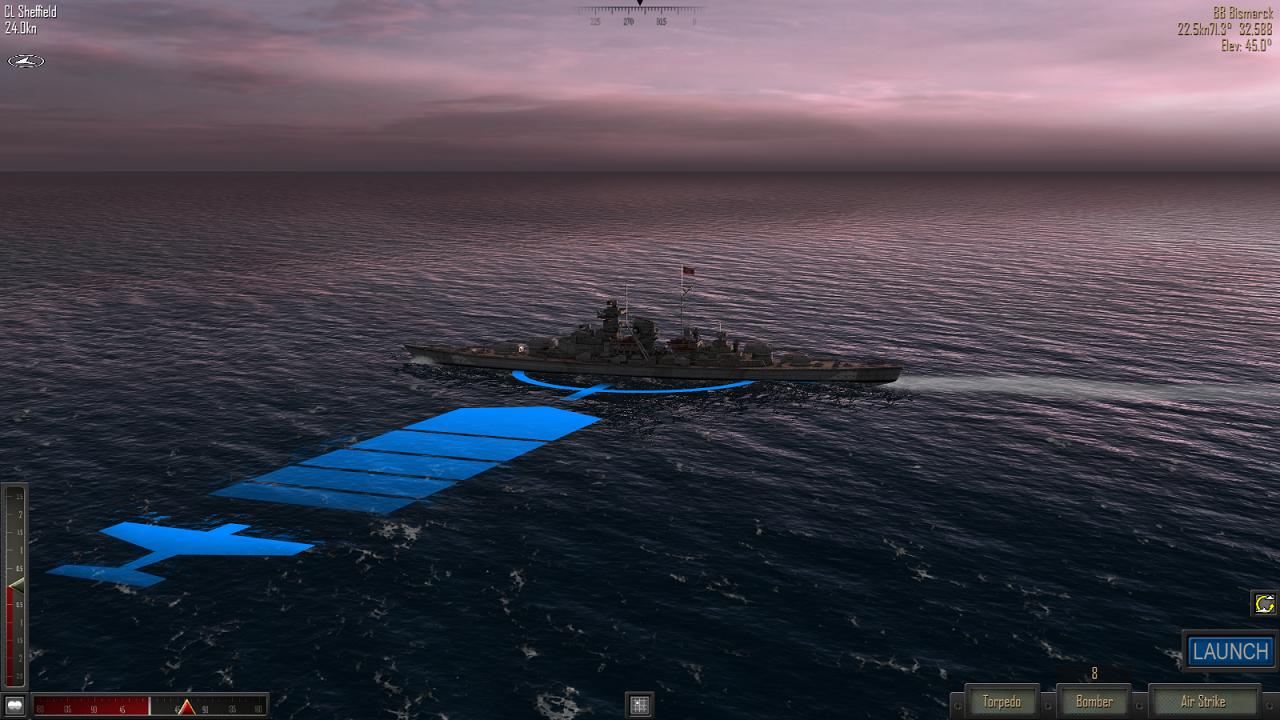
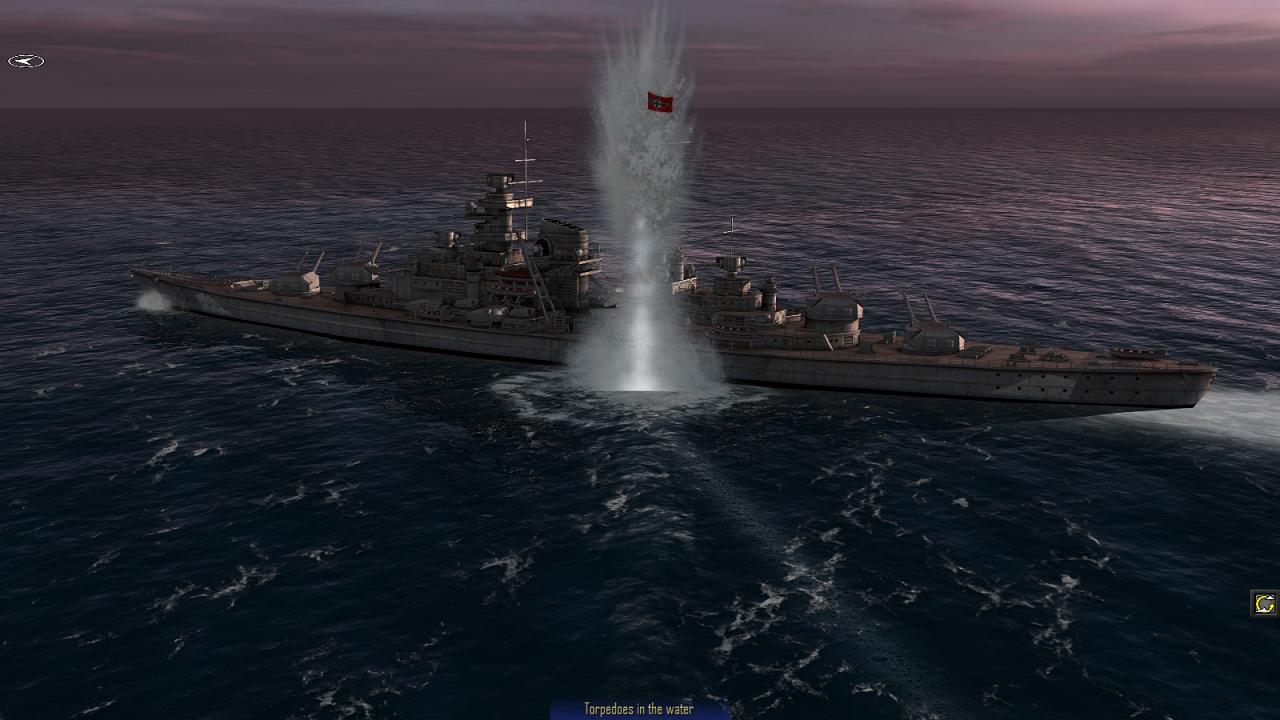
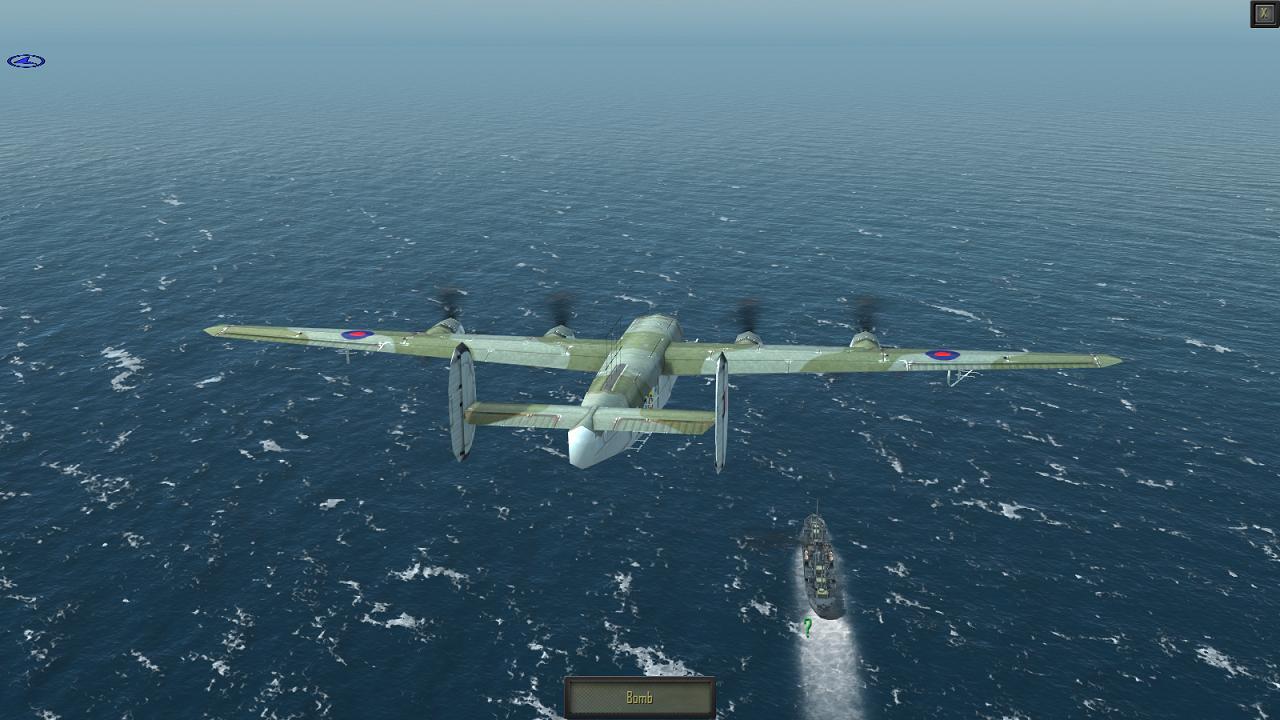
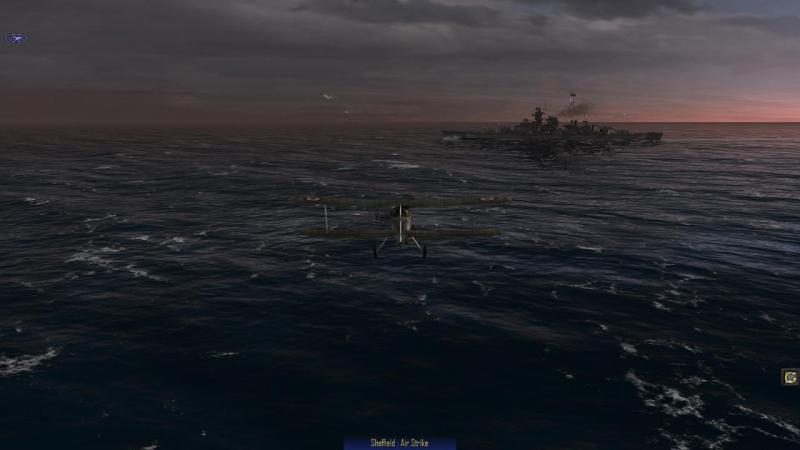
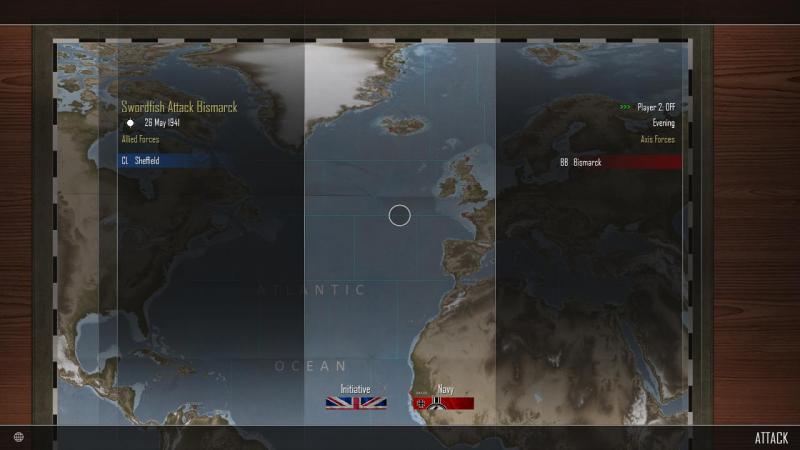
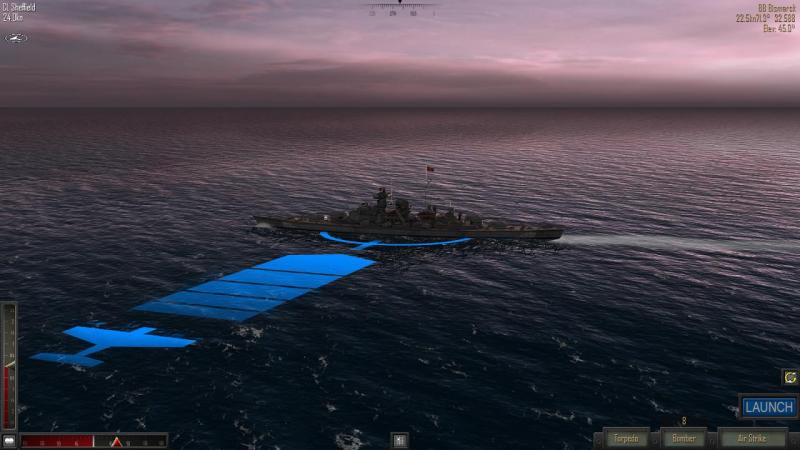
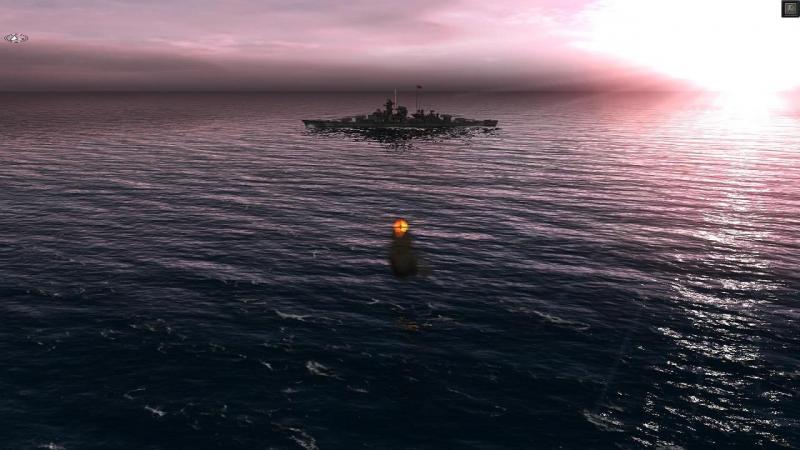
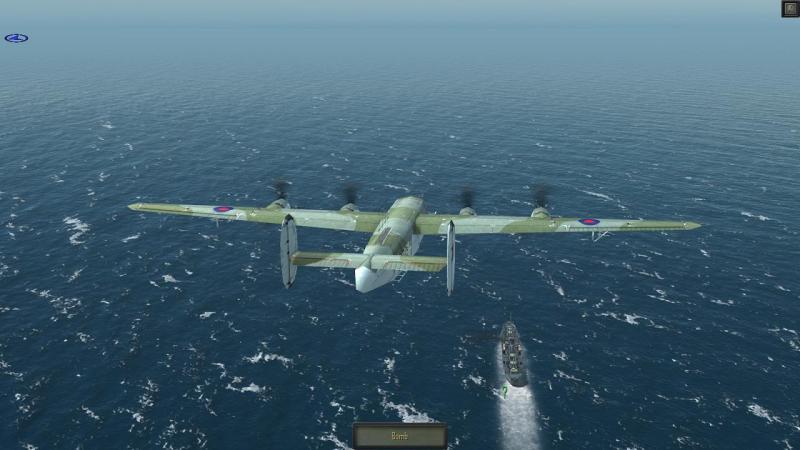
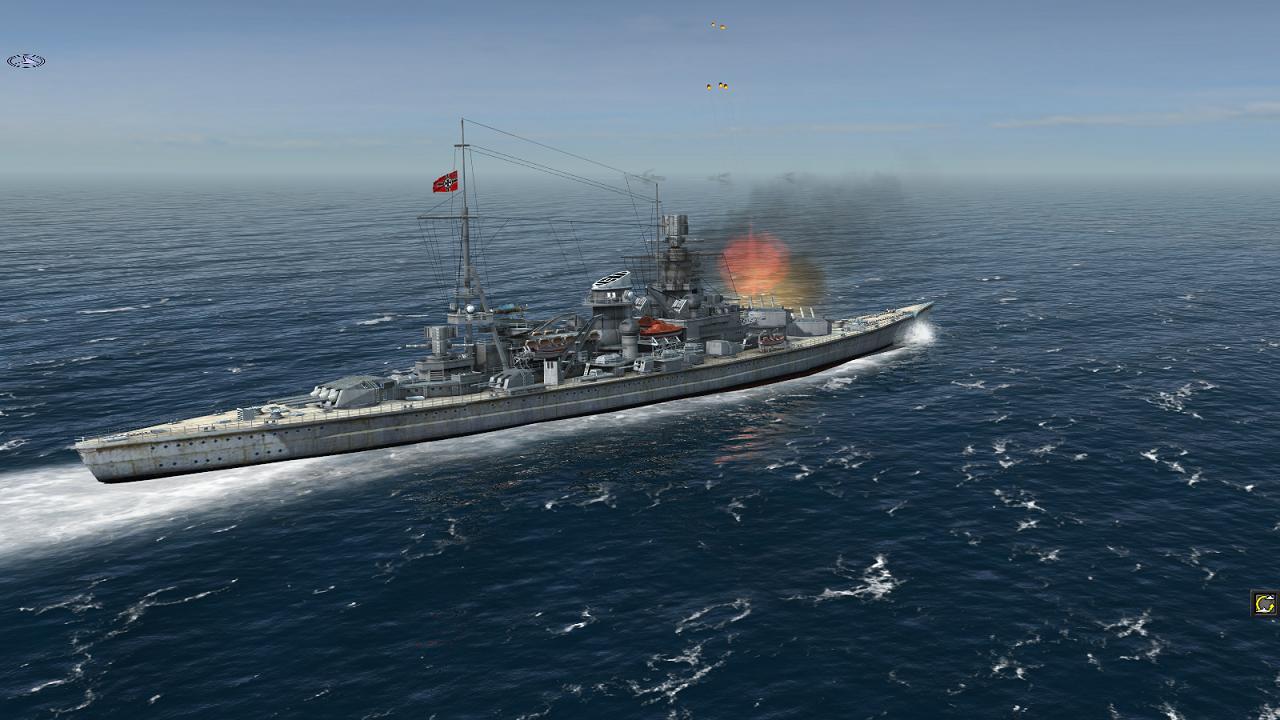
Single battles - above the waves Atlantic Fleet provides for aero-naval combat in the form of airstrikes, which can come in two flavours - those called in from a ship, and those despatched from an aircraft carrier. I have been on the receiving end of one of the latter, when, attacking HMS Glorious with Scharnhorst and Gneisenau, I was harried by flights of Swordfish despatched by the carrier, before I could sink her. Despite taking losses from our flak, the first wave dive-bombed Scharnhorst rather severely, and the second finished her off with torpedoes. I believe air-to-air combat can also occur, where opposing aircraft come into contact - for example, a German long range maritime patrol aircraft being intercepted by fighters from an escort carrier. I decided to try out the mission featuring a Swordfish strike on Bismarck. Here is the launch screen for this single battle. As you can see, this has been set up so that HMS Sheffield will be calling in the strike. In real life, the cruiser was shadowing the German battleship and when Ark Royal's Swordfish first attacked, they went for Sheffield by mistake. She likely escaped loss or serious damage only because several of the torpedoes dropped exploded prematurely. A subsequent attack with different fuses was the one which sealed Bismarck's fate, with Admiral Lutjens signalling Berlin "Ship unmanoeuvrable. We shall fight to the last shell. Long live the Fuehrer!" Here's Sheffield. In this action, she starts within range of Bismarck's guns, so you need to begin evasive manouevres right away, while you call in the Swordfish! When airstrikes are available to your side, they operate is if they are an additional weapon for your current ship. Cycling through weapon types while in the 'You shoot' phase of a turn brings up the airstrike option, and at the same time, the red 'FIRE' button turns blue and its label changes to 'LAUNCH'. Which 'does exactly what it says on the tin' as the saying goes. Simplified yes, but rather clever and very nicely presented, most definitely! So, select the target, and you get this: Using the similar bottom-left-hand scales and mouse dragging that you use to direct gunfire, you swing and drag the blue air attack marker which now appears, placing it on your target, rotating it to set up the attack direction, and moving it laterally on the sea surface to set the path of the aircraft. In the pic above, I forgot to allow for target movement - I should have dragged the marker ahead of Bismarck, sufficiently far to allow for her movement, and possibly evasive action. The attacks are semi-automated, after that - planes will follow a suitable attack profile which you can't change, but you do need to remember to drop the weapon or weapons, when you judge the moment is right. Each airstrike is like a salvo of shells, but arriving in succession - four to a wave usually, it seems. My first Swordfish got shot down, during attack number one. Second time around, the plane got through, although I nearly forgot to drop the torpedo. And when I did, I suddenly realised that I had not allowed for target movement, resulting in a miss astern. If I recall right, you can adjust the target maker for each attacking run, and when I did that, to aim ahead of my target, things went rather better. The centre screenshot is the view just after dropping the torpedo, which is just below the aircraft. The last pic shows the satisfactory result, though I'll likely either need a lot of hits like that, or some better-aimed ones, targetting her propulsion or steering. The aircraft 3-d models are a little low-polygon, but quite realistic and nicely textured. As with the submarine action, and indeed the more sophisticated surface combat, this aero-naval element plays like simulation at the level of a tactical wargame, rather than at the level of individual weapon systems, but that is per design. The net result is this - here, we have, for a remarkably low price, a highly accessible, more than adequately realistic, visually impressive, ship-filled, historically well-founded and hugely engaging product, in the air, on the sea, and below it. Atlantic Fleet is, in short, this WW2 naval gamer's dream come true. And I make no apoligies for spending so much time on the single battles, for they are (a) what I enjoy most (b) at the heart of Atlantic Fleet's gameplay, and © a wonderful advertisement for the game. But be patient, grasshopper, we've got one more section to go, before we take Atlantic Fleet on campaign! Coming next - a quick look at some of Atlantic Fleet's other single battles!


-
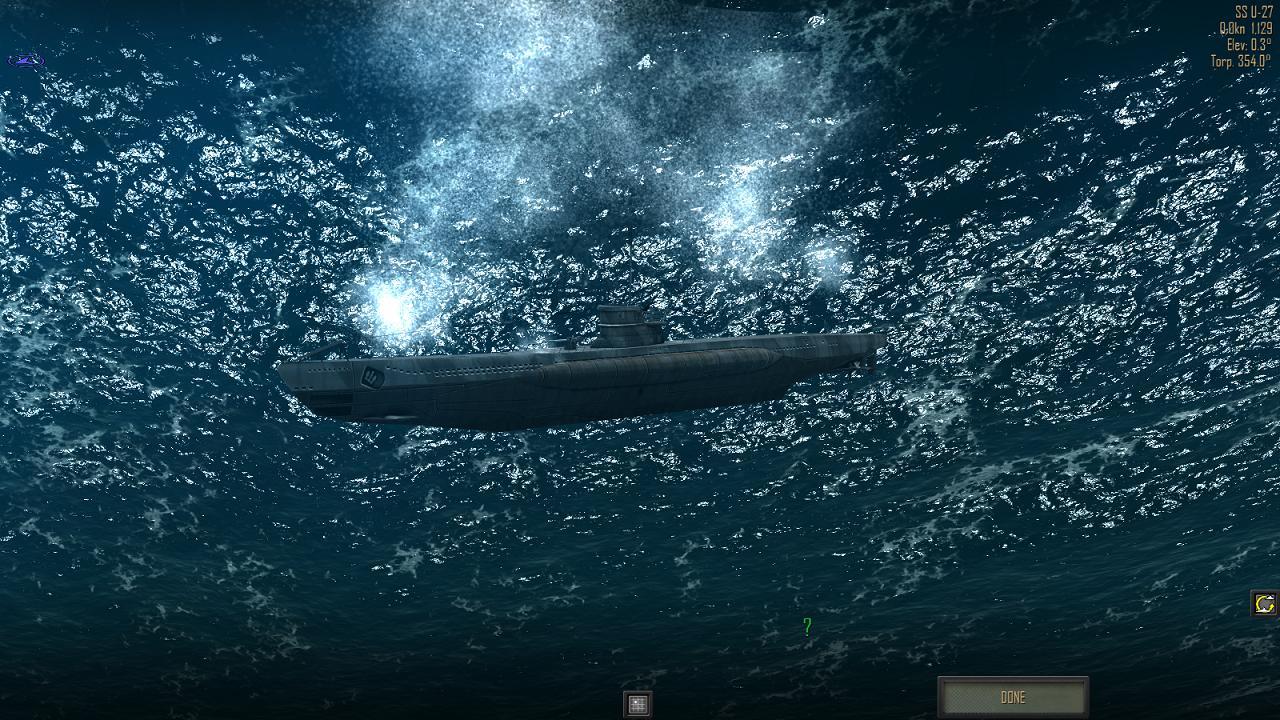
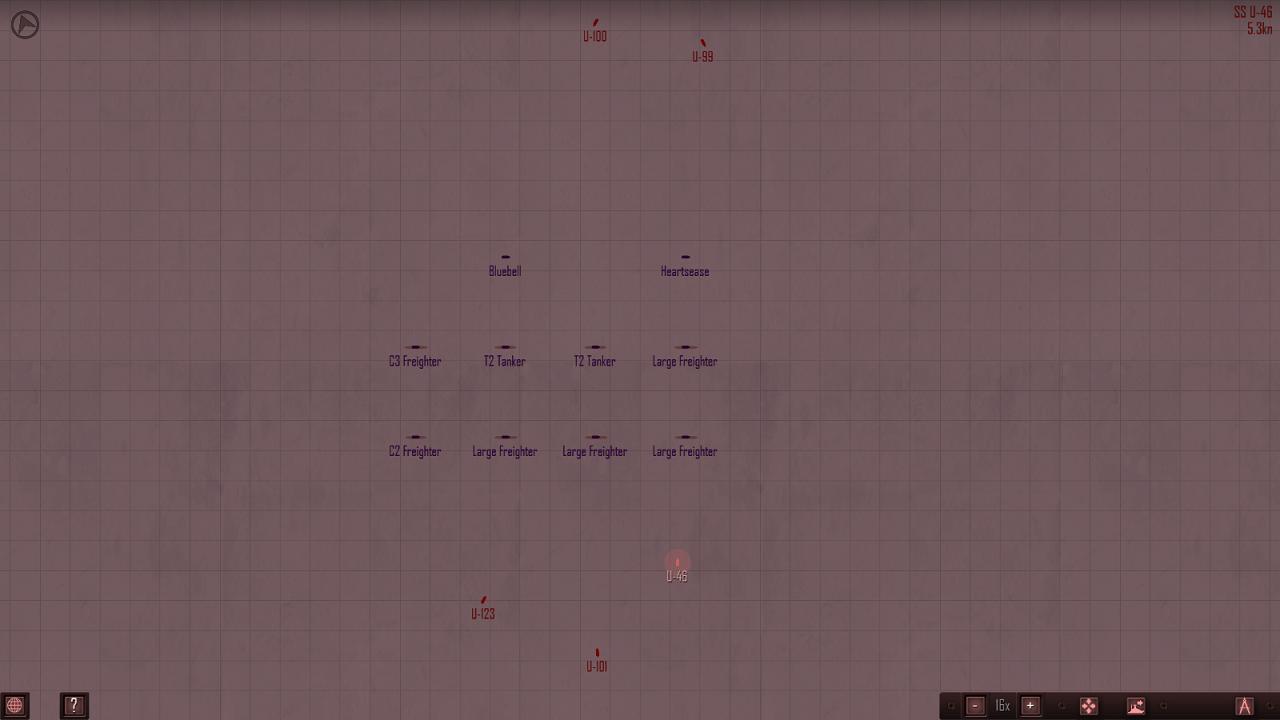
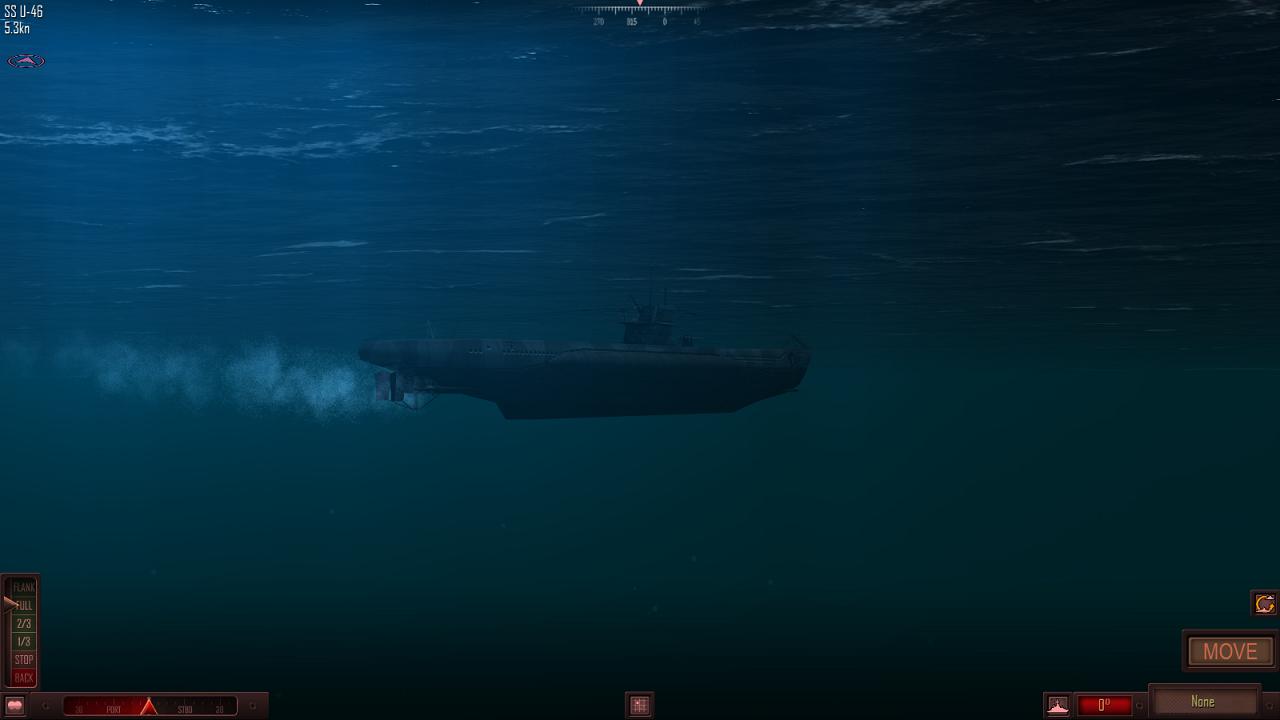
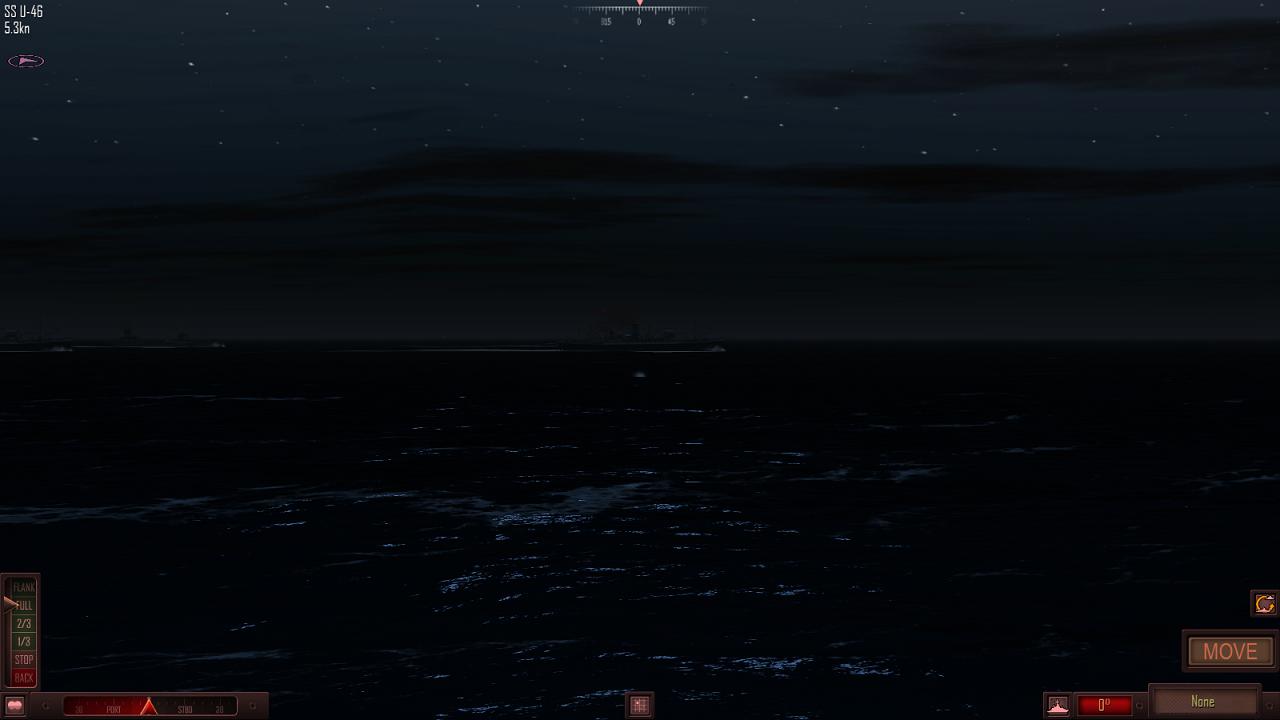
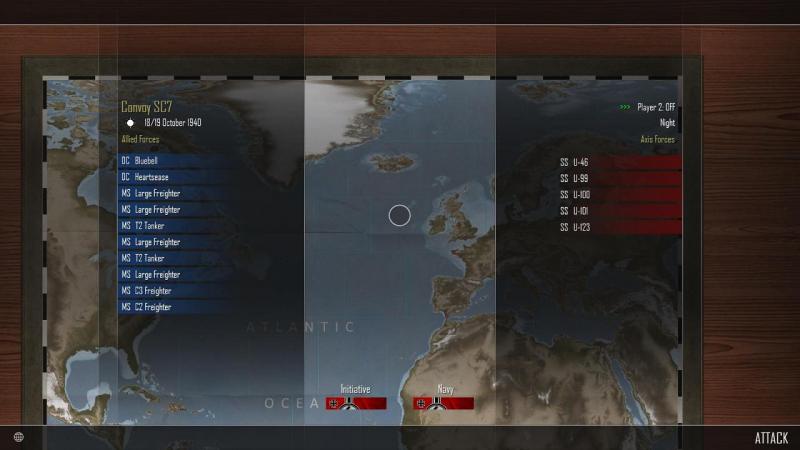
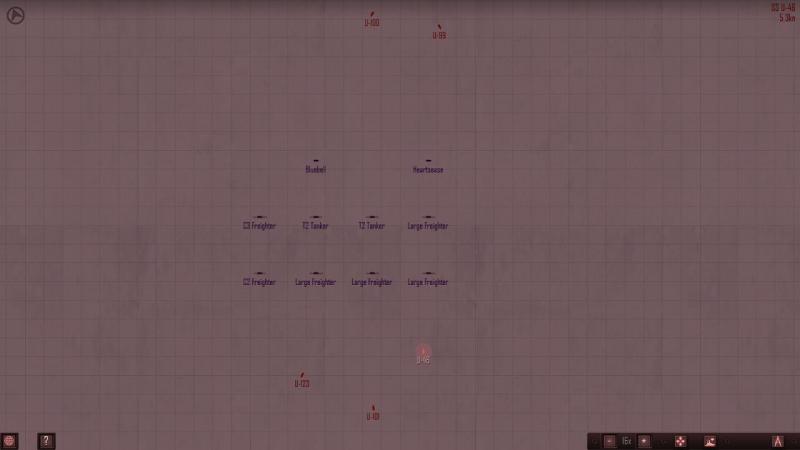
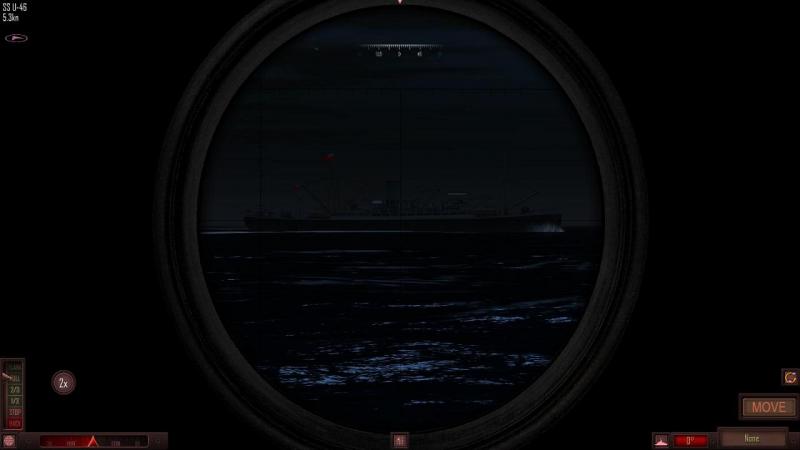
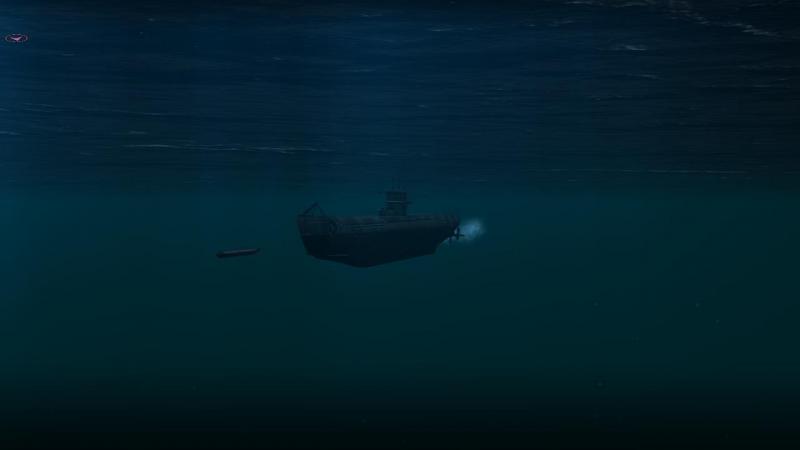
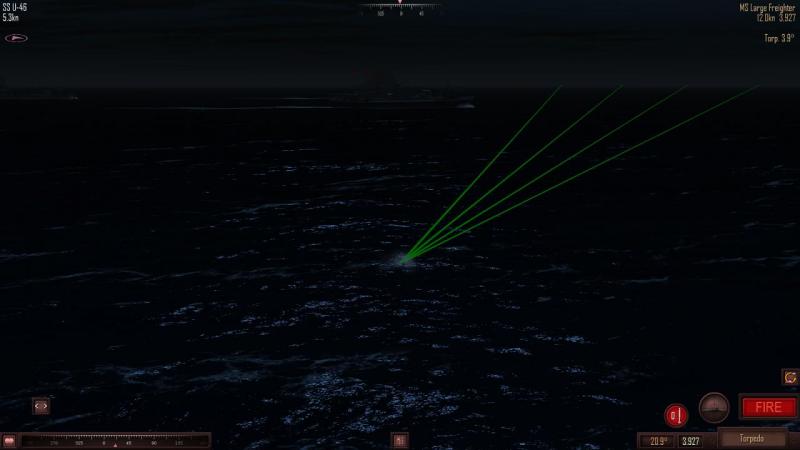
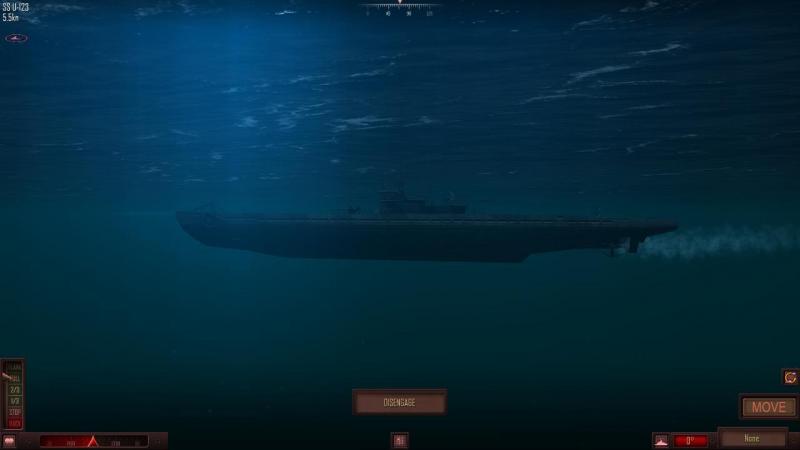
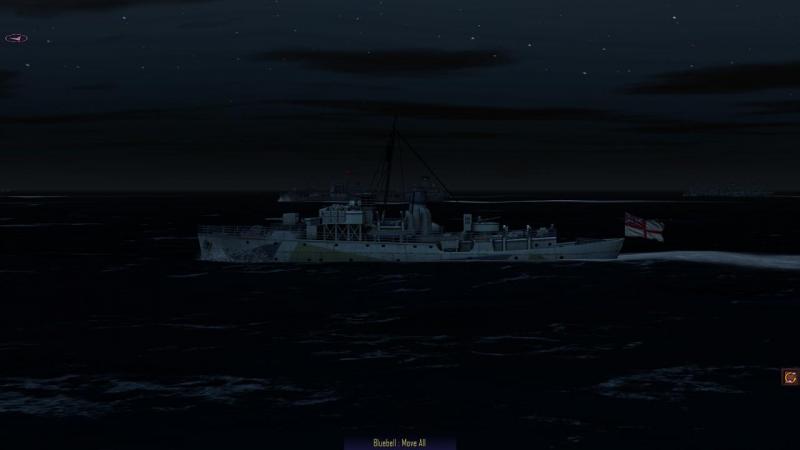
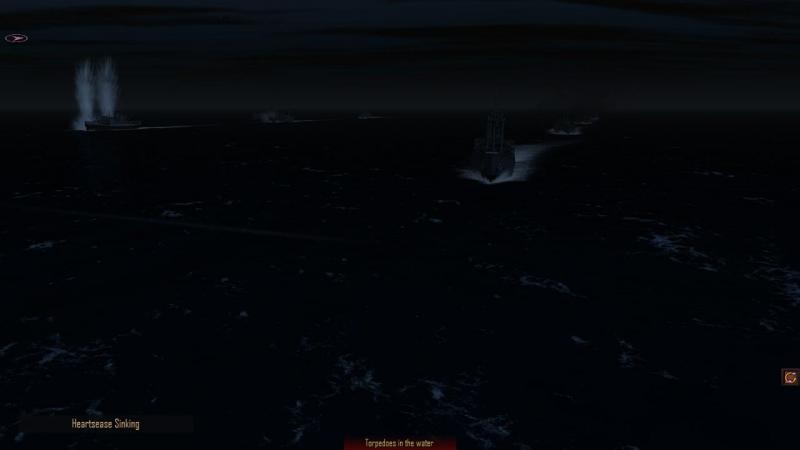
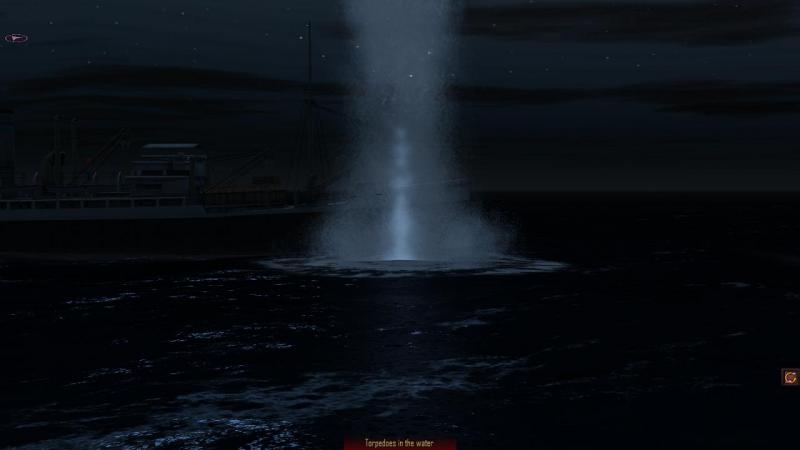
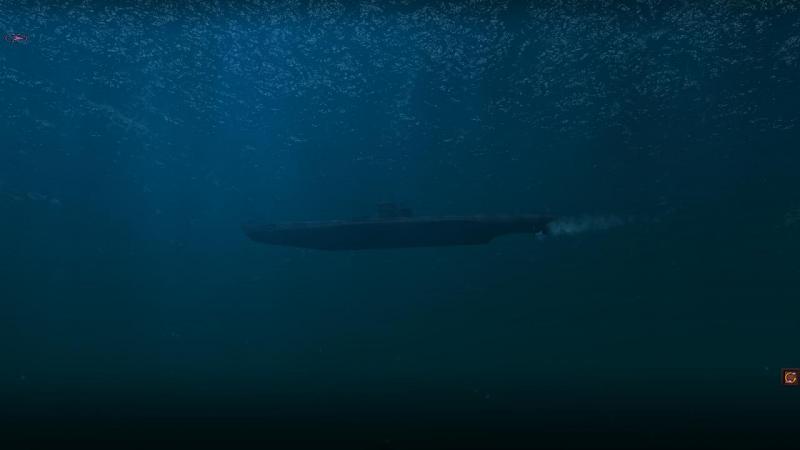
Single battles - below the waves... Here's the lauch screen for one of the included submarine actions, a night attack by a U-Boat 'wolfpack' on Convoy SC7. U-boat buffs will see that we have two 'ace' boats participating in this attack, Kretschmer's U-99 and Schepke's U-100. You can play as the convoy escorts, or as the attacking U-Boats. The next three screenshots show the start of the action from three different viewpoints, before I have begun to move my first submarine - the external, above-water view, showing the periscope wake from my first boat, U-46; the submarine view of the same, which is evidently a Type VII; and the map view, showing the pack slavering to get at the convoy, which is formed up into two columns, with just two escorts, both on one side of the merchantmen (I refuse to use the term 'merchants', that is for people who sell you stuff, not ships). I have had very little practice with torpedoes and none with Atlantic Fleet's subs, but it wasn't difficult to fall back on a little of my old Silent Hunter experience, here. I turned my boat right, to lead the ship I intended to attack, and made my move. Below is the periscope view, before I had clicked on the target to select it. At the firing turn, I had to cycle past deck gun options to get to torpedoes (one day I will see what happens, if I try to fire the gun submerged!). Following the drill taught in the torpedo attack tutorial mission, I then set up a fan of shots from my four bow tubes, calculated so that at least one fish would hopefully connect with the target, as it moved left to right into their path. From what I can see, you just judge all of this by eye or experience. EDIT - got that wrong - the 'firing solution' display, top right, when torps are selected, gives you an estimated gyro angle. As in real life, you can set up your torpedoes to veer left or right, over a decent angle either side of dead ahead. It's easier to do this from the external view, above the surface. Then, it's 'Torpedos, los!' Unless the range is very close - Atlantic Fleet seems to impose a rather high minimum range for torpedoes - you next do the same for your other three subs - one of which, U-123, is a bigger, Type IX boat: You can then watch the enemy ships move and shoot (not the latter in this case as you are undetected, at first) - provided, I think, that you have the option selected to switch views back and forth. Like this: I have this option on, and via the 'torpedo cam' and 'enemy ship cam' views, was gratified to see that I was getting some hits... I didn't hang around to wait for retaliation - I could already hear the pings of asdic - but dived away from periscope depth, while the crew reloaded my bow tubes. I didn't hang around to complete the mission, so I have yet to have the anti-submarine experience, from the sub's viewpoint. But so far, while much simplified compared to a dedicated subsim like the Silent Hunter series and I doubt if I'll be seeing acoustic torpedoes or chemical air bubble decoys, it plays rather well - and looks terrific! I'm looking forward to risking a typical Kretschmer night surface attack, trying to get between the columns of ships and watching the escorts let fly with starshells, hopefully not in my direction! Coming next - single battles, above the waves!


-
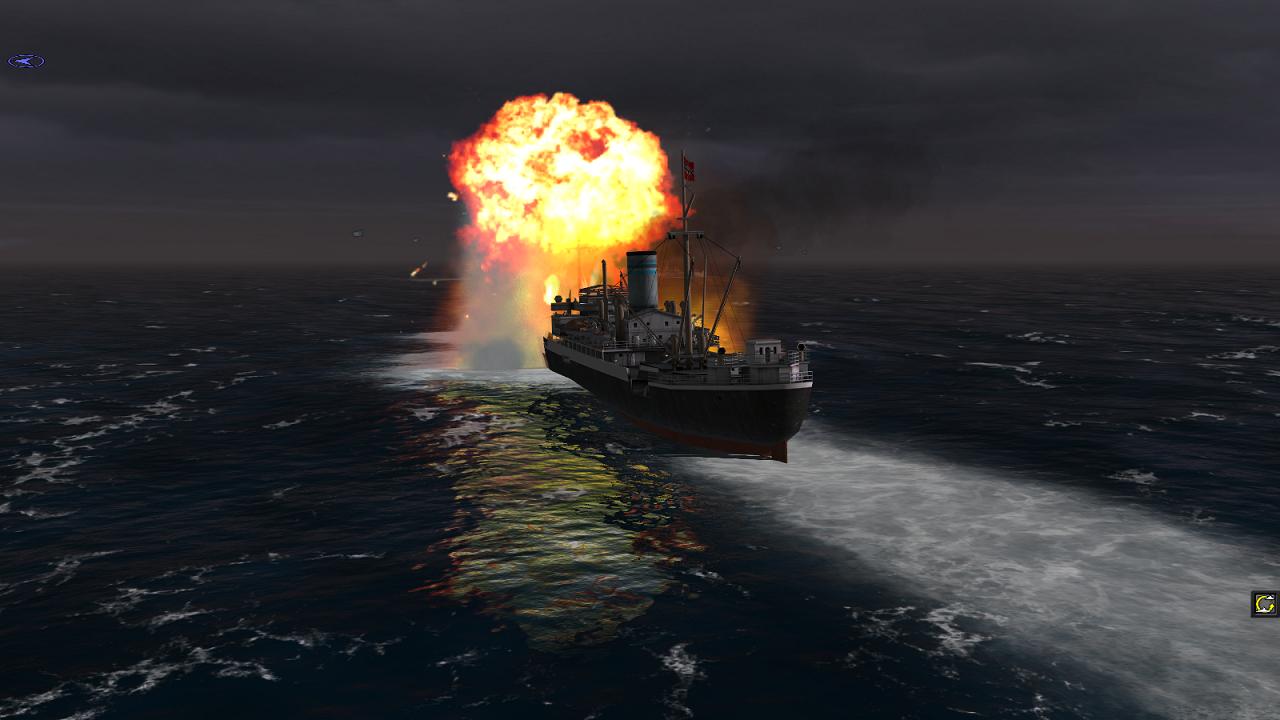
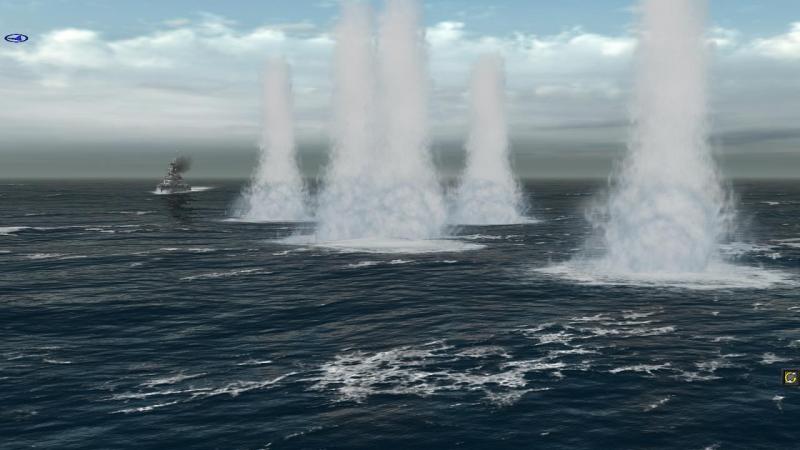
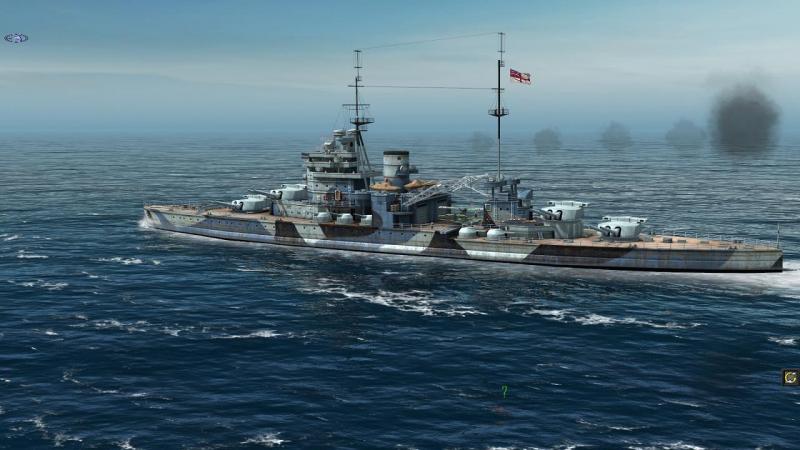
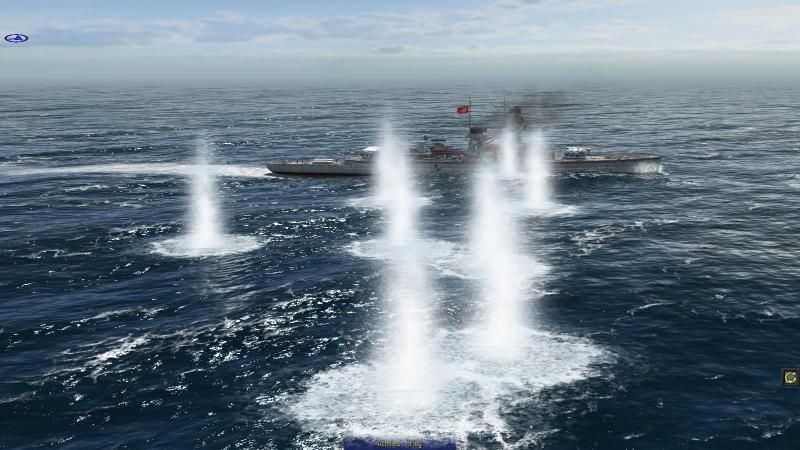
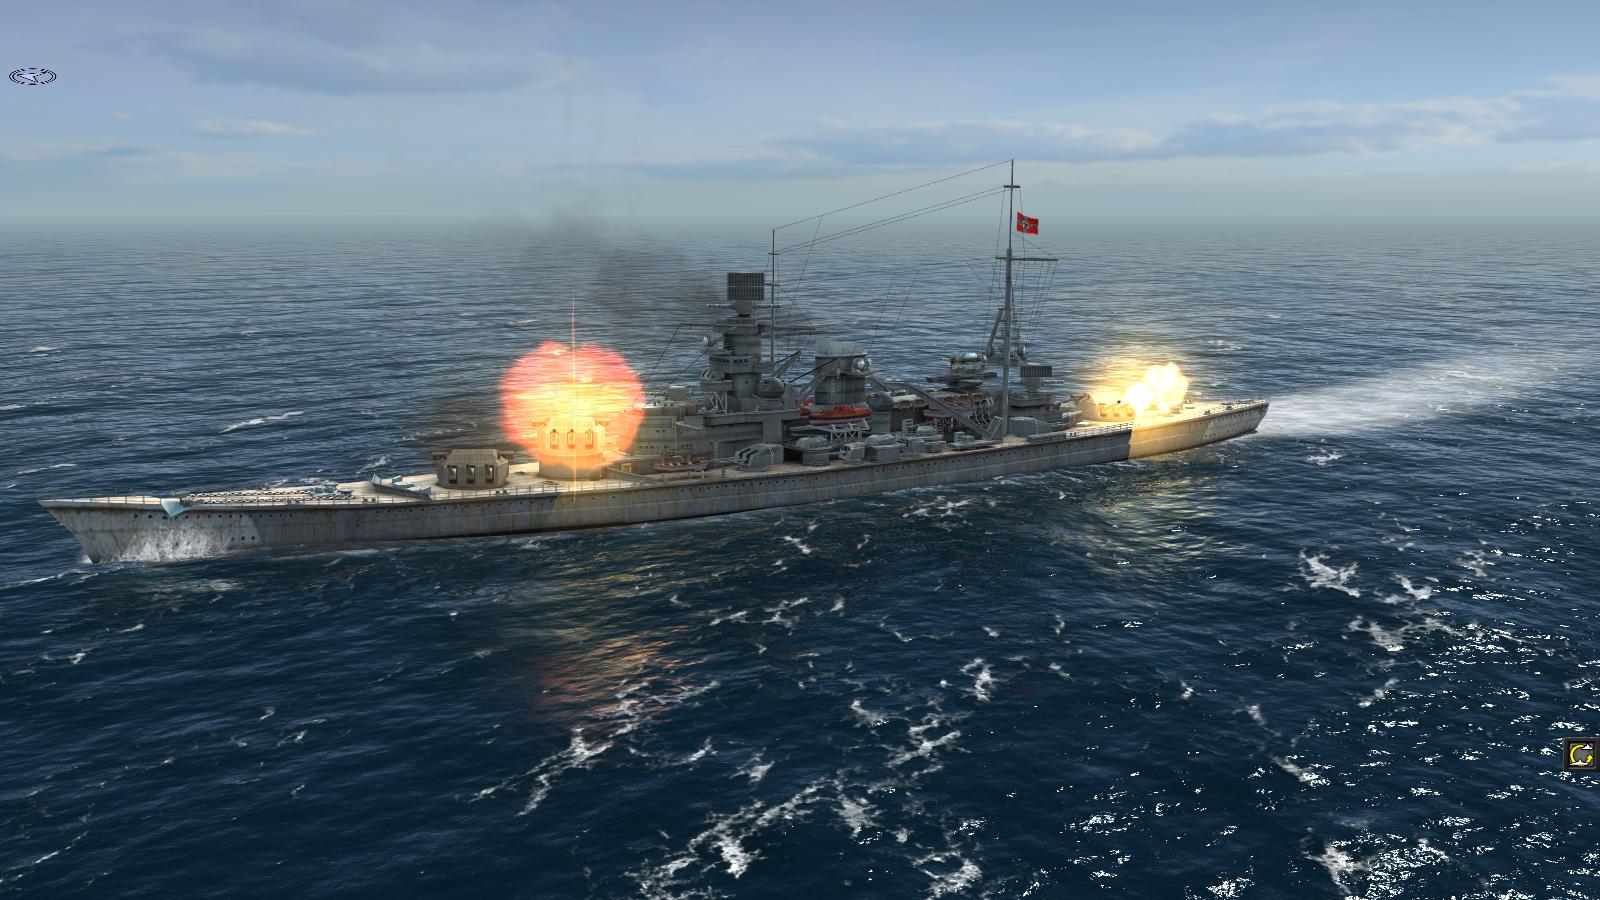
Single battles - the violent bit... Ok, I’m re-fighting Bismarck's last action, playing as the Royal Navy. I’ve moved my current ship, King George V. Now comes the second phase of Atlantic Fleet’s 4-phase turn system – I get to do some shooting! I decide KGV will hold fire for now, and so a couple of mouse-clicks on the weapon selection button, bottom right, cycles us through the available nasties, until ‘None’ is displayed. The ‘FIRE’ button changes to display ‘DONE’ and clicking this, my current ship switches to Rodney, for which I order a turn to port. Built to live within the Washington Naval Treaty, her nine big 16-inch guns are all on the forecastle, ahead of her compact superstructure. This is good for engaging targets on the bow, although ‘C’ turret will be masked by ‘A’ and ‘B’ until I ‘open my ‘A’ arcs’ in my next turn. It’s worth noting that during the firing phase, you can fire only one type of weapon – either your main armament; or your secondary armament (tertiary, where available, is generally AA, which engages planes automatically); or torpedoes (if your ship has them); or anti-submarine weapons (depth charges, Squid or Hedgehog). In the same turn, you can’t engage multiple targets, or the same target with multiple weapons. And you can fire only full salvoes, except that you can pick how many torpedoes you launch in one turn. Ammunition loads are realistic, by the way. There are different ways of selecting a target in Atlantic Fleet but the easiest is just to mouse-click on it. If you want a better view, you can switch to a first person one through a sight with 2x, 4x and 8x magnification. Selecting a target draws a red engagement line through the chosen enemy, as seen above - it's a lot less conspicuous, in the external or 3rd person view. Selecting a target will also cause the ‘Firing solution’ I mentioned earlier to be displayed, top right of the screen. This simulates the work of your sensors – optical rangefinders and/or radar, and the people who operate them. This is the point from which you need to start applying some skill. You don’t have an AI Gunnery Officer, who will just take the engagement from there. In effect, you are the Gunnery Officer. You need to take the information you have, order a range (as a barrel elevation) and a bearing, correcting both for wind and movement, and then push the Big Red Button. As at the start of the ‘Move’ turn phase, for firing, ships are static. But you have to take account of the relative movement of both your ship and the target – and the wind strength and direction, unless you have disabled its effect – in choosing the bearing on which you will open fire. Typically, this involves leading a moving target, allowing for its speed and angular direction, then making some estimation of the allowance you need to make for the wind (whose strength and direction is indicated by the little blue arrowhead, top right). With the mouse cursor, you drag the bearing left or right of the target as you judge necessary, in the little horizontal scale bottom left of the screen. As you do, this, the red target line is dragged left or right. Your gun turrets – those which can bear on the target – will swing around, to train out onto the desired bearing. OK, so your aim is good for line...you hope. Next, you need to get the range right – by elevating your guns, mouse-dragging the setting in the vertical scale bottom left of the screen. Typically, you start with the estimate shown in the ‘firing solution’ (top right of screen). As you do this, you will see the barrels elevate. For future salvoes, you will be able to use either the ‘Shot History’ (from the map) or the ‘Splash History’ (from the 3-d world) to get a better range estimate. But first time with a new target, the ‘firing solution’ is all you’ve got. But wait! We’re not done yet! Is the target closing or receding? Will the wind’s speed and direction – as well as pushing your shells left or right – push them over or short of the target? Especially at longer ranges – relative to the heaviness of your weapon’s calibre - you might want to add to or drop your chosen elevation a little. Now you are ready to cut loose. Hit the ‘FIRE’ button and with a flash of orange fire and a (rather small) puff of brown smoke, you’ll see your rounds arc up into the sky. They are rendered like actual, oversized shells with bright bases, so appear as tracers, visible even in daylight. In the screenshot below, Dorsetshire is engaging Bismarck, which can be seen fine on the heavy cruiser's bow, moving right to left. If you have the ‘switch ship view’ button active, the view will pick up the rounds as they near the end of their trajectories, roaring down on your target – you hope! In the pic below, you can see the first salvo from Bismarck's turrets Anton and Bruno, just short of impact. You know what, I'm rather glad I had turned Rodney to port, just now! ‘Just like the real thing’, as the Airfix slogan went, you’ll see the white shell splashes leap up, and if you’re lucky or skilful, the flash and smoke of one or more hits. You get to do this for each ship on your side, one after the other – move-shoot; move-shoot. No ships are visibly moving during the firing phase, but the overall effect, the sense that you’re directing a WW2 surface engagement, is still highly engaging. Ship-handling in Atlantic Fleet is relatively simple, but gunnery is an acquired skill, rewarding concentration, practice - and patience. Next, it’s the enemy’s part of the turn, and you get to see his ships move and then (stop and) shoot, one ship after another. The enemy AI appears reasonably good, neither super-human nor super-dumb. His shells will splash down near or around you – the latter is a ‘straddle’, from which hits are possible – and you can try ‘steering to the shell splashes’, to throw out the enemy’s correction of his next salvo. After that, it starts all over again, ship by ship, within each of the four phases of a turn – You move-You shoot-They move-They shoot. If you have chosen ‘Player 2-ON’ at the battle launch screen, you get to make his move, too! Incidentally, having tried this once for Bismarck’s last battle, I found that I could steer normally – my rudders weren’t jammed, as in the real fight! Nevertheless, you''ll get plenty of practice in ship handling and gunnery in this mission playing for the Royal Navy, with the odds pretty safely in your favour. Plenty of opportunity also to savour the damage modelling, both in terms of the seeing your shells hit, burn and begin to demolish your target, which you might want to finish off with torpedoes...and in terms of the 'under the hood' bit, where Atlantic Fleet simulates and can display different levels of damage to a big range of components and systems, as well as modelling the effect - hit and damage enemy radars or rangefinders for example, and their accuracy will diminish. All very impressive...especially if it's not one of your ships, that's taking the damage... Coming next, a flavour of some of the other single battles!

-
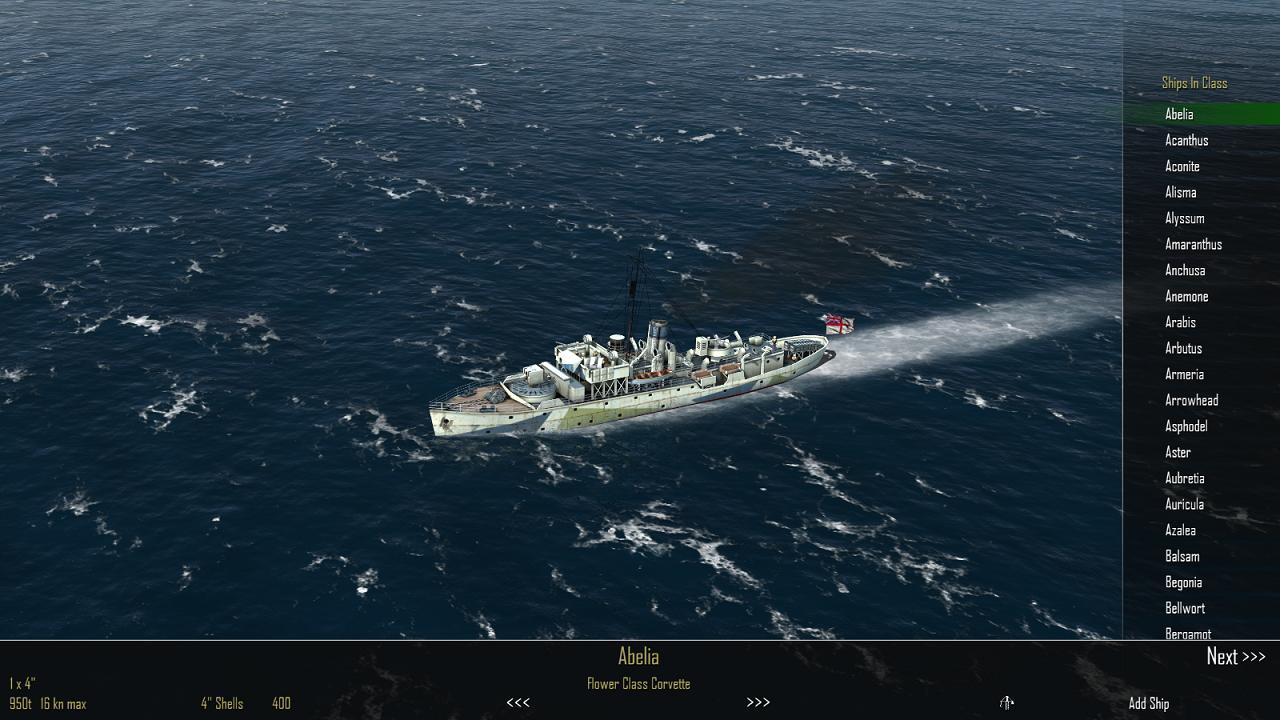
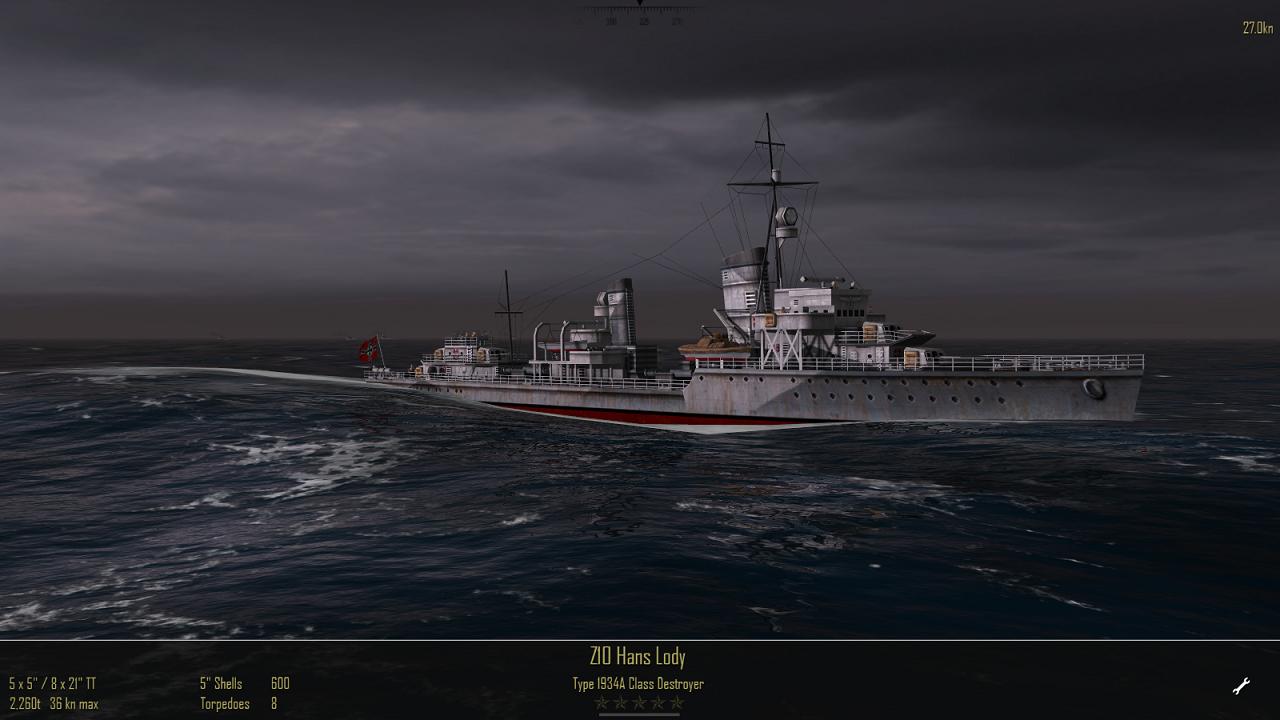
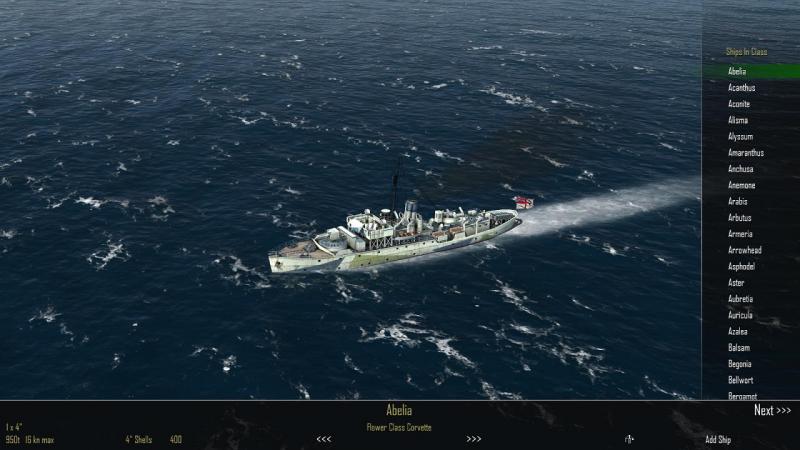
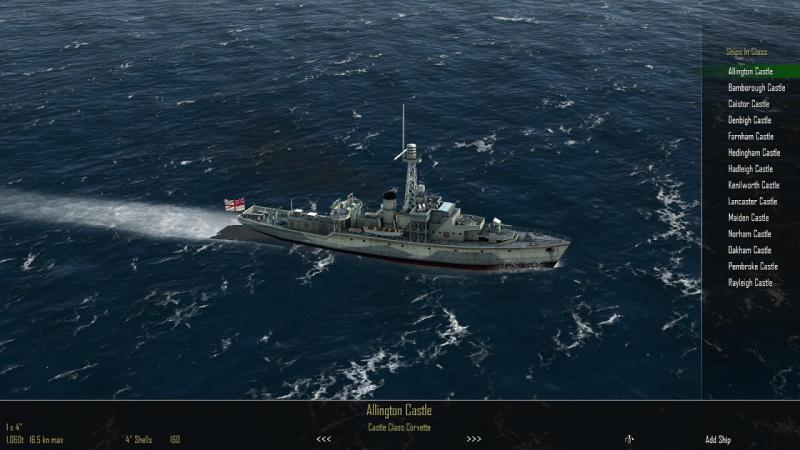
No S-Boats/E-Boats or MTBs I believe Dsawan, this being primarily an ocean-going sim, but there are Flower and Castle class corvettes, which feature in some of the convoy actions and can be player-controlled... ...and yes there are some playable subs, more on that soon;


-
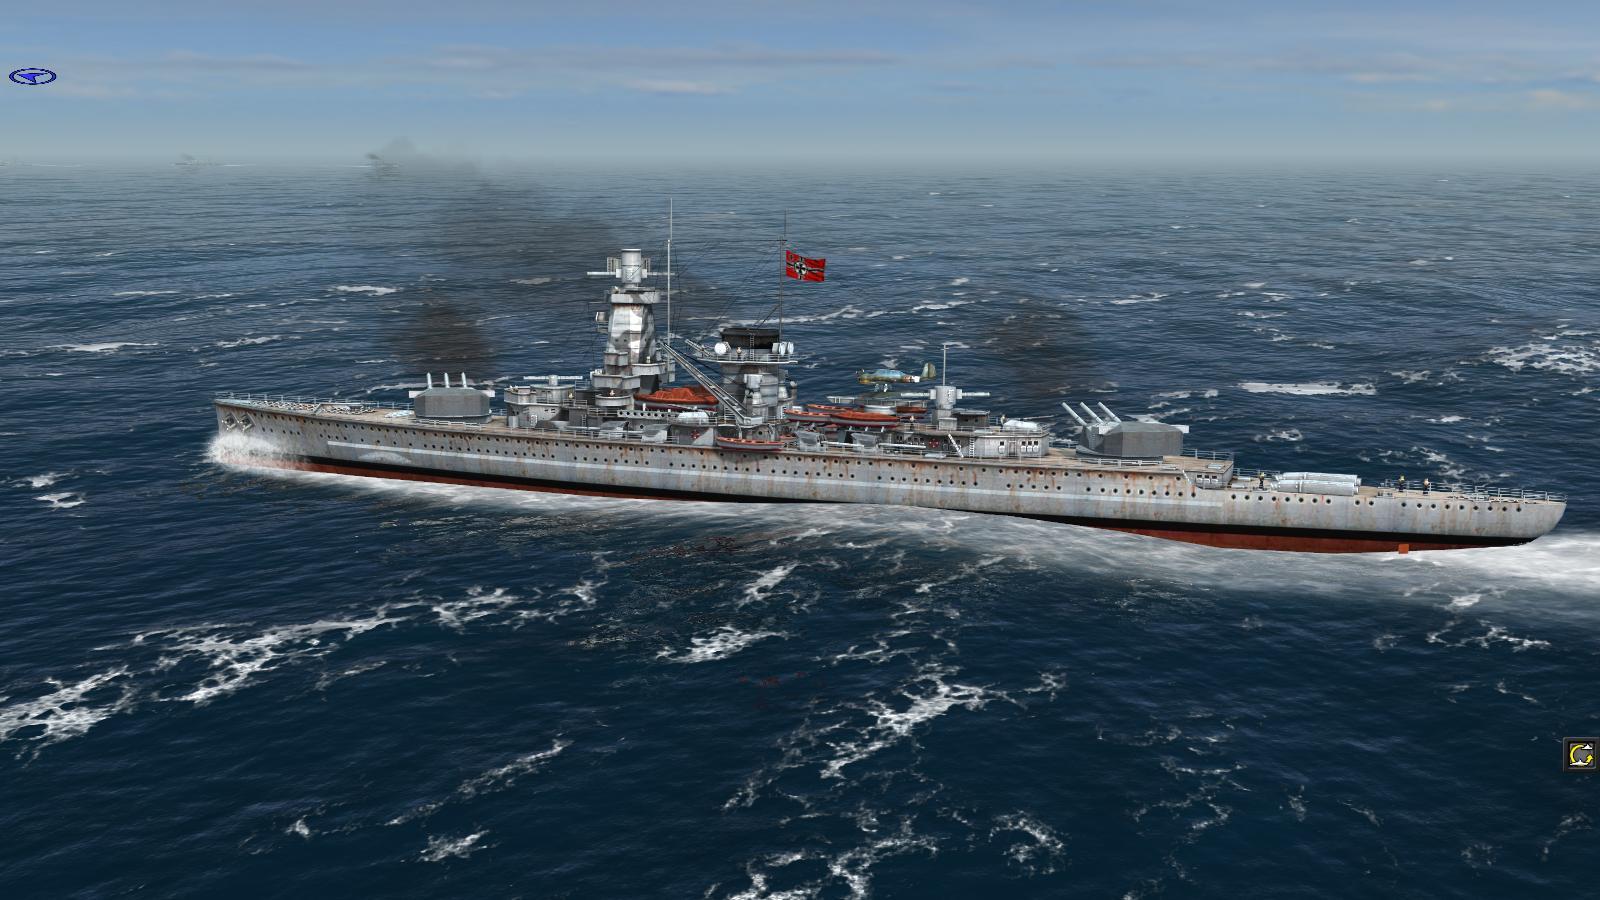
The single battles in action The sea fight I have chosen to illustrate Atlantic Fleet's gameplay doesn't have a 'Battle of...' name, presumably because it took place so far from any named landmark - it's Bismarck's last fight. Her rudders jammed by an air-dropped torpedo, the great ship was slowly steaming in a circle, when the Home Fleet finally caught her up. And the rest is history... Here's the launch screen for the battle, as portrayed in Atlantic Fleet. Bismarck (eight 15 inch guns) is on her own, her consort Prinz Eugen having been detached for independent operations after Admiral Gunther Lutjens decided that fuel loss from a earlier hit from Prince of Wales made a dash for a friendly port necessary, for the flagship. The Royal Navy has the battleships Rodney (nine 16 inch guns) and King George V (ten 14 inch guns) The heavy cruiser Norfolk (eight 8-inch guns) is still shadowing Bismarck, and coming up from the south is another three-funnel 'County' class heavy cruiser, Dorsetshire. The more eagle-eyed readers may have noticed, in this screen, the setting 'Player 2', top right, here set to 'OFF'. Meaning what, exactly? OK, remember that I said there was no multi-player in Atlantic Fleet? Well, there is, actually...sort of. Leave 'Player 2' set to 'ON' in the previous, mobile device version and after taking your turn, you could hand your smartphone or tablet to another player, to take the other side's turn. In the PC game, you can slide out of your seat to make room for the other player, or even play both sides yourself, turn by turn! Anyhow, you launch the battle (by clicking on the word 'ATTACK', bottom right of the above screen) and you're in the 3-d world. If your enemy has the initiative (first move) you start with that happening; then it's your turn, starting with your first ship, if you have more than one. Below is mine for this battle, playing on the RN side - a 'KG Five', nameship of the class, HMS King George the Fifth, with Rodney on the port beam. As I said previously, each ship in a class has the same Atlantic Fleet model to represent all, and at any period in their service lives. This works less well for the likes of the Queen Elizabeth class, battleships whose inter-war and early-war refits left them in several different configurations. But for the 'KG Fives', it's not such an issue; and regardless, the superb ship models are certainly one of Atlantic Fleet's best features, a joy to the eyes of any WW2 warship afficianado. But let's see how you wield these beauties in virtual battle! As I said earlier in the review, Atlantic Fleet is turn based, with the sequence 'You move-You shoot-The enemy moves-The enemy shoots'. Ship-handling and gunnery are simple enough. Before doing anything, it's a good idea to orient yourself by bringing up the map ('M' key, or click the little icon bottom centre). Zoomed out a bit, the screenshot below shows the relative positions of the ships in this battle. We're closing the enemy nearly head on, Norfolk is trailing Bismarck on her starboard quarter, and Dorsetshire is coming up from the south. The grid doesn't change as you zoom so doesn't help much with the range. But if I click on Bismarck, I get a 'firing solution', the red text top right - this displays estimates for speed (in knots), range (in yards) and recommended elevations (the setting for the indicated range) for my main and [in square brackets] secondary batteries. The functions available from the icons on the bottom edge of the map screen include zoom, centre on current ship and - the little compass dividers - a 'Shot History', which when turned on shows the elevations at which previous shots at my current target were taken, and where they fell. This is one of three gunnery assistance tools the game provides. The other two are the evevation in the top right 'firing solution' - provided by your ship's radar or optical rangefinders - and a 'Splash [as opposed to 'Shot') History which you can call up in the 3-d world, not the map, and which helps you judge your next salvo from the shell splashes of your last one. Adjusting your fire from the fall of shot as seen in shell spashes is classic WW2 gunnery practice, to the extent the Japanese put colour dyes in their shells, differently-coloured for each ship, so that fire from multiple ships could be better plotted, from the colour of the shell splashes. Hence the classic reaction from one US sailor at the Battle of Leyte Gulf, 'They're shooting at us in technicolor!' Hence also the tactic of steering towards the enemy's last shell splashes, so that his next correction would actually throw off his aim. This seems to work well enough against the AI in Atlantic Fleet, incidentally. Now, you can get your ships moving - until you do, they roll in the swell, but are not going anywhere. This is easily done. Select your speed and course using the two sliders at the bottom left of the screen. The '<>' brackets down there increase or reduce mouse sensitivity for fine tuning, as you cannot input a figure. Then click the big 'MOVE' button, bottom right. I say 'big', but the on-screen icons in Atlantic Fleet I find neat and quite inconspicuous. Incidentally the blue arrowhead, top left, is a wind speed and direction indicator, which will be important if you have elected to let this affect trajectories. Your ship will now suddenly spring to life and make its move, the icons mostly disapppearing. The effect is a bit sudden but you get used to it and as far as I can see, the response is realistic, in terms for example of inertia, acceleration/decelleration and turning circle. Once you have moved your first ship, you can then shoot, and go on to move & shoot from the others on your side, completing your side's part of the turn. There is a 'fleet move' option, to move all but the current ship on a common speed and heading, but it's for pre-battle (or convoy) moves only, as the other ships lose their firing turn. Once your ship has completed its move, it stops, and the icon set re-appears, this time a different one, those for gunnery, as seen below. At the map, I had decided - as I think Admiral John Tovey did in real life - that I would manoeuvre my battleships independently, to split the enemy fire. Below, King George V has begun a turn to starboard and Rodney to port, to get the plan under way. Bismarck is still fine on our bows, and as I have mouse-click selected her as my target, a red line now links us. As you will doubtless be expecting, this is where things get interesting! ...to be continued!
-
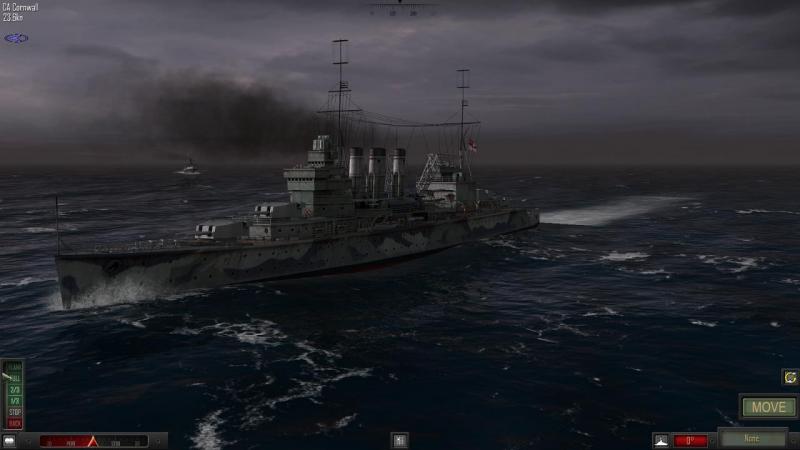
The single battles As a child growing up in the days when World War 2 was fresh in the minds of our elders - an uncle was injured in Normandy, while my late mother well recalled being bombed during the 'Blitz' in Belfast - the great sea fights of the war always held a special place in my interest and imagination. So while Atlantic Fleet comes with no less than two campaigns, its single battles are what I was most looking forward to. And I wasn't disappointed! There are no less than thirty historical sea battles for you to re-fight. The two screenshots below show what's available. As you can see, the first item on the list is 'Custom Battle', which is actually a 'quick mission builder'; this, we will look at a little later. For me, never mind the campaigns - this little lot, on its own is more than worth the extremely modest £6.99 price of admission. I find such sea battles are pretty well endlessly re-playable. In the lower part of the list, in the screenshot immediately above, you can see that I have highlighted the aforementioned Battle of the North Cape, Scharnhorst's last fight. The map has panned to show its location, ringed white above the northern shores of Norway; while the panel on the right provides brief notes on the battle and its real-life outcome. Attempting to locate Arctic convoy JW55B, the German battlecruiser instead bumped into a covering force of British cruisers - including the now-preserved HMS Belfast - who shadowed Scharnhorst by radar in the darkness. When the 'KGV' class battleship Duke of York arrived on cue, Belfast famously illuminated Scharnhorst by starshell, and the fight was on. With her radar destroyed by an early hit, Scharnhorst fought back, using her superior speed to disengage. She might have made it, too. But a 14 inch shell fired just as she was about to slip out of effective range destroyed a boiler and her speed advantage was lost. From Scharnhorst's bridge, Admiral Erich Bey, knowing what would now happen, signalled Berlin, 'We will fight on till the last shell'. And they did, more or less, all but 36 of her nearly 2,000 complement going down in a hail of shells and torpedoes, or perishing in the dark, icy Arctic waters. Such, let us not forget, are the sombre events that we re-create in the warmth and safety of our homes. But I digress... Having selected your battle, the next screen lists the forces on either side, as seen below. The little flags at the bottom of the screen enable you to pick the side you'll play for, and who will hold the initiative - who moves first, I believe. Naturally, choices you made in the Options & Help screen will come into play here, and my own selections include wind affecting trajectories and battles beginning at longer range - which increases the difficulty and probably the realism, though I'm pretty sure that even at the shorter starting range available, you won't get the sort of silly close-in knife fights between major warships which one sees in certain other games. The sheer variety of battles is most impressive. For surface action, there's everything from an all-out slugging match between capital ships - like the Battle of the Denmark Straits - Bismarck and Prinz Eugen -vs- Hood and Prince of Wales... ...to HMS Cornwall's despatching of the disguised commerce raider Pingiun, in the South Atlantic (which was a relatively close-range affair, with the Germain ship maintaining her disguise in an effort to escape, then suddenly turning on her pursuer): In between, there are battles between U-boats and convoys, and even the Swordfish torpedo plane attack on Bismarck, the damage from which ensured that the big battleship's first war cruise was her last. And you can even sink another sneaky surface raider in warmer waters, with the Pacific battle between HMAS Sydney and Kormoran, which in real life resulted in the ultimate destruction of both ships, after the Germans managed to lure their much more dangerous opponent to close range and inflicted devastating damage on the big Australian cruiser before she could start returning fire. Many of Kormoran's crew were able to take to the boats and most were rescued, but Sydney lurched off burning into the gathering darkness, with neither ship nor crew ever to be seen again. Once more, lest we forget... But a review's a review and we must needs press on. In the next part, we'll look at how a typical surface action plays out, in Atlantic Fleet. ...to be continued!
-

Atlantic Fleet PC/Mac Edition Available
33LIMA replied to dsawan's topic in Naval Combat Information Center
I could not fail to do a distinct review for Atlantic Fleet, and the first part is now up, here. -
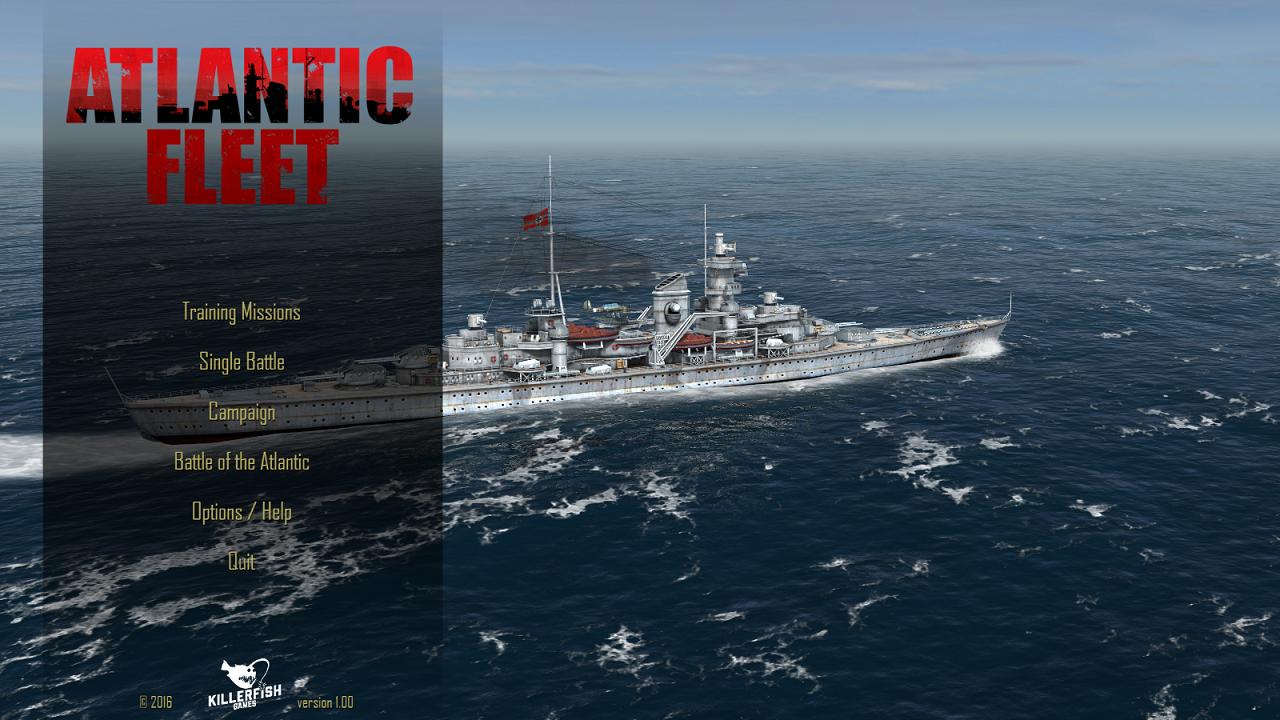
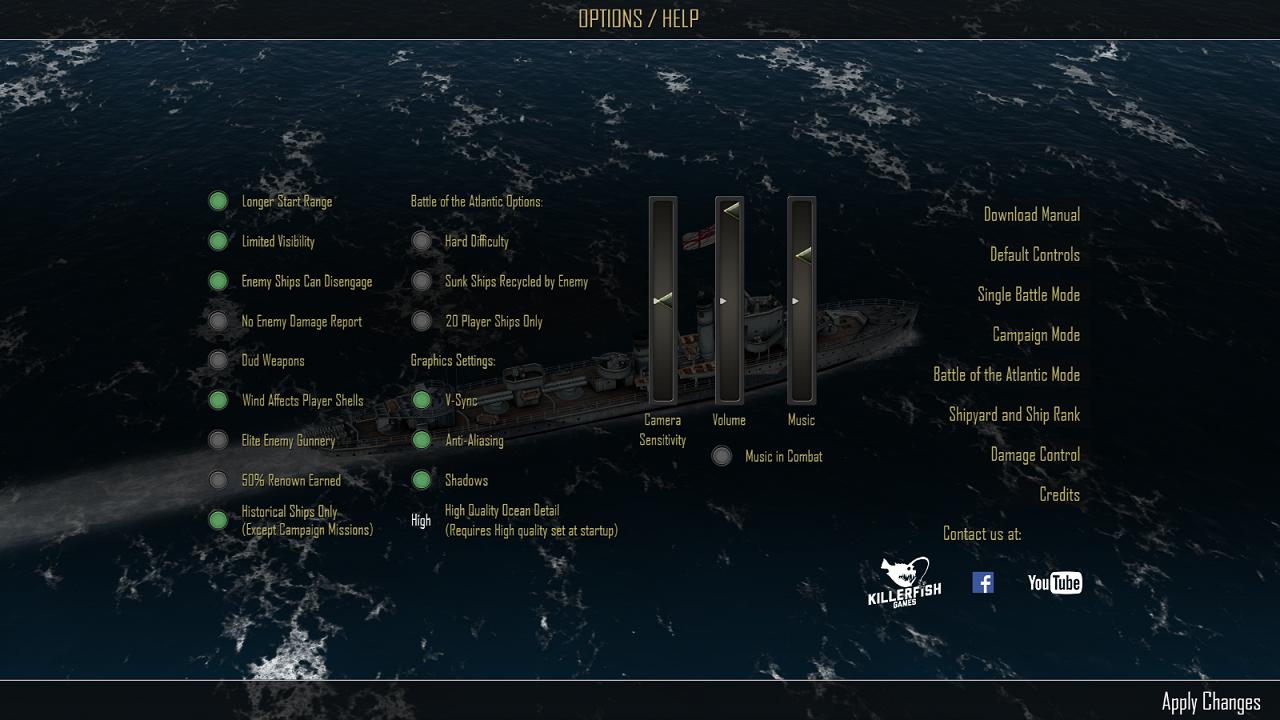
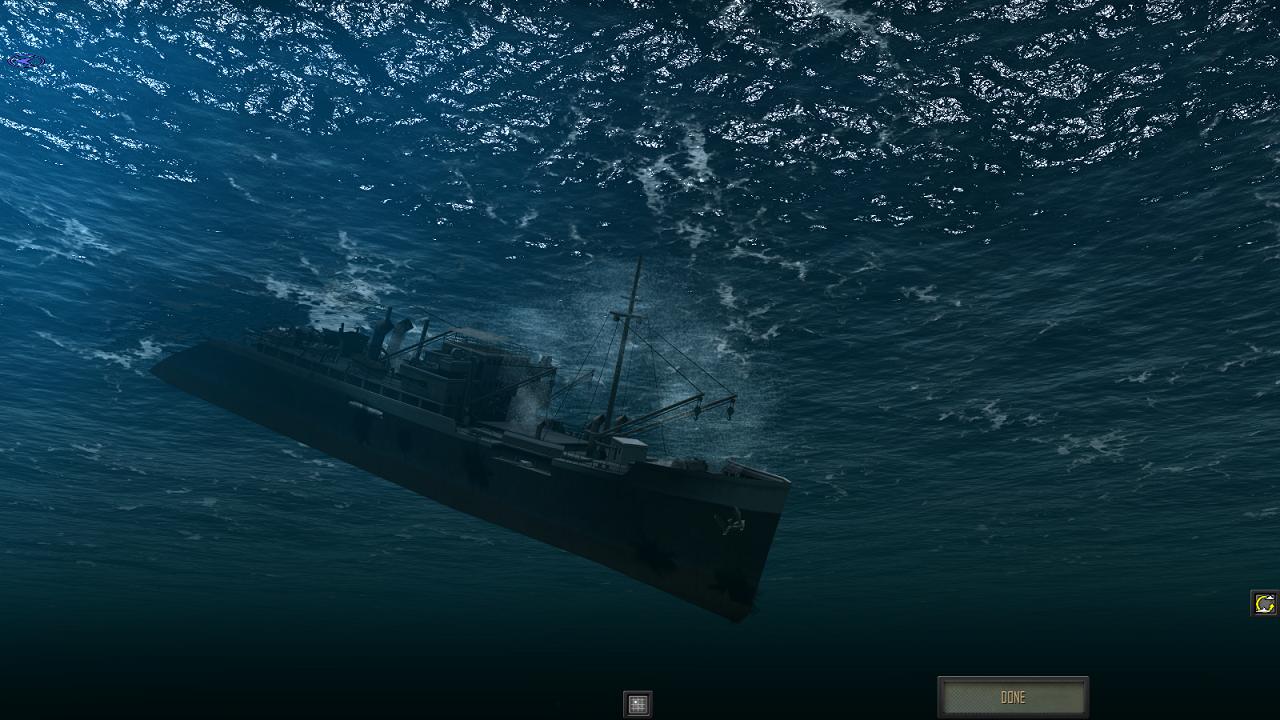
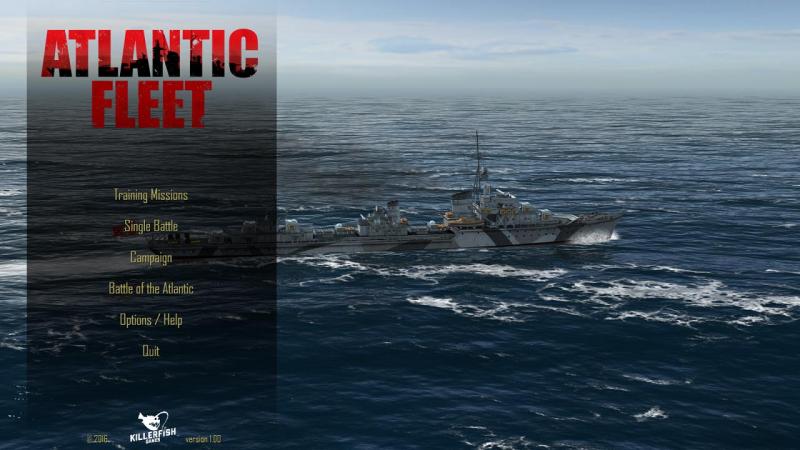
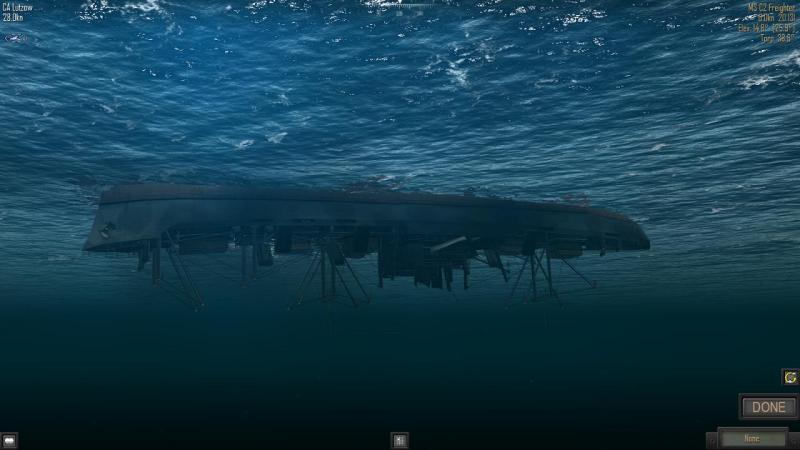
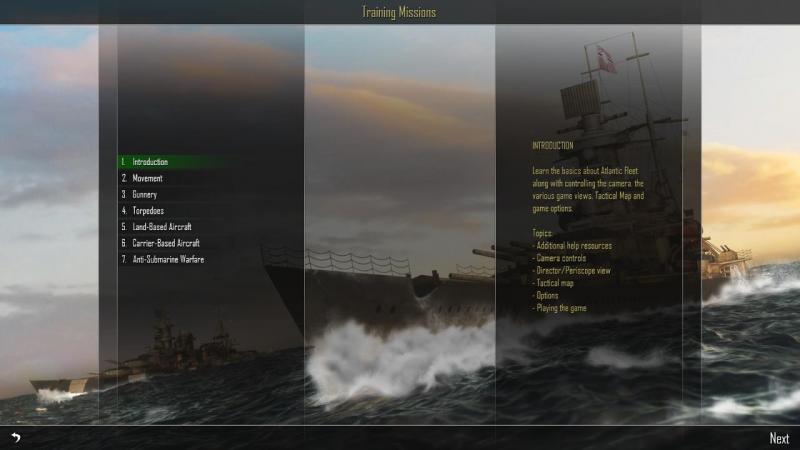
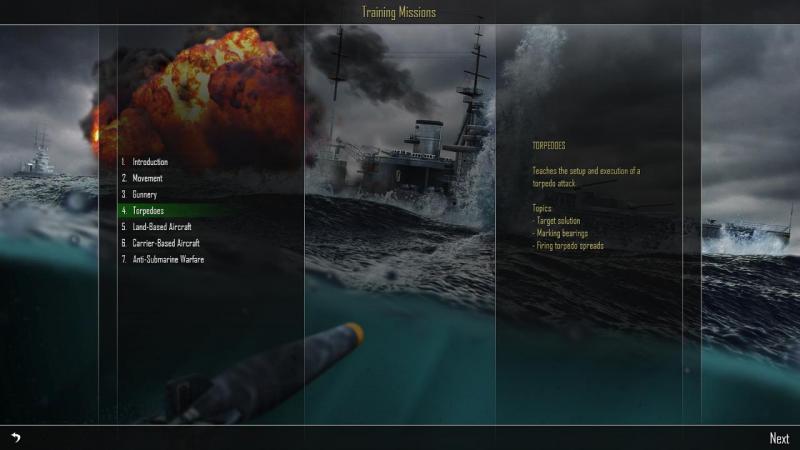
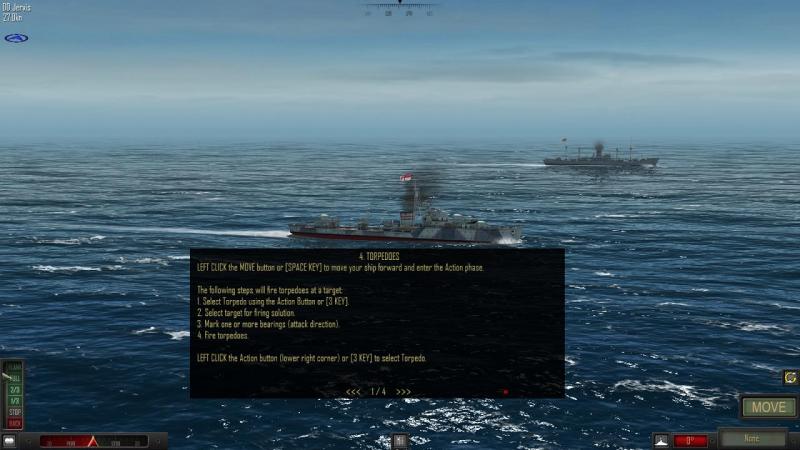
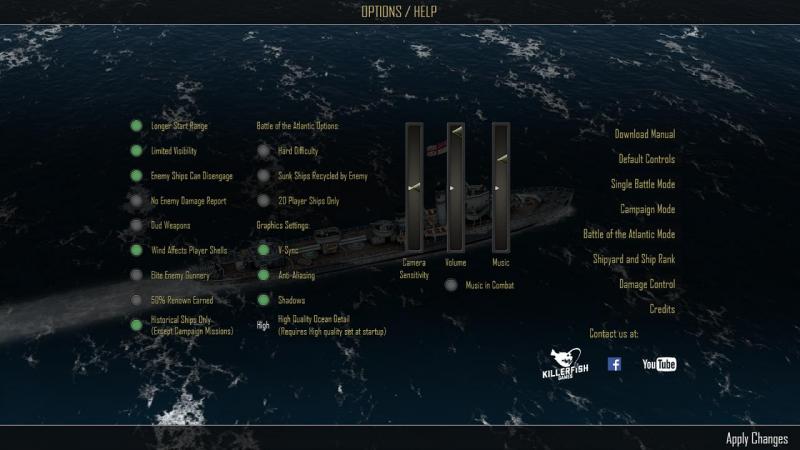
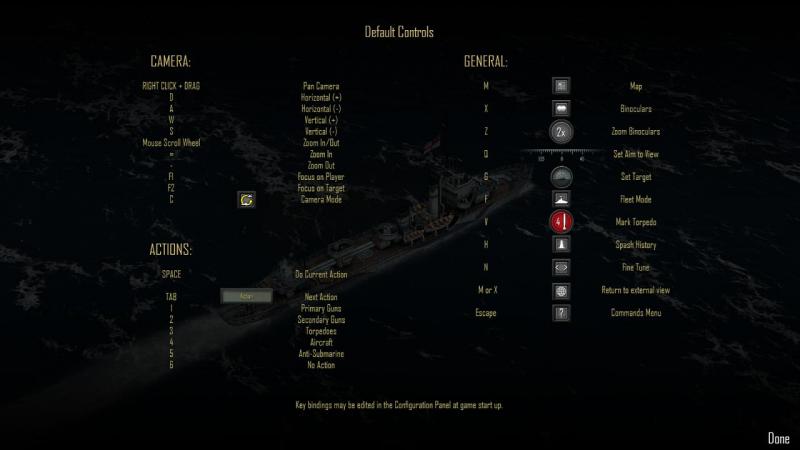
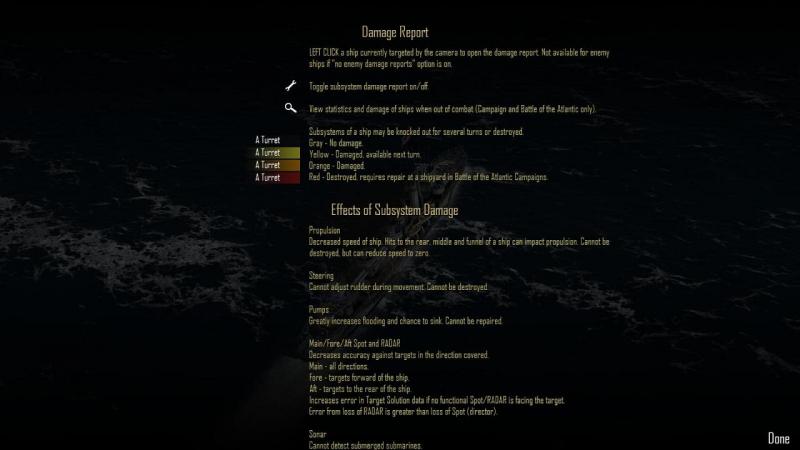
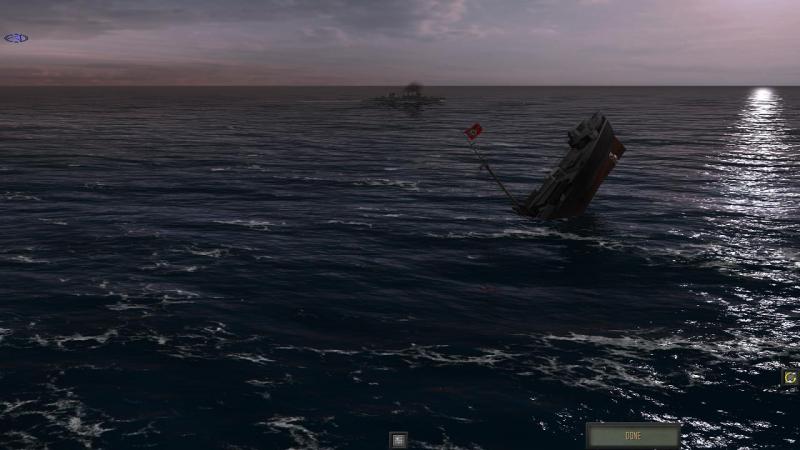
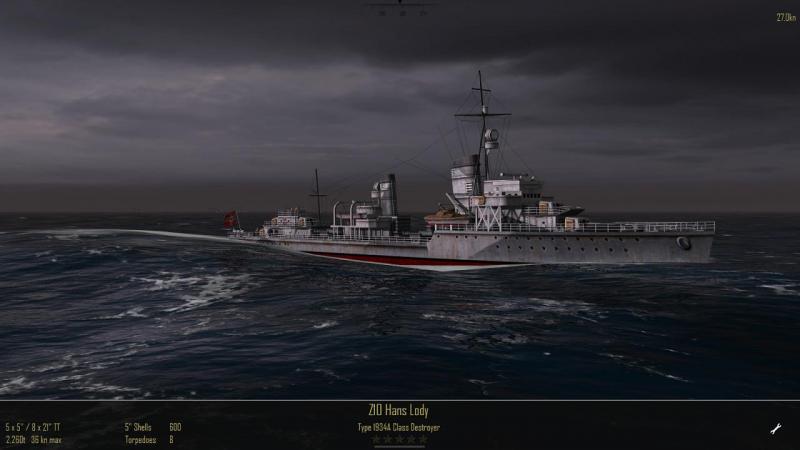
Killerfish Games's PC version of its iOS WW2 naval simulation/wargame takes the high seas by storm! I started playing PC games on a system with a 14" screen and an early Pentium, and I'm not about to go back there, so I watched with interest but from afar, when I saw Fred 'Heinkill' Williams's affectionate and very favourable SimHQ review for the iOS-based Atlantic Fleet. Sometimes, though, dreams do come true, it seems, for a PC port has just arrived, after the developers completed the work and updated the graphics for the new platform. Since the release of Fighting Steel and Destroyer Command in the late 1990s, it's been a bit of a famine for WW2 naval simmers, broken recently by the arrival of the rather good Victory at Sea. Well, now we also have Atlantic Fleet, so it's time to cast off, put to sea again and enjoy the feast that's followed that famine. And Atlantic Fleet is indeed a veritable multi-course meal of a feast, for anyone who remotely fancies tugging on his (or her) virtual seaboots and taking to the high seas to fight out some of the classic sea battles and campaigns of World War 2. Your mission is to preserve, or sever, the vital sea-lanes which kept Britain fighting against Nazi Germany, bringing vital supplies of food, weapons and raw marterials of all kinds to the British Isles...or not, if the Kriegsmarine has its way... Atlantic Fleet iOS was the sequel to Pacific Fleet, and while our US cousins might regret it, I for one am very happy that Killerfish decided to get their PC feet wet with a port of the more recent, more modern game. I was brought up on a happy diet of Airfix 1/600 warships from the same theatre and the great little Eagle 1/1200 kits, released in themed sets like the Battle of Narvik, complete with accounts and maps of the relevant action. I soaked up films like Battle of the River Plate and Sink the Bismarck!, and later Ludovic Kennedy's excellent BBC TV documentaries on WW2 warships and battles - his later, excellent book Pursuit - the sinking of the Bismarck is on my desk as I type this. It was probably in the 1960s BBC documentary series The Valiant Years that I first heard Winston Churchill's famous observation that '...the only thing that ever really frightened me during the war was the U-boat peril'. Of course, while he was talking about the submarine threat to the supplies that kept Britain alive and in the fight, for much of the war the Kriegsmarine's surface units were also part of the threat that so concerned the great British war leader. And the air power of both sides played an important role. One of the joys of Atlantic Fleet is that when you step back into those dark and dangerous days, you can re-fight the Battle of the Atlantic and its most famous historical actions on, above or below the waves. Installation and features At time of writing, Atlantic Fleet is distributed via Steam - at a mere £6.99 Sterling. As we will see, for a game with high production values, engaging gameplay and an historical depth and coverage that would put many a full-price simulation in the shade, if not to shame, this is a very considerable bargain, to put it mildly. I gather there are no plans to offer a different distribution channel and while I prefer the 'good old days' of standalone game installation, I have had no bother at all with any of the excellent Steam-based games I have purchased (Victory at Sea, Wargame: European Escalation and Wargame: AirLand Battle being the others) and would not consider passing up on a good game merely because of that. I must start with Atlantic Fleet's high production values - these you will see from the moment the game loads. Here's the main menu screen. The ship seen here is the famous German battlecruiser Scharnhorst,* lost fighting against the odds at the Battle of the North Cape - which you can re-fight in Atlantic Fleet. Scharnhorst's brave showing prompted Admiral Fraser in Duke of York to say afterwards to his officers "Gentlemen, the battle against Scharnhorst has ended in victory for us. I hope that if any of you are ever called upon to lead a ship into action against an opponent many times superior, you will command your ship as gallantly as Scharnhorst was commanded today". Such is the world of steel ships and iron men that Atlantic Fleet re-creates for us. But I digress...can't help it, I feel the hand of history on my shoulder, as TCB once said. *...and yes, before you start posting corrections, I know the ship above is actually a Hipper class heavy cruiser - Prinz Eugen, probably - not Scharnhorst, but I couldn't resist the quote above and don't have a menu pic of Scharnhorst, to hand . The point is, it looks great, it's animated, with camera pivoting around the ship, and there's a different ship each time. See, here's another menu shot, and this time, it's one of the big German destroyers, several variations of which appear in the game: Atlantic Fleet is single-player only, so you will not find here any way to blow up anything other than an entirely virtual foe-man. You do, however, get a sombre but really effective musical theme to accompany the menu, and you can have music in-game, too. Taking the menu options from the top, first there is 'Training Missions'. These missions are actually rather useful, and a good way of ensuring that it is the enemy who ends up like this, and not you: And again yes, you heard right, you can drop the camera below the waves, to get this view, complete with rather scary grinding and booming ship sinking sounds; As for those training missions, which will hopefully reduce the frequency with which your own ships feature in such scenes, here's what you get. Again it's nicely presented, with good artwork and a clean, crisp interface. I did mention the high production values, didn't I? Here's the intro screen for the torpedo training mission. I really like Atlantic Fleet's artwork and the general design: Load the mission and you get a little scenario, here a Royal Navy destroyer steaming alongside a hapless German merchantman. You click your way through a series of topic boxes, to learn the lesson. You can toggle the topic box on and off, for a better view. They each do a very good job of taking you through the relevant drill. This is where you may first get to see the Atlantic Fleet mode of gameplay, and its most prominent feature is that it is turn-based, like a wargame. The sequence is: You move-You shoot-The enemy moves-The enemy shoots. We'll see how this works in more detail, later. Continuous gameplay would be better, and certainly more simulation-like, but it is what it is, and I soon got quite comfortable with it. Jumping ahead to the last menu option, we come to 'Options/Help', and here's what you get: As the menu title suggests, some of the things listed on the right of the screen above are options screens, others are help. The 'home' screen, above, lets you tweak various gameplay and difficulty options, as you can see. The 'Default controls' screen lets you re-map keyboard commands, like this... ...while the 'Damage Report' is a help option and looks like this: I find it all very well-presented and impressively thorough, very well up to the standards of PC sims and better than many I've seen, including the very best. My main interest in a WW2 naval sim or game is the ability to re-fight historical or hypothetical battles, and it's that option we will look at next. Here, we will see how Atlantic Fleet's gameplay comes together, when the shells, torpedoes and bombs start flying. ...to be continued!


-

From the album: Combat Sims
-
From the album: Combat Sims
-

From the album: Combat Sims
-

From the album: Combat Sims
-

From the album: Combat Sims
-

From the album: Combat Sims
-

From the album: Combat Sims
-
Atlantic Fleet PC/Mac Edition Available
33LIMA replied to dsawan's topic in Naval Combat Information Center
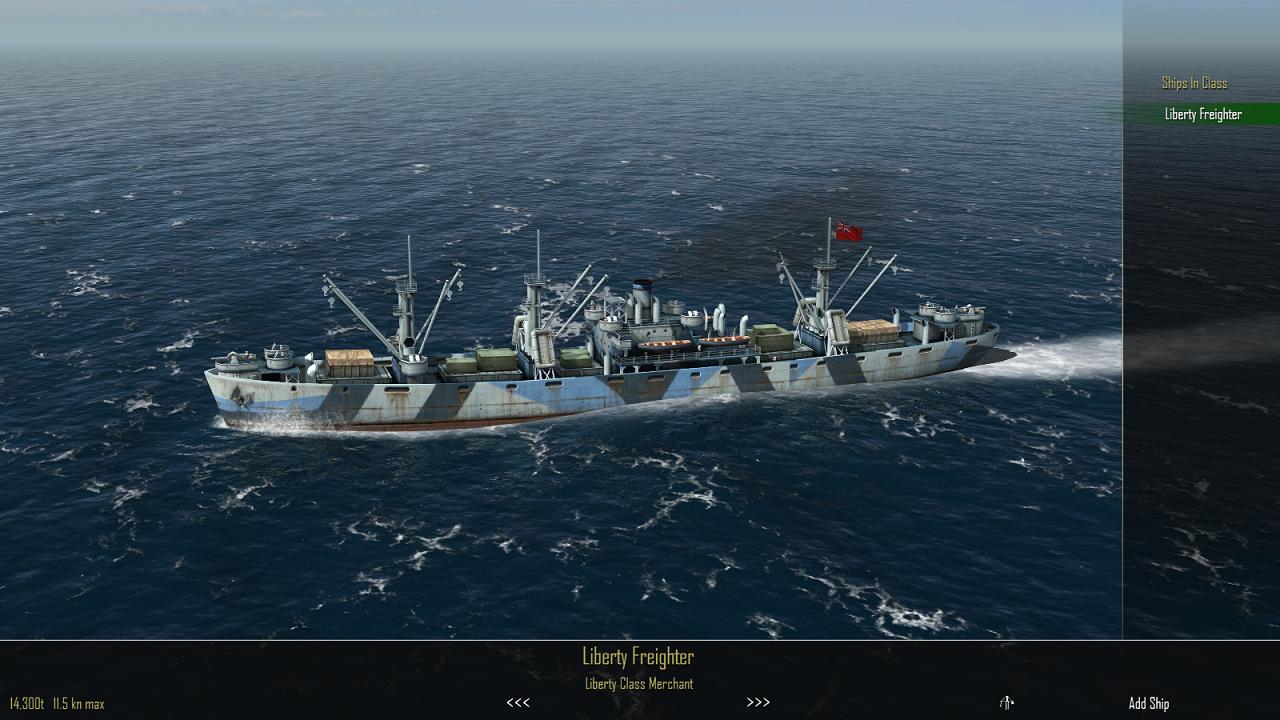
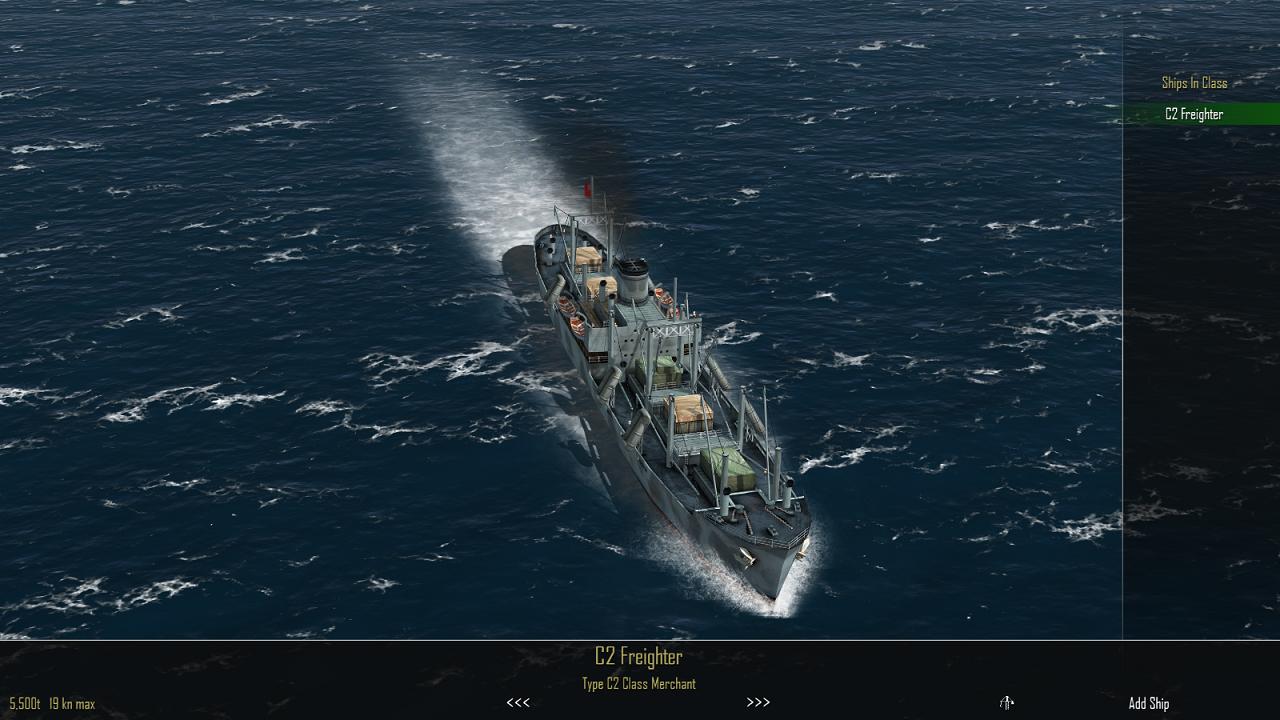
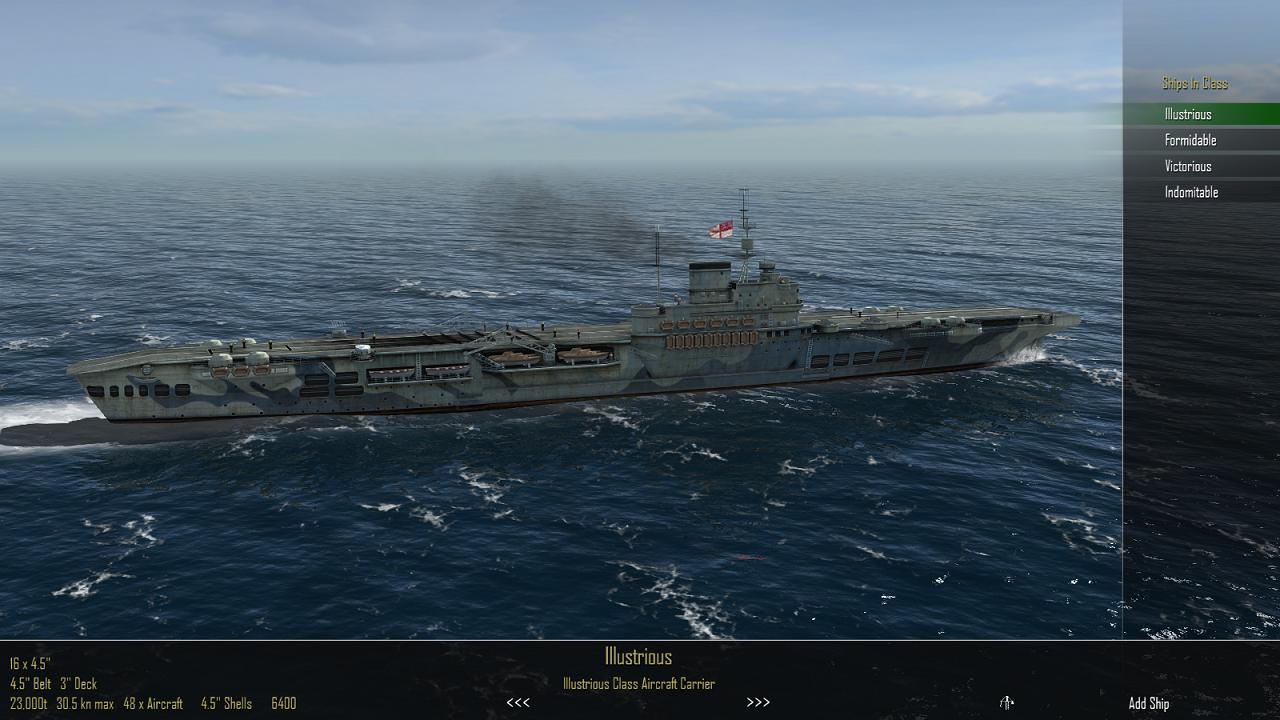
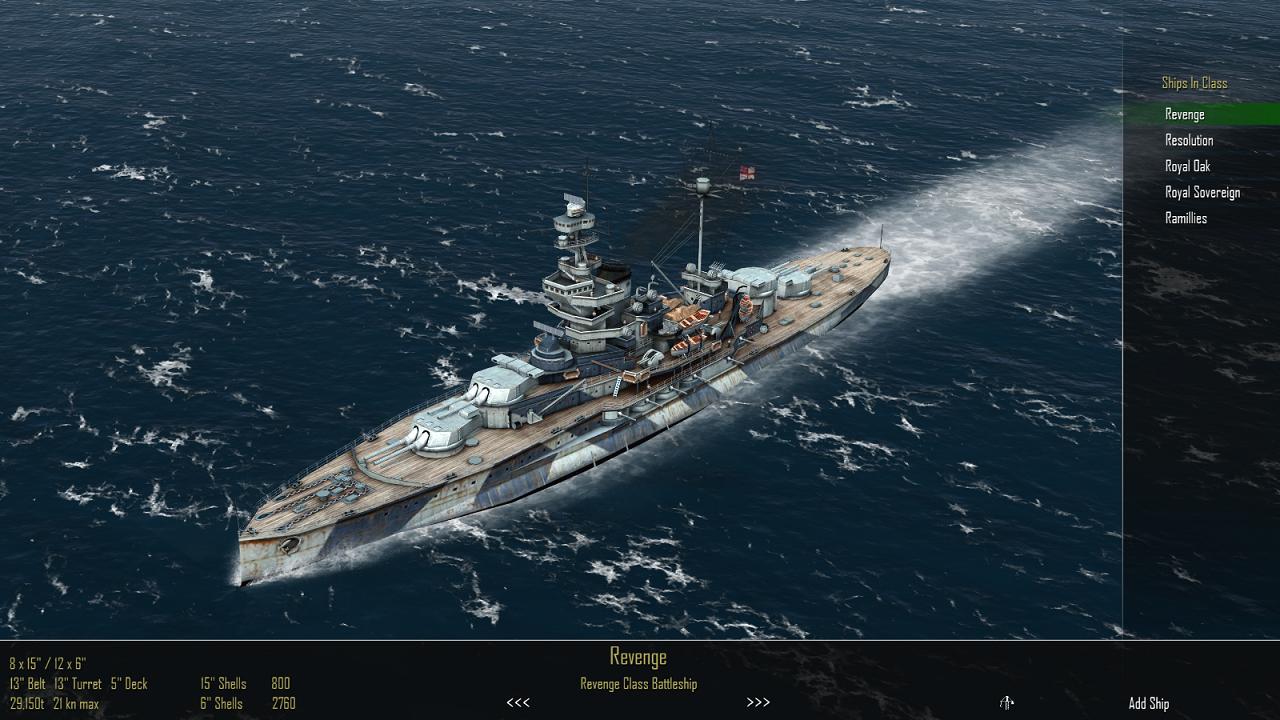
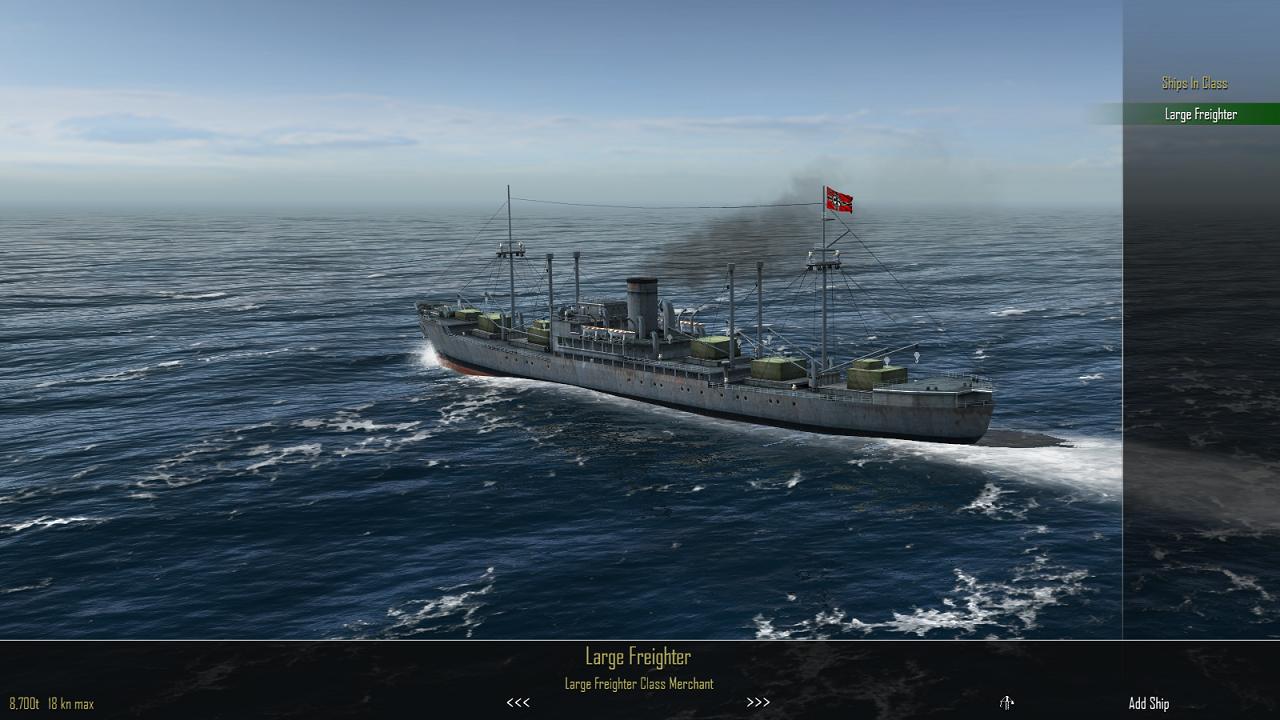
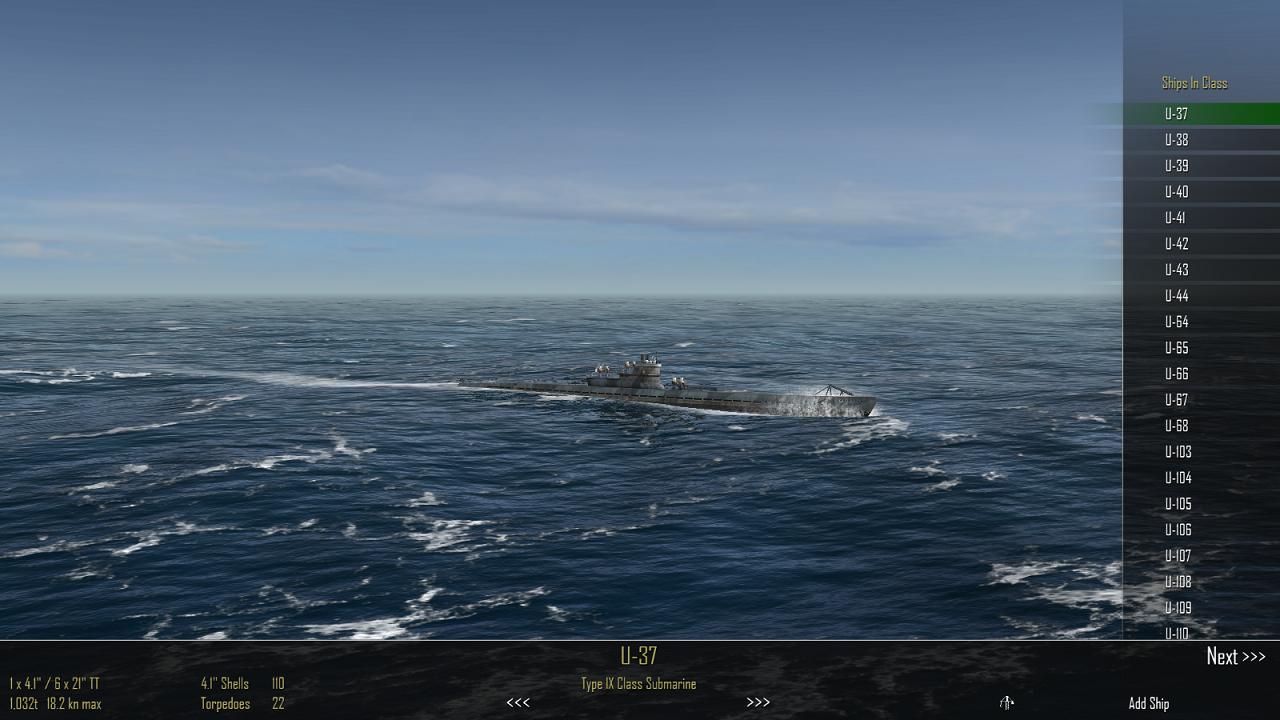
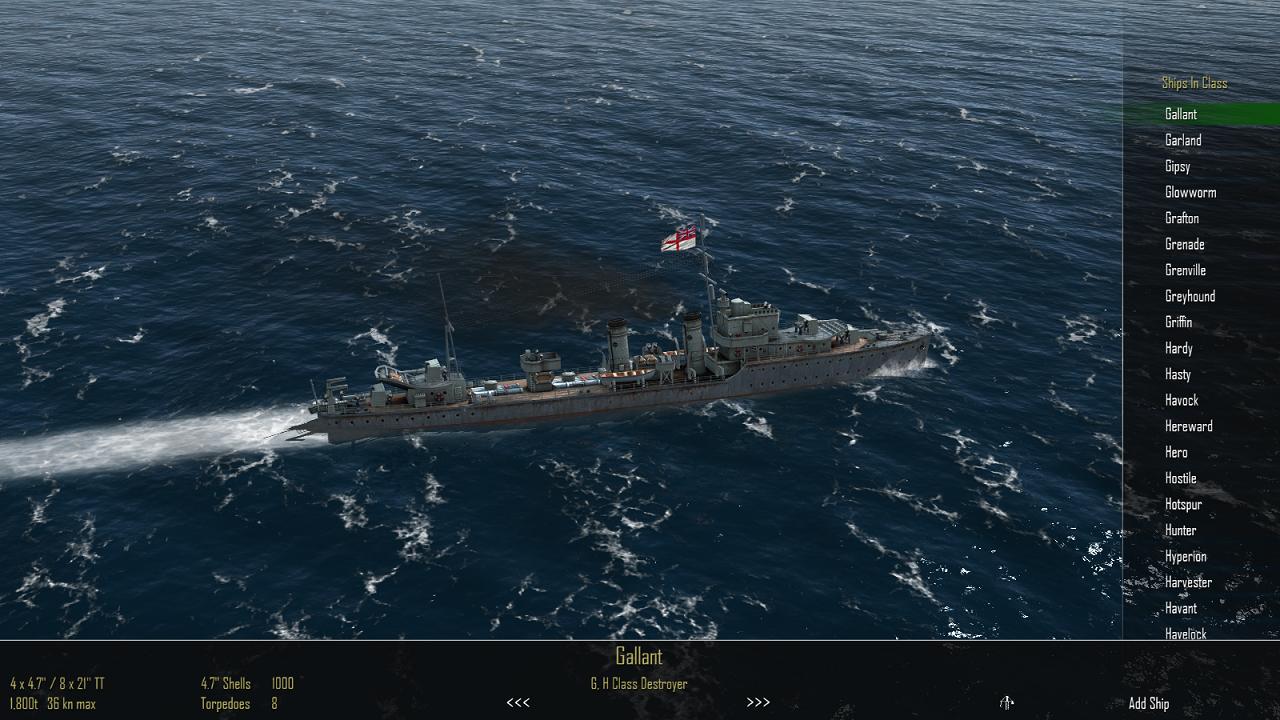
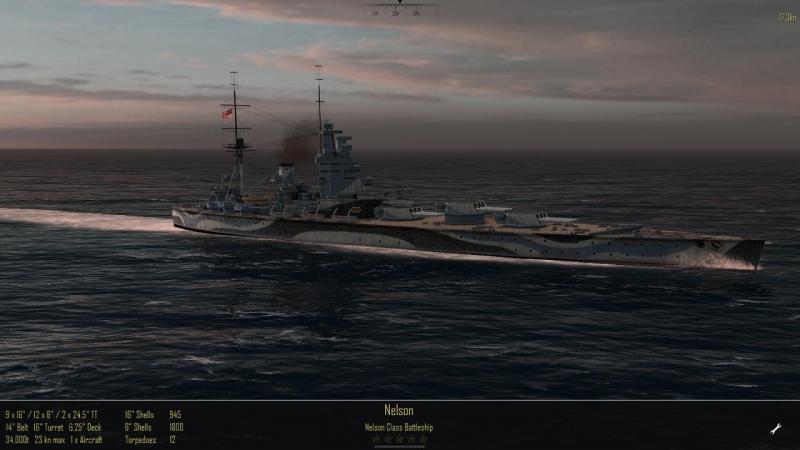
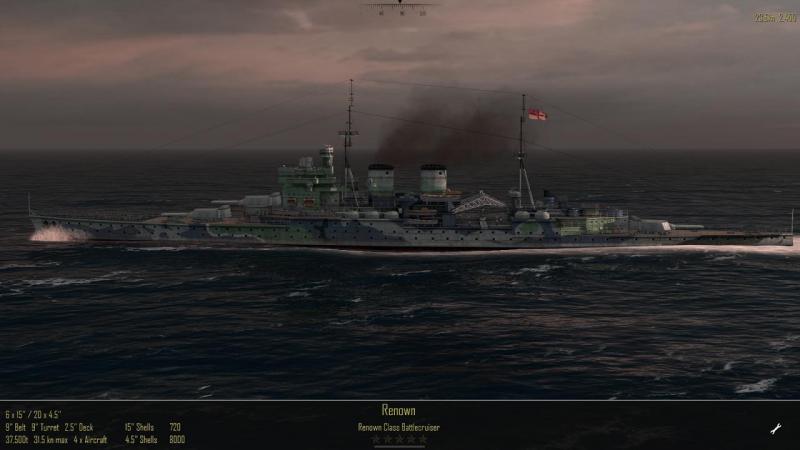
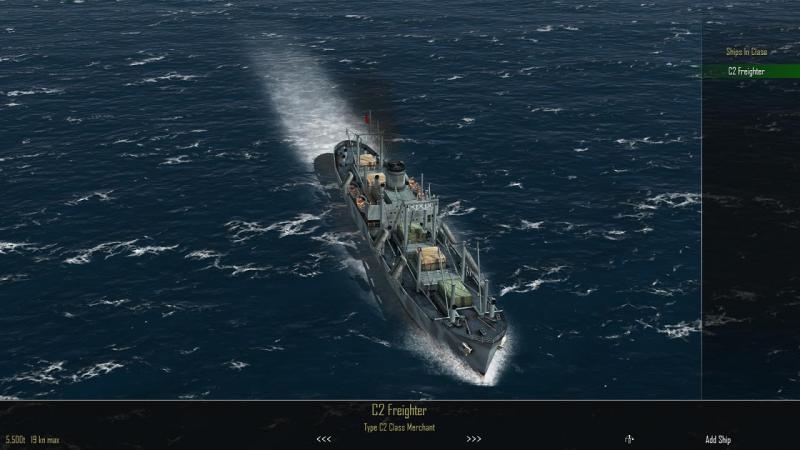
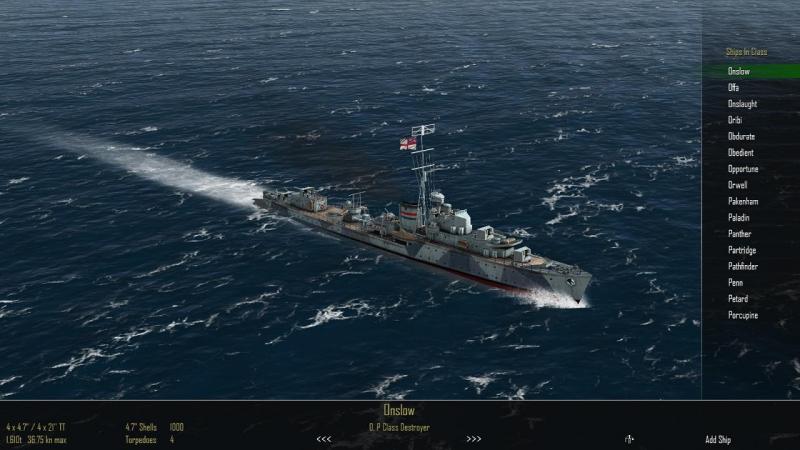
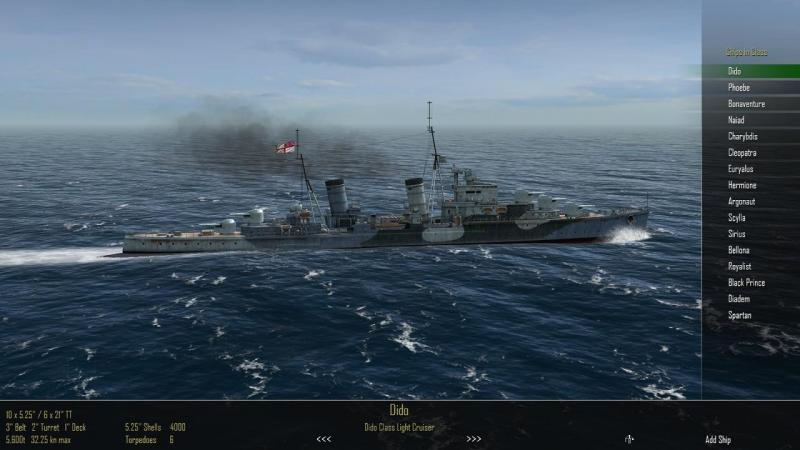
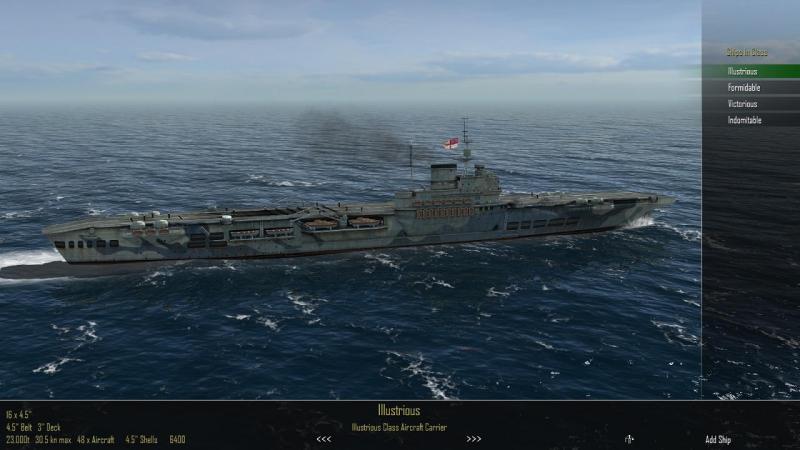
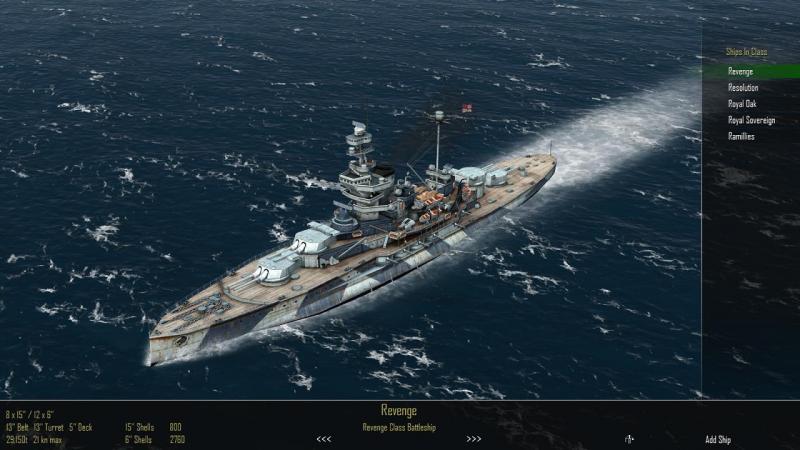
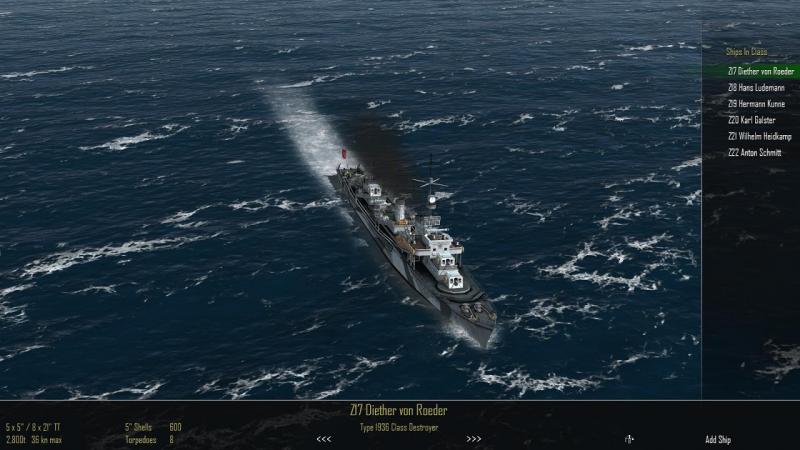
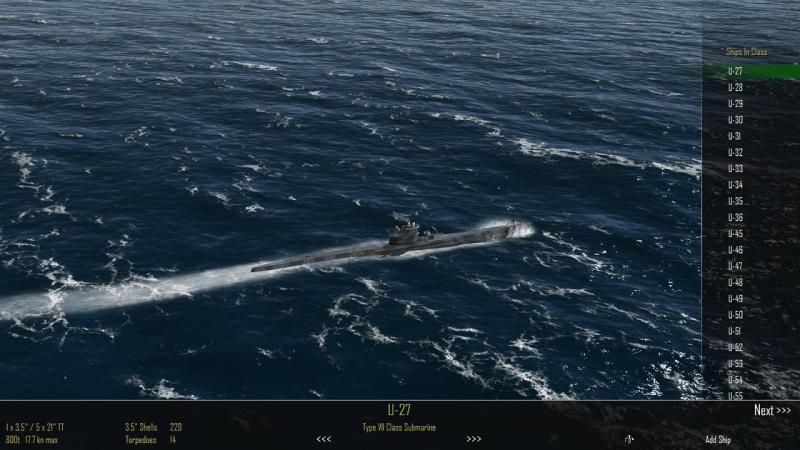
Some of the Allied battle-wagons available: Any ships which don't feature in one of the c.30 historical pre-set battles included, you can quickly put into a custom mission (the first option in the list of Single Battles is 'Custom Battle' and this launches a simple mission generator). The ship selection option for this lets you scroll through the available ships for each side in turn, and even though one ship represents all those in its class (with none of the subtle variations between many actual sister ships), the variety is as impressive as the visual quality, as this sample will show: These are not fixed renderings, but fully animated, with the view panning aound the ship, exactly as it will appear in-game. Atlantic Fleet is definitely an absolute must-have for anyone with an interest in gaming WW2 naval battles and very highly recommended for anyone other gamer. The content, gameplay, production values, historical fidelity, width and depth I find hugely impressive and reflect tremendous credit on everyone involved in putting this big gem - now it's on the PC and Mac, it's not a little gem anymore! - to sea.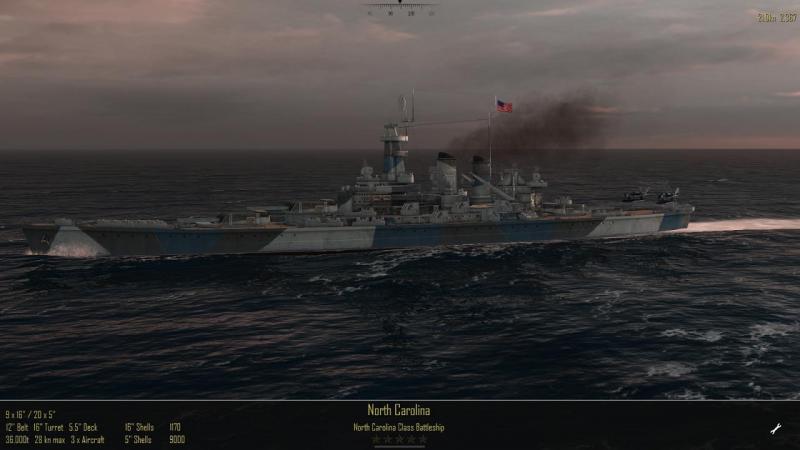


-
Atlantic Fleet PC/Mac Edition Available
33LIMA replied to dsawan's topic in Naval Combat Information Center
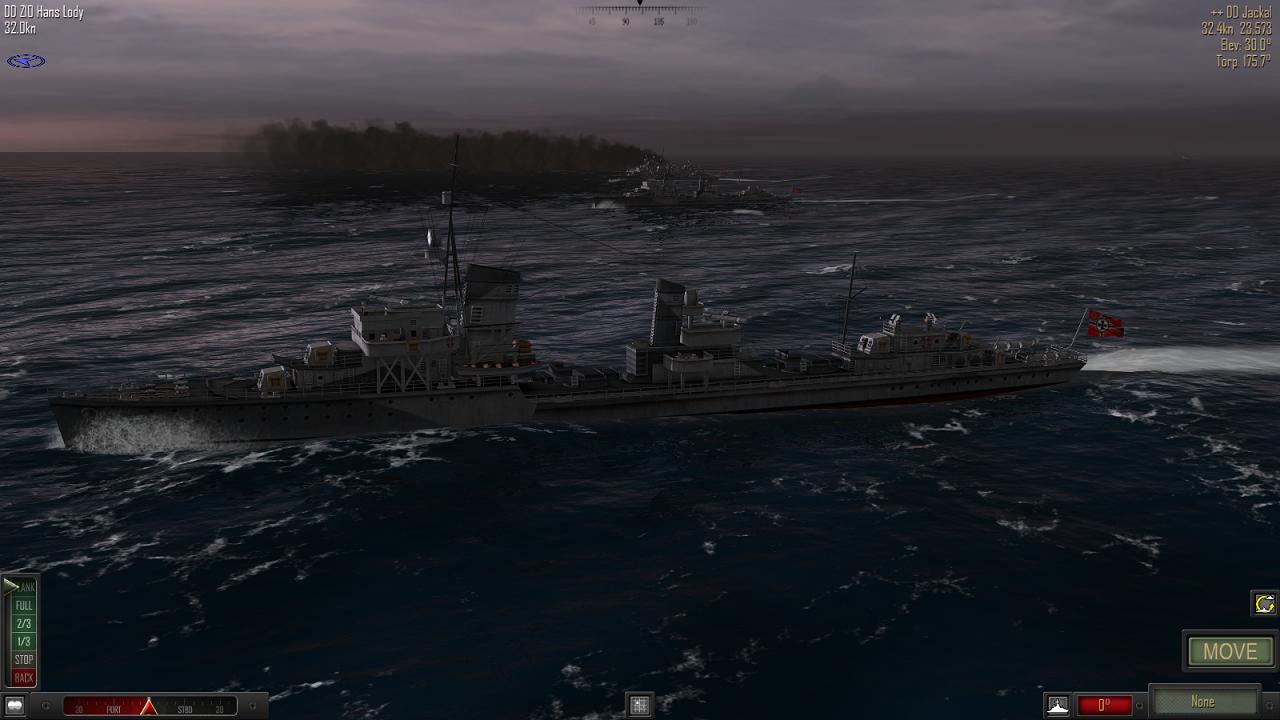
Well, it's full Steam ahead, for me... ...end of a raider, as Cornwall blows Pinguin's cover... ...and a duel develops in the Western approaches, as a flotilla of big German destroyers is intercepted by a force of British light cruisers and destroyers... Love it.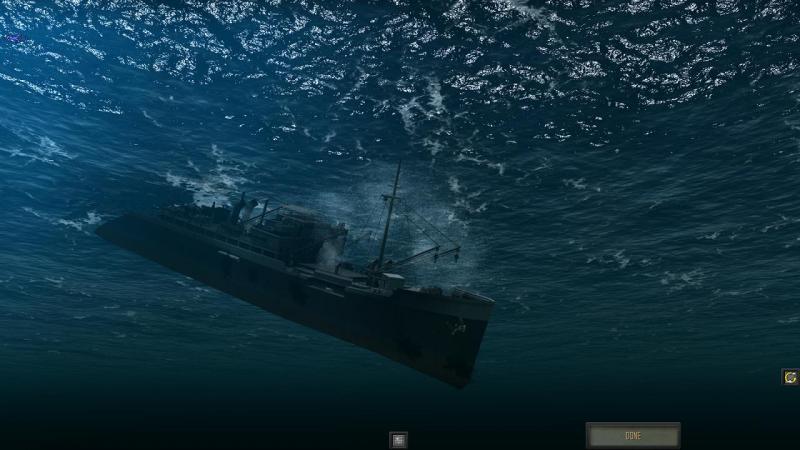


-
Atlantic Fleet PC/Mac Edition Available
33LIMA replied to dsawan's topic in Naval Combat Information Center
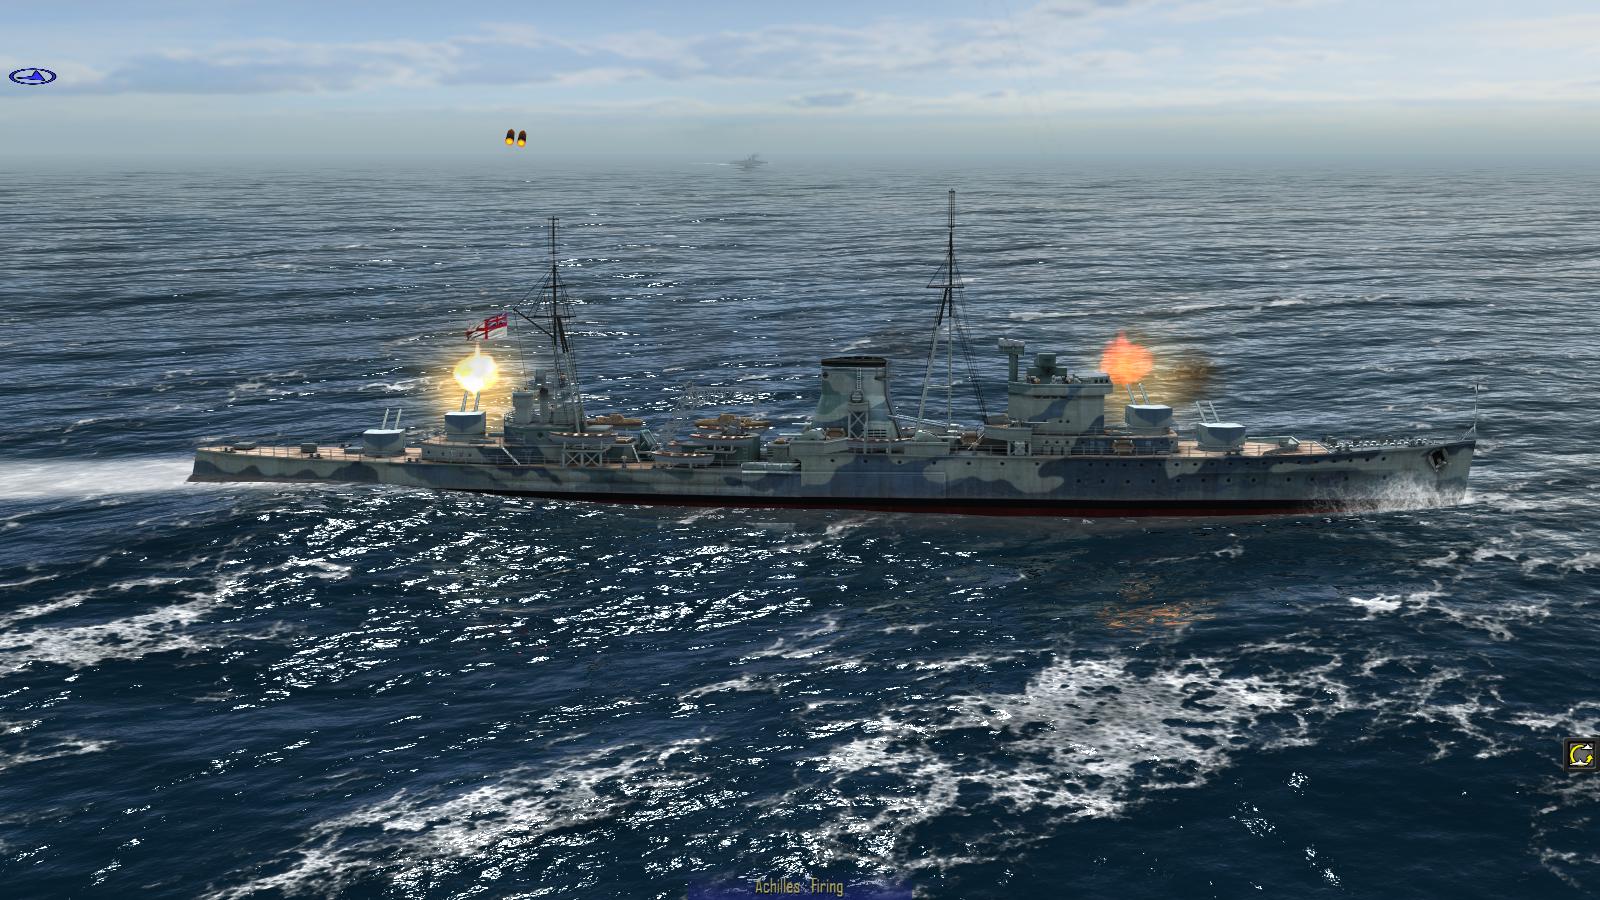
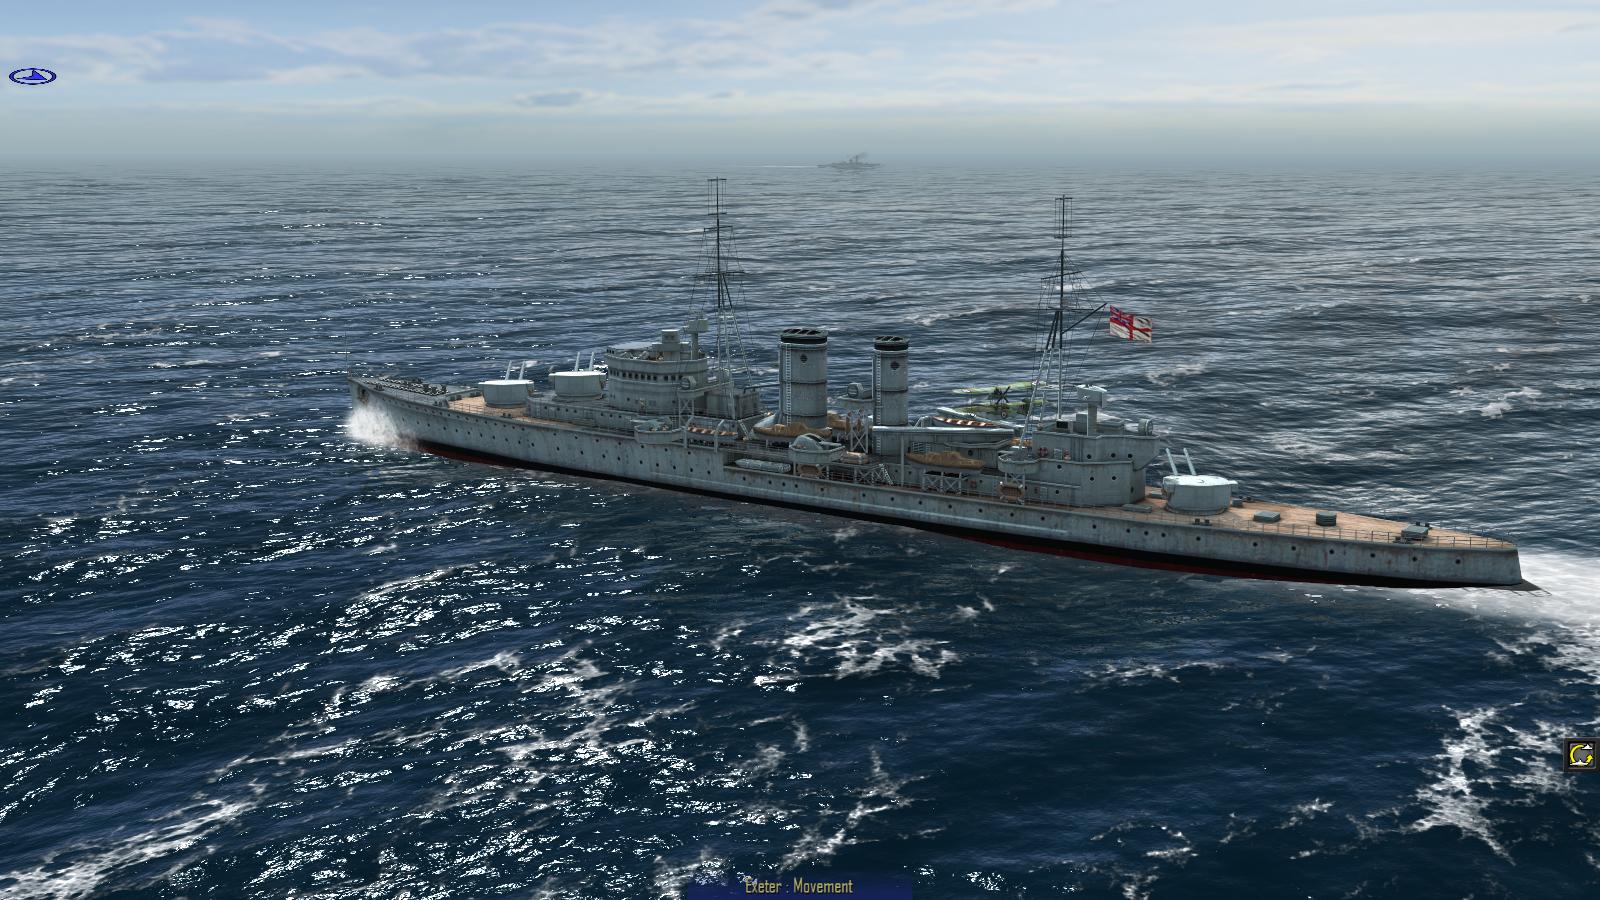
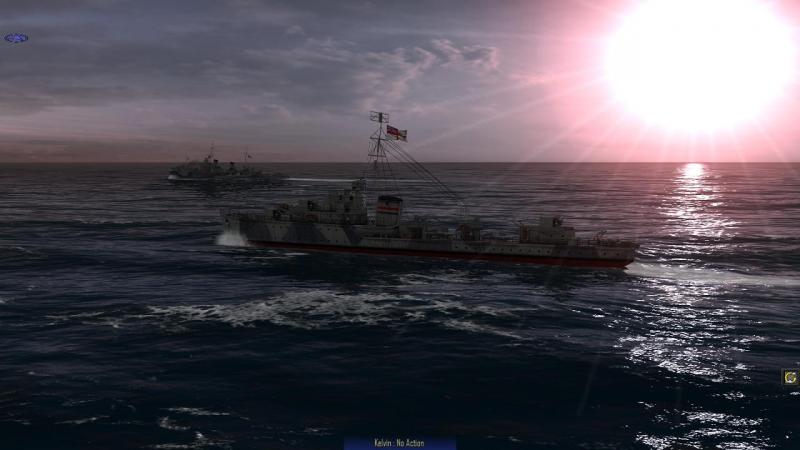
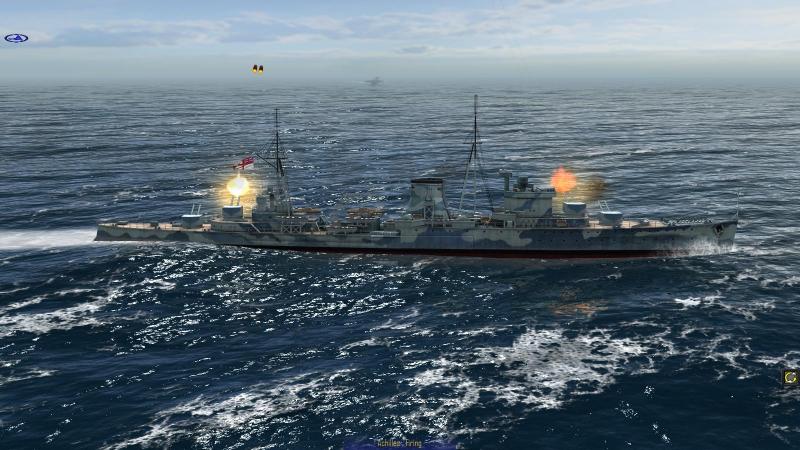
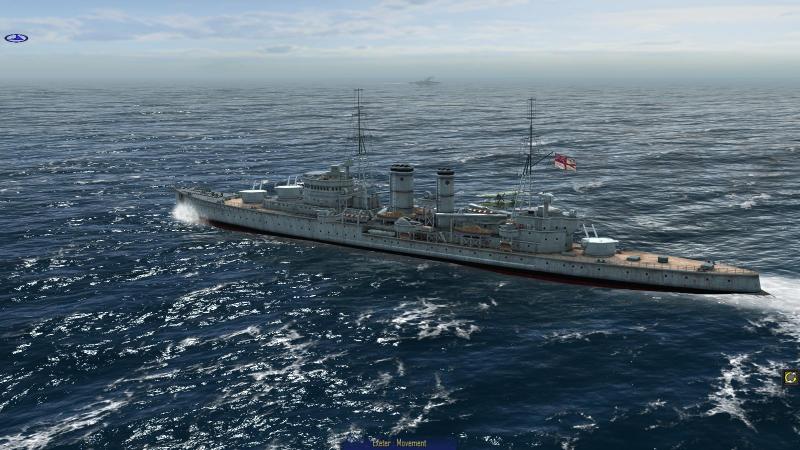
Re-fighting the Battle of the River Plate is equal fun;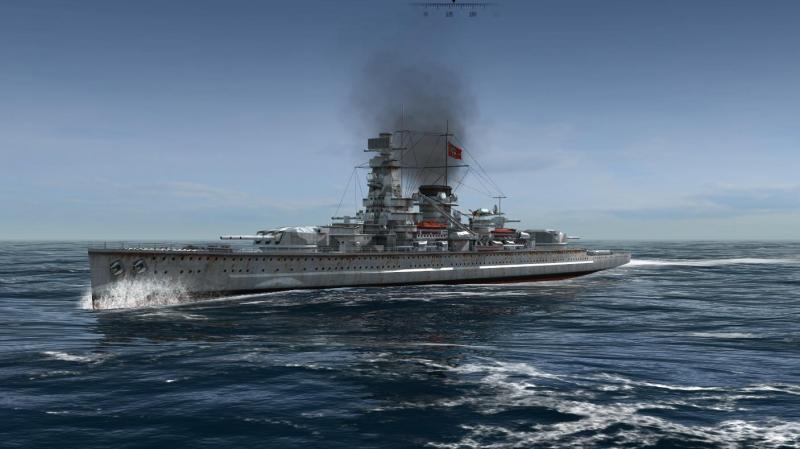
-
Atlantic Fleet - HMNZS Achilles, Battle of the River Plate
33LIMA posted a gallery image in Member's Albums

From the album: Combat Sims
-
Atlantic Fleet - HMS Exeter, Battle of the River Plate
33LIMA posted a gallery image in Member's Albums

From the album: Combat Sims
-
From the album: Combat Sims
-
Atlantic Fleet - Graf Spee under fire, Battle of the River Plate
33LIMA posted a gallery image in Member's Albums

From the album: Combat Sims
-

From the album: Combat Sims
-
From the album: Combat Sims
-
From the album: Combat Sims