
Stephen1918
-
Content count
1,169 -
Joined
-
Last visited
-
Days Won
19
Everything posted by Stephen1918
-
If I ever get back to the Spanish Civil War, I'll certainly make a Heinkel. But I've been neglecting the Real World since early November and there are things I need to do there. Also, to be honest, I want to spend some time flying in the Eastern and Italian Fronts.
-
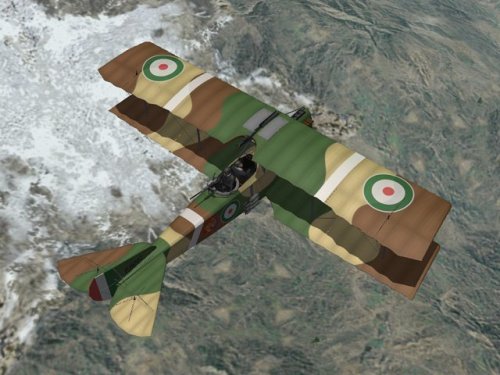
View File SAML S.2 The SAML S.2 was an improved version of the Aviatik B.I which was built under license by the Societá Anonima Meccanica Lombarda (known as the SAML S.1.) The S.2 was specifically designed to fly in the mountainous terrain of the Italian Front. Improvements mostly involved the wings, which had a slight sweep and were closer together than the Aviatik design. The biggest improvement was the more powerful Fiat A.12 engine capable of delivering 300hp. The SAML S.2 was used primarily for reconnaissance and was armed with a fixed Fiat-Revelli machine gun over the wing with a ring mounted machine gun operated by the observer. My SAML S.2 includes 2 skins with appropriate decals and a small bomb loadout. I have included my skinning templates with the download. Version 2 - More accurate fuselage and gunner station, corrected wing placement and dihedral, corrected gauges in cockpit - all new LODs, revised skins, revised FM, new cockpit LOD and revised cockpit.ini Credits: My thanks to Ojcar for making the data.ini file for this plane and for providing valuable resources and advice on the details of the SAML S.2. Installation instructions: For FE1: Unzip the file and move the folder named "SAMLS2" into the FirstEagles/Objects/Aircraft folder. For FE2: Unzip the file and move the folder named "SAMLS2" into the FirstEagles/Objects/Aircraft folder. Then in the FirstEagles/Objects/Decals folder, create a new folder named "SAMLS2". Move the folder named "D" from the Aircraft/SAMLS2 folder into the Decals/SAMLS2 folder you just made. Submitter Stephen1918 Submitted 12/23/2018 Category Other Entente Aircraft
-
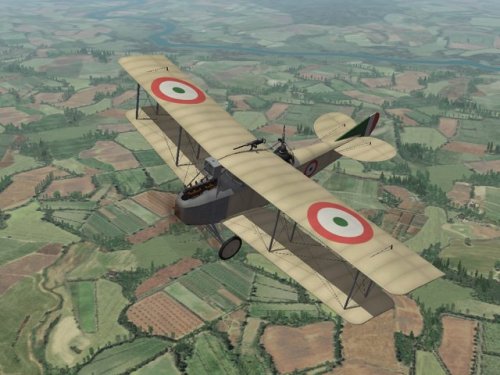
View File Pomilio PE The Pomilio PE was a two seat, Italian general purpose plane that entered service in 1917. It had a 300hp Fiat 6 cylinder engine with a radiator mounted in the nose of the aircraft. A fin under the fuselage, around the tail skid, helped improve the stability of the plane. The Pomilio PE was used primarily for reconnaissance and was armed with a fixed Fiat-Revelli machine gun over the wing with a ring mounted machine gun operated by the observer. The Pomilio could carry a light bomb load with 3 bombs mounted on the each side of the plane. My Pomilio PE includes 2 skins - a green/yellow speckled camo, and a 3 color camo - each with appropriate decals. I have included a small bomb loadout. I have included my skinning templates with the download. Historical Notes: - My Pomilio PE uses the later style fuselage with a flatter deck behind the pilot because it allowed me to give greater range to the gunner in the game. - I have taken extensive liberties with the speckled camo skin version of the plane. When the camouflage was applied at the factory, it usually covered the metal panels around the engine. The speckled camo scheme was not applied to the top of the lower wing. The national insignia on the top wing did not usually extend into the aileron. The 3 color camo version is much more accurate and is the default skin. Credits: My thanks to Ojcar for making the data.ini file for this plane. Installation instructions: For FE1: Unzip the file and move the folder named "PomilioPE" into the FirstEagles/Objects/Aircraft folder. For FE2: Unzip the file and move the folder named "PomilioPE" into the FirstEagles/Objects/Aircraft folder. Then in the FirstEagles/Objects/Decals folder, create a new folder named "PomilioPE". Move the folder named "D" from the Aircraft/PomilioPE folder into the Decals/PomilioPE folder you just made. Submitter Stephen1918 Submitted 01/08/2019 Category Other Entente Aircraft
-
Version 1.0.0
169 downloads
The Pomilio PE was a two seat, Italian general purpose plane that entered service in 1917. It had a 300hp Fiat 6 cylinder engine with a radiator mounted in the nose of the aircraft. A fin under the fuselage, around the tail skid, helped improve the stability of the plane. The Pomilio PE was used primarily for reconnaissance and was armed with a fixed Fiat-Revelli machine gun over the wing with a ring mounted machine gun operated by the observer. The Pomilio could carry a light bomb load with 3 bombs mounted on the each side of the plane. My Pomilio PE includes 2 skins - a green/yellow speckled camo, and a 3 color camo - each with appropriate decals. I have included a small bomb loadout. I have included my skinning templates with the download. Historical Notes: - My Pomilio PE uses the later style fuselage with a flatter deck behind the pilot because it allowed me to give greater range to the gunner in the game. - I have taken extensive liberties with the speckled camo skin version of the plane. When the camouflage was applied at the factory, it usually covered the metal panels around the engine. The speckled camo scheme was not applied to the top of the lower wing. The national insignia on the top wing did not usually extend into the aileron. The 3 color camo version is much more accurate and is the default skin. Credits: My thanks to Ojcar for making the data.ini file for this plane. Installation instructions: For FE1: Unzip the file and move the folder named "PomilioPE" into the FirstEagles/Objects/Aircraft folder. For FE2: Unzip the file and move the folder named "PomilioPE" into the FirstEagles/Objects/Aircraft folder. Then in the FirstEagles/Objects/Decals folder, create a new folder named "PomilioPE". Move the folder named "D" from the Aircraft/PomilioPE folder into the Decals/PomilioPE folder you just made. -

SAML S.2
Stephen1918 replied to Stephen1918's topic in Thirdwire - First Eagles 1&2 File Announcements
Mike, I haven't seem this in my install of FE (checked in both FE1 and FE2.) In your case, it looks like the game isn't recognizing the gunner. Check your data.ini and make sure that something hasn't been changed - especially the names in the SystemName area under Fuselage, and the names of the nodes under Gunner in the crew section. -
Today I uploaded the SAML S.2 - my first Italian plane, appropriate for Gterl's new Caporetto terrain. The SAML S.2 was an Italian two-seat reconnaissance plane It was an improved version of the S.1, which was a license built copy of the Aviatik B.I. My SAML S.2 includes two skins, decals, a small bomb loadout, along with my skinning templates. My thanks to Ojcar for making the FM and for advising me on details of the plane.
-
I first posted this two years ago and I'm re-gifting this to all of you this year. A completely flyable Santa Claus for FE (both FE1 and FE2,) including a cockpit view. He's probably the most well known pilot of all time, but never shot down another plane. He may wear different uniforms and be known by many names but he is always remembered for his message of peace and goodwill. Installation Instructions Download and open the attached Zip file (below). Put the folder named "Santa" into your First Eagles "Aircraft" folder. Notes: Start in the air - Santa does not take off and land very well, (too many hooves) so it is best to begin your mission in the air. Easy mode only - I didn't spend a lot of time on the FM. The center of gravity is too close to the back, so he doesn't fly well in "Normal" or "Hard" modes. Extra aircraft - By default, First Eagles assigns two planes to a recon flight. You can remove one of them in the Loadout screen. Avoid AA - He's neutral and unarmed, but ground-based AA will still open fire when he gets close. Remember to set the mission date to a Winter month. Now, go spread some Holiday Cheer. SantaForFE.zip
- 6 replies
-
- 15
-

-

-

-
Are FE1 and FE2 identical for add-ons?
Stephen1918 replied to alexis99's topic in Thirdwire - First Eagles 1&2
You can assume that just about everything for First Eagles at Combat Ace will work in FE1 I use FE1 most of the time and just about everything I've downloaded works fine in FE1. Geezer has made some planes recently that only work in FE2. VonS has made some data files that are intended for FE2. I think everything else will work in both. Most of the modders here are making things that work in both. Everything that I have made so far will work in both FE1 and FE2, but there may be different installation procedures. -
And, if I may say so, A beautiful FM Ojcar! Thanks for all your help.
-
Version 2.0.0
192 downloads
The SAML S.2 was an improved version of the Aviatik B.I which was built under license by the Societá Anonima Meccanica Lombarda (known as the SAML S.1.) The S.2 was specifically designed to fly in the mountainous terrain of the Italian Front. Improvements mostly involved the wings, which had a slight sweep and were closer together than the Aviatik design. The biggest improvement was the more powerful Fiat A.12 engine capable of delivering 300hp. The SAML S.2 was used primarily for reconnaissance and was armed with a fixed Fiat-Revelli machine gun over the wing with a ring mounted machine gun operated by the observer. My SAML S.2 includes 2 skins with appropriate decals and a small bomb loadout. I have included my skinning templates with the download. Version 2 - More accurate fuselage and gunner station, corrected wing placement and dihedral, corrected gauges in cockpit - all new LODs, revised skins, revised FM, new cockpit LOD and revised cockpit.ini Credits: My thanks to Ojcar for making the data.ini file for this plane and for providing valuable resources and advice on the details of the SAML S.2. Installation instructions: For FE1: Unzip the file and move the folder named "SAMLS2" into the FirstEagles/Objects/Aircraft folder. For FE2: Unzip the file and move the folder named "SAMLS2" into the FirstEagles/Objects/Aircraft folder. Then in the FirstEagles/Objects/Decals folder, create a new folder named "SAMLS2". Move the folder named "D" from the Aircraft/SAMLS2 folder into the Decals/SAMLS2 folder you just made. -
Since Ojcar has made a new FM for the Polish Anatra DS, I have updated the Russian and Austrian versions as well. I took the opportunity to make some improvements to the wings and other details of both planes. And the Austrian version got a new cockpit with German gauges and gun. Both planes have new LODs, but the skins Eugene2 has made recently for the Anatra DS will still work. My thanks to Ojcar for making a new FM that has better handling for the plane and better take offs. https://combatace.com/files/file/12396-anatra-ds-anasal/ https://combatace.com/files/file/13014-anatra-ci/
-
Ready for Christmas - Italian-Caporetto Terrain
Stephen1918 replied to gterl's topic in Thirdwire - First Eagles 1&2
Beautiful terrain. Thank you! -
About two weeks ago, Wilches recommended a post-war, Polish version of the Anatra DS. That resurrected my interest in the Russian Civil Wars, and since the changes seemed minor, I decided to do it. It took a little longer than I expected, but it's finished and I uploaded it today. The Polish version has a different cowling, different radiator, and a slightly different rudder. As a result, it uses different skins from the Russian plane. I included the new skinning templates with the download, along with decals. The plane is armed the same as the Russian version, with two guns and a small bomb loadout. Ojcar made a new FM for this plane (my thanks to him) with improved handling and smoother take-offs. I will be revising the Russian and Austrian versions of the Anatra DS in the near future.
-
Anatra DS and Anatra C.I updated
Stephen1918 replied to Stephen1918's topic in Thirdwire - First Eagles 1&2
I saw this plane presented as a plastic model kit from Omega: https://obchod.valka.cz/product_info.php/p/1107177/title/1-48-Anatra-Anasal-DSS-Yugoslav I don't know if such a plane actually existed, but I liked the look of it. Austria Hungary had many Anatra C.I's. After the war a lot of them ended up in the air force of the Czech Republic, so it isn't unreasonable to assume that some of them found their way into the Yugoslav air force. -
Anatra DS and Anatra C.I updated
Stephen1918 replied to Stephen1918's topic in Thirdwire - First Eagles 1&2
When I was uploading the Anatras, I noticed that the Aviatik-Berg D.I's didn't have any screenshots, so I uploaded some pictures for them. They are showing up as updated files, but there is really nothing new there. -
Polish Anatra DS "Anasal"
Stephen1918 replied to Stephen1918's topic in Thirdwire - First Eagles 1&2 File Announcements
The Poles got 8 Anasals in March 1919 they also captured a Soviet plane, as you say, in April. -
Polish Anatra DS "Anasal"
Stephen1918 posted a topic in Thirdwire - First Eagles 1&2 File Announcements
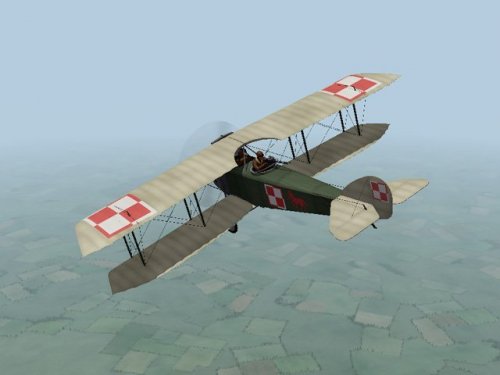
View File Polish Anatra DS "Anasal" The Anatra DS was a two seat Russian plane powered by a Salmson 9 cylinder, water cooled, rotary engine. The plane was therefore called the "Anasal", short for "Anatra Salmson". When the Ukrainian city of Odessa was occupied by Austria-Hungary early in 1918, the Anatra factory was found intact and production continued as the "Anatra C.I". Many of the first Austrian versions had the Austrian cross painted over the Russian insignia. The Anatra DS was used mostly for reconnaissance, but also as a fighter and light bomber. Many of them survived the war and were used in the fighting in Eastern Europe after the end of World War I. Poland declared its independence in late 1917. The new nation armed itself with whatever was available, including abandoned Russian, German and Austrian planes, and purchased planes from other nations. Several Anatra DS were purchased from the Anatra factory in Odessa. The Polish Anantra DS was identical to the Russian version, except for slight changes to the cowling, the radiator, and the rudder. The skins to my plane are similar, but not identical to my Russian version. As a resullt, I have included new skinning templates for the Polish Anasal. Historical Notes: I found several sources which said that Anatras carried a machine gun mounted on the fuselage for the pilot. I couldn't find any details of the mounting, so I guessed where it might be located. I don't know how the Poles armed their plane, so I used the guns I used on the Russian version. I also included a small bomb load. Credits: My thanks to Ojcar once again for making a new data.ini file for this plane. Installation instructions: For FE1: Unzip the file and move the folder named "PolishAnasal" into the FirstEagles/Objects/Aircraft folder. For FE2: Unzip the file and move the folder named "PolishAnasal" into the FirstEagles/Objects/Aircraft folder. Then in the FirstEagles/Objects/Decals folder, create a new folder named "PolishAnasal". Move the folder named "D" from the Aircraft/PolishAnasal folder into the Decals/PolishAnasal folder you just made. Submitter Stephen1918 Submitted 12/01/2018 Category Other Entente Aircraft -
Polish Anatra DS Uploaded
Stephen1918 replied to Stephen1918's topic in Thirdwire - First Eagles 1&2
33Lima - Thanks! Actually, the Polish insignia are straight of of FE. FE already has insignia for all the nations included in the Nations.ini. Decals for nations not involved in WWI, like Switzerland, Netherlands, Soviet Union, and Poland are stock FE decals. I did include decals for Ukraine, since the Anatra factory was theirs, but not a skin. Silberpfeil - Thanks! The gunner is set to be more average, but you can make the FM adjustments for your install easily enough. The Gun Data includes an Accuracy setting, so that would need to be adjusted as well. -
Version 1.0.0
72 downloads
The Anatra DS was a two seat Russian plane powered by a Salmson 9 cylinder, water cooled, rotary engine. The plane was therefore called the "Anasal", short for "Anatra Salmson". When the Ukrainian city of Odessa was occupied by Austria-Hungary early in 1918, the Anatra factory was found intact and production continued as the "Anatra C.I". Many of the first Austrian versions had the Austrian cross painted over the Russian insignia. The Anatra DS was used mostly for reconnaissance, but also as a fighter and light bomber. Many of them survived the war and were used in the fighting in Eastern Europe after the end of World War I. Poland declared its independence in late 1917. The new nation armed itself with whatever was available, including abandoned Russian, German and Austrian planes, and purchased planes from other nations. Several Anatra DS were purchased from the Anatra factory in Odessa. The Polish Anantra DS was identical to the Russian version, except for slight changes to the cowling, the radiator, and the rudder. The skins to my plane are similar, but not identical to my Russian version. As a resullt, I have included new skinning templates for the Polish Anasal. Historical Notes: I found several sources which said that Anatras carried a machine gun mounted on the fuselage for the pilot. I couldn't find any details of the mounting, so I guessed where it might be located. I don't know how the Poles armed their plane, so I used the guns I used on the Russian version. I also included a small bomb load. Credits: My thanks to Ojcar once again for making a new data.ini file for this plane. Installation instructions: For FE1: Unzip the file and move the folder named "PolishAnasal" into the FirstEagles/Objects/Aircraft folder. For FE2: Unzip the file and move the folder named "PolishAnasal" into the FirstEagles/Objects/Aircraft folder. Then in the FirstEagles/Objects/Decals folder, create a new folder named "PolishAnasal". Move the folder named "D" from the Aircraft/PolishAnasal folder into the Decals/PolishAnasal folder you just made. -
removing a node, or whatever its called
Stephen1918 replied to Trotski's topic in Thirdwire - First Eagles 1&2
I tried making new nacelles for the old Farmans once and the result wasn't much better than the original. It had to be quite large to cover all the bumps in the original, and I couldn't get the edges around the cockpit and engine to match. Laton made a Savoia Pomilio SP.3 for Italy that is a good stand-in for the shorthorn, and has skins that are easier to work with. https://combatace.com/files/file/4661-savoia-pomilio-sp3/ -
I have problem with Stephen's Farman HF20 Unarmed
Stephen1918 replied to Sky High's topic in Thirdwire - First Eagles 1&2
Somewhere in FE (I don't remember where) there's a section of an ini file that has controls for formations - how far apart the planes are, etc. Could that have been changed by accident? -
Over the years, the modders at Combat Ace have made a pretty comprehensive addition to FE that rivals the stock game. If you are building your Eastern Front: I recommend ojcar's campaigns - Armchair Aces over Galicia. The list of planes is long but it matches what Crawford posted pretty closely - using whatever planes we have available for FE. https://combatace.com/files/file/15533-armchair-aces-over-galicia/ I also recommend Capitaine Vengeur's medals and pilots from his Beyond the Western Front series https://combatace.com/files/file/15954-ww1-medals-pack-for-fe-beyond-the-western-front/ https://combatace.com/files/file/14447-ww1-pilots-pack-beyond-the-western-front/ Both of them did a lot of research to make everything as accurate as possible.
-
I have uploaded a cockpit for the DFW C.V. The cockpit features fully functional gauges, rudder control, stick, and throttle. It will work in both FE1 and FE2. Installation instructions are included. I discovered a typo in the data.ini which makes the Fuselage disappear in Cockpit view, I have included instructions for correcting that type in the download.
-
removing a node, or whatever its called
Stephen1918 replied to Trotski's topic in Thirdwire - First Eagles 1&2
Removing a part from a plane Basically, you are telling the game that a certain part represents the destroyed version of another part. So it doesn't show until the part is destroyed. Then you assign it to a part that doesn't exist, so that part never gets destroyed so the part you named never shows. Use Mue's LOD viewer to find the name of the part. Any parts attached to this part (indented beneath it in the list) will also be removed. Create a component under [AircraftData] - make sure its numbered correctly Create a component definition and make up a name for the fictitious part Add the name of the part you want to remove Example: This removes the gunner from the DFW, but leaves the machine gun. If you want to remove the gun, then the DestroyedNodeName should be Tailgun_Stand [AircraftData] EmptyMass=1027.0 EmptyInertia=2483.3,3916.1,5536.5 ReferenceArea=41.52 ReferenceSpan=13.27 ReferenceChord=1.68 CGPosition=0.00,0.00,0.00 OnGroundPitchAngle=14.0 UseMetricUnit=TRUE DefaultArmorType=WOOD DefaultArmorThickness=25 Component[001]=Fuselage Component[002]=TopWingLeft Component[003]=TopWingRight Component[004]=TopWingMidLeft Component[005]=TopWingMidRight Component[006]=TopWingTipLeft Component[007]=TopWingTipRight Component[008]=BottomWingLeft Component[009]=BottomWingRight Component[010]=BottomWingMidLeft Component[011]=BottomWingMidRight Component[012]=BottomWingTipLeft Component[013]=BottomWingTipRight Component[014]=Tail Component[015]=LeftStab Component[016]=RightStab Component[017]=VertTail Component[018]=Nose Component[019]=Remove <-- Add component [Remove] <-- Component name must match ModelNodename=Empty <-- this can be any word you want DestroyedNodeName=gunner <-- this is the name of the part you want to remove DetachWhenDestroyed=TRUE HasAeroCoefficients=FALSE -
Cockpit for the DFW C.V
Stephen1918 posted a topic in Thirdwire - First Eagles 1&2 File Announcements
View File Cockpit for the DFW C.V This cockpit will replace Fokker D7 cockpit used until now to make the stock DFW C.V into a flyable plane. I can't find out who first converted the stock DFW into a flyable plane by using the cockpit from the Fokker D7. It seems to have been done several times over the years. I found a mod to convert the DFW C.V into a C.I uploaded by Christian59 in 2007 which used the Fokker cockpit, and it seems to have already been done before. The most recent version I could find was by JacksonM in 2017 and was included with his Hangar Screen pack. I have used parts of the cockpits I made for other German planes to make a completely new cockpit for the DFW C.V which fits the fuselage better and has the correct placement for the gun. The new cockpit features fully functional gauges, throttle, rudder control, and stick. This cockpit should work with the DFW in both FE1 and FE2. NOTE - There is a typo in the stock FM for DFW C.V which causes the Fuselage to disappear in the cockpit view. I have included instructions to correct the typo. If you are using one of the modded FMs, you may need to correct the typo there too, check to be sure. Instructions to fix the Data.ini are included in the download in a separate text file. Installation Instructions for both FE1 and FE2 If you have already have a flyable DFW C.V using the FokkerD7 cockpit, delete the "cockpit" folder if it exists, and delete the DFWC5_cockpit.ini file. Then open my "DFWC5" folder and place all the files - 1 folder and 1 ini file - into your DFWC5 folder. You will also need to change one word in the DFWC5_data.ini. See the file named "ChangeForDFWC5DataIni" If you still have the stock version, Open my "DFWC5" folder and place all the files - 1 folder and 1 ini file - into your DFWC5 folder. You will also have to add the following line to the plane's ini file. CockpitDataFile=DFWC5_cockpit.ini You will also need to change one word in the DFWC5_data.ini. See the file named "ChangeForDFWC5DataIni" NOTE - If the DFWC5_data.ini is not in the folder, you may need to extract it from the ObjectData.cat file using one of the utilities found here at CombatAce. Submitter Stephen1918 Submitted 11/16/2018 Category First Eagles - WWI and Early Years - Add On Cockpits