

Do335
-
Content count
1,135 -
Joined
-
Last visited
-
Days Won
1
Posts posted by Do335
-
-
Mod is quite functional but I'm constantly tuning it. Will probably make another topic once I've made it all satisfactory. Meanwhile I hope it is a chance to get more ppl into modding this game!
List of changes:
- expanded ship names to include some what-if ships.
- Turret arcs and elevation angles edited on all warships when necessary iaw navweaps.com
- ships' healthpoints redone based on displacement. BB/BC is disp/1000, CV/CVE is disp/500, CA/CL is disp/400, DD is disp/135, SS is disp/120. Result value is close to game default but more variations and generally tougher ships. CV points is significantly higher, intention is to add some "tank" to the "glass cannon" and still able to launch planes after taking hits.
- All ships AAA strength x4. Result is AI heavy bombers about 3/4 chance of success, medium bombers 2/4 chance, attack planes 1/4 chance, vs 1 BB 1 CL 1 DD group. Rough about.
- Air strike coverage x 0.1. If a seazone had air strike coverage 1, it is changed to 0.1, in order to reduce abstract air strike events and reduce chance of heavy "one shot one kill" bombers.
- All ships have sonar and can detect and get targeting info on subs. BB main gun becomes no.1 sub killer.
- Sub torpedo salvo reduced, Type VII/IX max 2 torp salvo, Triton 3 torp salvo (AI can still fire 5 or 6), Type XXI 4 torp salvo. (Wanted to set XXI to 3 torp salvo as well but it locks up the AI action turn.)
- All ships purchasable from week 0 except Type XXI sub which is week 1 Dec 1941 when merchant tonnage bar raised to 700k.
- DDs torpedo loadout doubled as to have some spare after sub hunting.
- Experimental H-41 class BB changed from H-39, 68800ton, 16.5" guns, increased muzzle V, 6 planes, heavy flak. Way too strong, but meanwhile is fun to see working and a data points reference.
-TBD: uncensor all in game art. As someone lacking fundamental aesthetics and skill, hopefully a proper skinner would jump in. Ah well.
Credit to tj666 for the uncensored KM flag on warship 3D models. At least a part of it is done!
To use the mod: backup the folder "AtlanticFleet_Data" in the game directory. Extract mod contents and overwrite.
https://drive.google.com/open?id=173zIFvSvi39y-a89rX2n2lpSSoHVJZ6hEdits made by a hex editor and Unity Assets Bundle Extractor
-
56 minutes ago, baffmeister said:I set the nose gear castor as a fake rudder which allows the use of some data entries to manipulate the rotation axis.
Awesome workaround it is!

-
 1
1
-
-
It has been a while but iirc Ongjin and Kosong was deleted as nodes. They caused frontline fail under some conditions - symptom being the line would be drawn as a straight line and the ground unit going back to its basearea. I've a couple of theories but none that verified by TK or other modders, as info on strategic nodes modding is non-existent..... Most reasonable one is the ground unit is attacking sideways, as in despite new territory being gained the new frontline would be drawn further away from the end objective sinuiju, and the campaign engine probably doesn't like that. ...Anyway, the current one held well to repeated testing - the one true method.
-
dragon: if you're using the strategic nodes for a ground war this would work a bit better.. The uploaded one could be problematic at rare times.
Spoiler//--nodes--
//--route west
//---red side
[StrategicNode001]
Area=Sinuiju
ConnectTo[001].Target=Sinuiju EW-GCI Site
ConnectTo[002].Target=Uiju[StrategicNode002]
Area=Sinuiju EW-GCI Site
ConnectTo[001].Target=Sinuiju
ConnectTo[002].Target=Chongju[StrategicNode003]
Area=Chongju
ConnectTo[001].Target=Sinuiju EW-GCI Site
ConnectTo[002].Target=Sinanju
ConnectTo[003].Target=Sinanju EW-GCI Site[StrategicNode004]
Area=Sinanju EW-GCI Site
ConnectTo[001].Target=Chongju
ConnectTo[002].Target=Taechon/Chongchon-Gang Bridge West[StrategicNode005]
Area=Taechon/Chongchon-Gang Bridge West
ConnectTo[001].Target=Sinanju EW-GCI Site
ConnectTo[002].Target=Pyongwon[StrategicNode006]
Area=Pyongwon
ConnectTo[001].Target=Taechon/Chongchon-Gang Bridge West
ConnectTo[002].Target=Oncheon[StrategicNode007]
Area=Oncheon
ConnectTo[001].Target=Pyongwon
ConnectTo[002].Target=Chinampo[StrategicNode008]
Area=Chinampo
ConnectTo[001].Target=Oncheon
ConnectTo[002].Target=Sinchon[StrategicNode009]
Area=Sinchon
ConnectTo[001].Target=Chinampo
ConnectTo[002].Target=Haeju[StrategicNode010]
Area=Haeju
ConnectTo[001].Target=Sinchon
ConnectTo[002].Target=Yonan (NK)[StrategicNode011]
Area=Yonan (NK)
ConnectTo[001].Target=Haeju
ConnectTo[002].Target=Panmunjon[StrategicNode012]
Area=Panmunjon
ConnectTo[001].Target=Yonan (NK)
ConnectTo[002].Target=Seoul//---blue side
[StrategicNode013]
Area=Seoul
ConnectTo[001].Target=Panmunjon
ConnectTo[002].Target=Incheon[StrategicNode014]
Area=Incheon
ConnectTo[001].Target=Seoul
ConnectTo[002].Target=Sosan[StrategicNode015]
Area=Sosan
ConnectTo[001].Target=Incheon
ConnectTo[002].Target=Taean[StrategicNode016]
Area=Taean
ConnectTo[001].Target=Sosan
ConnectTo[002].Target=Taejon[StrategicNode017]
Area=Taejon
ConnectTo[001].Target=Taean
ConnectTo[002].Target=Kunsan[StrategicNode018]
Area=Kunsan
ConnectTo[001].Target=Taejon
ConnectTo[002].Target=Yosu[StrategicNode019]
Area=Yosu
ConnectTo[001].Target=Kunsan
ConnectTo[002].Target=Masan[StrategicNode020]
Area=Masan
ConnectTo[001].Target=Yosu
ConnectTo[002].Target=Chinhae[StrategicNode021]
Area=Chinhae
ConnectTo[001].Target=Masan
ConnectTo[002].Target=Kimhae[StrategicNode022]
Area=Kimhae
ConnectTo[001].Target=Chinhae
ConnectTo[002].Target=Pusan//--route west-mid
//---red side
[StrategicNode023]
Area=Sinanju
ConnectTo[001].Target=Chongju
ConnectTo[002].Target=Namsi[StrategicNode024]
Area=Namsi
ConnectTo[001].Target=Sinanju
ConnectTo[002].Target=Taechon[StrategicNode025]
Area=Taechon
ConnectTo[001].Target=Namsi
ConnectTo[002].Target=Pyongyang/Taedong-gang Bridge North (NK)[StrategicNode026]
Area=Pyongyang/Taedong-gang Bridge North (NK)
ConnectTo[001].Target=Taechon
ConnectTo[002].Target=Pyongyang (NK)[StrategicNode027]
Area=Pyongyang (NK)
ConnectTo[001].Target=Pyongyang/Taedong-gang Bridge North (NK)
ConnectTo[002].Target=Songin-ni (NK)[StrategicNode028]
Area=Songin-ni (NK)
ConnectTo[001].Target=Pyongyang (NK)
ConnectTo[002].Target=Namchonjom[StrategicNode029]
Area=Namchonjom
ConnectTo[001].Target=Songin-ni (NK)
ConnectTo[002].Target=T'osan[StrategicNode030]
Area=T'osan
ConnectTo[001].Target=Namchonjom
ConnectTo[002].Target=The Iron Triangle (CCF/NK)[StrategicNode031]
Area=The Iron Triangle (CCF/NK)
ConnectTo[001].Target=T'osan
ConnectTo[002].Target=Hwachon//---blue side
[StrategicNode032]
Area=Hwachon
ConnectTo[001].Target=The Iron Triangle (CCF/NK)
ConnectTo[002].Target=Dongducheon
ConnectTo[003].Target=The Punchbowl[StrategicNode033]
Area=Dongducheon
ConnectTo[001].Target=Pukhan-gang Bridge SouthWest
ConnectTo[002].Target=Hwachon[StrategicNode034]
Area=Pukhan-gang Bridge SouthWest
ConnectTo[001].Target=Dongducheon
ConnectTo[002].Target=Osan[StrategicNode035]
Area=Osan
ConnectTo[001].Target=Pukhan-gang Bridge SouthWest
ConnectTo[002].Target=Chonan[StrategicNode036]
Area=Chonan
ConnectTo[001].Target=Osan
ConnectTo[002].Target=Namchon[StrategicNode037]
Area=Namchon
ConnectTo[001].Target=Chonan
ConnectTo[002].Target=Chonju[StrategicNode038]
Area=Chonju
ConnectTo[001].Target=Namchon
ConnectTo[002].Target=Sangju[StrategicNode039]
Area=Sangju
ConnectTo[001].Target=Chonju
ConnectTo[002].Target=Taegu[StrategicNode040]
Area=Taegu
ConnectTo[001].Target=Sangju
ConnectTo[002].Target=Yongchon[StrategicNode041]
Area=Yongchon
ConnectTo[001].Target=Yangsan
ConnectTo[002].Target=Taegu[StrategicNode042]
Area=Yangsan
ConnectTo[001].Target=Yongchon
ConnectTo[002].Target=Pusan//--route east
//---red side
[StrategicNode043]
Area=Uiju
ConnectTo[001].Target=Sinuiju
ConnectTo[002].Target=Supung-dong (NK)[StrategicNode044]
Area=Supung-dong (NK)
ConnectTo[001].Target=Uiju
ConnectTo[002].Target=Pyoktong (NK)[StrategicNode045]
Area=Pyoktong (NK)
LocalObjective=TRUE
ConnectTo[001].Target=Supung-dong (NK)
ConnectTo[002].Target=Chosan (NK)[StrategicNode046]
Area=Chosan (NK)
ConnectTo[001].Target=Pyoktong (NK)
ConnectTo[002].Target=Inha-ri[StrategicNode047]
Area=Inha-ri
ConnectTo[001].Target=Chosan (NK)
ConnectTo[002].Target=Huichon[StrategicNode048]
Area=Huichon
ConnectTo[001].Target=Changjin (Chosin)
ConnectTo[002].Target=Inha-ri[StrategicNode049]
Area=Changjin (Chosin)
ConnectTo[001].Target=Magon-ni
ConnectTo[002].Target=Huichon[StrategicNode050]
Area=Magon-ni
ConnectTo[001].Target=Changjin (Chosin)
ConnectTo[002].Target=Yodog-up[StrategicNode051]
Area=Yodog-up
ConnectTo[001].Target=Yonpo (NK)
ConnectTo[002].Target=Magon-ni[StrategicNode052]
Area=Yonpo (NK)
ConnectTo[001].Target=Yodog-up
ConnectTo[002].Target=Hungnam[StrategicNode053]
Area=Hungnam
ConnectTo[001].Target=Yonpo (NK)
ConnectTo[002].Target=Wonsan[StrategicNode054]
Area=Wonsan
ConnectTo[001].Target=Hungnam
ConnectTo[002].Target=Pork Chop Hill[StrategicNode055]
Area=Pork Chop Hill
ConnectTo[001].Target=Heartbreak Ridge
ConnectTo[001].BasePoint=355187,423000
ConnectTo[002].Target=Wonsan[StrategicNode056]
Area=Heartbreak Ridge
ConnectTo[001].Target=The Punchbowl
ConnectTo[002].Target=Pork Chop Hill[StrategicNode057]
Area=The Punchbowl
ConnectTo[001].Target=Heartbreak Ridge
ConnectTo[001].BasePoint=355187,423000
ConnectTo[002].Target=Sokcho
ConnectTo[003].Target=Hwachon//---blue side
[StrategicNode058]
Area=Sokcho
ConnectTo[001].Target=Kangung
ConnectTo[002].Target=The Punchbowl[StrategicNode059]
Area=Kangung
ConnectTo[001].Target=Sokcho
ConnectTo[002].Target=Samcheok[StrategicNode060]
Area=Samcheok
ConnectTo[001].Target=Kangung
ConnectTo[002].Target=Ulchin[StrategicNode061]
Area=Ulchin
ConnectTo[001].Target=Samcheok
ConnectTo[002].Target=Pyonghae[StrategicNode062]
Area=Pyonghae
ConnectTo[001].Target=Ulchin
ConnectTo[002].Target=Yecheon[StrategicNode063]
Area=Yongdok
ConnectTo[001].Target=Yecheon
ConnectTo[002].Target=Pohang[StrategicNode064]
Area=Yecheon
ConnectTo[001].Target=Pyonghae
ConnectTo[002].Target=Yongdok[StrategicNode065]
Area=Pohang
ConnectTo[001].Target=Yongdok
ConnectTo[002].Target=Kyongju[StrategicNode066]
Area=Kyongju
ConnectTo[001].Target=Ulsan
ConnectTo[002].Target=Pohang[StrategicNode067]
Area=Ulsan
ConnectTo[001].Target=Kyongju
ConnectTo[002].Target=Pyongyong[StrategicNode068]
Area=Pyongyong
ConnectTo[001].Target=Ulsan
ConnectTo[002].Target=Pusan[StrategicNode069]
Area=Pusan
ConnectTo[001].Target=Kimhae
ConnectTo[002].Target=Yangsan
ConnectTo[003].Target=Pyongyong-
 1
1
-
-
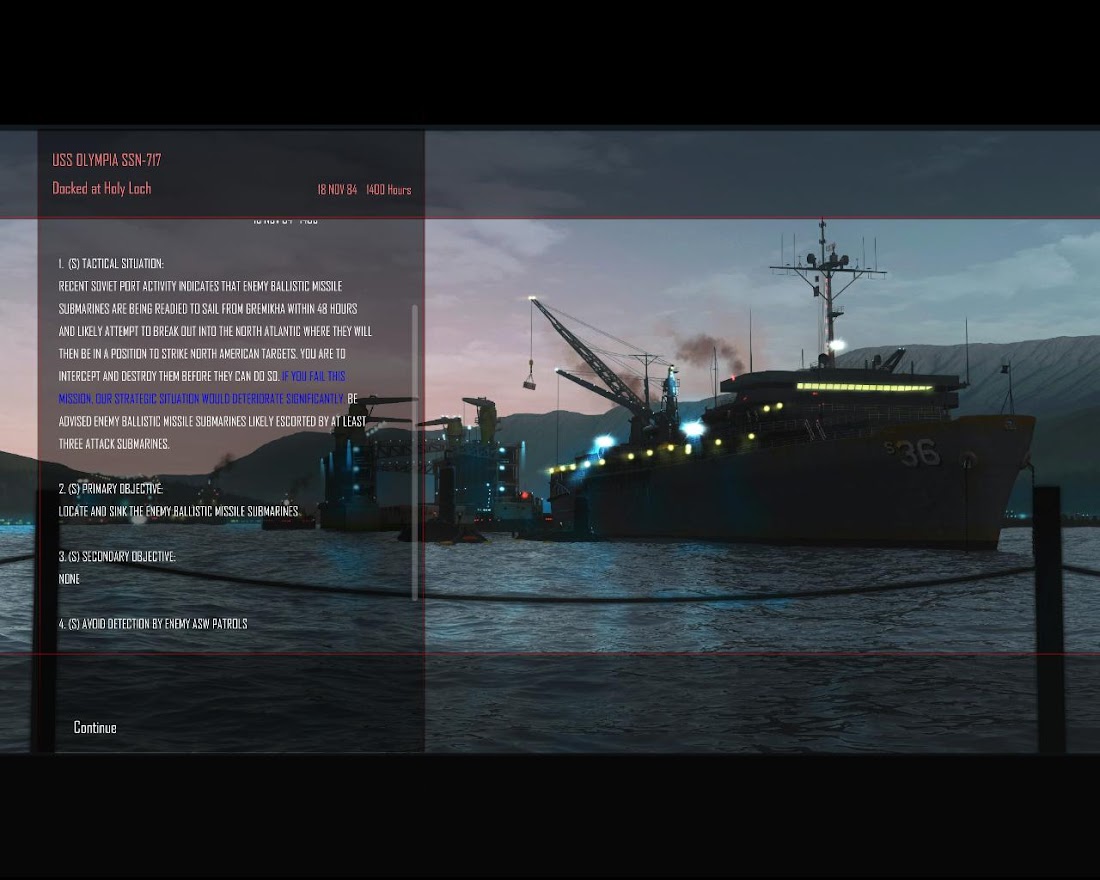
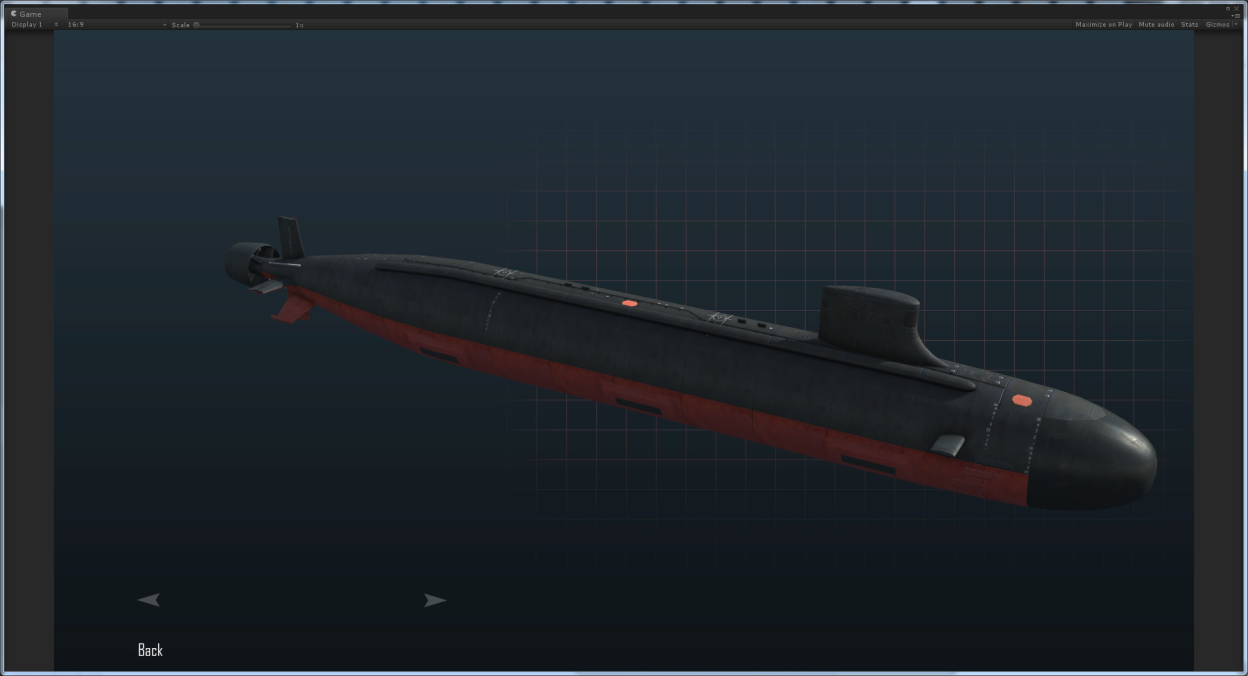
Added none campaign final SSBN hunt
-
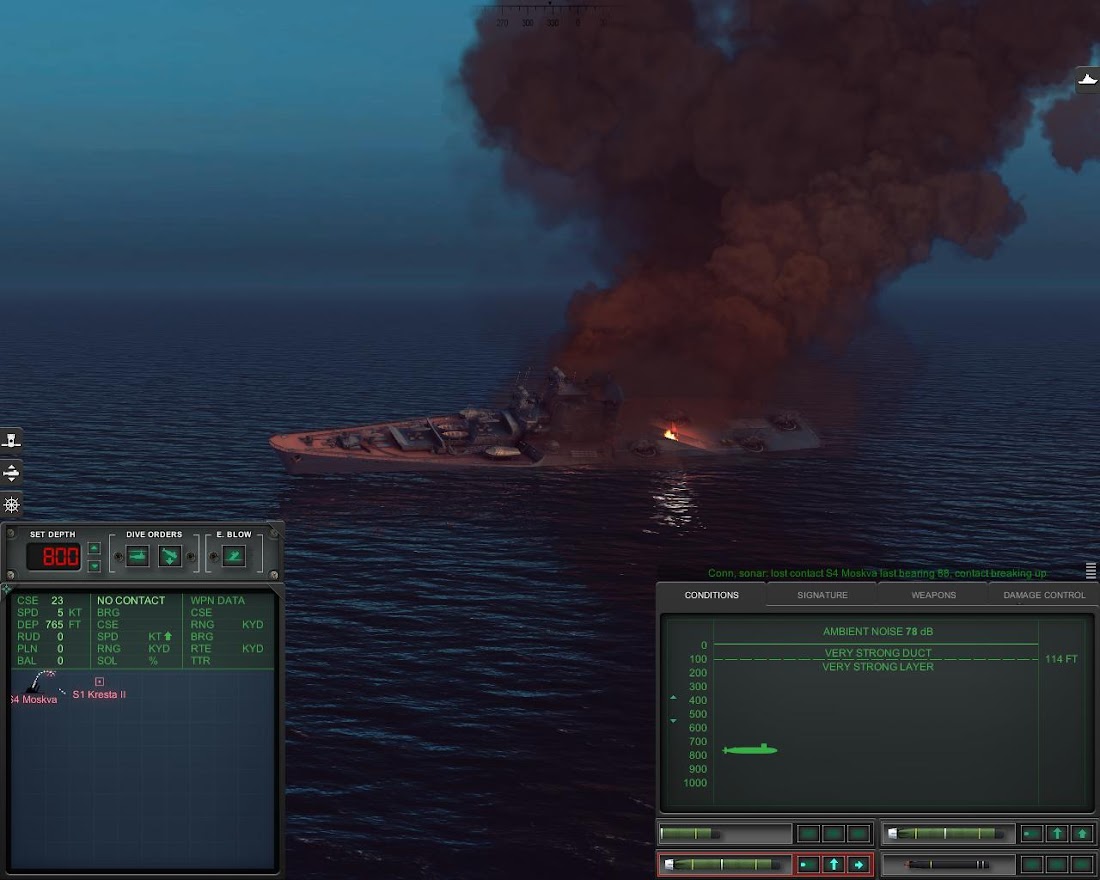
Catching a Moskva helicopter carrier. Capital ships are so rare in campaigns...
Successfully shaking off a SET-65 torpedo. There were 2 on me and things were quite dicey. Doesn't work on the newer USET-80, or the Mk48 for that matter...
-
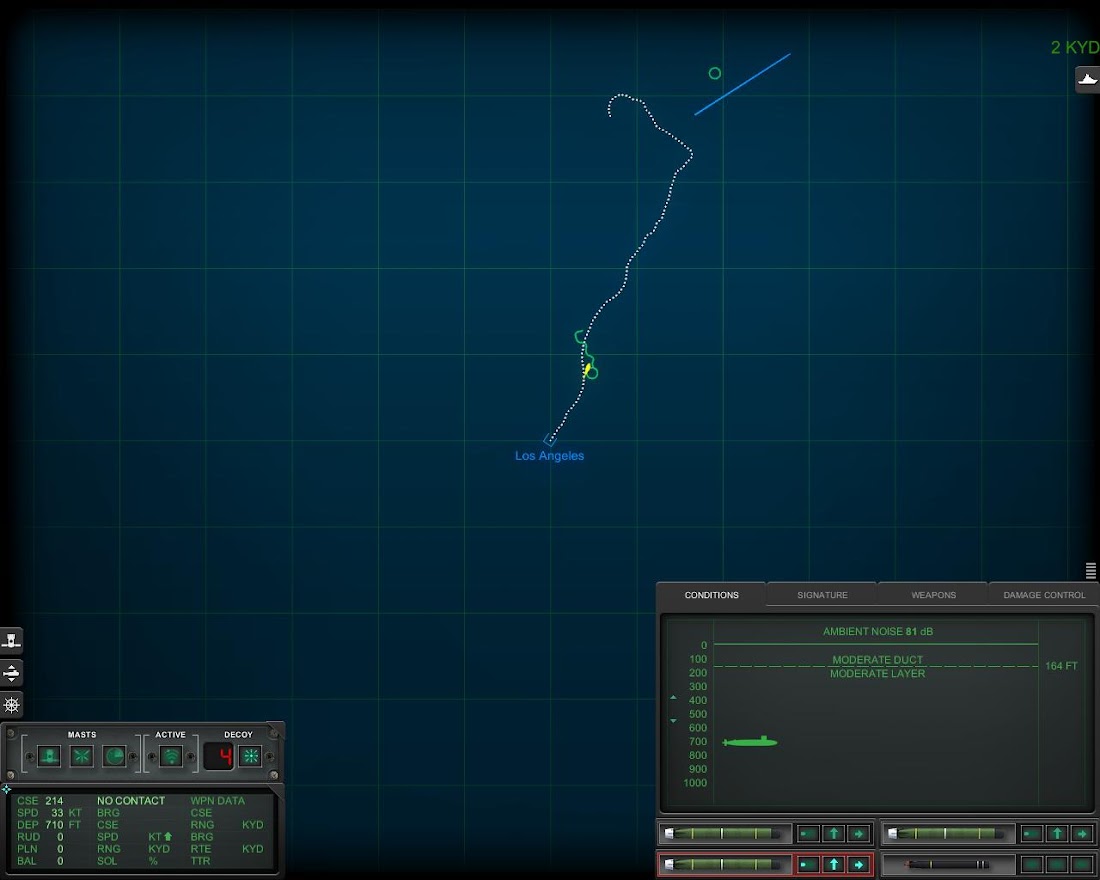
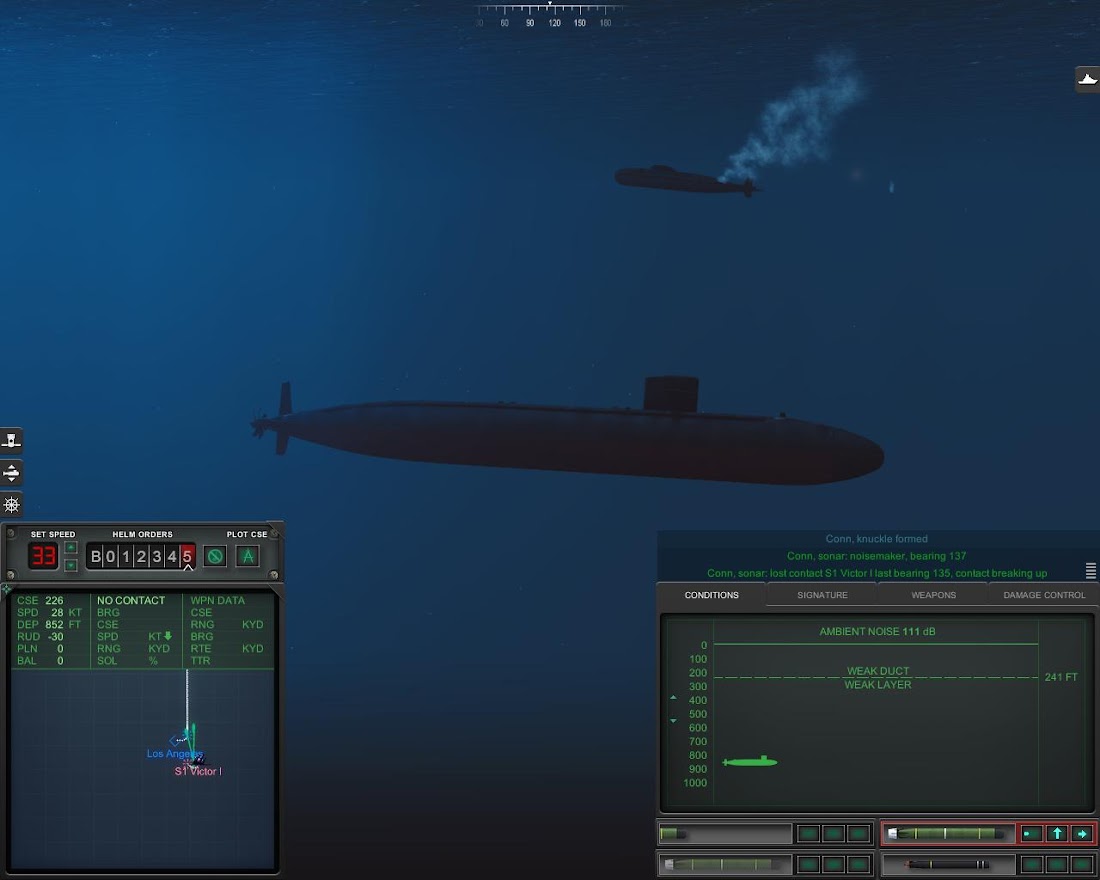
Mission to intercept SSGNs returning to base and came in contact with something on the way.
111db ambient noise and can't hear nothing.
Switch to active sonar..."one ping only"... moments later contact a Victor I flanking towards me.
Sends a fish on 50% Sol. Contact fades. Fish searches around and sinks a fishing trawler. Darn it.
Mini sprint and drift to the last known contact location. Still nothing.
Continues mini sprint and drifts forward....Contact 1 thousand yards on my face!
Snap shoots 1 Mk48 and enables immediately.
Victor I counter fires 2 torps.
Hard to starboard and flank! Noisemaker!
Victor I explodes. His torps flew behind. Phew.
-
Lots of action but not much eye candy...
Finally a stable 1.09e build. Plan to make my own mods after Seawolf/688i/SCS (and getting rid of the inevitable new bugs, bah...). Atm mostly just a stock 688.
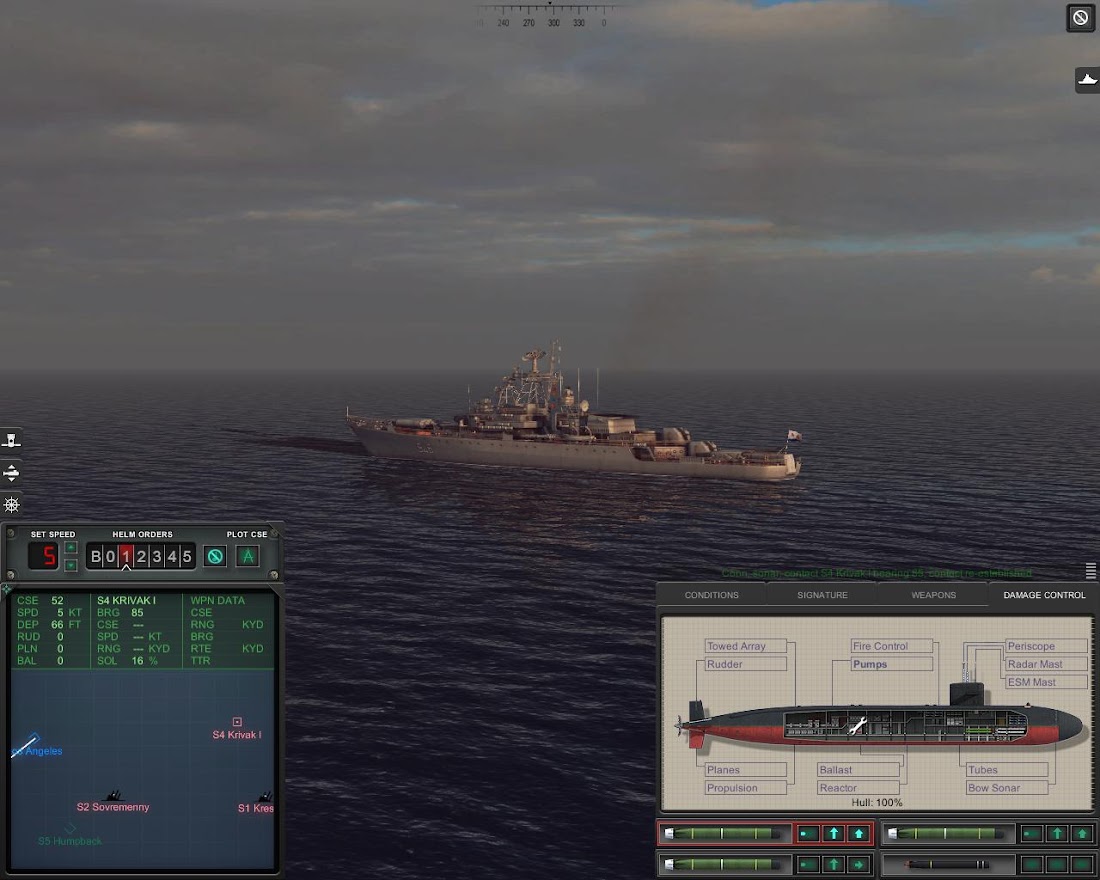
A stationary Krivak. Thought game bugged so turned off "Hide low SOL 3D contacts". It is indeed stationary. BUT this gives it better hearing. Everytime I launch a torpedo at it, it counter fires a nasty SS-N-14 Silex. Coupled with a strong layer it is very difficult to pinpoint its location. Shoot-sprint-listen-repeat, not until the 3rd torpedo was it hit.
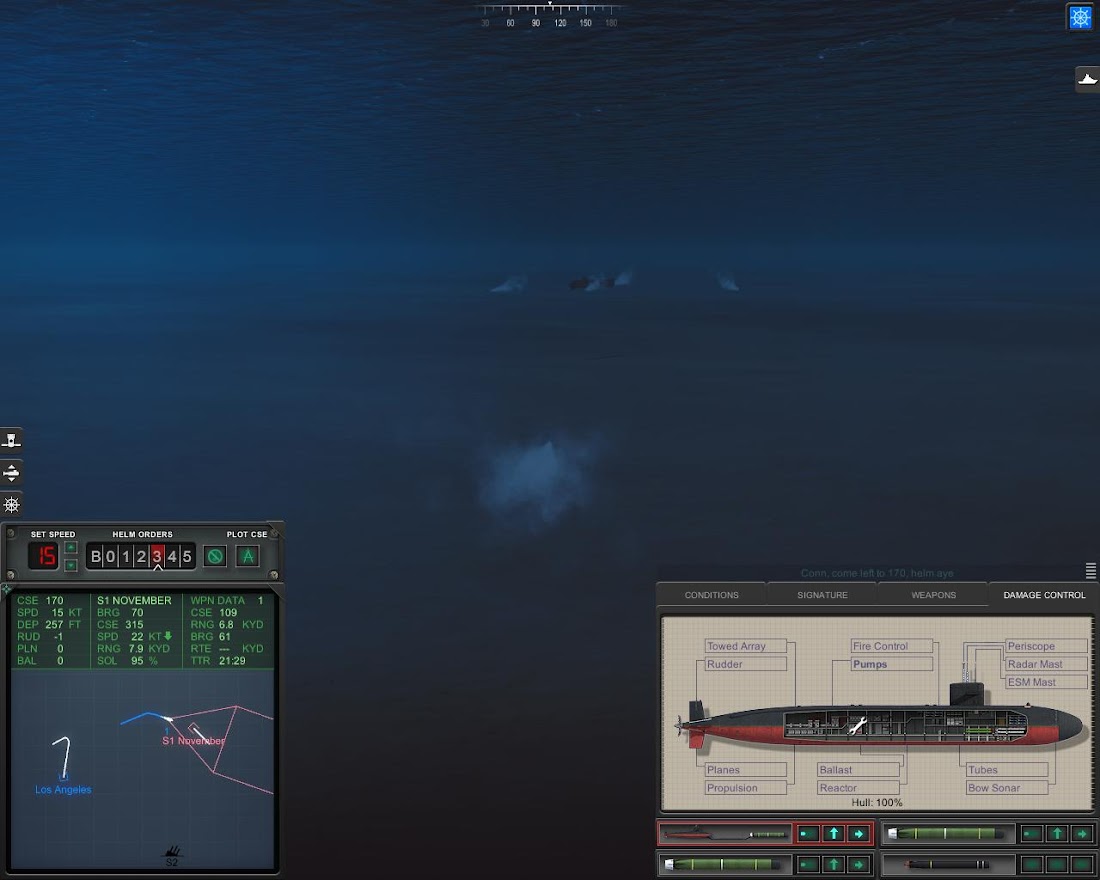
Hunting an SSGN and its escort from the baffles. These old Soviet boats are quite blind. However they still counter fired down the bearing! Had to waste a MOSS.
This time, I learned my lesson. Yes it is an old November and didn't even detect my launch transient, but same deal if it was from baffles. Trick is to offset the torpedo and let it come in from an angle. The November counter fires 4 fish but they all went side ways.
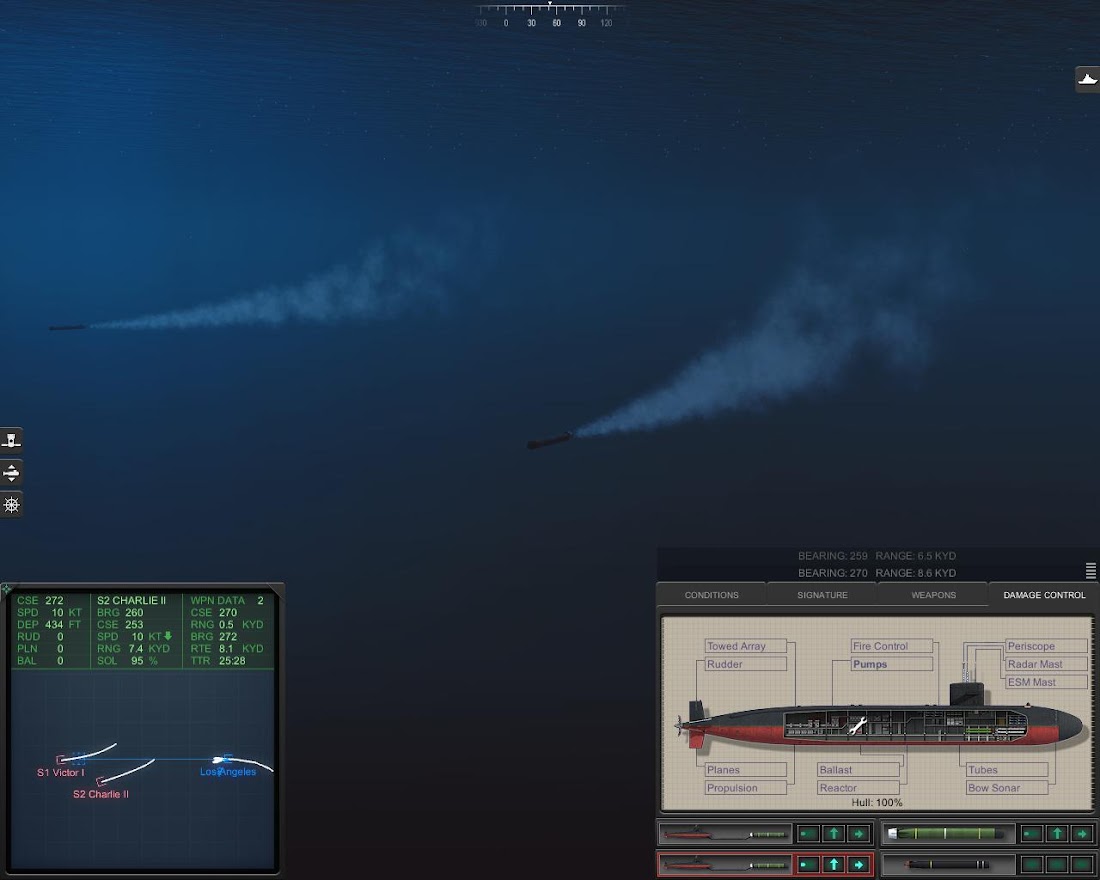
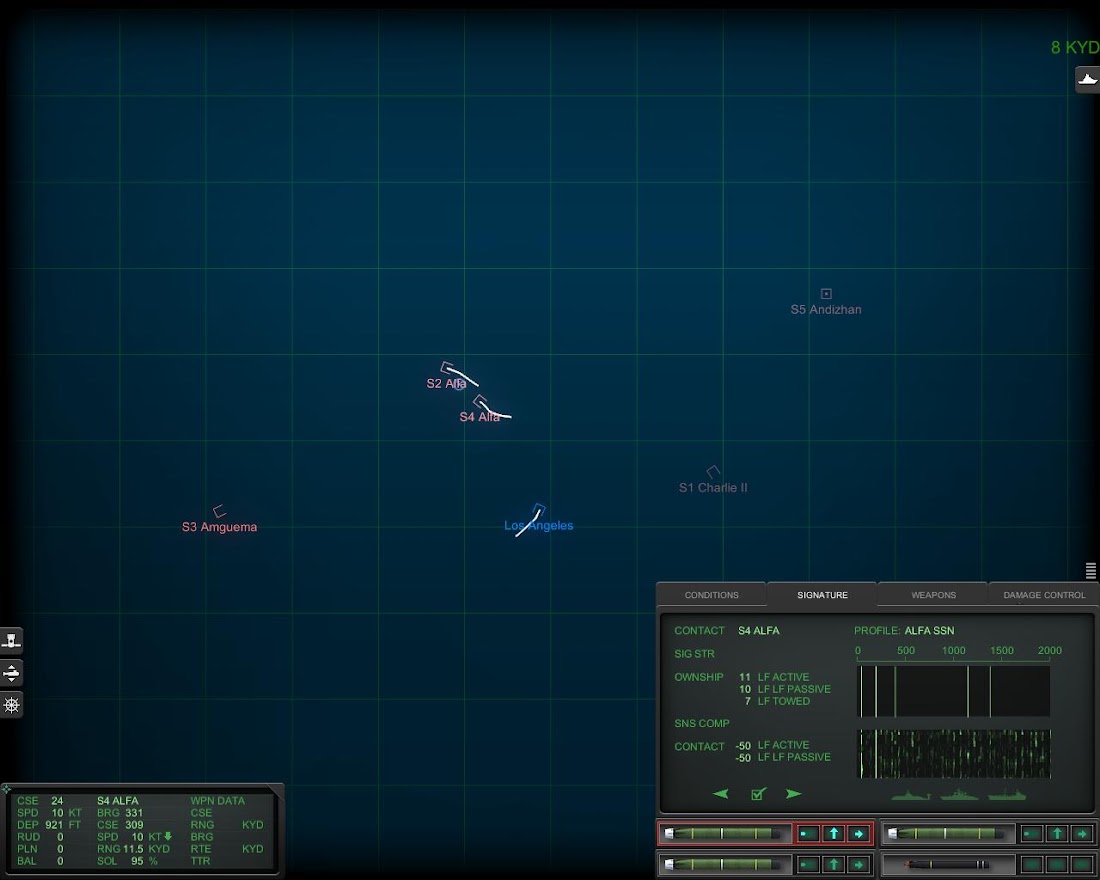
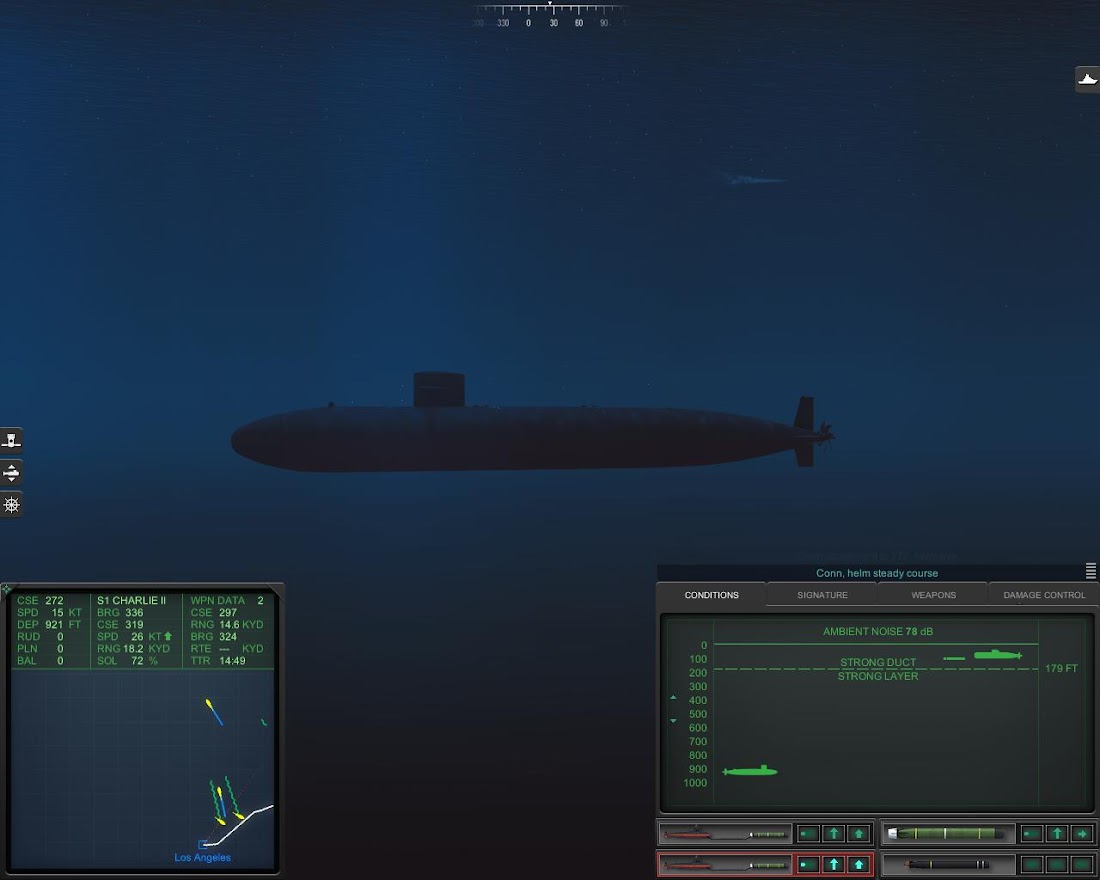
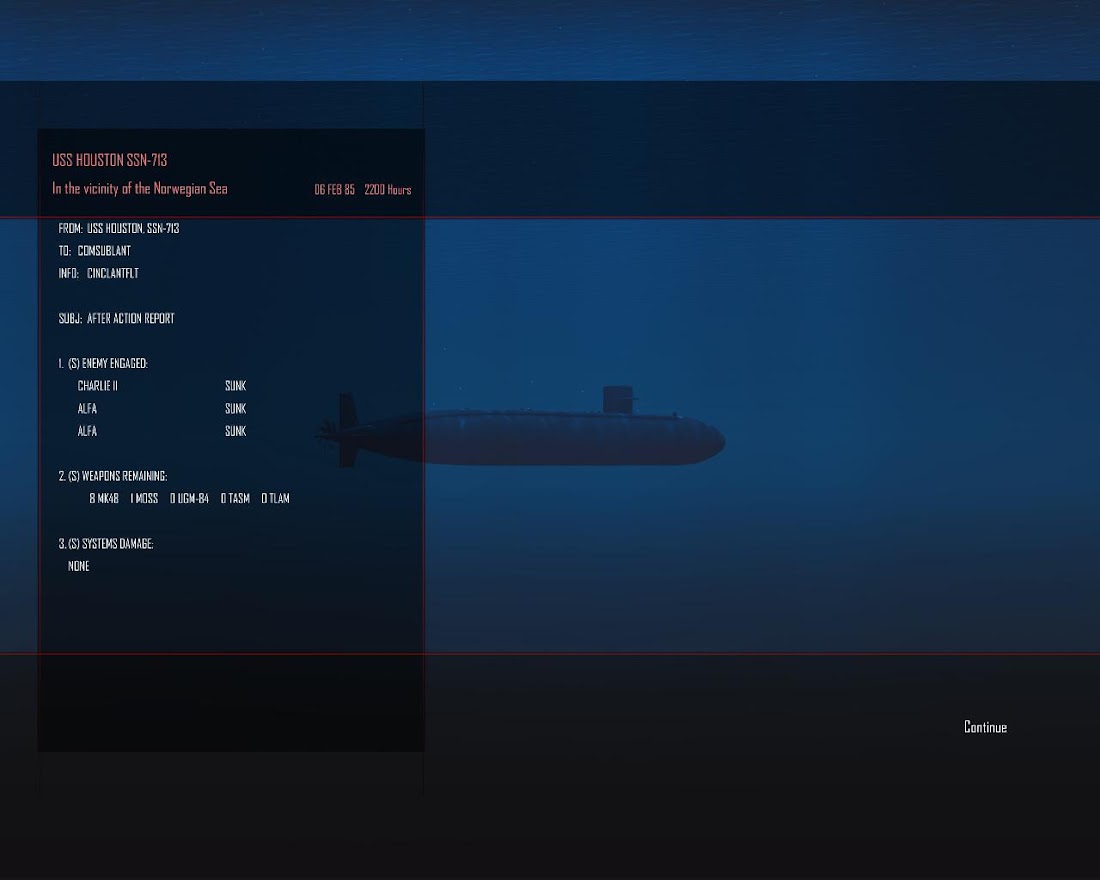
And hardest ASW mission so far - Hunting an old Charlie II SSGN but escorted by 2 Alfas.
6 o'clock position secured. However! The Charlie II is above the strong layer and nowhere to be seen.
I launch at the 2 Alfas, who are oblivious to what's going on. But the Charlie II heard the transients and countered. I still dunno where it is:X Send out 2 MOSSes - both fail to attract anything, but doing 15kts I narrowly avoid the Charlie II's fish - any faster and the torpedo wire would break. Woot.
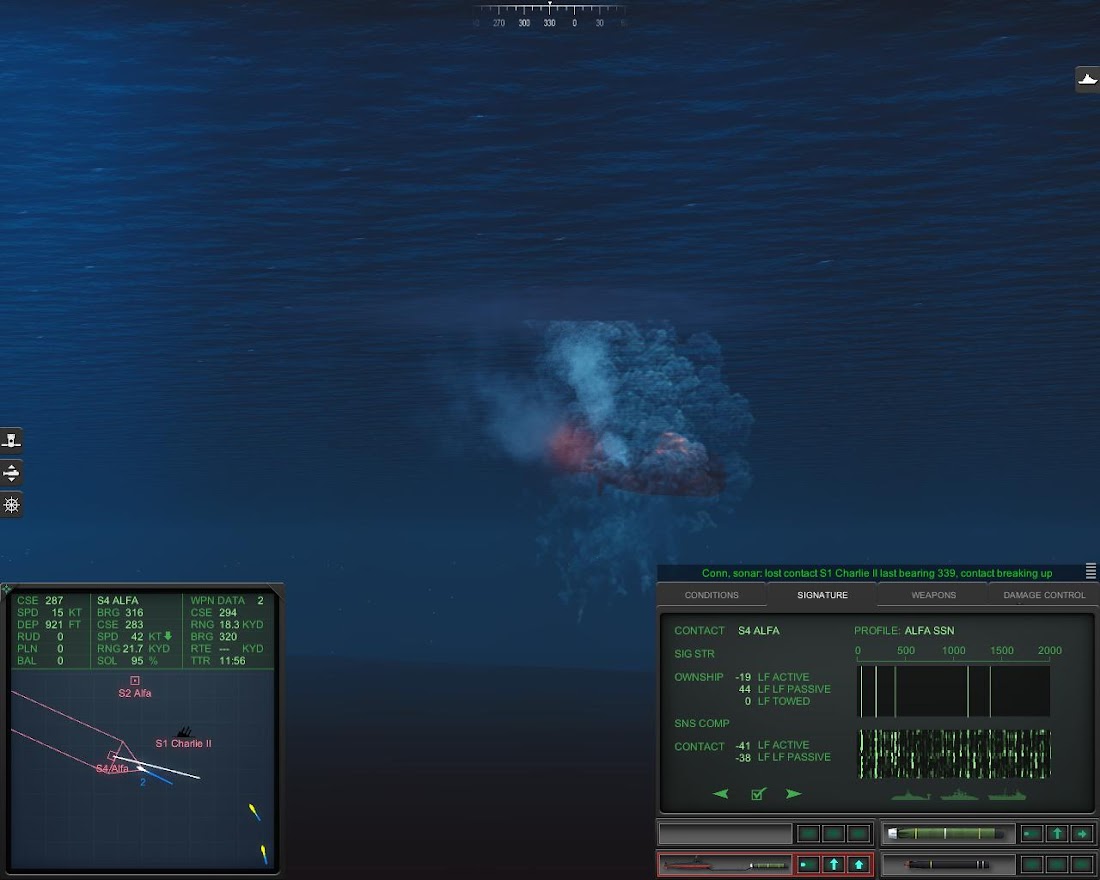
Half way towards the Alfa on the northern side, the torpedo finds the Charlie instead. Eh, why not.
Meanwhile it took forever for the other torpedo to acquire the southern Alfa. It starts a fierce "one circle" (air combat terms) dogfight with the torpedo. Using its 42kt top speed and great diving depth, the fight starts at 1400ft, comes up to sea level, then goes back down to 1000ft. Eventually it unbelievably dodges it - the torpedo locks onto the northern Alfa instead, and sinks it! WTF! What a crap shoot. "You arrogant *ss. You've killed us!"...
Was too engaged to take screenshots. I sent another fish to finish the job, which was done after mucho manual torp steering.
I think that's enough action. Some failed ones include: firing on a amphib landing force in shallow waters but forgot to fire a MOSS, and nuked by 3 torpedoes from 3 sides; Firing a MK48 with its enable point fairly close, and search mode set to Left - had to spend the next 3 years dodging my own torpedo. No screenshots on those....
-
BotA savegame editing
C:\Users\Do335\AppData\LocalLow\Killerfish Games
kmcampaignInfo.dat - KM campaign
rncampaignInfo.dat - RN campaign
Open with hex editor of choice.
campaign turn: hex address 57e
campaign over: hex address 582
campaign renown: hex address 584
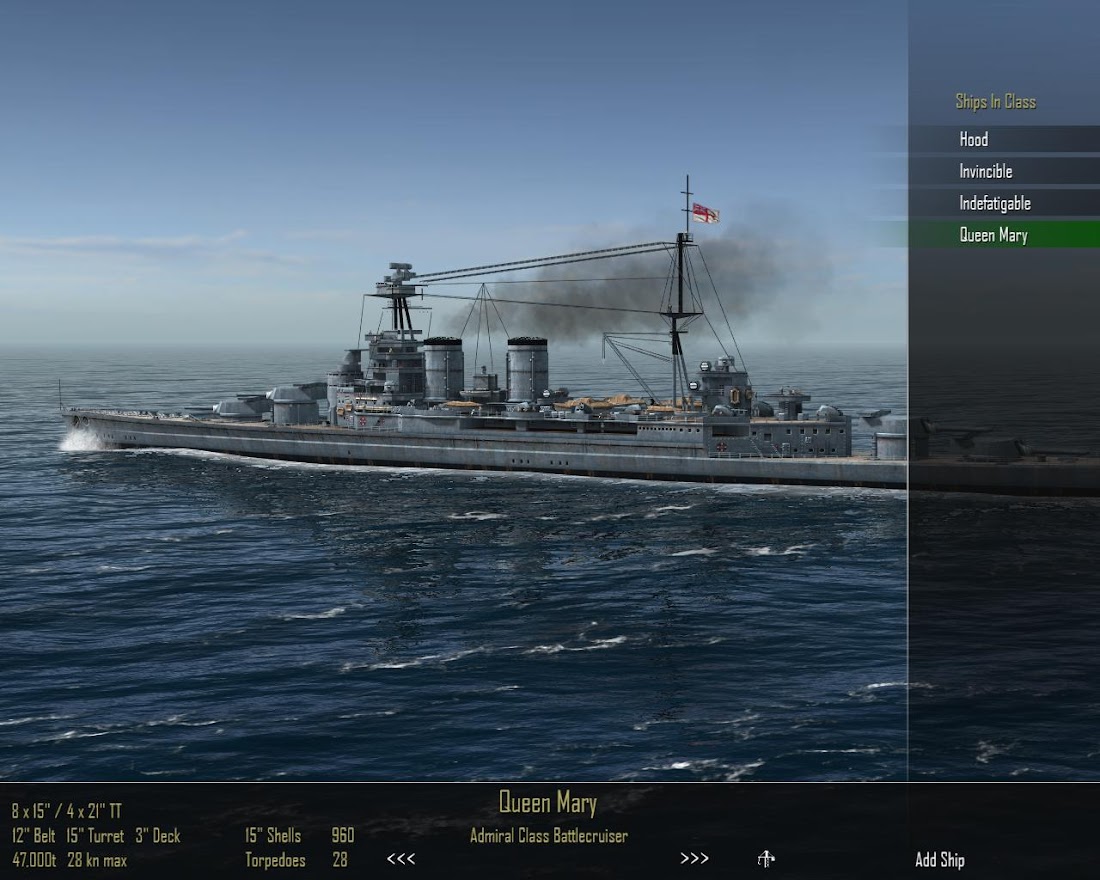
campaign merchant tonnage: hex address 5a8Ship names expanded. Usable by player/AI in BotA.
Queen Elizabeth class: Ontario, Arcadia, Quebec
Revenge class: Resistence
Nelson class: Jellicoe, Beatty
Lion class: Conqueror, Thunderer, Vanguard
Admiral class: Invincible, Indefatigable, Queen Mary
Scharnhorst class: Prinz Adalbert, Yorck
Bismarck class: Schlieffen, Clausewitz
Hutten class: Hindenburg, Ludendorff
-
2
-
-
Tis normal..
QuoteYou might not always get the upgrade, supply and other constraints limit what and when they're availale, and combat status may prevent unit from upgrading immediately (there has to be a lull in combat for unit to upgrade) so the date you specify is the earliest the plane will be available.
http://bbs.thirdwire.com/phpBB/viewtopic.php?p=23624#p23624
From own experience the "lull in combat" was rather important.
-
just waiting to checkout the Seawolf.
-
11 hours ago, Wrench said:I like the Zentradi pod!
LOL noo:D
-
Roy Fokker is da man
-
Tuned way down post May 2012 patch. A flight of Skyraiders can do it.
-
19 hours ago, baffmeister said:The campaign and terrain is focused on the fighter bomber types so no bomber types planned
Good deal BM I could just imagine the frame rate with all those turrets.
All the best to the campaign!

-
1
-
-
Modding - not check
Dynamic campaign - not check
Passing for me. But! I'm sure lotta ppl are excited.
-
Well I searched the flt manual for both the F9F-5 and AD-4. The range of the 2 aircraft are indeed similar, ~1000nm, loaded with 2 wing tanks, plus same ordnance load. However endurance of AD compared to the Panther under the same condition is almost twice, 5.0 vs 2.6 hours. For maximum clean endurance, AD is three+ times vs Panther, and this is AD without ext tanks while panther gets the wingtip ones.
Something more interesting, as the AD endurance chart shows, the lower the altitude, the lower the fuel consumption and the better endurance it can sustain. This is something unfathomable to me mostly flying jet engines whose best endurance is always flown at high altitude. Specifically the Panther's clean max endurance is flown at 35,000ft, while the AD's is at... sea level! This should give the AD a definitive advantage on low alt ground support hops.
9 hours ago, streakeagle said:Whether discussing range or endurance, early jet engines were thirsty and did not provide much power for the amount of fuel consumed. The theoretical range listed on wiki sites is clean and hi-hi-hi... ferry range. In actual experience, the F9Fs had some serious problems with time on target with any useful ordnance load during Korea. The F2Hs were significantly better, but were in short supply in Korea and still vastly inferior to prop aircraft. When you consider the cost of using a Skyraider to using an F9F or F2H, the only thing you lose with the Skyraider is speed. It can carry more than a B-17 and can get there with enough fuel to hang out for awhile waiting for ground support calls. Whether you are talking about an A-1 Skyraider or an A-10 Warthog... you need air superiority and decent SEAD to avoid losses. But if they are properly supported, no fast jets can do a better job.
-
10 hours ago, streakeagle said:I recently bought and read all of the Osprey books on Skyraiders, F4Us, P-51s, and F9Fs over Korea. The F9F was always short on fuel which degraded range, endurance, and payload. The F2H had much better range in comparison. But the prop aircraft were far superior to these early jets. F9Fs and F2Hs did fly some attack sorties, they mainly provided top cover for F4Us and Skyraiders due to their endurance limitations.
Perhaps a question of range vs. endurance? Say a ground support mission target area is 200 miles away. You first gotta fly the 200 miles to and back, which is range. The mission then requires 1 hour loiter time over the target, which is endurance. The jets have somewhat OK range, but their endurance is severely lacking compared to the props.
Also a panther with wingtip tanks fully loaded has 6000lbs+ of fuel. Plus rockets and bombs is pretty heavy. I wonder if they can take off from carriers with full fuel load.
--- I have been wondering about this myself from quite some time as well, but about the Sabres' fuel situation patrolling Mig Alley. I then realize they need to have 30 minutes station time south of the Yalu. Adding in combat which is often mid-low altitude full throttle use, things indeed become tight...
-
1 hour ago, Wrench said:But I've found SOOOOOO many with just oddball flaws -- fuel tank boxes 1/2 meter BELOW the aircraft!! or all tail surfaces one side!
heck even Tk's have some errors in the datas. Especially the early titles. I think the ones in Exp1/2 are quite good.
-
Wrench:
check Wings over Korea pack. I fine tuned the hitboxes on all objects (planes as well as ships and tanks and infantry and whatnot.. plus component hierarchy)
Strictly speaking it's a bad idea to use bounding box as hit box. For example, a swept wing, while having the same volume as a straight wing, will have a much larger bounding box. so it's best to "eye" them (...then test/shoot at them... then eye them again... erhm...) iirc the corsair's gull wing was tricky, it was slanted so i got it too thick initially and even the Mig-15's 37mm couldn't properly kill it. Then the thing with big bombers is they're so big, internal volume no longer is the best way to define their toughness....
-- thankfully Korea theater doesn't contain too many planes.... and this is a single player modding game. I cringe at a complete ww2 theater
 + Multiplayer PvP!
 ....
....
-
Sent!
I guess non-US cannot fill the form(
Neither am I but I always use US based VPNs (small businesses) to bypass the Chinese internet censorship. So... tis also concerns me...
-
3
-
-
if u don't have SF2NA, set NavalMap=False
on a trip so hopefully some1 else could give the detailed steps
-
AircraftType=A-6E
DefaultTexture=XXX
This is fail:
Upgrade[01].Type=A-6E_79
Upgrade[01].Texture=YYY
This is pass:
Upgrade[01].Type=A-6E
Upgrade[01].Texture=YYY
Upgrade[02].Type=A-6E_79
Upgrade[02].Texture=YYY
So I'll restore the default 3W skin and change the one I want in the loadout/briefing screen?
-
The campaign engine cannot upgrade ac type and skin at the same time.
So it has to be done one at a time.


Preserving the TW official forum
in Thirdwire: Strike Fighters 2 Series - General Discussion
Posted
It seems Thirdwire BBS is gone for good. Don't remember deleting prev mediafire upload, but apparently it happend(hmmm). Re-up to mega and mediafire. IIRC saved 100+ more pages compared to the prev upload.
- I'm not visiting these foras anymore nowadays. But TK's posts should help anybody else still wanting to mod/play this game.
https://mega.nz/file/o8h0FDQb#hSGnjYs2zaqppl3wM-SN97L3tSp4RTzepu9z8NFDK7o
https://www.mediafire.com/file/34nfyelvyl9tiwm/TK_Posts_ThirdWire_BBS.7z/file