
WhiteBoySamurai
-
Content count
960 -
Joined
-
Last visited
-
Days Won
25
Everything posted by WhiteBoySamurai
-
Samurai's Shipyard
WhiteBoySamurai replied to WhiteBoySamurai's topic in Thirdwire: Strike Fighters 2 Series - Mods & Skinning Discussion
I'm back. Thanks for the info, KJakker. I'll get around to those modified Spruances eventually. Kidd class is nearly ready to go. Just doing some final testing and decals. The Red October was a modified Typhoon class. I think there is (was?) one in the SF1 downloads section, though it doesn't really do anything except be a target. If the game engine could handle proper ASW, I'd build more subs. -
Strike Fighters 2 Screenshots
WhiteBoySamurai replied to Dave's topic in Thirdwire: Strike Fighters 2 Series - Screen Shots
Well, thief! Where are you? I smell you... I hear your breath. I feel your air. My armor is iron. My teeth are swords. My claws are spears. My wings are a hurricane! I am FIRE. I am DEATH! -
Version 1.1
981 downloads
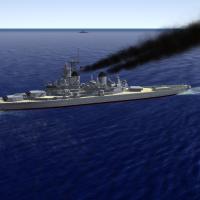
This is a full conversion of the ID(io)T Team's Iowa class battleship for SF2:NA/April 2012. Along with the expected effects, weapons, ship names, and collisions modifications, I rearranged the entire system hierarchy which fixed a critical issue causing the ship to sink after only a single missile strike. (It's now almost as tough as the real thing.) Tomahawk launchers are also fully functional and deadlier than ever. In addition, the aft deck now supports up to two helicopters. Keep in mind that there are no catapults or arresting wires, so fly with care. This is a complete package with all the guns, sounds, and effects. Even if you have the model already or are using the version included in DS, I humbly recommend that you try out this fully updated version. All credit for this model goes to the ID(io)T Team. Thanks for giving us such a magnificent battleship. -
Strike Fighters 2 Screenshots
WhiteBoySamurai replied to Dave's topic in Thirdwire: Strike Fighters 2 Series - Screen Shots
Bringing some fire to a cold dark night. -
Samurai's Shipyard
WhiteBoySamurai replied to WhiteBoySamurai's topic in Thirdwire: Strike Fighters 2 Series - Mods & Skinning Discussion
Perhaps I mentioned this before, but I was originally building this ship as a Spruance before SF2:NA came out. So yeah, I can definitely do that. However, I'm going to need a list of the years each ship was modified. That would require deeper digging than I have the time or patience to do at the moment, so it would be a great help if you could find it for me. And for now, I've got to finish packing and get things squared away. See you all again in a couple of weeks! -
Samurai's Shipyard
WhiteBoySamurai replied to WhiteBoySamurai's topic in Thirdwire: Strike Fighters 2 Series - Mods & Skinning Discussion
Just testing out the Kidd and checking weapons/detection, decal placement, shadow issues, etc. There's still some detail to be added and the textures are just getting started. I'm taking a trip to the US to visit family for a few weeks, so unfortunately I won't be able to get any work done during that time. This ship should be done around the end of April after I get back. Thanks again for your patience and support! -
Samurai's Shipyard
WhiteBoySamurai replied to WhiteBoySamurai's topic in Thirdwire: Strike Fighters 2 Series - Mods & Skinning Discussion
Here is the Kidd so far. I just finished the new fire control radars (SPG-51 and SPG-60). There's still a good deal of work to do, but I'm going to try using some textures from the stock Spruance so that she looks as much as possible like her parent class in-game. -
Strike Fighters 2 Screenshots
WhiteBoySamurai replied to Dave's topic in Thirdwire: Strike Fighters 2 Series - Screen Shots
Is that the Nevada? Looking good! If it's up, shoot it down. If it's down, blow it up. (Admittedly, a nearby Patriot site helped a little...) -
C-14 China Cat class
WhiteBoySamurai posted a topic in Thirdwire: Strike Fighters 2 Series - File Announcements
File Name: C-14 China Cat class File Submitter: WhiteBoySamurai File Submitted: 16 March 2014 File Category: Patrol Craft This model represents the C-14 China Cat series, a small missile boat designed in China for use in the Middle East. It has been in service with the Islamic Republic of Iran Navy since 2002, and it is also used by the PLAN in limited quantities to test new light weaponry. The China Cat can reach speeds of up to 50 knots and can carry a variety of weapons. Three variants are included in this package with the following weapons: C-701, a very small anti-ship missile designed for attacking other patrol boats and fast attack craft. C-704, a significantly larger anti-ship missile developed from the C-701 designed for attacking medium-size vessels. 122mm unguided rockets in a 16-round launcher for light artillery support All versions have a 23mm cannon on the bow in addition to the above. Optional for new modders: As this model was built as part of a tutorial I made for CombatAce, I have included the 3D Max files and texture templates in a separate package. CombatAce modders are free to modify these files as they see fit to create alternate configurations or entirely different vessels. If you have any questions, comments, concerns, or constructive criticisms regarding this model, please do not hesitate to contact me. Thank you! Click here to download this file-
- 1
-

-
- plan
- patrol boat
- (and 2 more)
-
LCS-1 Freedom class Littoral Combat Ship
WhiteBoySamurai posted a topic in Thirdwire: Strike Fighters 2 Series - File Announcements
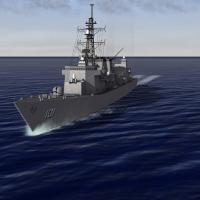
File Name: LCS-1 Freedom class Littoral Combat Ship File Submitter: WhiteBoySamurai File Submitted: 25 June 2011 File Category: Other This model represents the first Littoral Combat Ship, USS Freedom, in commission with the US Navy since 2008. These vessels are designed to be fast, stealthy, and highly modular. This package includes decal sets for all current and future ships of the class, plus all necessary sounds, guns, and weapons such as the exclusive RIM-116 Rolling Airframe Missile. The ship can support two helicopters. See the readme file for full details. A SRBOC countermeasures system has been installed to help defend against anti-ship missiles. This system is still in the beta stages, but if well-received, will be added to my other models as appropriate. The weapon systems, collision mesh, and decals have been updated for compatibility with SF2: North Atlantic and the March 2012 patch. If you have not installed/do not plan to install either, this model will not work properly. When setting up a task force, using the USNgrey texture will allow hull decals based on the ship number. This is bugged in single missions (as the ship number apparently defaults to 90 and can't be changed), so select a specific texture set with the hull number you want. If you have any questions, comments, concerns, or constructive criticisms regarding this model, please do not hesitate to contact me. Thank you! Click here to download this file -
LCS-1 Freedom class Littoral Combat Ship
WhiteBoySamurai replied to WhiteBoySamurai's topic in Thirdwire: Strike Fighters 2 Series - File Announcements
This model has been updated with optimized textures, more authentic main gun and missile launcher, and lights on the helicopter deck for landing at night. Enjoy! -
Samurai's Shipyard
WhiteBoySamurai replied to WhiteBoySamurai's topic in Thirdwire: Strike Fighters 2 Series - Mods & Skinning Discussion
H everyone. Real life got incredibly busy again and I had to take a break from modding, and I'm going to be heading to the US for a couple of weeks in April, but I'm getting done as much as I can in the mean time. I'm uploading a new model, the China Cat class patrol boat that I had started in the mini-tutorial I posted a few months back. Three different versions are available, including the rocket-armed version in the screenshot above. They're used extensively by Iran, so it might make a nice addition to Operation Darius, desert campaigns, and so on. It's a simple low-poly model, so you can easily have dozens and dozens of them on screen to simulate a speed boat swarm. Also, since I was in a "littoral" sort of mood, I took some time to update the Freedom class. The first thing I did was remap the whole thing so that it fits on a 2048x1024 texture instead of 2048x2048, saving everyone 50% of the GPU memory with no loss of quality. Next, I added some lights on the helo deck. Lastly, I rebuilt the main gun and RAM launcher, as I was never really satisfied with how they came out, and I am planning to use those weapons on other ships anyway. The new version will be uploaded later today. As for other projects, the Kidd/Kee Lung class is coming along smoothly, since I can recycle many components from other projects. the long-hull Essex is still a ways off, I'm afraid, but I've already finished mapping the deck, main and secondary guns. I still have a lot of work to do on the island and other details though, so please bear with me. -

Version 1.0
302 downloads
This model represents the C-14 China Cat series, a small missile boat designed in China for use in the Middle East. It has been in service with the Islamic Republic of Iran Navy since 2002, and it is also used by the PLAN in limited quantities to test new light weaponry. The China Cat can reach speeds of up to 50 knots and can carry a variety of weapons. Three variants are included in this package with the following weapons: C-701, a very small anti-ship missile designed for attacking other patrol boats and fast attack craft. C-704, a significantly larger anti-ship missile developed from the C-701 designed for attacking medium-size vessels. 122mm unguided rockets in a 16-round launcher for light artillery support All versions have a 23mm cannon on the bow in addition to the above. Optional for new modders: As this model was built as part of a tutorial I made for CombatAce, I have included the 3D Max files and texture templates in a separate package. CombatAce modders are free to modify these files as they see fit to create alternate configurations or entirely different vessels. If you have any questions, comments, concerns, or constructive criticisms regarding this model, please do not hesitate to contact me. Thank you! -
Simple ship modelling tutorial
WhiteBoySamurai posted a topic in Thirdwire: Strike Fighters 2 Series - Knowledge Base
Someone requested a tutorial on how I create model ships. While I’m not a pro by any stretch of the imagination, hopefully the information I provide here will be useful for new modders who want to try creating some vehicles for Strike Fighters. For this tutorial, I will be creating a relatively small and simple model , the C-14 China Cat class fast attack craft. Though designed and built in China, the Iranian Navy uses a large amount of these boats with many different weapon configurations, so they will be a nice object to have in the various Middle Eastern terrains. When making a model, I think it’s a good idea to have some general goals in mind for how you want it to be used and how you intend for it to turn out. My goals when making this model are the following: Fast turnaround (because I have a massive backlog of mods already) Low complexity (so that nearly anyone’s computer can display a lot of them at once) Modularity (so I can easily create variants with different weapons as used by the real thing) I am not terribly concerned with photorealistic accuracy in this case. I imagine these boats will be cannon fodder for most players, and I don’t envision anyone scrutinizing the model’s minor details like what often happens with flyable aircraft mods. Tools: To create this model, I will be using 3DS Max 2009, because that’s what the Thirdwire Exporter requires, and GIMP, because even though it has the worst user interface of any program made by man, I can’t afford alternatives like Photoshop. (Sure, GIMP is “powerful” I suppose, but it’s like a bent rocket with no fins.) Note: You can still build models using other versions of Max or even its freeware cousin Gmax, though in those cases you’d need to send the model to someone with 2009 and the exporter. And you can certainly use other paint programs—In fact you really should if at all possible, because GIMP is absolute rubbish. Step 1: Set up your diagrams There are many good tutorials for this process, so I won’t cover it. While it is possible to make models without diagrams, it is a huge pain and involves a lot of guesswork for proper scale and proportions. It’s very important to get the proper dimensions of the object you plan to model. Usually Wikipedia has it correct, but not in the case of the boat I’m doing today. Official sources list the C-14 as 17.6 tons (important for the data file later), 13.65m length (14m including motors and planks), 4.8m beam, and 1.9m depth. Step 2: Lay down the hull There are so many different ways to make a ship hull, and I probably don’t even know half of them. The method I’ll use for this vessel is to start with a sphere. I’ll give it 18 segments and radius of 2.4m (matching the 4.8m width of the boat). For larger ships, you’ll need to start with a much bigger object with many more segments. Now, I’ll make the sphere into a bowl shape by using “chop” and a hemisphere setting of 0.5. Obviously you’ll use different settings depending on the shape of the ship’s hull, but in this case it’s pretty simple. From there, I’ll convert the sphere to an editable mesh or poly. Then, I’ll make extensive use of the Scale tools, as well as moving vertices around by hand to get it into the proper shape. Actually, I decided the most efficient way to do this particular shape is to chop off the rear half of the hemisphere, cap the hole, and then extrude it. This raised area of the aft hull is easily done by slicing and extruding. There’s a machine gun pit, but we’ll get to that later because doing it the “easy way” is a somewhat advanced technique. Step 3: Start the superstructure In the case of this boat, it’s just a simple cabin. I’ll make it using a box and adjust the vertices as needed. To reduce model complexity, I’ll paint on the windows and portholes later instead of cutting out transparent ones. By the way, don’t forget to delete the polygons on the bottom of the cabin. There’s no point in having the game render triangles that can’t be seen. Lastly, it’s a good idea to use the same “object color” for objects that you intend to have the same texture. It makes unwrapping and texturing complex models much easier to have everything organized that way, so you can just use “select by color” and have everything ready. Now we have to do the mast. Oh god I hate doing these. It’s not difficult, just tedious. Basically you just need to slap a bunch of cylinders together and carefully orient them using the rotate tool until you have the shape you want. Unfortunately I will have to do two different masts, one for the anti-ship missile carrying variants, and the other for rocket carriers. WARNING: The default setting for creating cylinders is 5 height segments and 18 sides. For the love of all that is good in the world, do not use these settings unless you're doing something like a battleship's main gun barrel. You will end up with polygon counts that are ridiculously high for no good reason. Height segments should always be set to 1 for straight cylinders, and for ship masts, 6 or 8 sides for each beam is plenty. Honestly, you can get away with rectangular boxes for these parts too. I’m doing just that with the crossbeams in this model. Step 4: Cutting shapes Let’s get back to that machine gun pit for a moment. One way to cut it would be to make careful and tedious use of the “slice” tool, and to be honest that’s what I was stuck using for a long time until I learned this other method. Here’s what to do: 1. Make a box, tapered at one end, and positioned to intersect the deck. (Make sure it doesn’t go through the bottom of the hull.) For example: 2. Highlight the hull, and then switch from “Standard Primitives” to “Compound Objects” in the Create tab on the right. 3. Under Object Type, click the “Boolean” button. 4. Scroll down to the Operation section. There are many different ways to cut one mesh with the other, but in this case I’m using “Subtraction (A-B).” 5. Click “Pick Operand B” and click the box. The box will be gone, leaving a hole in the deck where it previously was. 6. Convert the hull back into an editable mesh or polygon (right-click menu). Adjust vertices manually and do other touching-up as needed. You'll end up with something like this: That's the model so far. We still have weapons and other details to add, but I'll continue in another post. General advice: Make regular backups of your models as you progress. It’s very easy to screw something up permanently. Name your components in a logical fashion. This really should go without saying, but common sense ain’t all that common. Having all the parts named and organized will make it much easier to do the hierarchy and data file, which are necessary to get the model working in game. And it also helps other modders later if your model needs to be tweaked. If something in the mesh is behaving strangely, the “reset XForm” tool solves almost all problems. It is highly recommended that you use it on all components before doing the hierarchy and before you start unwrapping. Be warned that you can’t undo this action, so backup first. I hope this is useful to some of you. If some of you would like to "follow along at home," I'll post the China Cat work-in-progress max file in this thread and you can experiment with it. -
Simple ship modelling tutorial
WhiteBoySamurai replied to WhiteBoySamurai's topic in Thirdwire: Strike Fighters 2 Series - Knowledge Base
Thanks, Julhelm. I never thought of using animation keys to control opacity. I have used vertically-segmented boxes like you described for most of my bigger ship hulls, though (Ticonderoga, etc.) I'd love to see your workflow for unwrapping-- I'd have difficulty explaining it clearly and I bet I could learn some things from how you do it. Also, would you be able to show us an example of how you'd draw lines to convert to polygons? -
Version 1.1
370 downloads
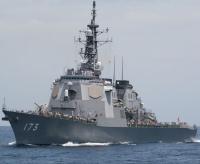
This model represents the Murasame class destroyers (DD-101~DD-109), in service with the JMSDF from 1994 to present. These modern warships are Japan's workhorse, capable of anti-air, anti-surface, and anti-sub combat. Two variants are included, the original as-built vessel, and a recent refit with ESSM replacing Sea Sparrows. The Murasame class features well-rounded armament including a 76mm gun, two Phalanx CIWS, two 4-canister SSM launchers, ASW torpedoes, and two vertical launch systems: a 16-cell Mk41 for VL-ASROC missiles, and a 16-cell Mk48 for Sea Sparrow missiles. The Mk48 is a low-cost light-weight vertical launch system equipped on many NATO and allied ships. A full names list and authentic decals are included. The model features a helicopter deck and a few other surprises. This ship is best used in conjunction with my Kongo class, Asagiri class, and upcoming JMSDF capital ships. If you have any questions, comments, concerns, or constructive criticisms regarding this model, please do not hesitate to contact me. Thank you! -
Max question......help
WhiteBoySamurai replied to colmack's topic in Thirdwire: Strike Fighters 2 Series - General Discussion
Before resetting everything the defaults, you can also try this: right-click the toolbar, select "Customize...", and then click the Reset button you find there. It should restore the missing Select and Rotate tool without messing with your other settings. -
Samurai's Shipyard
WhiteBoySamurai replied to WhiteBoySamurai's topic in Thirdwire: Strike Fighters 2 Series - Mods & Skinning Discussion
Thanks a lot, that info helps me out tremendously. I can always use more good quality photos like you posted. In particular, I need some before and after (open/enclosed) pics of the bridge, and anything that can show me the layout of the deck lights, and examples of post-refit gun arrangements. I don't have any video recording software, but I will gladly post a picture tutorial (pictorial?) of the basic steps in making a ship model. I'm really overwhelmed with requests, so the more people building boats, the better. Thanks! Murasame is uploaded and awaiting approval. Asagiri has been updated. I like the Haruna too; the two forward 5" guns are wonderfully old-school. She's on the to-do list. -
Strike Fighters 2 Screenshots
WhiteBoySamurai replied to Dave's topic in Thirdwire: Strike Fighters 2 Series - Screen Shots
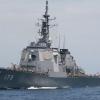
JMSDF underway -
Asagiri class destroyer
WhiteBoySamurai replied to WhiteBoySamurai's topic in Thirdwire: Strike Fighters 2 Series - File Announcements
I've just updated this ship, improving the model a bit and fixing some things (inconsistent door sizes, incorrect landing light configuration, etc.). The Asagiri's successor Murasame class is also going up tonight, so be sure to download that too. -
Charle de Gaulle
WhiteBoySamurai replied to aleks1's topic in Thirdwire: Strike Fighters 2 Series - File Announcements
I really hate to criticize, but I wouldn't even say this model is game-ready at all, much less SF2-ready. It's 300,000 polygons and doesn't look it; no labeling or hierarchy of components. A good start would be to remove the parked aircraft like Wrench said. Then get rid of the terrible railings to save another 64000 polygons or so. -
Samurai's Shipyard
WhiteBoySamurai replied to WhiteBoySamurai's topic in Thirdwire: Strike Fighters 2 Series - Mods & Skinning Discussion
Yeah, I intend to do the as-built (1944) and the SBC-27C conversion (1954). I think I'll be able to bring the polygon count down to a reasonable level in any case. Sorry, I really prefer to do ships that fall into at least two of these categories: Modern and/or pretty Heavily-armed Relatively easy to model Ubiquitous in a particular era/theater Anyway, I'm now working on textures for the Murasame. Weapons and decals are finished. The model is just barely over 28000 polygons, the same level of complexity and detail as my Aegis ships. When it's finished I think this will actually be one of my best works so far. -
Testing Naval Gunfire Against Surface Targets.
WhiteBoySamurai replied to KJakker's topic in Thirdwire: Strike Fighters 2 Series - Mods & Skinning Discussion
You can send it my way. I have my reservations about a mod like this, though, since it may have adverse effects (i.e. guns not behaving as they should for anti-air work, or when the game calculates damage from momentum), and it would require re-packaging and re-uploading every single ship model. -
Collision lods of ships
WhiteBoySamurai replied to gerwin's topic in Thirdwire: Strike Fighters 2 Series - Mods & Skinning Discussion
You're right, the normal lod -> collision lod method doesn't work for some ships. It could be an issue of too much complexity (for models with lots of wires, railings, and radar dish stuff) or gaps in the mesh (the Kynda had this issue for me). The Slava works for me as far as I can tell (my missiles can hit it), though to be honest I've never tried strafing the ship. The box experiment might be able to work. For one thing, try setting the center point for the "hull" box at 0,0,0. That's what I set it for the hull of all my ships, and maybe Thirdwire has the same idea. If that doesn't work, we should probably assume that the collision mesh needs at least a superstructure (linked to the hull in the hierarchy, of course) and probably the other components listed in the data file. -
Collision lods of ships
WhiteBoySamurai replied to gerwin's topic in Thirdwire: Strike Fighters 2 Series - Mods & Skinning Discussion
The game engine doesn't seem to treat ground objects as truly solid objects like terrain (or flight decks) for purposes of crashing into them. I've damaged the main rotor of a helicopter on many occasions by flying through a ship's superstructure, but other than that I rarely see the sort of catastrophic damage you'd expect from such an event. Regardless of those issues, the stock ships and any designed with proper collision meshes will properly take hits from missiles and gunfire. When it comes to third-party ships released before SF2:NA, missiles and bullets will pass right through. The only thing we've been able to get to work is to copy the ship's LOD (preferably the lowest-poly one if there are more than one) and assign that as the collision LOD. This is very inefficient, though, because like you said the game engine has to do more work because of all the extra polygons. Gerwin, I've tried something similar to what you did: Export a boxy collision LOD roughly the same size as the third party ship. I couldn't get it to work either. I'm pretty sure the reason is that the model's pivot points (and maybe min-max extents) have to be the same as the collision model. Because we have no way of knowing where those points are in the original model, this is nearly impossible. I've tried making helo decks for stock and third party ships too, but ran into the same problem for the same reasons. Without the original file, we can't know precisely how everything is supposed to line up. More experimentation is required in any case. Edit: Just noticed that the stock Knox also does not have node names assigned for its components. Strange... [Hull] ModelNodeName= <= This is kind of important >_> EffectSize=1.0 MinExtentPosition=-6.81,-67.43,-3.87 MaxExtentPosition= 6.81, 65.32, 9.70
