


Gepard
-
Content count
6,674 -
Joined
-
Last visited
-
Days Won
328
Everything posted by Gepard
-
Formosa Strait Terrain version 1.0
Gepard replied to Gepard's topic in Thirdwire: Strike Fighters 1 Series - File Announcements
In file Formosa v1.0.zip you find included the file GroundObject.zip. Unzip this file into your objects.folder. Should run. -
MiG E-8 needs FM help
Gepard replied to 76.IAP-Blackbird's topic in Thirdwire: Strike Fighters 1 Series - Mods/Skinning Discussion
Ye, this beast had had lift engines behind the cockpit. -
MiG E-8 needs FM help
Gepard replied to 76.IAP-Blackbird's topic in Thirdwire: Strike Fighters 1 Series - Mods/Skinning Discussion
For the E-8 i think it would be a must, but for your E-9 not. -
MiG E-8 needs FM help
Gepard replied to 76.IAP-Blackbird's topic in Thirdwire: Strike Fighters 1 Series - Mods/Skinning Discussion
Dont worry about my critics. My intention is to help. -
MiG E-8 needs FM help
Gepard replied to 76.IAP-Blackbird's topic in Thirdwire: Strike Fighters 1 Series - Mods/Skinning Discussion
Your E-8 has a curved belly, the real thing had a flat one. -
Formosa terrain development report
Gepard posted a topic in Thirdwire: Strike Fighters 1 Series - Mods/Skinning Discussion
Last weekend i released the Beta version 0.4 of Formosa terrain. I think it will be the last Beta. Now i'm working on the last steps to finish this project. In the last days i included my 8 self generated germany airfields into Formosa. My aim it is to give each airbase a unique face. So all PRC air bases and 3 taiwanese are now finished and the last taiwanese bases i hope to finish this weekend. After this i will add some additionally Flak to some target areas. The last step will be to rename the WIP designation of some target areas. I hope that Formosa terrain will be finished at the end of May or in the first week of June. If someone has remarks or ideas what i could improve Formosa terrain. then post it here please. -
Formosa terrain development report
Gepard replied to Gepard's topic in Thirdwire: Strike Fighters 1 Series - Mods/Skinning Discussion
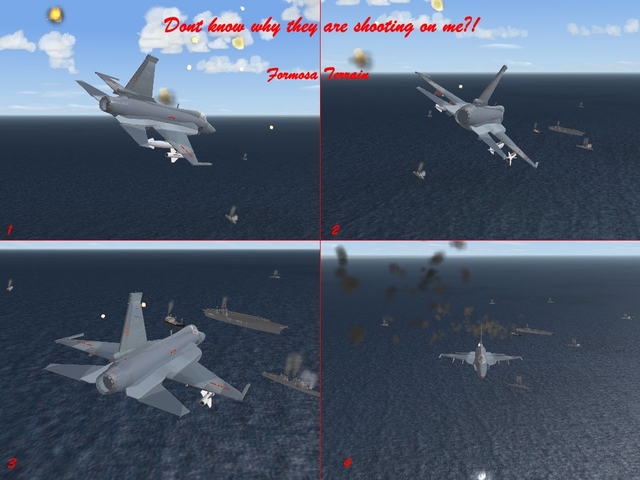
Formosa terrain now with carrier battle groups. Dont know why this american bastards are shooting on me: -
-
MiG E-8 needs FM help
Gepard replied to 76.IAP-Blackbird's topic in Thirdwire: Strike Fighters 1 Series - Mods/Skinning Discussion
The real E-8 taken from a russian web site -
MiG E-8 needs FM help
Gepard replied to 76.IAP-Blackbird's topic in Thirdwire: Strike Fighters 1 Series - Mods/Skinning Discussion
You should make the air intake section longer, so that it fit into the engine section. -
Suchoj T-4
Gepard replied to Wraith27's topic in Thirdwire: Strike Fighters 1 Series - Mods/Skinning Discussion
This bird was called "Sotka". "Cost a hundret tons of gold" and was much to expensive. -
MiG-23S How about It?
Gepard replied to lindr2's topic in Thirdwire: Strike Fighters 1 Series - Mods/Skinning Discussion
Not Saphire-21 but Saphire-22. This radar was used first with MiG-21S and was used in MiG-23S. -
Battle of Britain Campaign Feedback
Gepard replied to Baltika's topic in Thirdwire: Strike Fighters 1 Series - Prop Heads Forum
I'm playing again with the BoB terrain files. I think the fighter bases need a rework. Really satisfied i was never with it. -
Terrain Editor (2 versions)
Gepard posted a topic in Thirdwire: Strike Fighters 1 Series - File Announcements
File Name: Terrain Editor (2 versions) File Submitter: Gepard File Submitted: 20 Apr 2008 File Category: Utilities/Editors This are the 2 versions of TK's terrain editor tool. The old version use for autotexturing SFP1 terrains. The new version is better for autotexturing FE, WOE, WOI. Click here to download this file -
MiG E-8 needs FM help
Gepard replied to 76.IAP-Blackbird's topic in Thirdwire: Strike Fighters 1 Series - Mods/Skinning Discussion
Ye-8 is very welcome. Further informations and some pictures: http://www.testpilot.ru/russia/mikoyan/e/8/e8_e.htm -
Terrain Editor (2 versions)
Gepard replied to Gepard's topic in Thirdwire: Strike Fighters 1 Series - File Announcements
http://forum.combatace.com/index.php?showforum=191 -
The best simulation game
Gepard replied to Lorddemonicus's topic in Thirdwire: Strike Fighters 1 Series - General Discussion
I think "Lock On" is a nice sim of soviet birds. And with the last patches "Battle of Britain 2 Wings of Victory" has become a very nice WW2 flight sim. -
T-55AM Panzer of ZAHAL (israelie Army)
Gepard posted a topic in Thirdwire: Strike Fighters 1 Series - File Announcements
File Name: T-55AM Panzer of ZAHAL (israelie Army) File Submitter: Gepard File Submitted: 04 May 2008 File Category: Ground Objects Mods T-55AM Panzer of ZAHAL In the 6-Days War of 1967 Israel captured a lot of syrian and egyptian T-55. This panzers were used in the israeli Army (ZAHAL) up to the 70th and proved as good and reliable combat vehicles. During the Yom-Kippur-War the israeli T-55 formed the spearhead of Sharons counter offensive to cross the Suez Canal. In combat with egyptian T-55 the israeli T-55 proved superior due better crew training. ************************************************ INSTALLATION Unzip all files into your objects/groundobjects folder. Thats it. *********************************************** This is a mod of TK's WOI stock T-55. The mod is freeware. Commercial use is not allowed. *********************************************** Hope you enjoy it. Michael (Gepard) Click here to download this file -
T-55AM Panzer of ZAHAL (israelie Army)
Gepard replied to Gepard's topic in Thirdwire: Strike Fighters 1 Series - File Announcements
If you has a 7.62mm_PKB MG in your gunlist you will also see the coaxial MG firing. -
BMP series?
Gepard replied to dsawan's topic in Thirdwire: Strike Fighters 1 Series - Mods/Skinning Discussion
The BMP-1 looked better than it was in reality. The BTR-70 and 80 proved superior in Afghanistan. -

Version
342 downloads
T-55AM Panzer of ZAHAL In the 6-Days War of 1967 Israel captured a lot of syrian and egyptian T-55. This panzers were used in the israeli Army (ZAHAL) up to the 70th and proved as good and reliable combat vehicles. During the Yom-Kippur-War the israeli T-55 formed the spearhead of Sharons counter offensive to cross the Suez Canal. In combat with egyptian T-55 the israeli T-55 proved superior due better crew training. ************************************************ INSTALLATION Unzip all files into your objects/groundobjects folder. Thats it. *********************************************** This is a mod of TK's WOI stock T-55. The mod is freeware. Commercial use is not allowed. *********************************************** Hope you enjoy it. Michael (Gepard) -
WINGS OVER POLAND CAMPAIGN (ONLY POL)
Gepard replied to Przybysz's topic in Thirdwire: Strike Fighters 1 Series - Mission/Campaign Building Discussion
The lingua franca of this forum is english. Its the language all people here more or less understand. If you want to speak in your own language then you should ask the administrator wheter he could open a polish section. And i think he will follow your request, because as he has done it already for czech, hebrew, german etc members. -
Terrain help
Gepard replied to eraser_tr's topic in Thirdwire: Strike Fighters 1 Series - Mods/Skinning Discussion
Did it only appear on the TE or also in the game? -
WINGS OVER POLAND CAMPAIGN (ONLY POL)
Gepard replied to Przybysz's topic in Thirdwire: Strike Fighters 1 Series - Mission/Campaign Building Discussion
Polska vs. Obwód Kalingradzki ( Polska agr.) Tja, our polish friends. Thats reminds me on the good old story, that the polish wanted to conquere this land, that now is know as Kaliningrad area, some hundred years ago, in the medieval. But the people who setteled there, they were called the Pruzzen, dont wanted to come under the polish regime. So the protected themself very successfully and pushed the polish knights away. The polish attacked the pruzzen again and again and again and the only result were bloody polish heads. Its a typical polish problem of polish selfdeception, the believing to be powerfull lions but to be in reality only weak poodles. But the polish poodle was clever. He called real wolfes to conquer the land of the Pruzzen, he called the Deutschritterorden, the knights of the german order. The germans build the fortress Marienburg and from this fortress they started crusades against Pruzzi, fought around 50 years. Then they hold Pruzzia in their hands. Now the polish poodles came to the german knights and said: Okay, thank you that you have taken Pruzzia, now hand it over and go home. But the knights of the german order were much cleverer than the polish poodle. Before they had started the conquest of Pruzzia they went to the pope and got the permission to keep all land that was conquered during the crusades agains Pruzzia. So the law was on the german side and to poodle went home with haning ears. The polish poodle was fooled and from this time the polish hated the germans, up today, in the strong knowledge of their inferiority. And now our polish friends want to play it again. But now they want to bite the russian bear instead the pruzzen. And we all know how this would end, with bloody polish heads. Also the poodles will have to call support again. The german wolfes or the american eagles? But beware little poodle wolf or eagle will fool you again. -
Formation Takeoff and Landings
Gepard replied to a topic in Thirdwire: Strike Fighters 1 Series - Mods/Skinning Discussion
Its only available for First Eagles.