

Rick Rawlings
-
Content count
629 -
Joined
-
Last visited
Posts posted by Rick Rawlings
-
-
Wow, I announced this challenge earlier than any of the others I think, but I am glad I didn't start sooner, as it has been a busy three weeks for old Rick Rawlings, that's for sure! However, as we draw nigh the starting date, it is time to clear up the remaining few points. Perhaps Louvert would be kind enough to edit them in to the original post for me.
Here is the link for the weekly data entry form:
For prizes, Louvert has generously offered up a free custom paintjob to the winner, which has always been a big hit in the past as his skills are considerable. I have decided to award either this very mug:

or one of it's brethren, for nothing says a WOFF challenge quite like a fresh beverage contained in a vessel emblazoned with a subtle reminder that yes, you are better than everyone else!
-
Rest of Flight: "You don't need rockets..."
Me: "Why don't we take rockets?"
Rest of Flight: "Why in the world would you need rockets?!?"
Me: "It's a railyard attack. We can destroy a lot more with rockets than just guns!"
Rest of Flight: "...oh yeah..."-
 3
3
-
-
Nice! "Next thing you know, Jet's flying in the air..."
-
The next Saturday after this. (I got way out in front on this one!) So you'd be pretty much on target!
-
Pilot list:
BuckeyeBob
TROOPER117
Rick Rawlings
Stache
MFair
HarryH
Baldric
Catch
Louvert
rjw
lofty_c
carrick58
trustworthinesstrustworthykebab
...Kindle Autocorrect for the lose!
-
And what a view it is! Is that where little DH-2s come from?

-
Yes, I suppose keeping your knees together is good advice in any number of circumstances!
-
Welcome aboard, Lt. Saidwick, looking good! Watch out for those reserve busses, though! A lot of times they have had the eight track pulled and then you are stuck listening to the BBC the whole flight!
-
Spade grip for the win! BUT, your speakers are definitely not keeping up with the rest of the rig!
-
The first challenge I ever ran was the reverse of this, we were in the Eindeckers getting wiped, so I always feel bad for these guys!
-
3
-
-
Reserved for any corrections I need to make or additional information to be added!
-
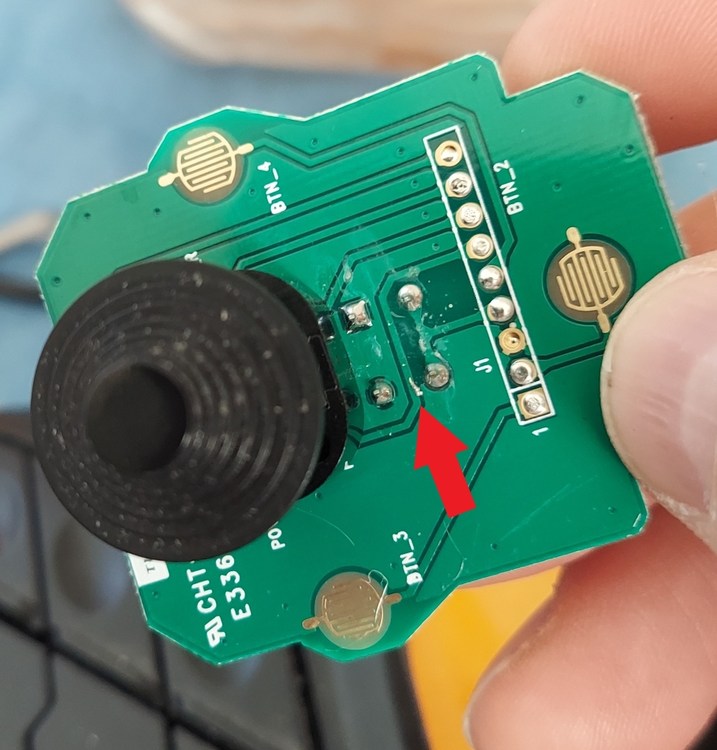
Soldering the new button in place is one of the easier parts once you have cleaned up the post holes. Be careful not to overheat the board, but make sure to get good solder flow. As you can see, I melted a bit of the hat switch housing in the tight confines:
No worries as it all still works fine! Here's the new button in place:
Now just reassemble everything carefully, making sure those rubber pads on the side are in the proper place before putting the screws back in and I would definitely make sure everything works before replacing the trigger pin! It did take me a couple of tries to make sure those thumb button pads were in place as I tried to put it all back together, so keep with it!
Here's a pretty good disassembly video (not mine!) of the joystick, that might help!
-
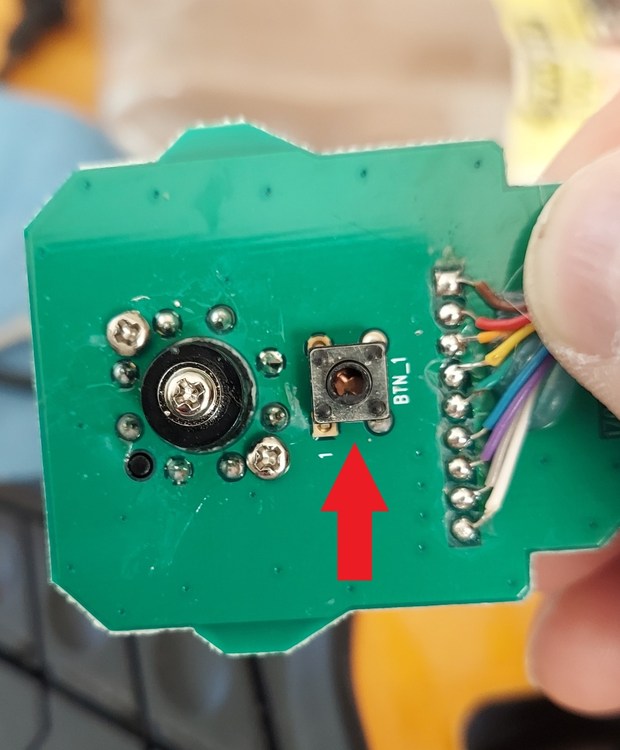
Here's the button you need:
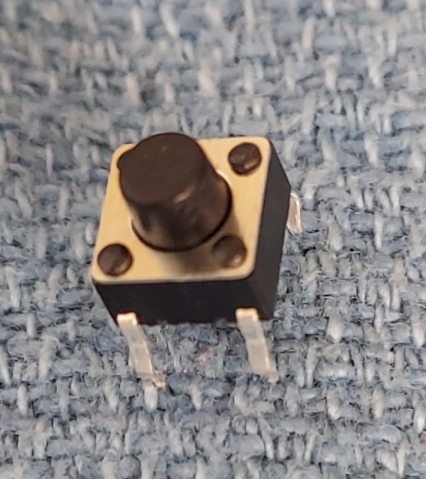
It's a 6x6(x6) momentary switch They were $7 on Amazon for 1, or $9 for 200(!) Obviously, if you have a good electronics store near you you should be able to get one for next to nothing. I wasn't sure of the height, so I got the assorted box:
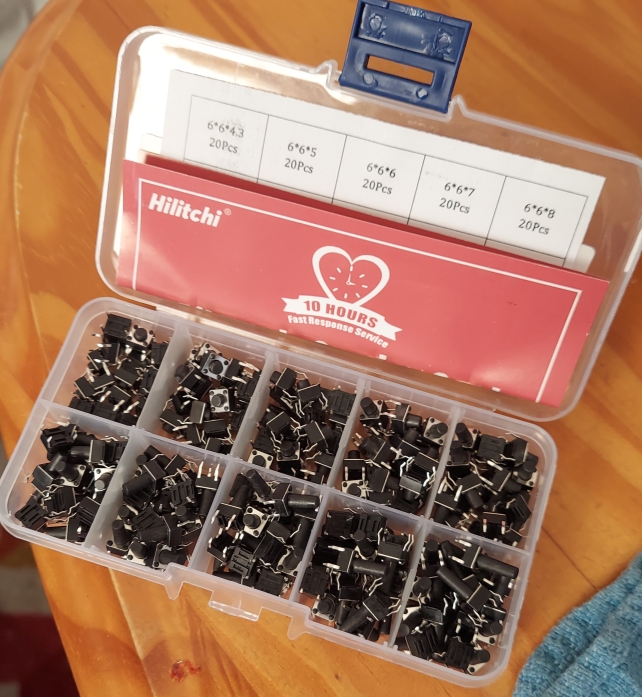
I ended up using the 6mm height one, but probably 5 or 7 would work, it would just change how soon the trigger engages the switch...
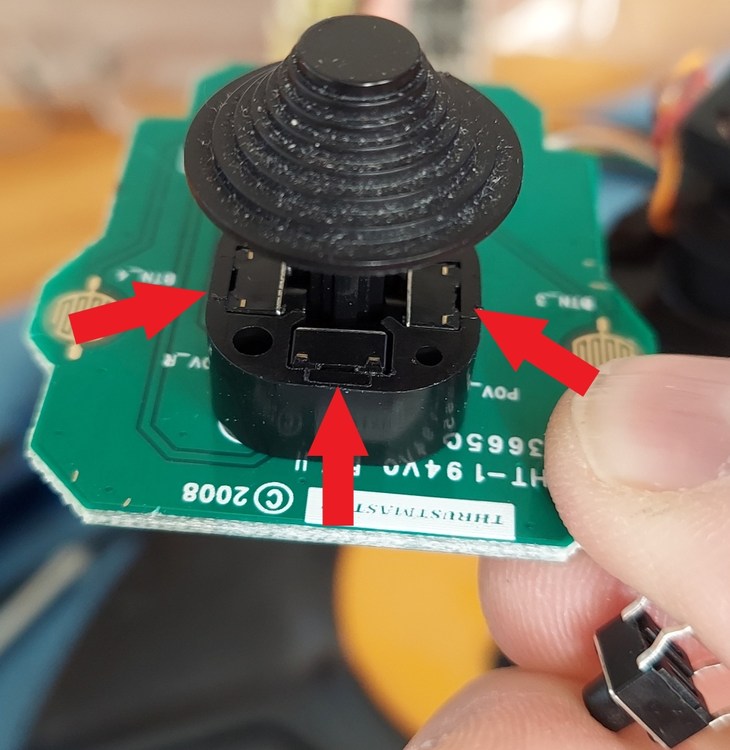
Incidentally, the hat switch is actually four of these buttons placed around a central shaft:
-
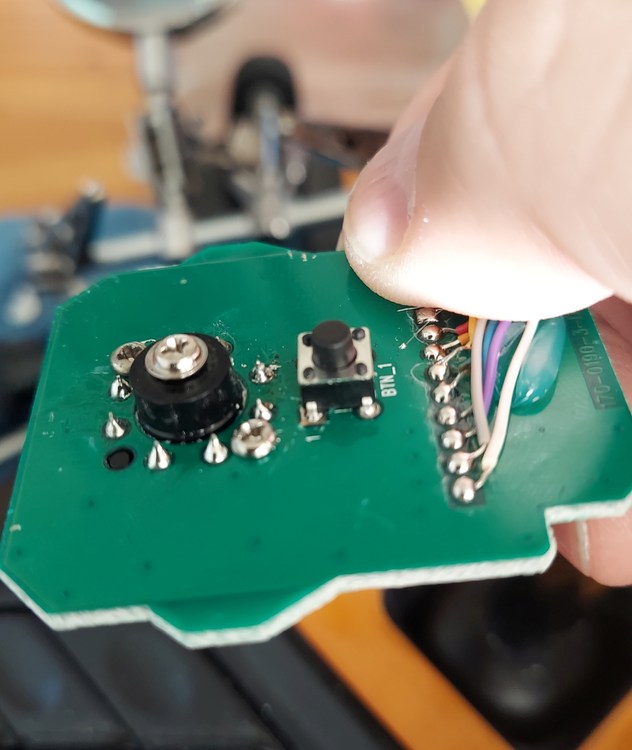
As you pull the the halves of the grip apart, you will end up with two of these:
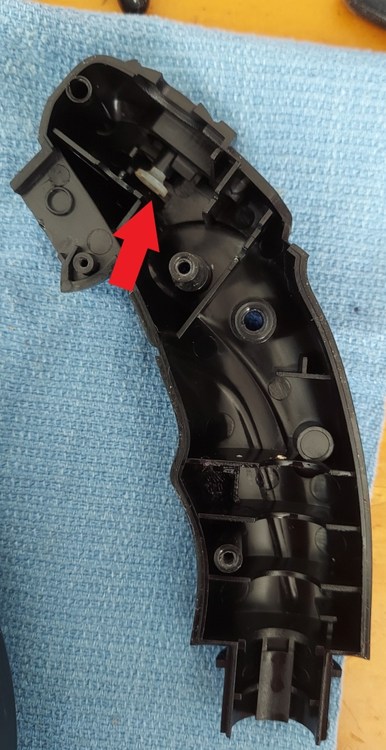
You'll notice another one of those little bastard rubber buttons again! They like to fall out, especially when you are trying to reassemble the thing! A good way to replace them when they fall out is to use needle nose pliers to position them and a flathead screwdriver to seat them. Expect this to happen a few times, so don't get frustrated!
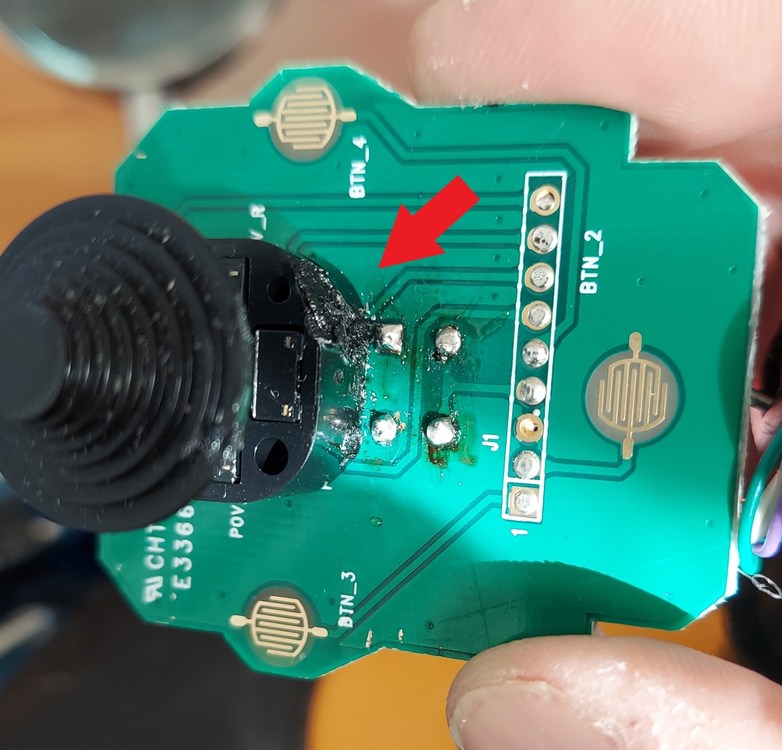
Here's what we are dealing with:
The big black button is obviously the hat switch and the arrow indicates the four solder pads you will have to melt to remove the old switch. There's not a lot of spare wiring in there, so it is a bit tricky working with all the weight of the joystick flopping around on the other end. The gold pads are the contact points for the little rubber pads of the back thumb buttons I have been complaining so much about...
This is the other side where you can see right down into the very core of the broken button. It only took me a moment to grab this shot, but I was probably exposed to so much radiation it will shorten my life by twenty years. You're welcome.
Anyway, you will probably want to hold onto the button with some pliers and pull once you have melted and removed the solder on the other side. I had to keep working back and forth, which is why having some kind of stand that will hold the circuit board while you work is so helpful!
-
My not-all-that old Thrustmaster T16000M main trigger recently stopped working and rather than fork over $80 for another (if you could even find one!) I thought I would try to do a repair myself. So I am going to provide a tutorial for this repair if anyone else has the same problem down the road. Also for me if I ever have to do it again and forget how!
You will need a soldering iron of medium wattage and a reasonably small tip, some solder, needle nose pliers, a hammer and nail or other appropriate tool and the correct 6x6 mm momentary switch. A solder-sucker and/or de-soldering braid and some sort of "helpful hands" noseclip holder setup would help immensely.
To start with, you will need to remove the small metal pin that holds the orange plastic trigger on:
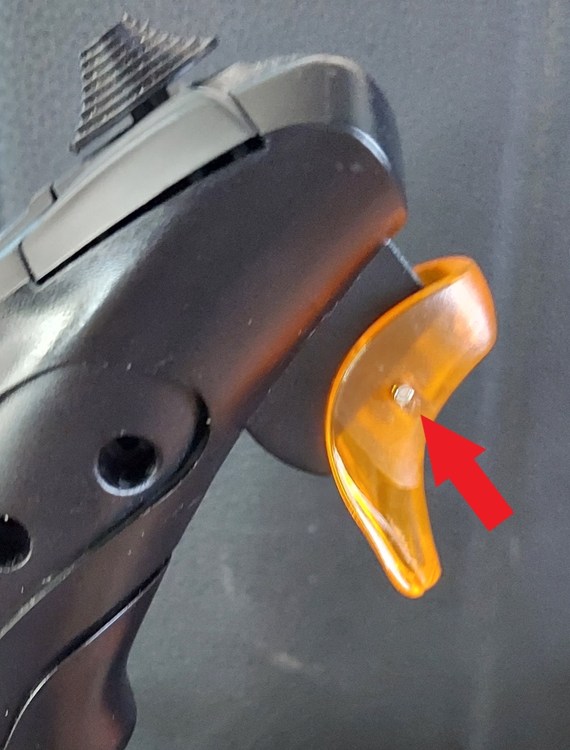
The ways that I have seen to do this are to use a hammer and nail and drive it out that way. You will need to brace the back of the joystick against something like a tightly wadded up towel or sweatshirt to have something to hit against. What I ended up using instead of a nail was one of the little screwdrivers they always include in one of those iphone repair kits. It was the perfect diameter and the back of the handle gives you something nice and relatively large to hammer on. Hammer the pin halfway out and use the needle nose pliers to pull it the rest of the way. Place the trigger and the pin in there own ziploc sandwich baggie.
That's actually one of the hardest parts of the project. The other hard part is everything else!
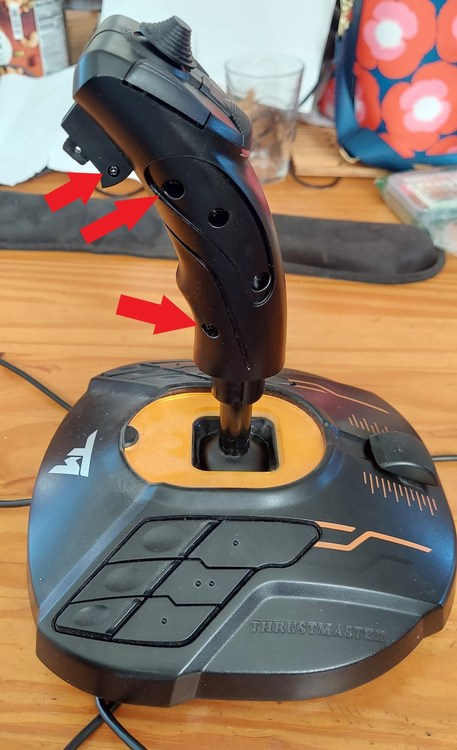
Next we need to disassemble the top part of the joystick. Please read through all the instructions before starting as there are some small parts inside you will not want to lose. I have already removed all the "handedness" components such as the side plates and bottom of the grip. Place all of those parts in one ziploc baggie. Then remove the indicated screws on the picture above. They should go in a separate baggie. Don't forget the little one on the trigger or you will have a frustrating time wondering why your joystick won't come apart. You should now be able to wiggle and carefully pry the whole grip assembly apart. When you do, the back thumb button will probably fall off:
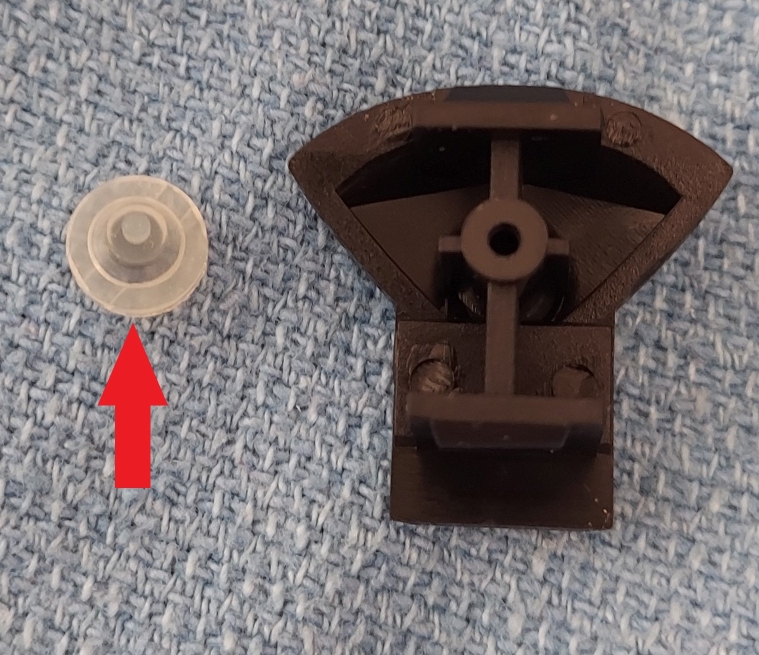
In the picture above, to the left of the back thumb switch is the little rubber button indicated by the arrow. There are three of those total in the grip assembly and you don't want to lose them. They act as both the spring and contact point for the back buttons so pull the grip apart in an area where things will not easily be lost. To replace it, simple flip it over and stick it in the little opening just like it looks like you should.
-
1 hour ago, trustworthykebab said:Count me in dear Rick. I must compensate for RFC-40 after mowing down so many of them in my DiD campaign

Outstanding!
Pilot list:
BuckeyeBob
TROOPER117
Rick Rawlings
Stache
MFair
HarryH
Baldric
Catch
Louvert
rjw
lofty_c
carrick58
trustworthiness
Well, that makes a lucky baker's dozen so far!
-
Starting another Rother Nought career with the new version. A pretty successful mission for our Sqn, 3 down with no losses for ourselves, with one credited to me.
-
1
-
-
carrick, yay! You made it! Now if I could just get gaw1 to check his messages!

Pilot list:
BuckeyeBob
TROOPER117
Rick Rawlings
Stache
MFair
HarryH
Baldric
Catch
Louvert
rjw
lofty_c
carrick58
-
Just a little trip on the German side...
-
5
-
-
Any landing you can...be crane-lifted down from...
-
1
-
-
3 hours ago, HarryH said:Thanks Rick. Don't you think the log book pic is uncannily reminiscent of John Cleese? As for the parrot, well he would be the mascot, if someone hadn't nailed him to his perch!!
Hmm. I'm not so sure. To me he has more of the look of a young Basil Fawlty, but what do I know?
-
Man, love that paint job! I suppose our squadron mascot will be a former (but no longer) parrot?
-
For me it really is the Red Baron experience taken to it's logical conclusion. Just being a pilot in the war on either side who can rise through the ranks through skill and luck and maybe survive the whole thing, while having a somewhat believable time of it. Now if they can just get Mitch Mitchell on drums, everything will be complete! Also, why does the thumbs up emoji on this forum always look like he's equivocating?
-
Ooh, nicely done! These challenges are a pretty alternate reality anyway. If we've had aliens and monkeys, and a penguin and a knight in the ranks (and we have), I think we can bend the active flying time of as distinguished a fellow as Colonel Landis, even if his name does wander unintentionally towards an old SnL skit...
What? A Rick Rawlings Challenge?
in WOFF BH&H2 - General Discussion
Posted
Cheers, mate! You'll have no real competition from me if history is any indicator!