


33LIMA
-
Content count
3,749 -
Joined
-
Last visited
-
Days Won
7
Everything posted by 33LIMA
-
Advance to contact! The map view below shows the tactical sitiuation at this time. My section is the group of blue dots just north of the track, centre left. By this time, the left- and right-flank objectives are showing as ours. Most of the other German troops are advancing on the right and have cleared the area of the castle. The distant small-arms fire I can hear appears to be coming from contacts further out on that flank, where some red dots betray the presence of enemy forces. From past expereince, I know that single dots moving fast are aircraft; those moving slowly are liable to be vehicles. Lacking AT weapons, the latter I will want to avoid. At this point, before beginning to cross the more open ground to our front, I go down on one knee and scan the ground methodically, from left to right. This is where the traditional OFP moderate zoom function comes in handy. You can keep your character still, turning just his head, with the 'Alt' key. Looking half left, this is what I can see... Looking right, without the zoom, I can see that the even numbers of my section have paused nearby. I stand up and walk a few yards further out before kneeling again. Time to practice some tactical movement. I want the gun group to cover the rifle group as it makes the next bound forward. Looking left, I select it and mark the spot I want it to occupy, near the base of some small trees. At this point, I decide I will switch from just walking forward, to skirmishing. To do this, I set the 'tactical mode' to 'Danger' (good details of theese modes and the whole ARMA2 'squad command interface are in this wiki.) The gun group is on position on my left, so I get up and walk forward again. This time, the rest of the rifle group move forward in short rushes, from fire position to fire position. This is where I would prefer they went from moving animation, with their weapon at the high port, to a static aiming position. But they run, then slow down with their weapon at the aim, then halt and scan for a bit, before finally halting. It'll do, but it's not quite how I was taught or would do it. If I run with the section in this mode, I quickly outdistance them, so I walk, occasionally going down on one knee, the better to observe. As we go, I'm looking for possible enemy positions but also for cover just ahead, where I'll go to if we come under effective enemy fire. Some birds flutter around and we see and hear the occasional aeroplane, but none come near us. I have subtitles and target markers turned off, and I find that I know enough German to understand the occasional word or sighting report called out by my men. We reach a small stand of trees and 'go firm', completing the first tactical bound. Down on one knee again, I select the next fire position for the gun group and call it forward. I'm pleased to see that this has the desired effect once more, with the gun group smartly moving forward and into position. I can see how it's going to be rather more tricky during a contact, easy to find the wrong keystroke combo, but for now, it's going quite well. I feel like the imperturbable Corporal Rooney in that training film, and while things are going quite well, I am glad that there are no Directing Staff to watch and critique my performance. The enemy will be doing that soon enough, I feel. ...to be continued!
-
The battle for Panovo You can find the mission I'm playing on Bohemia Interactive's Iron Front forum, here. It was made by Metalvenom and he describes it as follows: "It's based on a capture mechanic where two armies clash over the entire map trying to capture points. Given the lack of ambient combat, this does a good job of throwing you into a constant war zone. Features: Dynamic Battles AI respawn at base location, then again set out to try and capture the towns. resupply point in the towns" Below is the combat area. I'm not clued in on Iron Front's maps, so am not sure if this one is stock or user-made [edit - it's one of the stock maps, in the Ukraine]. It's set on the Eastern Front, anyway, so it'll be the Red Army of Peasants and Workers that we're up against. Friendly Forces are blue. My section is centre left, amongst the blob of blue dots (each representing a 'unit', which in ARMA-speak is a single soldier, vehicle or plane). Our general axis of advance is the big green arrow nearby. Objectives are the grey ovals off to the right; these later turn red or blue, depending on which side's in control there. Because this is a free-for-all (and hence a rather good section training exercise, albeit with live enemies) we are free to pick our own objectives and routes, and have no particular idea what the others will be up to. The map view will display the enemies as red dots when they appear - I don't know enough about ARMA2 to know if this level of visibility is a function of my realism setting ('Veteran') or built into the mission, but it is convenient for present purposes. Which is to rehearse myself and my section; specifically, to explore how close I can come in Iron Front to re-creating the experience, long past but not forgotten, of leading an infantry section or patrol. Old ARMA2 hands - not me! - will be entirely familiar with the tab-based approach to looking up what's commonly called a 'briefing'. I prefer all this information to be presented together, and not as a briefing, but as it should be in any soldier sim - as ORDERS, using a sensible format like the NATO one you can see in the training film linked to in the first post (this is strongly based on the British WW2 format, which was functionally identical). The training film is untypical, though, because the boss - 'Mister Bish', the 2nd Lieutenant platoon commander - is giving orders to just one of his section commanders. Normally, at an 'Orders Group', the force commander at whatever level gives the orders/aka briefing to ALL his subordinates, simultaneously. So if for examlpe in a mission you are a section commander, your boss is a subaltern and he will give orders to you and his other two section commanders at the same session. I have rarely seen any kind of military sim which gets this basic point right - they provide briefings not orders, and they are given as if just to the player, not all the participating subordinate commanders. Never mind that the others are AI and will follow their scripts, they should 'be there' for the orders. But I digress... So I have played the mission briefly a couple of times, to practice the keystrokes, and familiarise myself with the interface and the terrain. We're fully bombed up so I'll ignore the resupply point just to our north. Looking along our axis, on the left there's rolling, broken countryside, fields dotted with trees and shrubs out as far as the objective on that flank, with some metalled (grey) roads. In the centre, there's a winding series of (brown) tracks and some buildings, leading towards the more distant objectives. On the right, there's more mixed countryside, dominated by buildings which I know to be a castle-like structure, on high ground. I decide to go left, for the objective on that flank. None of our other troops seem to be headed that way and rather than co-operate with them, I want to do my own thing. Most un-military but I want to play this a rehearsal for my own section. Platoon attacks are further along the syllabus. In my favoured 3rd person view, I pull up the compass and with that and the map, orient myself for our advance. Bottom left, you can see the row of little 'unit icons', each one representing a soldier in my section, numbered starting with myself. You can slide this row sideways if you have more than ten 'units' (there's 11 of us in my section) but can't toggle it off entirely. Despite being the section commander, I have a Kar 98K rifle, not a 'Schmeisser' MP38 or 40 submachinegun. It would be a simle matter to change my weapon with the Mission Editor, but I like rifles - preferally self-loading, like the Gewehr 43 also available in Iron Front - and decide to stick with my Mauser. One thing I have already done by this time is sort the section into two teams. Doing this, I happily find that whoever designed the set-up shared my preferences for having odd numbers are on the left, evens on the right. One of my blokes has an MG42, I can see, and he's on the left. So I use the 'Team' menu to create a 3-man gun-group centred on the gunner with two other 'odd numbers', with the rest forming a rifle group centred on me - all the even numbers, plus a few of the odds, so that I will be in roughly the middle of section formations - 'wedge' (which we called 'arrowhead') and 'line' anyway. This is visible in that the gun group numbers on the icons are green for the gun group ('G' for 'green' and 'gun', to help me remember easily) and red for the rifle group. To begin with, we are in the default wedge formation. I let the other troops in our vicinity head off, and they disappear towards the centre and the right. For my own section, I choose to advance at the walk - time enough to run when the rounds start flying. The section walks with me, by default. I double-tap the Ctrl key so my rifle drops from the default 'aim' position to the more appropriate 'alert' position, with the butt close to my shoulder but the muzzle lowered. On that subject, all this walking about with your weapon in the aim, looking down (or through) the sights, I find horrible, despite it seemingly being fashhionable in certain quarters. It's a good way to trip over something and probably plug your muzzle with dirt. It's also a good way to compromise your peripheral vision. Don't do it! Except when you're closely approaching a position you believe may be occupied by the enemy. Scan with your sights by all means, but not while moving. Unfortunately in Iron Front, probably as in ARMA, troops often advance at the aim, if you order them to be more careful (by setting tactical modes like 'Danger'). And it is particularly awful to see your machine gunner doing this, like his loaded MG42 was a lightweight rifle, which would be bad enough. Likewise somebody with a scoped sniper rifle. Very silly, soldier animations would be better without this, except in the closest of close quarter combat, urban or rural. On the positive side, as you can see, we are nicely turned out. In this mission, we're attired as soldiers of the Waffen SS, with its distinctive camouflage helmet covers and smocks. These Iron Front figures are just suberb, complete with nicely-rendered accoutrements like the distinctive German cylindrical respirator carrier, water bottle, mess tin, rolled-up camouflaged zeltbahn poncho, bayonet, entrenching tool and ration bag. Veering slightly north to avoid skyling the whole section on a grassy hummock on our original line of advance, I come upon the resupply point. Here, there is a King Tiger and a Schutzenpanzerwagen (SPW), the half-tracked APC famous as the mount of the panzergrenadiers. I could actually occupy one or both of these, but this is to be a footslogging mission, so we move on. We come to some fences and I have the opportunity to try out the 'V' key, which enables your character to step over such obstacles. I'm not going to use obstacle-crossing drills just yet - stopping short, moving one team over covered by the other, then covering the second team over from the far side. Maybe later, when contact with the enemy is possible. For now, I'm just getting the feel of things. We move past some buildings on our right and come up to the broken countryside we will have to cross. The sound of distant small-arms fire clatters and pops, somewhere out there. Clearly, it's time to get a bit more tactical. ...to be continued!
-
Back to CFS3...in the Martin B-26 Marauder I was - and suppose I still am - a fan of Microsoft's last fling in the Combat Flight Simulator series, CFS3. I didn't especially like the air-to-air combat - AI planes flying at empty weight meant that even heavier, more sluggish enemies could often prove frustrating foes. And there was the unfortunate fact that CFS3 ignored the strategic bomber component (even decent add-ons like Firepower, which added 4-engined bombers, just tended to expose CFS3's limitations as a bomber sim). European Air War, this wasn't. Neverthess, CFS3 was billed primarily as a simulator of tactical air power, 1943-45, and that, I felt, it did reasonably well. The radio and intercomm chatter and the wingman commands were very limited, of course. And I didn't particularly like it's 'alternative history' version of WW2, as presented in the dynamic campaign, with German shipping flowing freely in the English Channel in daylight and the Germans having the possibility of invading England even late in the war. It's World War Two, Jim, but not as we know it. A dynamic campaign that's...well, a bit too dynamic. But unlike IL-2 at the time - I mean, as in, over ten years ago - CFS3 provided rather good coverage of the European Theatre of Operations, which was and remains my main interest, by a wide margin. So I played CFS3 a lot, and downloaded many user-made aircraft, like those of the 1% and GroundCrew teams. I also ended up buying many of the CFS3 add-ons, my favourite being the D-Day one, which improved quite a bit on the historical accuracy of the dynamic campaign. This expansion I could never get to install correctly in Vista. But salvation was at hand - in the shape of the ETO Expansion, a massive user mod which features improved terrain, a huge increase in the planeset (including many of the aforementioned user-made models) and an 'era switcher' which enables the player- as in the recent CUP mod for IL-2 '46 - to configure the sim to cover different eras, in this case from the Spanish Civil War to the end of WW2. Just recently, I have been prompted to fire up CFS3+ETO Expansion once more, by the arrival of the latest version of Ankor's DX9 mod. To the dynamic shadows and sea reflections of previous versions, this adds ground object and cloud shadows...and, joy of joys, enables players to lose at long last the dreadful 'fisheye (wide-angle) lens' external view that always gave CFS3 aircraft a distorted appearance, which I for one loathed. As an illustration of this, here is a picture of the rather unattractive Whitley bomber, one of the ETO Expansion's planes, without Ankor's mod... ...and here is a pic of the Expansion's Coastal Command version of the Whitley, with the latest DX9 mod. Note that despite the camera being zoomed in more closely, the perspective is much more natural. You can also see the shadows cast on the aircraft itself, and also the ground shadows, cast here by trees, clouds and folds in the ground. I'm not saying it makes the poor old Whitley pretty, mind, but the natural perspective is a big improvement. Having fired up CFS3+ETO Expansion with the DX9 mod installed, I naturally took several virtual aircraft up for a virtual spin. It was soon apparent that some of the planes which benefit most are those USAAF machines in natural metal finish, like this P-47 Thunderbolt (this is the stock CFS3 one, with the latest DX9 mod applied)... ...and here's the P-38 Lightning - again, this is the stock CFS3 version: So I thought I'd go for a campaign with one of these nice silver birds, in the ETO Expansion. I chose the B-26 Marauder - this is how the Expansion's natural metal version looks (unlike IL-2- the 'skin' supplied is used for all planes of that type, in game). Note how the reflections on the fuselage nicely pick up on the terrain below. I''ll have one of those, I decided, for my first CFS3 campaign for some time. Having selected the D-Day era, I started by creating a new pilot, chose a bomber career for him, then used the 'Change aircraft' option to switch from the allocated B-25 Mitchell to my nice shiny B-26G. I was undeterred by the real Marauder's bad reputation. Being a 'hot' machine for a bomber, she had at first a bad name for crashes, earning unsavoury nicknames like the one in this mission report's title, also 'The Widowmaker'. By 1944 things had improved and I expected I'd appreciate advantages such as the good defensive and offensive armament, high speed and tricycle undercarriage. 'Baltimore Whore' or not, she's not just a pretty face. I kicked off the campaign and began to remember how CFS3's dynamic campaign handles these things. I was started in May 1944, about a month before the real D-Day, although I knew that my unit's performance could influence this. I was placed at the lead of the squadron operation, flying from RAF St Eval in Cornwall. I can't recall which Bomb Squadron we were flying with, but CFS3 isn't particularly strong on creating a strong sense of unit, and any resemblance between that and the markings on your aircraft is co-incidental. On campaign, CFS3 offers you one of a set range of mission types, which you can opt to change. I never worked out whether there were any campaign advantages to be had, between which missions you chose and when. Commonly, you start with an anti-shipping missions, whichever side you are playing for. And that's what I got. I was placed at the head of two flights of four B-26s - bombers in CFS3 fly fighter-style 'finger four' formations, widely-spaced to boot. Our target was enemy shipping down to the south-west. Not quite in the English Channel, but still, it was rather silly of the Germans to expose whatever ships it was to overwhemling air power in daylight. Well, it wasn't quite daylight yet. It was just before dawn as we formed up for take-off. But it would be daylight, by the time we got to the target area. I had accepted a torpedo armament - bombs being the alternative, naturally - so we started with these rather short, fat airborne tin fish slung under our silver bellies. If I'd known they'd be external - and if I knew if CFS3 replicated their drag, which I didn't - I might have gone for bombs. A fat lot of good it likely would have done me, as it turned out. The second flight of four B-26s was already in the air so I wasted no time in taking off to the north, passing over St Eval again as I began a wide turn to the left, to come around to our assigned track out to the target, which lay to the south-south-west. I kept throttled back to let the others catch up, and it wasn't long before all eight bombers were stacked up behind and either side of me, sadly in their wide fighter formations. At least the risk of mid-air collisions should be low! The 'warp/move to next event' feature in CFS3 has evolved to a very fast form of time acceleration, instead of the CFS1 and CFS2 'teleport' equivalent. It remains a very convenient way of flying what would otherwise be longish, uneventful legs in the typical CFS3 campaign mission. The trick is not to leave it too late to interrupt this 'very fast forward' process. This is especially important in torpedo or other low level attacks, for you 'warp' at a fixed altitude, about 14,000 feet in this case, which is much too high an attack profile fo most CFS3 missions. And if enemies were spawned based on radar detection, which I suspect they may not be, well at that sort of height they would have seen you coming from many miles away. So while I flew a direct course to the target, I took care to break the 'warp' at intervals, which not only made sure I could lose altitude in good time, but also gave me a chance to admire the sunrise and the reflective effects on my aircraft. I forgot to check if the briefing advised if we had a fighter escort - you often have on a CFS3 campaign mission, and in this case it was a flight of Mustangs, four I think. They were soon to make themselves useful. ...to be continued!
- 9 replies
-
- 3
-

-
- b-26
- eto expansion
- (and 2 more)
-
Yeah, there's a decent range of Armée de l'Air/Aeronavale types in the ETO Expansion, which include these...
-
Link to the ETO expansion is at 'ETO Expansion' in post 1, para 4 above, click on the blue underlined text, or the link below: http://aussiex.org/forum/index.php?/files/category/10-eto-pto-sim-outhouse/ Scroll down a bit till you see the downloads listed individually; for ETO Expansion it's the base mod, the 1.20 update and a good bit further down, the 1.40 update & separate hotfix, and the 1.50 update which is on page 2. There is a very good guide (in the base mod zip?) to the rather complex installation drill, which goes through it in full step-by-step & foolproof detail. The latest version of Ankor's DX9 mod, which is a must-have for any CFS3 installation, Over Flanders Fields and pre-WOFF3 versions of Wings over Flanders Fields, is here: http://www.sim-outhouse.com/sohforums/local_links.php?catid=161&linkid=21670 And in case the lore of old has been lost, this CFS3config setup pictorial guide by Olham... http://combatace.com/topic/60374-graphics-setup-an-easy-pictorial-guide/ ...tho intended for OFF users, is equally appropriate to get the best from CFS3, including the 2048 'Composite Aircraft Texture Max Dimension' that I needed to avoid blurred markings, panel lines etc on aircraft skins at my monitor's 1600x900 native resolution. Good hunting! Here's a few more of the Expansion's distinctive aircraft...
- 9 replies
-
- 1
-
-
- b-26
- eto expansion
- (and 2 more)
-
From the album Combat Sims
-

WoFF screenshot of the month, August - V-strutters
33LIMA replied to 33LIMA's topic in WOFF UE/PE - General Discussion
Friends and allies...French and British Nieuport 17s... Not friends and allies...a Nieuport hunts an Aviatik making a low-level run for home.. -
WoFF screenshot of the month, August - V-strutters
33LIMA replied to 33LIMA's topic in WOFF UE/PE - General Discussion
Lest anyone thing this is all about Albatri, feather- or fabric-covereed, here's an RFC Nieuport 24: -
WoFF screenshot of the month, August - V-strutters
33LIMA replied to 33LIMA's topic in WOFF UE/PE - General Discussion
To see what? :) Oh, I know, it'll be to see one of these... -
WoFF screenshot of the month, August - V-strutters
33LIMA replied to 33LIMA's topic in WOFF UE/PE - General Discussion
Must be SOMEBODY else flying these nice birds... -
From the album Combat Sims
-

From the album Combat Sims
-
From the album Combat Sims
-
WOFF Screenshot of the Month, July - 'Meet the Fokkers!'
33LIMA posted a topic in WOFF UE/PE - General Discussion
Strikefighters players at CombatAce have long had a 'Screenshot of the Month' thread, which showcases the many visual delights of Thirdwire's classic and prolific jet age combat flight sim. So, I thought to myself, maybe it's time we also had such a platform for the many and no less photogenic aircraft and settings of Wings Over Flanders Fields. What say you, shall we try this and see how it goes? There's no rules, save that your screenshot must be taken in Wings over Flanders Fields (not OFF, please) with no post-capture editing or enhancement allowed, except cropping - we want to showcase the sim and the enjoyment we get from it, not our photo-editing skills. There's no prize and no formal winner will be declared, though visitors are encouraged to vote after a fashion by 'Liking' one or more of any screenshots they particularly fancy. For the first thread, July 2016, the theme is 'Meet the Fokkers!' - aircraft designed by Anthony Fokker, of which there's a good few in this sim. So, what are you waiting for? Switches off, petrol on, and 'get some in'! -
WOFF Screenshot of the Month, July - 'Meet the Fokkers!'
33LIMA replied to 33LIMA's topic in WOFF UE/PE - General Discussion
Next up, for August - V-strutters, so it's a soapbox racer and venetian blind-free zone (cue Olham). -
Taking on one of WW1's more dangerous jobs in Wings over Flanders Fields One of the features of the often-static trench warfare during 1914-18 was the widespread use, by both sides, of tethered observation balloons, both to monitor movements and developments on the enemy side of the Lines, and to direct artillery fire. Naturally, the air forces regularly made efforts to inhibit the effectiveness of these balloons by attacking them. This could be a dangerous occupation, for both balloon busters and those being busted. The latter were probably the first airmen routinely issued with parachutes, but they didn't always work. And aircraft attacking a tethered balloon were relatively easy targets for guns deployed to defend them. On the German side, this included an auto-cannon that fired bursts of big tracers which the British airmen knew as 'flaming onions'. A few WW1 fighter pilots actually specialised in shooting down balloons. One of these was ace Rudolf von Eschwege, the 'Eagle of the Aegean', whose career was vividly described between the wars in 'German War Birds' written by Claude W Sykes under the pseudonym 'Vigilant'. Von Eschwege developed a taste for attacking the 'sausages' but In the end, fell victim to a trap sometimes sprung upon balloon-busters, whereby the balloon was crewed with dummies and loaded with a large explosive charge in the basket. This was fired by an electrical wire from the ground, when the attacker was close to the target, with results that can readily be imagined. Balloon-busting is prominently featured in my favourite WW1 air war movie, The Blue Max. Although the target looks a bit too much like an aluminium-coloured weather balloon, the scene is all the better for the absence of the sort of CGI used for the rather contrived balloon attack sequence in the more recent The Red Baron. A plus for the earlier movie is that the aircraft used by our hero, George Peppard alias Leutnant Bruno Stachel, was a nice flying replica of a Pfalz D.III, a type reportedly favoured for balloon-busting due to its strength in a fast dive. You may recall that a realistically-dangerous balloon attack is a major feature of another much-superior old war film, Aces High, using Stampe SV.4s converted to resemble SE5a's Getting on to combat flight sims, these missions are of course a regular feature in the classic Red Baron 3D. Invariably, a flight of enemy fighters is circling over the balloon, ready to pounce, but realism is the better because the target balloon is winched down as you approach. If I recall right, this also happens in Rise of Flight... ...though not in First Eagles/FE2... ...or in Wings over Flanders Fields. Fortunately, in none of them are you liable to be blown up by a TNT-loaded balloon basket, although the exploding gasbag itself could perhaps be a hazard, as illustrated in the FE2 screenshot above! As luck would have it, I wasn't too far into my current WoFF Jasta Boelcke campaign before I drew a balloon-busting mission. I was given a flight of no less than six machines for the task, plus another flight of three in general support, so with the Staffelfuhrer's exhortations ringing in my virtual ears and undaunted by the typically abysmal spring weather, off we go. Nothing much to it, I think to myself. I would cross the Lines near my target, taking full advantage of the extensive cloud cover, swing around and then clobber the sausage headed for home and safety. Still dangerous, very possibly, but complicated...well, not especially. Little did I know... ...to be continued!
-
Postscript – death of an ace One of WoFF’s many good features is the fact that you get to fly with or against historical aces, identified as such in your squadron and mission rosters, and in the labels which, if turned on, identify other aircraft and your target on the Tactical Display a.k.a. 'TAC'. These hot shots are generally indicated by the abbreviation ‘HA’; which should probably have been a reserved term, since it was used by the RFC for the first couple of years of WW1 to indicate 'Hostile Aircraft'. They later changed this to EA, 'Enemy Aircraft', reportedly because the staff people thought ‘hostile’ invested the enemy with too much of an air of danger, threat or suchlike. The WoFF aircraft labels and the TAC can be quite sophisticated; the former offers the option not only of identifying other aircraft inside your set range, but can even be set to tell you what they’re doing – eg fighting, or going home. I have my labels set to ‘dot mode’ rather than text, to ensure aircraft are visible at my chosen range of 6 Km; I rarely if ever cycle through the other label modes. So I can only confirm if I am up against an historical ace if I turn on the TAC and select him as a target, at which point the aircraft type and the ace’s name will display under the TAC display. As I was about to be reminded. The mission in question was on 5th April. Further north, in the British sector, the Battle of Arras was about to get under way. In Jasta Boelcke’s area of operations, we have been meeting a mix of enemies, but mostly French squadrons. So it was to be, on this day. Three of us were sent aloft to check out reports of enemy aircraft operating over the front, which likes a few miles west of our airfield at Proville, with another flight of four operating in loose support. I knew from the briefing that I had two aces as flight mates, Frommherz in his distinctive ‘blaue maus’ and Bernert with his black rear fuselage. At the flight line, thanks to the now-free WoFF skinpack, both of their Albatrosses carried the appropriate markings. No picture, I'm afraid - I wasn't planning on making a report of this mission, so screenshots are thinner on the ground than usual! Once our formation had formed up, I climbed out along the recommended heading on a leg away from the front to gain height – just below 9,000 feet was the briefed altitude. Then we turned south-west for the Lines. The other flight was still climbing, over to my left rear, and they gradually fell behind and out of view in the cloudy conditions. The first indication of trouble came when a glance behind showed Bernert was no longer in his place to my left rear. Scanning behind, I spotted him climbing hard to the left. Obviously he’d spotted something and broken formation to go for it. I turned on the TAC, but it showed no enemies and I decided against increasing its range beyond the 2,000 feet I had set. No amount of scanning revealed what it was Bernert had seen, nor any flak; likely the clouds concealed all. I should perhaps have turned back so as to keep my formation together, but I was irritated by Bernert’s indiscipline. So I maintained my course, but kept a wary eye to my left rear, lest we should be jumped. After a few minutes, Bernert returned to formation, and I throttled back to let him catch up. I’d have a quiet word with him after the flight, but for now, it was back to the business at hand. About half-way to our patrol zone, I spotted dark German flak bursts against the grey-white clouds, higher up and to our right front. I couldn’t make out their target but turned to climb directly towards whatever it was. What it was, was a single French Nieuport 17. The daring fellow was diving straight at us, and he seemed to be on his own. I targeted him (via tha TAC, which is needed to activate the ‘padlock’ view) and ordered him attacked. Not to be left out, I had a go at him myself, careful to avoid the others – I was well aware that the great ace for whom our jagdstaffel was named died in a mid-air collision with a friend, while they were both chasing the same foe and unaware they were on a fatally converging course. The Nieuport seemed well able to turn inside of me and I had I been minded to dogfight him, I would have had to use the vertical, to avoid him or mount an attack. As it was, up against three of us, he was quickly on the defensive. I stayed above him and rolled in for a few firing passes, breaking away after each, keeping my speed up, rather than being sucked in to a turning fight. Shortly, the Nieuport’s flight became erratic and he fell off into a sideslip, and then a spin, from which he recovered a few hundred feet from the ground. He sailed on a little further, before force landing heavily in a field, well on our side of the Lines. I knew that at least one of the others had had a crack at him but wasn’t concerned about who would be credited with the kill. As Boelcke himself said, it’s the staffel that must fight and win the battle, not the individuals. I climbed back up in a wide spiral, looking for the others. They had become well separated but were soon slipping back into formation, and I throttled back to let them close up. Suddenly, a silver wing sporting a red, white and blue roundel flashed close past ahead. More Nieuports, and this time they had caught us all napping! There were at least two, and now we had our hands full. I picked a target and just in case anyone hadn’t woken up, gave the order to attack; then I switched targets to a second enemy. It was at this point, with the ‘TAC’ turned on to padlock my target, that I saw that this Nieuport was flown by an historical ace, William Thaw of the Escadrille Lafayette, formerly the Escadrille Américaine. In fact I believe that Thaw hadn’t ‘made ace’ at this point (and only just did so, with four aircraft and a balloon). But I didn’t know that, at the time! I don’t think WoFF lets you cut short the careers of real aces, but here was my chance, if not to do that, then at least to avoid providing him with one of his victories! Perhaps it was all in my mind, but Thaw seemed to throw his little silver bird around the sky like the budding ace he was. To stay out of his way, I ended up pushing the nose hard down and rolling around into him, before pulling up again, airframe creaking with the strain. Several times this got him off my tail, at the cost each time of several hundred feet in precious altitude. During the last of these pull-ups I somehow managed to get my guns onto him before I had to push down again to avoid a stall. It was a hasty deflection shot, but it was enough. Pieces flew off the Nieuport. I recovered and looked around for him. There he was, wings level, running for home! My trusty Albatros had saved my bacon, First, her powerful Mercedes engine had enabled me to make the yo-yo manoeuvres that had kept me in the fight. Then her equally powerful two-gun armament had enabled me to put enough lead into the air to make the one shot I’d been able to take, count. In a lesser aircraft, I’d likely have been dead meat. All this time I’d been relying on my flight-mates to keep the other enemy or enemies occupied. Looking around, the sky now seemed empty – just me and Thaw. My first full-speed firing pass from dead astern hit him again, and sent the Nieuport into a turn to the left. I broke away hard and came in for another firing run. Then another, taking deflection shots at the turning machine, getting a few hits each time. I broke early, to keep my speed up and besides, no way was I going to risk ending my career in a collision. But on the last pass, getting impatient, I kept my guns onto him a little longer. The movement of my plane in the wind made it impossible to hold him rock-steady in my line of fire, so I was just snapping out bursts when the sight picture looked right. Just when a collision seemed inevitable, the Nieport’s wings came off and the fuselage, marked with the ‘T’ which identified its pilot, burst into flames, nosed straight down and fell like a blazing comet. This was one event I managed to grab a screenshot of - two screenshots, in fact! Got him! No doubt about that one. I cleared my tail with a full-power climbing spiral to the right. Below, Thaw smashed into the ground and a vertical column of dark smoke briefly marked the spot. No other aircraft, friend or foe, were to be seen. So what now? I decided I would cover the remaining distance to assigned patrol zone. Not much chance that the source of the reported enemy air activity was still there, but I might as well check it out, and finish with a bit of a lone wolf patrol. Climbing again to the south west, for the second time I saw dark flak bursts, up ahead. As I climbed after them, I could see that they were receding, heading roughly west. Perhaps it was one of the Nieuports, heading home after the last fight. I raced after whatever it was, but seemed to be making little headway; not surprising as he was well above me and I was in a climb. Then the flak stopped, and I realised I had reached the front lines. No point pushing my luck with a foray into enemy territory, I thought. Time to go home. I swung around to the east, but was suddenly startled by the sight of tracer smoke trails and the zip and thwack of rounds going close or hitting my machine. I banked hard and looked around. Nothing. Surely not ground fire, at this height? Crikey! A linen-coloured wing with a French roundel flashed past my nose and disappeared out of sight. Where the heck had he come from? And more to the point, where was he now? ‘He’ was a Sopwith ‘strutter’, an RFC two-seater also made in large numbers for French service. I quickly padlocked him and decided he was going to pay a hard price for so rudely catching me napping. But I quickly became aware that this was not going to be easy. The Frenchman wasn’t listed as an historical ace, but he flung his kite about the sky like a true professional. He seemed to be able to turn very tightly indeed; most of the time, he had little difficulty staying behind my ‘nine to three o’clock’ line, which was just where I didn’t want him. So I gave up trying to out-turn him and went vertical again. This reversed our relative positions and finally I was able to make some firing passes, deflection shots as he turned hard. I was very wary of return fire from his observer, but if any came my way, I didn’t see it. It may have helped, that I didn’t hold my position too long, but instead made a series of slashing attacks, extending away after each. My hits took their toll and the Sopwith came out of his turn and settled into a descent to the west. I waited for him to crash land, but he seemed to float along nicely and to be in no hurry to go down. I turned over him, reluctant to go down to ground level to finish him off. This was nearly my undoing. More rounds whacked into my Albatros, and this time it was ground fire. Panicked, I threw my machine around to the east. I was promptly hit again and wounded. I put my nose down and jinked for home, hardly noticing or caring that the Sopwith had at last dropped to the ground and rolled to a stop. Fortunately I was only just on the enemy side of the Lines and the ground fire soon died off. Soon I was back over our own trenches and checking my map for the nearest friendly airfield. Happily there was one just north of my track, not too far beyond the outer limits of the shelled area. My good old Mercedes once more earned its keep and didn’t miss a beat until I switched off once my wheels had trundled to a stop in front of the hangars. Eleven days in hospital was the price I paid for straying into the sights of ground MGs in my quest for the ‘strutter’. In return, I had two victory claims. Bernert had come to grief, his machine destroyed but the pilot just lightly injured like myself. Frommherz had fired some rounds, got a few hits but no victories, though he had made it back to Proville with no damage or injury. Not a bad day’s work. Granted, William Thaw will have miraculously survived his fiery plunge to earth but I’ve the satisfaction of besting him in single combat! Already, my thoughts are beginning to turn towards that ‘Blue Max’. With eight victories once my latest claims are confirmed, I can see in my minds eye the pretty gold and blue enamel cross hanging at my throat, and my portrait on the Sanke postcard celebrating my ace status…but I mustn’t get carried away. It’s dangerous out there, and today, it could so easily have been me, going down in that burning, wingless fuselage. But we’ll not think of that. In a few days, I’ll be out of hospital and back in my Albatros at the head of my flight, in (Wings over) Flanders Fields.
-
Another Atlantic Fleet battle in Arctic waters! I have always been something of a fan of the big German destroyers of World War 2, ever since assembling tiny 1/1200 plastic kits of some of them in the early 1960s. These were made by Eagle, part a themed series representing the ships involved in the First and Second Battles of Narvik in April and June 1940. Like this one, of a Leberecht Maas class...or is it Erich Giese? Maas wasn't actually at Narvik, having been sunk in a disatrous 'friendly fire' incident in the North Sea, bombed at night by an He111 of KG 26 which didn't know the navy had laid on a mine-laying operation in the same area. Another destroyer from the force, Max Schulze, was lost with all hands immediately afterwards, some say from another bomb, others by a mine in the same area. Atlantic Fleet’s comprehensive set of historical battles doesn’t include the quite well-known actions at Narvik, the reason I believe being that the game’s 3D environments don’t include land – and these battles were fought in the confines of the fjords at Narvik. Which is quite something, especially considering that the second battle involved the Royal Navy hunting down and destroying the German shipping left from the first battle with nine destroyers and a battleship, no less. The photo below shows the battleship, HMS Warspite, in action during the battle, well into Ofotfjord. Big and powerful as they were, the German destroyers had rather less reliable machinery and being somewhat top-heavy, were less sea-worthy than their British counterparts, though all this seems to have gradually improved as the design was developed. At any rate, these are disadvantages which I don’t think affect them in Atlantic Fleet and having conquered Convoy PQ13 in my previous outing, I looked around for another historical battle featuring these ships. There are several more on offer and from these, I picked another Arctic encounter, one which came just over a month after the earlier battle. This was the German effort to sink HMS Edinburgh, in May 1942. The historical battle In late April 1942, Edinburgh left Murmansk as part of the force covering return Convoy QP11. The cruiser was carrying a substantial consignment of gold bullion, payment towards the war material then being convoyed to the Soviet Union. Edinburgh was the sister-ship of the preserved HMS Belfast, a modified Town (or Southampton) Class cruiser, with twelve 6-inch guns. Belfast is seen below on the River Thames in London, before she was repainted in wartime camouflage. On this outing, Edinburgh was crippled by hits from two torpedoes fired by U-456, and forced to turn back to Murmansk, escorted by destroyers Foresight, Forester and some minelayers. One of the torpedoes had basically demolished Edinburgh's stern, as you can see from this contemporary photograph. Air attacks by torpedo bombers failed to sink Edinburgh. But on 2 May, she was found and attacked by three destroyers – Z 7 Herman Schoemann and the un-named Z 24 and Z 25, which had earlier sunk a merchantman in an inconclusive tussle with the convoy, before resuming their hunt for Edinburgh. In the action which followed, the crippled cruiser fought back and severely damaged Schoemann, which was abandoned and scuttled with 8 dead, the rest rescued by her consorts and a U-boat which arrived later. However, Edinburgh was torpedoed again by Z 24 or Z 25 and was abandoned and scuttled in turn, with 58 men lost in all. Edinburgh's gold bullion was recovered in the early 1980s in a salvage operation as dramatic as many a battle, but that's another story. How did I get on re-fighting the battle in Atlantic Fleet? It's time to find out! ...to be continued!
-
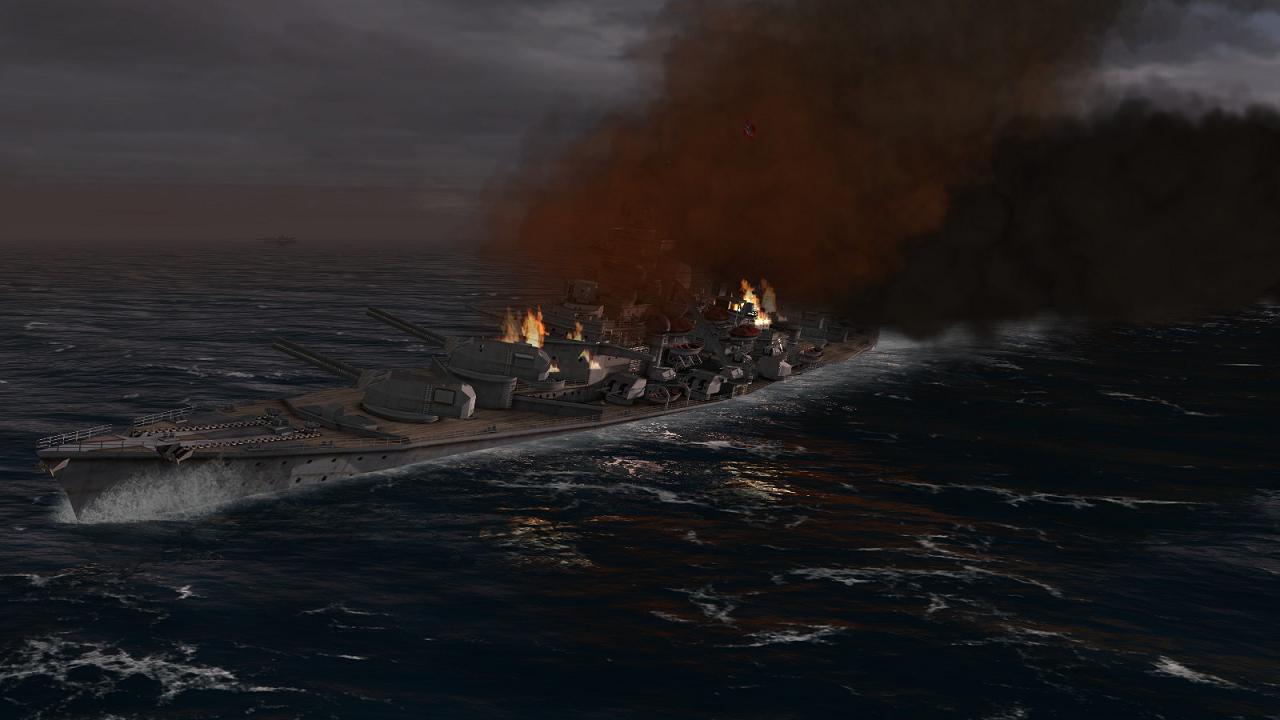
The tipping point and beyond The map view below shows the tactical situation at the time of Z 25's loss. The battle between my two remaining destroyers and the enemy's opposite numbers is now in full swing. The sinking of Z 25 has left Edinburgh unengaged, but she's crippled and at a longer range, so Foresight and Forester are clearly the main threat. Forester has a fire raging aft but is still full of fight. She and Schoemann's are still slugging it out. For now, Schoemann seems to be getting the better of her enemy. Edinburgh is still in the fight, but for the time being, I must ignore her. She's still only got 'B' turret in action and is crawling along to the rear of the fight. I just have to hope that she doesn't succeed in landing a 6-inch shell on either of my destroyers, in the meantime. Suddenly, Forester turns to port and launches torpedoes at either Schoemann or Z 24. I’m forced to turn both end-on to the incoming torpedo tracks, and chose to do so by swinging towards our attacker, dropping the range. We have been closing faster than I'd reckoned on and I'm not at all sure I will be able to avoid the incoming tin fish. This could be my undoing! While the torpedoes are in the water, Z 24 and Schoemann blast away at the British destroyers with their forward guns, getting hits. Then it's the enemy's turn, and despite the smaller bows-on target, Forester succeeds in landing a salvo on Schoemann, starting a nasty fire. But both British destroyers have been hit hard, and are also on fire. Whichever way you look, the sea seems to be full of burning warships, all mixed up and firing away at one another. Surely this can't go on; something has got to give. Sure enough, the tipping point in the battle now arrives. The torpedoes from Forester go wide, just as Foresight goes under. This of course leaves both of my destroyers able to engage Forester, and the concentration of fire is quickly decisive. She, too, slips beneath the waves. Now, at last, it's Edinburgh's turn! Z 24 and Schoemann shift their fire onto the slowly oncoming cruiser. She's still dangerous, and even as our shells splash around her, she's firing back with her one serviceable turret. With the range closing, Edinburgh's accuracy seems to have improved, and she gives Z 24 a nasty fright. She's lucky to escape with a wet forecastle and likely, some splinter damage. Schoemann is now well within torpedo range and launches a salvo of four. Edinburgh is barely moving and she's not going to be able to avoid my attack, I am certain. She doesn't, but although the results are visually spectacular, they are not fatal. I wait in vain for Edinburgh to sink. At least one of my torpedoes must have been a dud, I feel sure. To cap it all, Edinburgh is still shooting. She decides to illuminate Schoemann, who is on the opposite side of Z 24 and being careful to keep out of the latter's arcs of fire. It's time for Z 24 to have a crack with her torpedoes. The range is just over 5,000 yards. I know it will take more than one turn for the torpedoes to reach their target, but Edinburgh is moving so slowly, she's basically a sitting duck. This time, the result is not in doubt. Edinburgh seems to stop in her tracks and slips quickly below the surface, nearly on an even keel. She has been a tough target, but she won't be escorting any more convoys, and that gold bullion she's carrying won't be seeing the inside of the vaults of the Bank of England any time soon...not for another forty years, in fact. Time to see if we can find any survivors from either side, sadly not very likely in these cold seas. Then it's back to base. We've suceeded in sinking the crippled cruiser, and her two consorts to boot, but at the cost of Z 25 lost, Schoemann badly damaged and Z 24, lightly. Perhaps nevertheless the Fuhrer will continue to recognise the value of surface ships as part of our efforts against the Arctic convoys. After all, every merchantman lost is a cargo which won't be sustaining the Bolshevik hordes in the decisive struggle against our embattled forces on the Eastern Front; we can still win this war!
-
WOFF Screenshot of the Month, July - 'Meet the Fokkers!'
33LIMA replied to 33LIMA's topic in WOFF UE/PE - General Discussion
It's that man again, Udet - this time not in a 'soap box derby car', but in a 'flying venetian blind' as Jimmy McCudden once called it... Just a couple of days of the month left, so if anyone else is flying WoFF's Fokkers, get posting! -
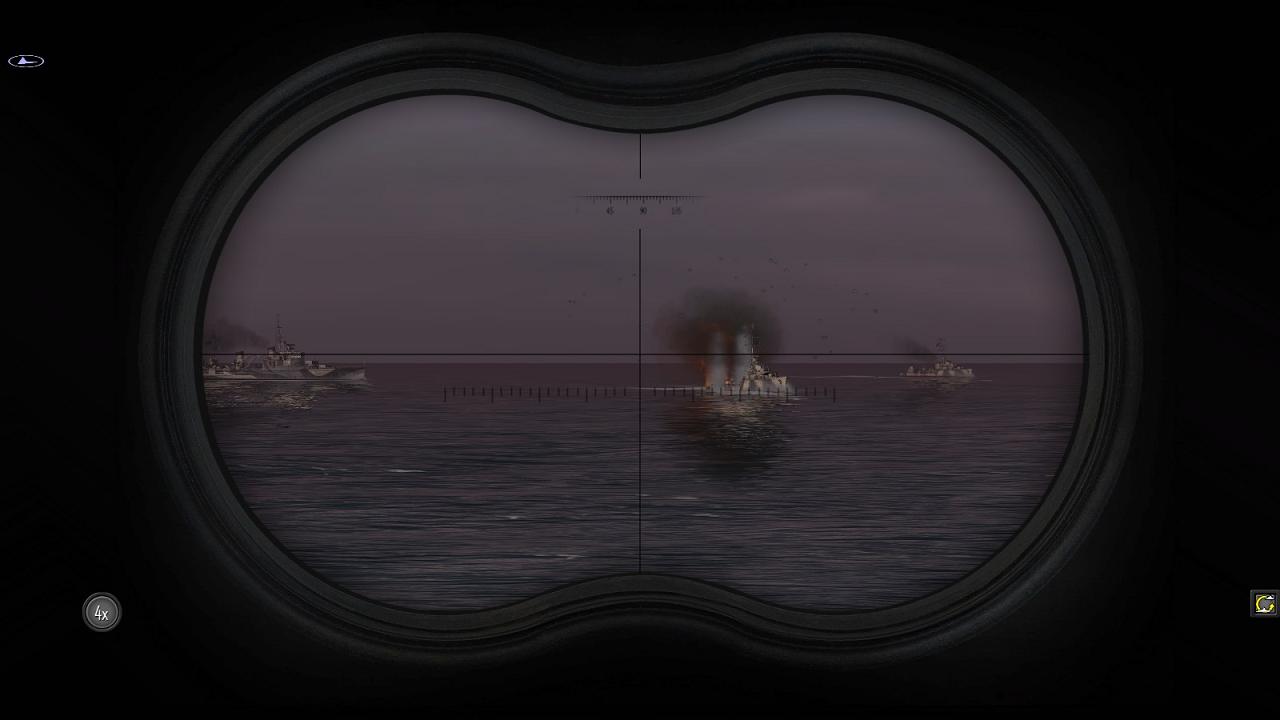
The battle in Atlantic Fleet The map view below shows the tactical situation at the start of the battle; there is no scale as such, but selecting a target either in the map or the 3D world will give you a range estimate – always or nearly always in Atlantic Fleet, battles start inside gun range. Atlantic Fleet doesn’t have a British minesweeper and here, we have just Edinburgh and the two destroyers, Foresight and Forester. The same 3D model represents all the Town Class cruisers in Atlantic Fleet, although in real-life, Edinburgh’s raked funnels were set back a good deal further than in the earlier sub-classes (see the picture of Belfast in the first post in this thread). My three destroyers are in line abreast sweep formation and as the enemy has the initiative, we will have to endure the first shots of the battle. Realistic or not, I have the view set to switch, with the current turn, between enemy and friendly ships, so I have a good view of the opposition. Edinburgh kicks off with a short move at about 3 Knots followed by a salvo nearly straight ahead from ‘B’ Turret, which falls short of her target. This seems to be the only turret operational and she’s also got a noticeable list, as well as propulsion damage. I’m encouraged to see that the cruiser is starting with a significant level of damage, as in the real battle! The closest enemy destroyer, Foresight, lets fly with a starshell, while Forester just closes the range, without firing. Now it’s my turn. The pause between turns gives me time to study the map and make a quick plan. I decide to repeat the tactics from my last battle, against a similar but undamaged force. Z 24 and Schoemann will turn slightly left and go to maximum revolutions, aiming to cut across the front of the advancing enemy and cross his ‘T’. Z 25, on the right of my line, will bear slightly to starboard so as to come up abeam of the enemy, dividing his fire and setting him up for a possible torpedo attack, later. I don’t always bother with starshells. Fired by the AI enemy, they reportedly improve his accuracy but for the player, I think their only benefits may be that starshells (i) improve the accuracy of the initial firing solution, which one never uses after the first, ranging salvo and (ii) cause to be visible/rendered more distant targets which would otherwise be invisible/not rendered (seen only as a radar target marker, in map view). My first salvo is fired by Schoemann. Unlike the later Narvik Class Z 24 and Z 25, she had 5-inch rather than 5.9-inch guns, and two forward turrets (all the Narvik Class in Atlantic Fleet are modelled with a twin forward turret). The 'flight of shell' visual effects in Atlantic Fleet are vastly more acceptable that the (to my eyes) horrible gamey ones in World of Warships - and there's none of the silly dodging around islands or icebergs that mark the latter as strictly an arcade shooter, to my mind - nothing wrong with that, of course, each to their own, but not my cup of tea. Soon the rounds are flying back and forth. It quickly becomes certain that Edinburgh is already in trouble, perhaps unable to manoeuvre, reduced to very low speed and with only one three-gun turret operational. So like the man walking along the beach throwing pebbles at every seagull because he wants to leave no tern un-stoned, I am happy to divide my fire between the three targets we have. My destroyers jink back and forth to put off the enemy gunners, as they advance through the snow squalls. Rounds from both sides are going close, but everyone is slow to land hits. First blood comes when I start getting some hits on the easiest target, the crippled cruiser. However, she’s also the toughest target, despite the prior damage. First serious damage is suffered by Foresight, which is the target of Z 24 on the left of my rough battle line. A straddle from a three-gun salvo produces a hit and perhaps also near miss splinter damage, and a fire breaks out amidships. Efficient damage control soon has the fire out and Foresight - which is now in the van of the enemy force - turns to starboard to bring her broadside to bear on Schoemann. You can see the latter, partially illuminated by starshell, now on a parallel course, while the ship further away to the left and on the opposite heading is Z 25, which is engaging Edinburgh. Forester has also turned and the two British destroyers are doing a good job of screening the damaged cruiser. Edinburgh is now firing starshell every so often, in between salvoes, as if to assist the shooting of Foresight and Forester. The whole force seems to be co-operating well. At the moment it's Schoemann who is lit up, but rather than the enemy concentrating on her, all three of my ships find themselves under fire. Edinburgh is the one engaging Schoemann, but fortunately she's only got the one turret in action, and her shooting with that continues to be unimpressive. There’s a strong wind blowing and as we move, its relative direction shifts somewhat, complicating the task for our gunners. In the meantime, the enemy is now making better shooting. Suddenly, Z 25 is hit hard by Forester and there’s a violent explosion from somewhere amidships. She’s still in the fight but her steering fails, locking her into the zig-zag to starboard which she was making when the rounds fell. In my centre, Schoemann is locked into her own little battle with Foresight, and is soon trading blow for blow in what looks like being a fight to the finish. Some hits amidships exact revenge for Z 25. In the process, the gap is widening between Schoemann and Z 24, still aiming to cut across the bows of Edinburgh, over on my left. Z 25 has restored steering, just in time to suffer a secondary explosion as something previously damaged cooks off, or fire reaches something it shouldn't. It's some consolation that Foresight has been hit again and is suffering similar woes. I find that the damaged Z 25 is now within torpedo range of Edinbugh – at near maximum, but the cruiser seems a good target, broadside on, barely moving, and possibly unable to manoeuvre. The state Z 25 is in, this might be her last chance to play a part in the battle. I let fly with a salvo of tin fish. But while they are in the water, Z 25 is hit again and little latter, suffers a further big explosion. This is the end for Z 25. She goes down. The battle has claimed its first victim, and it’s one of mine. ...to be continued!
-
Re-fighting the battle for Convoy PQ13 in Atlantic Fleet Of all the many dramatic photographs taken of the war at sea, some of the most haunting are of the last moments of what maybe minutes before was a fine warship in fighting trim. Pictures like this well-known shot of a Japanese escort sunk by skip-bombing. The crew cling to the capsizing vessel as what appears to be another bomb, dropped by the aircraft from which the photo was taken, splashes across the water towards the stricken ship like a stone skipped on a pond. Back in the 1990s I coveted but never obtained a rather expensive book from the alas long-departed Military Book Club, War at Sea 1939-45 by Kreigsmarine veteran Jurgen Rohwer. This was a large-format book with a short narrative account written around an excellent series of photographs, many of which I haven't seen before. When, just recently, I picked up this book second-hand, I was just as struck as I had been many years ago by its cover photo, one of a series a wrecked and apparently abandoned German destroyer. At the time I realised the pictures were indeed of a German destroyer, taken from an enemy ship. But what ship was she, what happened to her crew, and how did she come to be one of the very few ships photographed so very closely by those who had sunk her? The historical battle Long before I got the book, I had discovered that the sinking German destroyer was the Z 26, lost during a confused battle in Arctic waters on 29th March 1942. By that time, Royal Navy was running a series of convoys - the PQ series, later changed to JW - to help keep the Soviet Union in the battle against Nazi Germany. The most famous Arctic convoy action is PQ17, which scattered after inaccurate reports that it was about to be intercepted by a force including the battleship Tirpitz and was then devastated by air and U-Boat attack. Other famous Arctic convoy-related actions were the Battle of the Barents Sea in December 1942, where the failure of the German force to get to grips with the convoy had Hitler pushing for the scrapping of the surface fleet; and the Battle of the North Cape a year later, when Scharnhorst was lost in action during an abortive sortie against Convoy JW55B. Throughout, the merchant, naval and aircrews of all sides had to endure exposure to some of the worst weather in any theatre of war, with frequent heavy, freezing seas in which survival time was low indeed. By the time in early 1942 that Convoy PQ13 sailed for Murmansk, the Kriegsmarine was still in the middle of redeploying its remaining seaworthy heavy units to northern waters, primarily to interdict the Arctic convoys, in co-operation with U-boats and bombers. Just three destroyers participated in the attack on PQ13 - Z 24, Z 25 and Z 26. They were all from a class which had begun to be laid down before the battle by whose name the class was commonly known - Narvik. Not an auspicious name - as one author put it, " 'Lost at Narvik' was the epitath of the Leberecht Mass and Deither von Roeder classes", ten of the big destroyers having been smashed in two fights in Narvik Fjord with the Royal Navy during 1940, like Bernd von Arnim, below. The Narvik class were big and with 5.9 inch guns, very heavily armed for destroyers, though not all shipped the twin forward turret intended for the class - they all do, in Atlantic Fleet. PQ13's nineteen merchant ships - most of them US and British Merchant Navy vessels - had already suffered some losses from aircraft. And severe weather had dispersed the ships, two groups re-forming and the rest proceeding independently. At this point, the German destroyers arrived, and after sinking a merchantman, ran into the convoy's close escort, headed by the cruiser HMS Trinidad, supported by RN destroyers and later by one of the Soviet destroyers which had sortied to meet the convoy. Z 26 was hit hard, mainly byTrinidad; Z 24 and Z 25 disengaged after rescuing around 90 of her crew, but about 240 never made it. The PQ13 action in Atlantic Fleet You don't need to use Atlantic Fleet's custom battle generator fo fight this one - it's included with the large set of historical battles that come with the game. Here's the intro screen. As usual, there's no 'fog of war' - less relevant anyway, in an historical mission - so you can see exactly who's on each side. You can choose to play for either navy - or to take the turns for both sides, by setting the 'Player 2' option to 'ON'. I have opted to play for the Kriegsmarine, and we have the initiative (= first turn). As well as the 6-inch gun Fiji (or Crown Colony) Class cruiser Trinidad, we are up against three Royal Navy destroyers - the inter-war types Eclipse and Fury, and the War Emergency Programme Oribi, the latter distinguisable by having just the one funnel, compared to two for the others. Six merchantmen are in the part of the convoy that we have come upon. The weather is poor, cloudy and with rain or snow. Here's the position at the moment the battle begins. Our three destrovers are, realistically, line abreast, in the sort of formation that would be used to sweep for the enemy. Trinidad herself is the only ship we have been able to identify visually at this stage; the others are just radar contacts. Clearly, it's time to get busy! ...to be continued!
-
Hey, thanks Silberpfeil! There's another one in preparation on a similar theme, Hunting HMS Edinburgh; watch this space!
-
1Lt Karl Richter
33LIMA replied to pappychksix's topic in Thirdwire: Strike Fighters 2 Series - General Discussion
Nice tribute - well done, that man. 'We will remember them.' -
Endgame We had sunk two of the three enemy destroyers and put the damaged cruiser Trinidad to flight...for the time being, anyway. Before settling matters with Trinidad and then getting at the convoy, there remained the third destroyer, Eclipse. She had been astern of Fury but sinking the latter had preoccupied both Z 24 and Z 25. Eclipse, unmolested, had been able to close the range and now turned to port - and fired torpedoes! In the picture above, you can see Z 24 and Z 25, the former above the splash of Eclipse's tin fish, the latter to the right of the tip of her rear mast. This was a dangerous development, requiring evasive action. Next move, I turned both destroyers hard to starboard, to comb the torpedo tracks, and then let fly at our attacker with our forward 5.9 inch guns. At this range, we managed to get some hits with one of the first salvos. Eclipse was far from beaten, though, and immediately landed hits on one of my destroyers. She was on fire astern but kept on coming. By forcing us to turn to avoid torpedoes, Eclipse had been able to cross our 'T', firing broadsides whilst we had only our front turrets bearing. When I judged that the torpedoes had passed, I turned both destroyers to bring our own broadsides to bear, but I had moved too quickly, and there was a big explosion as Z 24 took a torpedo astern! She stayed afloat though she was well down by the stern and for a while, her steering was out (indicated by the 'ghosted' horizontal scale near the bottom left-hand corner of the screen below) with her rudder jammed at 25 degrees to starboard. Z 25 had turned to port and escaped the fan of torpedoes. She took Eclipse under fire... ...and down she went at last... That left Trinidad, still withdrawing to the west behind a smokescreen. Heading back towards the cruiser, and with her fires put out, Z 25 found herself opposite one of the escaping merchantmen... ...and had a crack, if only to let the convoy know that we hadn't forgotten about them. This map view shows the tactical situation at about this time. in the centre, Z 24, still afloat and in action, has shifted fire from the sunken Eclipse to the retreating Trinidad (as indicated by the numbering of the shot history and associated tracks). To the north, Z 26 is passing the wreck of Oribi in pursuit of Trinidad. To the south, Z 25 is also coming after the cruiser. The convoy is continuing to withdraw to the west-north-west, though its stragglers are well within range. At this point, Trinidad stopped making smoke, and started shooting with her rear turrets. The destroyer attacks had bought enough time for her damage control parties, evidently. She was still moving slowly away from us but her armament seemed to be intact. Now the fight was on again in earnest! The difference now was that Trinidad was in torpedo range of both Z 24 and Z 26. Trinidad's fire control had likely been damaged and though close, her salvo scored no hits. In reply, first Z 26 and then Z 24 launched four torpedoes each. Z 26's salvo landed first, all four tin fish hitting Trinidad to starboard. Seconds later, the four torpedoes from Z 24 also found their mark, to port. The first four would have been enough, but better safe than sorry, as the saying goes. Merchantmen in Atlantic Fleet have only AA weapons, so what followed was more a massacre, than a battle. Still, this was the reason we had come here. The results screen confirmed our victory. I had been lucky not to lose at least one destroyer, especially as Z 24 had taken a torpedo. She and Z 25 with no worse than medium damage meant I had got off fairly lightly. If Trinidad had crippled or sunk one of my ships in the opening exchanges, the battle would likely have gone the other way. The enemy cruiser should perhaps have turned immediately to bring full broadsides to bear, but I had the impression the British were keen to get between us and the convoy they were there to protect. In the event, they could have served their charges better had they been more cautious. Fortune does not always favour the brave, it seems. We had certainly re-written a little piece of history. Z 26 had not been sunk. In the real battle for convoy PQ13, Trinidad had actually been hit by one of her own torpedoes after a malfunction; in this fight, she had been hit by ours, and had not survived. The ability to re-fight so many and varied historical battles is truly one of the many high points of Atlantic Fleet.