


33LIMA
-
Content count
3,749 -
Joined
-
Last visited
-
Days Won
7
Everything posted by 33LIMA
-
Thanks for the positive feedback! And yes, good idea about campaigns; I had been thinking of featuring a campaign with 60 Squadron RFC as they went through a good variety of aircraft types (if you live that long) but there are many more possibilities, 'On campaign with the Flying Tigers/56 Squadron/the Red Baron/JG 26/Second Panzer Division/the Desert Rats' or whatever...yep will give it a go soon!
-
Try this: http://combatace.com/topic/81279-blitzkreig-1940-cfs3-eto-expansion/ http://combatace.com/topic/81631-cfs3-eto-spanish-civil-war/ http://combatace.com/topic/81323-arm%C3%A9e-de-lair-1940-cfs3-eto-expansion/ CFS3 is not great at air-to-air but not bad at fighter-bomber or even medium bomber ops. It's a lot better with the ETO Expansion. There's also the Mediterranean Air War (MAW) expansion and a PTO one, tho I'm happy with CFS2 and IL-2 '46 + DBW for the Pacific.
-
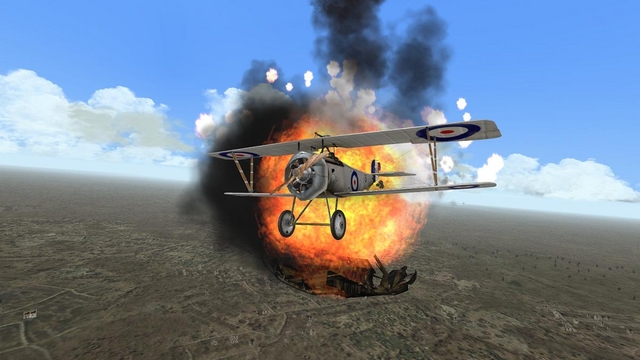
Going to war with the ultimate predator - the Koenigstiger heavy tank! For this mission reports, it's back to terra firma - speficically, to the snowy wastes of the Russian Front in World War Two. Our hosts are Graviteam, in the form of their excellent tank simulator Steel Fury - Kharkov 1942. The 'Kharkov 1942' bit of the title is now pretty well redundant, as modders have greatly extended the scope of the sim, not least into North Africa and with many later-war AFVs...including the tank which is the star of this particular show. The tank The mighty Panzerkampfwagen Tiger Ausfuehrung B - better known as the Tiger II or the King Tiger - needs little introduction. Combining the sloped armour that the Soviet T-34 taught the Germans to apply to tanks with the other design concepts of the original Tiger I, the King Tiger was one of the outstanding tank designs of World War 2; perhaps the most effective tank on the battlefield from the summer of 1944 till the end of the war. Its early transmission problems were dealt with and its reliability was soon adequate. With very thick armour all around and especially frontally, and a powerful gun that combimed deadly armour-piercing capability with extreme accuracy, the King Tiger was a formidable enemy, if you were unlucky enough to meet one in the field. They were not invincible, of course. In Normandy in July 1944, Lt John Gorman of the 2nd Battalion, Irish Guards, Guards Armoured Division, surpised a King Tiger but was perhaps himself surprised when his gunner's first round - they had a 75mm HE 'up the spout' - had little effect. The Sherman's gun then got a stoppage and Gorman ordered his driver to ram, which caused the startled German crew to bail out. Gorman's crew did likewise, one of them briefly sharing a ditch with the German tankers. A 'borrowed' Sherman Firefly's 17 pounder gun enabled the intrepid Gorman to settle the matter permanently. The mission One of these days I will go to virtual war in Steel Fury in a Panzer 38(t) or even a Panzer III. But for now, the prospect of fighting in, rather than against, heavily-armed and heavily-armoured tanks retains, for me, a certain irresistible appeal. So I was glad to find that the modders have not only provided SF with a King Tiger, but some missions for the beast as well. Here's the one I elected to play for this mission report - 'Counterstrike' by Deviator, with adjustments by Lockie and input also from Woofiedog and Tanker. I'm using the latest NTA mod, Lockie's latest mission pack, and the winter weather mod, all enabled via the indispensable Jonesoft Generic Mod Enabler (JSGME). The weather mod by Maleshkin transforms the standard SF environment into a winter wonderland which nicely captures the essence of the Eastern Front at its chilliest. Details of all of these are available over on the Graviteam Steel Fury forum, here. [Edit, August 2014 - the NTA add-on has been discontinued, but a successor, the Steel Tank Add-on (STA) is now available: http://stasf2008.ephpbb.com/t6-steel-tank-add-on-steel-fury ] It's worth mentioning that the this mission has a long video intro consisting of some excellent clips of German armour and other troops in action, including some combat camera footage I had not seen before - from the Deutsche Wochenschau newsreels by the look of it. And here's the mission. The screenie below was taken a little way into the mission itself, by which time my platoon of King Tigers (blue trapezoids) had driven out in front of the dismounted infantry we were supporting. It was early 1945 and the mission itself was a counterattack, by elements of the 3rd SS Panzer Division 'Totenkopf', on the village of Pettend in Hungary, a German ally which was then feeling the full weight of the Soviet steamroller as the red tide swept westwards towards the Reich. I have the orders panel turned off for clarity; incidentally, in-game, I also turned off the 'head up display (ammo load, turret orientation etc) using Ctrl+backspace and could also have turned off the orange diamond/arrowheads (Ctrl+|) that act as target indicators, which you can see in some of the screenshots which follow. The orders in the panel I have turned off tell us simply that our the aim is to seize and hold the village, destroying enemy forces in the area. From the markings on the map, these can be seen to consist of infantry defensive positions in an arc on the outskirts of the village, likely with tank support; I'm not ruling out the possibility that they may also have antitank guns. Our own force consists of our brave grenadiers in what appears to be weak company strength, with just my under-strength platoon of three King Tigers for fire support. Looking at the map, the terrain was fairly open and I contemplated going either left- or right-flanking. From either flank, I could have supported the advancing grenadiers by fire at roughly right-angles to their axis of advance, in the approved manner, perhaps finishing with an assault on Pettend timed to arrive on the objective at the same time as the troops, for maximum shock effect. But after milling about a bit the grenadiers seemed to be in a hurry to get at the Ivans rather than give me time for any fancy manoeuvres. So I formed us up in line formation and decided we would just roll on into the objective, ahead of the infantry, to shield them, and basically shooting anything that looked likely to hold them up. Plan made - time to get busy! I lined myself up and waited for my two other King Tigers to get into position, either side of my own tank. ...to be continued!
-
On to the objective! Just as I was beginning to think we had dealt with Ivan's armour, a new threat developed from the opposite flank. My tank commander indicated yet another tank target, off to the right. Again I spun my tank on its tracks and swung the turret right, at the same time. He wasn't hard to find, stopped out in the open and aiming right at us. I let him have it and he burst into flames after my second round. But the fight was still not over. Scanning left again, I picked up the shape of yet another T-34, partly concealed behind some buildings. I swung the tank left to get a better shot at him, then put two rounds into him, too. Moving off again, I approached the outskirts of Pettend. There was still a lot of small-arms fire flying back and forth, but I was on the look-out for deadlier prey than enemy troops. As I edged over to the left, yet another T-34 suddenly came into view, this time at scarily short range. I saw his 85mm gun fire and the tracer flash past to my right, likely aimed at another King Tiger. I fired once in return and the Soviet crew promptly bailed out. Some of them were carrying weapons so I machine-gunned them mercilessly, seeing two of them stagger to their feet and collapse. I continued slowly edging towards Pettend, relying on this to open up new arcs of view and hopefully continue to reveal whatever might be concealed the other side of the scattered buildings. From the gunsight, I scanned back and forth. There was nothing to be seen to my front, but smashed or burning Soviet armour. The small-arms fire seemed to be easing off, too Continuing my cautious advance, I came across a stationary T-34 at close range. Taking no chances, I put a round into his side. I immediately realised he was already knocked out; my round succeeded only in killing a crew member who was foolishly hanging around, in front of his tank. The fighting definitely seemed to have died down now, with our grenadiers having reached the objective and apparently being engaged in mopping up the last remnants of whatever Russian infantry was still holed up in or around Pettend. I swung right, intending to come around that flank and help clear the village, without venturing too deeply into it. At this point, I was rewarded with the news that the mission objective had been achieved! I opted to play on, however, continuing to edge around the right flank and looking out for any surviving Ivans. One of my King Tigers seemed to have been left behind - I was to find out later that he had lost a track - but my other tank was still with me. All I could see was smashed T-34s. There was still some desultory small-arms fire, whether involving holed-up infantry or bailed-out tankies. Between us in our two King Tigers, we machine-gunned any enemies we saw. The snow began to fall heavily, as I halted in the middle of the village, after machine-gunning some Ivans clustered around a knocked-out tank. Job done! I was literally about to hit the 'escape' key to quit the mission when a round slammed into the front of my tank. I hesitated, then as I made again to quit, my tank was hit again, the split second before my finger hit the key. Too late to do anything about it but determined to find out who was responsible, I used the post-mission 'review' facility to tab from target to target. And this is what I saw. Apparently the Russians called these self-propelled 122mm guns 'beast killers' because of their ability to destroy the German Panthers and Tigers; and it was this ISU-122 that had clobbered me. He had the nerve to sidle up to the railway embankment and settle into a nice fire position, while the commander had a good look at my King Tiger, which had begun to burn nicely. Lockie tells me that the opposition you face in a mission like this will vary with your game settings for 'balance' and 'experience' - for example, enemy AT guns may appear in this mission at the more difficult settings. Oh well! At least we had won the battle. Tabbing around, the Soviets had lost heavily. The Red infantry hadn't had any anti-tank guns, it seemed, nothing heavier than a few of those distinctive Maxim guns on wheeled mounts with little armoured shields. They had been relying for protection on a company of T-34/85s, which we seemed to have wiped out. One of my King Tigers was sitting back in a ploughed field, immobilised. One of his tracks lay unrolled onto the ground in front of him, but the crew looked pretty relaxed, as the snow fell around them. The other King Tiger was helping the grenadiers mop up near some scrub on the outskirts of Pettend. Both seemed oblivious to my own fate. Overall this was an exciting and interesting mission. The lack of anti-tank guns on the Soviet side had perhaps been compensated for by the lack of artillery or air support for my own side, and the superior numbers of T-34/85s meant that even for three King Tigers, things might have turned out differently. Next time, though, I will make sure I am settting my sights correctly...and try out one of the lighter tanks, from the many now available for Steel Fury - Kharkov 1942. King Tiger at the Royal Armoured Corps Tank Museum, Bovington Camp, Dorset, in 2008 - author's picture
-
Into action! With my other two King Tigers I raced for the Start Line, which was a tree-lined track running across our front. At this point, I thought better of charging in ahead of the infantry. The mission brief had suggested there were enemy tanks around, and it seemed wiser to hang back and exploit the greater effective range of my long-barreled and accurate gun, rather than do them the favour of closing the range. So I modified my plan, on the fly. I would still go in on the same axis as the infantry, but I would not rush it. Instead, I would pause every few hundred metres, to scan my arcs carefully for targets - and for tanks in particular - before resuming my advance. I decided my first halt for observation would be on the Start Line. As I approached, I could see the objective, Pettend, a straggling group of buildings to my direct front, maybe 800 metres ahead. I gave the loader the order to load Armour Piercing; I had 30 of these rounds, and 40 High Explosive. As usual, I was playing by going first to the gunner's station (F2) and then toggling between the external view (for optimum all around vision) and the gunsight view (to scan for and engage targets). Although nominally in the gunner's station you can give steering commands to the driver from here. The alternative is probably to play from the tank commander's view (F3) and use the open hatch view for general observation, supplemented by the binoculars, and leave gunnery mostly to the AI gunner. I think I'll try that next time! Halted in my first fire position - in the open, the ground between Pettend and our force didn't have much in the way of cover - I scanned from left to right. And there he was! With the sight zoomed in, I was able to pick out a T-34/85 amongst the buildings, near some railings on a low wall. This is where I made a potentially serious mistake. In my haste, I set the range using the wrong scale. These are not the easiest to read - I think there is a mod somewhere which changes their colour - but there are four scales. Two, which appear on top in the screenie below, are for different AP rounds - the one marked 'Pzgr 39/43' is for conventional German AP (which has a small explosive filler) while 'Pzgr 40/43' is for a lighter tungsten-cored round with greater penetration at shorter range. The two larger, lower scales are for HE ('Spgr 39') and HEAT/hollow charge ('Gr 39 Hl'). In SF 42 you rotate these scales using the mousewheel and read the range against the spike at the bottom right, at about the 5 o'clock position. Your aiming point is the bottom right apex of the large central triangle, which moves up or down as you adjust the range - the other traingles are to help you aim off for crossing targets. But I ended up using the HE scale for an AP round! Realistic gunsight reticles and usage is one of the marks of a realistic tanksim and I really ought to have been more careful! Even at fairly close range it took me three rounds to hit and kill the T-34. He didn't burn but I knew he was dead when his driver's hatch popped open and the crew bailed out. By now, targets seemed to be popping up everywhere and I traversed left to pick up another T-34/85 which was coming in from the outskirts of the village on that side. After my first round, he jinked to my left, giving me a shot into his side, which did the trick. A command to engage infantry to the right was quickly replaced with a more urgent call to engage another T-34, on our left flank. Two of the beggars had appeared as if from nowhere, likely out of a fold in the ground. They were were fairly racing across the snow, stopping to fire from the short halt as they came. I pivoted my tank on its tracks to face them, both to get my gun around faster and to present them with my thickest, frontal armour. The range was still short enough not to make my sight-setting error totally fatal and my first target shuddered to a stop after a first-round hit. I then switched to the second T-34 as he sped right and after my second round, he too halted and the crew bailed out. No more targets! I rolled forwards again, across a barren ploughed field. My platoon-mates had also been busy. The funeral pyres of burning enemy tanks stained the winter skies in several directions. But the battle was far from over! ...to be continued!
-
Just for completeness, with Wings Over Flanders Fields having supplanted OFF, I've posted a mission report with the Nieu.28 in WOFF in the CombatAce mission Reports forum, over here.
-
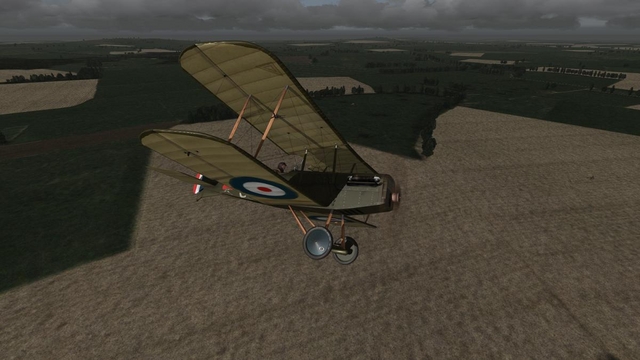
The other nationalities in Wings Over Flanders Fields Part 1 - the French air service I can't do a biography-based mission report for the US and French sides as I only have memoirs by British and German pilots. But for the sake of completeness, I'm going to do a separate pair of mission reports in Wings Over Flanders Fields, one flying for the Aéronautique Militaire, the other for the US Army Air Service. First up, it's the French service, flying the little Nieuport 11, aptly nicknamed the bébé (baby). The plane Oddly enough, pre-war Nieuport designs were monoplanes. Their first biplane was the two-seat Nieuport 10 of 1915, which set the pattern for the aircraft which were to follow: biplanes with a much smaller lower wing, joined to the upper one with a V-shaped interplane strut. These were intended from the start to be armed. The early Nieuport 10 AV had the observer in front ('en avant', hence AV) with a circular cut-out in the upper wing, to enable him to stand up and fire a carbine or a Hotchkiss machine-gun pintle-mounted on the wing in front. But the later Nieuport 10 AR, and the more powerful Nieuport 12 which followed, moved the observer to the rear ('en arriere', hence AR) where he manned a Lewis Gun on a moveable or rotating mount. The Nieuport 10 AV During 1915, some Nieuport 10s were flown as fighters on patrols, with a Lewis Gun fixed above the upper wing to fire ahead, high enough to miss the propeller arc. Their success inspired the Nieuport 11, a smaller, nimbler development. This was arguably the first real fighter aircraft; genuinely capable of air-to-air combat in a way the inferior Fokker monoplanes were not - the latter being interceptors rather than fighters, with a synchronised gun but primitive wing-warping roll control and generally not well-suited to dog-fighting. In the hands of France's emerging aces like Georges Guynemer and Jean Navarre, the Nieuport 11 was instrumental by early 1916 in reversing the German's brief period of ascendancy in the air, 'the Fokker Scourge'. The British contribution was the DH-2, but while also better than the Fokker, this 'pusher' design was a technological blind alley. By contrast the Nieuport 11 proved capable of significant further development. Later versions, the Nieuport 16, 17, 23, 24 and 27, were widely used by both French and British, and later by the US Escadrille Layfayette. RFC aces like Albert Ball and Billy Bishop also rose to prominence flying Nieuport Scouts. The type was widely used by Italian and Russian air forces as well as on the Western Front, despite a continuing and alarming tendency to failures of the weak lower wing, often killing the pilot. All in all, the Nieuport V-strutters were one of the war's classic designs, inspiring the layout of the German Albatros D III which from early 1917, largely swung the air superiority pendulum back towards the Germans. Recommended reading on Nieuport aircraft would include Crowood's 'Nieuport Aircraft of WW1' by Ray Sanger and Osprey's 'Nieuport Aces of WW1' by Norman Franks. The unit For this mission, I created a new French pilot and assigned him to Escadrille N.12 (the French gave squadron numbers a leading alphabetic designator which - though a change could sometimes lag behind a change of aircraft - indicated the principal type of aircraft flown - 'N' for Nieuport, Spa for SPAD, for example). The unit had a long and worthy combat history. There's a great online source here; even if you speak no French, the illustrations, maps and tabular information tell their own story. The unit marking was a blue and while 'fanion' or guidon with the number '12', usually in red, carried on the side of the fuselage. As you can see, it's 1 May 1916 and we are based at La Cense, near Compiegne. Happily, we are close enough to La Belle Paris for us to have some interesting and diverting 'R and R', on our days off. But that's a very different kind of mission with quite distinct objectives! The mission Here's the brief for today's mission, which takes us well away from the delights of Paris. It's a patrol along a dog-leg route, up to the trench lines, which are not too far away. I'm leading a flight of three; a second flight of two aircraft is also flying the mission, as 'top cover'. Our briefed mission height is 10,000 feet. Starting on the grass in front of the sheds at La Cense, I waited till the first couple of machines had roared off then sped after them. All of us were in green and brown 'shadow shading' camouflage, apart from one fellow who was in clear doped linen, with prominent blue, white and red chevrons on his fuselage. This was the aircraft of squadron ace Lt Pierre Dufaur de Gavardine, said in the Osprey aces book to have scored six victories with the unit, before being badly wounded early in 1917. I was quickly off the ground and climbing steadily. With the front just a short distance away, I hoped to meet the Boche in the air before very much longer and perhaps indulge the superiority of my neat little aircraft, at the expense of some inferior Fokkers, Aviatiks or the like. Would my hopes be realised or dashed? I would find out in good time. ...to be continued!
-
Into action! I was soon at reasonably close range and started shooting. This is where it got tricky. With my machine-gun several feet above my head and no proper gunsight, I found it rather hard to get my rounds on target. The rather low rate of fire from just one gun and the visible dispersion of my tracer rounds didn't help. the natural thing to do was use the crossed bracing wires in front as a reference point and aim off accordingly. By the time I had sort of worked this out, it was time to break off and come around for another pass...and then another! A third attack proved un-necessary. While lining up I had given my two comrades the signal to attack and one of them took me at my word. I straightened up and came in for another pass at the Aviatik, but he was no longer there. What was left of him was falling in flames, shorn of his wings which fluttered behind him, as my victorious flight-mate flew past in triumph. Right, then, the second Aviatik would be mine. Again I attacked. And again, I broke off my firing pass with the Aviatik flying serenely on. This was not how it was supposed to work out. Having broke low, it took me longer to come around again. I made a second pass, during which my ammunition gave out. As I rolled out again as if to line myself up for another firing pass, I could see that a flight-mate was taking full advantage, and had beaten me to the mark. Not that I had any rounds left, anyway...just one gun, no proper sight, and under two hundred rounds, even for that. I was too used to flying Albatrosses! For the second time, mixed feelings were the order of the day, as I watched my comrade's target stream black smoke and plunge earthwards. Two kills from the mission, two German working aeroplanes and crews who would work no more. But neither of them were mine. I consoled myself with the thought that my attacks had perhaps softened up both victims and contributed to my team's success. I rolled in after my successful comrade and then throttled back till they were both back in formation, which took some time, as one of them had lost a bit of height. Then I opened her up and steered us both back towards the front. One of my flight-mates gave me some anxious moments, falling well behind then doing it again, after I orbited so he could catch up. But we made it over with no more than some desultory Archie fire to worry about. As we reached our side of the Lines, I nosed down into a gentle dive to complete the transit back into safer skies. Soon we were back at La Cense and in the circuit. I have screwed up several virtual landings by pausing and un-pausing the action in an effort to get a decent screenie and managed to do it again today. The crash didn't look too bad but was fatal, although it was galling to read that I was considered a victim of enemy action. Perhaps the CO thought that would look better in the unit records than 'Killed after crash landing while trying to take a screenshot'. Can't say I blame him, I suppose. I enjoyed flying the little Nieuport 11 but was a bit disappointed at the paucity of targets...and my inability to hit them hard, when they did show up. With such an armament as I had, I really needed to get much closer and conserve my limited supply of ammunition. Nice that a good combat flight sim can reinforce the same lessons the real pilots of World War One had to learn!
-
Over the front! With my two flight-mates in Vee formation either side, I climbed hard on the short leg to the north-east, with the other flight also going strong, just ahead and above me. Approaching the waypoint nearly half-way to the Lines, I checked my map then, at the right moment, eased off my climb rate and turned ninety degrees right, keeping a more careful look-out, now. In the danger zone to my rear, the skies remained clear, except for my faithful flight-mates. It wasn't long before we had company, though. Anxious to meet the Boche in the air, I had edged out into No-Man's Land and soon had Archie for company. The barrage was reasonably accurate but not particularly intense. I threw in a few random course and height changes, just in case. There was now no sign of the other flight. Seemingly alone with my own flight, and as the Boche airmen were not co-operating with my plans for fame and ace-dom, I decided that a little show of initiative was now in order. I turned left into enemy territory, soon leaving the trench-lines behind and below. For a while it looked like this flexible interpretation of my orders might draw a blank. Then I saw them. Two pale dots appeared in the sky, slightly higher and half left. They were edging slowly left to right, deeper into enemy territory. After tracking their progress for a while, I turned onto an interception course, cursing the Archie bursts close to my plane, which might give my game away, if these two dots were enemy aircraft. As indeed they were. As I slowly closed the range, the dots resolved themselves into a pair of white aircraft, which I correctly judged to be Aviatik two-seaters. This was more like it! I slid into position, behind and below them in the approved manner, and crept ever closer, waiting for the right moment to let them have it. ...to be continued!
-

JSGME enable mod for custom UI.XML file for WOFF
33LIMA replied to rjw's topic in WOFF UE/PE - General Discussion
Thanks Robert, that's great - got it now. I have seen at least one other user express a preference for darker dots so you might want to upload this to the CombatAce mods section for OFF/WOFF. Many thanks again! -
This any better?
-
Re-living a classic WW1 memoir in Wings Over Flanders Fields! The man and the book The SE5a, low down over enemy territory, pulled up to release its last two bombs onto a German gun battery. The bombs' release was accompanied by a blast directly below and behind the aircraft, possibly a premature detonation, which ripped off the tailplane on one side, leaving it trailing behind, held by an elevator control wire. The SE dived vertically, pulling out too late to prevent the undercarriage from being ripped off as she bounced drunkenly back into the sky. Now desperately headed west for friendly territory, the pilot saw German soldiers just below training a machine gun onto him, then simply stare open-mouthed, rather than shooting. Regaining the British side of the Lines, he force-landed heavily. 'Coming to' and finding himself alive, he was briskly saluted by an artillery subaltern whose men helped him from the wreckage. On being chided for his officiousness, the Gunner officer replied 'I thought you must be at least a wing commander. You had such a very big streamer on your machine.' 'Streamer be blowed', the pilot replied. 'That was my tail-plane.' 'Wind in the Wires' was first published in 1933 and is an entertaining and vivid account of the author's wartime service, including the dramatic events I've summarised above. His record was an unusual one, because it comprised two periods 'on ops' separated by two years in a German prisoner of war camp! The book starts with an account of the author's flying training, after his secondment to the Royal Flying Corps from an infantry regiment. He trains on Caudrons and Maurice Farman 'longhorns', a 'pusher' type so named as its elevator was mounted on long booms out in front of the crew nacelle. Early on, there's a chilling account of a crash in which an experienced pilot makes an ill-advised turn to regain the airfield after an engine failure on take-off, resulting in an horrific crash right in front of the helpless students, instructors and ground-crew. Gaining his wings despite this early shock, the author is posted to France in the autumn of 1915, where he finds himself with 16 Squadron based at Merville near Armentieres, home of the mademoiselle who, as the song had it, 'hasn't been kissed in forty years'. Two of the squadron's three flights were operating the BE2c two-seater general purpose biplane, said to be of the latest type, with the new (skid-less) undercarriage and 90 hp RAF engine. The author was posted to the third flight, operating Maurice Farman 'shorthorns', a slightly-updated cousin of the 'longhorn' on which he trained. He offers amusing descriptions of the varied personalities in the unit, referring to them by the nicknames he gave them. His unfriendly and unhelpful flight commander is 'Growl'. Another flight commander - dubbed 'Foxy' - has a rather warped sense of humour: he titters at own his descriptions of unfortunate pilots burned in crashes being 'completmong carboneezey' ('completely carbonised' in his pidgin French). The highly-withdrawn Major commanding the squadron is 'the Starched Shirt', which a helpful list at the front of my revised 1971 edition confirms is no less than Hugh 'Stuffy' Dowding, who later commanded RAF Fighter Command in the Battle of Britain. Doubtless these nicknames saved his publishers more than one libel suit! Grinnell-Milne received absolutely none of the careful mentoring and instruction that more enlightened or professional leaders like Mick Mannock bestowed upon their own new pilots. A trip up to the lines with an experienced observer to get the lie of the land and a taste of 'Archie', then it was down to 'on-the-job-training'. Until his flight's elderly pushers were replaced by BE2cs, the author soldiered on, flying mostly defensive patrols over the lines in a 'shorthorn' armed with a Lewis Gun for the observer. These patrols, left to the less experienced pilots, were designed mostly to deter any incursions by German aircraft, even though the author acknowledges that they were seldom going to be able to bring to battle the faster German two-seaters. His patrols were uneventful and they spent their time watching for German planes which never came and on their secondary function of observing and reporting enemy ground activity in or near the Lines. At the end of each uneventful flight, they dived and peppered the German trenches with gunfire. The highlight of this period was an ineffective but spirited attack on a German observation balloon. Converting to BE2cs later in 1915, the author finds the type to be stable but highly manoeuvrable, fully capable of making vertically-banked turns and looping. Flying the BE, he ventures on recce and artillery observation missions but soon finds his yearning is for combat with enemy aeroplanes. In November, he shoots down what he describes as a 'big white Albatros' which will have been a two-seater machine-gun-armed C-type. Other highlights are his fight with the infamous 'Two Tails', an Ago C III pusher credited with almost mystical prowess and his participation in an attack on a railway junction, said to be the biggest bombing raid mounted by the RFC up to that time. In May 1916, when flying the dreaded 'Long Reconnaisance', his BE's engine fails on the return journey, possibly from flak damage, and he has to force land just a few miles short of friendly territory. Taken prisoner with his observer, Grinnell-Milne is much impressed by his sympathetic reception by German aviators from a nearby airfield. Two years later, the author escapes from his captivity and joins the famous 56 Squadron, flying SE5a fighters, scoring several victories in the closing months of the war. From one episode to the next, all of these experiences are described with humanity and a dry sense of humour, laced with many details which the enthusiast of this period will treasure. 'Wind in the Wires' appears to be back in print again, courtesy of publishers Grub Street, and is highly recommended: http://www.grubstreet.co.uk/products/view/572/wind-in-the-wires/ The air war in autumn 1915 In this mission report, we'll be looking at the early period of the author's combat career. At this time, the concept of specialised fighter squadrons was still a little way off. Two-seater units might be allocated one or two faster machines more suited to air-to-air fighting - or less suited, in the case of the wildly-unsuitable BE 9 'pulpit' the author mentions that 16 Squadron trialled at one point. But in general, the two-seaters were expected to undertake all roles, including air fighting. Grinnell-Milne's account makes it clear that although under-powered and awkwardly-armed, the BE was not entirely incapable of effective air combat. However, the arrival from summer 1915 of Fokker monoplanes equipped with a machine gun which could safely fire ahead through the propeller arc signaled the start of a new, deadlier era in air warfare. On the ground, little had changed. Static trench warfare remained the order of the day, with the Battle of Loos, fought just to the south of 16 Squadron's sector of the front, failing to achieve the hoped-for breakthrough. The Mission As with the other mission reports planned for this series, the aim is to fly a campaign mission in Wings Over Flanders Fields which recreates as far as practicable the sort of experiences described in the book. 'Wind in the Wires' being one of comparatively few which cover the role of the 'working aeroplanes' rather than the 'fighting aeroplanes', I opted to fly a mission from the first part of the author's combat career, in the later part of 1915, when the squadron had ditched its 'shorthorns' and was equipped with the BE2c. Sure enough, No. 16 Squadron is in WOFF's order of battle in this period and I chose to start in October 1915 - WOFF gives you more freedom over start date than did OFF. Here's the 'Duty Room' for the Squadron. It describes our establishment in typically fulsome WOFF detail, including the names of both pilots and observers. We have the nimble Bristol Scout for the top-ranking pilots and for the rest, the BE2c. I'm Lieutenant Richard Growl, having decided to adopt the nickname given by Grinnell-Milne to his surly flight commander! Homing in on my own flight, I can find out something about my fellow-pilots. Obviously we are not the hottest outfit in the Flying Corps but we have a job to do and we will get on with it. Looking at the intelligence report, I can find out more about what's going on at the front in this period (this one's actually dated a month later, from a career started previously, but you get the picture as to what's available here): And so, to battle! Here's the briefing screen for the campaign's first mission. As usual, I have selected 'Always lead' in the WOFF 'Workshops', so I'm in charge of 'B' Flight on this sortie, which is to be a bombing raid on German front-line positions. The squadron's 'A' flight is said to be flying 'top cover', just as some of the BEs in the bombing raid described in 'Wind in the Wires' were assigned to escort the bomb-carrying machines. In this pic, you have a better view of the map, showing our dog-leg route out to the target and a straight leg back to our base at Merville. We are each carrying four 25-pound 'Cooper' bombs. It was common practice for BEs to leave behind the observer on bombing runs, at least if carrying the heavier 112-pound bombs, but I'm glad to say that won't be the case on this mission! And here we are on the grass at Merville, bombed up and good to go. Our BEs are in the clear doped linen scheme common at that time. The weather's quite good, although there's quite a bit of low-lying cloud around. Checking the controls, I started her up and took off, followed by the others. Turning right beyond the airfield boundary, I crossed what will have been the River Lys, said to have been canalised at this point. I didn't see the barge which Grinnell-Milne says was used for the officers' accommodation but the general lie of the land looks pretty authentic, with detail sufficient for basic visual navigation. At about five hundred feet, I throttled back and held her level to allow the flight to catch up. As they closed in on me, I opened her up again and began a long, slow climb for height, out along our plotted track to the north-east. The objective was not too far off, so instead of going to autopilot and running time compression, I opted to fly in real time and enjoy the view of WOFF's very pleasing new terrain. As we climbed, the superior WOFF formation-keeping was also much in evidence. What lay ahead I could not know. But we made a bold sight as we climbed away together, the aircraft rising and falling gently as we steadily gained height. Drawing close to the Lines, we passed to our left a large town, which a glance at the map showed must be Ypres - or 'Wipers' as the Tommies knew it. Some low-lying cloud towards the trenchlines indicated that target acquisition might be difficult, but I pressed on. I had decided to attack at whatever height I had managed to gain by the time I reached the area of our objective. This turned out to be just over four thousand feet; not very high but enough to be out of harm's way from rifle and machine-gun fire from the ground. At this point I turned on the Tactical Display or 'TAC', set to display ground targets. This shows up the front lines and in red and blue, the general locations of ground units on both sides. Given the limitations of 'MonitorVision' and the general mess of the 'shelled area' that now rolled out beneath us, I had few qualms about using this visual aid, which I expected I would soon have to use anyway, to get my flight to execute its attack. The difficulty now seemed to be, which target to attack? After dithering for a while, I tabbed to select an isolated red enemy blob, out behind the others in the big rectangular boxes along the front lines. The latter I took to be entrenched enemy troops. The isolated blobs to their rear seemed likely to be easier targets, out in the open perhaps. I gave the order to attack, then as my flight swung away, turned so as to make my own separate bombing run, throttling back and losing altitude as I did so. I failed to notice a convoy of motor transport on a nearby road running through the mud, which was actually the target I had selected; this would have been plain had I the sense to padlock it. Instead, I chose a small but prominent, dark, circular fieldwork, at the end of a trench running off the main positions. This looked important - possibly a command post or a supply dump. Whatever it was, it was about to be bombed. Letting go my load of four little Cooper bombs in two closely-spaced salvoes, disdaining a bombsight view and working from the external view looking down, I watched anxiously for the results. My expectations were, I admit, fairly low. I was much gratified to see my bombs bursting pretty well on target. That'll wake up those Huns, I thought to myself! As I banked around, my feelings were rather more mixed, as I saw the bombs from the rest of my flight explode right in the middle of the MT on the road. And noticed also that there was a second convoy just a little further down the road, which I could have attacked instead of my better-protected dugout. By now down to about three thousand feet, I turned for home, slowing down to allow my flight to close up, all the while unmolested by enemy AA fire. I must admit that in my anxiety to locate and clobber something worthwhile, I had neglected to keep a good lookout in the air around us. But there was no sign of any Hun aircraft. Perhaps 'A' Flight, somewhere up above and out of sight, had kept the Fokkers at bay, today. Thereafter, it was an uneventful flight back to Merville, this time with the assistance of autopilot and time compression, until the last few miles. Our airfield's proximity to the River Lys made finding it easy and we soon slipped gracefully down towards our base. Making my own landing ahead of the others, I swept across the path of a local freight train, put her down and ran up to the sheds, where I switched off and relaxed again. Job done! Here's the main and secondary debriefing screens, showing the level of detail you can get on how your mission went. Overall, not a bad day's work for 'B' Flight, although my own bombs would evidently have been better reserved for the enemy motor transport. This was a fairly quiet mission but then, that's typical of the real missions recounted by Grinnel-Milne, flown when the air-to-air war was just taking a more deadly turn. Many simmers will have had their interests inspired by the books they've read and I'm no exception. 'Wind in the Wires' is a great account of one man's WW1 air war and Wings Over Flanders Fields is a great way of bringing it to life. Both are highly recommended! Mark 'Polovski' Rogers of ODB Software answers some likely 'readers questions'... - can you tell us anything about the work that went into WOFF, that's relevant to this particular mission? Not just the BE2c but across the board, all squadrons were revised to more accurately reflect the real squadrons duties at the time. It should apply to most squadrons and craft types. A vast amount of the development time on WOFF was due to the work and testing of the AI that went on. Included in the large feature list for WW1, we also wanted the AI pilots to have human like traits and qualities. One of those was a realistic formation keeping capability, including the problems of keeping up in turns, meeting up with Escorts, going to mission, and return, and rejoining sometimes after a mission. Obviously there are many things that humans do without even thinking but actually defining that in terms of an artificial intelligence is a massive undertaking. We also wanted to include faults and mistakes this adds to the human-like behaviours. Obviously we can always improve areas but we believe it's one of the best AI's out there in many areas. - any pointers as to what the Fokker Scourge or skins packs include, which would enhance the experience? The Fokker Scourge Expansion of course adds two more Eindecker types, and more squadrons using them to the appropriate theatres. Although the BE2c 'early' version is included in WOFF, it's only flyable in the Fokker Scourge add-on. The introduction of the flyable BE2c 'early,' was to allow the player to experience the earlier period fear of pilots and observers at that time of the Scourge trying to defend with just a rifle and to feel the threat more. - any plans for the future that may impact here?. We are of course hoping to add more craft across all periods so if we get good support we will of course be adding more early craft too. We hope to improve the BE2c model slightly too at some point (no promises but if time etc allows). The competition Fuller details of the competition, including the prize, will be announced soon. Current plans are that it will be a word search from this series of reports, which when combined will produce a famous air fighting maxim...watch this space! Coming next in CombatAce-WW1 - 'Sagittarius Rising' by Cecil Lewis
- 3 replies
-
- 2
-

-
- woff
- wind in the wires
- (and 1 more)
-
PS - as of Patch 1.24, the WOFF 3d models for the BE2c and BE2c 'early' have been improved, now featuring corrected rigging and other changes, resulting in a significantly more accurate appearance for this important type:
-
JSGME enable mod for custom UI.XML file for WOFF
33LIMA replied to rjw's topic in WOFF UE/PE - General Discussion
Thanks Robert. If I read this right, I see you changed the dot mode only label colour to red (for enemies anyway). Did you discover a method to change it (back to) black or to dark grey? I'd prefer this as (i) it's likely less visible when seen thru your own airframe (ii) I don't mind the dots being hard to see against the ground, but for realistic appearance and better visibility, I would much prefer to see the dots dark (dark grey or even 'back to black') against the sky. -
Does AnKor's mod work on OFF?
33LIMA replied to UK_Widowmaker's topic in WOFF UE/PE - General Discussion
For some reason it didn't work in OFF for me either, at first, with exactly the same symptom, despite reports at Sim Outhouse that it worked with OFF and stock CFS3. But I had to replace my graphics card - a GTS 250 for an 8800GT - and then it worked. Apparently you need to re-run CFS3.config and reset the screen resolution even if it looks right. Maybe also delete any driver profile for the OFF CFS3.exe in case there's some incompatibility somewhere that's not universal. But despite the GTS 250 being apparently from the same family as the 8800GT/9800GT and not updating drivers with the graphics card change, the mod now works fine in OFF and cFS3, where before it worked for me only in WOFF. Some weirdness at work, there. -
A Luftwaffe Messerschmitt Bf110 Campaign in the ultimate CFS3 expansion CFS3 - so far anyway - marks a controversial end to the Microsoft Combat Flight Simulator series. In returning from CFS2's Pacific to the European Theatre of Operations, CFS3 had many new features. On the positive side, there was a modest but intriguing range of flyable aircraft, including the 'usual suspects' like the Spitfire, FW190 and P-51 but also medium bombers like the Ju-88 and B-25 Mitchell and some late-war prototypes like the Dornier 335 'push-pull' heavy fighter and the P-80 and Vampire jets. There were 'autogen' scenery objects to populate the terrain; and most of the ETO was covered, in a single 'map'. Less positively, graphics were questionable, with many rather poor cockpits and odd, mostly unrealistic coloured bands and other markings the player could apply to personalise his flight. Wingman commands were still the same limited set from CFS2, with no ground control interaction, a major gap. AI, damage models and flight models were dubious. Wingman radio traffic sounded canned and cheesy. And while there was a dynamic campaign at last, it was a rather odd beast, a sort of parallel universe 1942-45 ETO where the Germans could have invaded England and their shipping plied the English Channel in daylight. But at least CFS3 covered the ETO, and while the air-to-air experience wasn't great (and completely left out battles with the heavy bombers) it made a passable job of simulating its declared subject: tactical fighter-bomber and medium bomber operations in the latter part of WW2 in Europe. For those of us whose fancy wasn't really caught by the Eastern Front, it was worth playing. Especially as the modders got to work, with groups like the Ground Crew and the AVHistory team developing many new planes. Commercial add-ons helped too; Firepower was widely praised, my other favourites being D-Day and Just Flight's Memphis Belle. Nowadays, much of the modder's good work on CFS3 is available as a great package, under the title of the ETO Expansion. Others are still around, including Mediterranean Air War (MAW) and a Pacific Expansion. This mission report features the ETO expansion, which adds a real host of aircraft starting with those from the Spanish Civil War, along with much-improved airbases, scenery, ground and aircraft textures, period menu music and improved effects. Details of the package and download links are available here: http://www.mrjmaint.com/CFS3/ETOHome.html Installation is fairly complicated and involves creating a second CFS3 install; but there is an excellent .pdf guide which takes you through the process step by step and is pretty foolproof if followed. The job's well worth while; it's still CFS3 at its core but on the outside, it's pretty well a whole new animal - CFS3, Jim, but not as we know it. One of ETO Expansion's features is the addition of extra campaigns. You can now start your World War 2 in 1940, either during the 'Phoney War' when the two sides faced off at the Franco-German border immediately after the Polish Campaign; or as I chose, in the Blitzkrieg, when in May 1940 the Germans attacked in the West in one of the most successful and decisive campaigns of the war. Having run the front-end ETO Expansion process which sets up the sim's spawns for this earlier period, I used the ETO Start 'selector' desktop proggie to choose the 1940 era. Pilot and campaign creation was next; both done in conventional CFS3 style. I chose to fly as a Luftwaffe fighter pilot. Unlike European Air War, CFS3 doesn't make it easy for you to fly your plane of choice. You select the role - fighter or bomber - and CFS3 picks the unit and the aircraft. There is a facility to transfer or change planes but it's limited. For this mission, I was allocated to a 'Zerstoerer' (destroyer) unit - as the Luftwaffe called its heavy fighters. Flying the sleek twin-engined Messerschmitt Bf110 and also known as 'Goering's Ironsides', these units were something of an elite. Disillusionment was to follow, when the Battle of Britain ruthlessly spotlighted the limitations of such aircraft in an environment dominated by more agile single-engined fighters. But that was all in the future. This was May 1940, and my Gruppe was about to play its part in the great Blitzkrieg in the west which, in a few weeks, would bring France to her knees and Britain to the verge of defeat. ...to be continued!
-
PS - CFS3 ETO Expansion now looks even better, thanks to Ankor's DX9 mod, which adds dynamic self-shadowing to aircraft and reflective water textures and works with conventional or modded CFS3 installations, as well as OFF and WOFF: ...and the Bf 110 featured in this mission report, in the latest (July 2016) version of Ankor's mod - no more fishe-eye lens external view: Available here.
- 9 replies
-
- 1
-
-
- cfs3
- eto expansion
- (and 1 more)
-
Does AnKor's mod work on OFF?
33LIMA replied to UK_Widowmaker's topic in WOFF UE/PE - General Discussion
Works fine for me too, and in CFS3 ETO expansion; -
Flying the famous Fokker D VII in another WOFF campaign mission inspired by a World War One classic! The man and the book I believe Rudolph Stark's 'Wings of War' was first published, in English at any rate, in 1933. It was translated by Claude W Sykes, described by Norman Franks as 'among the better aviation writers of the period' in his introduction to a recent reprint of Sykes's 'German War Birds', written under the pen-name 'Vigilant' and one of my favourite WW1 air war books from my younger days. 'Wings of War' starts during 1917 with Stark a two-seater pilot, yearning to transfer to single-seater 'scouts', as fighters were commonly called in those days. His transfer comes through and he receives his fighter pilot training at Jastaschule 2 at Saultain, near Valenciennes in occupied France. There's little said about this period; he completes his training just before Christmas 1917 and the book really begins with his posting to the Bavarian Jasta 34 at Chenois, flying against the French, not far from where his two-seater unit was based. Stark flies a sleek Pfalz D III, his lilac personal colours being painted on top of the type's distinctive silver-doped factory finish. His first air combat in single-seaters is nearly his last. With two others, they attack a twin-engined Caudron but a French fighter loops onto Stark's tail and riddles his Pfalz, holing the petrol tank. Stark is lucky to escape after an involuntary spin earthwards. Racing for home, seemingly pursued by further gunfire, he lands to realise the rattling behind him is his seat-belt buckle flapping against the fuselage, the belt having been parted by a French bullet. In March 1918, Jasta 34 moves north, to Le Cateau, to participate in the German spring offensive against the British. This was designed to win a decisive victory on the Western front, using troops freed up by the collapse of Imperial Russia and the truce with the Soviets, before the arrival of substantial US forces in France swung the balance of forces irreversibly against Imperial Germany. The fighing is intense and Stark, still apparently flying the Pfalz, claims his first victory in late March, a British two-seater. In May, Stark is made temporary leader of Jasta 77, based at the same airfield, and in June, he is appointed to command another Bavarian jagdstaffel, Jasta 35, in the Cambrai area. By August, their attacks having stalled, the Germans are facing a British counter-offensive and Jasta 35 is pleased to receive its first Fokker D VIIs, as replacements for some some of its older aircraft. Supplies of the superb new German fighter are limited, though, and in September, the staffel is compelled to accept instead some more machines from Bavarian manufacturers, the Pfalz D XII, to the disappointment of those pilots who don't get Fokkers. It is all to no avail. Driven back on the ground and outnumbered in the air, the Germans are clearly losing the war. Falling back as the front is pushed east, Jasta 34 fights on, to the Armistice in November, bombed on the ground and harried in the skies above. While Stark's book covers just the last year of the war, he had an interesting and eventful time of it, flying in combat the Fokker Dr I triplane as well as the Fokker D VII and the Pfalz D III. His combat memoir is a vivid one with rather more detail on places, units and planes than you tend to get in a wartime account. In fact, most printed descriptions of the Pfalz D XII rely heavily on Stark's quoted views of the type. 'Wings of War' (mine is the 1973 Arms & Armour Press edition) also benefits from the inclusion amongst its illustrations of reproductions of several of the author's own paintings, depicting some of his fights in the air. Highly recommended. The air war in autumn 1918 By this point in the war, German fortunes were in terminal decline. In an effort to contest the increasing numerical and technical superiority of enemy fighters such as the SPAD XIII, the Camel, the SE5a and the newer Dolphin, the Germans had, in early and mid-1918, held competitive trials for fighter prototypes from many manufacturers, with frontline pilots participating in the evaluations. Anthony Fokker's entry to the trials was his company's V11, which, with a fuselage lengthened to solve initial handling problems, was the star of the show in the early trials. It was ordered into production as the Fokker D VII, regarded by many as the best German fighter of the war and a worthy match for anything in the enemy camp, with its responsive controls and relatively viceless handling. But many units had to soldier on with obsolescent Albatros and Pfalz scouts, against stronger enemy air arms which now included the RAF's 'Independent Force' carrying out 'strategic' day and night bombing and the first units of the United States Army Air Service, flying first the elegant Nieuport 28 but by the end of the summer, transitioning to the often-unreliable but sturdier SPAD XIII. The mission Here's my pilot for this campaign mission, evidently a family member of the author! I've started him off in September 1918, because this is the month from which the unit, in WOFF, is fully equipped with the plane I wanted to fly, the Fokker DVII. Previously, the staffel was said by Rudolph Stark to be flying a mix of the Allbatros DV, the Pfalz D III and (tho not featured in WOFF) unspecified Rolands. And here's Jasta 35's line-up for the campaign. I'm starting off in the second flight, with myself and two other pilots. The author himself is in the first flight. As their designation indicates, our Fokkers are made under licence by the Ostdeutsche Albatros Werke (OAW). Despite the late stage of the war, we seem to have plenty of both aircraft and pilots. At this point, we're based at Lieu St. Amand, just north of Cambrai, in Flanders. Here's our briefing for the first mission. The full staffel is turning out to protect a pair of Hannover CL IIIs on a medium-level reconnaisance mission, down to the sourh-west, to an objective just the far side of the trench lines. The first flight is described as flying top cover so I'll be taking on the role of close (or closer) escort for the two-seaters. Here we are, both flights lined up on the airfield and good to go. In the briefing stage, you have the opportunity to pick a 'skin' for your plane and here, from those available, I'd chosen that of Xaver Prey. I'm not sure if this skin comes with WOFF or OFF - I've experimentally copied over the skins from OFF to WOFF using Jonesoft's mod enabler pending purchase of the official WOFF skin pack. Anyhow, you can see from the line-up that there are variations in the 'lozenge' fabric covering of our machines, as there were in real life, but we all carry the Jasta 35b unit colours of a white chevron on the top of the upper wing and a black chevron underneath the lower one. My individual marking comprises the black and white bands you can see behind my cockpit, Rudolph Stark's machine had a lilac nose and fuselage band and a black-edged lilac tailplane. Off we went, into the clear blue September skies. This was my first campaign mission in WOFF during this late period of the war. Flying for the side which was just two months away from collapse, I was more than a little anxious as to what the next hour or so would bring. With good reason, as it turned out! ...to be continued!
-
Decisions, decisions! I was soon joined by my two flight-mates, in the 'vee' formation I had selected in the 'loadout' screen'. I opened her wide and we began the climb towards the rendez-vous point with the two reconnaisance machines. Before too long, I was relieved to see them ahead. Hannovers are not the fastest of aeroplanes and I was able to overhaul them while still climbing. Soon, I was closing on them steadily, from above and behind. At that point, I noticed a cluster of dark specks appear in the sky, about half right and slightly higher, some way off. As I watched, I realised these were German flak bursts. This didn't look good. If their targets were fighters, they were clearly a potential threat to my charges. I continued to shadow the Hannovers, but began a new climb, so as not to be caught at a height disadvantage by the incoming enemy aircraft, whoever they might be. The cluster of flak bursts was slowly drifting left to right, and I was hopeful that they would eventually pass well astern. At this point, however, the Hannovers well and truly put the proverbial cat amongst the pigeons. They began a steady 180 degree turn to the right, taking them back in the direction of the unseen enemy flight which was the target of that AA fire. I shook my head at their foolishness, then began a turn after them, easing off my rate of climb. The flak seemed to slacken off for a while but then broke out afresh. now slightly right and low....and much closer. I still could not see the targets, even against the clear blue sky, but they were now so close that a clash appeared imminent. As I turned into the patch of sky just ahead and above the flak bursts, it disgorged a shower of aircraft - five or six. Sopwih Camels, from the straight upper wing and dihedral on the lower one. Their formation burst like a starshelll and they came at us from several directions. I picked out the nearest and issued a hasty command to attack, even as I attempted a rapid turn to get around and onto the tail of my chosen Camel as he flashed past behind us. My intended target was hard on the heels of one of my flight. All the more reason to get after him! But in my haste, I tried to turn too tighttly while still climbing and I spun out. I should have put the nose down or at least levelled off, as I turned. I lost ground, but recovered quickly from the spin and was soon after the Camel again. He, too had lost height ,in pursuit of my comrade who was turning desperately to get away. I got in a good burst, which seemed to cause the Camel to stagger then spin, down and out of the fight. I cleared my tail and turned to stay above him, watching to see if he recovered. He did. By this time, I was well below the rest of the fight. Now, I had a decision to make. Should I climb up to rejoin the main battle? Or was it better to go after the Englishman down below, in the hope of getting the first victory of my career with Jasta 35? In retrospect the right answer was to climb up and rejoin the fight. I had saved a flight-mate and driven a Camel down from the battle, so evening the odds. By rejoining my comrades above I could have helped them defeat the remaining Englishmen. But I had lost sight of the others, and was reluctant to leave the one opponent I could see. So I dived down after the Camel, noticing that he was now flying straight and level for home. I was soon on his tail. A quick look around me revealed nothing. The Camel turned right as my first burst seemed to go straight into him. I also turned right, managing to keep pace with the likely-damaged or wounded enemy, despite the rotary-engined Camel's reputation for a right turn that few other aircraft could follow. Suddenly, a burst of MG fire whacked into me from somewhere unseen. Blood spattered my goggles...my blood. Cursing my stupidity at being caught thus, I broke hard, but my machine answered the controls only sluggishly. The reason wasn't hard to see. My lower left wingtip was in tatters. My attacker was the Camel which you can see on the right of the screenie below. By the look of it, he'd clobbered me with a deflection shot from somewhere ahead but out of sight. As I fought for control of my damaged Fokker, out of the corner of my eye I saw an impact in a field to my right. It was some consolation that the Camel I had attacked had crashed - you can see the grey burst of smoke from this to the lower left of the picture. But it looked like I would be the next man down. Even as the last of the German flak bursts aimed at the Camel I'd shot down faded, I banked around towards what I hoped was a suitable field for a forced landing. Somehow I managed to keep my wings level, plonked my Fokker down onto the grass and switched off the motor. By some miracle, she didn't roll over or cartwheel to destruction. To my right as I trundled to a halt, my victim burned in a nearby field. Above, my conqueror wheeled around and then headed off towards the Lines and home. As it happened, he was from No. 4 Squadron, Australian Flying Corps, so at least I'd been shot down by a pilot from a pretty illustrious unit, famous not least for an air fight the following month when, greatly outnumbered but flying the new Sopwith Snipe (also featured in WOFF) they reportedly claimed ten Fokkers downed for just one loss. And that was the end of my mission. It was in fact also the end of my career. The debrief - despite permitting me to make out a claim for my victory, which I did - informed me that I had died of my injuries. There are many cases on record of a badly-injured pilot making a forced landing but not recovering from their wounds, so while disappointing, this was not unusual. As so many likely did, I paid a high price for making a bad decision, in this case, going after a Camel who was out of the fight instead of rejoining my comrades. Nevertheless, the mission was a telling and convincing recreation of the battles depicted by Rudolph Stark in 'Wings of War', brought back to life in Wings Over Flanders Fields, whose superb single-player campaign system and great new AI and visuals make it so very well suited to such endeavours. That completes this particular series of mission reports, though others like them will doubtless follow. I hope you enjoyed reading the reports as much as I enjoyed flying the missions, however they ended! For now, keep your eyes open for the announcement for the CombatAce Wings Over Flanders Fields competition, which will be posted by Skyviper soon. Good hunting...or should I say, hals und beinbruch!
-
Bringing Arthur Gould Lee's classic WW1 book to life with Wings Over Flanders Fields! The man and the book 'Thursday, January 3rd. Ferrie has been killed. He led his patrol out this afternoon, had a scrap, came back leading the others, then as they were flying along quite normally in formation, his right wing suddenly folded back, then the other, and the wreck plunged vertically down. A bullet must have gone through the main spar during the fight. The others went after him and steered close to him in vertical dives. They could see him, struggling to get clear of his harness, then half standing up. They said it was horrible to watch him trying to decide whether to jump. He didn't, and the machine and he were smashed to nothingness. I can't believe it. Little Ferrie, with his cheerful grin, one of the finest chaps in the squadron. God, imagine his last moments, seeing the ground rushing up at him, knowing he was a dead man, unable to move, unable to do anything but wait for it. A parachute could have saved him...' So wrote Arthur Gould Lee in 'No Parachute'. Lee learns to fly in the late summer of 1916 in the Maurice Farman 'Shorthorn', having been commissioned into the Sherwood Forresters. He misses being shipped to Gallipoli due to a motorcycle accident, then has his (third!) application to transfer to the Royal Flying Corps accepted. He then flies the Avro 504 and BE2 with 66 Squadron, still in England. Lacking proper instruction, he crashes an Avro after an engine failure. His injuries delay his posting to an operational squadron in France until May 1917, enabling him to gain more flying hours, including eighteen on the Sopwith Pup he will fly for most of his spell at the front. His posting is to No.46 Squadron at la Gorgue, which has just transitioned to the Pup from the obsolescent two-seater Nieuport 12. He flies through the summer and into the autumn, fighting many battles against the formidable Albatros V-strutters, with which the Pup can compete only at higher altitudes, outgunned with what Lee describes as 'our pop-pop-pop gun' against the German's twin Spandaus, which by contrast he describes as making a sound like calico being ripped. During November, the squadron is finally re-equipped with the Sopwith Camel. Although the pilots are looking forward to flying their offensive patrols with an aircraft that will enable them to meet the Albatros on more equal terms, they are instead diverted to 'ground strafing' duties for the Battle of Cambrai, making very dangerous low level gun and bomb attacks on German troops and positions in and near the front lines. Lee is shot down three times in nine days. In January 1918, with the rank of captain and the appointment of flight commander, he's posted home for a well-earned rest. After a period as an instructor, he joins a squadron equipping with the sopwith Salamander - a ground-attack version of the Snipe - but the war ends before he is deployed to France. Looking at his logbook at the conclusion of his combat service, he finds he's done 386 hours solo, 260 of them in France, including 222 over the Lines; he's made 118 patrols and ground-attack flights, had 56 air combats, and claims 5 victories and another 6 shared. Lee's book 'No Parachute' was published in 1968, but was written at the time, comprising extracts from the many he wrote to his wife, supplemented by some diary extracts. It's a veritable treasure-trove of accounts of air fights, ground attacks and squadron life (including the lyrics of many classic RFC songs) with many snippets of information about aircraft performance and markings of the sort that enthusiasts in particular love to see. Lee rose to senior rank in the RAF after the war and profited from his experience to add to the book appendices criticising the dominance of the Royal Aircraft Factory in aircraft supply, the RFC's persistence with deep patrols and standing patrols, and of course the failure to peffect and supply parachutes to aircrew. It's certainly my favourite WW1 aviation memoir. Lee followed it up with an equally good sequel, 'Open Cockpit', which covers his whole wartime career. Both are highly recommended. The mission This was originally planned to be a mission flying the Sopwith Pup in mid-1917. But that year was getting a bit crowded and to better illustrate the development of fighing aircraft, I decided instead to fly the Camel later in the year, and to finish this series of reports as planned with Rudolph Stark's 'Wings of War', but flying the famous Fokker D VII rather than the Pfalz D III. I enlisted in 'Forty Six' as Lt Richard Lee, starting in late november 1917, by which time WOFF has us entirely equipped with Camels. Here's the briefing for the first mission. We've been summoned to the front to deal with some reported aerial intruders. I'm leading 'B' flight with four Camels, whose pilots included Arthur Gould Lee himself. The second flight ('A' Flight, shown in the panel on the right below) includes Ferrie, the pilot whose sad and dramatic death is described in the excerpt from the book quouted at the start of this mission report. Air defence systems being rudemintary in WW1, I knew there was every prospect that the Huns reported over the front might well be gone by the time we got there, and so it was to prove. We started optimistically enough, roaring off the grass from our aerodrome at Filescamp Farm. I had chosen the skin for Victor Yeates, author of the famous 'Winged Victory', although I'm not sure he served with 'Forty Six' at this point in the war I turned for the target area, disregarding the planned dog-leg route so as to arrive faster; if this throws off 'A' flight, well, there were only two of them and that was a chance I was prepared to take. My own flight soon caught me up. I opened the throttle and began climbing hard to the south-east. I didn't trust the briefed mission height of under 4,000 feet and climbed to nearer nine thousand, reluctant to be jumped from above by marauding V-strutters and thinking that if the enemy were indeed low down, I would be able to pick them up from the whitish British anti-aircraft bursts they were more than likely to attract. So much for that plan! When I arrived over the trenches, dodging warily around the large clouds hanging in the sky, there was a lot of shelling going on down on the ground, but not a soul to be seen in the air, apart from our good selves. Up and down the front we flew, getting intermittently Archied for our troubles. But of the Hun fliers, we saw not a sign, high or low. It began to look like we would have to make our own entertainment. ...to be continued!
- 3 replies
-
- 2
-
-
- no parachute
- wings over flanders fields
- (and 1 more)
-
Airfield attack! I rolled into a strafing run on the Hun airfield, lining myself up with the front of a row of canvas hangars, where I judged it likely there would be some aircraft parked. But all I could see was two or three Albatros scouts. I picked the nearest of these, a red-nosed job, and gave him a burst, hosing the furthest aircraft rather inaccurately as I pulled up. It was in the final stages of my pass that I realised that a line of objects along the near edge of the airfield was a better target - a long row of mostly silver Pfalz scouts. By now, I was taking some return fire from ground MGs. But this was too tempting a target to leave untouched. So I pulled up and around, swinging over to the east, so as to make a firing pass from east to west, that would see me heading in the direction of friendly territory as I came out of my firing run. I was not going to make a third pass; no point in over-doing it. I swept in and over the line of enemy aircraft, hopefully getting some hits but without visible results. Most of my rounds ended up being fired at the last in line, a green and mauve machine which looked like a two-seater, likely the squadron hack. If nothing else, I'd thumbed my nose at an airfield full of Huns! Off I went, back to the Lines, feeling reasonably satisfied with my day's work. But another opportunity now presented itself. There, to my right, was another balloon. It was practically on my way home so I quickly decided that I would pay him a little visit, too. This time Archie was wide awake and black bursts appeared all around, but it didn't much help the balloon, which was soon going down in flames like the first one, just a few minutes earlier. Pursued noisily but ineffectively by Archie, I maintained my course westwards and was soon back in friendly territory. The flight back to Filescamp was uneventful and I landed without mishap. I was presented with a claim form and filled it in claiming two baloons destroyed. This was rejected out of hand, likely as I'd got one balloon but the other had been a victim of his own AA fire. A tad frustrating, but I knew I was responsible for the destruction of two balloons - one way or another - and for a rather daring solo raid on a Hun airfield, confirmations or no confirmations. As Bruno Stachel was told after his unconfirmed first kill, 'Then you have the deep satisfaction of knowing you have served the Fatherland.' Coming next in CombatAce-WW1 - 'Wings of War' by Rudolph Stark
- 3 replies
-
- 2
-
-
- no parachute
- wings over flanders fields
- (and 1 more)
-
The party begins! Up and down the Lines we trailed. I descended to about five thousand feet, thinking that perhaps I might spot some low-flying Huns underneath us, who'd been invisible from higher up. I even took a detour several miles into Hunland as far as Douai, where there was a cluster of German aerodromes, hoping I might well see some aerial activity in that vicinity, and maybe surprise some Huns forming up or going home. No such luck, just the same result - empty skies with no other aircraft to be seen, friend or foe. Except for the balloon. At the southernmost limit of one of my trips down the Lines, I had noticed a German observation ballloon, quite low down on the edges of the shelled area, near a town I judged to be Athies or Monchy. I decided that if I didn't meet any Huns on my next circuit, I'd have a crack at that balloon. One last time, I swept up and down the Lines with my Camels, anxiously watching the skies above as well as down below, now that we were at a lower level. But never a Hun did we see. The bombardment raged on below us, but the skies stayed clear, as we steered between massive banks of cloud all around. Heading south again, towards the balloon, out of boredom I blipped my engine a couple of times, cutting the ignition and powering up again when I released the switch. This was a bad idea. My flight decided I was having engine trouble and broke off to continue the patrol without me. I continued south. I had intended to release them anyway, before tackling the balloon, so now was as good a time as any. I searched for that balloon, my vision hampered by those large clouds which blocked out much of my view in all directions. Finally I saw him, about half right and lower down. I rolled over, throttled back slightly and dived onto him. The clouds seemed to have hampered the German gunners too, for I was unmolested by Archie. I took full advantage of this happy situation and as the range closed, I raked the balloon with my twin Vickers Guns, being careful to fire in short bursts to avoid stoppages. It all worked out rather nicely. But I wasn't done yet. In stalking the balloon, I had noticed a Hun airfield nearby, just outside the shelled area. I hadn't attacked the airfields on my little diversion to Douai as that would have meant losing all my altitude a good distance into Hunland. But I was now at low level and this German airfield was close enough to the Lines that I could quickly escape across into friendly terrirory, if things got too hot. If the Huns wouldn't come to me, I decided, well, I would just have to come to the Huns. And this lot would do nicely. ...to be continued!
-
From the album WOFF
-
From the album WOFF