

33LIMA
-
Posts
3,749 -
Joined
-
Last visited
-
Days Won
7
Content Type
Profiles
Forums
Gallery
Downloads
Store
Everything posted by 33LIMA
-
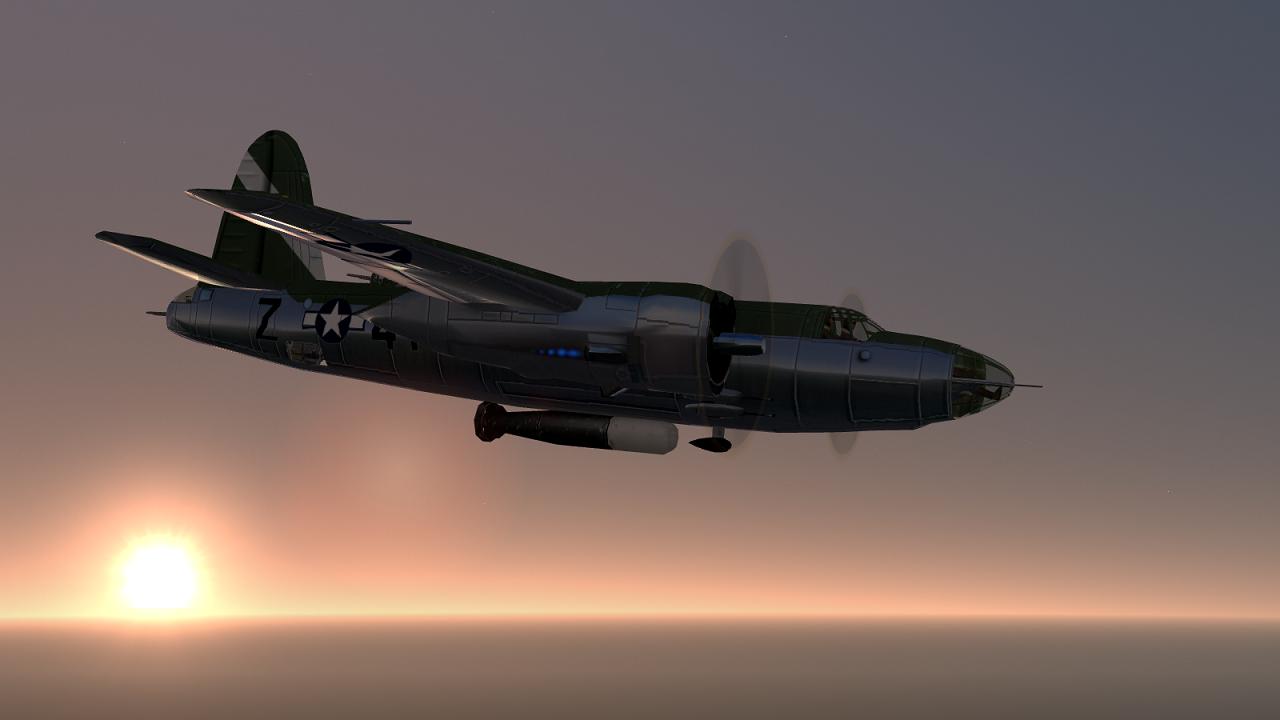
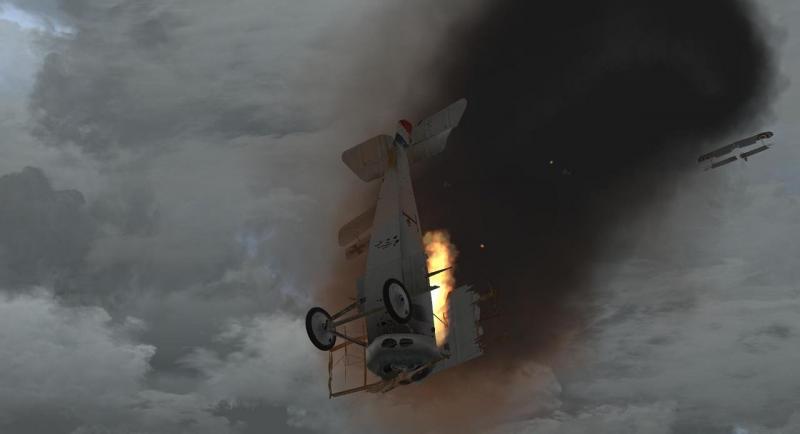
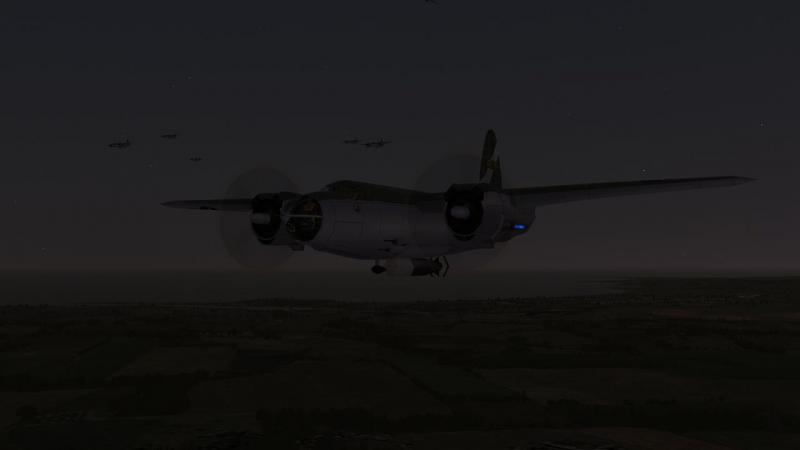
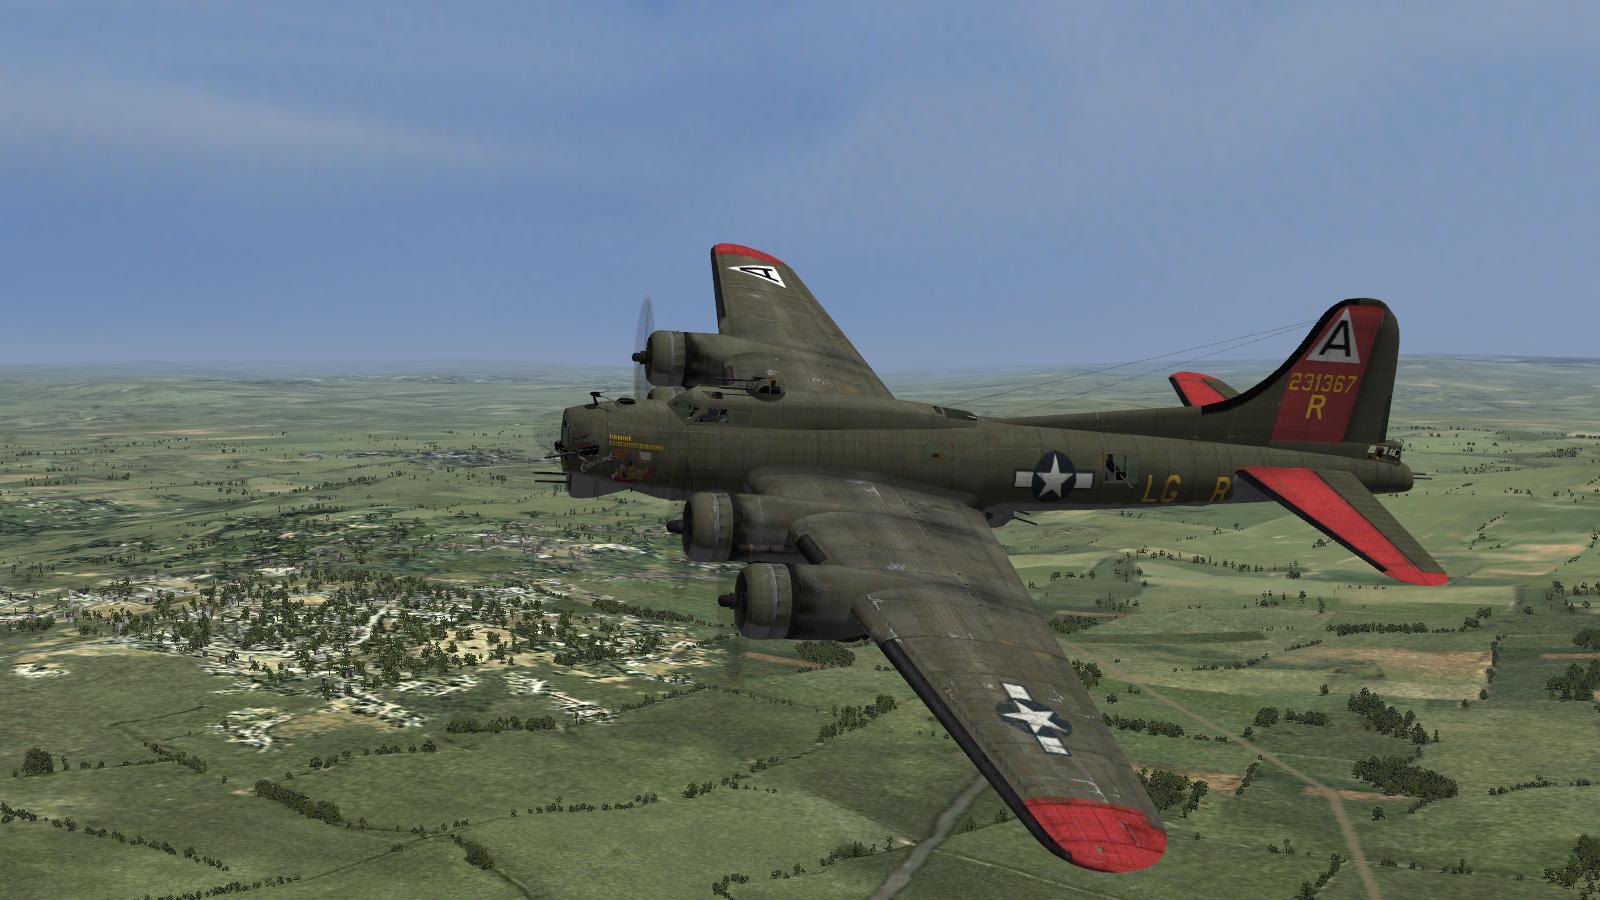
From the album: Combat Sims
-
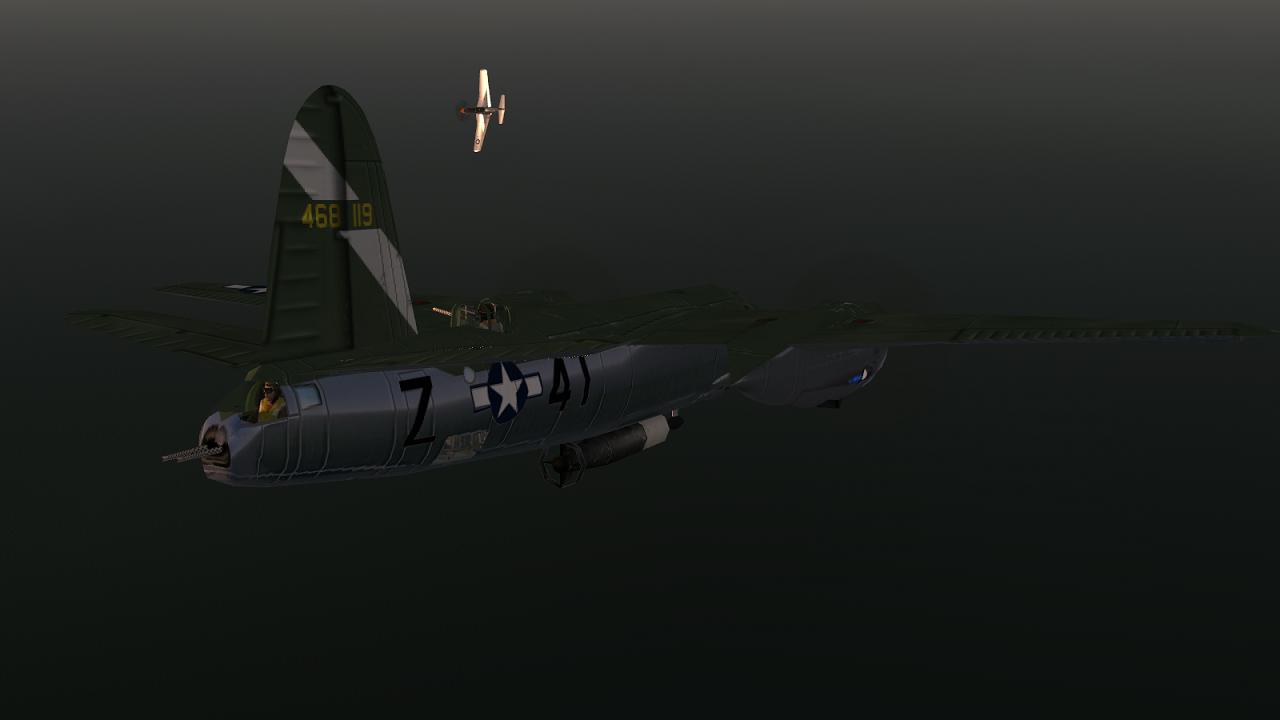
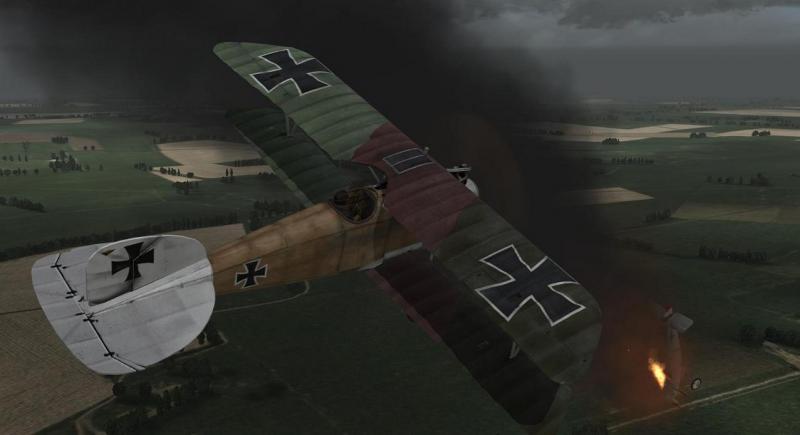
From the album: Combat Sims
-

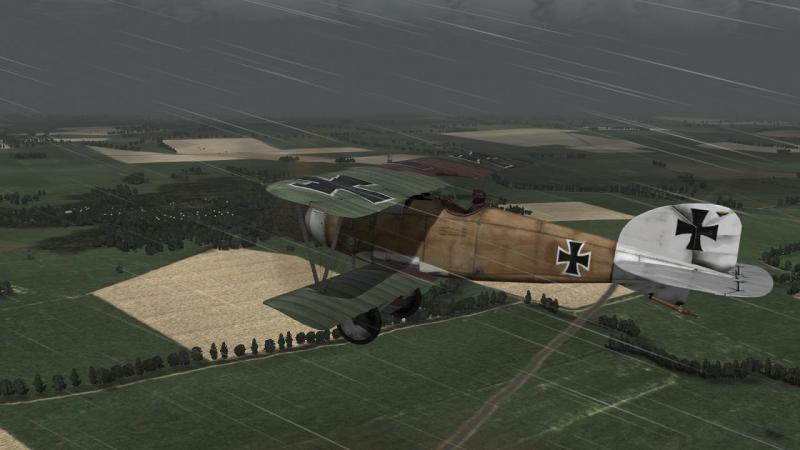
WOFF Screenshot of the Month, July - 'Meet the Fokkers!'
33LIMA replied to 33LIMA's topic in WOFF UE/PE - General Discussion
Next up, for August - V-strutters, so it's a soapbox racer and venetian blind-free zone (cue Olham). -
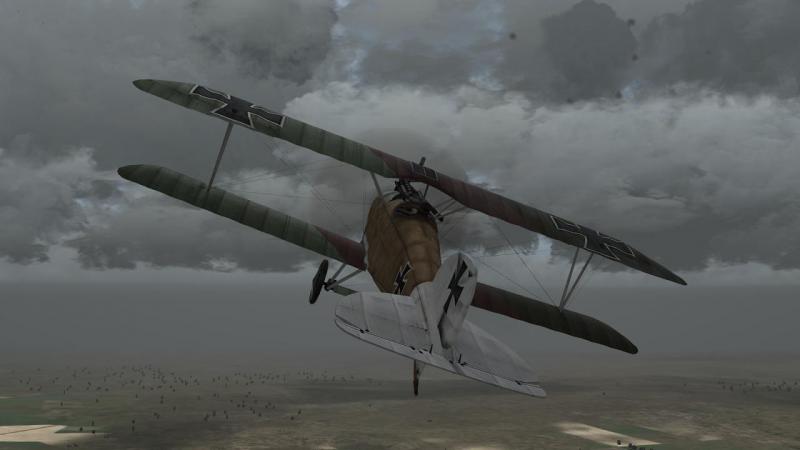
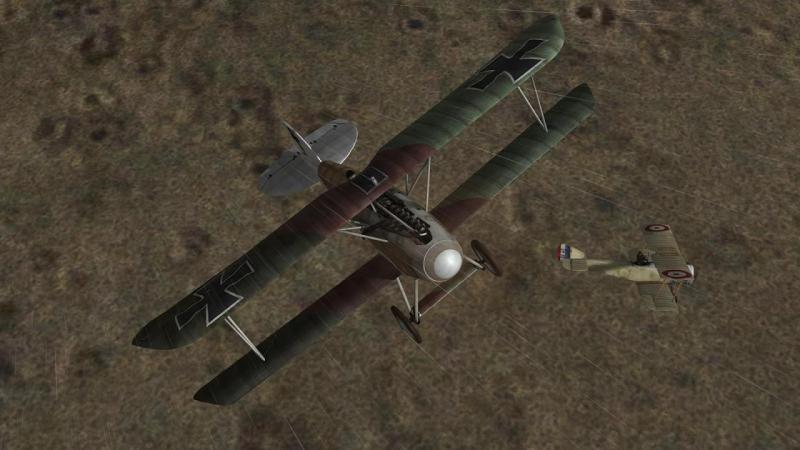
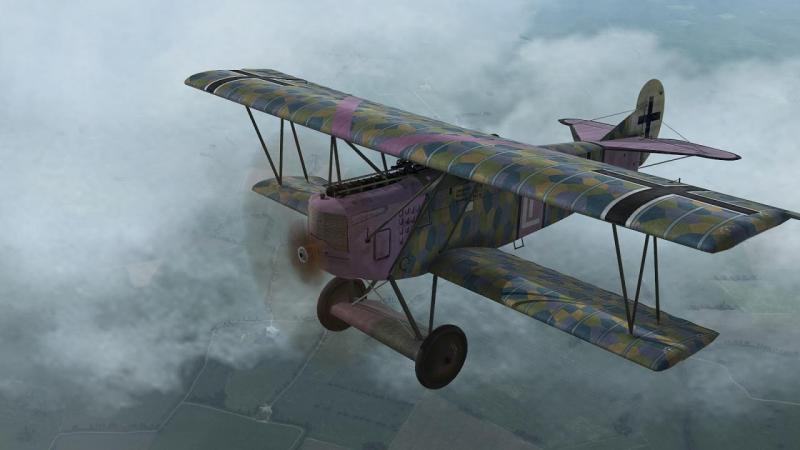
Not many people wanted to 'Meet the Fokkers' so how about pics of planes with V-shaped interplane struts, for August 2016? I reckon that's the Albatros D.III, D.V and the Nieuport 10, 12, 16, 17, 23, 24 and 27. To get started, here's a D.V of someone who sounds like he's on the wrong side, Olivier Beaulieu-Marconnay

-
Postscript – death of an ace One of WoFF’s many good features is the fact that you get to fly with or against historical aces, identified as such in your squadron and mission rosters, and in the labels which, if turned on, identify other aircraft and your target on the Tactical Display a.k.a. 'TAC'. These hot shots are generally indicated by the abbreviation ‘HA’; which should probably have been a reserved term, since it was used by the RFC for the first couple of years of WW1 to indicate 'Hostile Aircraft'. They later changed this to EA, 'Enemy Aircraft', reportedly because the staff people thought ‘hostile’ invested the enemy with too much of an air of danger, threat or suchlike. The WoFF aircraft labels and the TAC can be quite sophisticated; the former offers the option not only of identifying other aircraft inside your set range, but can even be set to tell you what they’re doing – eg fighting, or going home. I have my labels set to ‘dot mode’ rather than text, to ensure aircraft are visible at my chosen range of 6 Km; I rarely if ever cycle through the other label modes. So I can only confirm if I am up against an historical ace if I turn on the TAC and select him as a target, at which point the aircraft type and the ace’s name will display under the TAC display. As I was about to be reminded. The mission in question was on 5th April. Further north, in the British sector, the Battle of Arras was about to get under way. In Jasta Boelcke’s area of operations, we have been meeting a mix of enemies, but mostly French squadrons. So it was to be, on this day. Three of us were sent aloft to check out reports of enemy aircraft operating over the front, which likes a few miles west of our airfield at Proville, with another flight of four operating in loose support. I knew from the briefing that I had two aces as flight mates, Frommherz in his distinctive ‘blaue maus’ and Bernert with his black rear fuselage. At the flight line, thanks to the now-free WoFF skinpack, both of their Albatrosses carried the appropriate markings. No picture, I'm afraid - I wasn't planning on making a report of this mission, so screenshots are thinner on the ground than usual! Once our formation had formed up, I climbed out along the recommended heading on a leg away from the front to gain height – just below 9,000 feet was the briefed altitude. Then we turned south-west for the Lines. The other flight was still climbing, over to my left rear, and they gradually fell behind and out of view in the cloudy conditions. The first indication of trouble came when a glance behind showed Bernert was no longer in his place to my left rear. Scanning behind, I spotted him climbing hard to the left. Obviously he’d spotted something and broken formation to go for it. I turned on the TAC, but it showed no enemies and I decided against increasing its range beyond the 2,000 feet I had set. No amount of scanning revealed what it was Bernert had seen, nor any flak; likely the clouds concealed all. I should perhaps have turned back so as to keep my formation together, but I was irritated by Bernert’s indiscipline. So I maintained my course, but kept a wary eye to my left rear, lest we should be jumped. After a few minutes, Bernert returned to formation, and I throttled back to let him catch up. I’d have a quiet word with him after the flight, but for now, it was back to the business at hand. About half-way to our patrol zone, I spotted dark German flak bursts against the grey-white clouds, higher up and to our right front. I couldn’t make out their target but turned to climb directly towards whatever it was. What it was, was a single French Nieuport 17. The daring fellow was diving straight at us, and he seemed to be on his own. I targeted him (via tha TAC, which is needed to activate the ‘padlock’ view) and ordered him attacked. Not to be left out, I had a go at him myself, careful to avoid the others – I was well aware that the great ace for whom our jagdstaffel was named died in a mid-air collision with a friend, while they were both chasing the same foe and unaware they were on a fatally converging course. The Nieuport seemed well able to turn inside of me and I had I been minded to dogfight him, I would have had to use the vertical, to avoid him or mount an attack. As it was, up against three of us, he was quickly on the defensive. I stayed above him and rolled in for a few firing passes, breaking away after each, keeping my speed up, rather than being sucked in to a turning fight. Shortly, the Nieuport’s flight became erratic and he fell off into a sideslip, and then a spin, from which he recovered a few hundred feet from the ground. He sailed on a little further, before force landing heavily in a field, well on our side of the Lines. I knew that at least one of the others had had a crack at him but wasn’t concerned about who would be credited with the kill. As Boelcke himself said, it’s the staffel that must fight and win the battle, not the individuals. I climbed back up in a wide spiral, looking for the others. They had become well separated but were soon slipping back into formation, and I throttled back to let them close up. Suddenly, a silver wing sporting a red, white and blue roundel flashed close past ahead. More Nieuports, and this time they had caught us all napping! There were at least two, and now we had our hands full. I picked a target and just in case anyone hadn’t woken up, gave the order to attack; then I switched targets to a second enemy. It was at this point, with the ‘TAC’ turned on to padlock my target, that I saw that this Nieuport was flown by an historical ace, William Thaw of the Escadrille Lafayette, formerly the Escadrille Américaine. In fact I believe that Thaw hadn’t ‘made ace’ at this point (and only just did so, with four aircraft and a balloon). But I didn’t know that, at the time! I don’t think WoFF lets you cut short the careers of real aces, but here was my chance, if not to do that, then at least to avoid providing him with one of his victories! Perhaps it was all in my mind, but Thaw seemed to throw his little silver bird around the sky like the budding ace he was. To stay out of his way, I ended up pushing the nose hard down and rolling around into him, before pulling up again, airframe creaking with the strain. Several times this got him off my tail, at the cost each time of several hundred feet in precious altitude. During the last of these pull-ups I somehow managed to get my guns onto him before I had to push down again to avoid a stall. It was a hasty deflection shot, but it was enough. Pieces flew off the Nieuport. I recovered and looked around for him. There he was, wings level, running for home! My trusty Albatros had saved my bacon, First, her powerful Mercedes engine had enabled me to make the yo-yo manoeuvres that had kept me in the fight. Then her equally powerful two-gun armament had enabled me to put enough lead into the air to make the one shot I’d been able to take, count. In a lesser aircraft, I’d likely have been dead meat. All this time I’d been relying on my flight-mates to keep the other enemy or enemies occupied. Looking around, the sky now seemed empty – just me and Thaw. My first full-speed firing pass from dead astern hit him again, and sent the Nieuport into a turn to the left. I broke away hard and came in for another firing run. Then another, taking deflection shots at the turning machine, getting a few hits each time. I broke early, to keep my speed up and besides, no way was I going to risk ending my career in a collision. But on the last pass, getting impatient, I kept my guns onto him a little longer. The movement of my plane in the wind made it impossible to hold him rock-steady in my line of fire, so I was just snapping out bursts when the sight picture looked right. Just when a collision seemed inevitable, the Nieport’s wings came off and the fuselage, marked with the ‘T’ which identified its pilot, burst into flames, nosed straight down and fell like a blazing comet. This was one event I managed to grab a screenshot of - two screenshots, in fact! Got him! No doubt about that one. I cleared my tail with a full-power climbing spiral to the right. Below, Thaw smashed into the ground and a vertical column of dark smoke briefly marked the spot. No other aircraft, friend or foe, were to be seen. So what now? I decided I would cover the remaining distance to assigned patrol zone. Not much chance that the source of the reported enemy air activity was still there, but I might as well check it out, and finish with a bit of a lone wolf patrol. Climbing again to the south west, for the second time I saw dark flak bursts, up ahead. As I climbed after them, I could see that they were receding, heading roughly west. Perhaps it was one of the Nieuports, heading home after the last fight. I raced after whatever it was, but seemed to be making little headway; not surprising as he was well above me and I was in a climb. Then the flak stopped, and I realised I had reached the front lines. No point pushing my luck with a foray into enemy territory, I thought. Time to go home. I swung around to the east, but was suddenly startled by the sight of tracer smoke trails and the zip and thwack of rounds going close or hitting my machine. I banked hard and looked around. Nothing. Surely not ground fire, at this height? Crikey! A linen-coloured wing with a French roundel flashed past my nose and disappeared out of sight. Where the heck had he come from? And more to the point, where was he now? ‘He’ was a Sopwith ‘strutter’, an RFC two-seater also made in large numbers for French service. I quickly padlocked him and decided he was going to pay a hard price for so rudely catching me napping. But I quickly became aware that this was not going to be easy. The Frenchman wasn’t listed as an historical ace, but he flung his kite about the sky like a true professional. He seemed to be able to turn very tightly indeed; most of the time, he had little difficulty staying behind my ‘nine to three o’clock’ line, which was just where I didn’t want him. So I gave up trying to out-turn him and went vertical again. This reversed our relative positions and finally I was able to make some firing passes, deflection shots as he turned hard. I was very wary of return fire from his observer, but if any came my way, I didn’t see it. It may have helped, that I didn’t hold my position too long, but instead made a series of slashing attacks, extending away after each. My hits took their toll and the Sopwith came out of his turn and settled into a descent to the west. I waited for him to crash land, but he seemed to float along nicely and to be in no hurry to go down. I turned over him, reluctant to go down to ground level to finish him off. This was nearly my undoing. More rounds whacked into my Albatros, and this time it was ground fire. Panicked, I threw my machine around to the east. I was promptly hit again and wounded. I put my nose down and jinked for home, hardly noticing or caring that the Sopwith had at last dropped to the ground and rolled to a stop. Fortunately I was only just on the enemy side of the Lines and the ground fire soon died off. Soon I was back over our own trenches and checking my map for the nearest friendly airfield. Happily there was one just north of my track, not too far beyond the outer limits of the shelled area. My good old Mercedes once more earned its keep and didn’t miss a beat until I switched off once my wheels had trundled to a stop in front of the hangars. Eleven days in hospital was the price I paid for straying into the sights of ground MGs in my quest for the ‘strutter’. In return, I had two victory claims. Bernert had come to grief, his machine destroyed but the pilot just lightly injured like myself. Frommherz had fired some rounds, got a few hits but no victories, though he had made it back to Proville with no damage or injury. Not a bad day’s work. Granted, William Thaw will have miraculously survived his fiery plunge to earth but I’ve the satisfaction of besting him in single combat! Already, my thoughts are beginning to turn towards that ‘Blue Max’. With eight victories once my latest claims are confirmed, I can see in my minds eye the pretty gold and blue enamel cross hanging at my throat, and my portrait on the Sanke postcard celebrating my ace status…but I mustn’t get carried away. It’s dangerous out there, and today, it could so easily have been me, going down in that burning, wingless fuselage. But we’ll not think of that. In a few days, I’ll be out of hospital and back in my Albatros at the head of my flight, in (Wings over) Flanders Fields.
-
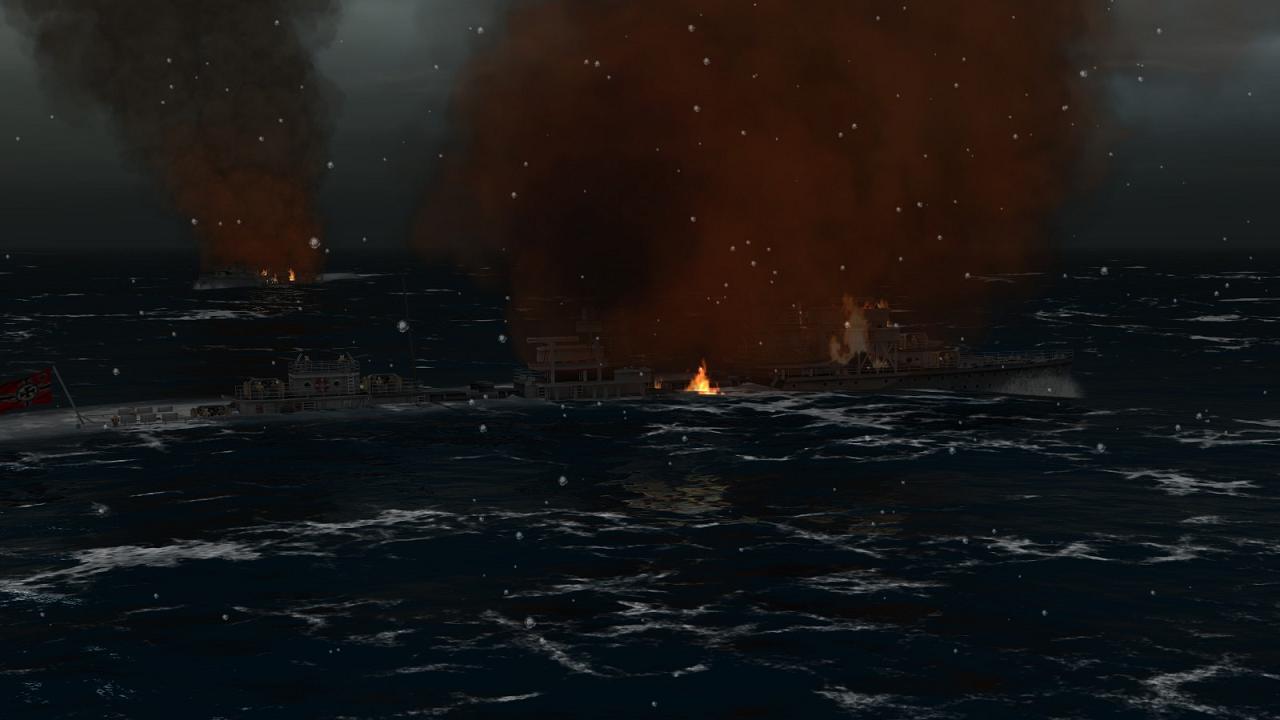
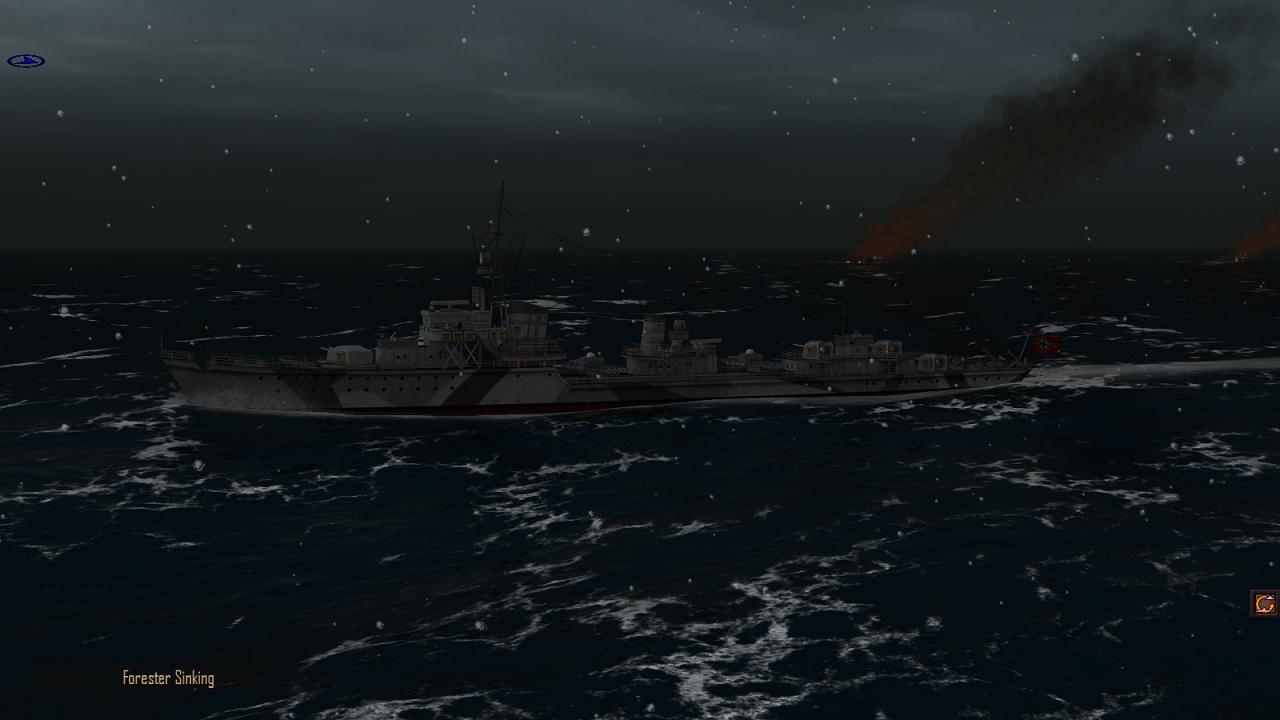
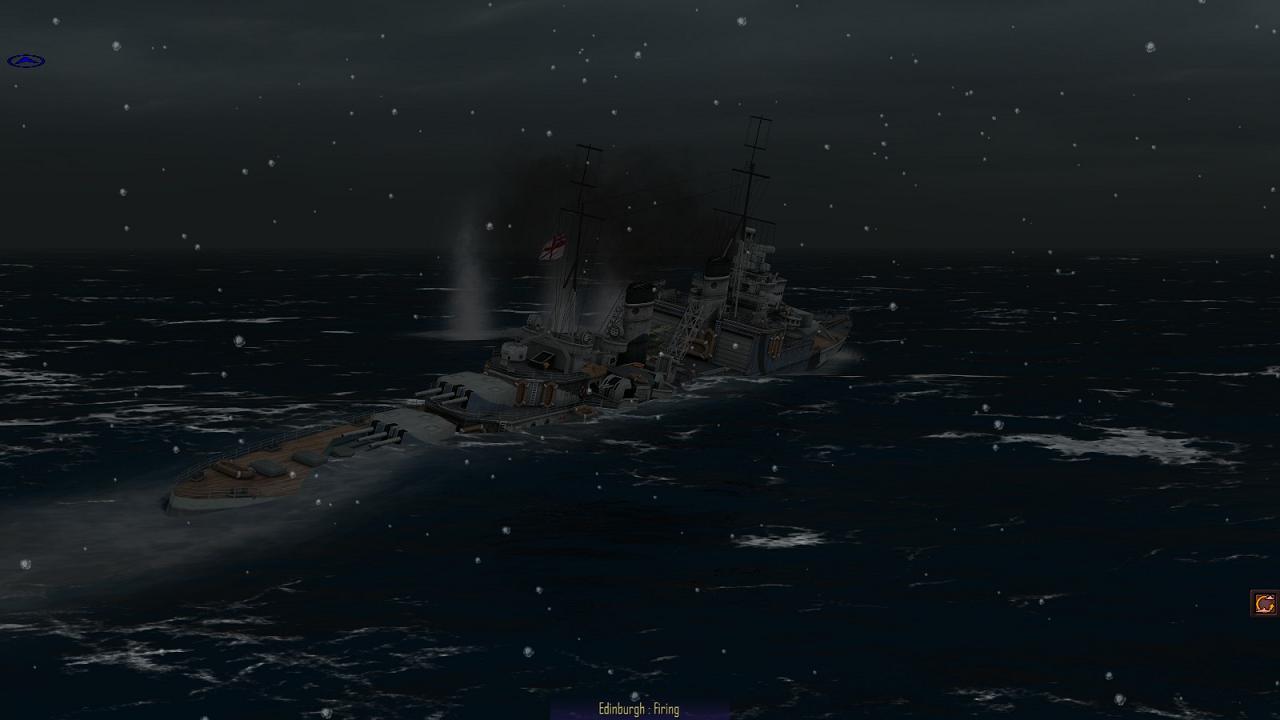
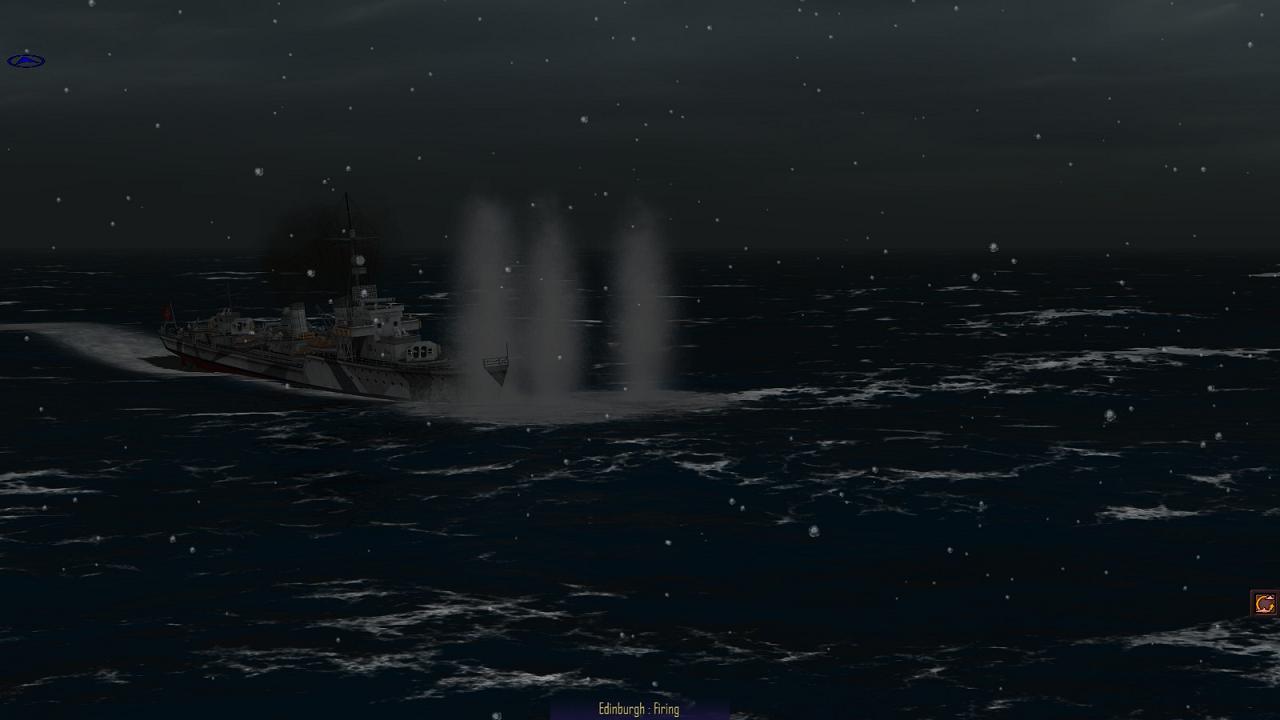
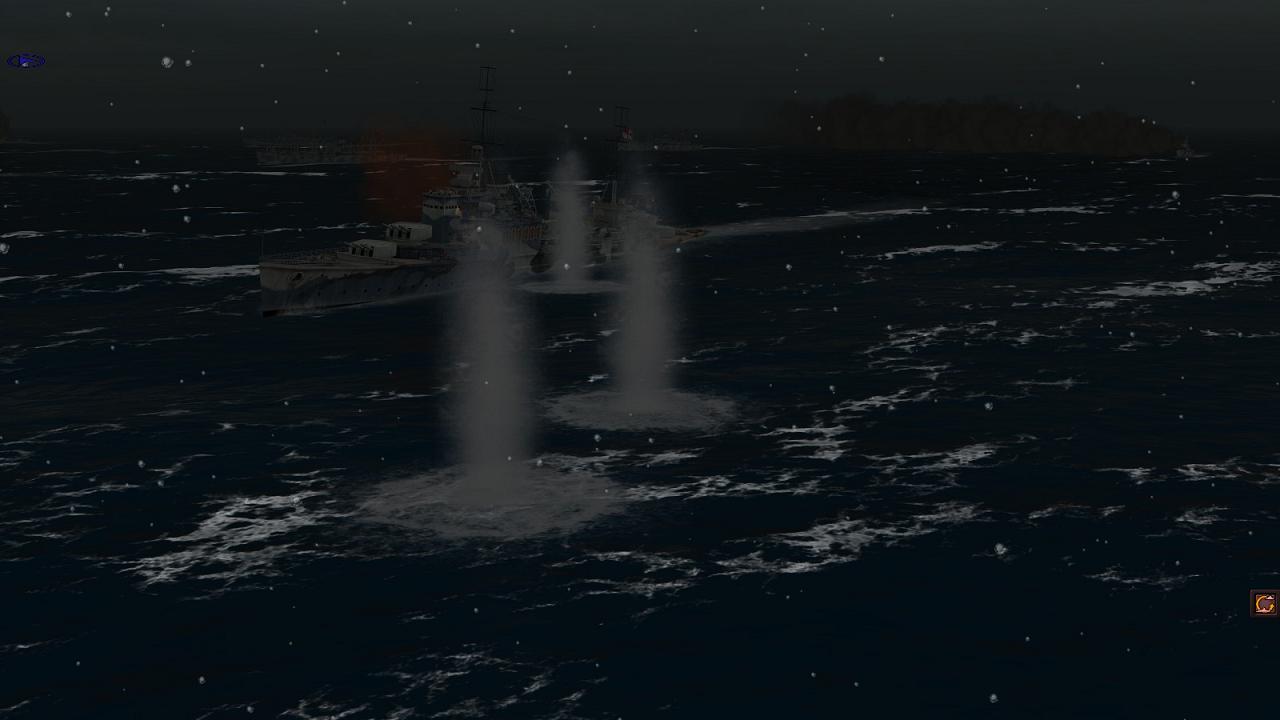
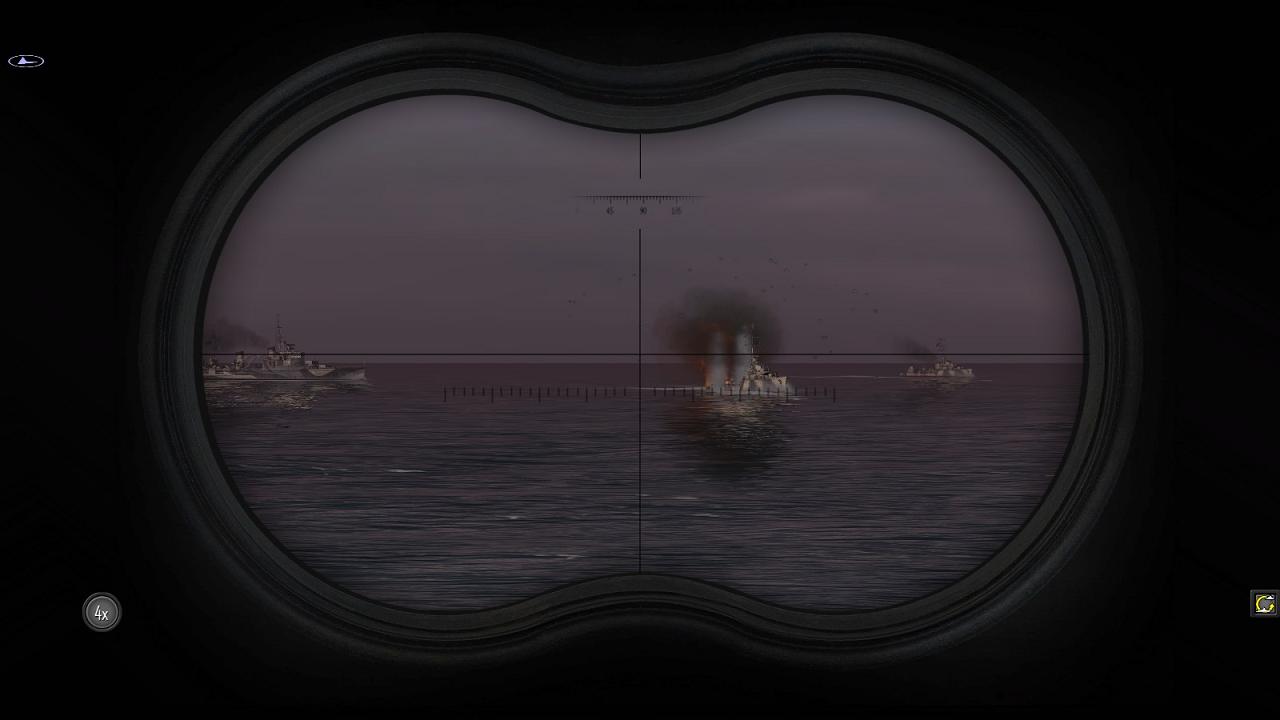
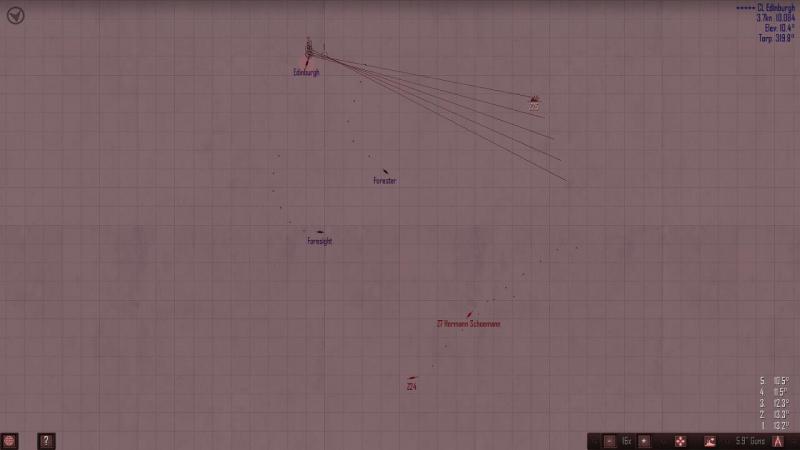
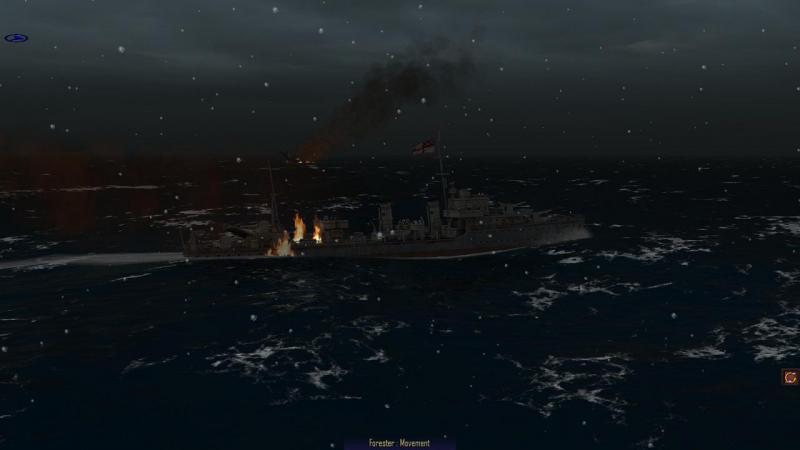
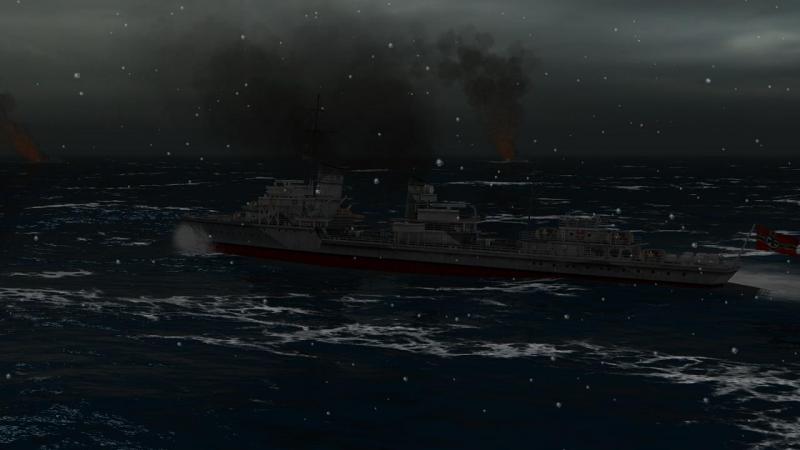
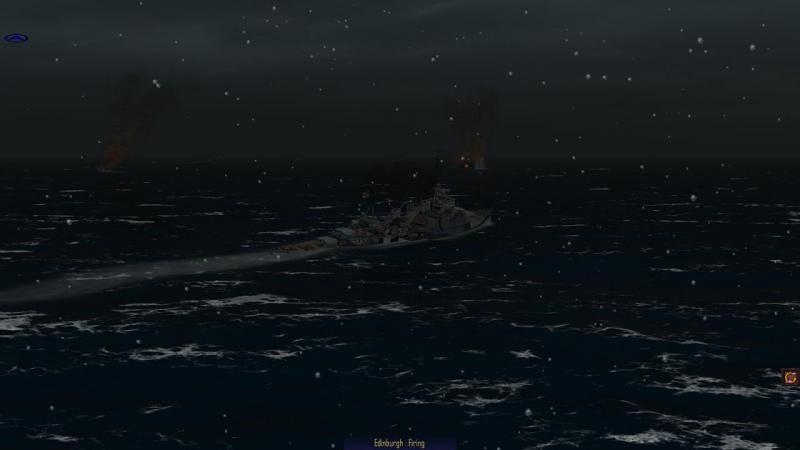
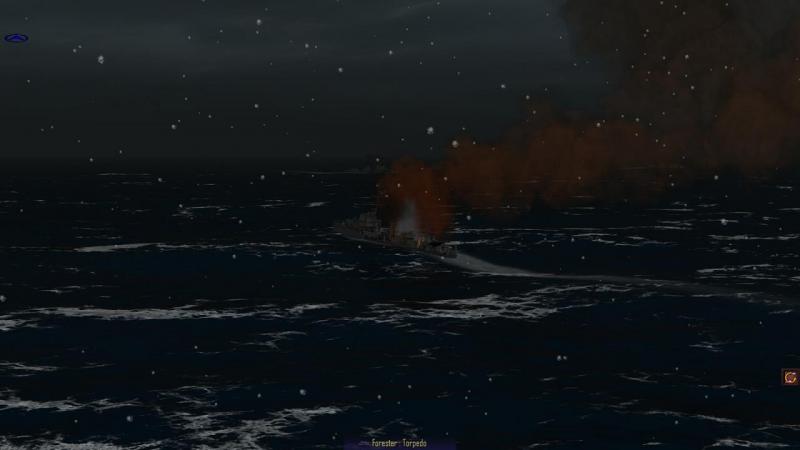
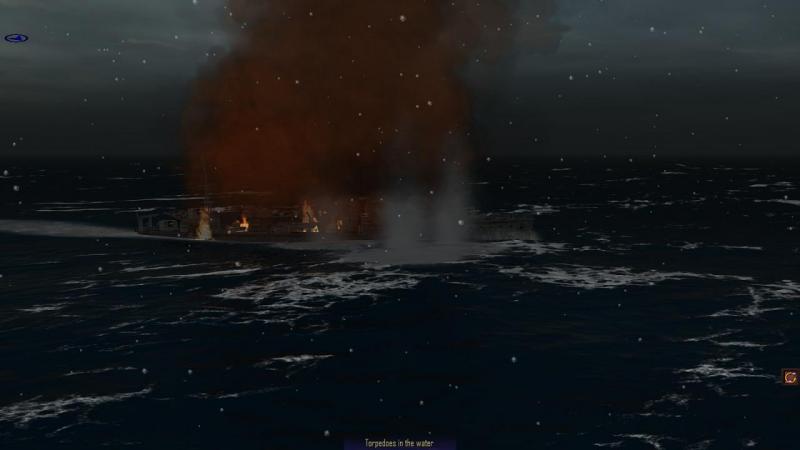
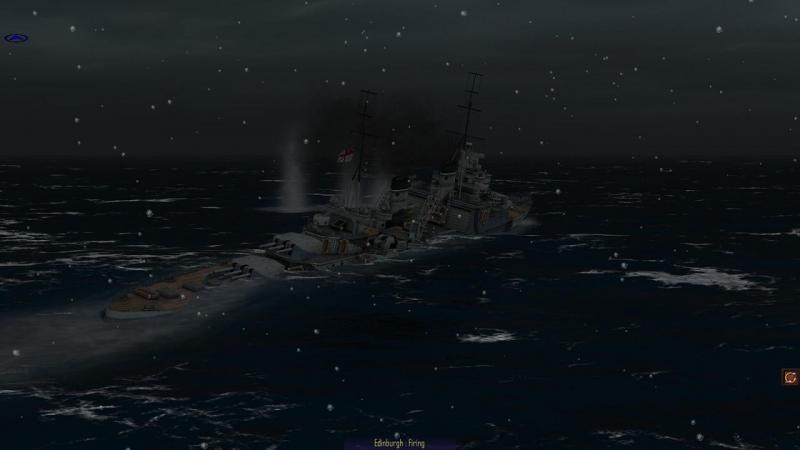
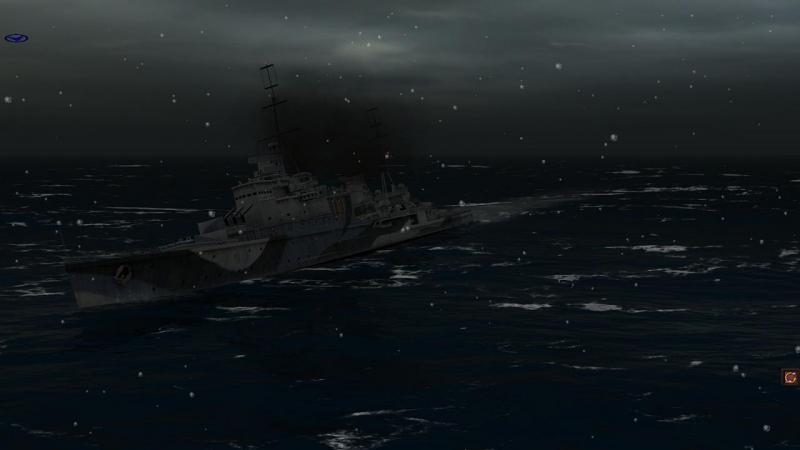
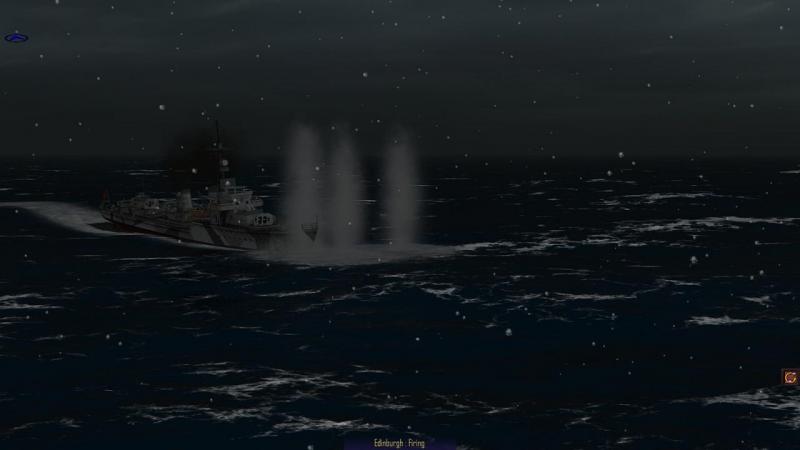
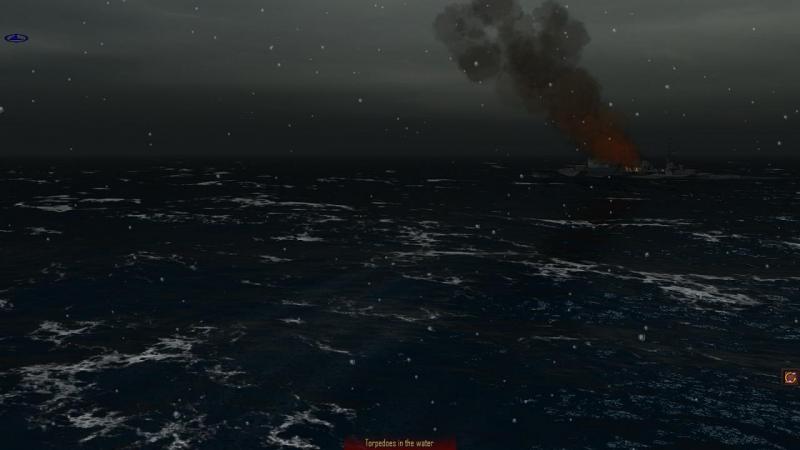
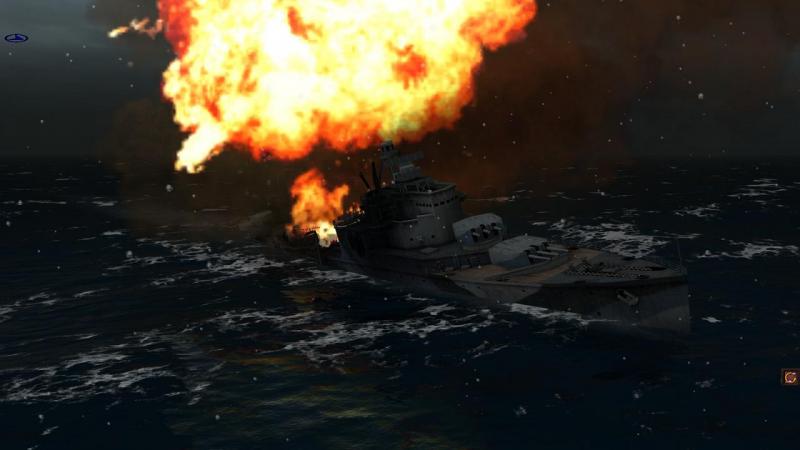
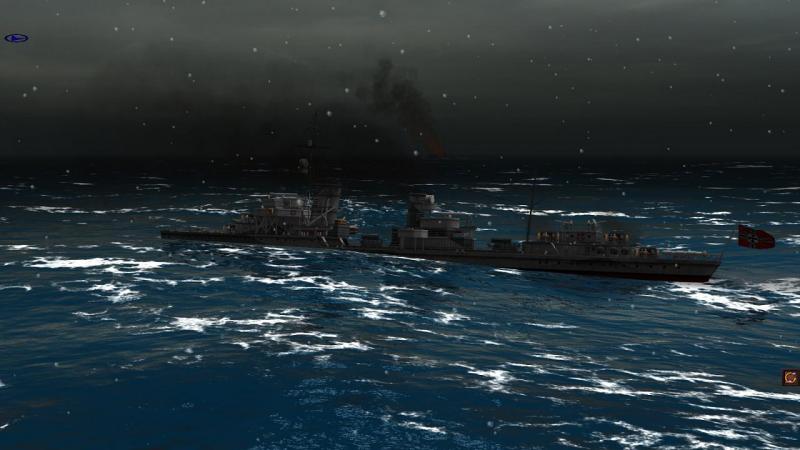
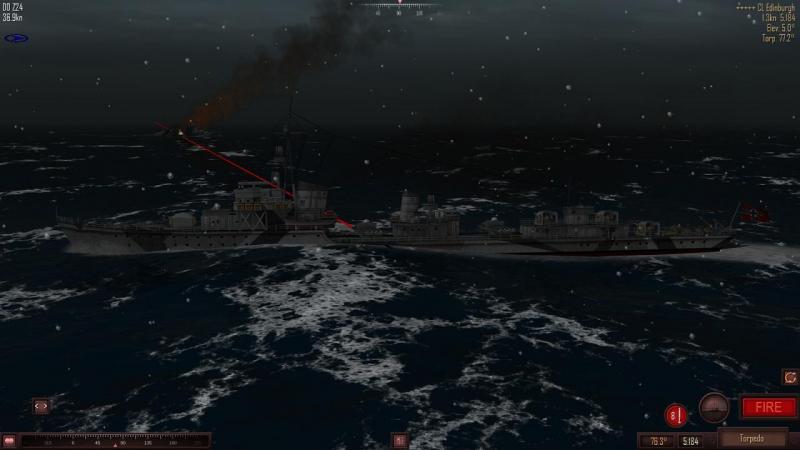
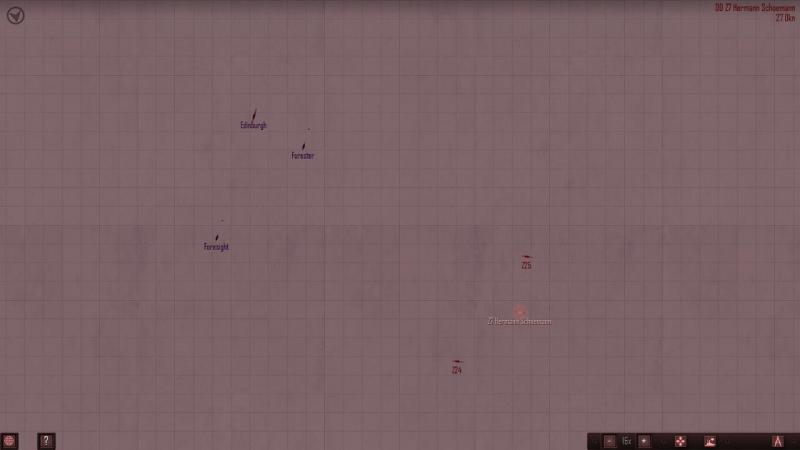
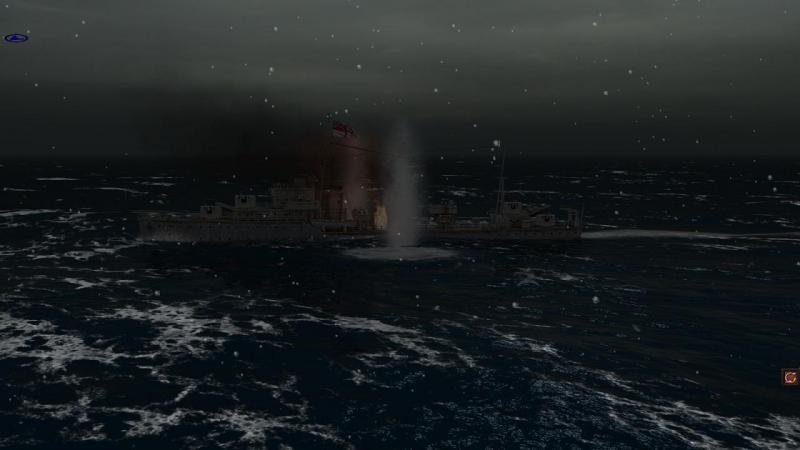
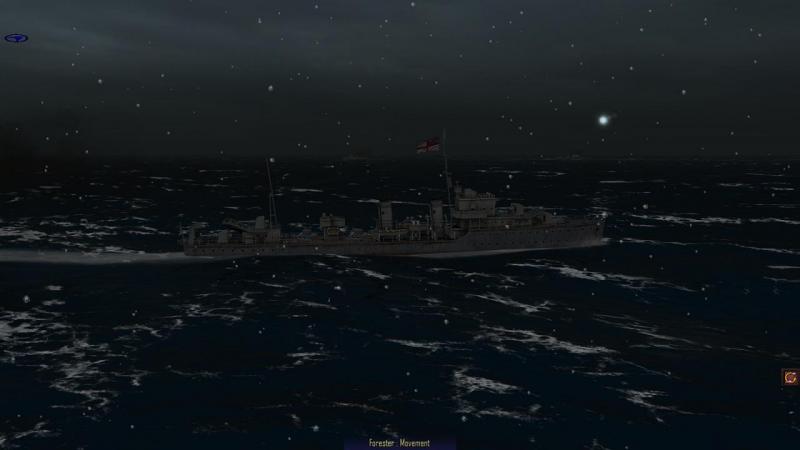
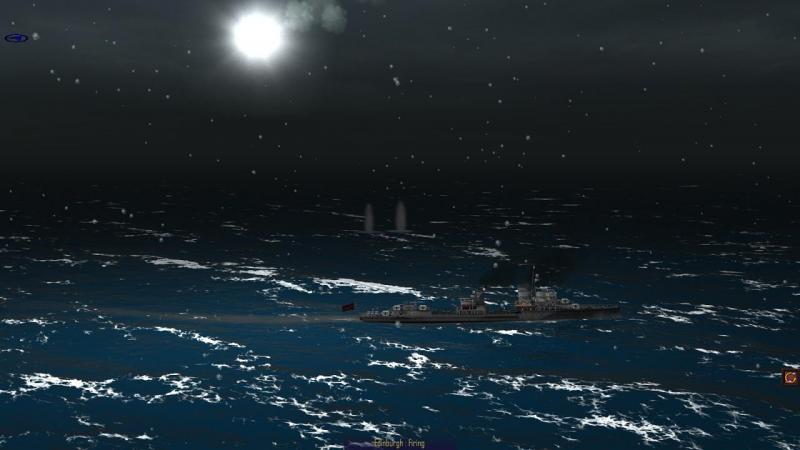
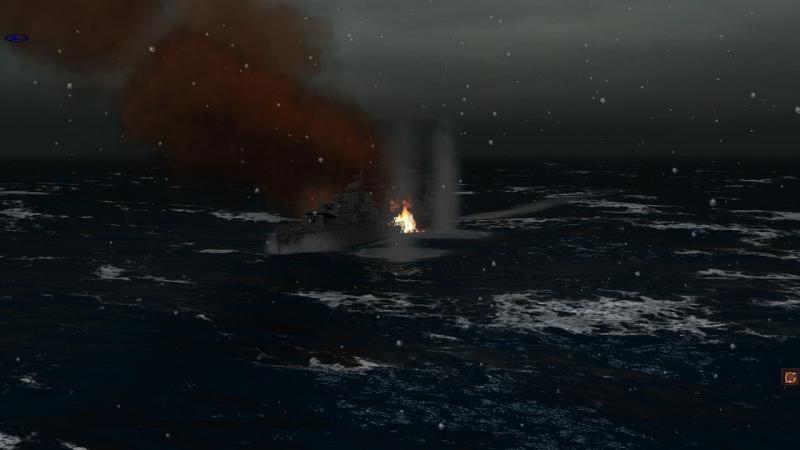
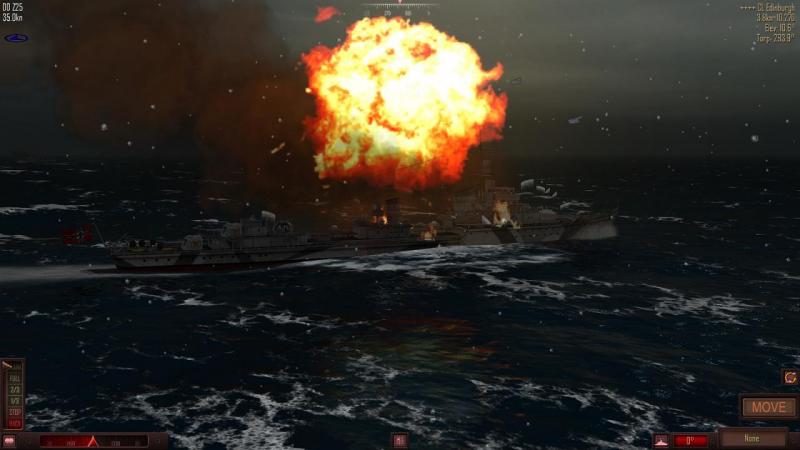
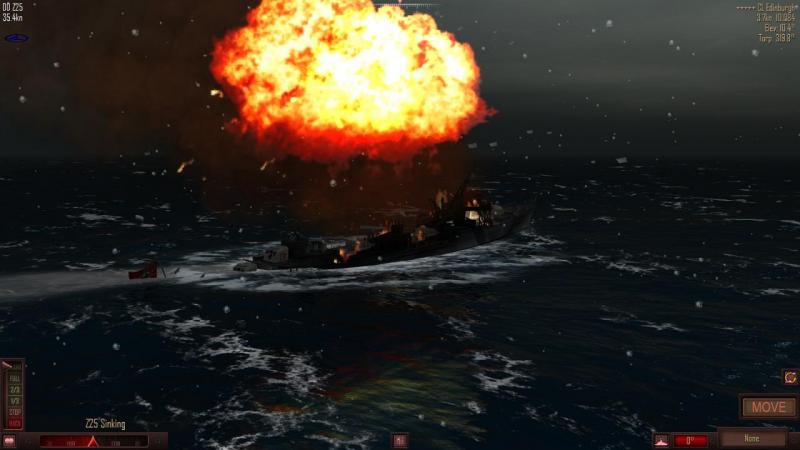
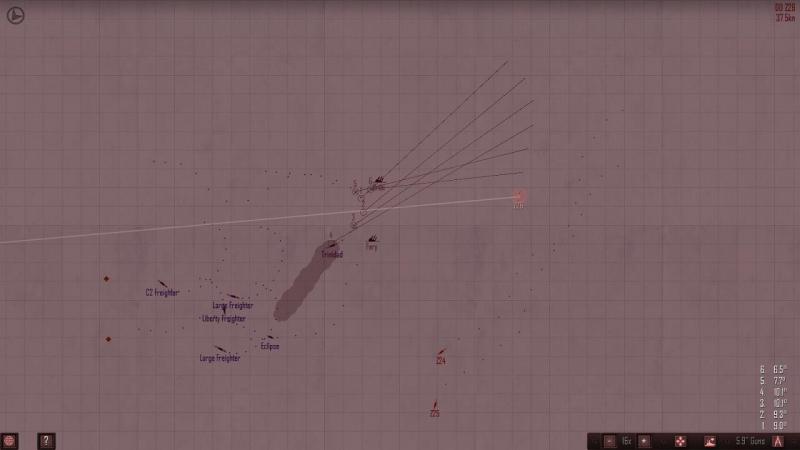
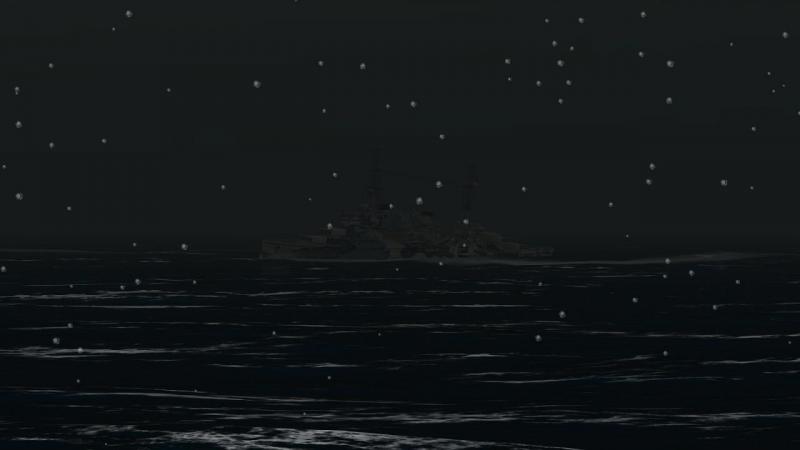
The tipping point and beyond The map view below shows the tactical situation at the time of Z 25's loss. The battle between my two remaining destroyers and the enemy's opposite numbers is now in full swing. The sinking of Z 25 has left Edinburgh unengaged, but she's crippled and at a longer range, so Foresight and Forester are clearly the main threat. Forester has a fire raging aft but is still full of fight. She and Schoemann's are still slugging it out. For now, Schoemann seems to be getting the better of her enemy. Edinburgh is still in the fight, but for the time being, I must ignore her. She's still only got 'B' turret in action and is crawling along to the rear of the fight. I just have to hope that she doesn't succeed in landing a 6-inch shell on either of my destroyers, in the meantime. Suddenly, Forester turns to port and launches torpedoes at either Schoemann or Z 24. I’m forced to turn both end-on to the incoming torpedo tracks, and chose to do so by swinging towards our attacker, dropping the range. We have been closing faster than I'd reckoned on and I'm not at all sure I will be able to avoid the incoming tin fish. This could be my undoing! While the torpedoes are in the water, Z 24 and Schoemann blast away at the British destroyers with their forward guns, getting hits. Then it's the enemy's turn, and despite the smaller bows-on target, Forester succeeds in landing a salvo on Schoemann, starting a nasty fire. But both British destroyers have been hit hard, and are also on fire. Whichever way you look, the sea seems to be full of burning warships, all mixed up and firing away at one another. Surely this can't go on; something has got to give. Sure enough, the tipping point in the battle now arrives. The torpedoes from Forester go wide, just as Foresight goes under. This of course leaves both of my destroyers able to engage Forester, and the concentration of fire is quickly decisive. She, too, slips beneath the waves. Now, at last, it's Edinburgh's turn! Z 24 and Schoemann shift their fire onto the slowly oncoming cruiser. She's still dangerous, and even as our shells splash around her, she's firing back with her one serviceable turret. With the range closing, Edinburgh's accuracy seems to have improved, and she gives Z 24 a nasty fright. She's lucky to escape with a wet forecastle and likely, some splinter damage. Schoemann is now well within torpedo range and launches a salvo of four. Edinburgh is barely moving and she's not going to be able to avoid my attack, I am certain. She doesn't, but although the results are visually spectacular, they are not fatal. I wait in vain for Edinburgh to sink. At least one of my torpedoes must have been a dud, I feel sure. To cap it all, Edinburgh is still shooting. She decides to illuminate Schoemann, who is on the opposite side of Z 24 and being careful to keep out of the latter's arcs of fire. It's time for Z 24 to have a crack with her torpedoes. The range is just over 5,000 yards. I know it will take more than one turn for the torpedoes to reach their target, but Edinburgh is moving so slowly, she's basically a sitting duck. This time, the result is not in doubt. Edinburgh seems to stop in her tracks and slips quickly below the surface, nearly on an even keel. She has been a tough target, but she won't be escorting any more convoys, and that gold bullion she's carrying won't be seeing the inside of the vaults of the Bank of England any time soon...not for another forty years, in fact. Time to see if we can find any survivors from either side, sadly not very likely in these cold seas. Then it's back to base. We've suceeded in sinking the crippled cruiser, and her two consorts to boot, but at the cost of Z 25 lost, Schoemann badly damaged and Z 24, lightly. Perhaps nevertheless the Fuhrer will continue to recognise the value of surface ships as part of our efforts against the Arctic convoys. After all, every merchantman lost is a cargo which won't be sustaining the Bolshevik hordes in the decisive struggle against our embattled forces on the Eastern Front; we can still win this war!


-
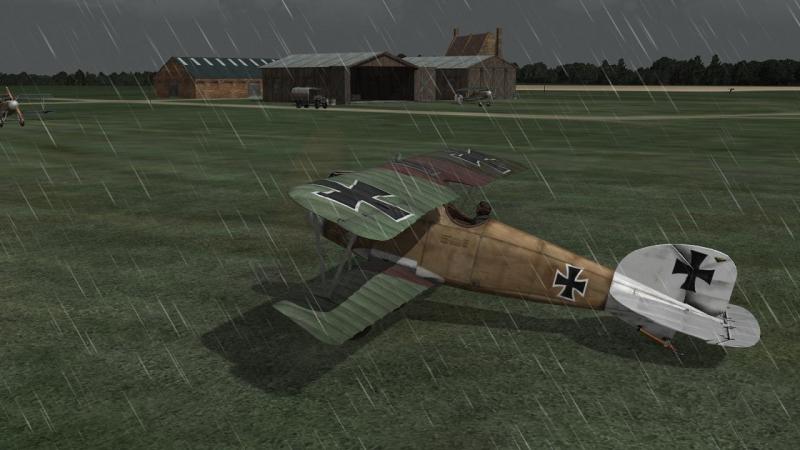
WOFF Screenshot of the Month, July - 'Meet the Fokkers!'
33LIMA replied to 33LIMA's topic in WOFF UE/PE - General Discussion
It's that man again, Udet - this time not in a 'soap box derby car', but in a 'flying venetian blind' as Jimmy McCudden once called it... Just a couple of days of the month left, so if anyone else is flying WoFF's Fokkers, get posting!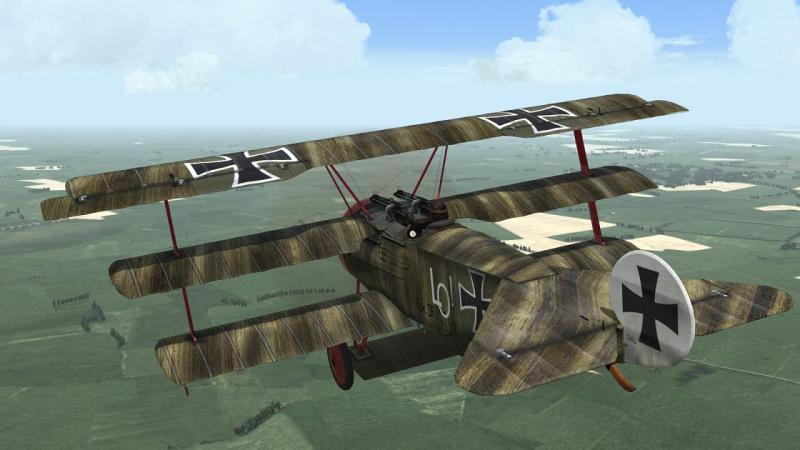
-
The battle in Atlantic Fleet The map view below shows the tactical situation at the start of the battle; there is no scale as such, but selecting a target either in the map or the 3D world will give you a range estimate – always or nearly always in Atlantic Fleet, battles start inside gun range. Atlantic Fleet doesn’t have a British minesweeper and here, we have just Edinburgh and the two destroyers, Foresight and Forester. The same 3D model represents all the Town Class cruisers in Atlantic Fleet, although in real-life, Edinburgh’s raked funnels were set back a good deal further than in the earlier sub-classes (see the picture of Belfast in the first post in this thread). My three destroyers are in line abreast sweep formation and as the enemy has the initiative, we will have to endure the first shots of the battle. Realistic or not, I have the view set to switch, with the current turn, between enemy and friendly ships, so I have a good view of the opposition. Edinburgh kicks off with a short move at about 3 Knots followed by a salvo nearly straight ahead from ‘B’ Turret, which falls short of her target. This seems to be the only turret operational and she’s also got a noticeable list, as well as propulsion damage. I’m encouraged to see that the cruiser is starting with a significant level of damage, as in the real battle! The closest enemy destroyer, Foresight, lets fly with a starshell, while Forester just closes the range, without firing. Now it’s my turn. The pause between turns gives me time to study the map and make a quick plan. I decide to repeat the tactics from my last battle, against a similar but undamaged force. Z 24 and Schoemann will turn slightly left and go to maximum revolutions, aiming to cut across the front of the advancing enemy and cross his ‘T’. Z 25, on the right of my line, will bear slightly to starboard so as to come up abeam of the enemy, dividing his fire and setting him up for a possible torpedo attack, later. I don’t always bother with starshells. Fired by the AI enemy, they reportedly improve his accuracy but for the player, I think their only benefits may be that starshells (i) improve the accuracy of the initial firing solution, which one never uses after the first, ranging salvo and (ii) cause to be visible/rendered more distant targets which would otherwise be invisible/not rendered (seen only as a radar target marker, in map view). My first salvo is fired by Schoemann. Unlike the later Narvik Class Z 24 and Z 25, she had 5-inch rather than 5.9-inch guns, and two forward turrets (all the Narvik Class in Atlantic Fleet are modelled with a twin forward turret). The 'flight of shell' visual effects in Atlantic Fleet are vastly more acceptable that the (to my eyes) horrible gamey ones in World of Warships - and there's none of the silly dodging around islands or icebergs that mark the latter as strictly an arcade shooter, to my mind - nothing wrong with that, of course, each to their own, but not my cup of tea. Soon the rounds are flying back and forth. It quickly becomes certain that Edinburgh is already in trouble, perhaps unable to manoeuvre, reduced to very low speed and with only one three-gun turret operational. So like the man walking along the beach throwing pebbles at every seagull because he wants to leave no tern un-stoned, I am happy to divide my fire between the three targets we have. My destroyers jink back and forth to put off the enemy gunners, as they advance through the snow squalls. Rounds from both sides are going close, but everyone is slow to land hits. First blood comes when I start getting some hits on the easiest target, the crippled cruiser. However, she’s also the toughest target, despite the prior damage. First serious damage is suffered by Foresight, which is the target of Z 24 on the left of my rough battle line. A straddle from a three-gun salvo produces a hit and perhaps also near miss splinter damage, and a fire breaks out amidships. Efficient damage control soon has the fire out and Foresight - which is now in the van of the enemy force - turns to starboard to bring her broadside to bear on Schoemann. You can see the latter, partially illuminated by starshell, now on a parallel course, while the ship further away to the left and on the opposite heading is Z 25, which is engaging Edinburgh. Forester has also turned and the two British destroyers are doing a good job of screening the damaged cruiser. Edinburgh is now firing starshell every so often, in between salvoes, as if to assist the shooting of Foresight and Forester. The whole force seems to be co-operating well. At the moment it's Schoemann who is lit up, but rather than the enemy concentrating on her, all three of my ships find themselves under fire. Edinburgh is the one engaging Schoemann, but fortunately she's only got the one turret in action, and her shooting with that continues to be unimpressive. There’s a strong wind blowing and as we move, its relative direction shifts somewhat, complicating the task for our gunners. In the meantime, the enemy is now making better shooting. Suddenly, Z 25 is hit hard by Forester and there’s a violent explosion from somewhere amidships. She’s still in the fight but her steering fails, locking her into the zig-zag to starboard which she was making when the rounds fell. In my centre, Schoemann is locked into her own little battle with Foresight, and is soon trading blow for blow in what looks like being a fight to the finish. Some hits amidships exact revenge for Z 25. In the process, the gap is widening between Schoemann and Z 24, still aiming to cut across the bows of Edinburgh, over on my left. Z 25 has restored steering, just in time to suffer a secondary explosion as something previously damaged cooks off, or fire reaches something it shouldn't. It's some consolation that Foresight has been hit again and is suffering similar woes. I find that the damaged Z 25 is now within torpedo range of Edinbugh – at near maximum, but the cruiser seems a good target, broadside on, barely moving, and possibly unable to manoeuvre. The state Z 25 is in, this might be her last chance to play a part in the battle. I let fly with a salvo of tin fish. But while they are in the water, Z 25 is hit again and little latter, suffers a further big explosion. This is the end for Z 25. She goes down. The battle has claimed its first victim, and it’s one of mine. ...to be continued!


-
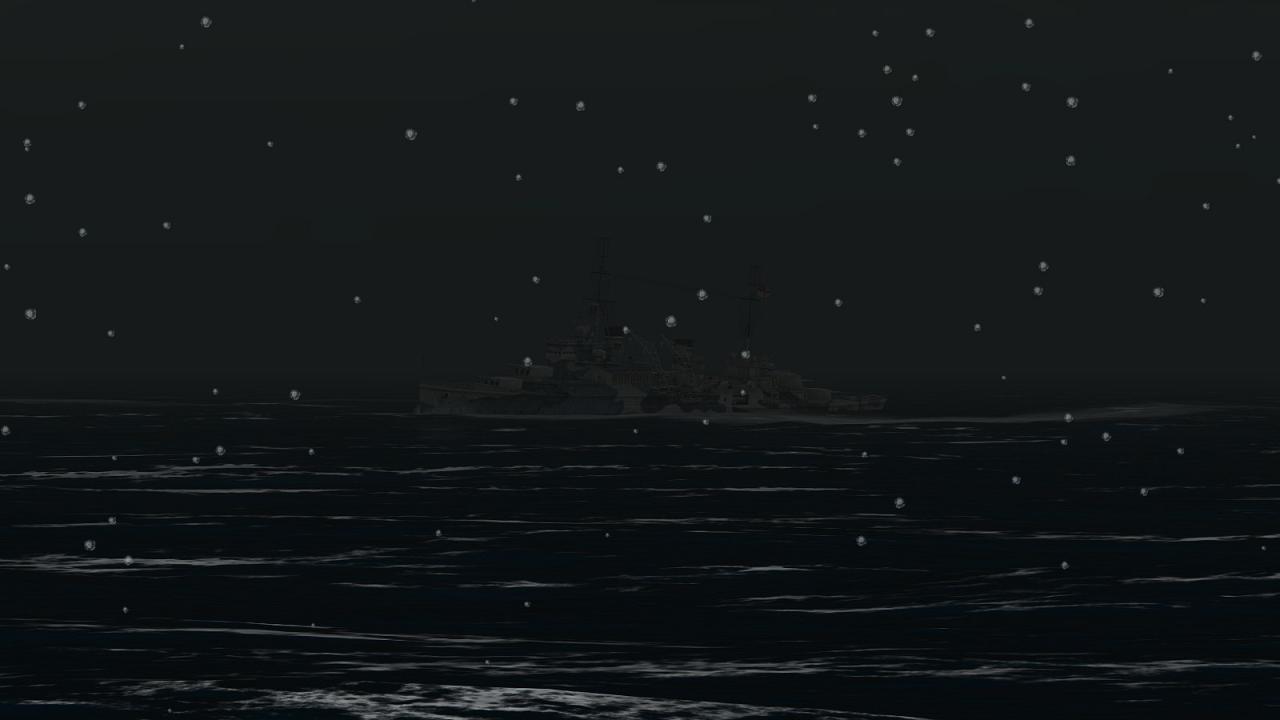
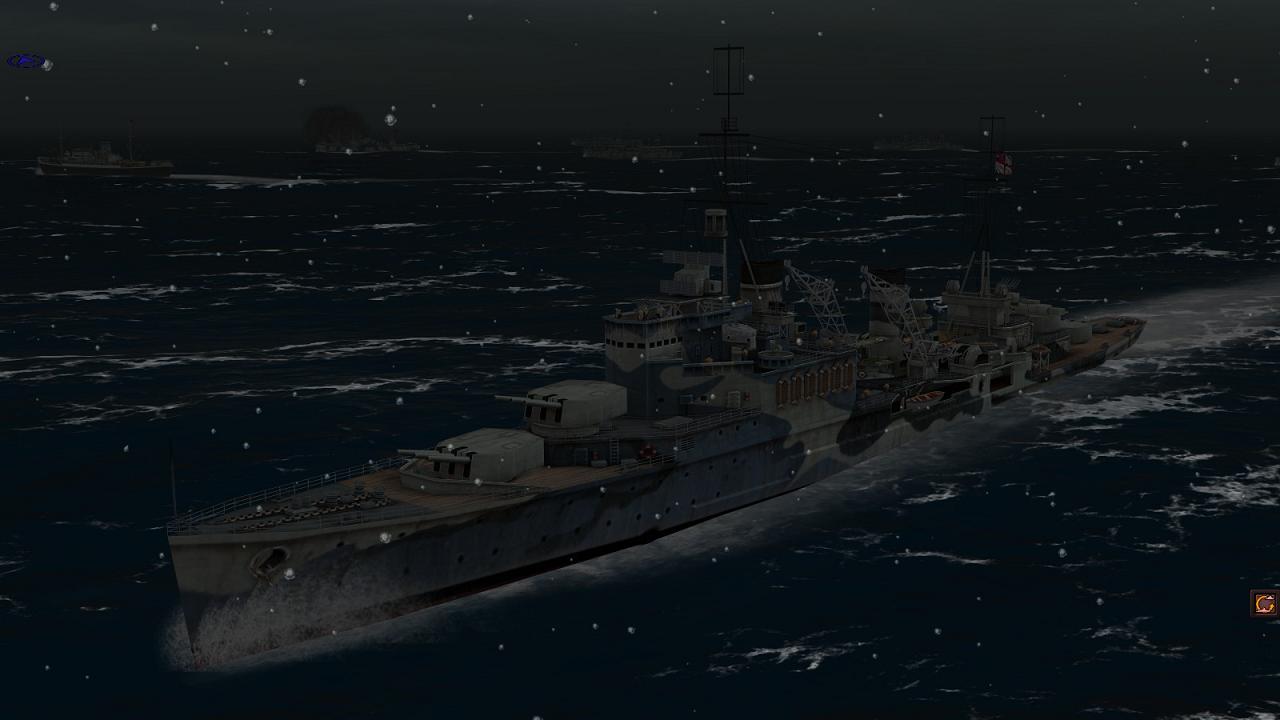
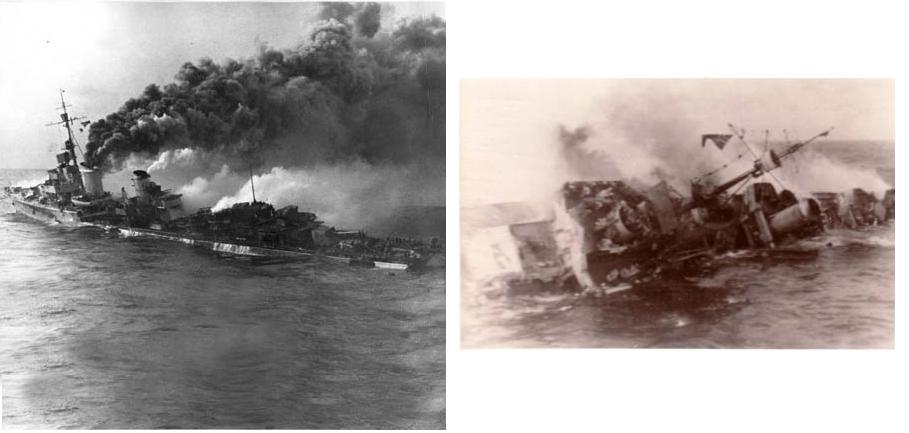
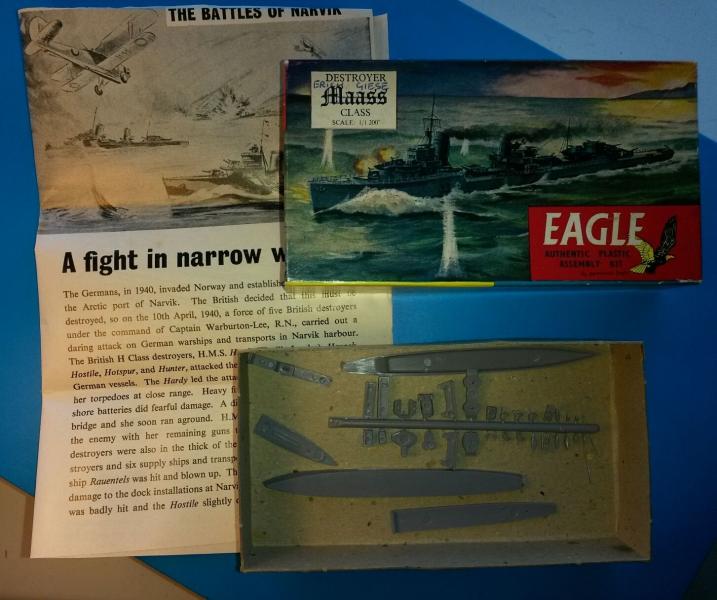
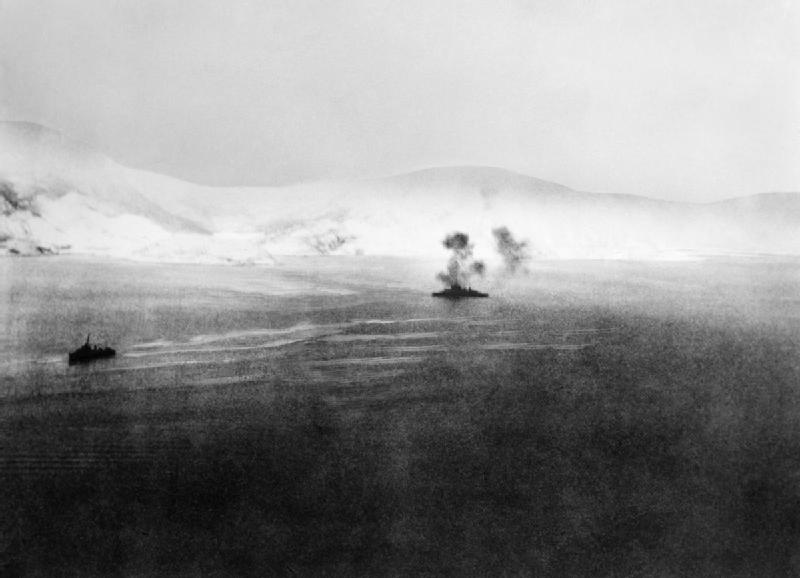
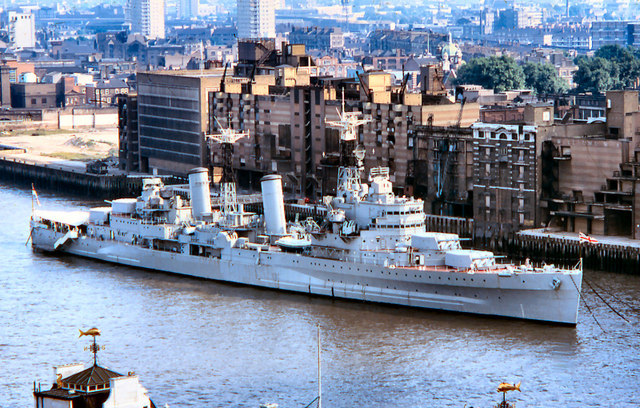
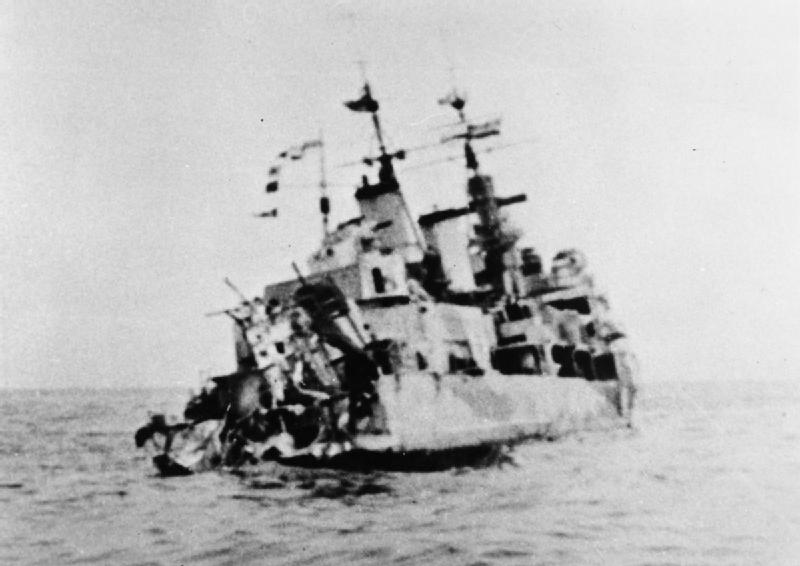
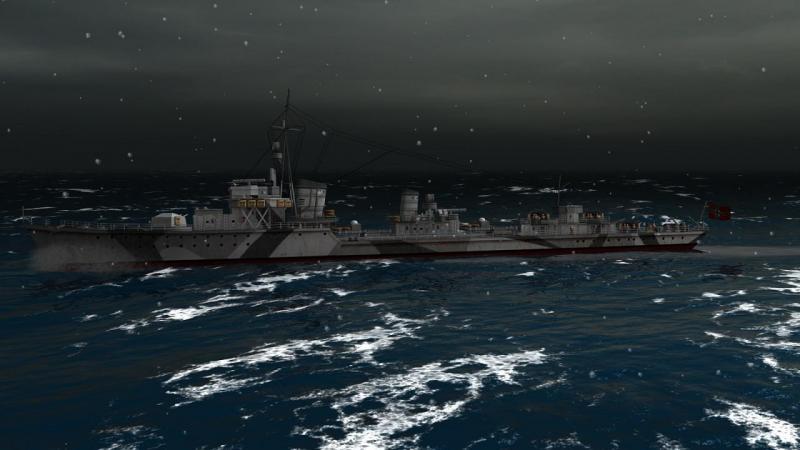
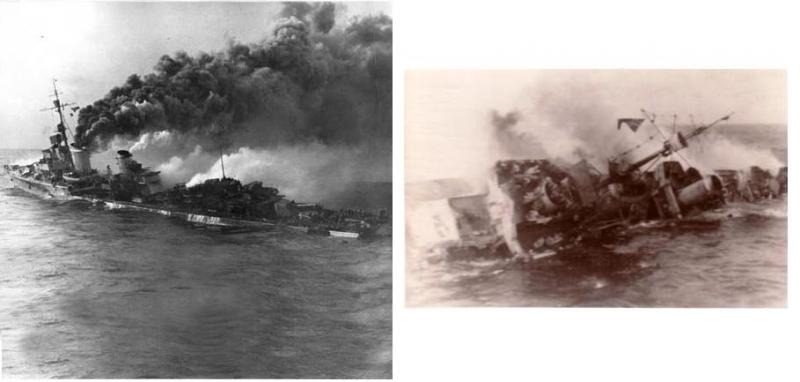
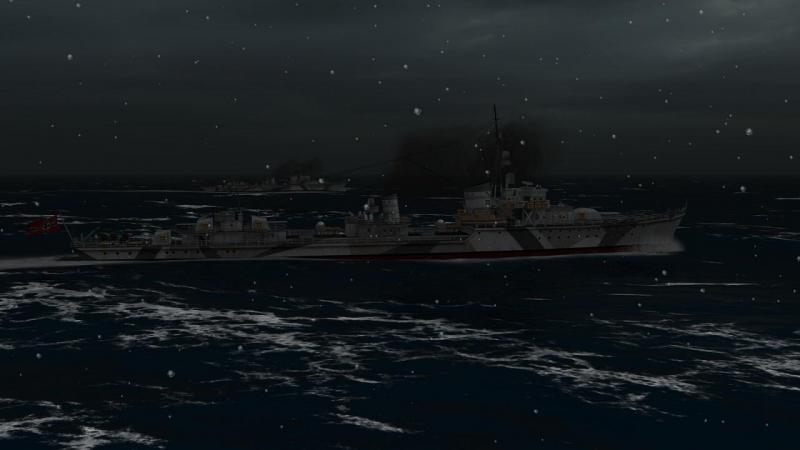
Another Atlantic Fleet battle in Arctic waters! I have always been something of a fan of the big German destroyers of World War 2, ever since assembling tiny 1/1200 plastic kits of some of them in the early 1960s. These were made by Eagle, part a themed series representing the ships involved in the First and Second Battles of Narvik in April and June 1940. Like this one, of a Leberecht Maas class...or is it Erich Giese? Maas wasn't actually at Narvik, having been sunk in a disatrous 'friendly fire' incident in the North Sea, bombed at night by an He111 of KG 26 which didn't know the navy had laid on a mine-laying operation in the same area. Another destroyer from the force, Max Schulze, was lost with all hands immediately afterwards, some say from another bomb, others by a mine in the same area. Atlantic Fleet’s comprehensive set of historical battles doesn’t include the quite well-known actions at Narvik, the reason I believe being that the game’s 3D environments don’t include land – and these battles were fought in the confines of the fjords at Narvik. Which is quite something, especially considering that the second battle involved the Royal Navy hunting down and destroying the German shipping left from the first battle with nine destroyers and a battleship, no less. The photo below shows the battleship, HMS Warspite, in action during the battle, well into Ofotfjord. Big and powerful as they were, the German destroyers had rather less reliable machinery and being somewhat top-heavy, were less sea-worthy than their British counterparts, though all this seems to have gradually improved as the design was developed. At any rate, these are disadvantages which I don’t think affect them in Atlantic Fleet and having conquered Convoy PQ13 in my previous outing, I looked around for another historical battle featuring these ships. There are several more on offer and from these, I picked another Arctic encounter, one which came just over a month after the earlier battle. This was the German effort to sink HMS Edinburgh, in May 1942. The historical battle In late April 1942, Edinburgh left Murmansk as part of the force covering return Convoy QP11. The cruiser was carrying a substantial consignment of gold bullion, payment towards the war material then being convoyed to the Soviet Union. Edinburgh was the sister-ship of the preserved HMS Belfast, a modified Town (or Southampton) Class cruiser, with twelve 6-inch guns. Belfast is seen below on the River Thames in London, before she was repainted in wartime camouflage. On this outing, Edinburgh was crippled by hits from two torpedoes fired by U-456, and forced to turn back to Murmansk, escorted by destroyers Foresight, Forester and some minelayers. One of the torpedoes had basically demolished Edinburgh's stern, as you can see from this contemporary photograph. Air attacks by torpedo bombers failed to sink Edinburgh. But on 2 May, she was found and attacked by three destroyers – Z 7 Herman Schoemann and the un-named Z 24 and Z 25, which had earlier sunk a merchantman in an inconclusive tussle with the convoy, before resuming their hunt for Edinburgh. In the action which followed, the crippled cruiser fought back and severely damaged Schoemann, which was abandoned and scuttled with 8 dead, the rest rescued by her consorts and a U-boat which arrived later. However, Edinburgh was torpedoed again by Z 24 or Z 25 and was abandoned and scuttled in turn, with 58 men lost in all. Edinburgh's gold bullion was recovered in the early 1980s in a salvage operation as dramatic as many a battle, but that's another story. How did I get on re-fighting the battle in Atlantic Fleet? It's time to find out! ...to be continued!

-
Hey, thanks Silberpfeil! There's another one in preparation on a similar theme, Hunting HMS Edinburgh; watch this space!
-
1Lt Karl Richter
33LIMA replied to pappychksix's topic in Thirdwire: Strike Fighters 2 Series - General Discussion
Nice tribute - well done, that man. 'We will remember them.' -
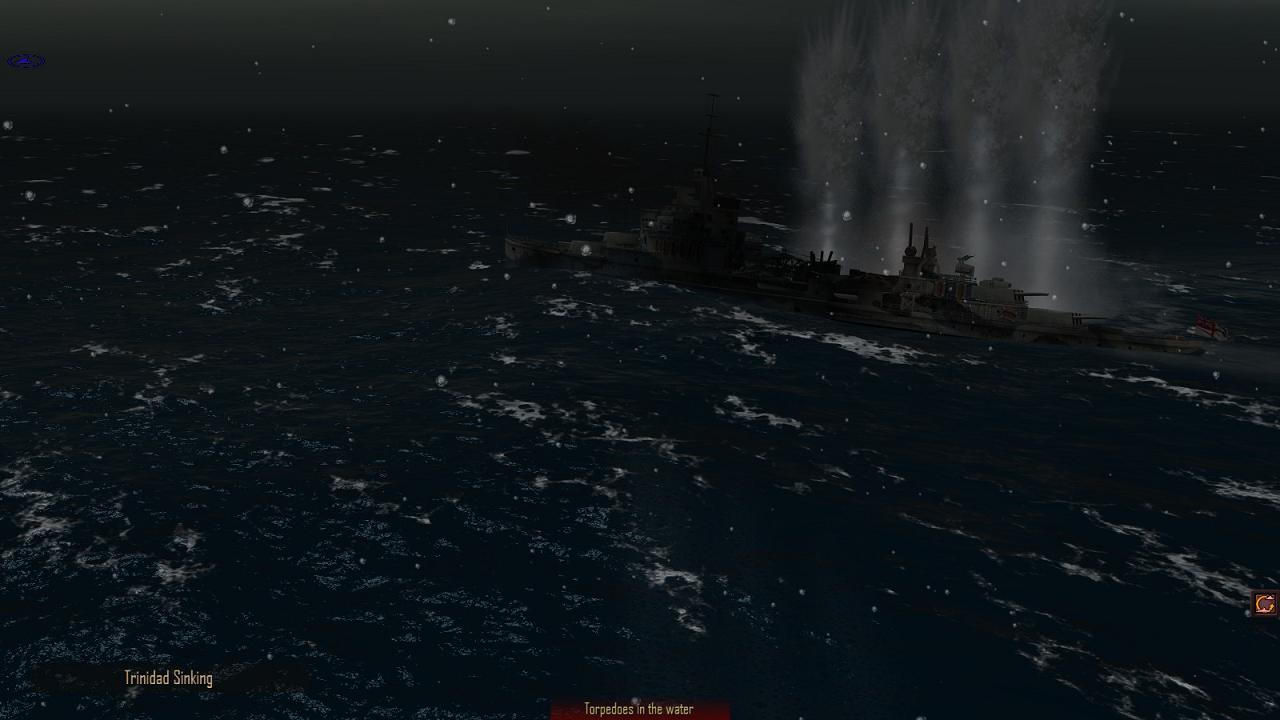
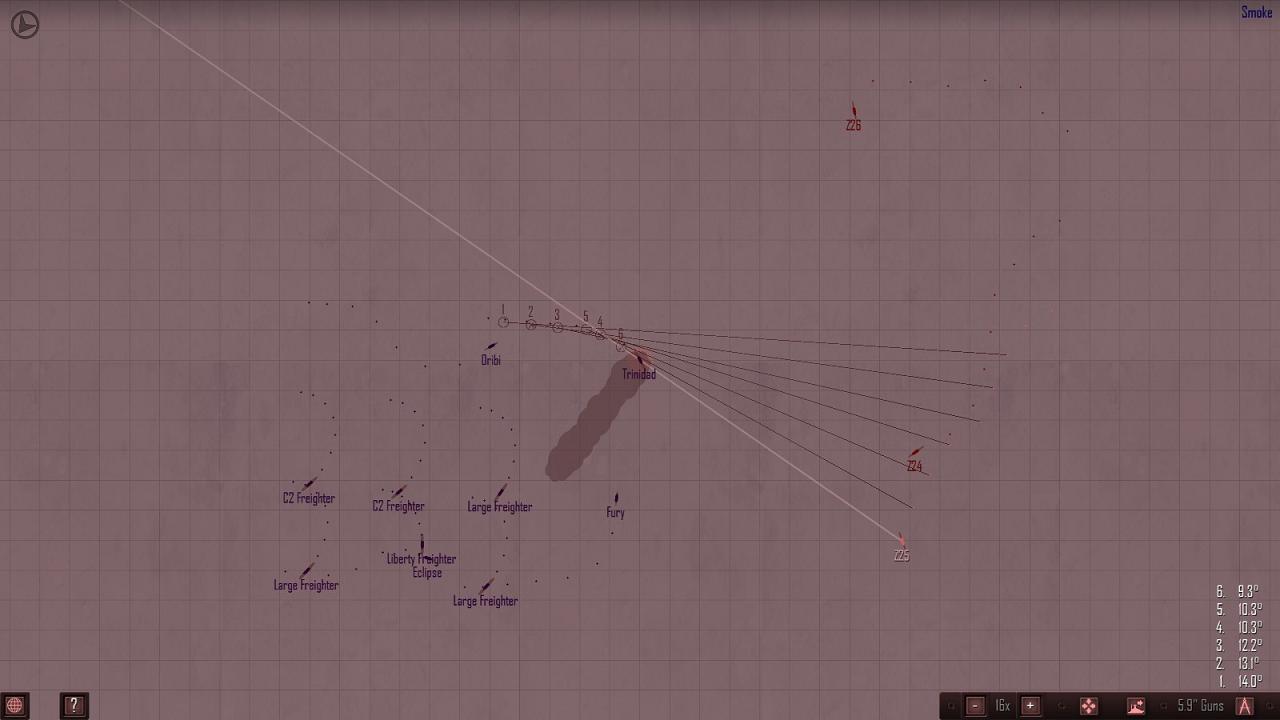
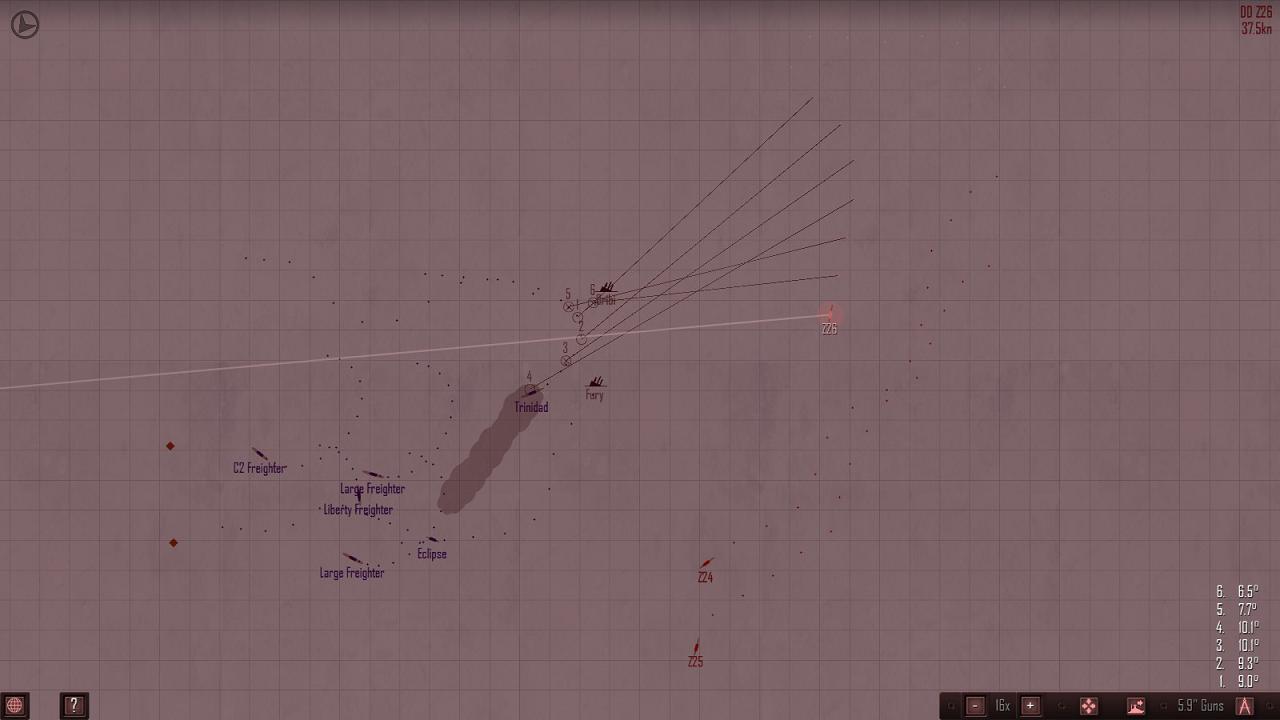
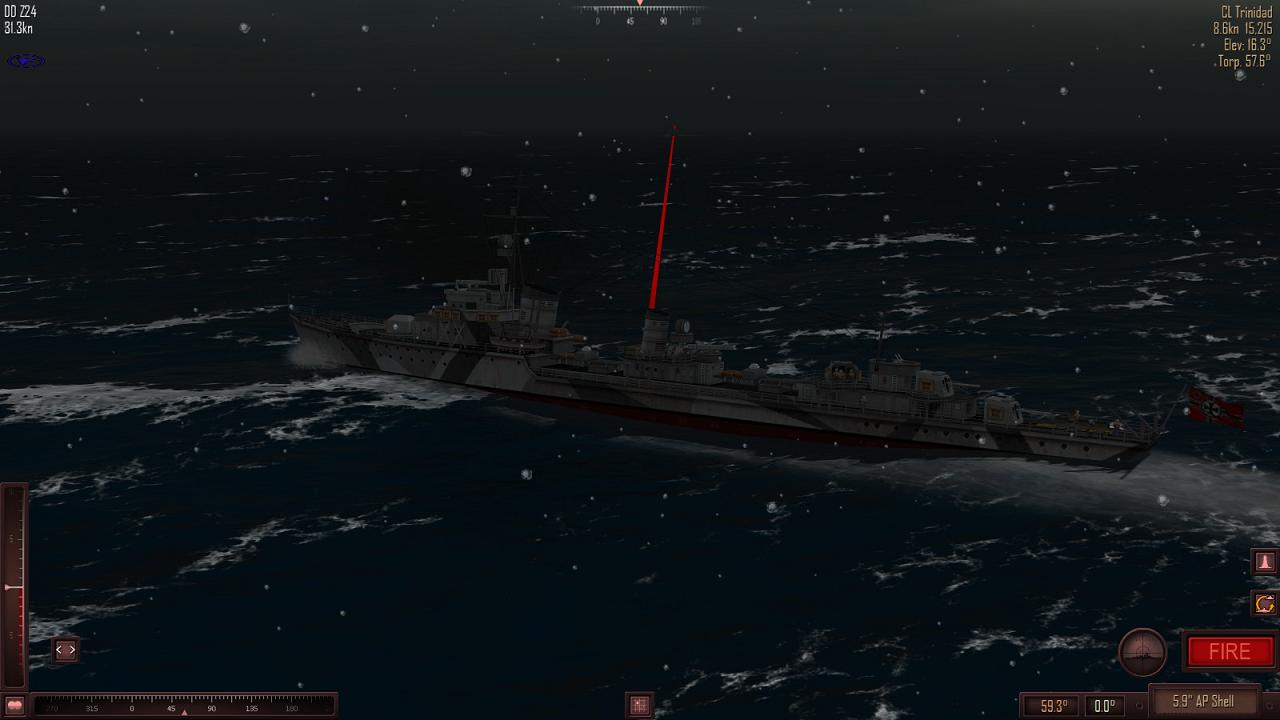
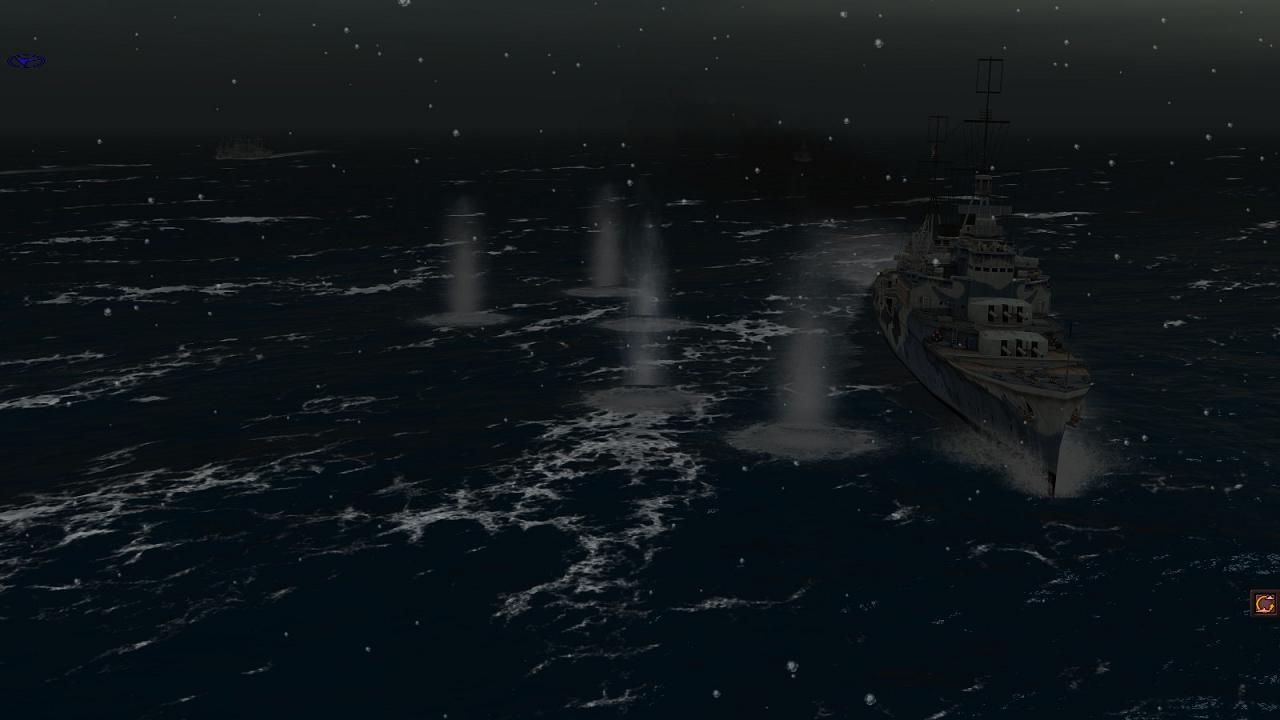
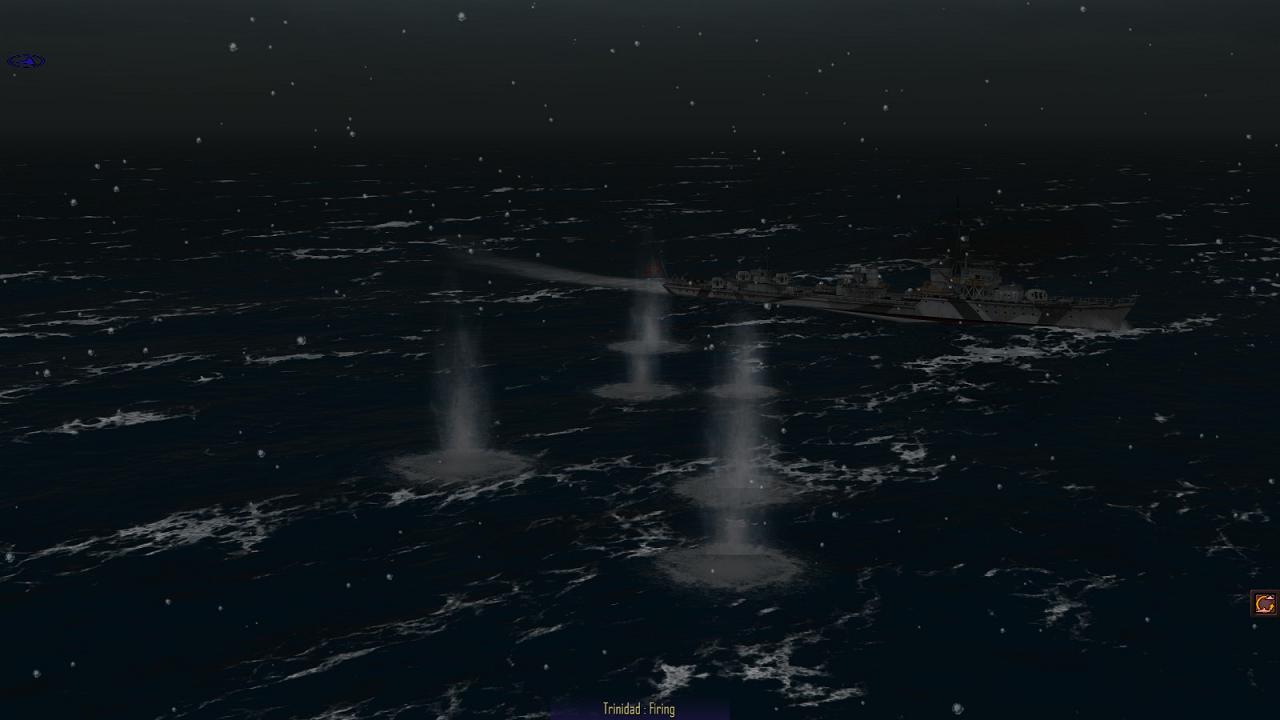
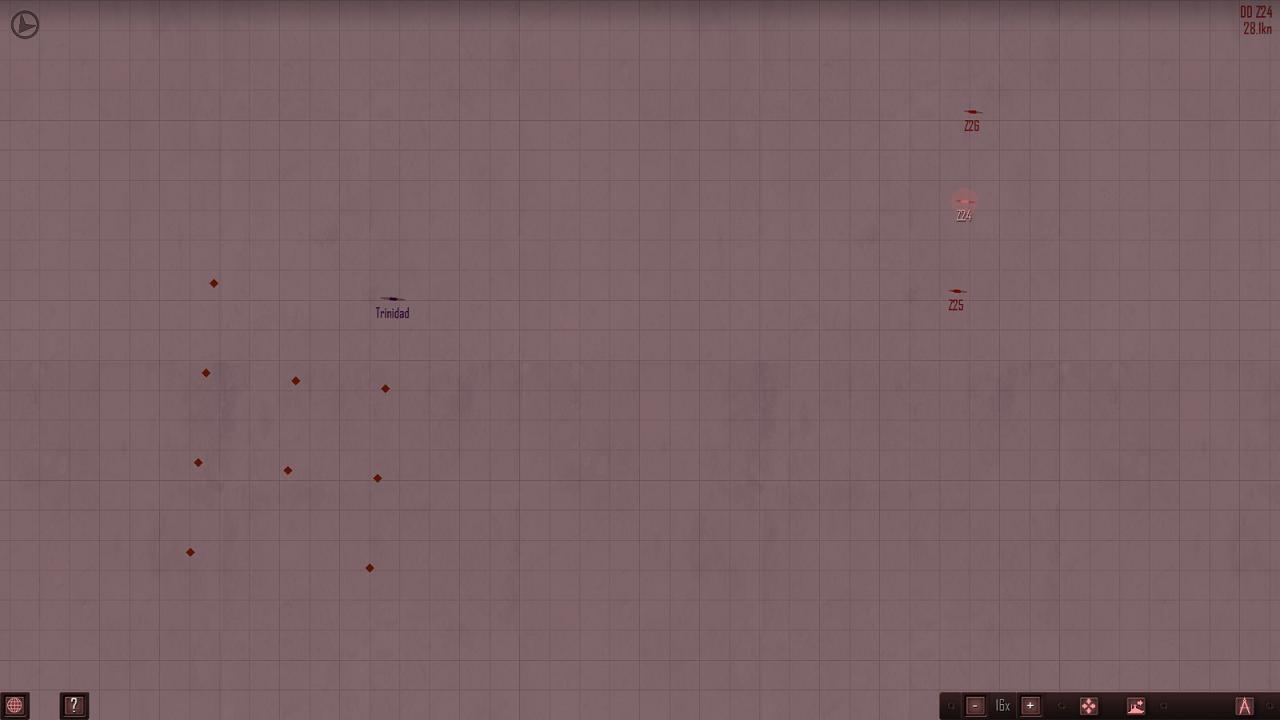
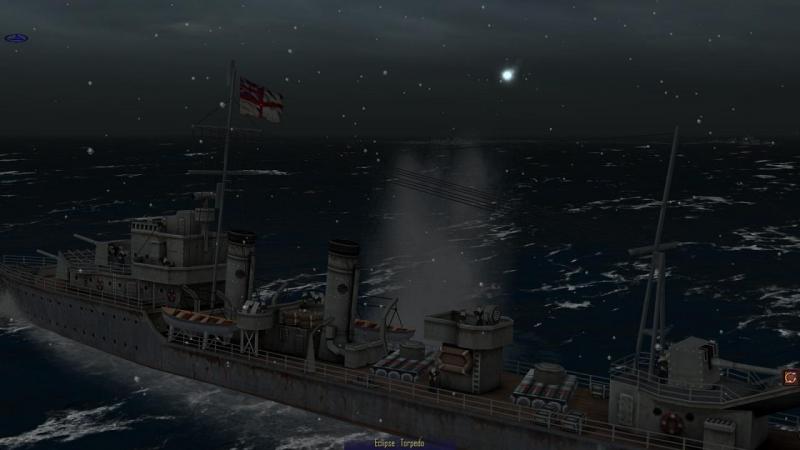
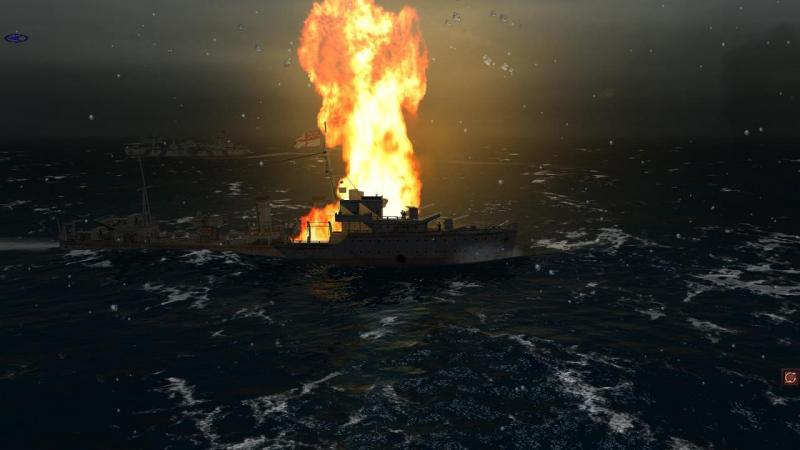
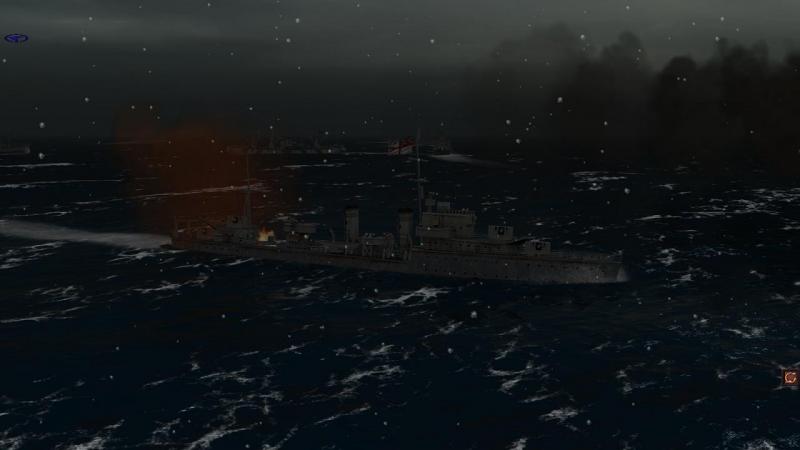
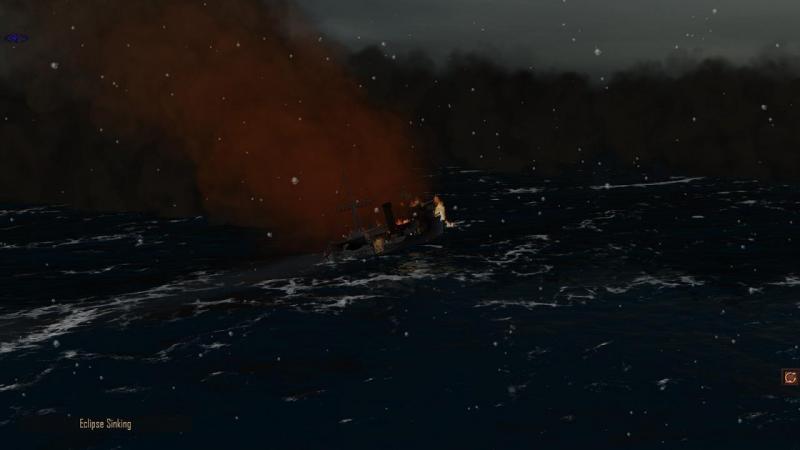
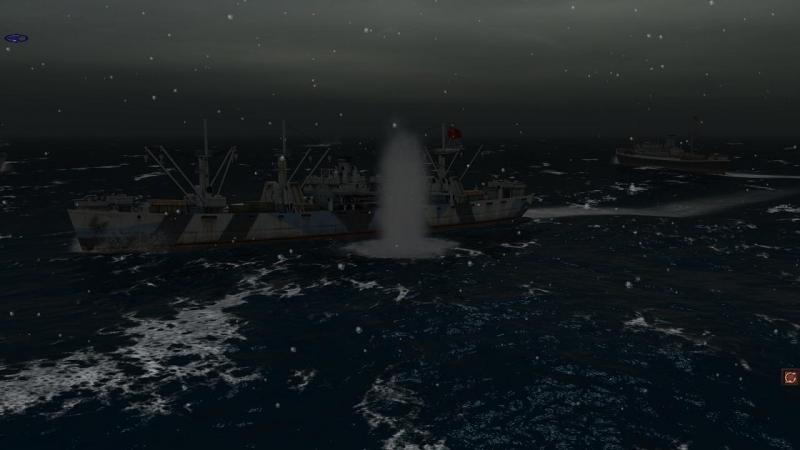
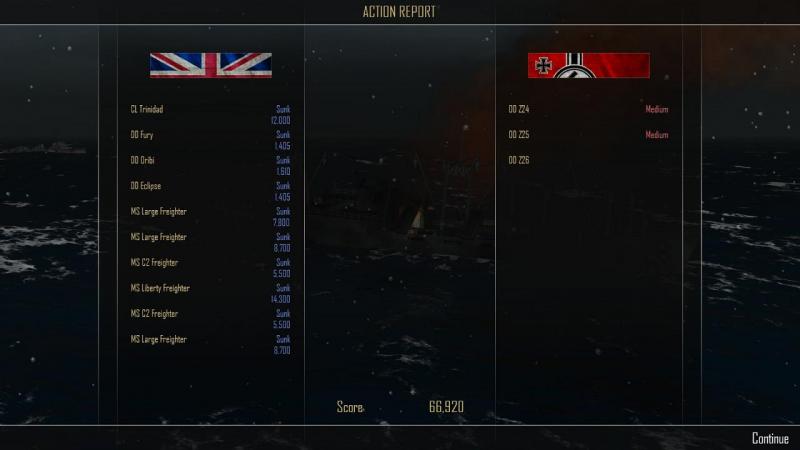
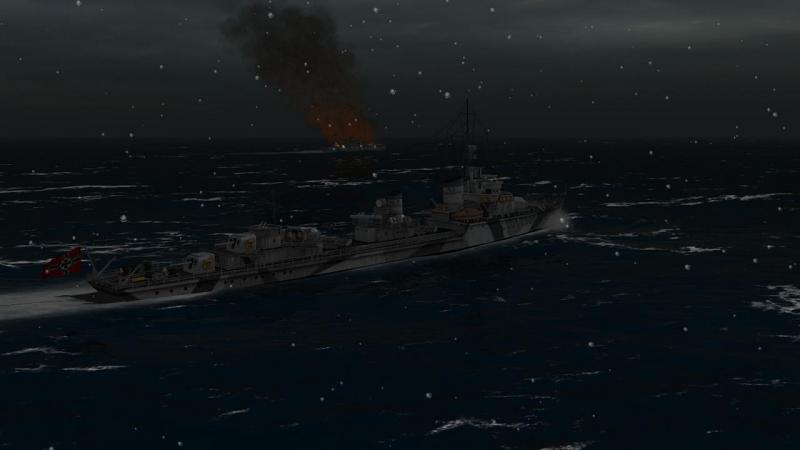
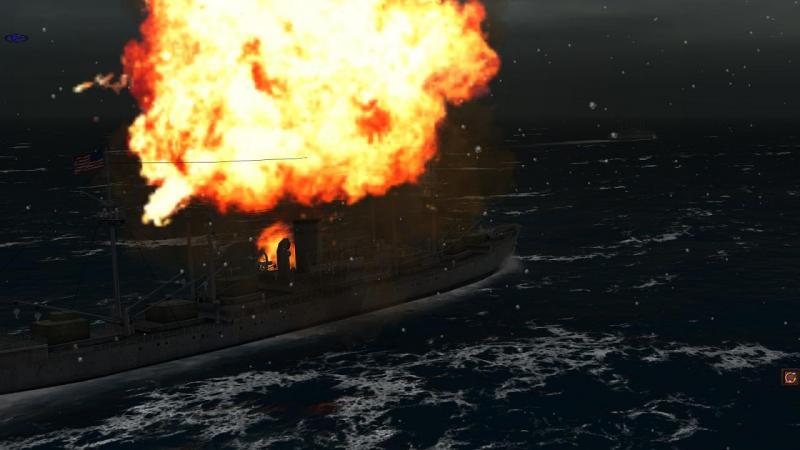
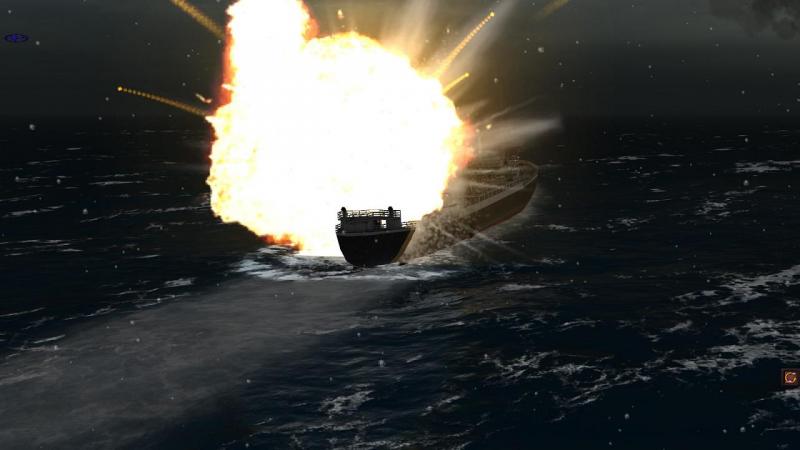
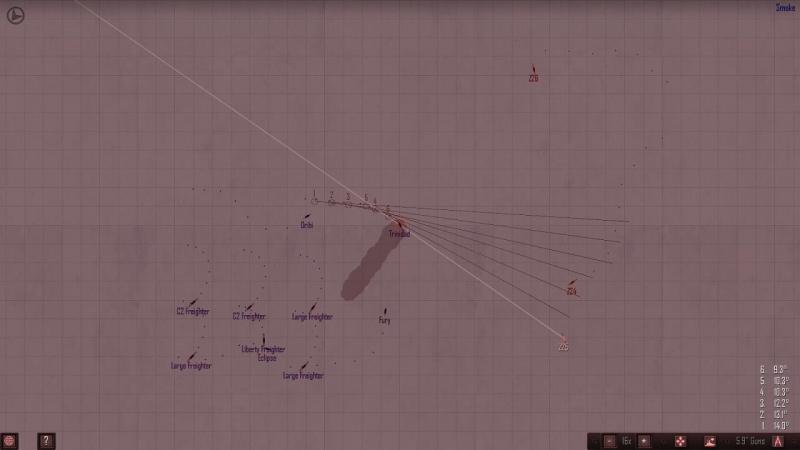
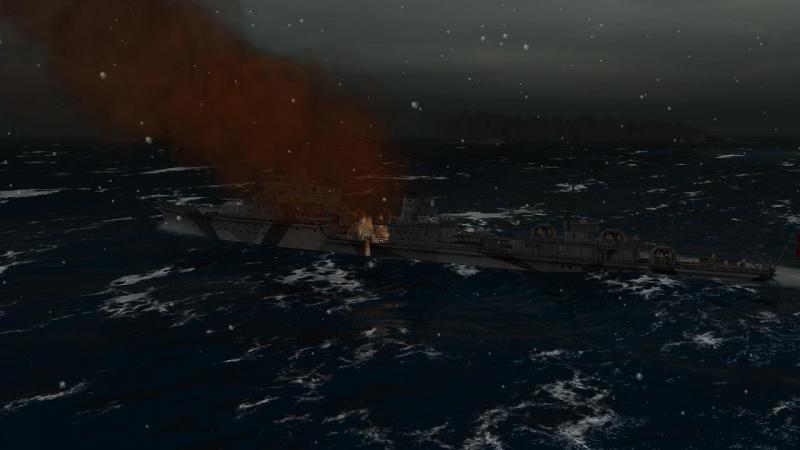
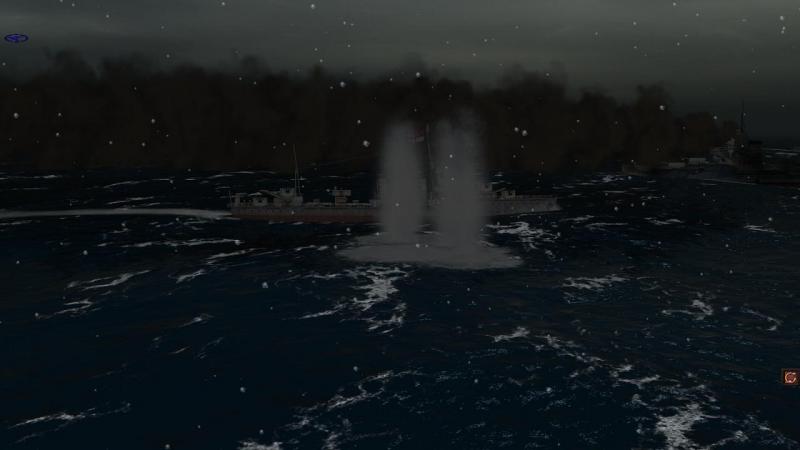
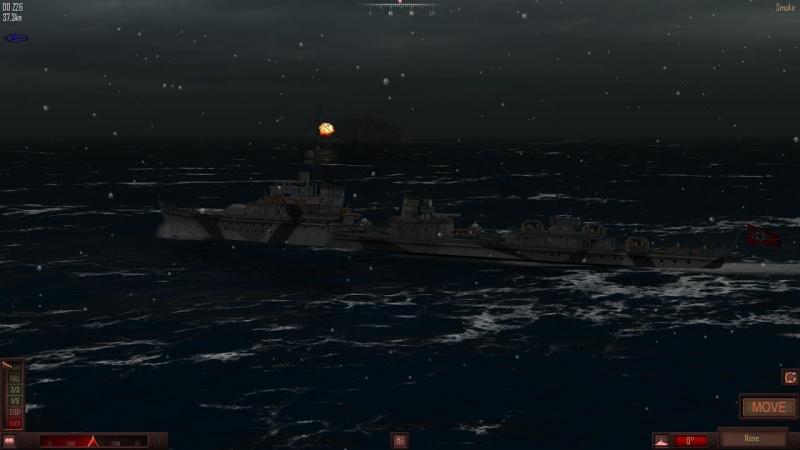
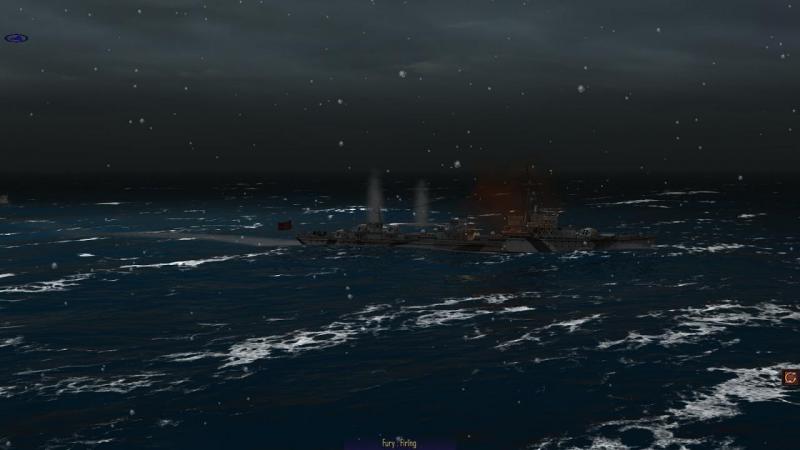
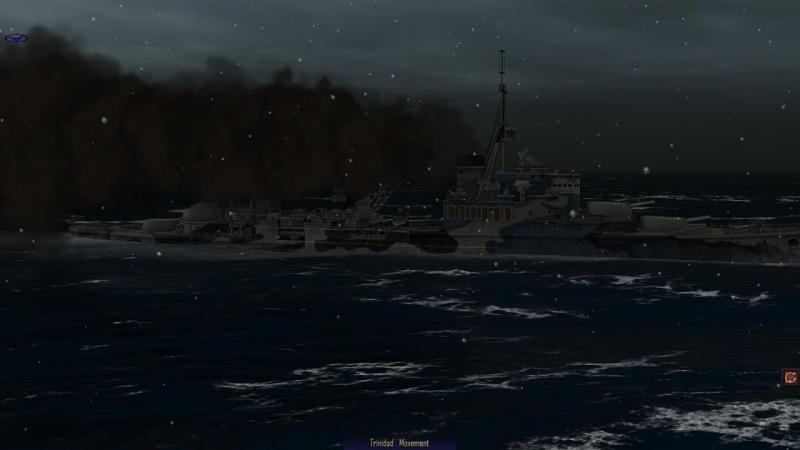
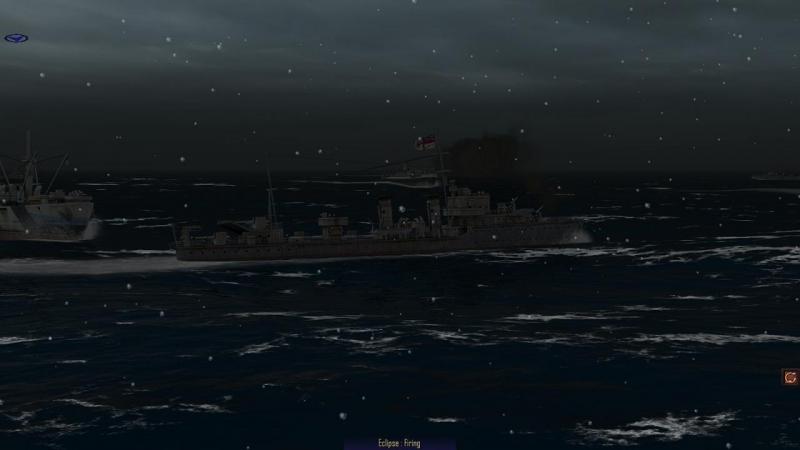
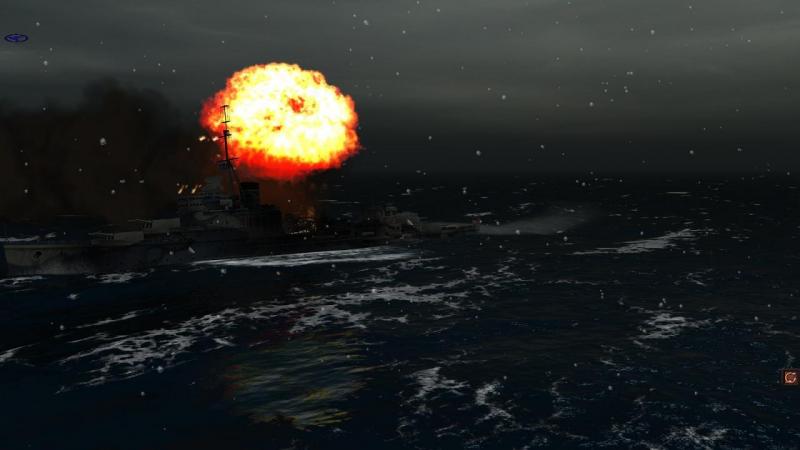
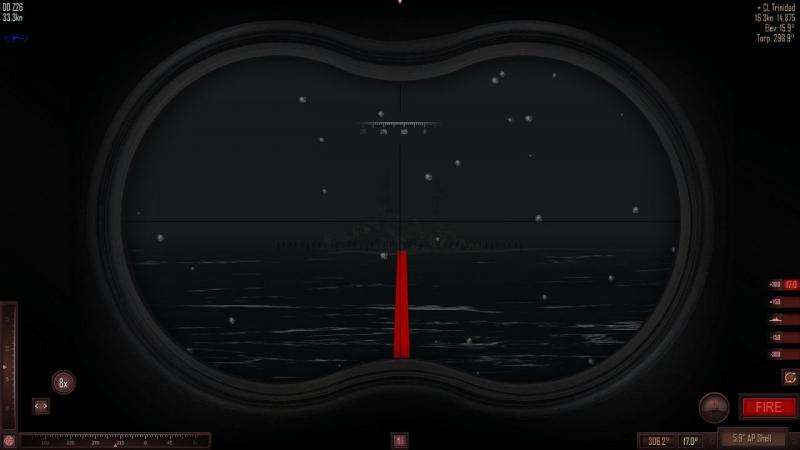
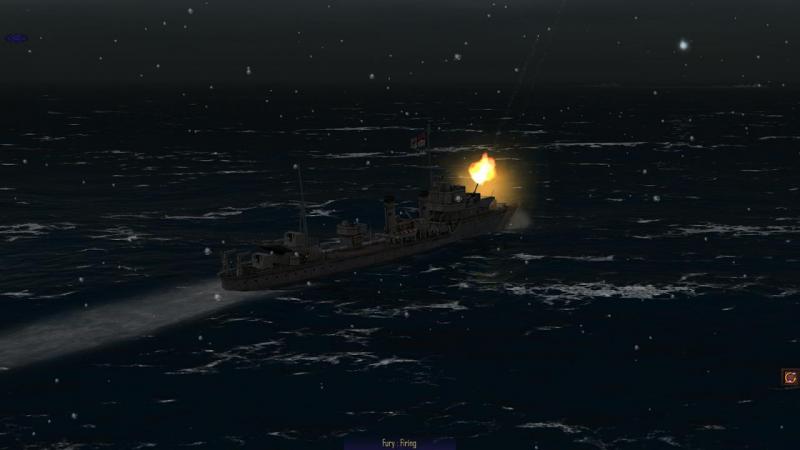
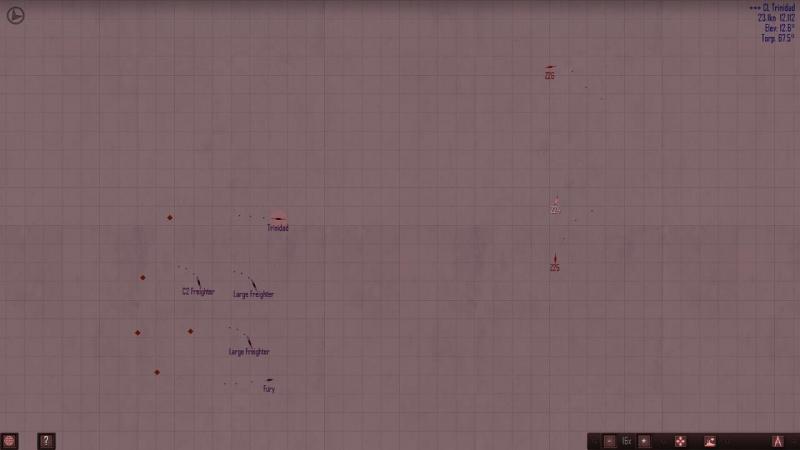
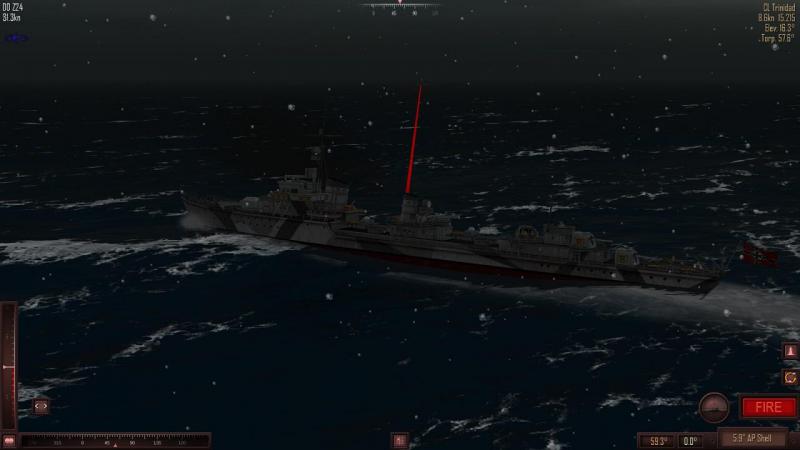
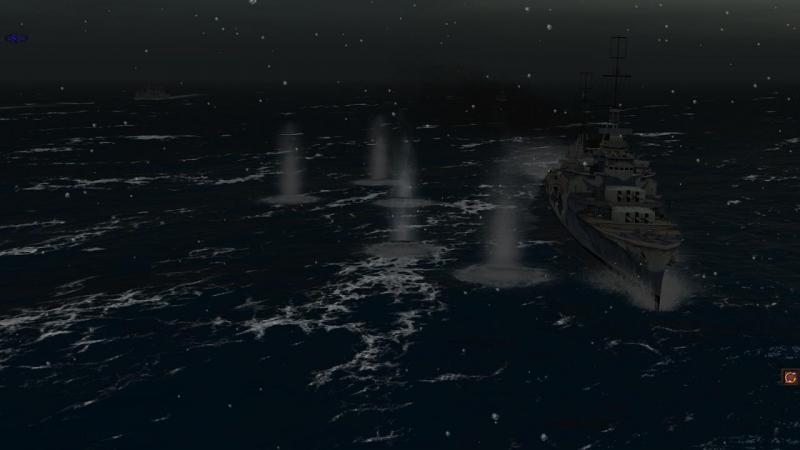
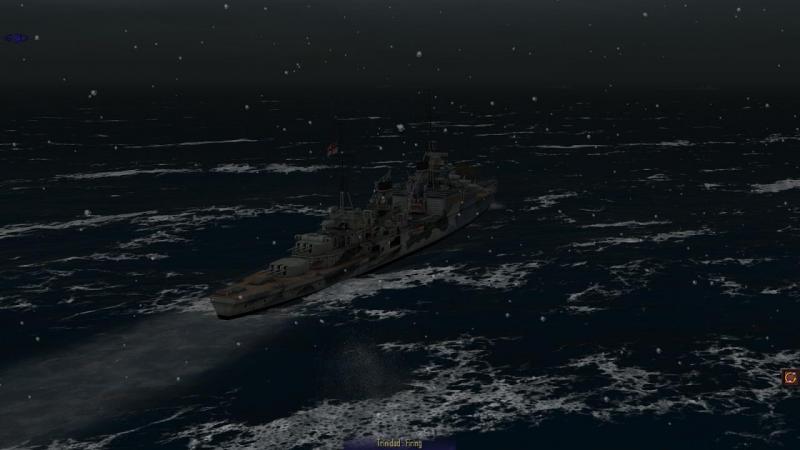
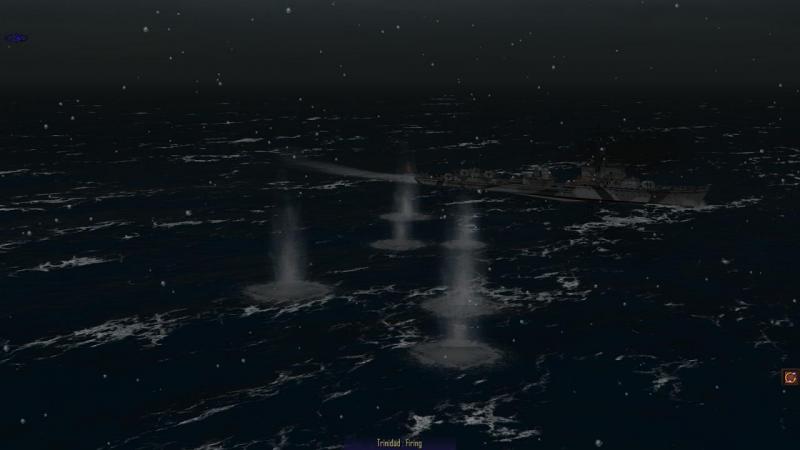
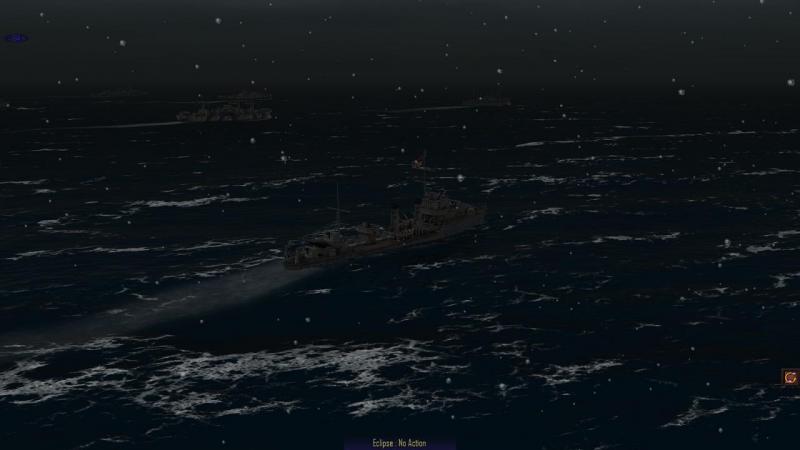
Endgame We had sunk two of the three enemy destroyers and put the damaged cruiser Trinidad to flight...for the time being, anyway. Before settling matters with Trinidad and then getting at the convoy, there remained the third destroyer, Eclipse. She had been astern of Fury but sinking the latter had preoccupied both Z 24 and Z 25. Eclipse, unmolested, had been able to close the range and now turned to port - and fired torpedoes! In the picture above, you can see Z 24 and Z 25, the former above the splash of Eclipse's tin fish, the latter to the right of the tip of her rear mast. This was a dangerous development, requiring evasive action. Next move, I turned both destroyers hard to starboard, to comb the torpedo tracks, and then let fly at our attacker with our forward 5.9 inch guns. At this range, we managed to get some hits with one of the first salvos. Eclipse was far from beaten, though, and immediately landed hits on one of my destroyers. She was on fire astern but kept on coming. By forcing us to turn to avoid torpedoes, Eclipse had been able to cross our 'T', firing broadsides whilst we had only our front turrets bearing. When I judged that the torpedoes had passed, I turned both destroyers to bring our own broadsides to bear, but I had moved too quickly, and there was a big explosion as Z 24 took a torpedo astern! She stayed afloat though she was well down by the stern and for a while, her steering was out (indicated by the 'ghosted' horizontal scale near the bottom left-hand corner of the screen below) with her rudder jammed at 25 degrees to starboard. Z 25 had turned to port and escaped the fan of torpedoes. She took Eclipse under fire... ...and down she went at last... That left Trinidad, still withdrawing to the west behind a smokescreen. Heading back towards the cruiser, and with her fires put out, Z 25 found herself opposite one of the escaping merchantmen... ...and had a crack, if only to let the convoy know that we hadn't forgotten about them. This map view shows the tactical situation at about this time. in the centre, Z 24, still afloat and in action, has shifted fire from the sunken Eclipse to the retreating Trinidad (as indicated by the numbering of the shot history and associated tracks). To the north, Z 26 is passing the wreck of Oribi in pursuit of Trinidad. To the south, Z 25 is also coming after the cruiser. The convoy is continuing to withdraw to the west-north-west, though its stragglers are well within range. At this point, Trinidad stopped making smoke, and started shooting with her rear turrets. The destroyer attacks had bought enough time for her damage control parties, evidently. She was still moving slowly away from us but her armament seemed to be intact. Now the fight was on again in earnest! The difference now was that Trinidad was in torpedo range of both Z 24 and Z 26. Trinidad's fire control had likely been damaged and though close, her salvo scored no hits. In reply, first Z 26 and then Z 24 launched four torpedoes each. Z 26's salvo landed first, all four tin fish hitting Trinidad to starboard. Seconds later, the four torpedoes from Z 24 also found their mark, to port. The first four would have been enough, but better safe than sorry, as the saying goes. Merchantmen in Atlantic Fleet have only AA weapons, so what followed was more a massacre, than a battle. Still, this was the reason we had come here. The results screen confirmed our victory. I had been lucky not to lose at least one destroyer, especially as Z 24 had taken a torpedo. She and Z 25 with no worse than medium damage meant I had got off fairly lightly. If Trinidad had crippled or sunk one of my ships in the opening exchanges, the battle would likely have gone the other way. The enemy cruiser should perhaps have turned immediately to bring full broadsides to bear, but I had the impression the British were keen to get between us and the convoy they were there to protect. In the event, they could have served their charges better had they been more cautious. Fortune does not always favour the brave, it seems. We had certainly re-written a little piece of history. Z 26 had not been sunk. In the real battle for convoy PQ13, Trinidad had actually been hit by one of her own torpedoes after a malfunction; in this fight, she had been hit by ours, and had not survived. The ability to re-fight so many and varied historical battles is truly one of the many high points of Atlantic Fleet.


-
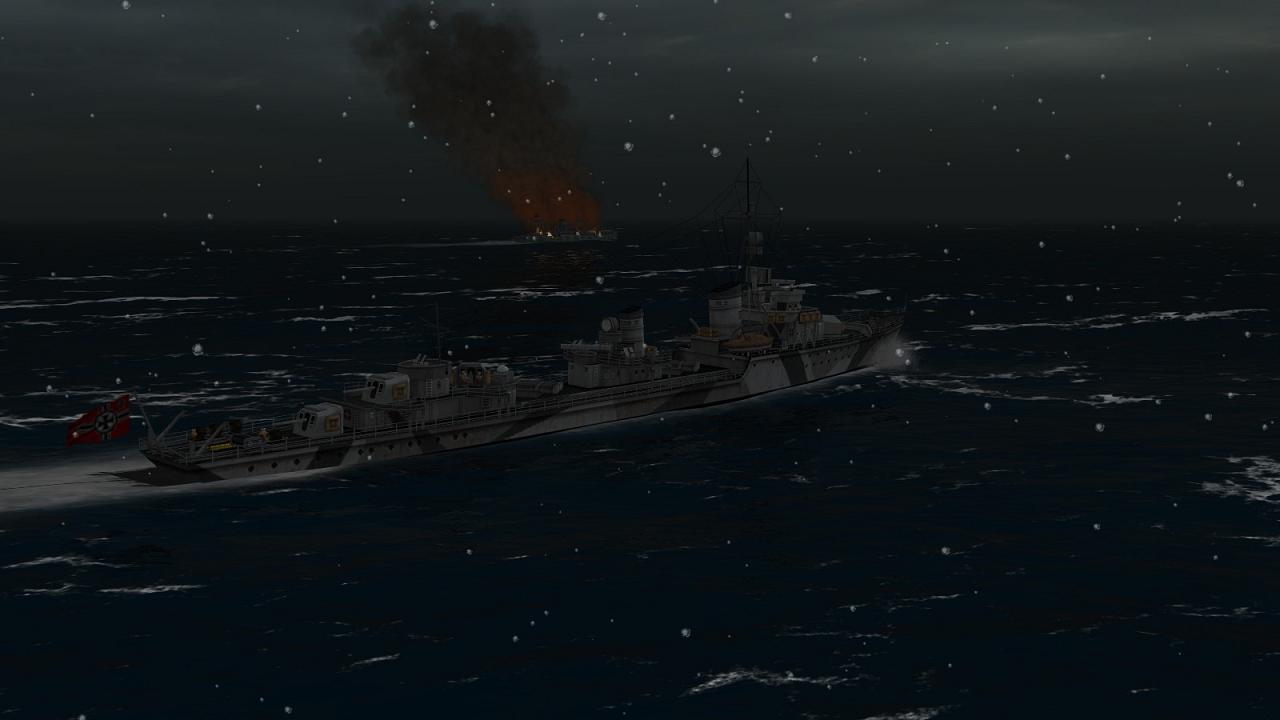
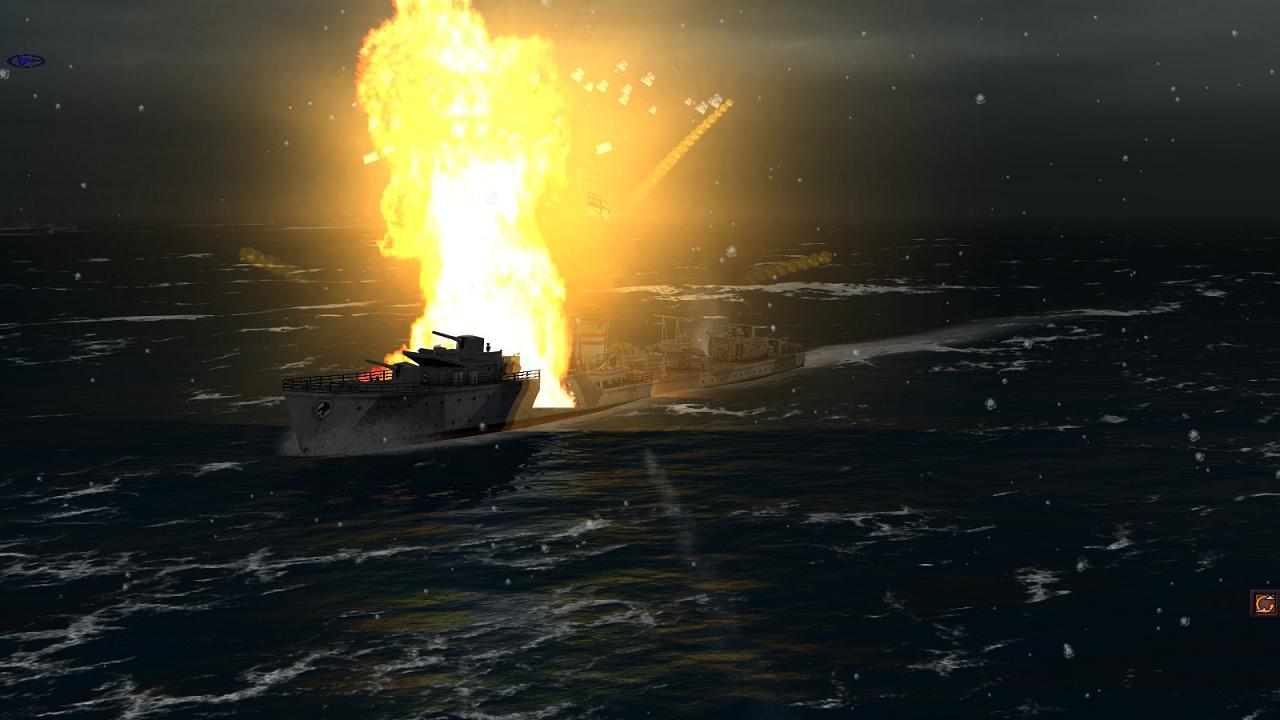
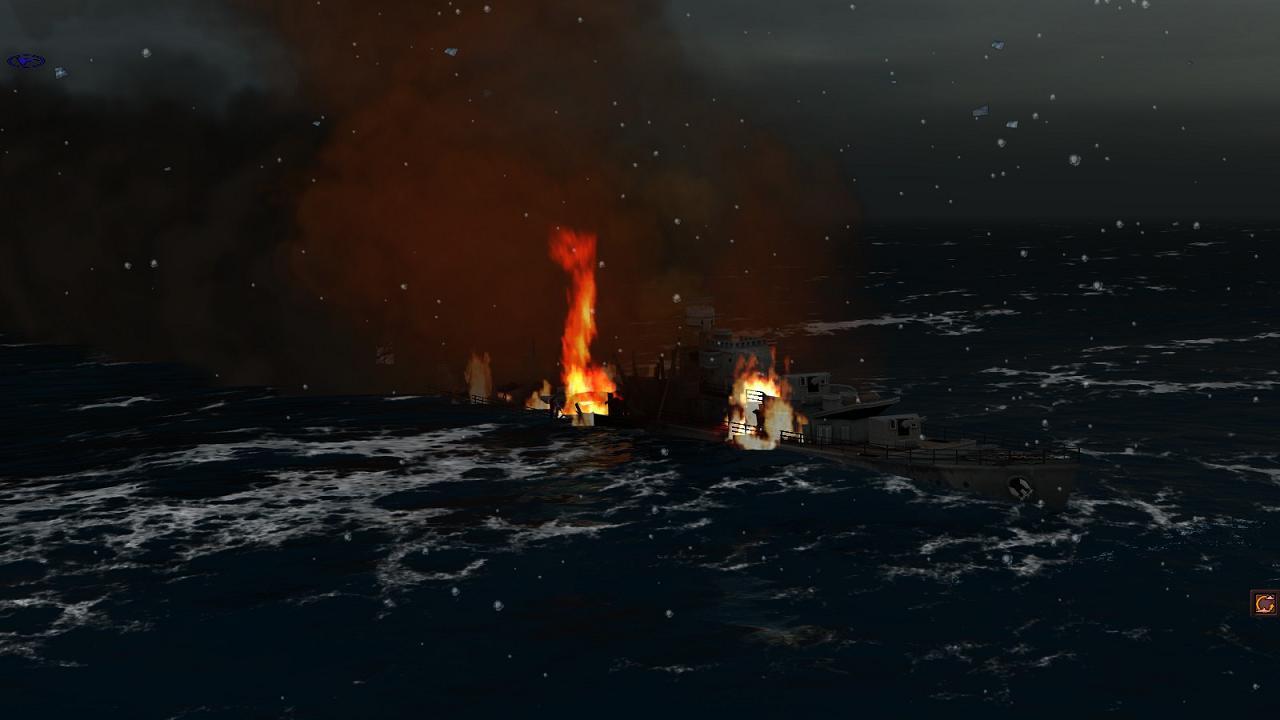
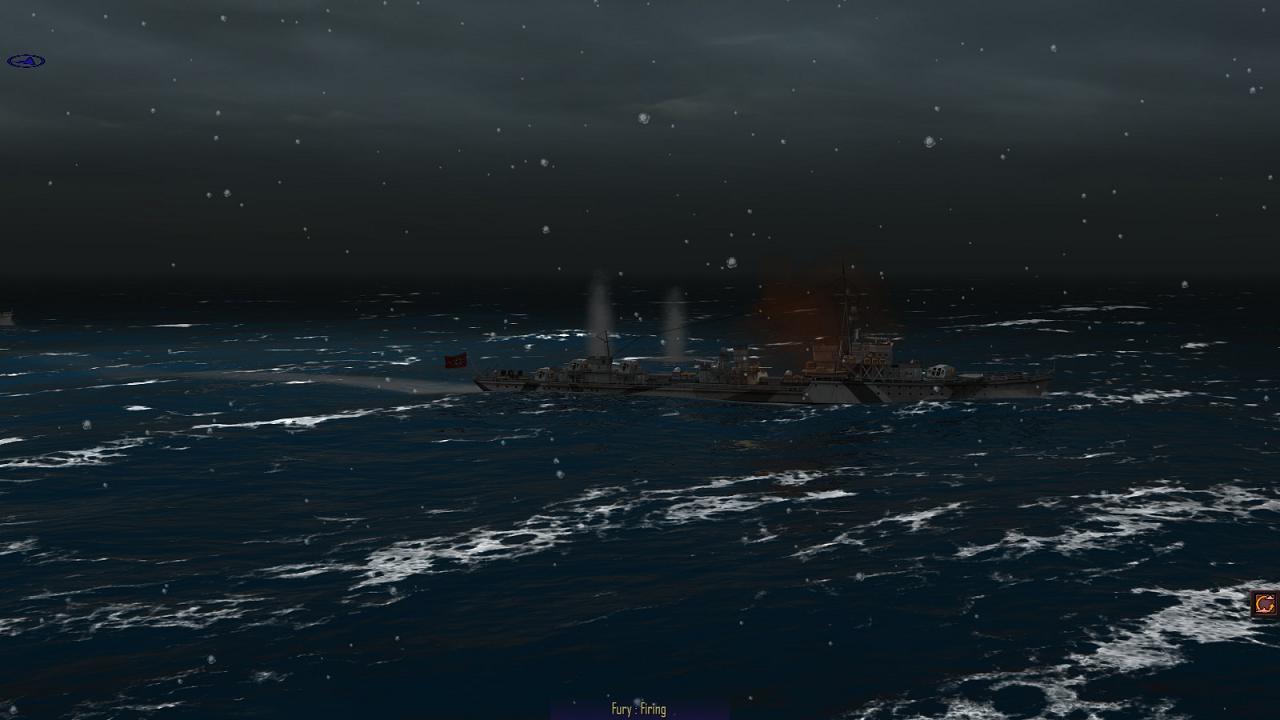
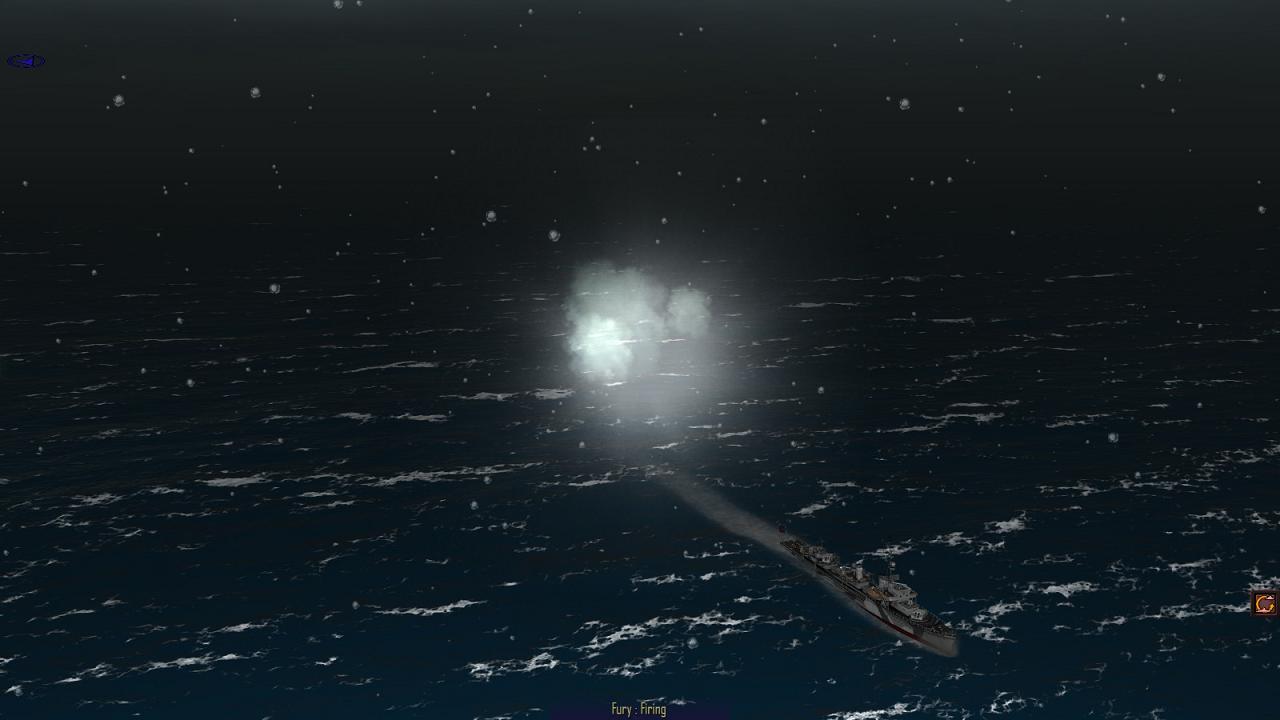
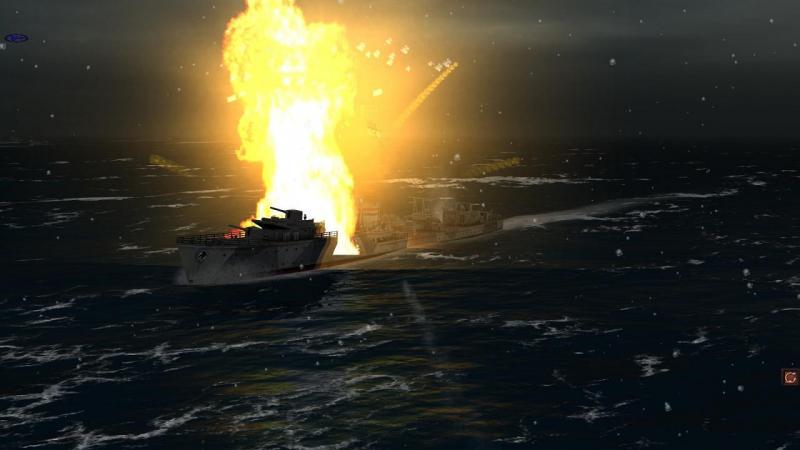
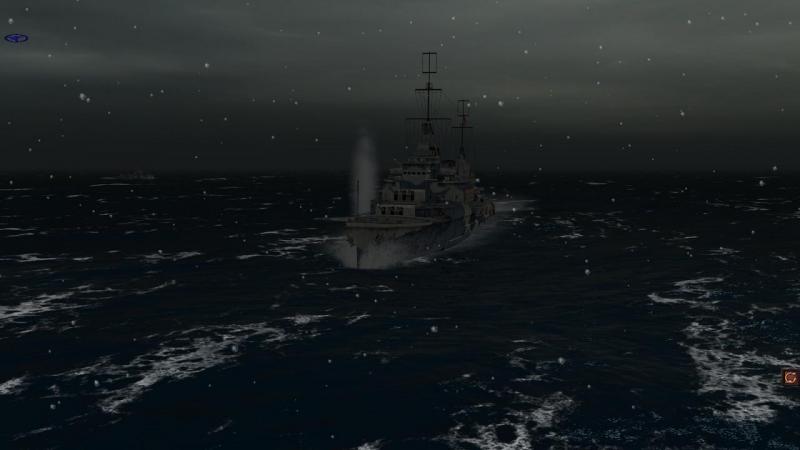
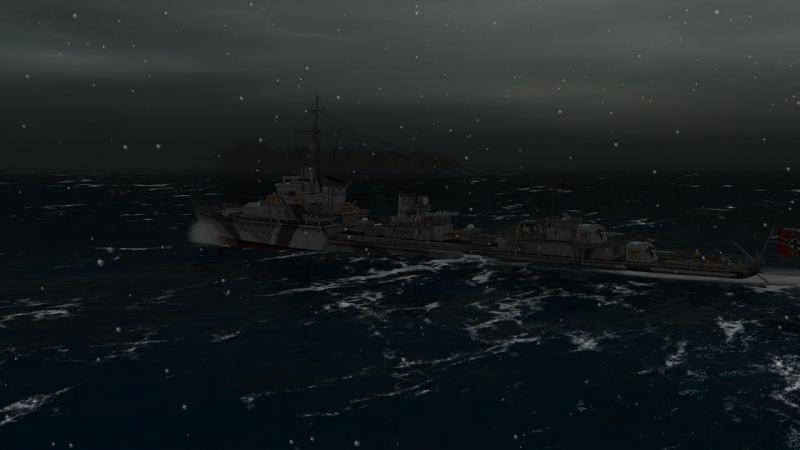
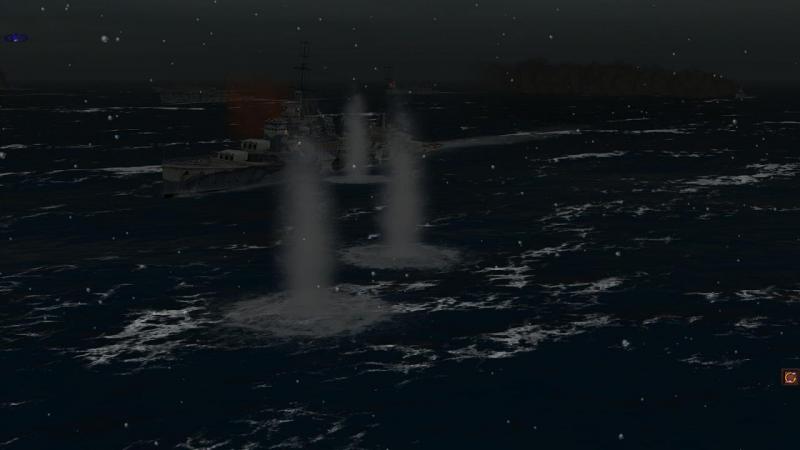
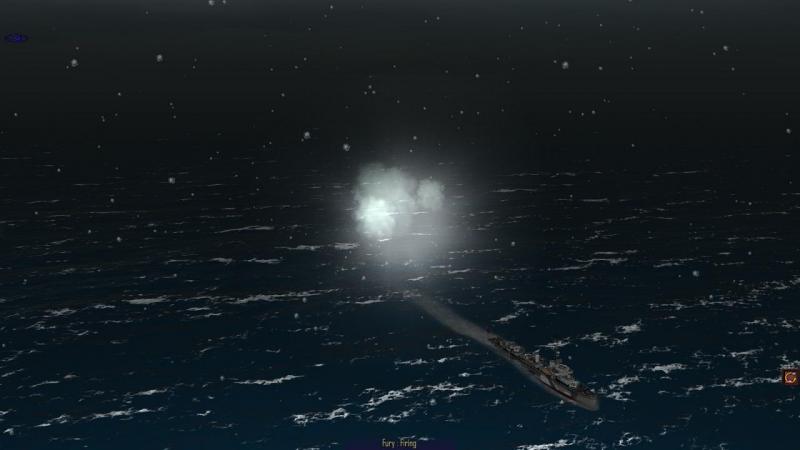
Destroyer versus destroyer Z 25 was now in trouble, and I turned her away, covering the withdrawal with her aftermost guns. You can see how the range has closed - Fury is visible in the picture above, headed left to right, just above turret Anton. The tactical situation around this time is shown in the map view below. To the north, Z 26 is racing to get back abeam of Trinidad, which has turned well away and is making smoke. Z 25, like Z 24 and Z 26, is still targeting Trinidad. Clearly, it was time to start hitting back at the enemy destroyers. Fury was now steaming north towards Trinidad, almost on a reciprocal course, as if she was trying to cover the cruiser's escape. I decided she must now be the priority target, and would be engaged by both the damaged Z 25 and by Z 24, while Z 26, coming down after Trinidad, kept up the pressure on the retreating cruiser. Still burning, Z 25 came about onto a roughly recriprocal course to Fury and brought a full broadside to bear on the enemy destroyer. Successive broadsides from both Z 24 and Z 25 churned the sea around Fury as she came level with Trinidad, heading in the opposite direction on her unengaged side.. Hit and down by the stern, Fury somehow survived my first salvoes and I knew I would now have to face her return fire, possibly a torpedo attack. Further north, Oribi was undamaged and steamed as if to cut off Z 26 in her pursuit of Trinidad. Now, it was Z 26's turn. As she was about to send another salvo after the smoke-shrouded Trinidad, there was an explosion to the left of her target. The victim was Fury, whose damage must have caused a magazine explosion or set off torpedo warheads. My next victim was Oribi, whose bridge was enveloped in a fresh fireball as Z 26 redirected her fire from Trinidad. Oribi's decks were soon awash; not long after this photo was taken, she went down. The situation at this time is shown on the map view below. Oribi has just been sunk by Z 26. Sister ships Z 24 and Z25 have sunk Fury. Trinidad is now steering further to the west, still making smoke. The convoy has turned over 360 degrees and is headed away to the west-north-west. The only enemy warship still in action is the destroyer Eclipse. The battle at last seemed to be well in hand, but it was in fact far from over. ...to be continued!


-
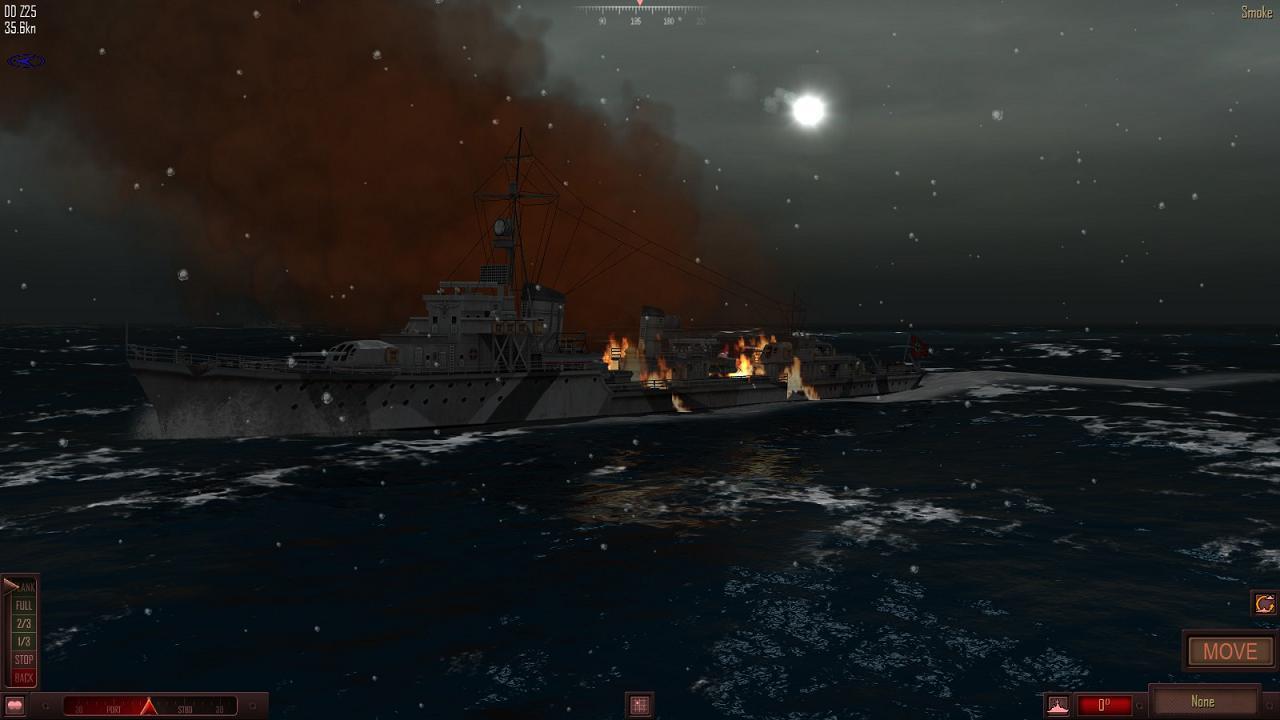
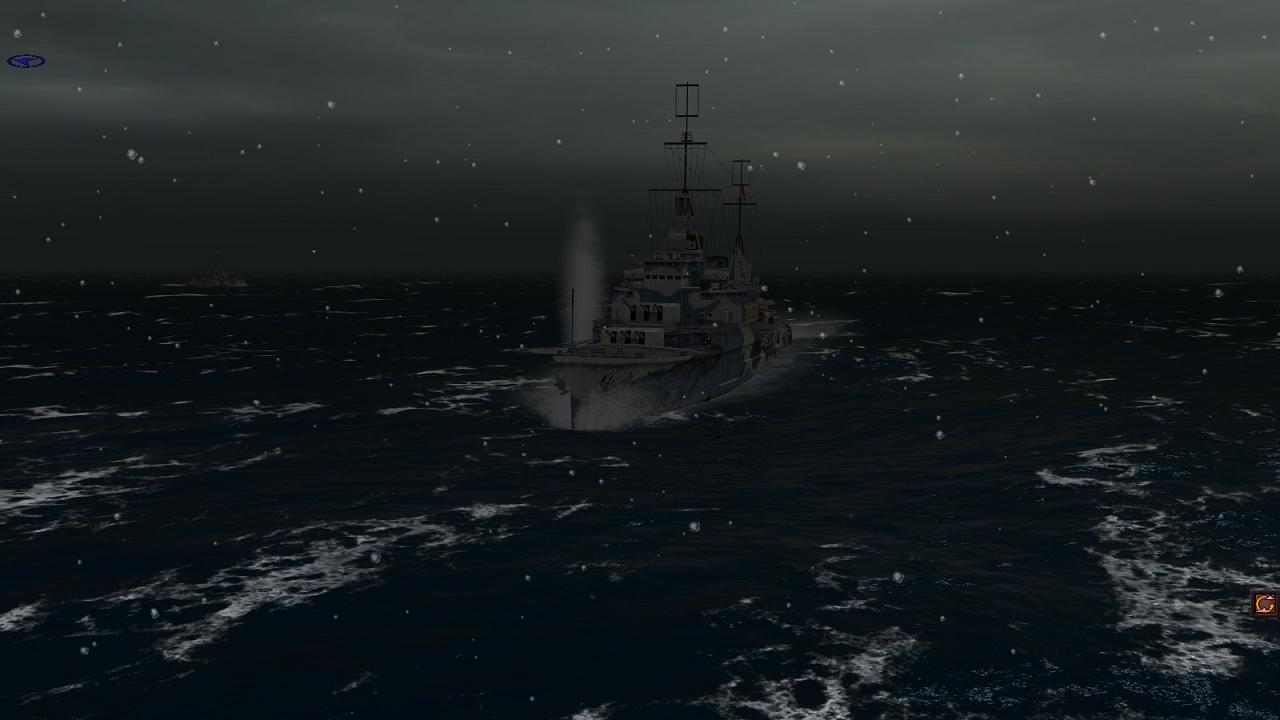
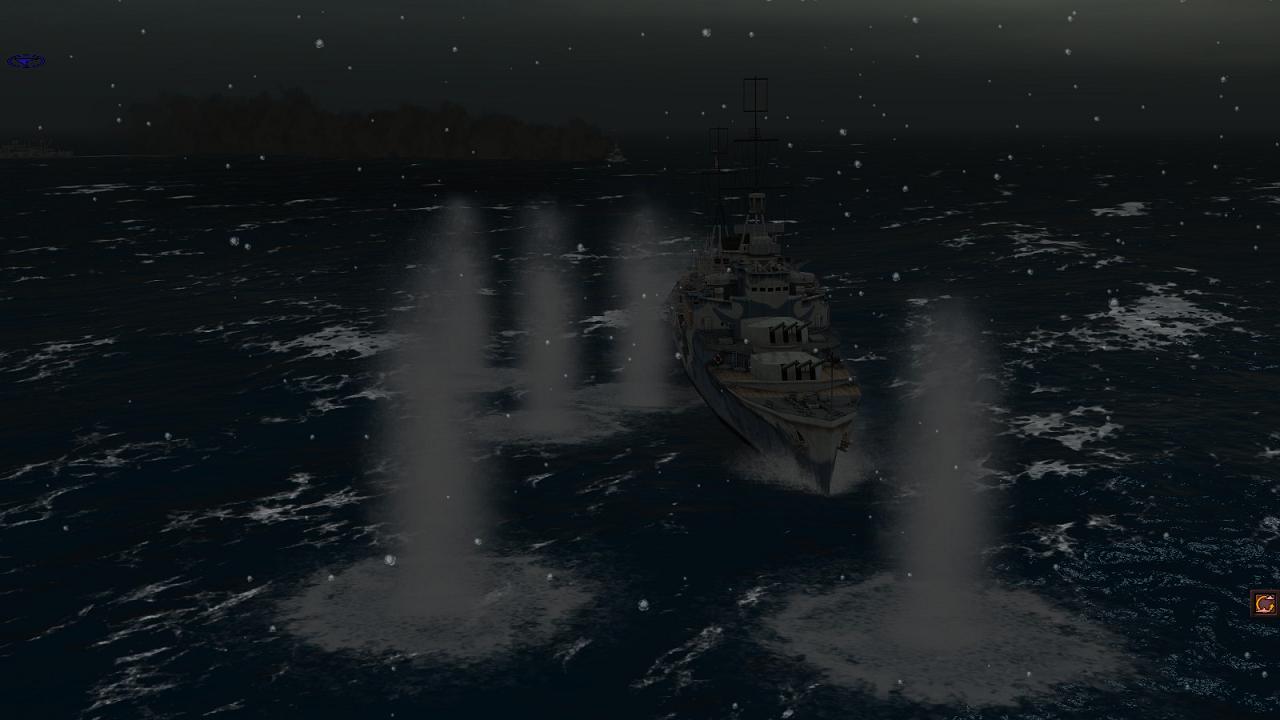
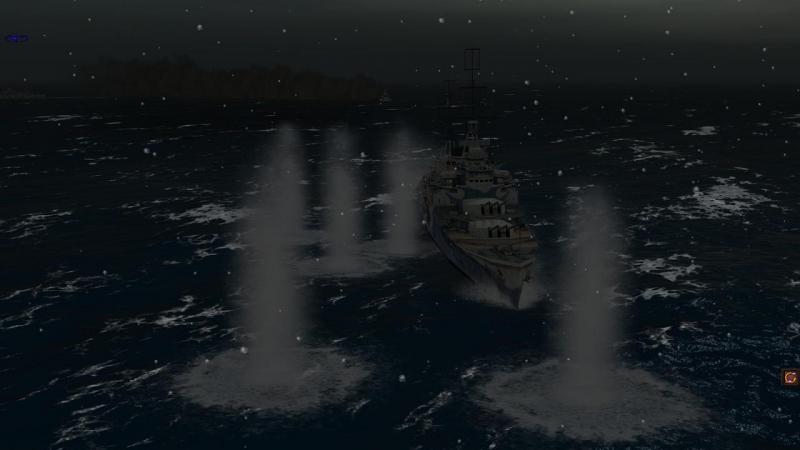
A turn of the tide? At this point in the fight, Trinidad, though hit more than once, was looking pretty well undamaged and was still engaging Z 25, to her front. The latter had been hit once, a 6-inch shell from a salvo falling over, which seemed to clip her funnel and did no serious damage. But now, astern and to starboard of Trinidad, Oribi came into action. At first she fired starshell, but I knew that worse would quickly follow, and that the illumination would likely improve the accuracy of Trinidad's shooting. That shooting was still concentrated on Z 24 or Z 25. One of them was well lit up by Oribi's starshell... ...and was soon taking hits from the destroyer Fury, across on the other side of the escaping convoy. Those Royal Navy captains were co-operating well! Despite this, I continued with my plan, concentrating my fire against Trinidad. She is seen below with a single shell-spash from one of our salvoes indicating that other armour-piercing rounds have found their mark, somewhere in the ship. Finally, Trinidad began to make smoke and turn away, a sure sign that she had been hit hard! At last, just when it seemed we would be swamped by the combined fire of the British ships, the tide of battle seemed to be turning my way, instead! Behind Fury, Eclipse, dangerously cutting across the bows of the retreating merchantmen, began shooting at us... ...but I was determined to press my advantage against Trinidad. I knew that repairs could see her back in action at any time, and that, especially with the range closing, her apparently-intact battery of twelve 6-inch guns could blow any of my destroyers out of the water. I had to keep after her. Z 26 had turned around and was soon catching up, pumping 5.9 inch rounds into the smoking cruiser. At last, I saw more visible signs that Trinidad was taking serious punishment. A violent explosion sent a fireball rising from amidships, leaving mangled wreckage where her second funnel had been. That's more like it! By now, Z 26 was well abeam of Trinidad, outside effective torpedo range but now a good target for full broadsides from my five 5.9 inch guns. There was another big explosion aboard Trinidad, this time between the bridge and 'B' turret. She' was still under way but I began to feel more confident that I had, and could maintain, the upper hand, by keeping her under fire from at least one destroyer. But the battle was far from over! Unengaged, the three British destroyers had been steadily closing in and now, a salvo from one of them smashed into Z 25, starting a nasty fire amidships. Could the tide of battle be about to turn again? ...to be continued!

-
Snow and starshells My first few salvoes having failed to draw blood, I was beginning to get worried. Sooner or later, somebody was going to get some hits, and I needed it to be me. Z 24 and Z 25 zig-zagged as they fired, to throw off the aim of the oncoming Trinidad. Astern of the cruiser, Oribi made smoke to cover the convoy's turn away to starboard. The 'manoeuvre' part of my plan seemed to be going rather better than the 'fire' bit. As Z 24 and Z 25 raced across Trinidad's bows, Z 26, firing as she came, steadily drew abeam of the enemy cruiser. I maintained a nearly reciprocal course so as to keep all my guns bearing, rather than closing fast to get into torpedo range. Finally, I got some hits! Three of Z 26's rounds splashed into the sea to port of Trinidad, but two more hit metal not water. At this point, the enemy destroyers pitched in. Fury, ahead of the escaping convoy as it turned to satrboard behind her, illuminated Z 25 by starshell. I continued meanwhile to engage Trinidad, but I seemed to have lost the range again, with my salvoes going close, but not close enough. To add to my troubles, Fury now joined Trinidad in engaging the illuminated Z 25. Bound to happen, sooner or later, and now it had. Here's the situation at this stage of the battle. The convoy continues to turn away to starboard, while Trinidad and Fury (and behind them, Oribi and Eclipse) are about to turn to bring their full broadsides to bear on Z 24 and Z 25. Z 26, seeing Trinidad turning away, has come about to port, to stop the range opening out. I've had my chance to do some serious damage to Trinidad before a general battle gets under way. And I've failed! Now, I can feel the fight slipping away from me, as the advantage passes to the British. ...to be continued!

-
Will history be re-written? This was not going to be easy. Our three destroyers, with five 5.9-inch guns apiece but protection against nothing but shell splinters and not much of that, were up against a cruiser with twelve 6-inch guns, accompanied by three destroyers whose four 4.7 inch guns each would be enough of a threat, as it was. I quickly made a plan, then started to put it into action. The plan had two elements - fire and manoeuvre. For the former, I decided we could concentrate all of our fire, for as long as possible, upon the closer and more dangerous target - Trinidad. By way of manoeuvre, we would split into two. Z 26 would go right to come in along the port side of the oncoming cruiser, with the possibility of making a torpedo attack. Z 24 and Z 25 would go left, to 'cross her T'. I sent two destroyers that way because they would also be closing with the convoy.. and likely, other destroyers. Z 24, in the centre of my line, went to full ahead and turned hard to port. Having completed the 'move' phase of my turn for my first ship, I now had the opportunity to get off the first rounds of the battle. I ordered Trinidad as our target... ...then from the gunnery position, fine-tuned our aim-off to the right, to allow for the significant crosswind. At this stage, only the initial firing solution was available - we had neither fall-of-shot (map) nor spash (3D world) history as yet. I backed off the recommended 16.3 degrees elevation to a round 16, as the initial solution usually turns out on the long side. Then we opened fire. My first salvo of AP rounds was left and slightly over. I'd need to allow a bit more for that darn crosswind! It was now the turn of my other two ships, to move then fire. Again, the crosswind undid my best efforts to secure some potentially decisive early hits. Trinidad, when her turn came, wasted no time in replying. For her target, she choose the two destroyers who were racing across her bows, ignoring, for now, Z 26, which was moving fast as if to pass her to port. Having failed to land early hits, I now needed a certain amount of luck, for the enemy to do no better. A lucky hit or more from an early salvo could scupper my plans at the outset. After a few tense seconds, the six rounds from the opening salvo from Trinidad's 'A' and 'B' turrets plunged down and crashed into the sea within about a hundred metres of Z 25. A miss! But it wasn't far off, for a first effort. It transpired that destroyer Oribi was astern of Trinidard, on the convoy's port side, with Fury, followed by Eclipse, to starboard. At first, these three took no action, save to stand towards the enemy, while the merchantment turned to starboard to get away. I would have to watch these fellows, but for now, I had my hands full with Trinidad. The enemy destroyers I woud continue to leave unengaged. ...to be continued!

-
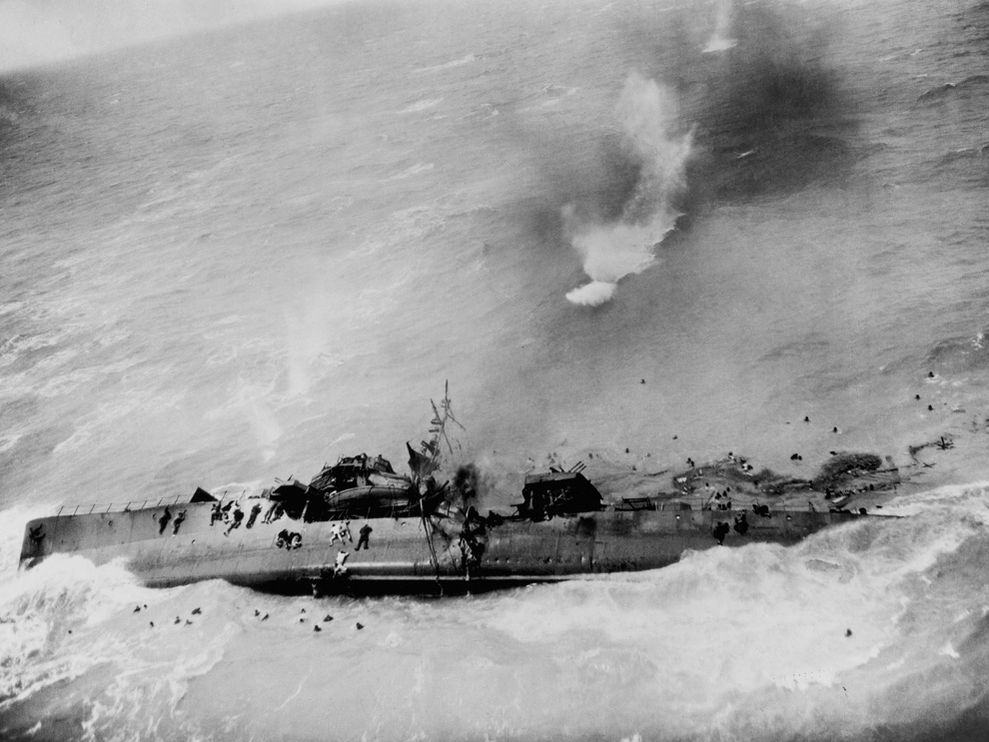
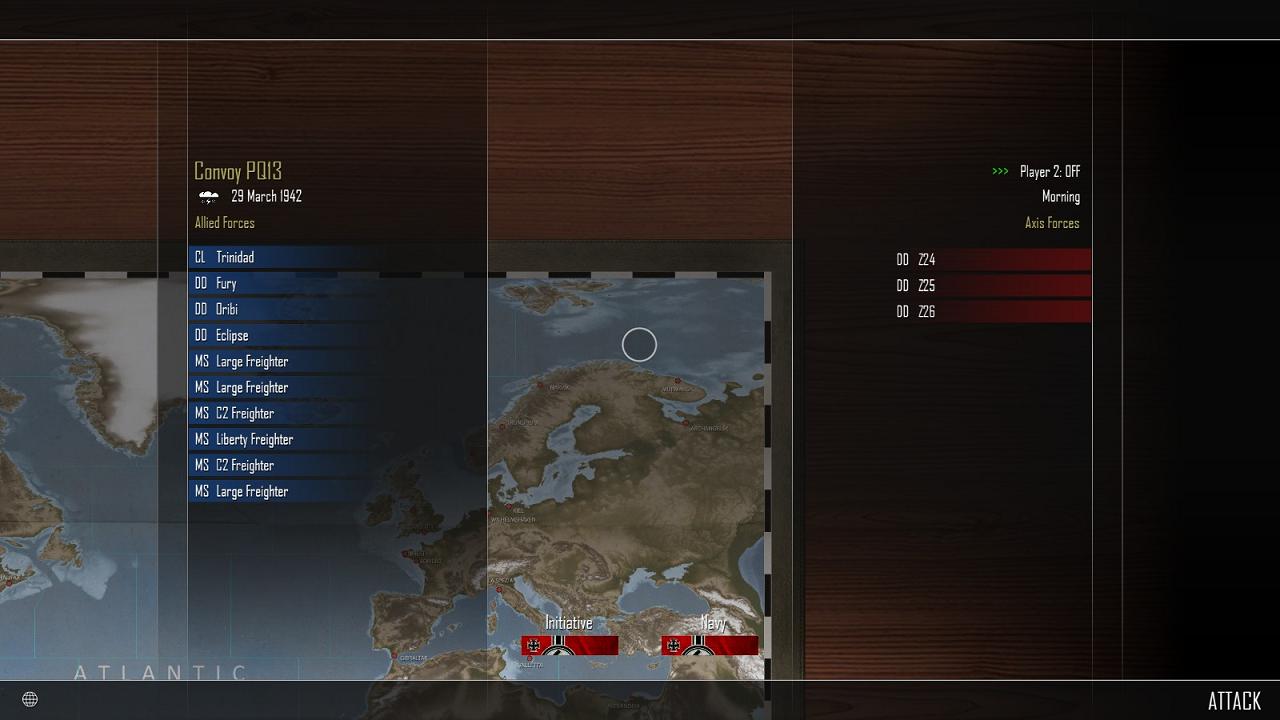
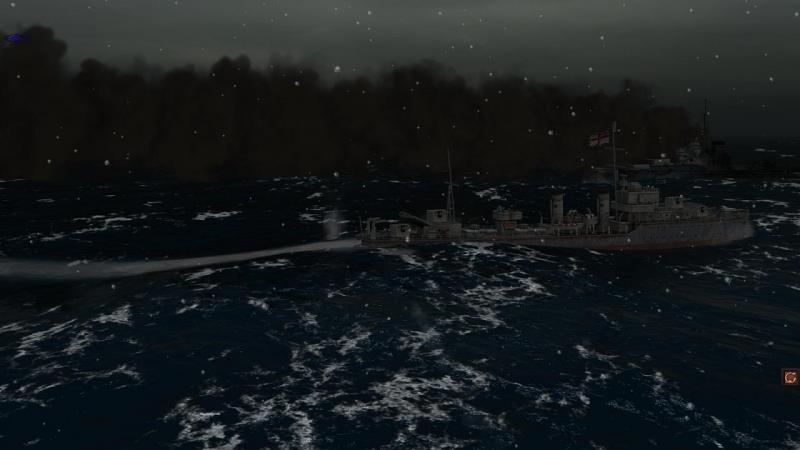
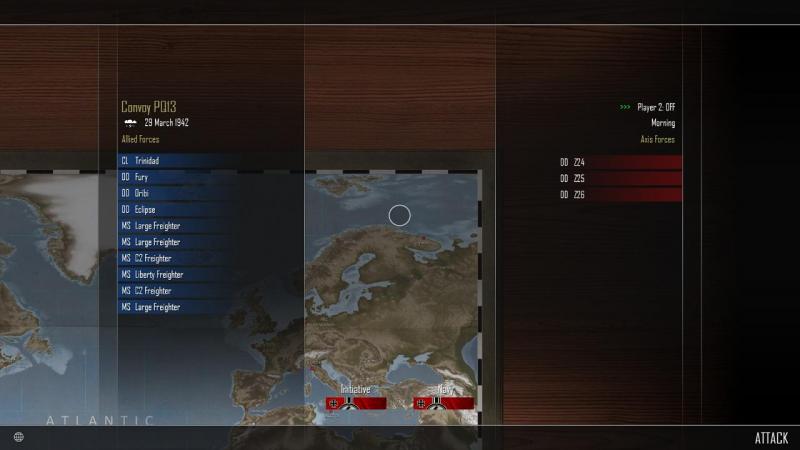
Re-fighting the battle for Convoy PQ13 in Atlantic Fleet Of all the many dramatic photographs taken of the war at sea, some of the most haunting are of the last moments of what maybe minutes before was a fine warship in fighting trim. Pictures like this well-known shot of a Japanese escort sunk by skip-bombing. The crew cling to the capsizing vessel as what appears to be another bomb, dropped by the aircraft from which the photo was taken, splashes across the water towards the stricken ship like a stone skipped on a pond. Back in the 1990s I coveted but never obtained a rather expensive book from the alas long-departed Military Book Club, War at Sea 1939-45 by Kreigsmarine veteran Jurgen Rohwer. This was a large-format book with a short narrative account written around an excellent series of photographs, many of which I haven't seen before. When, just recently, I picked up this book second-hand, I was just as struck as I had been many years ago by its cover photo, one of a series a wrecked and apparently abandoned German destroyer. At the time I realised the pictures were indeed of a German destroyer, taken from an enemy ship. But what ship was she, what happened to her crew, and how did she come to be one of the very few ships photographed so very closely by those who had sunk her? The historical battle Long before I got the book, I had discovered that the sinking German destroyer was the Z 26, lost during a confused battle in Arctic waters on 29th March 1942. By that time, Royal Navy was running a series of convoys - the PQ series, later changed to JW - to help keep the Soviet Union in the battle against Nazi Germany. The most famous Arctic convoy action is PQ17, which scattered after inaccurate reports that it was about to be intercepted by a force including the battleship Tirpitz and was then devastated by air and U-Boat attack. Other famous Arctic convoy-related actions were the Battle of the Barents Sea in December 1942, where the failure of the German force to get to grips with the convoy had Hitler pushing for the scrapping of the surface fleet; and the Battle of the North Cape a year later, when Scharnhorst was lost in action during an abortive sortie against Convoy JW55B. Throughout, the merchant, naval and aircrews of all sides had to endure exposure to some of the worst weather in any theatre of war, with frequent heavy, freezing seas in which survival time was low indeed. By the time in early 1942 that Convoy PQ13 sailed for Murmansk, the Kriegsmarine was still in the middle of redeploying its remaining seaworthy heavy units to northern waters, primarily to interdict the Arctic convoys, in co-operation with U-boats and bombers. Just three destroyers participated in the attack on PQ13 - Z 24, Z 25 and Z 26. They were all from a class which had begun to be laid down before the battle by whose name the class was commonly known - Narvik. Not an auspicious name - as one author put it, " 'Lost at Narvik' was the epitath of the Leberecht Mass and Deither von Roeder classes", ten of the big destroyers having been smashed in two fights in Narvik Fjord with the Royal Navy during 1940, like Bernd von Arnim, below. The Narvik class were big and with 5.9 inch guns, very heavily armed for destroyers, though not all shipped the twin forward turret intended for the class - they all do, in Atlantic Fleet. PQ13's nineteen merchant ships - most of them US and British Merchant Navy vessels - had already suffered some losses from aircraft. And severe weather had dispersed the ships, two groups re-forming and the rest proceeding independently. At this point, the German destroyers arrived, and after sinking a merchantman, ran into the convoy's close escort, headed by the cruiser HMS Trinidad, supported by RN destroyers and later by one of the Soviet destroyers which had sortied to meet the convoy. Z 26 was hit hard, mainly byTrinidad; Z 24 and Z 25 disengaged after rescuing around 90 of her crew, but about 240 never made it. The PQ13 action in Atlantic Fleet You don't need to use Atlantic Fleet's custom battle generator fo fight this one - it's included with the large set of historical battles that come with the game. Here's the intro screen. As usual, there's no 'fog of war' - less relevant anyway, in an historical mission - so you can see exactly who's on each side. You can choose to play for either navy - or to take the turns for both sides, by setting the 'Player 2' option to 'ON'. I have opted to play for the Kriegsmarine, and we have the initiative (= first turn). As well as the 6-inch gun Fiji (or Crown Colony) Class cruiser Trinidad, we are up against three Royal Navy destroyers - the inter-war types Eclipse and Fury, and the War Emergency Programme Oribi, the latter distinguisable by having just the one funnel, compared to two for the others. Six merchantmen are in the part of the convoy that we have come upon. The weather is poor, cloudy and with rain or snow. Here's the position at the moment the battle begins. Our three destrovers are, realistically, line abreast, in the sort of formation that would be used to sweep for the enemy. Trinidad herself is the only ship we have been able to identify visually at this stage; the others are just radar contacts. Clearly, it's time to get busy! ...to be continued!


-
WOFF Screenshot of the Month, July - 'Meet the Fokkers!'
33LIMA replied to 33LIMA's topic in WOFF UE/PE - General Discussion
Just right, Olham! After all, what have the Fokkers ever done for us, eh? Apart from shoot down Camels. And SE5s. And Bristols...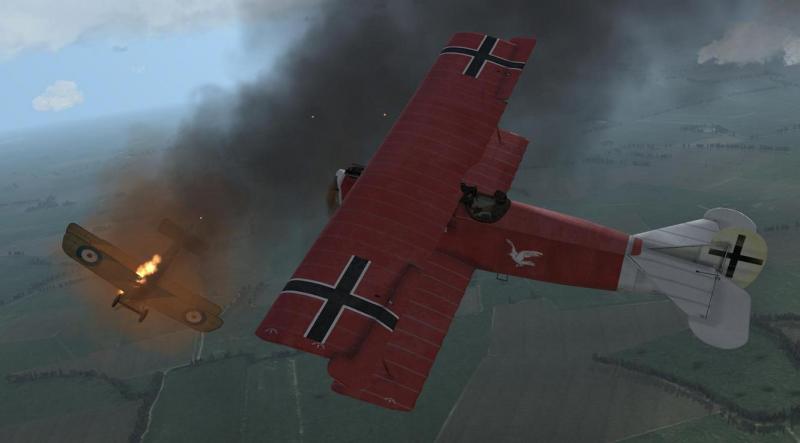
-
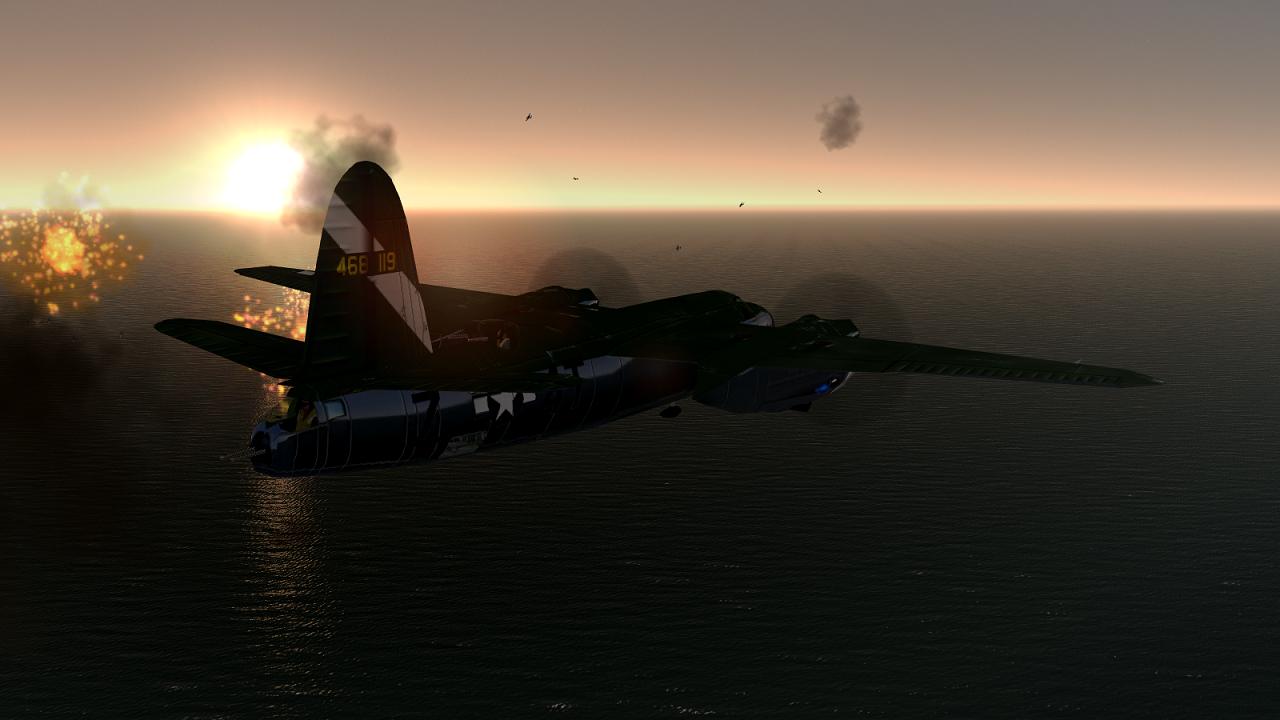
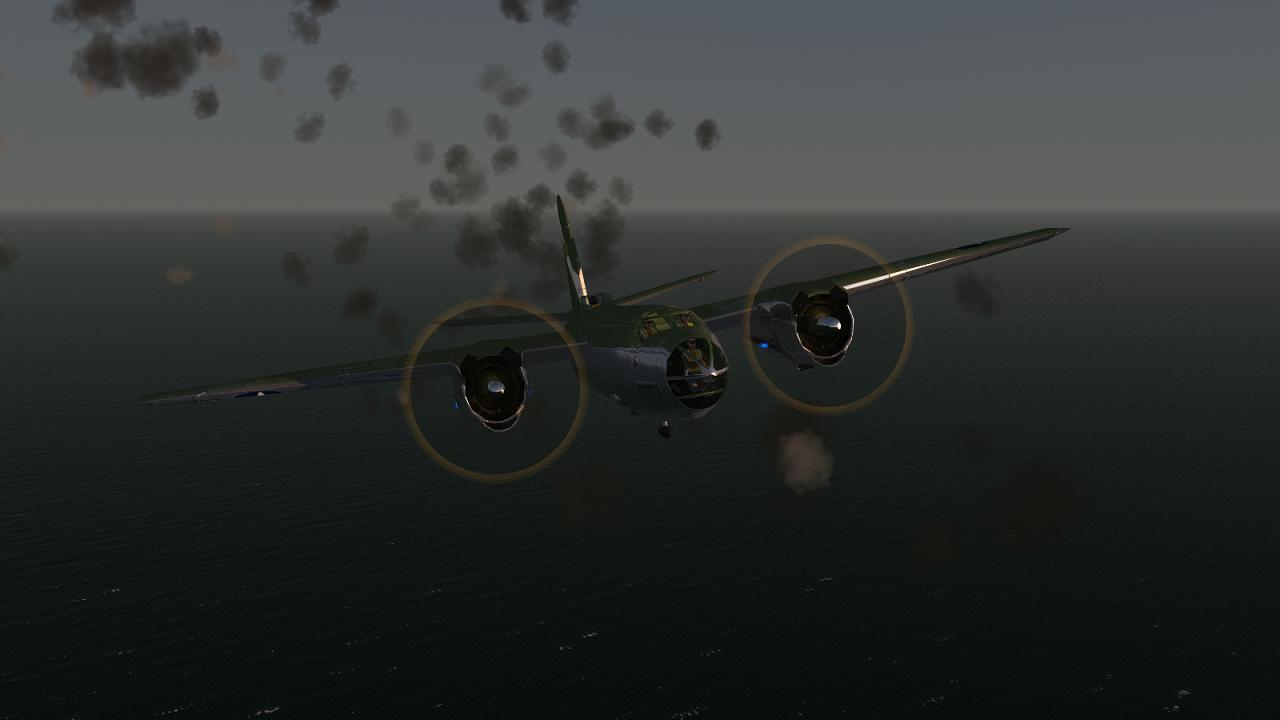
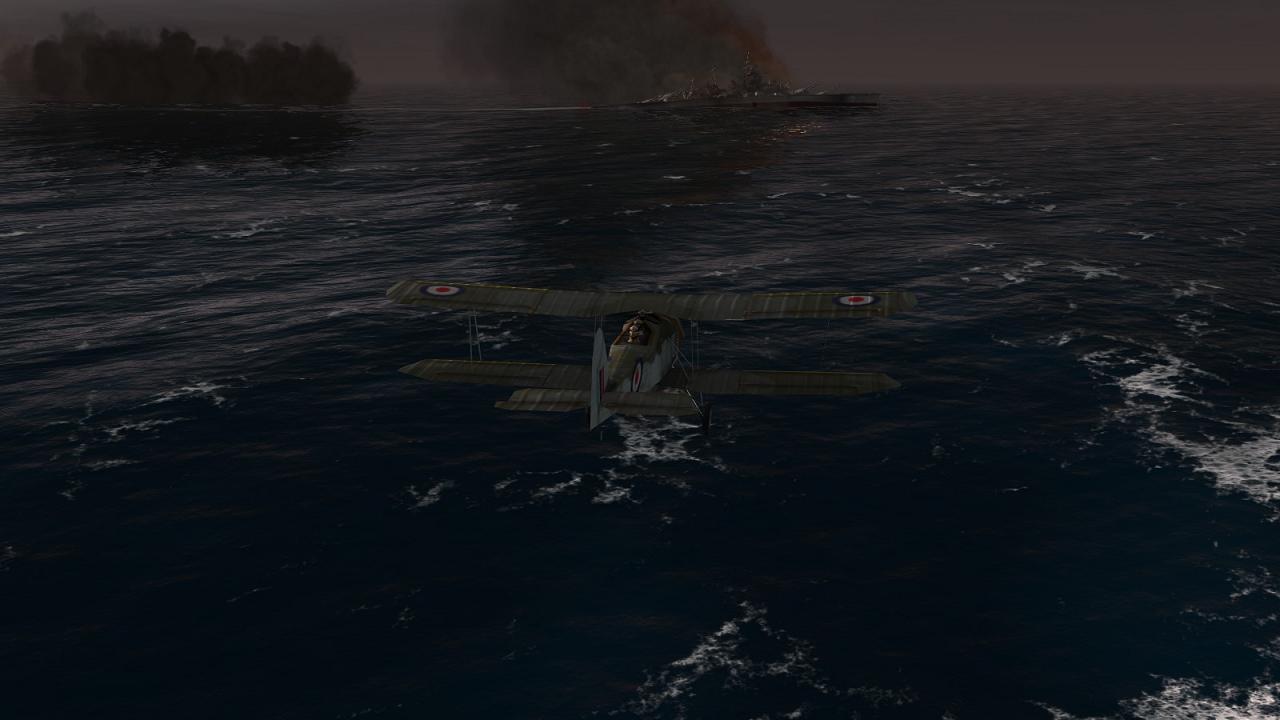
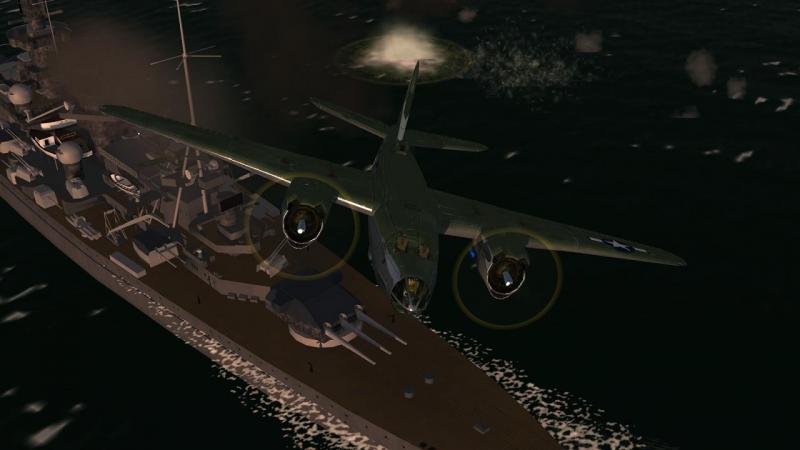
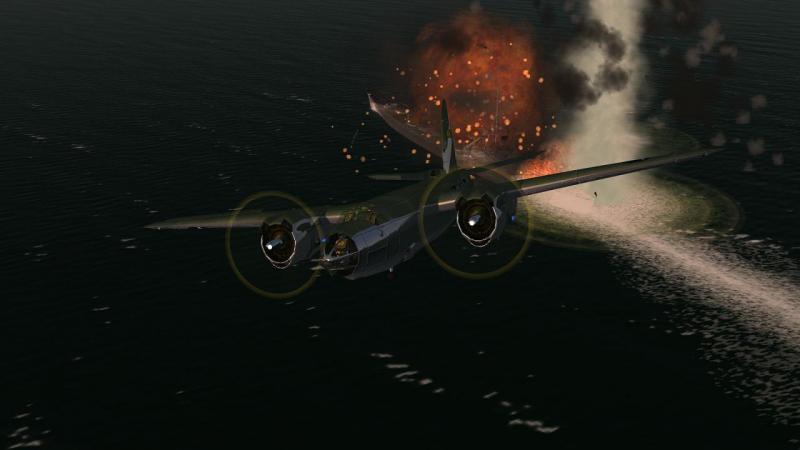
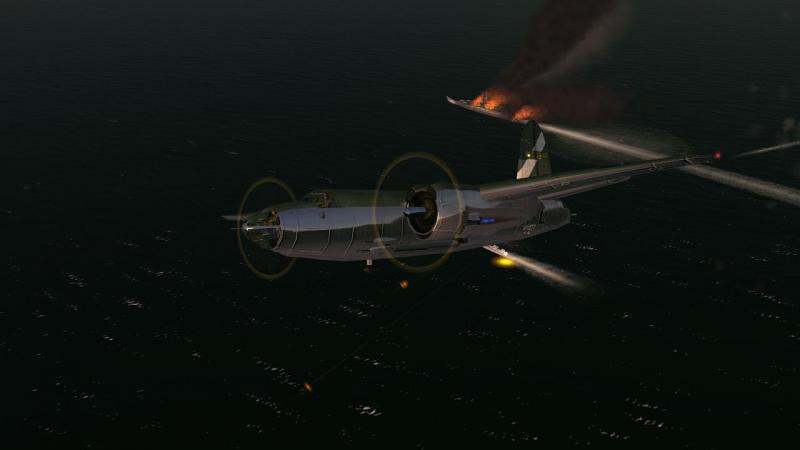
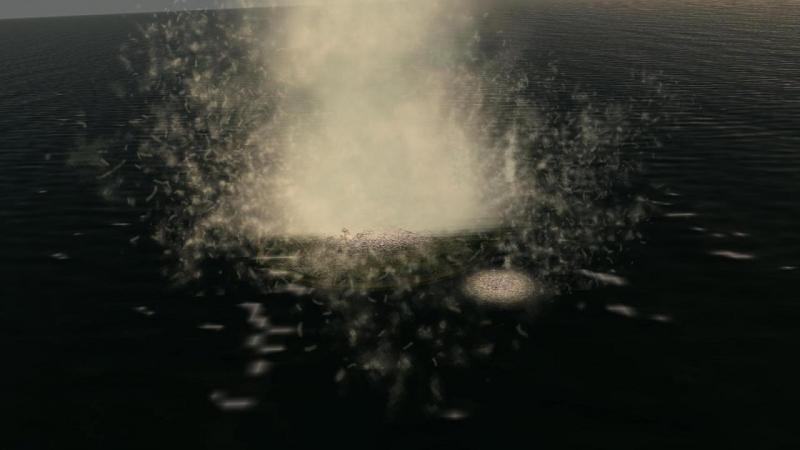
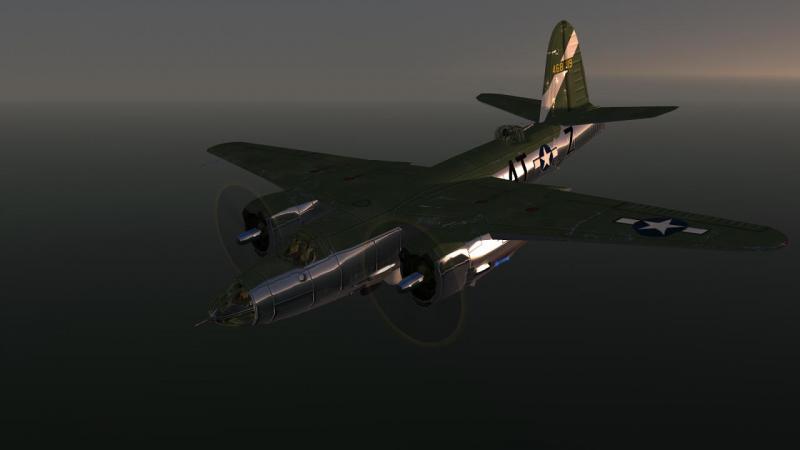
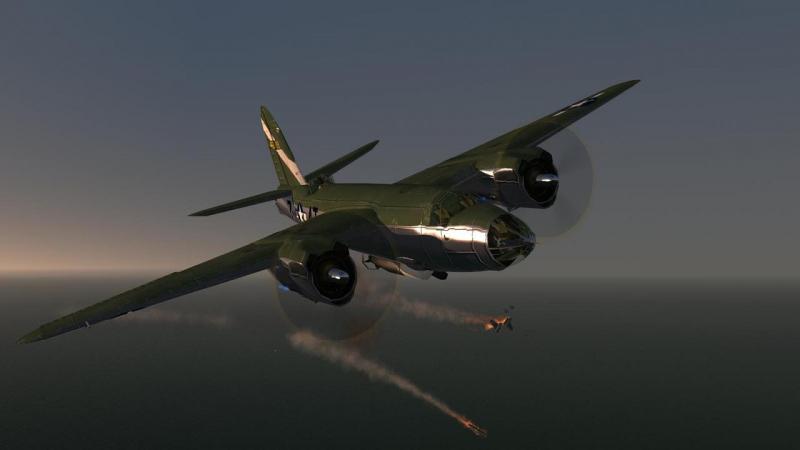
The moment of truth arrives... I levelled off and settled onto my torpedo run. CFS3 is a bit more forgiving than it shoud be, in terms of how high and how fast you can be for a successful torpedo launch, but I still made some effort not to over-stretch this - I aimed for about 100 feet and under 200 knots. As for the others, whom I'd already ordered in to make their own attacks, I still hadn't heard the stock 'Beginning my attack!' radio messages, so it looked like I was definitely going in first. As if that wasn't bad enough, I was conscious even before the flak opened up that my B-26 was responding somewhat sluggishly to the controls, evidently from damage sustained in the earlier fighter attack. I fly with the 'simulation messages and warnings' text display turned off, so apart from seeing a hole in my fin, I had no reall idea how bad it was. I was seriously tempted to turn away and make another run once the others had started their attacks, but I was so close now that it seemed just as risky to turn away, as go on. So I bored on in - if I was about to get wiped out, as seemed more than likely, I might at least try to be sure of getting a hit with my single torpedo. After what seemed like ages but was only seconds, I hit the release. Nothing happened. I hit the key again. Same result. Realised I must be hitting the wrong key. Tried another. Away went the torpedo, splashing into the water much too close to the target. I pulled the stick hard left to roll my wingtip away from Scharnhorst's main mast, cursing the sluggish response. I waited for the double crash as wingtip met mast then plane met sea. Instead, we scraped past with what looked like inches to spare. I reversed my roll and tried to get away, pushing the throttles fully forward. Everything seemed to be moving painfully slowly, like one of those nightmares when you want to move but can't. Behind me, there was an explosion as my torpedo hit the German battlecruiser, well aft on her starboard quarter. I tried to shove the nose down, to get away at wave-top height. Instead, the extra power seemed to be forcing her up, increasing the angle of attack. Contrails streaming back from my wingtips indicated a power stall was near. Behind me, fires were burning on Scharnhorst... ...but all the while, flak from the battlecruiser and her escorts filled the air around me. If the stall didn't get me, it seemed the German gunners would. It didn't seem like it could get any worse, but now it did. Ahead and just left, I saw that an air fight was going on, obviously the one between the Focke Wulfs and our Mustang escort. I banked right to steer away from this, even as a trio flak bursts went off just to port, under my wing and beside my tail. Somehow, my empennage didn't fall off, and at last, the flak began to die away. They were still firing at me but now, the shells were consistently bursting astern. Looking back, I could see that the sky behind me was stained with its dark bursts. How I had got through all that, goodness only knew. Not only had I somehow survived, but my single torpedo hit seemed to have done Scharnhorst quite a bit of harm. Ships in CFS3 don't seem to take any evasive action but just plough on regardless, which doubtless helped, as did the liklihood that the sim doesn't seem to model realistically the distance a torpedo would have to travel in the water to arm. Mine had run for a hundred feet at most. Still, I wasn't complaining. The complaining started instead when I realised one of the Focke Wulfs - probably the beggar who had shot down my number two - was now coming in behind me. I made some sluggish changes of course to try to throw off his passes. This seemed to work, to the extent that instead of firing, he banked and rolled around behind me, as if to avoid an overshoot. I checked the map and made sure I was headed home. I could perhaps have tried to reach the dogfight and tried to wipe him off on that, but reckoned that could just as easily backfire and provide me with double trouble instead. I held the trottles wide open and nosed down towards the sea. Perhaps his aerobatics would cause him to fly into it. And I had four .50 Cal. machine guns to cover behind and above, ready to give him a hot reception. My tail and mid-upper gunners were already snapping out short bursts, which seemed to be deterring the 190 from making a sustained attack. Just as I was beginning to feel once again that I might get away with this, the best laid plans of mice, men and Marauders went t*ts up. The roar of my engines faded. Speed dropped off, and in a second or two, my engines fell silent, their props spinning to a complete halt. This, I now remembered, happens a lot in CFS3. If I recall right, it's fuel system damage that somehow causes two engines to fail simultaneously, in the sim's twin-engined aircraft. I suspect the chance of this happening in real life is as close to nil as makes little difference, but there it is. I had no chance to find out how well the CFS3 B-26 flew on one engine. Maybe just as well... Down we went. Not that there was much 'down' left, maybe a couple of hundred feet. At this point, the Focke Wulf overshot. My gunners seemed to be too surprised - or perhaps it was, too depressed - to do anything about it. You can't feather props in CFS3, though this had happened automatically. I don't know if their remaining drag - they weren't windmilling - made any difference. But my stubby-winged Marauder seemed to make a very poor glider. She just seemed to want to head belly-first for the water; my instinctive but misguided efforts to raise her nose probably just made it worse. I should have pushed the stick forward to reduce the angle of attack, built up speed, then flattened out at the last moment, to ditch. Instead, we belly-flopped, hard, into the water. There was a big spash, and that was it. That was indeed it. Mission over. Campaign over. Pilot (and crew) killed on their first operation. Scharnhorst didn't sink, unsurprisingly, and if there were any attacks made by the rest of the squadron, I saw no successes recorded for them. Serves me right for attacking on my own, instead of remembering to make my own attack only after having set up concentric attacks by the rest of the squadron, and then waiting for these to begin. I suppose I was distracted by that unexpected fighter attack at the start. In the end, I'm miffed that I fell victim to the dreaded CFS3 twin-engine double whammy, but realise that I was lucky to get that far! If I recall right, ship attacks are one type of mission you cannot set up, to get some practice, in the usual CFS3 single mission generator. Whis is a pity, because they can be (a) fun (b) challenging and © are a common assignment at the start of the dynamic campaign. There are some user-made single missions which feature such targets, though perhaps not in the Marauder. Which is a pity. But with Ankor's DX9 mod making such a big difference to the appearance of the sim, on top of those delivered by the ETO Expansion, I'm definitely going to be flying some more CFS3 soon!


- 9 replies
-
- 2
-

-
- cfs3
- eto expansion
- (and 2 more)
-
WOFF Screenshot of the Month, July - 'Meet the Fokkers!'
33LIMA replied to 33LIMA's topic in WOFF UE/PE - General Discussion
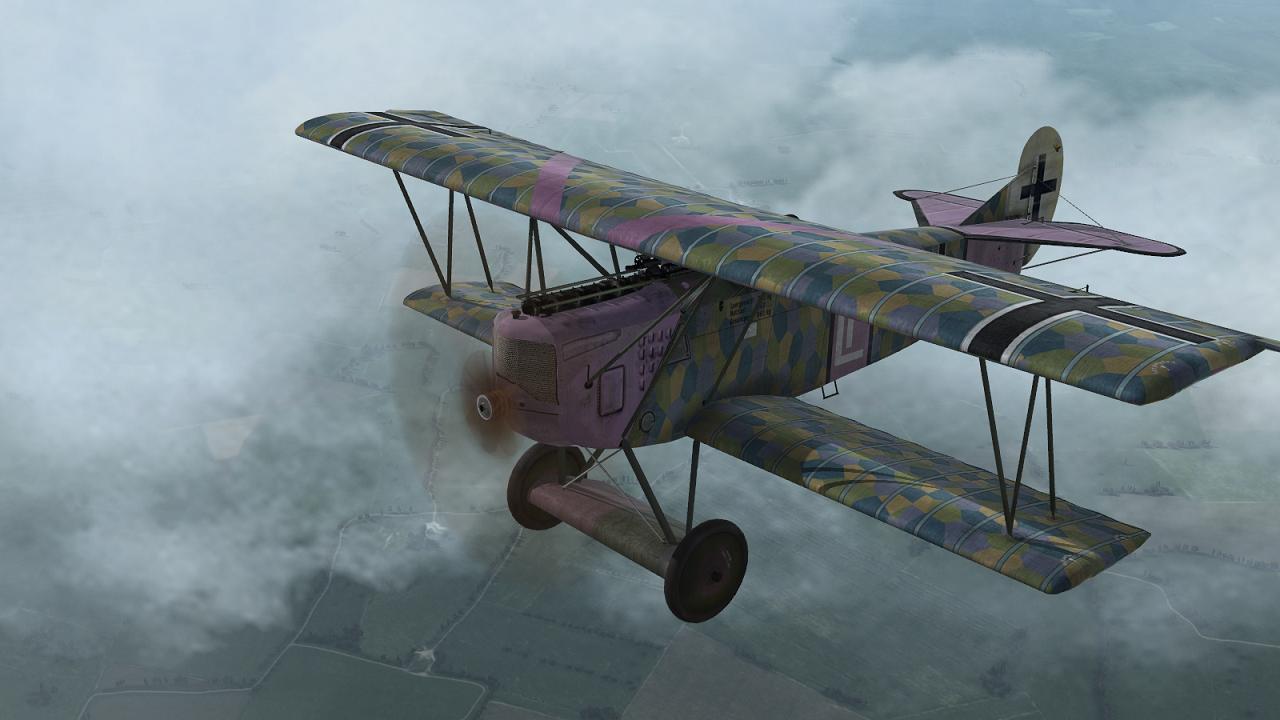
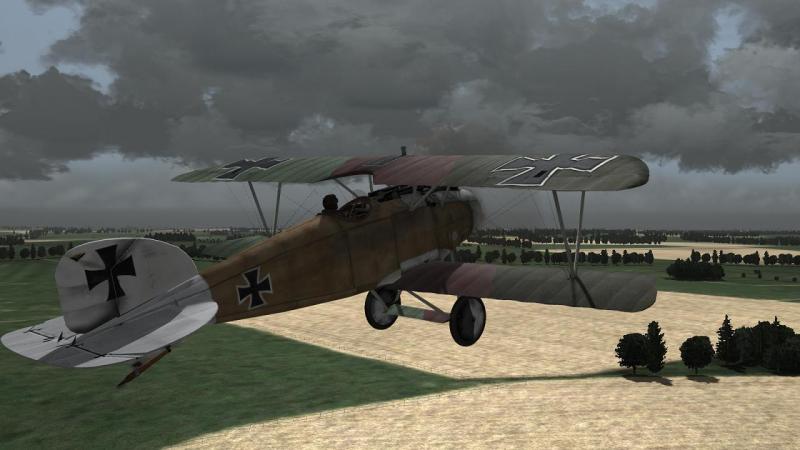
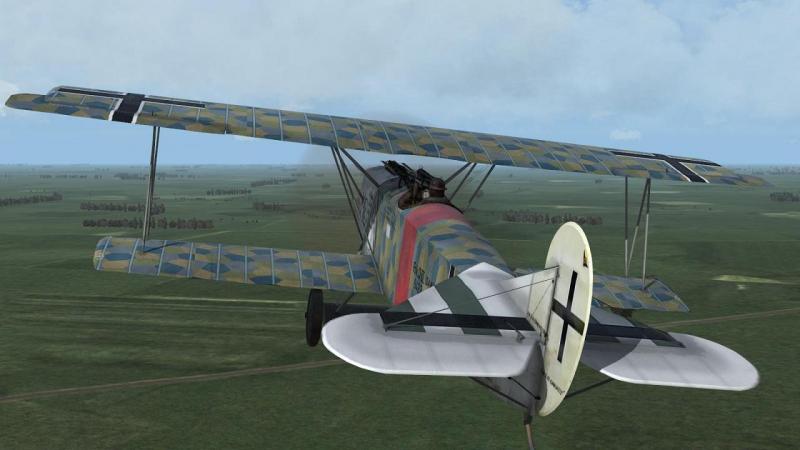
Meanwhile, back at the Fokkers... Karjus, Jasta 75... ...and Stark, Jasta 34b (author of 'Wings of War'): Note the Albatros company logo on the rudders of both - not a mistake, but signifying that these machines were made by the Ostdeutsche Albatros Werke. Enough to get Olham flying one of these birds, maybe? :)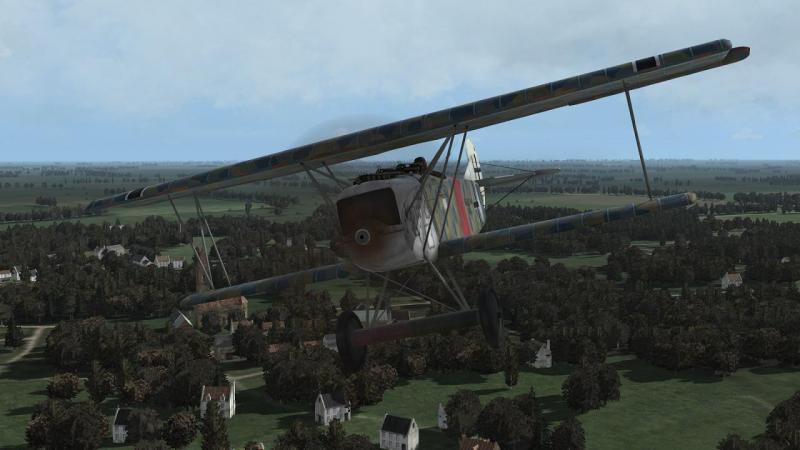
-
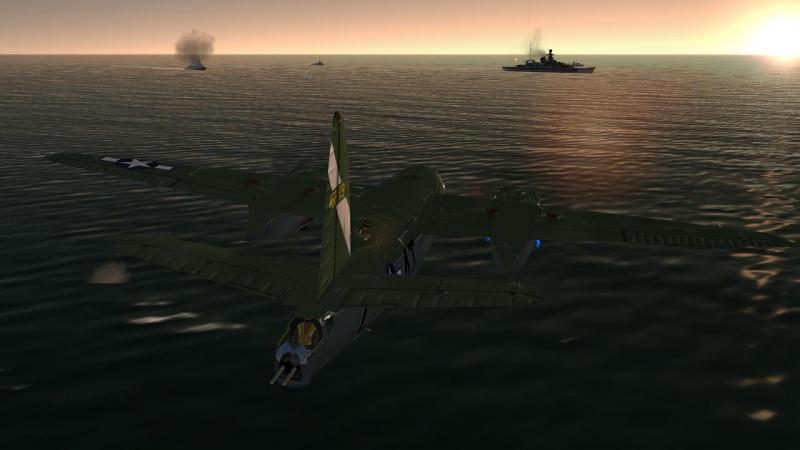
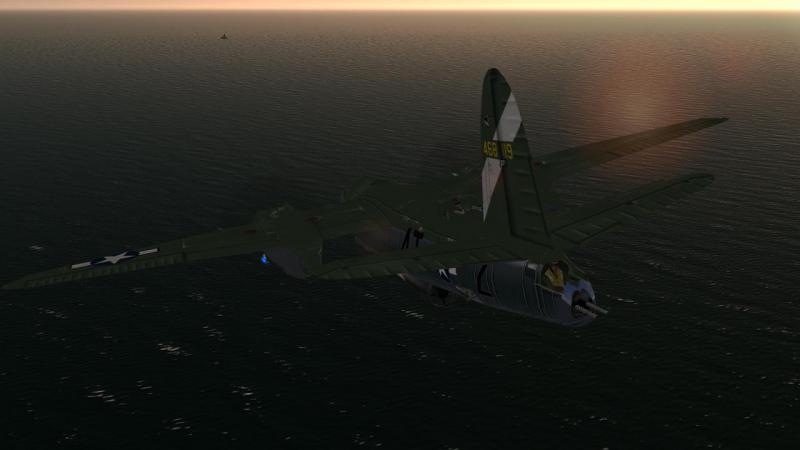
Back on target... I turned on the Tactical Display, a.k.a. TAC, to orient myself, and immediately became disoriented. The blue line to the twelve o'clock position indicated that my next waypoint - which should have been the target itself - lay almost directly ahead, with the range read-out indicating seven miles. But where was the little purple triangle which I remembered should highlight the direction of my mission target? Instead, I could see a group of ships to my right rear - enemies, as they showed as redon the TAC. It seemed most unlikely there would be two groups of enemy ships in this vicinity. Hmmm...ok then, a shipping target in the hand is worth two shipping targets in the bush, I quickly decided. I would attack the one I could see, even though I wasn't sure it was the one we had been sent out here to clobber. I pulled up and turned right. Now then, how was it that one goes about organising a squadron attack in CFS3? Let me see, now... Ah yes, I remember. I selected a ship target. Then issued the 'Attack!' order. This sent one - or was it a pair? - of the others in against the target. A radio acknowledgement confirmed the command was being complied with. Select another target, then rinse and repeat, until all the aircraft had been allocated a target. It was all coming back to me. But this is where things started to unravel. The first indication of trouble came suddenly. There was the crash of an explosion and the B-26 to my left rear disintegrated into a shower of falling aircraft parts. At the same time, he reported on the radio that he was taking heavy damage, which was something of an understatement. Our assailant was one of the FW 190s, of course. Well, nothing else for it - we were committed to the attack. I carried on, swinging down and around in a wide sweep to the right, calculated to being me onto the starboard bows of the oncoming enemy ships. As the range wound down, I could see that one of the enemies was a lot bigger than the others - he looked to me like a Hipper class heavy cruiser. OK, you'll do, I told myself. I continued my approach. As I got closer still, the flak started. Lines of red tracers snaked up towards me and shells started bursting nearby, on the sea and in the air - the ETO Expansion flak effects are positively scary, compared to stock CFS3! I could see by now that my target was not merely a heavy cruiser, but the battlecruiser Scharnhorst. Sudddenly but much too late, I remembered that in previous CFS3 gameplay, I had learned to be a bit more clever about my atttacks - not issuing attack orders in quick succession as I had just done, but doing so at intervals, as my formation circled the target. Finally, having allowed enough time for the others to start making their attacks from different points of the compass - and they could be quite slow to do this - then I would make my own run-in. Instead, here I was, attacking a bloody great battlecruiser with destroyer escort, all on my own. All of a sudden, I felt a lot less clever. ...to be continued!

- 9 replies
-
- 1
-
-
- cfs3
- eto expansion
- (and 2 more)
-
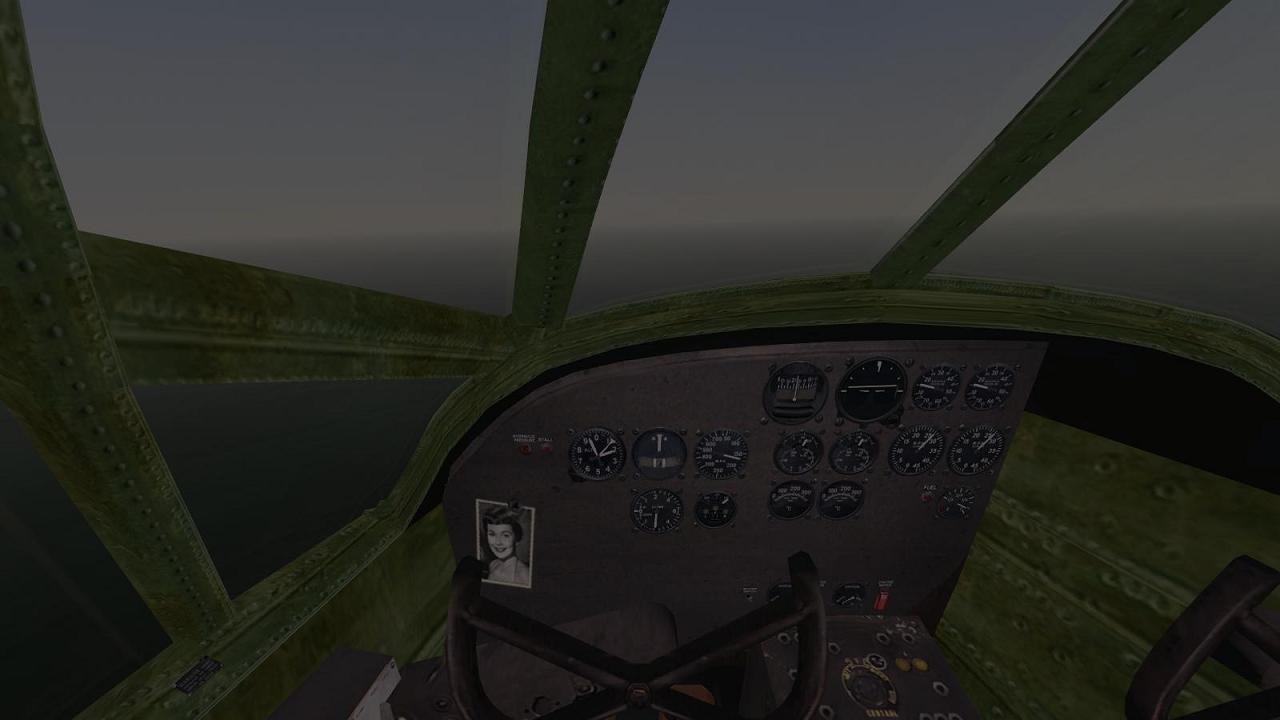
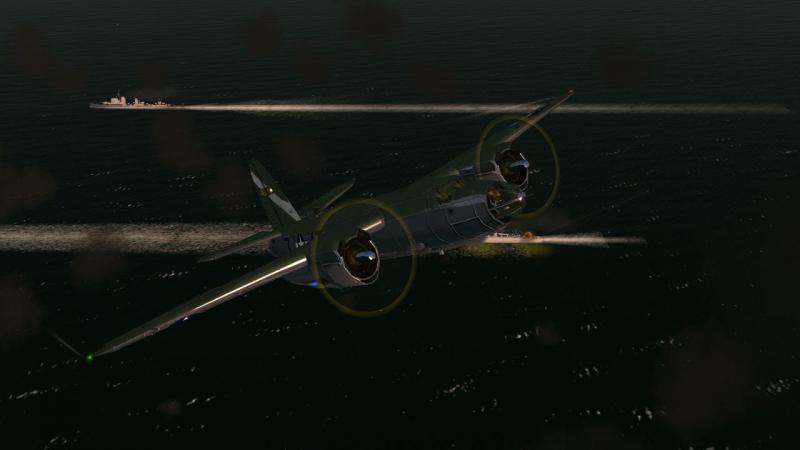
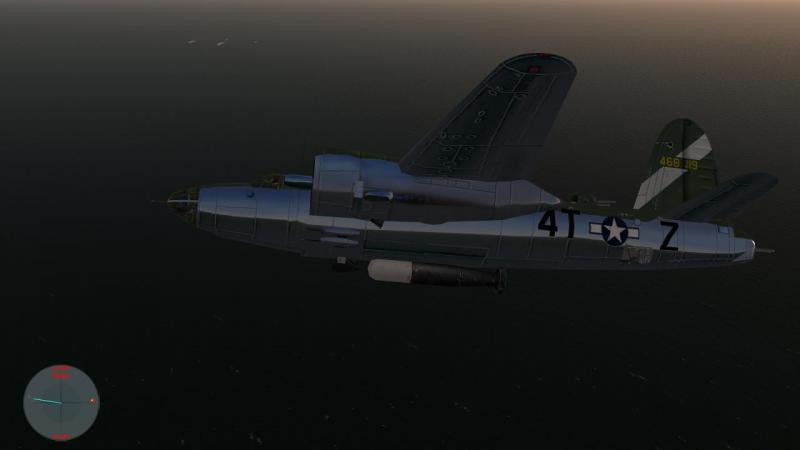
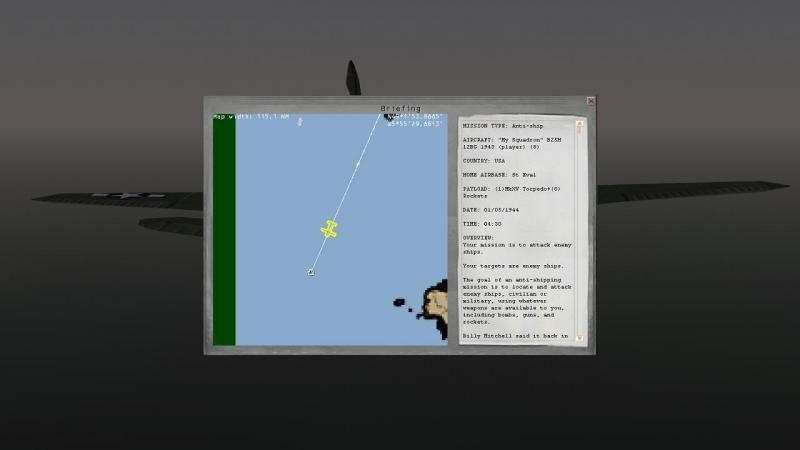
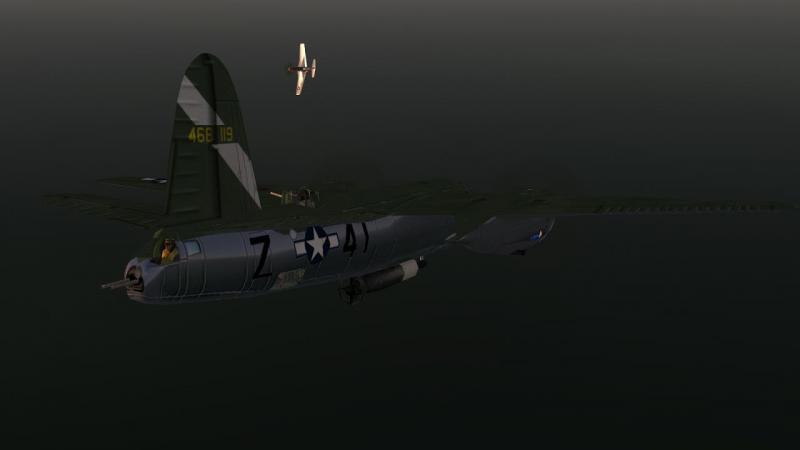
A rude interruption! As we neared the target area, I checked my position on the in-flight 'mini-map', as you can see below. This map has to be one of the worst in any flight sim ever, low resolution and particularly indecipherable if zoomed in, with airfields and your target being the only things marked on it with any clarity. You can also see the mission briefing, on the right. These being generated, not scripted, campaign missions, this briefing is pretty canned. It also hasn't caught up with the fact we have changed planes, as it still shows us as allocated B25H Mitchells. The land visible at the top of the map is Land's End in Cornwall; to the right edge of the map is the tip of Brittany. You can see why the principal occupation of squadrons based at the real RAF St Eval was patrolling to catch U-boats, as they transitted to and fom their bases around St Nazaire and Brest. Nearing the target area, it was time to get down from the 14,000 feet default transit altitude. Now then, how does it go, for a descent? Power, attitude, trim. I chopped the throttle and let the speed decay, then pushed the nose down. Formation-keeping in CFS3 is not brilliant and it invariably takes a while before the boys recognise your move and follow; I tend to tap the 'R' key to order 'rejoin!' but am not sure if it actually makes a difference. I didn't bother with the trim, I must confess. CFS3's virtual cockpits were notably poor for the period, well behind those in IL-2. The Marauder being a stock CFS3 model is typical, but though not visible below, at least it now benefits from the dynamic shadows that come with Ankor's DX9 mod, which as Stary has observed, really transforms the visuals of CFS3 (stock or modded) and is now built-in to Wings over Flanders Fields (working fine with predecessor Over Flanders Fields, too). The squadron had by now begun to descend with me and was closing formation again - 'closing' being a relative term, CFS3's bomber formations being too wide - IIRC they are liable to break up more often, if a modder tries to tighten them up. By now, the sun was just clearing the watery horizon to the east. Suddenly and without any warning, this pretty picture was rudely interrupted. Tracer fire whizzed down past my bomber, some of it hitting me somewhere astern. At about the same time, my mid-upper and tail gunners started shooting back. I didn't really need to look behind, to confirm that we were under air attack - from FW 190s, by the look of them. 'Where's our escort?', flashed through my head as I jinked to throw off the enemy's aim. 'On the job' was the answer. A Focke-Wulf overshot my B-26 and turned hard left, pursued by a silver P-51. 'Go get 'em!' I thought, exultantly. Much relieved, I settled back into my dive towards the target area, but opened out the throttles, easing off the angle of descent a little. The P-51s and FWs seemed now to be mixing it up behind us, so it was time to get clear, find those ships and hit them hard. It wasn't going to be quite so simple, however. To be continued!

- 9 replies
-
- 1
-
-
- cfs3
- eto expansion
- (and 2 more)
-
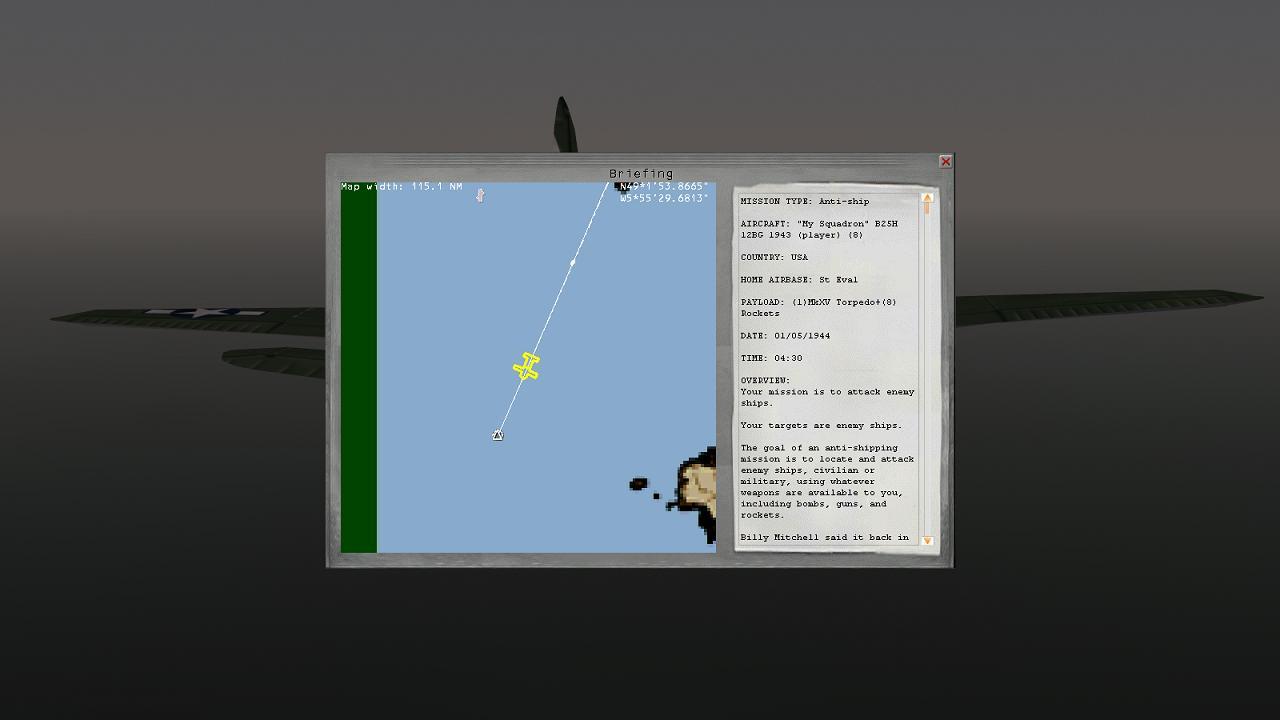
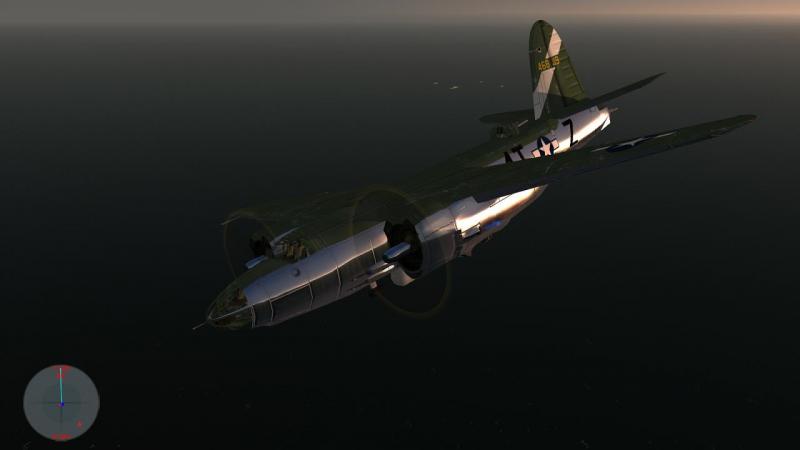
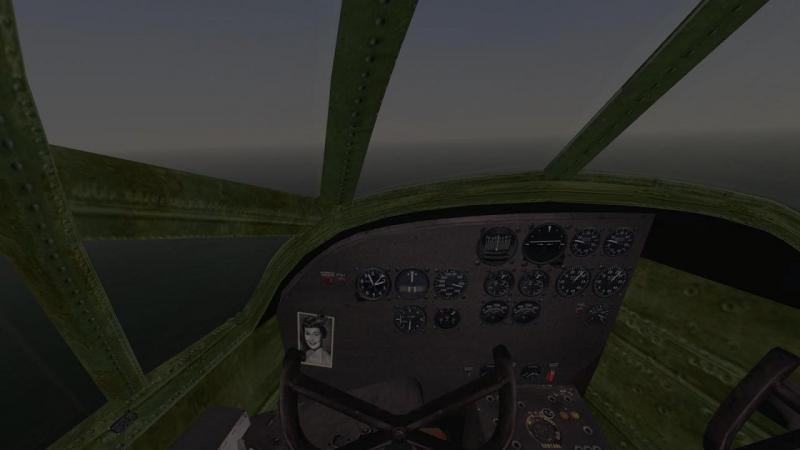
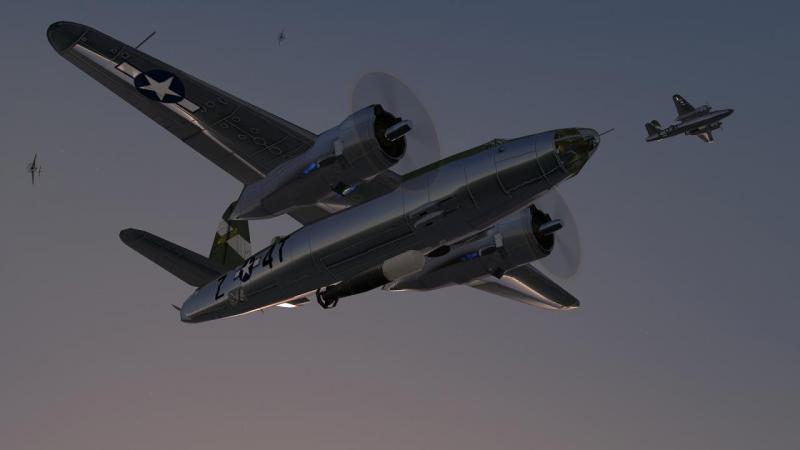
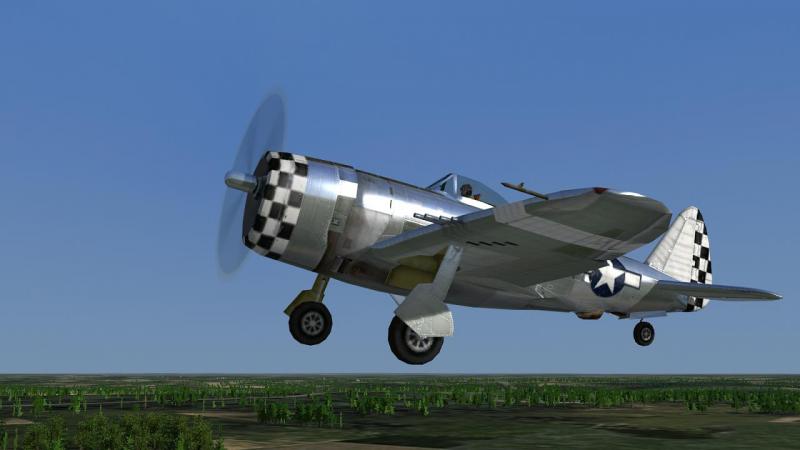
Back to CFS3...in the Martin B-26 Marauder I was - and suppose I still am - a fan of Microsoft's last fling in the Combat Flight Simulator series, CFS3. I didn't especially like the air-to-air combat - AI planes flying at empty weight meant that even heavier, more sluggish enemies could often prove frustrating foes. And there was the unfortunate fact that CFS3 ignored the strategic bomber component (even decent add-ons like Firepower, which added 4-engined bombers, just tended to expose CFS3's limitations as a bomber sim). European Air War, this wasn't. Neverthess, CFS3 was billed primarily as a simulator of tactical air power, 1943-45, and that, I felt, it did reasonably well. The radio and intercomm chatter and the wingman commands were very limited, of course. And I didn't particularly like it's 'alternative history' version of WW2, as presented in the dynamic campaign, with German shipping flowing freely in the English Channel in daylight and the Germans having the possibility of invading England even late in the war. It's World War Two, Jim, but not as we know it. A dynamic campaign that's...well, a bit too dynamic. But unlike IL-2 at the time - I mean, as in, over ten years ago - CFS3 provided rather good coverage of the European Theatre of Operations, which was and remains my main interest, by a wide margin. So I played CFS3 a lot, and downloaded many user-made aircraft, like those of the 1% and GroundCrew teams. I also ended up buying many of the CFS3 add-ons, my favourite being the D-Day one, which improved quite a bit on the historical accuracy of the dynamic campaign. This expansion I could never get to install correctly in Vista. But salvation was at hand - in the shape of the ETO Expansion, a massive user mod which features improved terrain, a huge increase in the planeset (including many of the aforementioned user-made models) and an 'era switcher' which enables the player- as in the recent CUP mod for IL-2 '46 - to configure the sim to cover different eras, in this case from the Spanish Civil War to the end of WW2. Just recently, I have been prompted to fire up CFS3+ETO Expansion once more, by the arrival of the latest version of Ankor's DX9 mod. To the dynamic shadows and sea reflections of previous versions, this adds ground object and cloud shadows...and, joy of joys, enables players to lose at long last the dreadful 'fisheye (wide-angle) lens' external view that always gave CFS3 aircraft a distorted appearance, which I for one loathed. As an illustration of this, here is a picture of the rather unattractive Whitley bomber, one of the ETO Expansion's planes, without Ankor's mod... ...and here is a pic of the Expansion's Coastal Command version of the Whitley, with the latest DX9 mod. Note that despite the camera being zoomed in more closely, the perspective is much more natural. You can also see the shadows cast on the aircraft itself, and also the ground shadows, cast here by trees, clouds and folds in the ground. I'm not saying it makes the poor old Whitley pretty, mind, but the natural perspective is a big improvement. Having fired up CFS3+ETO Expansion with the DX9 mod installed, I naturally took several virtual aircraft up for a virtual spin. It was soon apparent that some of the planes which benefit most are those USAAF machines in natural metal finish, like this P-47 Thunderbolt (this is the stock CFS3 one, with the latest DX9 mod applied)... ...and here's the P-38 Lightning - again, this is the stock CFS3 version: So I thought I'd go for a campaign with one of these nice silver birds, in the ETO Expansion. I chose the B-26 Marauder - this is how the Expansion's natural metal version looks (unlike IL-2- the 'skin' supplied is used for all planes of that type, in game). Note how the reflections on the fuselage nicely pick up on the terrain below. I''ll have one of those, I decided, for my first CFS3 campaign for some time. Having selected the D-Day era, I started by creating a new pilot, chose a bomber career for him, then used the 'Change aircraft' option to switch from the allocated B-25 Mitchell to my nice shiny B-26G. I was undeterred by the real Marauder's bad reputation. Being a 'hot' machine for a bomber, she had at first a bad name for crashes, earning unsavoury nicknames like the one in this mission report's title, also 'The Widowmaker'. By 1944 things had improved and I expected I'd appreciate advantages such as the good defensive and offensive armament, high speed and tricycle undercarriage. 'Baltimore Whore' or not, she's not just a pretty face. I kicked off the campaign and began to remember how CFS3's dynamic campaign handles these things. I was started in May 1944, about a month before the real D-Day, although I knew that my unit's performance could influence this. I was placed at the lead of the squadron operation, flying from RAF St Eval in Cornwall. I can't recall which Bomb Squadron we were flying with, but CFS3 isn't particularly strong on creating a strong sense of unit, and any resemblance between that and the markings on your aircraft is co-incidental. On campaign, CFS3 offers you one of a set range of mission types, which you can opt to change. I never worked out whether there were any campaign advantages to be had, between which missions you chose and when. Commonly, you start with an anti-shipping missions, whichever side you are playing for. And that's what I got. I was placed at the head of two flights of four B-26s - bombers in CFS3 fly fighter-style 'finger four' formations, widely-spaced to boot. Our target was enemy shipping down to the south-west. Not quite in the English Channel, but still, it was rather silly of the Germans to expose whatever ships it was to overwhemling air power in daylight. Well, it wasn't quite daylight yet. It was just before dawn as we formed up for take-off. But it would be daylight, by the time we got to the target area. I had accepted a torpedo armament - bombs being the alternative, naturally - so we started with these rather short, fat airborne tin fish slung under our silver bellies. If I'd known they'd be external - and if I knew if CFS3 replicated their drag, which I didn't - I might have gone for bombs. A fat lot of good it likely would have done me, as it turned out. The second flight of four B-26s was already in the air so I wasted no time in taking off to the north, passing over St Eval again as I began a wide turn to the left, to come around to our assigned track out to the target, which lay to the south-south-west. I kept throttled back to let the others catch up, and it wasn't long before all eight bombers were stacked up behind and either side of me, sadly in their wide fighter formations. At least the risk of mid-air collisions should be low! The 'warp/move to next event' feature in CFS3 has evolved to a very fast form of time acceleration, instead of the CFS1 and CFS2 'teleport' equivalent. It remains a very convenient way of flying what would otherwise be longish, uneventful legs in the typical CFS3 campaign mission. The trick is not to leave it too late to interrupt this 'very fast forward' process. This is especially important in torpedo or other low level attacks, for you 'warp' at a fixed altitude, about 14,000 feet in this case, which is much too high an attack profile fo most CFS3 missions. And if enemies were spawned based on radar detection, which I suspect they may not be, well at that sort of height they would have seen you coming from many miles away. So while I flew a direct course to the target, I took care to break the 'warp' at intervals, which not only made sure I could lose altitude in good time, but also gave me a chance to admire the sunrise and the reflective effects on my aircraft. I forgot to check if the briefing advised if we had a fighter escort - you often have on a CFS3 campaign mission, and in this case it was a flight of Mustangs, four I think. They were soon to make themselves useful. ...to be continued!
- 9 replies
-
- 3
-
-
- cfs3
- eto expansion
- (and 2 more)
-

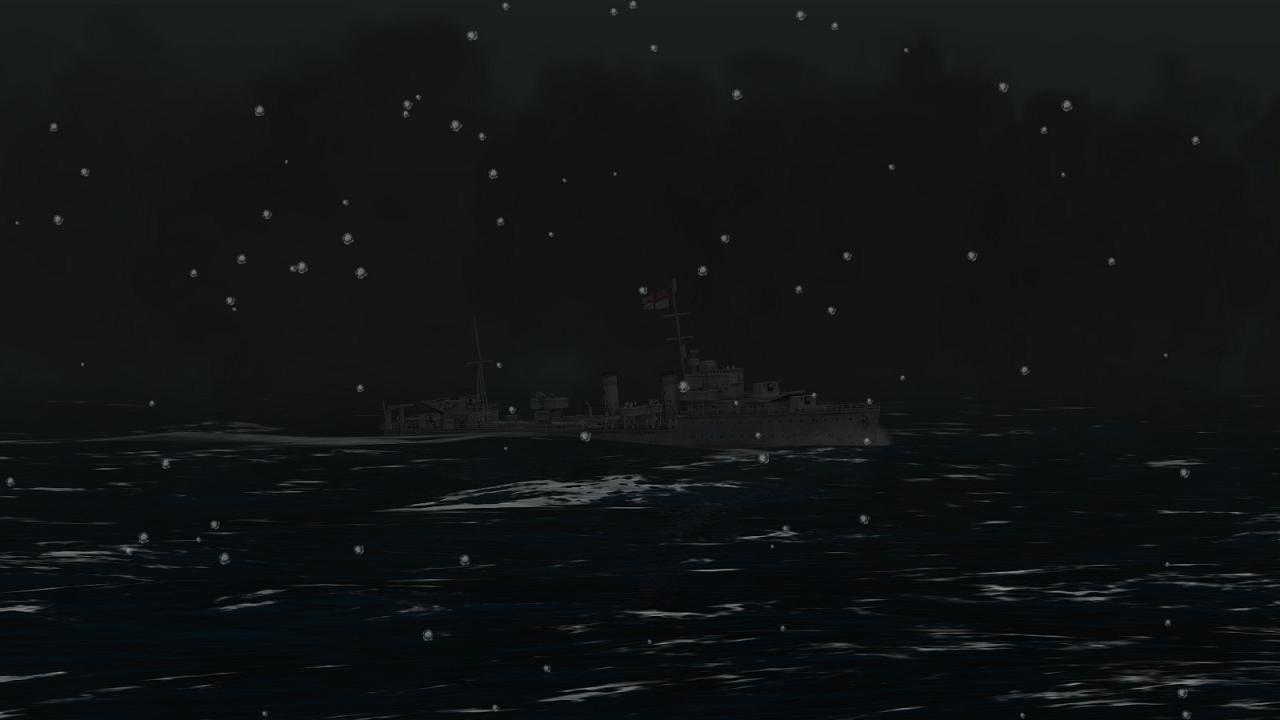
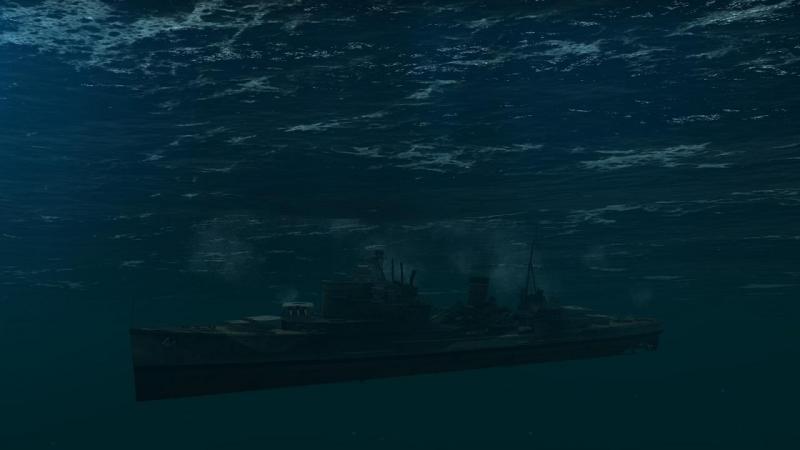
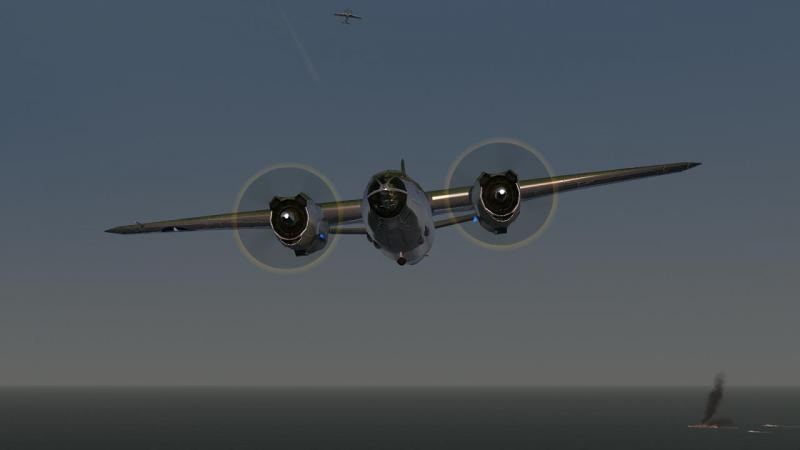
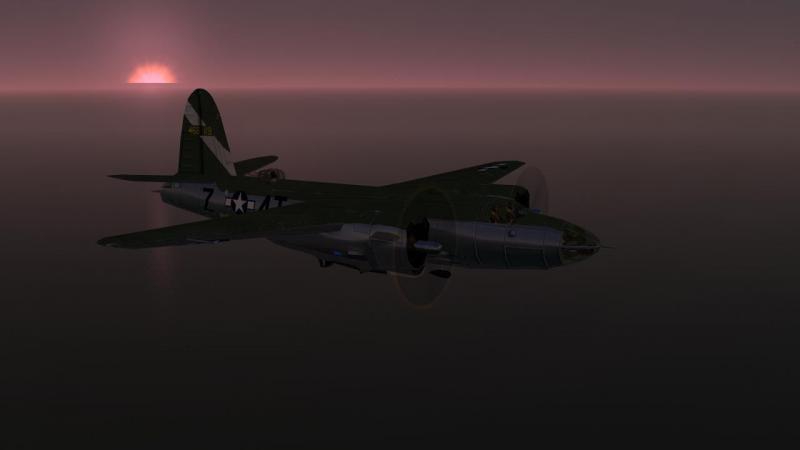
From the album: Combat Sims
-
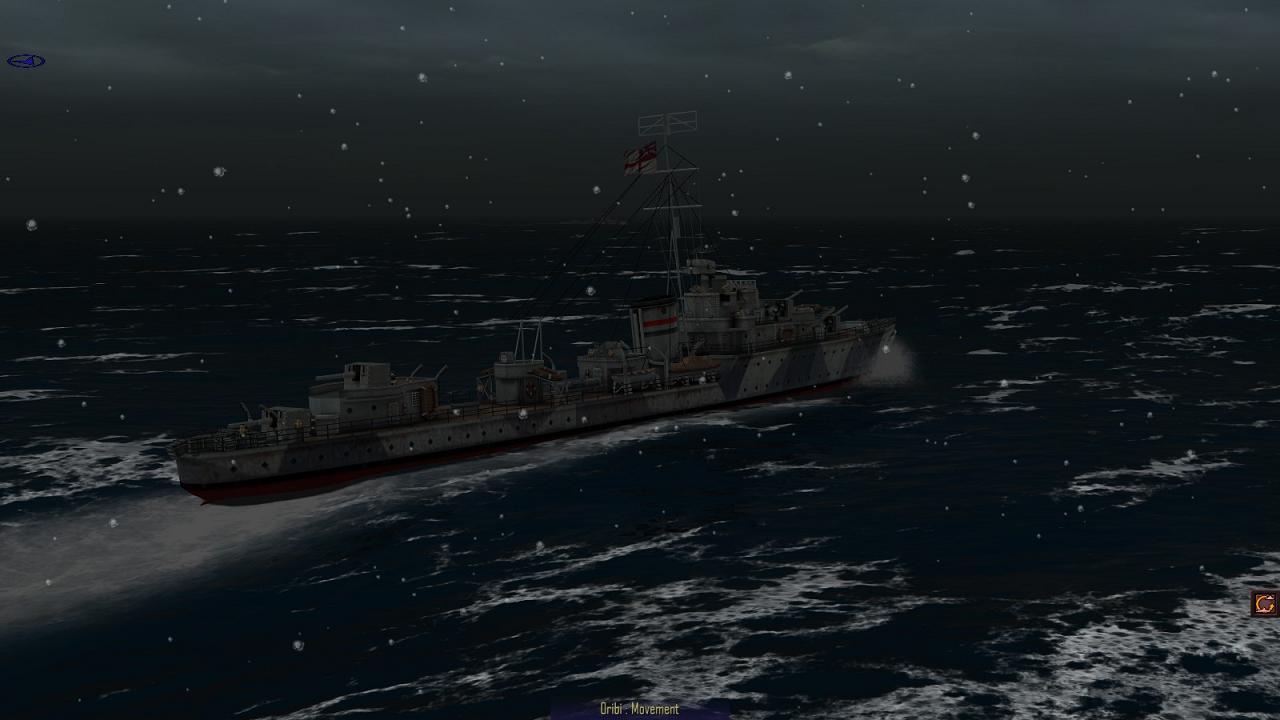
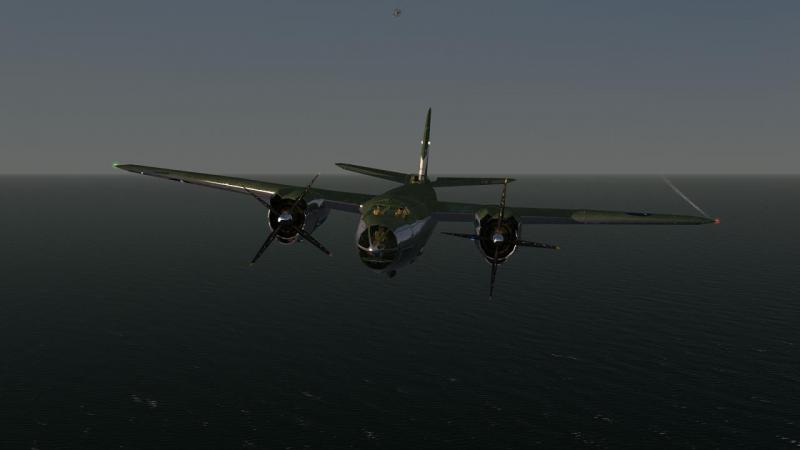
From the album: Combat Sims