

Wrench
-
Content count
27,288 -
Joined
-
Last visited
-
Days Won
145
Everything posted by Wrench
-
Can Fuel Tanks from the 4th Dimension Be Removed?
Wrench replied to Geary's topic in Thirdwire: Strike Fighters 2 Series - Mods & Skinning Discussion
Um, isn't that kinda like paying for the same ground twice??? but, it is true about the transferable skillsets! -
Reaching out to the intelligentsia collective...
Wrench replied to Zurawski's topic in Thirdwire: Strike Fighters 2 Series - General Discussion
I've got the Warbird Tech on the 'Sabre Day-Fighters' (included the H), be glad to send it to ya, Zur! -
Version
217 downloads
Eritrean AF MiG-29 Fulcrum-C Skin Pak = For SF2, Any and All = A new skin/decal pak for the TMFs MiG-29C, representing ErAF Fulcrums from the late 1990s to the present. Inis tweeks were made to the data, loadout inis. You'll want to back up your original before installing this pack. A new "Userlist.ini" is included (may not be fully accurate, and changes/updates are welcomed!). Weapons are =NOT= included, so you'll need the GunnyPak or some other full WeaponsPak for SF2. You also =MUST= have TMF's MiG-29C in your game install (doh!) to install this pak to. These skins have been partly repainted (with redrawn panel and rivet lines) in several areas to remove the painted-on markings, creating a 'blank' canvas to allow for the use of decals for ALL markings. The side effect of that, is other countries can easily be created by simple edits of the decals ini. On this version, as stated above, ALL the markings used here are decals. Serial numbers are 'best guess' based on the limited information (both text and photographic) available. In actuality, the ErAF only has 7 MiG-29s; I've cheated and extraploated numbers for 12 aircraft. So, it's not 100% historically accurate. As always, fairly easy to follow, yet detailed install instructions are included. Please read them after unzipping, and before installation!!! Happy Landings! wrench kevin stein with thanks to TMF for creating this bird; especially to BPAO. -
F2A-3 Buffalo, Update Pak
Wrench posted a topic in Thirdwire: Strike Fighters 1 Series - File Announcements
File Name: F2A-3 Buffalo, Update Pak File Submitter: Wrench File Submitted: 28 February 2012 File Category: US Navy and USMC F2A-3 Buffalo, Skin and Ini Update Pak For SF/Wo*/SF2 PTO Installs This is a semi-complete package for the Dev A-Team F2A Buffalo, in USN and USMC service at the beginning of World War 2. It is semi-complete due to DAT rules, the aircraft lod is NOT included. So, you'll need the F2A-R2.LOD to compete this package. Everything else IS included. 3 skin/decal set are included; and there's 3 individual readmes, as I've combined all the earlier seperate downloads from my now-closed site, into one. I'd reccomend reading them all, if only for the historical reference VF-2 "Flying Chiefs", USS Lexington, December 1941 VMF-212, MCAS Ewa, Territory of Hawaii, circa January 1942 VMF-221, Midway Island, June 1942 (yes, them). This skin is 100% historically accurate, with BuNum matched to Modex numbers for the aircraft assigned during the Battle of Midway. (shown in screenshot) Canopy works via manual animation key, the standard Shift/0 Also included is the engine sound, and a pilot figure. NOTE: the pilot figure is set for 06 level, so you drop him into the root of the /Objects/Aircaft folder. For SF2 usage, you'll get a new folder for him in the /Pilots sub-folder. In essence, you've got him twice! Once unzipped, all you need to is drop the LOD into the /F2A folder,and off you go. I'd also advise reading each of the enclosed readmes. *Note: while still designed with 06 SF/Wo* in mind, it should also be usable in 08 Level SF/Wo*. If used in 08s & SF2, be advised a completly new FM will be necessary. Also, cockpit repositioning will be needed for SF2. Post all questions & problems in the SF2 PropHead Forum. I'll get them worked out (excepting FMs and LOD issues)!* Click here to download this file -
Brewster B-339 Buffalo, 67 Sqdn, RAF (Far East)
Wrench posted a topic in Thirdwire: Strike Fighters 1 Series - File Announcements
File Name: Brewster B-339 Buffalo, 67 Sqdn, RAF (Far East) File Submitter: Wrench File Submitted: 28 February 2012 File Category: British Commonwealth RAF Brewster B-339 Buffalo, 67 Squadron, Far East for the DAT F2A - read on.... This will allow you to re-create the Brewster B-339 Buffalo as used the Royal Air Force in the Netherlands East Indies, Burma and Southeast Asia, at the beginning of World War 2. It creates a new, stand-alone version, seperate from the US Navy's F2A. This is an INCOMPLETE mod, as it only contains the inis and skins and some other small parts needed to create a nationalized version of the Dev A-Team F2A (USN). The aircraft's LOD and cockpit folders are =NOT= included -- you will need to copy them over from the F2A to complete this mod. A new skin, representing 67 Squadron, as seen in Singapore, and mostly in Burma. *while designed for 06 level SF/Wo*, it IS usalbe in SF2 - the FM, however, will need rebuilding. Fly Accordingly!* As always, full detailed insturctions included in the enclosed readme! SO READ IT!!! Click here to download this file -
File Name: B5N1 Kate: Pearl Harbor & Midway Skin/Decals/Ini Set File Submitter: Wrench File Submitted: 28 February 2012 File Category: Japanese Air Force and Navy Nakajima B5N1 Carrier Air Groups Skin Pak -- 2/5/09 "Pearl Harbor & Midway Attackers" The Bombers Part 2 This package contains a set of 6 NEW skins and decal sets for DATs B5N1 "Kate" carrier based torpedo/level bomber. These skins are designed for a 'start of the war' time frame, up until approximately July/September 1942. Basically, up until Midway, although Shokaku and Zuikaku skins could probably be used up until the Battle of the Eastern Solomons and/or Battle of Santa Cruz time frame. You MUST have the DATs Kate to install this pack to! Full instructions and stuff are in the enclosed readme. READ IT after unzipping *works fine in SF2* Click here to download this file
-

Version
66 downloads
F2A-3 Buffalo, Skin and Ini Update Pak For SF/Wo*/SF2 PTO Installs This is a semi-complete package for the Dev A-Team F2A Buffalo, in USN and USMC service at the beginning of World War 2. It is semi-complete due to DAT rules, the aircraft lod is NOT included. So, you'll need the F2A-R2.LOD to compete this package. Everything else IS included. 3 skin/decal set are included; and there's 3 individual readmes, as I've combined all the earlier seperate downloads from my now-closed site, into one. I'd reccomend reading them all, if only for the historical reference VF-2 "Flying Chiefs", USS Lexington, December 1941 VMF-212, MCAS Ewa, Territory of Hawaii, circa January 1942 VMF-221, Midway Island, June 1942 (yes, them). This skin is 100% historically accurate, with BuNum matched to Modex numbers for the aircraft assigned during the Battle of Midway. (shown in screenshot) Canopy works via manual animation key, the standard Shift/0 Also included is the engine sound, and a pilot figure. NOTE: the pilot figure is set for 06 level, so you drop him into the root of the /Objects/Aircaft folder. For SF2 usage, you'll get a new folder for him in the /Pilots sub-folder. In essence, you've got him twice! Once unzipped, all you need to is drop the LOD into the /F2A folder,and off you go. I'd also advise reading each of the enclosed readmes. *Note: while still designed with 06 SF/Wo* in mind, it should also be usable in 08 Level SF/Wo*. If used in 08s & SF2, be advised a completly new FM will be necessary. Also, cockpit repositioning will be needed for SF2. Post all questions & problems in the SF2 PropHead Forum. I'll get them worked out (excepting FMs and LOD issues)!* -

Version
74 downloads
Kawasaki Ki-61 "Tony", Skin and Ini Paks, For SF/WoV/WoE PTO Installs Thi package contains a reskin and cockpit/cockpit ini modification of the Dev A-Team's Ki-61 "Tony" . You MUST have the Dev A-Team's Ki-61 Tony, and it's suggested also Christian59's "Tony Family Package" before installing this mod, as without it, this does you no good!! Having the DATs Hurricane 1 would be a good idea too, as the new cockpit ini will need it! This package several skins for various Ki-61 marks, but no lods or cockpit are included. You WILL need the DATs Ki-61, and Christian59s "Tony Family Package" to apply this to. SKins/decals supplied are for: 19 Sentai (screenie shown) 37 Sentai 105 Sentai (all 3 Chutai) each is contained in a seperate zip, so you'll have some extracting to do. Each set contains it's own readme, so you'd be advised to read it. Note: while desgined for SF/Wo* at the 06 level, it should be usable in 08 levels and SF2. Be advised, however of many FM issues that will need resolving. An experimental SF2 FM for one of these (disremember which) can be found in the SF2 PropHeads Forum, in this thread: http://combatace.com/topic/70595-tony-data-ini-for-testing/ have fun! -

Version
56 downloads
Brewster B-339 Buffalo, ML-KNIL, Pak For SF/WoV/WoE PTO Installs 1/8/09 This will allow you to re-create the Brewster B-339 as used the Dutch Army Air Force in the Netherlands East Indies, at the beginning of World War 2. This is an INCOMPLETE mod, as it only contains the inis and skins and some other small parts needed to create a nationalized version of the Dev A-Team F2A (USN). The aircraft's LOD and cockpit folders are =NOT= included -- you will need to copy them over from the F2A to complete this mod. 2 new skins, from new templates I created (based off the originals by Gramps) are included. One is a more-or-less 'standard' RAF style coloring, with the Orange roundel (trindel??), and the other is more NEI-ish; done up in "Old Leaf", "Young Leaf" uppers and natural metal unders, with the Dutch flag roundel (rectangudel???). Full instrucions in the enclosed read me - so READ it!! *while designed for 06 level SF/Wo*, it is usalbe in 08 level SF/Wo*, and in SF2. However, the FM WILL need rebuilding for SF2. Fly Accordingly!!* -

Version
54 downloads
RAF Brewster B-339 Buffalo, 67 Squadron, Far East for the DAT F2A - read on.... This will allow you to re-create the Brewster B-339 Buffalo as used the Royal Air Force in the Netherlands East Indies, Burma and Southeast Asia, at the beginning of World War 2. It creates a new, stand-alone version, seperate from the US Navy's F2A. This is an INCOMPLETE mod, as it only contains the inis and skins and some other small parts needed to create a nationalized version of the Dev A-Team F2A (USN). The aircraft's LOD and cockpit folders are =NOT= included -- you will need to copy them over from the F2A to complete this mod. A new skin, representing 67 Squadron, as seen in Singapore, and mostly in Burma. *while designed for 06 level SF/Wo*, it IS usalbe in SF2 - the FM, however, will need rebuilding. Fly Accordingly!* As always, full detailed insturctions included in the enclosed readme! SO READ IT!!! -
remove component
Wrench replied to a topic in Thirdwire: Strike Fighters 1 Series - Mods/Skinning Discussion
that only works for cockpits, not the external lod -
Can Fuel Tanks from the 4th Dimension Be Removed?
Wrench replied to Geary's topic in Thirdwire: Strike Fighters 2 Series - Mods & Skinning Discussion
they're built into the aircraft lod, just like stock one. do a search for 'remove component' .. i know rjuiceco was asking about it in the SF/Wo* forums yesturday/today/recently. it'll be a data ini edit. btw, editing the OUT file won't do a thing...the OUT is generated in 3dsMAX when the lod is finalized/exported. In automotive terms, it's like the chasis broadcast sheet, that lists what goes on the bare vehicle frame. the OUT is MOST handy for decal placement, node "moving", and removing -like what you're trying to do -
Can SF2 .DDS Textures be converted to SF1 .BMP?
Wrench replied to Geary's topic in Thirdwire: Strike Fighters 2 Series - Mods & Skinning Discussion
xvi32 is great ... and it opens ANSI and UNICLOD lods, too. Just change file type in the drop down -
Alternate Kill Decals
Wrench replied to Piecemeal's topic in Thirdwire: Strike Fighters 2 Series - Mods & Skinning Discussion
wwwhhoooppps!! my fault, brothere! forgot the copy in the damn link!! here be: http://combatace.com/topic/70674-2-colour-tail-number-decal-how-to/ -
Alternate Kill Decals
Wrench replied to Piecemeal's topic in Thirdwire: Strike Fighters 2 Series - Mods & Skinning Discussion
this might help some... scroll down to my post, #9 -
Q/A-5 "FANTAN"
Wrench replied to paulopanz's topic in Thirdwire: Strike Fighters 2 Series - Mods & Skinning Discussion
you da man Daniel! -
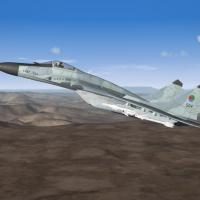
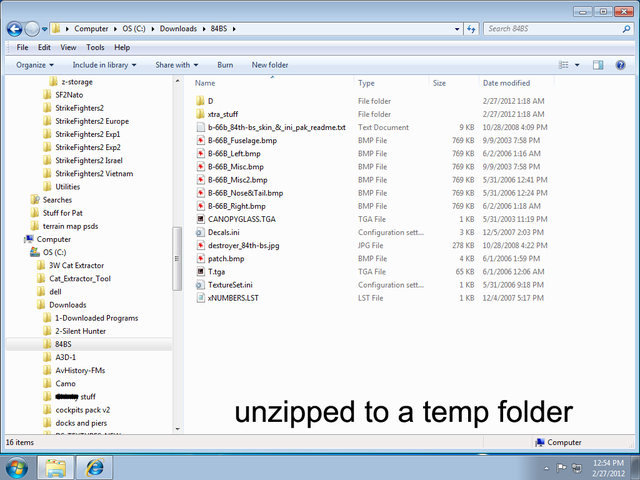
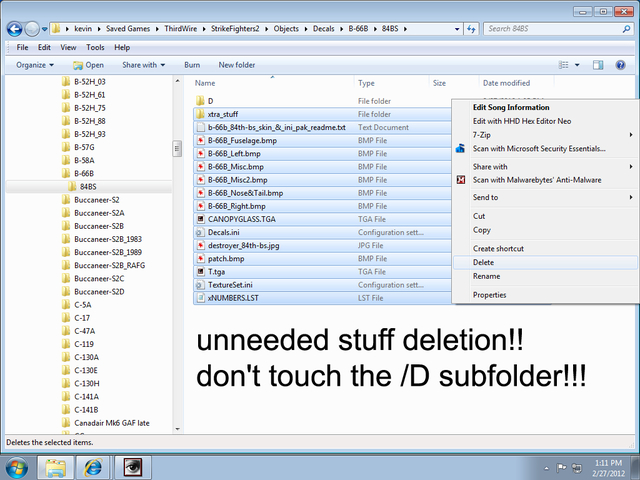
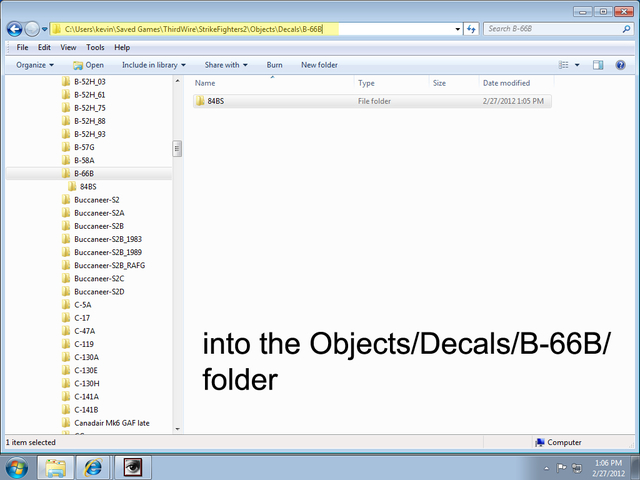
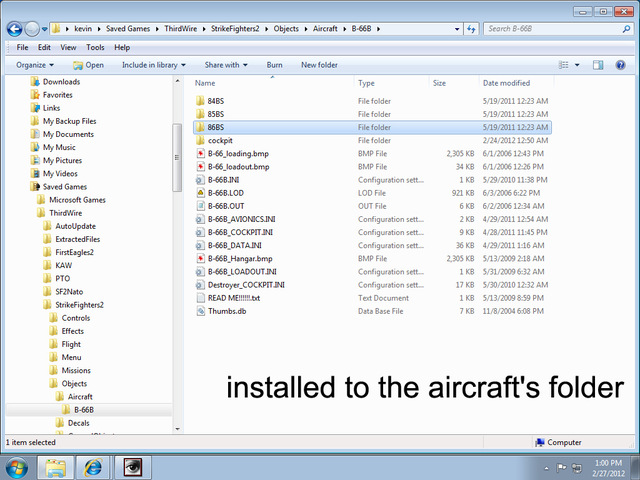
There's always the question of "How Can I get the decals from my 1stGen aircraft, into SF2 the quickest and easiest way" or, you have a skin/decal set you want to add. Well, the simple truth is, it's so easy, it'll make your airplane spin!! Well use in our example, just a something 'pulled out the air', so to speak. All others will be similiar; this is just an example for showing what to move, and what to delete (we'll get to that in a minuite...) You've download and unzipped the aircraft....our example is my older B-66 skin pak.. then, it's a simple copy/paste of the "86BS" folder to the B-66 (note, the 86BS highlighted) now, since the /D (or decals subfolder) is STILL inside the skin folder, the Game Engine will not see them. So, the easiest/simplest/quickest way, is to simply copy/patse the ENTIRE SKIN FOLDER -WITH THE INTACT /D SUBFOLDER to the correspondingly named aircaft foler in the ModFolder's /Decals subfolder... please note the highlighted full file pathway -that'll be important in a minute! Then, simply open this folder, and DELETE everything, but the /D subfolder that leaves you with an empty skin folder --don't need all the stuff, as this is ONLY for the decals. What this does, is keep the decal callout paths exactly the same, without adding the extra work of editing the decals.ini for each and every skins example: [Decal007] MeshName=Nose DecalLevel=0 DecalFacing=Left FilenameFormat=B-66B/84BS/D/NTagL Position=7.3,-0.40 Rotation=0.0 Scale=2.5 MaxLod=3 you'll notice that I've highlighted the MaxLod= line. There are literaly hundreds of old, perfeclty usable 1stGen skin/decal sets that are completly lacking this line. SF2 NEEDS this line and it must be added, or you decals won't show up. This is expecially true on lots of the WW2 stuff. SO, open the decals ini and check it. If not, it's an super esay text edit (you just type it in!!) to add. This is the easiest and simplest way I've found to do it! It works for all skins/decal paks; it'll even work in 08 Level 1stGens too, as they also possess the /Objects/Decals folder. any questions, comments, request for clairifications, post in the SF2 Mods & Skinning Forums wrench kevin stein
-
From the album Wrench's Images
-
From the album Wrench's Images
-
From the album Wrench's Images
-
From the album Wrench's Images
-
Important Announcement for ALL SF2 PropHeads!
Wrench posted a topic in Thirdwire: Strike Fighters 2 Series - World War II Forum
We have our new SF2 WW2 Category!! I'd asked Erik to create one for us, where we can put all the aircraft, aircraft mods, and skin sets. Sorry, it's not seperated into Skins, Aircraft, etc. It's all one category. While it may get confusing, at least ALL the stuff will be in one place. Over the next few days, I'll be moving all the WW2 and Post-War (to 1948) Skins and Aircraft Mods into this category. With a little bit of luck, I'll find them and move them all. If anyone finds one (or more!) that I missed, PM me with the file link and I'll take care of it. Also, with a LOT more bits of luck, we can start (re)generating interest in SF2-based WW2, and drag some FM and 3d Gurus -most likely kicking and screaming- along to get some of these "Angry WarBirds" up to SF2-speed. Thank you All, and Thanks To Erik!! So, remember: when uploading for WW2, PLEASE make sure that it [a] goes in the correct category most !!!DEFINATELY!!! has years or a text callout that says "WW2" or immeadeate Post-War in your announcment statement wrench kevin stein -
Important Announcement for ALL SF2 PropHeads!
Wrench replied to Wrench's topic in Thirdwire: Strike Fighters 2 Series - World War II Forum
now, what's gonna happen with non-converted stuff you might ask?? expecially all the items (well, MOST of the items) that had been posted on my site. well, since 99.9999999999999% are NOT really SF2 ready (in special reference to FM/data inis), they're going to be posted, in packages in the relevant WW2 sections in the 1stGens Downloads. for instance, the Pearl Harbor/Midway Kate skin & decal paks the 3 TBF/TBM paks -will be combined into one, with 3 seperate internal folders. various and sundry Havoc's, Mitchells, so on and so forth ....blahblahblah. You get the idea. it's a rather simple matter to drop them into a WW2 SF2 mods folder, and move the decals where they need to go. In fact, I'll be writing a short tutorial for the KnowledgeBase on a quickie, simple, easy way to do that. Considering the sheer amount of WW2 mods (yah, a goodly portion by ME!), it's gonna take some time to assemble the require paks and get them uploaded. (read: remembering where I archived them too!!) On a side note, for those folks here NOT CA subscribers, I'd like to ask that you DO become a subscriber, at least for some time (even the minimum monthly) -pay/donate the membership, simply to cover server costs. I'm going to be uploading 100s of megs worth of stuff, and as a thank you to Erik and other Admins that actually pay for CombatAce, it'd be a reallly nice gesture! Just a suggestion. One I'd like you all to think about. Whatever you can afford. It's the very least "Thank You" we can offer. k -
Can SF2 .DDS Textures be converted to SF1 .BMP?
Wrench replied to Geary's topic in Thirdwire: Strike Fighters 2 Series - Mods & Skinning Discussion
yeup, as said above, you MUST open the LOD with a hex editor, and reaname all the dds extensions to bmp. it's not hard at all (BUT =caveat=, back up a copy of the LOD for CYA!!!) -
File Name: A-3 Skywarrior Skin/Ini Update Pak (for DAT A-3D) File Submitter: Wrench File Submitted: 26 February 2012 File Category: Other A-3D Skywarror Upgrade/Update Pak = For SF2, Any and All = For the Dev A-Team's A3D-1 *PLEASE NOTE: this is =NOT= a complete aircraft mod! A major component, the aircraft's LOD is NOT included!! This file is propritary of the Dev A-Team, and cannot be shared. You =MUST= be a Registed User at their site, with access to their downloads, to make use of the Pak. If you do not have, or cannot get access, DO NOT DOWNLOAD THIS MOD, AS YOU WILL NOT BE ABLE TO USE IT!!!* It should be noted at this time, that while the folder & main ini are called "A3D-1", the aircraft in actuality is an A3D-2 (late)/A3B, as evidenced by the 'shovel nose' radome. Lots of changes have been effected, to try and bring it close to SF2 standards; much more work is STILL needed by those that know how (FM rebuild). A new cockpit, adjusted loads (included a Nuke specific STRIKE loadout, and a Strike_Heavy -with MK.84s, for use with the 3W Mission Editor), a 61kt USN-spec Mk.7 atomic bomb is included (nuke effects are NOT included). All other loadouts use stock in-game items. See "Notes" for partial change list. Wingfold operates by the standard manual animation keystroke, Shift/9. 3 skins and decal sets are included: VAH-1, by ChampionVA56 VAH-3, also by Champ VAH-13, based on Champ's, by me, with all new decals and markings (all markings are decals) Decal Randomization for all skins is set to TRUE. New hangar and loading screens are included (yes, I know the artwork loading screen is the early -1 version, but it's an R.G Smith, Offical Douglas Aircraft litho ... so there ya go!) The base skin for VAH-13, being "clean" can be used for many other units by simply creating new squadon codes and tail markings. 23 600 series modex decals are included (601-624). Serial/Bu numbers should be considered 'generic' in nature, but are 100% accurate for the model depicted. As always, fairly easy to follow, yet detailed install instructions are included. Please read them! Also, the "Notes" section is requied reading, as well. Seriously; READ the Notes ... it contains vital comments and requests. I've done everything I can ... now it's up to someone else. Following DAT policy, all their documentation is included. But NOT the aircraft LOD. Just so's you know for sure. Happy Landings! wrench kevin stein Click here to download this file
