


Gepard
-
Content count
6,673 -
Joined
-
Last visited
-
Days Won
328
Everything posted by Gepard
-
Hier mal ein kurzer Report wie weit ich bin. Da ich FE als Basisspiel verwende kann ich leider keine SEAD definieren. Aber kein Problem. Ich habe nun folgendes mir ausgedacht: Dünger streuen = Armed_Recon Feuer löschen = CAS Fallschirmspringer = Strike SAR = Recon Dünger streuen und Fezer löschen wird über GroundObjects gesteuert. Dafür habe ich einen niedlichen Waldbrand mit 32 großen Einzelfeuern gebastelt. Zum Dünger streuen habe ich ein Feld in Größe von 1,25 ha definiert. Es besteht aus 32 Einzelschlägen von jeweils 25x25 Meter. An jede Einzelschlagsecke habe ich rote Fahnen gesetzt. Werde ich wohl in Orange umfärben, denn zur Zeit sieht es aus wie eine Demonstration zum 1.Mai. Fallschrimspringer absetzen müßte in terrain Targets.ini definiert werden. Dürfte aber kein Problem werden. Fallschirmspringer sind ja bereits vorhanden, muß ich also nicht selber basteln. SAR Einsätze müßten ebenfalls über die Targets.ini gehen. Ich denke mal ich werde einfach ein oder zwei Fahrzeuge in die Prärie setzen und in die Aufgabenbeschreibung schreiben: "Finde vermisste Personen im Planquadrat X" Probleme bereitet mir zur Zeit noch das Abwurfmaterial. Die Effekte sind bisher immer noch das übliche Knall, Puff, Peng und meine Versuche sie in Wasser oder Düngerschwaden zu verwandeln haben noch keinen Erfolg gezeigt.
-
Danke für die Hilfe. Die Idee mit den zwei Engines war Klasse. Jetzt muß ich nur noch das Fahrzeug durch ein paar Bäume ersetzen. Mal sehen ob ich die in 3ds max hinbekomme. Ich habe mich entschlossen Armed_Recon Einsätze für Feuerlöscheinsätze zu nutzen. SEAD wird zum Düngerstreuen gemacht und Strike für Fallschirmspringer absetzen genutzt.
-
So, jetzt habe ich meinem Sohn eine Z-37 Cmelak zusammengebastelt und eine Hercules zum Fallschirmtransporter umgerüstet. Fein. Nun soll es ans Feuerlöschen gehen, damit die Cmelak auch was zu tun bekommt. Nur habe ich gestern den gannzen Abend erfolglos damit verbracht ein brennendes Groundobject zu bauen. Hat jemand von Euch Ahnung wie man so was hinkriegen könnte?
-
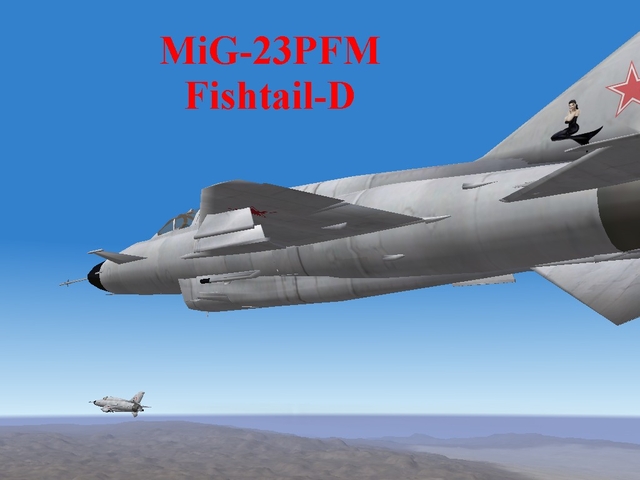
MiG-23PFM Fishtail-D
Gepard posted a topic in Thirdwire: Strike Fighters 1 Series - File Announcements
File Name: MiG-23PFM Fishtail-D File Submitter: Gepard File Submitted: 22 March 2009 File Category: Fictional Aircraft, Experimental and UAV's MiG-23PFM Fishtail-D Beta ***************** ---------------------------------------------------------- I. History This is a "What if" plane. It was not real, but could have been it if the E-8 development line would not have been canceled in 1962. Imagine: A lot of MiG ingenieurs did not agree with Mikoyans decision to stop the E-8 program. They made a proposal to use proven elements of the E-8 and the MiG-21PF to start a new project called E-9. Mikoyan agreed and intended to use the E-9 as gap filler till his favored project E-11, the later swing wing MiG-23 Flogger, was ready. In autumn 1963 the E-9 was ready for flight tests. It was a combination of MiG-21PF engine, wings and avionics with a new fuselage, tail and canards. The E-9 was accepted by the soviet air force in spring 1964 and entered the production line in summer 1964 as MiG-23F. In 1966 the Soviet Air Force demanded to equip the new fighter with state of the art avionics and to increase the range. So the MiG-23 Fishtail got a bigger fuselageback fueltank, a modified vertical tail, a mirror on the canopy. Other modifications are the more powerfull R-13 engine and the Saphir-21 Radar, but in the version RP-23. It is not widely known, that the Saphir 21 was originaly developed for the E-8. Only with a smaller antenna it could be fitted in the MiG-21 as RP-22. The smaller antenna reduced the detection range of this radar by 10 km. An other welcome addition of the PF is the ability to carry one gunpod under the left wing root. In 1970 the last and most advanced version of the Fishtail was accepted by the Soviet Air Force. New features were the R-25 engine and the big backfueltank. The combat abilities were incresed by a now internal GSha-23 gun, double short range IR missile rails and chaff flare dispensers. +++++++++++++++++++++++++++++++++++++ II. Known issues. It is still a beta. I know that the flight gear movement is not perfect. I know, that the skin is only a test shot, quick and dirty. etc. I will try to make it better as fast as possible. +++++++++++++++++++++++++++++++++++++ III. CREDITS: I want to say thank you to a lot of guys who helped me with files, ideas and hints. First of all i want to say thank you to Ricardo Batalha whos MiG-21 gmax file was the basic for this bird. Thanks to EricGen, Amokfloo, Blackbird, Wrench ... for their hints and ideas. A big thanks to Paladrian for the Cockpit. And again a big thank you to TK for the MiG-21 flight modell that i modded to make this bird. ---------------------------------------------------------- IV. INSTALLATION: -Unzip all files into your objects/aircraft folder. Thats it ---------------------------------------------------------------- V. The MiG-23PFM Fishtail-D is FREEWARE. COMMERCIAL USE IS NOT ALLOWED. ---------------------------------------------------------- VI. For remarks, comments, bugs, etc please use CombatAce forum or send me a PM. Hope you enjoy it. Michael (Gepard) Made in Germany March 2009 Click here to download this file -
In den letzten Tagen habe ich mit 3ds max dieses kleine Biest gezaubert. Doch gibt es noch ein paar Probleme, die ich nicht lösen kann. Deshalb zwei vielleicht dumme Frage von mir an die Gurus. Wieso kommen die Bremsklappen und das Fahrwerk im Spiel nicht raus, obwohl sie in 3ds max animiert sind?
-
Ich habe gestern ein wenig an FE herumgebastelt und einfach meine Kontrolleneinstellung von WOE nach FE kopiert. Danach funktionierten Klappen, Bremsen etc wie gehabt.
-
Feuerlöscheinsätze würde ich eher als SEAD definieren. Bei SEAD müssen mehrere Ziele zum Erfüllen eines Einsatzauftrags bekämpft werden. Da wäre praktisch um ein großes Feuer in mehrere kleine zu zerteilen.
-
Ich versuche das mal. Aber an die Registry habe ich mich bisher nie herangewagt.
-
MiG-23F Fishtail-B
Gepard posted a topic in Thirdwire: Strike Fighters 1 Series - File Announcements
File Name: MiG-23F Fishtail-B File Submitter: Gepard File Submitted: 18 March 2009 File Category: Fictional Aircraft, Experimental and UAV's MiG-23F Fishtail-B Beta ***************** ---------------------------------------------------------- I. This is a "What if" plane. It was not real, but could have been it if the E-8 development line would not have been canceled in 1962. Imagine: A lot of MiG ingenieurs did not agree with Mikoyans decision to stop the E-8 program. They made a proposal to use proven elements of the E-8 and the MiG-21PF to start a new project called E-9. Mikoyan agreed and intended to use the E-9 as gap filler till his favored project E-11, the later swing wing MiG-23 Flogger, was ready. In autumn 1963 the E-9 was ready for flight tests. It was a combination of MiG-21PF engine, wings and avionics with a new fuselage, tail and canards. The E-9 was accepted by the soviet air force in spring 1964 and entered the production line in summer 1964 as MiG-23F. It is equipped in the fashion of that time: No gun, only AAM, unguided rockets and bombs. RP-21 radar und R-11 engine. +++++++++++++++++++++++++++++++++++++ II. Known issues. It is still a beta. I know that the flight gear movement is not perfect. I know, that the skin is only a test shot, quick and dirty. etc. I will try to make it better as fast as possible. +++++++++++++++++++++++++++++++++++++ III. CREDITS: I want to say thank you to a lot of guys who helped me with files, ideas and hints. First of all i want to say thank you to Ricardo Batalha whos MiG-21 gmax file was the basic for this bird. Thanks to EricGen, Amokfloo, Blackbird, Wrench ... for their hints and ideas. A big thanks to Paladrian for the Cockpit. And again a big thank you to TK for the MiG-21 flight modell that i modded to make this bird. ---------------------------------------------------------- IV. INSTALLATION: -Unzip all files into your objects/aircraft folder. Thats it ---------------------------------------------------------- V. For remarks, comments, bugs, etc please use CombatAce forum or send me a PM. Hope you enjoy it. Michael (Gepard) Made in Germany March 2009 Click here to download this file -
MiG-23F Fishtail-B
Gepard replied to Gepard's topic in Thirdwire: Strike Fighters 1 Series - File Announcements
Thanks for finding this bug. I will change it as soon as possible. -
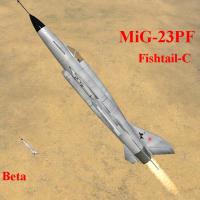
MiG-23PF Fishtail-C
Gepard posted a topic in Thirdwire: Strike Fighters 1 Series - File Announcements
File Name: MiG-23PF Fishtail-C File Submitter: Gepard File Submitted: 19 March 2009 File Category: Fictional Aircraft, Experimental and UAV's MiG-23PF Fishtail-C Beta ***************** ---------------------------------------------------------- I. This is a "What if" plane. It was not real, but could have been it if the E-8 development line would not have been canceled in 1962. Imagine: A lot of MiG ingenieurs did not agree with Mikoyans decision to stop the E-8 program. They made a proposal to use proven elements of the E-8 and the MiG-21PF to start a new project called E-9. Mikoyan agreed and intended to use the E-9 as gap filler till his favored project E-11, the later swing wing MiG-23 Flogger, was ready. In autumn 1963 the E-9 was ready for flight tests. It was a combination of MiG-21PF engine, wings and avionics with a new fuselage, tail and canards. The E-9 was accepted by the soviet air force in spring 1964 and entered the production line in summer 1964 as MiG-23F. In 1966 the Soviet Air Force demanded to equip the new fighter with state of the art avionics and to increase the range. So the MiG-23 Fishtail got a bigger fuselageback fueltank, a modified vertical tail, a mirror on the canopy. Other modifications are the more powerfull R-13 engine and the Saphir-21 Radar, but in the version RP-23. It is not widely known, that the Saphir 21 was originaly developed for the E-8. Only with a smaller antenna it could be fitted in the MiG-21 as RP-22. The smaller antenna reduced the detection range of this radar by 10 km. An other welcome addition of the PF is the ability to carry one gunpod under the left wing root. +++++++++++++++++++++++++++++++++++++ II. Known issues. It is still a beta. I know that the flight gear movement is not perfect. I know, that the skin is only a test shot, quick and dirty. etc. I will try to make it better as fast as possible. +++++++++++++++++++++++++++++++++++++ III. CREDITS: I want to say thank you to a lot of guys who helped me with files, ideas and hints. First of all i want to say thank you to Ricardo Batalha whos MiG-21 gmax file was the basic for this bird. Thanks to EricGen, Amokfloo, Blackbird, Wrench ... for their hints and ideas. A big thanks to Paladrian for the Cockpit. And again a big thank you to TK for the MiG-21 flight modell that i modded to make this bird. ---------------------------------------------------------- IV. INSTALLATION: -Unzip all files into your objects/aircraft folder. Thats it ---------------------------------------------------------------- V. The MiG-23PF Fishtail-C is FREEWARE. COMMERCIAL USE IS NOT ALLOWED. ---------------------------------------------------------- VI. For remarks, comments, bugs, etc please use CombatAce forum or send me a PM. Hope you enjoy it. Michael (Gepard) Made in Germany March 2009 Click here to download this file -
Version
381 downloads
MiG-23PF Fishtail-C Beta ***************** ---------------------------------------------------------- I. This is a "What if" plane. It was not real, but could have been it if the E-8 development line would not have been canceled in 1962. Imagine: A lot of MiG ingenieurs did not agree with Mikoyans decision to stop the E-8 program. They made a proposal to use proven elements of the E-8 and the MiG-21PF to start a new project called E-9. Mikoyan agreed and intended to use the E-9 as gap filler till his favored project E-11, the later swing wing MiG-23 Flogger, was ready. In autumn 1963 the E-9 was ready for flight tests. It was a combination of MiG-21PF engine, wings and avionics with a new fuselage, tail and canards. The E-9 was accepted by the soviet air force in spring 1964 and entered the production line in summer 1964 as MiG-23F. In 1966 the Soviet Air Force demanded to equip the new fighter with state of the art avionics and to increase the range. So the MiG-23 Fishtail got a bigger fuselageback fueltank, a modified vertical tail, a mirror on the canopy. Other modifications are the more powerfull R-13 engine and the Saphir-21 Radar, but in the version RP-23. It is not widely known, that the Saphir 21 was originaly developed for the E-8. Only with a smaller antenna it could be fitted in the MiG-21 as RP-22. The smaller antenna reduced the detection range of this radar by 10 km. An other welcome addition of the PF is the ability to carry one gunpod under the left wing root. +++++++++++++++++++++++++++++++++++++ II. Known issues. It is still a beta. I know that the flight gear movement is not perfect. I know, that the skin is only a test shot, quick and dirty. etc. I will try to make it better as fast as possible. +++++++++++++++++++++++++++++++++++++ III. CREDITS: I want to say thank you to a lot of guys who helped me with files, ideas and hints. First of all i want to say thank you to Ricardo Batalha whos MiG-21 gmax file was the basic for this bird. Thanks to EricGen, Amokfloo, Blackbird, Wrench ... for their hints and ideas. A big thanks to Paladrian for the Cockpit. And again a big thank you to TK for the MiG-21 flight modell that i modded to make this bird. ---------------------------------------------------------- IV. INSTALLATION: -Unzip all files into your objects/aircraft folder. Thats it ---------------------------------------------------------------- V. The MiG-23PF Fishtail-C is FREEWARE. COMMERCIAL USE IS NOT ALLOWED. ---------------------------------------------------------- VI. For remarks, comments, bugs, etc please use CombatAce forum or send me a PM. Hope you enjoy it. Michael (Gepard) Made in Germany March 2009 -
Angefangen habe ich noch nichts, nur eine Weile darüber nachgedacht. Gestern habe ich mir mal den Spaß gemacht meine MiG-23PFM in FE zu kopieren und bin dann einmal just for fun quer durch die Vogesen gedüst. Das macht echt mehr Spaß als Tiefflug bei WOE im selben Gebiet. Die Auflösung eines terraintiles liegt ja bei FE bei 500x500 Metern während sie sonst bei 2000x2000 Metern liegt. Für nen zivilen Mod würde ich deshalb FE als Basisspiel vorziehen.
-
MiG-23F Fishtail-B
Gepard replied to Gepard's topic in Thirdwire: Strike Fighters 1 Series - File Announcements
Starfighter, thanks for finding this bug. Here a quick fix for it. Open the data file. Look for the weapon entries and you find for each weaponpoint an line like below AttachmentPosition=.....x.....,.....x.....,-0.44 Change the -0.44 into -0.46 and save it. Should be better now. -
Nee, hat bei mir nicht funktioniert. Ich habe meinen alten Laptop ausgegraben und mache die Arbeit nun auf ihm. In 23 Tagen ist dann auch dort Feierabend.
-
Ich habe die erste Version meiner MiG-23 Fishtail in die Download Sektion eingestellt. Danke noch mal für Eure Hilfe.
-
Ich habe die erste Version meiner MiG-23 Fishtail in die Download Sektion eingestellt. Danke noch mal für Eure Hilfe.
-
Und Natascha hat man beigebracht Deutsch zu quasseln, nachdem ein westdeutscher Testpilot eine MiG-29 mit massiven over G's belegt hat, obwohl ihn Natascha angebrüllt hat es nicht zu tun. Tat sie nur leider auf Russisch.
-

Version
408 downloads
MiG-23F Fishtail-B Beta ***************** ---------------------------------------------------------- I. This is a "What if" plane. It was not real, but could have been it if the E-8 development line would not have been canceled in 1962. Imagine: A lot of MiG ingenieurs did not agree with Mikoyans decision to stop the E-8 program. They made a proposal to use proven elements of the E-8 and the MiG-21PF to start a new project called E-9. Mikoyan agreed and intended to use the E-9 as gap filler till his favored project E-11, the later swing wing MiG-23 Flogger, was ready. In autumn 1963 the E-9 was ready for flight tests. It was a combination of MiG-21PF engine, wings and avionics with a new fuselage, tail and canards. The E-9 was accepted by the soviet air force in spring 1964 and entered the production line in summer 1964 as MiG-23F. It is equipped in the fashion of that time: No gun, only AAM, unguided rockets and bombs. RP-21 radar und R-11 engine. +++++++++++++++++++++++++++++++++++++ II. Known issues. It is still a beta. I know that the flight gear movement is not perfect. I know, that the skin is only a test shot, quick and dirty. etc. I will try to make it better as fast as possible. +++++++++++++++++++++++++++++++++++++ III. CREDITS: I want to say thank you to a lot of guys who helped me with files, ideas and hints. First of all i want to say thank you to Ricardo Batalha whos MiG-21 gmax file was the basic for this bird. Thanks to EricGen, Amokfloo, Blackbird, Wrench ... for their hints and ideas. A big thanks to Paladrian for the Cockpit. And again a big thank you to TK for the MiG-21 flight modell that i modded to make this bird. ---------------------------------------------------------- IV. INSTALLATION: -Unzip all files into your objects/aircraft folder. Thats it ---------------------------------------------------------- V. For remarks, comments, bugs, etc please use CombatAce forum or send me a PM. Hope you enjoy it. Michael (Gepard) Made in Germany March 2009 -
A question to the modelling gurus
Gepard posted a topic in Thirdwire: Strike Fighters 1 Series - Mods/Skinning Discussion
One question to the modelling gurus. What could be the reason that one gear of this bird is half sunken in the runway? Have tried to find it out for a couple of hours and found no solution. Any ideas? -
A question to the modelling gurus
Gepard replied to Gepard's topic in Thirdwire: Strike Fighters 1 Series - Mods/Skinning Discussion
E-11 was'nt this the prototype designation of the real MiG-23 swing wing fighter, as E-10 was the one with the lift engines? Perhaps Lindr2 knows more about it. -
Is the MF MiG-29A a Sparrow Magnet?
Gepard replied to NeverEnough's topic in Thirdwire: Strike Fighters 1 Series - General Discussion
The Sparrow is over rated in the game. Open the weapon data files and you find a hit capability of 70%. In real combat in 1991 the AIM-7M achieved only 36%. Its a simple fact. -
A question to the modelling gurus
Gepard replied to Gepard's topic in Thirdwire: Strike Fighters 1 Series - Mods/Skinning Discussion
Lets call it Fishtail. -
-
AIR REFUELING
Gepard replied to Veltro2k's topic in Thirdwire: Strike Fighters 1 Series - Mods/Skinning Discussion
I say no. Air refuelling is not my cup of tea.