06 Aug 2014
Version 1.01F for SF:P1 Series. Tested in Wings Over Israel and Wings Over Europe.
Converted MAX to LOD by Spectre8750
Additional Model and Skin Fixes by Spectre8750
Original Model by unknown
Supplied:
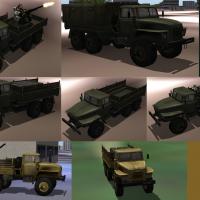
U375_ZPU-2 Bed mounted ZPU-2 Gun
Ural-375D Covered Bed version and
Ural-375D-C Crates Loaded
Ural-375D-U Open Bed
Ural375wT with Troops
-------------------------------------------------------------------------------------------------------------
Ural-375 Truck / Soviet Main Truck replacing the Zil and Produced between 1964-1979
Ural-4320 Truck Then became the Main Truck being produced from 1976 onward. And was
Very similar. Main noticeable difference being the front Grill.
Varieties
The Ural-375D came in a variety of forms:
Ural-375 has an open cab roof that could be covered by a canvas - i.e.: a soft-top cab rather than a hardtop.
Ural-375A has a fully enclosed all-steel cab, was a chassis for wagon-style body, payload 12,787 lb (5,800 kg), framework shortened to 13.2'
Ural-375D Most produced 375.
Ural-375S was a tractor-trailer truck with framework shortened to 5.3'.
Specification
The Ural-375D has the same equipment as the GAZ-66 and ZIL-131.
Hood design, 3 seats cab.
Payload: 9,920 lb (plus trailer: 22,050 lb)
Full weight: (off road - 11,020 lb),
Loading height: 4'7.9"
Suspension: solid axles, leaf springs, rear wheels at balance-cart.
Engine: 180 horsepower (130 kW) ZIL-375YA V8 gasoline (carburetor) pushrod engine.
Gearbox: 5x2 steps,
Max. Speed 47 mph (76 km/h).
Brakes: drums, with pneumatic control.
Stopping distance from 20 mph (32 km/h) - 36'.
Measures: LxWxH = 24 ft 1 inx8'10"x8'9.5", wheel base 13'9.4". Track 6 ft 7 in (2.01 m)
Maneuverability: turning circle 69',
Ground Clearance: 15.7", overcome ford: 4 ft 11 in (1.50 m) Curb weight: 18,520 lb (8,400 kg).
Tires: 14-20", pressure 0.3-2 p.s.i. (controlled).
Fuel tank: 79+16 gal. Fuel economy: 4.9 mpg (at 19-25 mph), 2.94 mpg (city cycle).
-------------------------------------------------------------------------------------------------------------
Install:
Drop "Objects" and "Sounds" Folders into the root folder of the Game of choice, overwrite.
Drop the contents of the _Skins into each Trucks folder. eg:
x:\Wings Over Europe\Objects\GroundObject\Ural-375D\Green
Open the *_DATA.INI for each truck and change the Nation to the appropiate nation for that map. eg:
SF1 Desert NationName=Paran
Wings Over Europe NationName=Soviet
Wings Over Vietnam NationName=NVietnam
Wings Over Isreal NationName=Egypt or Syria
Play
Enjoy
Spectre8750

Hasty Airstrip by Krfrge - April, 2014
This was built in response to a question on Combat Ace.
Credits go to Mitch for the original desert factory. I used one of the ground platte to make the aristrip. Next to Stary for his great terrain mods. If I have missed anyone please let me know so you are given proper credit.
This was originally designed in WoE.
What's in this package:
1. GERMANYG9.bmp tile
2. GERMANYG9.LOD
3. HastyAirstrip1.LOD
4. HastyAirstrip1.TGA
5. Jungle.TGA
6. Airfield9.ini
7. Airfield9.LOD
8. Airfield9_DATA.ini
Installing:
1. Place all 8 items into a terrain folder of your choice.
2. Add the GermanyG9 tile entry to your terrain_data.ini.
To do so, open the terrain_data.ini file with notepad and add the following entry:
[Texturexxx] <--------make sure to change the XXX to the next number
Filename=GERMANYG9.BMP
HasWater=0
Color=0.352682,0.385123,0.234305
SolidObjectTexture=
AlphaObjectTexture=jungle.TGA
3. Add the GermanyG9 tile to your terrain_texture.ini.
To do so, open the terrain_texture.ini file with notepad and add the following entry:
[GERMANYG9.bmp]
TextureType=4
DetailType=0
HeightMapScale=100.000000
TransitionType=0
TransitionTo=0
3WayTransitionTo=0
RiverType=0
RoadType=0
RandomFactor=100
ExclusionRegion=0
ExcludeMaxX=0
ExcludeMinX=0
ExcludeMaxY=0
ExcludeMinY=0
LimitRotation=0
Allow0deg=0
Allow90deg=0
Allow180deg=0
Allow270deg=0
SolidObjectTexture=
AlphaObjectTexture=jungle.tga
4. Add the following to your terrain_targets.ini
[TargetArea490] <-----------Renumber to the last target entry
Name=Hasty Airstrip <-----------You can rename this
Position=XXX000.000000,XXX000.000000 <-----Adjust the location
Radius=2485.281250
ActiveYear=1950 <-----------You can adjust the year
Location=1 <-----------You can adjust the location (1 or 2)
Alignment=FRIENDLY <-----------You can adjust the alignment (FRIENDLY or ENEMY)
AirfieldDataFile=airfield9.ini
NumSquadrons=1
Target[001].Type=HastyAirstrip1
Target[001].Offset=0.00,0.00
Target[001].Heading=0
Target[002].Type=ZPU-2
Target[002].Offset=227,235
Target[002].Heading=45
Target[003].Type=AAA
Target[003].Offset=8,67
Target[003].Heading=45
Target[004].Type=ZPU-2
Target[004].Offset=-121,325
Target[004].Heading=345
Target[005].Type=Camonet
Target[005].Offset=250,360
Target[005].Heading=0
Target[006].Type=Camonet
Target[006].Offset=278,340
Target[006].Heading=17
Target[007].Type=AAA
Target[007].Offset=47,274
Target[007].Heading=17
Target[008].Type=ZPU-2
Target[008].Offset=-316,-351
Target[008].Heading=220
Target[009].Type=Camonet
Target[009].Offset=-222,-117
Target[009].Heading=220
Target[010].Type=ammo
Target[010].Offset=278,-132
Target[010].Heading=220
Target[011].Type=ammo
Target[011].Offset=250,-171
Target[011].Heading=217
Target[012].Type=ammo
Target[012].Offset=296,-160
Target[012].Heading=178
Target[013].Type=Camonet
Target[013].Offset=282,-195
Target[013].Heading=178
Target[014].Type=AAA
Target[014].Offset=-16,-121
Target[014].Heading=180
Target[015].Type=AAA
Target[015].Offset=47,39
Target[015].Heading=100
Target[016].Type=BRDM
Target[016].Offset=172,133
Target[016].Heading=183
Target[017].Type=AAA
Target[017].Offset=235,-281
Target[017].Heading=77
Target[018].Type=Camonet
Target[018].Offset=24,-325
Target[018].Heading=7
Target[019].Type=Camonet
Target[019].Offset=-7,-363
Target[019].Heading=7
Target[020].Type=Camonet
Target[020].Offset=-211,-250
Target[020].Heading=187
Target[021].Type=Camonet
Target[021].Offset=-289,-156
Target[021].Heading=237
Target[022].Type=AAA
Target[022].Offset=317,168
Target[022].Heading=237
Target[023].Type=ZPU-2
Target[023].Offset=-218,-39
Target[023].Heading=260
You can substitue any of the above targets with others of your choice and additional targets to fit your requirements.
5. Add the following entries into the terrain_types.ini
[TargetTypexxx]
Name=HastyAirstrip1
FullName=Hasty Airstrip
ModelName=HastyAirstrip1.lod
TargetType=SMALL_RUNWAY
ActiveYear=0
TargetValue=1000
UseGroundObject=FALSE
DamagePoint=140.0
ArmorValue=0.0
ArmorType=0
RepairRate=10.0
StartDetectChance=100
StartIdentifiedChance=50
IncreaseDetectChanceKey=10
MaxVisibleDist=30000.0
ZBufferOffset=6.000000
FlatObject=TRUE
DamagedModel=
DestroyedEffect=
DestroyedModel=
SecondaryChance=0
[TargetTypexxx]
Name=Runway9
FullName=Runway
ModelName=airfield9.lod
TargetType=SMALL_RUNWAY
ActiveYear=0
TargetValue=0
UseGroundObject=FALSE
DamagePoint=10.0
ArmorValue=0.0
ArmorType=0
RepairRate=10.0
StartDetectChance=100
StartIdentifiedChance=50
IncreaseDetectChanceKey=10
MaxVisibleDist=30000.0
ZBufferOffset=6.000000
FlatObject=TRUE
DamagedModel=
DestroyedEffect=
DestroyedModel=
SecondaryChance=0
6. You can takeoff using the north-south runway currently. I am working on improving the line-up and use of the 30 degree offset runway.
I subscribe to the Comabt Ace Freeware Policy.
If you have questions contact me at Combat Ace.
Krfrge April 2014.
~~~~~~~~~~~~~~~~~~~~~~~~~
Change 1 - Adjustment to airfield9_DATA.ini
The below adjustment should correct the displacement off the airfield
[Runway001]
Heading=0
Offset=135,-145
Length=300
Width=50
TouchDownHead=0,125
TouchDownTail=0,-125
TakeOffHead=0,130
TakeOffTail=0,-130
TaxiHead[01].Heading=90
TaxiHead[01].Offset=-10,143
TaxiHead[02].Heading=90
TaxiHead[02].Offset=-10,-143
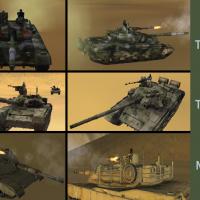
This is my new mod
This package have type-99(China),T-90(Russian),M1A1(USAF)
DATA not by myself maybe have some unknow bug
Maybe tank size is big
I add new tank sound
------------------------------------
Add to GunDATA
------------------------------------
M1A1
[GunDataXXX]
TypeName=120MM_L44
FullName=120MM Rheinmetall Maingun
Caliber=120.000000
ROF=4.000000
MuzzleVel=920.000000
AmmoWt=30.250002
WarheadWt=0.000000
Reliability=100.000000
Accuracy=95.000000
AddLight=TRUE
MaxLightRange=2000.000000
FireColor=0.400000,0.360000,0.256000
GunFireEffect=TankGunFireEffect
GunFireSound=TankGun
EffectClassName=TankGunEffects
EffectTime=0.100000
TracerTexture=Tracer3.tga
TracerSize=0.200000
TracerDistFactor=0.002000
TracerLength=0.018000
MaxVisibleDist=4000.000000
MaxStreakVisibleDist=1000.000000
TimeFuzed=FALSE
[GunDataXXX]
TypeName=25MM_M242
FullName=25mm M242 Bushmaster
Caliber=25.000000
ROF=200.000000
MuzzleVel=1100.000000
AmmoWt=0.180000
WarheadWt=0.010000
Reliability=100.000000
Accuracy=50.000000
AddLight=TRUE
MaxLightRange=1200.000000
FireColor=0.500000,0.450000,0.320000
GunFireEffect=23mmFireEffect
GunFireSound=Cannon
EffectClassName=23mmEffects
EffectTime=0.100000
TracerTexture=Tracer.tga
TracerSize=0.150000
TracerDistFactor=0.002000
TracerLength=0.015000
MaxVisibleDist=4000.000000
MaxStreakVisibleDist=1000.000000
TimeFuzed=FALSE
Thanks
_____________________________
jasonowen
azlyirnizam
north
----------------------------------------------------
Frtn
FV510 "Warrior" - English tracked armoured vehicle. For StrikeFighters 1.
If you have my BMP-2 vehicle : upgrade contains three _lod files. It allows to increase number of units you can put on the mission without FPS degradation.
And BONUS : new moro camouflage skin. View the screenshot.
This model is designed for Strike Fighters P1. Not tested on another versions of StrikeFighters.
Three camo colours available : grey, green, desert
Based on "Call of Duty" 3d model - modified and adapted by me.
This is a new graphic layers for my BMP-2 offensive vehicle. 'Sand" camo without UN insignia. Read info.txt how to install new skin.
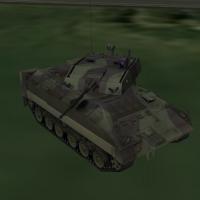
BMP-2 infantry fighting vehicle. I made two versions of this vehicle : with gun only, and with gun and one antitank missile. Two camo colours available.
Thanks to Marcos Styll for 3d model.


 FV510 "Warrior" - English tracked armoured vehicle. For StrikeFighters 1.
 If you have my BMP-2 vehicle : upgrade contains three _lod files. It allows to increase number of units you can put on the mission without FPS degradation.
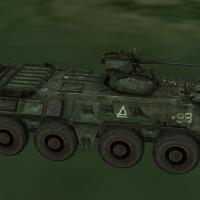 This model is designed for Strike Fighters P1. Not tested on another versions of StrikeFighters.
 This is a new graphic layers for my BMP-2 offensive vehicle. 'Sand" camo without UN insignia. Read info.txt how to install new skin.
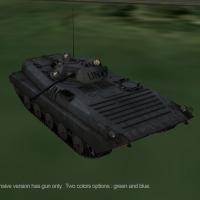 BMP-2 infantry fighting vehicle. I made two versions of this vehicle : with gun only, and with gun and one antitank missile. Two camo colours available.