Wrench
-
Content count
27,285 -
Joined
-
Last visited
-
Days Won
145
Everything posted by Wrench
-
What If Screenshot Thread.......
Wrench replied to Dave's topic in Thirdwire: Strike Fighters 2 Series - Screen Shots
Yak-3RDs from an unidentified Guards Unit, over East Germany circa 1947 -
Vought F-8EB Crusader - Belgian Air Component
Wrench replied to Spinners's topic in Thirdwire: Strike Fighters 2 Series - Sci-Fi/Anime/What If Forum
I'd think better as Royal Netherlands Naval Air Service, replacing their Seahawks, if they'd kept/modernized Karl Doorman. (yes, it exists, but isn't available any longer) -
SF2 Screenshot Thread
Wrench replied to Stary's topic in Thirdwire: Strike Fighters 2 Series - General Discussion
Go to Club Vandersexxxx in Amsterdam, and forget the safe word??? (yah, was watching "EuroTrip" the other day) -

Version
774 downloads
Yakovlev Yak-9U, -9UT and -9P "Frank" by Pakso = For SF2, Any & All versions (Full-4 Merged Prefered) = *Note: Full-4 merged prefered tag is because some decals used are referenced from SF2:I* MOdifications, tweeks, FM enhancements, and so forth to Pakso's Yak-9 WW2/Korean Era/Early Cold War Soviet & satellite countries fighter. This package contains 3 aircraft: Yak-9U Yak-9UT (made from the data ini supplied by Pasko on the original release) *Note: these have the plywood aft fuselage, hence no rivets* Yak-9P will full metal fuselage (export version?) The 9U & 9P have the standard arament of 2 12mm machine guns and single 20mm cannon through the prop hub. The 9UT has 2 20mm upper deck cannon and a 37mm gun through the prop hub (T= anti-tank. Works great against bombers too!) All aircraft have new, enhanced FMs for SF2. While pretty close, there is probably some room for improvement - this is !ENCOURAGED! for those with the skills and time to accomplish. All aircraft have completely NEW skins, created from a Home-Grown Templates (patent pending), and how have the correct color schemes, as well as corrected/new panel and rivet lines for the variant (9U/UT is different from 9P). All national marking and 'Bort' numbers are stock, in-game decals. Userlists are incuded for all three. All guns and weapons, excepting bombs which are stock, are provided in this pak, as well as Pasko's pilot figure. As expected, the canopy opens/closes via manual animation keystroke -the (in)famous Shift/0. A new in-line V-12 sound, from many of the WW2 mods, is included. A quick note on guns: the nose cannon on ALL variants has been set as "Fire_Secondary_Gun", so make sure you have a seperate button mapped for it's use. As always, fairly easy to follow, detailed install instructions are included. So, please read them. Also, give the "Notes" section a read for further information and stuff like that there. For historical purposes, Pasko's original readme is included. Good Hunting! wrench kevin stein -
MF F-14 help
Wrench replied to Swordsman422's topic in Thirdwire: Strike Fighters 2 Series - Mods & Skinning Discussion
did you look at the OUT file? Should've come with the pakcage. Lists all the mesh names -
SF2 Screenshot Thread
Wrench replied to Stary's topic in Thirdwire: Strike Fighters 2 Series - General Discussion
1947 -- looking for airlifters to annoy -
SF2 Screenshot Thread
Wrench replied to Stary's topic in Thirdwire: Strike Fighters 2 Series - General Discussion
yakkity yak .. the PLAAF flys back (totally unhappy with how that AMT-24m green looks ....but, its the right color) -
Version
699 downloads
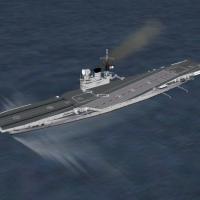
HMS Victorious (R38) Aircraft Carrier by Hinchbrooke = For SF2, Any and All = This is the aircraft carrier HMS Victorious as she appeared "post 1950s refit" until her retirement in the late 1960s. Originally released for 1stGens way back in 2005 and subsequently "lost" in the ether. Prompted by one of the CA members into looking for it, I scrounged through all my archive CDs (dating back to 2004) and actually located it. This will give our Fleet Air Arm guys someplace new to land on! Some very small tweeks for SF2 (mostly to the radar statments for TEWS -but as she 'retired' in 1969, that's a bit moot). As CVs are 'unvulnerable' in-game, her defensive armament is minimal (the same 2 guns that Hinch put on way back when), and mostly for show. Also included, just for fun, are 2 missions set on the Desert map, using my SF2 mod of Skippybing's Sea Vixen. One is a take off, the other is landing. End Users can always change the aircraft and 'mission date' to fit whatever aircraft pleases you. They are edits of the stock SF2 carrier take off/landing missions, moved to a different map and using Royal Navy equipment. As always, READ the enclosed readme for fully detailed, easy-to-follow install instructions. Hinch's original readme is included, for historical reference purposes. With thanks to Hinch for creating this, so long ago! Enjoy! wrench kevin stein -

Version
386 downloads
DH Sea Vixen FAW.1 & 2 Replacement Data Inis = For SF2, Any & All versions = This small package contains data inis for =BOTH= the Sea Vixen FAW.1 and FAW.2, allowing them to trap on aircraft carriers. It is to be applied to my Sea Vixen Pak located at the following url: http://combatace.com/files/file/11975-dh-sea-vixen-faw1-faw2 Small tweeks in the flight model now allow it safe landings on the various carriers available (and soon to be available). No other changes are in effect. Note: this is NOT the aircraft itself, just 2 new data inis!! As always, comparatively easy install instructions are included. Give them a read! Happy Landings! wrench kevin stein -
Not all airplanes show up in single mission list
Wrench replied to DarthRevan's topic in Thirdwire: Strike Fighters 2 Series - General Discussion
check for double nexused folder??? does the main ini have the needed lines, as Dels pointed out? (the C & D should have no problem, as they aren't stock birds) [AircraftData] AircraftFullName=F-104C-10_65 Starfighter AircraftShortName=F-104C-10 AircraftDataFile=F104C-10_data.ini CockpitDataFile=F104C-10_cockpit.ini <---- HangarScreen=F104C_hangar.bmp LoadoutImage=F104C_loadout.bmp Loadingscreen=F-104C_LOADING.bmp LoadoutFile=F104C-10_loadout.ini AvionicsDLL=Avionics60.dll <---- AvionicsDataFilename=F104C-10_avionics.ini <--- UserList=F104C-10_UserList.ini are you flying with the operational years of said aircraft? -
Southern Cal Terrain Sky colors
Wrench replied to hurc's topic in Thirdwire: Strike Fighters 2 Series - General Discussion
that's what I'm talking about!! -
Adjusting Beginning & End Year Spread
Wrench posted a topic in Thirdwire: Strike Fighters 2 Series - Knowledge Base
This will tell you how to change to 'year spread' of the game; making it cover a wider range of calendar years, and not having to mess with aircraft data ini service years, which should NEVER NEVER NEVER EVER!!!! be messed with. The ServiceYear= entries of an aircraft should only be adjusted when you are 1) creating a 'nation specific' version that has carved in stone, hard data service years, or 2) correcting a mistake in said service dates That's covered in another thread in the KB, and not truely relevant here. Ok, there are 2 files you need to tweek for expanding the available years in ANY of the 3rd Wire games. Options.ini Singlemission.ini* (*SingleMission.ini is optional, but add more targets and Fun Factor to missions) Options ini is found in the root directory of your game ie: assuming the standard install path, C:\Users\*nameofuser*\Saved Games\ThirdWire\StrikeFighters2 or whatever mod folder that EACH of the SF2 exes (SF2:V, SF2:I, SF2:E, and expansion paks 1 & 2) you may have created. Open the options ini in any text editor; notepad works really good, and scroll down until you find these entries: StartYear= EndYear= There'll be 3 of them, one in each of the entries for SingleMission, DogFightHost and CoOpMission. Now, mind you as SF2 dosen't have any multiplayer, they really don't do anything now. But, adjust them anyways. Change the start and end years; I try use at least a 100 year spread, due to having several WW2 installs. So, it can look something like this for your normal, jets install: If you have aircraft pre-dating these years, use the entries below (this will include ALL WW2 style aircraft): Plenty of leeway there, given as with the SF2 expansion paks we have WW2 aircraft, and immeadeate post-war aircraft readily available (Mustang, Spitfire, Meteor, Mig-15, Yak-23; you get the idea) Save and Close the Options ini. Now, using the 3rd Wire Cat Extractor, available here at CA in the SF2 Downloads/Utilities section, open the MissionData001.Cat, and extract the SingleMission.ini. Place it into your mods folders /Flight folder. Open the SingleMission ini, and you'll see this: [TargetValues] MinStrikeTargetValue=100 HeavyStrikeValue=1000 NormalStrikeValue=200 These show the 'minimum value' for targets on the Strike Missions. Since us Terraformers put all kinds of interesting stuff on the terrains, many that have values far below those stock ones, do this: This will give a wider variety of targets, based on values assigned in each terrain's **_types.ini. The targets are assigned randomly in single missions, and semi-randomly/partly scripted in campaigns. So, in some missions, you might find yourself being tasked against a high value target such as a HQ building, or something as lowly as a single tent or parked Jeep/BRDM. Save and close the SingleMission.ini That's it...your done! Go Fly!! Wrench kevin stein -
Service start/end dates not working.
Wrench replied to Fightingirish's topic in Thirdwire: Strike Fighters 2 Series - General Discussion
the procedure is in a post in the SF/Wo* Knowledge Base -- it's the same for ALL 3W series games. But, just to make things easier for all involvoed, I'll do up a new post in the SF2 KB -
Question about terrain height and clouds
Wrench replied to malibu43's topic in Thirdwire: Strike Fighters 2 Series - Mods & Skinning Discussion
no. not since TK locked it out -
WOE screens vs the ODS screens
Wrench replied to saisran's topic in Thirdwire: Strike Fighters 1 Series - Mission/Campaign Building Discussion
rename the offending menu screens to x-nameofimage, and the game will revert back to stock. sad to hear that, we worked hard on EVERYTHING for that mod -
FAA BUCCANEERS SF1
Wrench replied to landrover's topic in Thirdwire: Strike Fighters 1 Series - Mods/Skinning Discussion
and for the 100 billionth time .... PLEASE DO NOT POST QUESTIONS IN THE KNOWLEDGE BASE!!!! It's for ANSWERS; questions go here, in the appropriate Forums -
Anyone thought of hacking the Buckaneer pit for a Lightning pit?
Wrench replied to Slant6's topic in Thirdwire: Strike Fighters 1 Series - Mods/Skinning Discussion
been using the F-4B pit since Russo first released it. Of course, all your problems are solved in SF2, with Expansion Pak 2; 5 different Lightnings are stock, with cockpits and proper weaponry. -
Version
496 downloads
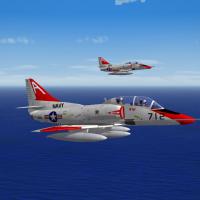
TA-4J Skyhawk by Fracture =For SF2, Full-4 Merged (Reccomended/Preferred) ** May (ok, probably) Requires SF2:V -hence the Full-4 Merged requirement-, as the A-4E_67 cockpit and avionics are referenced for the Mod. If you don't have these minimum requirements, you shouldn't download this, as you may not be able to use it withOUT heavy editing ** This is a overhaul of Fracture's TA-4J Skyhawk trainer/attack aircraft. All the inis have been brought up to the latest (as of July, 2011) standard. Some modifications to the avionics are more for 'playability', as research showed these most likely did not have an RWR. The standard NAV/Attack radar, yes. Loadouts use all common or garden variety stock weapons. It is set to fly all mission profiles as any other standard Scooter. Decal randomizations is implemented, so be sure you're at least at the June, 2011 patch level. New damage textures (dds) and a new SF2-style hangar screen are included. As always, fairly easy to follow, highyl detailed install instructions are included. So, please read them .... Fracture's original readme is also included. Happy Landings! wrench kevin stein -
CV HMS Victorious, R38 by Hinchbrooke for SF2
Wrench posted a topic in Thirdwire: Strike Fighters 2 Series - File Announcements
File Name: CV HMS Victorious, R38 by Hinchbrooke for SF2 File Submitter: Wrench File Submitted: 15 October 2011 File Category: Aircraft Carriers HMS Victorious (R38) Aircraft Carrier by Hinchbrooke = For SF2, Any and All = This is the aircraft carrier HMS Victorious as she appeared "post 1950s refit" until her retirement in the late 1960s. Originally released for 1stGens way back in 2005 and subsequently "lost" in the ether. Prompted by one of the CA members into looking for it, I scrounged through all my archive CDs (dating back to 2004) and actually located it. This will give our Fleet Air Arm guys someplace new to land on! Some very small tweeks for SF2 (mostly to the radar statments for TEWS -but as she 'retired' in 1969, that's a bit moot). As CVs are 'unvulnerable' in-game, her defensive armament is minimal (the same 2 guns that Hinch put on way back when), and mostly for show. Also included, just for fun, are 2 missions set on the Desert map, using my SF2 mod of Skippybing's Sea Vixen. One is a take off, the other is landing. End Users can always change the aircraft and 'mission date' to fit whatever aircraft pleases you. They are edits of the stock SF2 carrier take off/landing missions, moved to a different map and using Royal Navy equipment. As always, READ the enclosed readme for fully detailed, easy-to-follow install instructions. Hinch's original readme is included, for historical reference purposes. With thanks to Hinch for creating this, so long ago! Enjoy! wrench kevin stein Click here to download this file -
CV HMS Victorious, R38 by Hinchbrooke for SF2
Wrench replied to Wrench's topic in Thirdwire: Strike Fighters 2 Series - File Announcements
it's just a small little bit ... just don't look at the right side!! PB: oopss!!!! ok people, rename the GroundObject folder to match what pureblue said! -
CV HMS Victorious, R38 by Hinchbrooke for SF2
Wrench replied to Wrench's topic in Thirdwire: Strike Fighters 2 Series - File Announcements
paulo, are you on XP with DX9?? I don't see that on Winge7 and Dx10. It could be an untextured mesh hidden inside somewhere, showing up (like on Pasko's F-82 Twin Mustang) can you post a screenie? PB: sf1 style? meaning that I didn't use a seperate skin subfolder? It still works though! -
File Name: Replacement Data Inis for Sea Vixen FAW.2 & FAW.2 File Submitter: Wrench File Submitted: 14 October 2011 File Category: Other DH Sea Vixen FAW.1 & 2 Replacement Data Inis = For SF2, Any & All versions = This small package contains data inis for =BOTH= the Sea Vixen FAW.1 and FAW.2, allowing them to trap on aircraft carriers. It is to be applied to my Sea Vixen Pak located at the following url: http://combatace.com/files/file/11975-dh-sea-vixen-faw1-faw2 Small tweeks in the flight model now allow it safe landings on the various carriers available (and soon to be available). No other changes are in effect. Note: this is NOT the aircraft itself, just 2 new data inis!! As always, comparatively easy install instructions are included. Give them a read! Happy Landings! wrench kevin stein Click here to download this file
-
Replacement Data Inis for Sea Vixen FAW.2 & FAW.2
Wrench replied to Wrench's topic in Thirdwire: Strike Fighters 2 Series - File Announcements
you all should thank Skippybing for creating it .. I just fiddled with it (and thanks to Ant for his skins!) -
Question about terrain height and clouds
Wrench replied to malibu43's topic in Thirdwire: Strike Fighters 2 Series - Mods & Skinning Discussion
TK did change the apparent generated height of the cloud deck a few patchs back ... it seem to be now 'fixed' at certain level. Want to test high altitude? download the Himialaya terrain, and fly on scatterd/broken/overcast days, and let us know (just watch out for cumulo-granite clouds) -
Targets_Types.ini File Question
Wrench replied to a topic in Thirdwire: Strike Fighters 2 Series - Mods & Skinning Discussion
remember, to, that the Game Engine only loads "items" within a 50km radius of the player's aircraft. Cuts down on processing cycles (methinks!) So, when you leave an area, vehicles, ships, AD units will "pop" out of existence; conversly, when approaching the target area, the "goodies" will 'pop' back IN to existence.