
Stephen1918
-
Content count
1,168 -
Joined
-
Last visited
-
Days Won
19
Files posted by Stephen1918
-
AEG C.IV
By Stephen1918 in Other Central Powers Aircraft
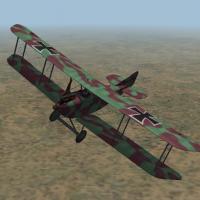
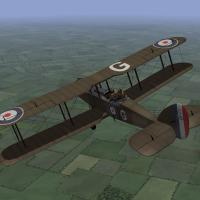
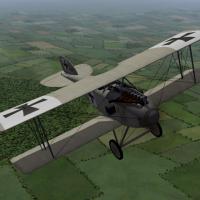
The AEG C.IV was a German 2 seater that was introduced in 1916 and saw service until the end of the war. It served on the Western, Eastern, and Palestine fronts and was operated by Bulgaria and Turkey as well as by Germany. It was primarily a reconnaissance plane, but was also used as a bomber escort, although not very successfully. It had a fixed Spandau machine gun for the pilot, a Parabellum on a ring mount for the observer, and could carry a small bomb load.
I have included two skins, a green and lilac camo, and a green and brown camo. I have also included a full set of number decals. My skinning templates are included in the download.
There are two bomb loadouts, one internal, and one external mounted under the wings. It is doubtful that the AEG C.IV carried external bombs, but I liked the look of it. For historical accuracy, you probably shouldn't use the External Bombs loadout.
Credits
Thanks to Ojcar for making the data file for the AEG C.IV and for providing valuable information, especially for the cockpit details.
Thanks also to Nix, who made the sound file for the Mercedes 160hp engine.
Thanks to Ojcar (again) for pointing out the problem with the decals.
Installation Instructions
For FE1 - Unzip the file and move the folder named "AEGC4" into your FirstEagles/Objects/Aircraft folder. You also need to move the sound file "mercedes160m2.wav" into the FirstEagles/Sounds folder.
For FE2 - Unzip the file and move the folder named "AEGC4" into the FirstEagles/Objects/Aircraft folder. Then in the FirstEagles/Objects/Decals folder, create new folder named "AEGC4". Move the folder named "D" from the Aircraft/AEGC4 folder into the Decals/AEGC4 folder you just made. You also need to move the sound file "mercedes160m2.wav" into the FirstEagles/Sounds folder.
333 downloads
-
Airco D.H.5
By Stephen1918 in Other Entente Aircraft
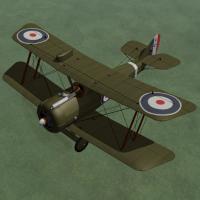
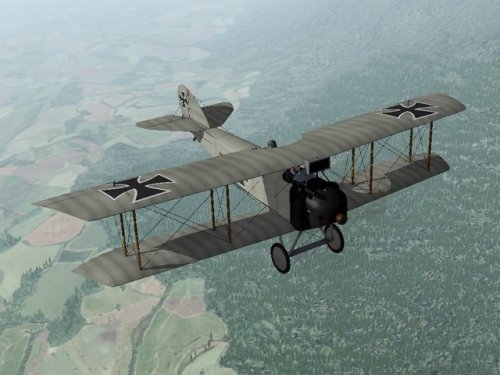
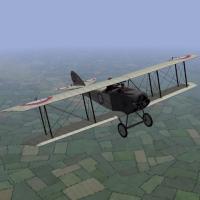
The Airco D.H.5 was intended to be an improved version of the D.H.2, combining the power of a forward facing prop with the forward visibility of a pusher. The reverse stagger of the wings was an unusual configuration and the strange appearance of the plane may have contributed to false rumors of its bad performance. Although a slow climber, the D.H.5's strength and maneuverability made it excellent for ground attack and light bombing missions.
I have included two skins with decal ini's for both British and Australian markings. Both use the letter decals that come with First Eagles, which you can set in the Loadout screen. The British skin allows you to also set the squadron. (The Australians all used a white stripe on the tail instead of squadron markings.) I have included a set of serial numbers which will be applied randomly.
You can also choose a light bomb load in the Loadout screen.
Historical Notes
The serial numbers are fictious, but in the correct range for most D.H.5s.
Credits
My thanks to Ojcar for once again making an excellent data file for the D.H.5.
My thanks also to Nix for providing the realistic sound file for the Le Rhône engine.
Installation Instructions
For FE1 - Unzip the file and move the folder named "AircoDH5" into the FirstEagles/Objects/Airplanes folder. You also need to move the sound file "rhone110bn4nC" into the FirstEagles/Sounds folder.
For FE2 - Unzip the file and move the folder named "AircoDH5" into the FirstEagles/Objects/Airplanes folder. Then in the FirstEagles/Objects/Decals folder, create a new folder named "AircoDH5". Move the folder named "D" from the Airplanes/AircoDH5 folder into the Decals/AircoDH5 folder you just made. You also need to move the sound file "rhone110bn4nC" into the FirstEagles/Sounds folder.
551 downloads
-
Airco DH4 - 2 pack
By Stephen1918 in Other Entente Aircraft
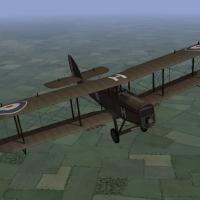
Although best known in its role as a bomber, the Airco DH4 was intended to be a general purpose airplane and was used for recon and ground support as well. Early versions were powered by a 250hp Eagle engine. Later versions were powered with a 375hp Eagle engine, which made them very effective bombers. The biggest problem with the DH4 was the gas tank placed between the pilot and gunner, which made communication between the two almost impossible.
I have uploaded two versions of the DH4 - Ojcar has created two FMs for the plane, one with the early 250hp engine, and one with the later 375hp engine.
Both planes have two skins, a brown and an olive color. Both use the letter decals that come with First Eagles (which you can set in the loadout screen) and a set of serial numbers which will be applied randomly. There are also loadouts for light, medium, and heavy bomb loads. The skins, decals, and loadouts are interchangeable for the two planes.
The skins are rather generic, I have included my skinning templates for those who wish to make better skins.
Credits
My thanks to Ojcar for once again making two excellent data files for the DH4.
My thanks also to Sinbad for providing a great deal of resource information for this plane.
Installation Instructions
The two versions can be installed separately or both together.
For FE1 - Unzip the file and move the folders named "AircoDH4_250" and "AircoDH4_375" into the FirstEagles/Objects/Airplanes folder.
For FE2 - Unzip the file and move the folders named "AircoDH4_250" and "AircoDH4_375" into the FirstEagles/Objects/Airplanes folder. Then in the FirstEagles/Objects/Decals folder, create new folders named "AircoDH4_250" and "AircoDH4_375". Move the folders named "D" from the Airplanes/AircoDH4 folders into the corresponding Decals/AircoDH4 folder you just made.
515 downloads
-
Airco DH9
By Stephen1918 in Other Entente Aircraft
The Airco DH9 was introduced early in 1918 as an intended replacement for the DH4. The pilot was seated closer to the gunner in the DH9 and an internal bomb compartment was provided. However, because of the DH9's low performance and unreliable engine, the DH4 remained the better bomber until the DH9a was introduced a few months later. Nevertheless, the DH9 did operate with better success on the Eastern and Palestinian fronts where it faced fewer enemy fighters.
I have included two skins, a brown and an olive color. Both use the letter decals that come with First Eagles (which you can set in the loadout screen) and I have included a set of serial numbers which will be applied randomly. There are also loadouts for light, medium, and heavy bomb loads.
The skins are rather generic, I have included my skinning templates for those who wish to make better skins.
Credits
My thanks to Ojcar for once again making an excellent data file for the DH9.
My thanks also to Sinbad for providing a great deal of resource information for this plane.
Installation Instructions
For FE1 - Unzip the file and move the folder named "AircoDH9" into the FirstEagles/Objects/Airplanes folder.
For FE2 - Unzip the file and move the folder named "AircoDH9" into the FirstEagles/Objects/Airplanes folder. Then in the FirstEagles/Objects/Decals folder, create a new folder named "AircoDH9". Move the folder named "D" from the Airplanes/AircoDH9 folder into the Decals/AircoDH9 folder you just made.
April 5, 2012 - Replaced data file with new version to fix problem with take offs and landings and to make the plane fly better.
452 downloads
-

Airco DH9a "Ninak"
By Stephen1918 in Other Entente Aircraft
The Airco DH9a, called the "Ninak" ("nine a") was introduced in June 1918 to replace the underpowered DH9. The 400hp Liberty engine required changes to the front of the fuselage, otherwise the plane was pretty much the same as the DH9. Although it was introduced late in the war, the DH9a did see service during the war, and was used extensively afterwards.
I have included two skins, a brown and an olive color. Both use the letter decals that come with First Eagles (which you can set in the loadout screen) and I have included a set of serial numbers which will be applied randomly. There are also loadouts for light, medium, and heavy bomb loads.
The skins are rather generic, I have included my skinning templates for those who wish to make better skins.
Credits
My thanks to Ojcar for once again making an excellent data file for the DH9a.
My thanks also to Sinbad for providing a great deal of resource information for this plane.
Installation Instructions
For FE1 - Unzip the file and move the folder named "AircoDH9a" into the FirstEagles/Objects/Airplanes folder.
For FE2 - Unzip the file and move the folder named "AircoDH9a" into the FirstEagles/Objects/Airplanes folder. Then in the FirstEagles/Objects/Decals folder, create a new folder named "AircoDH9a". Move the folder named "D" from the Airplanes/AircoDH9a folder into the Decals/AircoDH9a folder you just made.
April 5, 2012 - Replaced data file with new version to fix problem with take offs and landings and making the plane fly better.
429 downloads
-
Airfields for Large Planes
By Stephen1918 in First Eagles - WWI and Early Years - Terrain and Environmental Mods
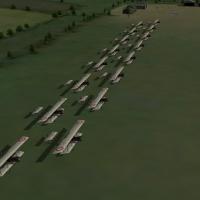
This replaces the stock airfield for both FE1 and FE2. The planes are spaced 25 meters apart instead of 15 and arranged in two rows, 10 meters apart. For smaller planes, like the Morane Saulniers, they will seem pretty far apart, but the larger planes, like the Farman F.40 and the Caudron G.4, can now take off without colliding.
In your Terrain folder, make a backup of your WW1_Airfield1.INI and replace it with mine. It will change all the airfields to the new configuration. All the parked planes and all the other spacing is the same as the stock airfield.
163 downloads
(2 reviews)0 comments
Updated
-
Airships
By Stephen1918 in First Eagles - WWI and Early Years - Object Mods
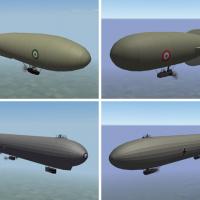
Dirigibles were used by both sides on all fronts during World War I. Early in the war, they were used for recon and bombing, but were soon replaced by aircraft. However, because they could stay aloft for long periods, and their ability to hover, airships continued to be used for naval operations, especially for scouting and anti-submarine patrols.
I have created five different types of airship. They are all identified as "Balloon" and they are all armed with machine guns. Drop them into your Ground Object folder and they will show up over the battlefields for more challenging balloon busting missions. I have included alternate skins for some of them so you can use them for different nations.
Historical Notes
The R23 and L32 are relatively accurate models of actual airships. The Type M, Type PL, and Type VZ are more or less generic representations of popular airship types which were used by different nations. I have averaged out the national and manufacturer variations, but the overall size and shape is relatively accurate.
I have taken liberties with the gondolas and simplified the rigging in order to keep file size down and frame rate up.
Installation Instructions
Unzip the file and copy the folders you want into your FirstEagles/Objects/GroundObject folder.
362 downloads
-
Albatros C.III
By Stephen1918 in Albatros
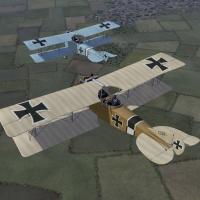
The Albatros C.III was a general purpose two-seat plane and was based on the C.I and C.II models. An improved tail structure made it more agile than its predecessors and it was produced in large numbers.
The plane was armed with a Parabellum machine gun mounted on a pivot in the rear cockpit along with a synchronized machine gun mounted beside the engine. The C.III was used for reconnaissance, aerial photography, and light bombing.
The gun ring had limited movement, especially in the vertical direction, which I have tried to reproduce in my model.
I have included two loadouts, one for four 12.5 kilo bombs carried internally, and another for six 12.5 kilo bombs carried externally under the wings.
I have also included three skinning options - an unpainted standard wood and linen, a light blue paint, and a green paint. All of these are pretty basic so I have included my skinning templates for those who want make their own skins.
This plane uses the national markings that come with First Eagles, so you can change nationalities to fly for Bulgaria or the Turks.
I have included decals for serial numbers and for personal markings. These will be applied randomly. Some of the personal markings include crosses, I don't know if that would be appropriate if you're flying for the Ottoman Empire.
Historical Notes:
The serial numbers are fictious, but in the correct range for the 1916 Albatros C.III.
The personal markings are completely fictious, but I think reasonable for German markings early in the war.
I have not found an example of the Albatros C.III in green paint, but many German planes on the Eastern Front were painted green later in the war, so the color is not unrealistic.
If historical accuracy is important to you, you can delete the offending files.
Credits:
My thanks to Ojcar for making the excellent data.INI file for this plane.
My thanks to Nix for making the realistic engine sound file for the Mercedes 6 cylinder engine.
Thanks also to Sinbad, Whitekinght06604, and Wrench who provided me with valuable resouces and information for the cockpit details.
Installation instructions:
For FE1: Unzip the file and move the folder named "AlbatrosC3" into the FirstEagles/Objects/Airplanes folder. You also need to move the sound file "mercedes160m2.wav" into the FirstEagles/Sounds folder.
For FE2: Unzip the file and move the folder named "AlbatrosC3" into the FirstEagles/Objects/Airplanes folder. Then in the FirstEagles/Objects/Decals folder, create a new folder named "AlbatrosC3". Move the folder named "D" from the Airplanes/AlbatrosC3 folder into the Decals/AlbatrosC3 folder you just made. You also need to move the sound file "mercedes160m2.wav" into the FirstEagles/Sounds folder.
March 12, 2012 - Uploaded a new version with an improved FM by ojcar.
790 downloads
-
Albatros D.I
By Stephen1918 in Albatros
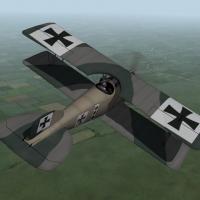
The Albatros D.I was the first in a long line of successful Albatros fighters. It had a molded plywood fuselage, which made it lightweight but strong. With its powerful engine and dual machine guns it outclassed any Entente fighters in the air at the time.
The biggest drawback to the D.I was the position of the upper wing, which obscured the pilot's view. Production quickly switched to the D.II which was basically the same plane but with the upper wing mounted lower.
The download includes three skins, a basic linen, a grey paint, and a 2 color camo. There is also a full a full set of serial number decals. The skinning templates are identical to the Albatros D.II templates, I have included them in this download for the sake of convenience.
This plane uses the same engine sound as the Albatros D.II, which you probably already have. I have placed an alternate line in the data file to change the sound to the default "PropLoop" sound if you prefer.
Credits
My thanks to Ojcar for making the data file for the Albatros D.I.
Installation Instructions
For FE1 - Unzip the file and move the folder named "AlbatrosD1" into your FirstEagles/Objects/Aircraft folder.
For FE2 - Unzip the file and move the folder named "AlbatrosD1" into your FirstEagles/Objects/Aircraft folder. Then in the FirstEagles/Objects/Decals folder, create a new folder named "AlbatrosD1." Move the folder named "D" from the Aircraft/AlbatrosD1 folder into the Decals/AlbatrosD1 folder you just made.
374 downloads
-
Albatros D.II - 2 pack
By Stephen1918 in Albatros
Note - This is a complete revision with new LODs, new skins, and new hangar and loading screens. I recommend you delete the older version and replace it with this one.
The Albatros D.II was identical to the D.I, except that the top wing was mounted lower and farther forward to improve visibility. The fuselage, engine, and guns were the same. Early models had two radiators low on either side of the fuselage, later models had the radiator mounted in the upper wing.
I have created both versions of the D.II. I put both radiators on the skins so the same skin can be used for both versions. The download includes two skins, a light camo and a dark camo, and a full set of personal markings for each plane. I have included my skinning templates for those who wish to make different skins.
Credits
My thanks to Ojcar for making the data file for the Albatros D.II.
My thanks also to Nix for making the sound file for the Mercedes 160hp engine.
Installation Instructions
The two versions can be installed separately or both together.
For FE1 - Unzip the file and move the folders named "AlbatrosD2_Early" and "AlbatrosD2_Late" into the FirstEagles/Objects/Aircraft folder. You also need to move the sound file "mercedes160m2.wav" into the FirstEagles/Sounds folder.
For FE2 - Unzip the file and move the folders named "AlbatrosD2_Early" and "AlbatrosD2_Late" into the FirstEagles/Objects/Aircraft folder. Then in the FirstEagles/Objects/Decals folder, create new folders named "AlbatrosD2_Early" and "AlbatrosD2_Late". Move the folders named "D" from the Aircraft/AlbatrosD2 folders into the corresponding Decals/AlbatrosD2 folder you just made. You also need to move the sound file "mercedes160m2.wav" into the FirstEagles/Sounds folder.
719 downloads
-

Albatros W.4 (Early)
By Stephen1918 in Albatros
The Albatros W.4 was a float plane version of the D.II. It used the same fuselage, engine, and armament as the D.II, but had a wider wingspan and tail. The W.4 was used for recon and spotting missions in the North Sea, the Baltic, and by Austria-Hungary in the Adriatic Sea.
I have made an early version of the W.4 with the radiators mounted on the sides of the fuselage. I have included a complete set of number decals, and three skins - a basic wood and linen skin for Germany, one for Austria-Hungary, and an early hex camo skin. I have also included my skinning templates. The skins for the early Albatros W.4 are interchangeable with the late version skins.
My version includes a loadout for a light bomb load, even though the W.4 was not used for bombing. You can delete the loadout file if you want more historical accuracy.
Since it's a float plane, the W.4 works best in the Flanders, Gibraltar or other terrain that has a lot of water. The plane will actually take off and land from a conventional airfield, but it looks strange to see the floats going under the ground. It would be best to start the missions in the air. The plane will show up occasionally parked on an airfield, but its availability is listed as "Rare" so it shouldn't happen too often.
Credits
Thanks to Ojcar for making the data file for the Albatros W.4.
Thanks to Nix for providing the sound for the Mercedes engine.
And thanks to Quack74 for giving me the idea for a float plane.
Installation Instructions
For FE1 - Unzip the file and move the folder named "AlbatrosW4" into the FirstEagles/Objects/Aircraft folder. You also need to move the sound file "mercedes160m2.wav" into the FirstEagles/Sounds folder.
For FE2 - Unzip the file and move the folder named "AlbatrosW4" into the FirstEagles/Objects/Aircraft folder. Then in the FirstEagles/Objects/Decals folder, create new folder named "AlbatrosW4". Move the folder named "D" from the Aircraft/AlbatrosW4 folder into the Decals/AlbatrosW4 folder you just made. You also need to move the sound file "mercedes160m2.wav" into the FirstEagles/Sounds folder.
309 downloads
(1 review)0 comments
Updated
-
Albatros W.4 (Late)
By Stephen1918 in Albatros
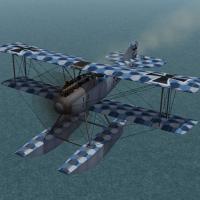
The Albatros W.4 was a float plane version of the D.II. It used the same fuselage, engine, and armament as the D.II, but had a wider wingspan and tail. The W.4 was used for recon and spotting missions in the North Sea, the Baltic, and by Austria-Hungary in the Adriatic Sea.
This is a late version of the W.4 with the radiator mounted on the upper wing. I have included a complete set of number decals, and two skins - a blue hex camo skin for Germany and one for Austria-Hungary. I have also included my skinning templates. The skins for the late Albatros W.4 are interchangeable with the early version skins.
My version includes a loadout for a light bomb load, even though the W.4 was not used for bombing. You can delete the loadout file if you want more historical accuracy.
Since it's a float plane, the W.4 works best in the Flanders, Gibraltar or other terrain that has a lot of water. The plane will actually take off and land from a conventional airfield, but it looks strange to see the floats going under the ground. It would be best to start the missions in the air. The plane will show up occassionally parked on an airfield, but its availability is listed as "Rare" so it shouldn't happen too often.
Credits
Thanks to Ojcar for making the data file for the Albatros W.4.
Thanks to Nix for providing the sound for the Mercedes engine.
And thanks to Quack74 for giving me the idea for a float plane.
Installation Instructions
For FE1 - Unzip the file and move the folder named "AlbatrosW4Late" into the FirstEagles/Objects/Aircraft folder. You also need to move the sound file "mercedes160m2.wav" into the FirstEagles/Sounds folder.
For FE2 - Unzip the file and move the folder named "AlbatrosW4Late" into the FirstEagles/Objects/Aircraft folder. Then in the FirstEagles/Objects/Decals folder, create new folder named "AlbatrosW4Late". Move the folder named "D" from the Aircraft/AlbatrosW4Late folder into the Decals/AlbatrosW4Late folder you just made. You also need to move the sound file "mercedes160m2.wav" into the FirstEagles/Sounds folder.
232 downloads
(1 review)0 comments
Submitted
-
Anatra C.I
By Stephen1918 in Other Central Powers Aircraft
This version includes a new FM made by ojcar.
When the Ukrainian city of Odessa was occupied by Austria-Hungary early in 1918, the Anatra factory was found intact and production of the Anatra DS was continued as the "Anatra C.I". Many of the first Austrian versions had the Austrian cross painted over the Russian insignia.
The Anatra C.I was used mostly for training, but some were used for reconnaissance, as a fighter and light bomber. Many of them survived the war and were used in the fighting in Eastern Europe after the end of World War I.
In version 2 - I have created a separate version for the Austrian plane, with a Schwarzlose machine gun and German bombs in the loadout. There are two Austrian skins, one with crosses painted over the Russian roundels, and one with standard insignia. (I have also included a postwar Yugoslav skin, because I like the insignia.) I have included my skinning templates for those who want make their own skins.
In version 3 - Ojcar has made a new FM for the plane. I have refined the wings and added some details. I created a new cockpit with German gauges and machine gun. I made two Austrian skins for the plane and I kept the Yugoslav skin, because I like the insignia. I have included my skinning templates for those who want make their own skins.
Historical Notes:
The serial numbers are fictitious. I found several sources which said that Anatras carried a machine gun mounted on the fuselage for the pilot. I couldn't find any details of the mounting, so I guessed where it might be located.
Credits:
My thanks to Ojcar once again for making a new data.ini file for this plane.
Installation instructions:
This revision replaces previous versions. If you have an older version, please delete it, then install the new version.
For FE1: Unzip the file and move the folder named "AnatraC1" into the FirstEagles/Objects/Aircraft folder.
For FE2: Unzip the file and move the folder named "AnatraC1" into the FirstEagles/Objects/Aircraft folder. Then in the FirstEagles/Objects/Decals folder, create a new folder named "AnatraC1". Move the folder named "D" from the Aircraft/AnatraC1 folder into the Decals/AnatraC1 folder you just made.
309 downloads
-
Anatra D - "Field Mod"
By Stephen1918 in Other Entente Aircraft
The Anatra D was a predecessor to the Anatra DS. The stock plane was powered by a Gnome rotary engine and armed with a single machine gun for the observer.
I have made a "field mod" version with a fuselage mounted machine gun for the pilot. Anades with additional machine guns are known to have existed, but I haven't found any photos of them. I added the gun for the pilot in what seemed to be a logical position.
The Anatra D was used mostly for reconnaissance, but also as a fighter and light bomber. After overcoming some initial design problems, it entered service in May, 1916 and was produced in relatively large numbers. Many of them survived the war and were used in the fighting in Eastern Europe after the end of World War I.
I have included three skins, two linen and a grey paint. A full set of number decals and a loadout for light bombs are included. I have also included my skinning templates for those who wish to make their own skins.
Credits:
My thanks to Ojcar for making the original data.ini for this plane. I have modified Ojcar's file to include the additional gun.
Installation instructions:
For FE1: Unzip the file and move the folder named "AnatraDMod" into the FirstEagles/Objects/Aircraft folder.
For FE2: Unzip the file and move the folder named "AnatraDMod" into the FirstEagles/Objects/Aircraft folder. Then in the FirstEagles/Objects/Decals folder, create a new folder named "AnatraDMod". Move the folder named "D" from the Aircraft/AnatraDMod folder into the Decals/AnatraDMod folder you just made.
79 downloads
(5 reviews)0 comments
Submitted
-
Anatra D "Anade"
By Stephen1918 in Other Entente Aircraft
The Anatra D was a predecessor to the Anatra DS. It was powered by a Gnome rotary engine and armed with a single machine gun for the observer. The Anatra D was used mostly for reconnaissance, but also as a fighter and light bomber. After overcoming some initial design problems, it entered service in May, 1916 and was produced in relatively large numbers. Many of them survived the war and were used in the fighting in Eastern Europe after the end of World War I.
I have included two skins, a plain linen and a grey paint. A full set of number decals and a loadout for light bombs are included. I have also included my skinning templates for those who wish to make their own skins.
Credits:
My thanks to Ojcar once again for making the excellent data.ini for this plane.
My thanks also to Crowford who provided valuable reference material for the Anatra D.
Installation instructions:
For FE1: Unzip the file and move the folder named "AnatraD" into the FirstEagles/Objects/Aircraft folder.
For FE2: Unzip the file and move the folder named "AnatraD" into the FirstEagles/Objects/Aircraft folder. Then in the FirstEagles/Objects/Decals folder, create a new folder named "AnatraD". Move the folder named "D" from the Aircraft/AnatraD folder into the Decals/AnatraD folder you just made.
156 downloads
-

Anatra DS "Anasal"
By Stephen1918 in Other Entente Aircraft
This version includes a new FM made by ojcar.
The Anatra DS was a two seat Russian plane powered by a Salmson 9 cylinder, water cooled, radial engine. The plane was therefore called the "Anasal", short for "Anatra Salmson". When the Ukrainian city of Odessa was occupied by Austria-Hungary early in 1918, the Anatra factory was found intact and production continued as the "Anatra C.I". Many of the first Austrian versions had the Austrian cross painted over the Russian insignia.
The Anatra was used mostly for reconnaissance, but also as a fighter and light bomber. Many of them survived the war and were used in the fighting in Eastern Europe after the end of World War I.
In version 2 - I have included a loadout for a light bomb load and three skinning options - A generic Russian skin, and skins for two Russian squadrons - the 19th and the 4th squadrons with decals for the squadron tail markings. I have included my skinning templates for those who want make their own skins.
In version 3 - I improved the details around the nose, completely reskinned the plane and cockpit, and corrected several problems with node names in the data file. New templates are included in the version 3 download.
In version 4 - Ojcar has made a new FM for the plane. I have refined the wings and added some details. Old skins will still work with this revision. I have included the old skinning templates with the download.
Historical Notes:
I found several sources which said that Anatras carried a machine gun mounted on the fuselage for the pilot. I couldn't find any details of the mounting, so I guessed where it might be located.
Credits:
My thanks to Ojcar once again for making a new data.ini file for this revision of the plane.
Installation instructions:
This revision replaces previous versions. If you have an older version, please delete it, then install the new version.
For FE1: Unzip the file and move the folder named "AnatraDS" into the FirstEagles/Objects/Aircraft folder.
For FE2: Unzip the file and move the folder named "AnatraDS" into the FirstEagles/Objects/Aircraft folder. Then in the FirstEagles/Objects/Decals folder, create a new folder named "AnatraDS". Move the folder named "D" from the Aircraft/AnatraDS folder into the Decals/AnatraDS folder you just made.
422 downloads
-
Anti-aircraft Guns
By Stephen1918 in First Eagles - WWI and Early Years - Object Mods
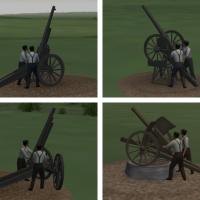
Most of the anti-aircraft guns in World War One were converted field guns, especially during the early years. Some modifications were necessary however to make an effective anti-aircraft weapon. I have created four new anti-aircraft guns for First Eagles.
A French 75mm field gun, mounted on a 120mm gun carriage. This allowed the barrel to be elevated quite high without danger of the breech hitting the ground on the recoil.
A Russian Putilov 76.2mm field gun. The turntable mount and variations of it were common in WWI because the gun could be quickly dismounted and used as a field gun again.
A German Krupp 77mm gun on a special anti-aircraft gun carriage. The axles were hinged and the tail had an anchor to allow the gun to be easily rotated. The gap in the carriage allowed the gun to be elevated higher than a normal field gun.
An Italian Déport 77mm field gun. The recoil mechanism remained horizontal so the breech couldn't hit the ground no matter how high the gun was aimed. An improvised mount gave the gun a higher elevation.
Captured field guns were often used as anti-aircraft weapons. I have left the helmets and tunics off the gun crews so you can easily convert them to whatever nation you want. It wouldn't be unusual to see Austrians using an Italian gun, Germans using a French gun, or Russians using a German gun.
All guns use the stock 75mm gun data from First Eagles.
My thanks to Hansa for providing reference material for World War I anti-aircraft guns.
Installation Instructions
You can install the guns individually or all at once. Unzip the file and move the folders you want into the FirstEagles/Objects/GroundObjects folder. You must also copy the file "DestroyedAAA.bmp" into the FirstEagles/Objects/GroundObjects folder.
Destroyed versions of all the guns use the same skin. The file named "DestroyedAAA.bmp" must be placed in the root level of the GroundObjects folder (not inside any other folders.)
378 downloads
-
Armed Observers for First Eagles
By Stephen1918 in First Eagles - WWI and Early Years - Add On Cockpits
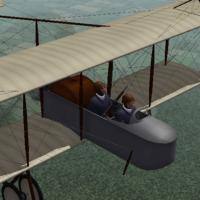
When World War I began, airplanes were designed strictly for reconnaissance. They were unarmed and built for stable flight rather than maneuverability. Within a very short time air crews began to carry weapons. Observers with pistols or rifles became common until armed aircraft were produced.
I have made a set of armed observers for First Eagles. The observer carries a rifle "at the ready." He moves his head, but does not shoot the gun. There is one for each stock pilot color, and one for each of the helmeted pilots I made before. A total of six observers.
You will need to install the observers into the game, then make a change to the data.ini for each plane to make them appear in the game. The center point matches the center point of the FE Gold and FE2 stock pilot, so they should swap into your plane without any adjustment. If the plane uses the old style FE1 pilot, some minor tweaking may be required.
Note that this only replaces the stock pilot and will not replace a gunner built into the 3D model.
My thanks to Whiteknight06604 for suggesting the idea and for beta-testing the observers.
Installing the observers into the game:
For FE1 - Open my folder named "FE1" and copy all twelve files into your "Aircraft" folder. Don't put them into any of the other folder. The LOD names are the names of the new "pilot." The numbers match the FE pilot numbers so uniform colors will match.
For FE2 - Open my folder named "FE2" and copy all six folders into your Objects/Pilots folder. The folder names are the names of the new "pilot." The numbers match the FE pilot numbers so uniform colors will match.
Putting the observers into a plane:
For both FE1 and FE2 - Open the plane's data.ini file. Find the section for crew (about 1/2 to 3/4 of the way down). The Observer should be in SeatID=2. Change the PilotModelName to the name of one of the new observer. Save the file and fly. (You might want to comment out the original name and type in a new line, like in my example, in case you want to change back.)
Example:
// Crew ---------------------------------------------------------
[Pilot]
SystemType=PILOT_COCKPIT
SeatID=1
PilotModelName=WWIpilotNew2
PilotHeadNodeName=head
Position=0.0,-0.2,0.70
MinExtentPosition=-0.32,-0.41,-0.26
MaxExtentPosition= 0.32,0.36, 0.82
[Observer]
SystemType=PILOT_COCKPIT
SeatID=2
//PilotModelName=WWIpilotNew2 <--old pilot name
PilotModelName=WWIObserver2 <--new pilot name
PilotHeadNodeName=head
Position=0.0,-1.0,0.70
MinExtentPosition=-0.32,-1.28,-0.26
MaxExtentPosition= 0.32,-0.50, 0.82
66 downloads
-
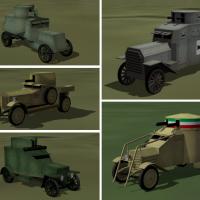
Armored Cars
By Stephen1918 in First Eagles - WWI and Early Years - Object Mods
Tanks did not appear on the battlefield until mid 1917 and were used mostly on the Western Front. But cars and trucks with steel plating and machine guns were used from the beginning of the war and were used in large numbers on all fronts.
I have made a set of five armored cars which can be used to replace the tanks in Army Co-operation missions. The tanks in First Eagles have a start date of 5/1917, these armored cars have a start date of 5/1914, so they will automatically replace the tanks in missions dated 1916 or before.
This download includes:
A British Rolls Royce, built on a Silver Ghost car chassis and armed with a Vickers Machine Gun in the turret. If you've seen the movie "Lawrence of Arabia," this is the car they used in some of the battle sequences.
A German Ehrhardt, with two Maxim Machine Guns in the turret. These were used mostly on the Eastern Front.
A French Peugeot, with a Hotchkiss Machine Gun in the Turret. Peugeots didn't have turrets until very late in the war, but I thought this looked better than an open truck, and it was easier to build.
An Italian Lancia, with two Fiat-Revelli Machine Guns in the turret. The rails on the front were for ripping up barbed wire.
A Russian Putilov, built on a British Austin truck chassis, with Vickers Machine Guns in two turrets. The steel trough around the gun and the multiple turrets are fairly typical of Russian armored vehicles.
I have included destroyed versions of all the trucks. They explode and burn quite nicely.
Installation Instructions
Unzip the file and drag the five armored car folders and the file named "DestroyedArmoredCar.bmp" into your FirstEagles/Objects/GroundObject folder. All the destroyed vehicles use the same skin and the BMP file must be in root level of the GroundObject folder.
434 downloads
-

Armored Train - For Tracks
By Stephen1918 in First Eagles - WWI and Early Years - Object Mods
Armored Trains were used extensively on the Eastern Front and to a lesser extent on the Palestine and Italian Fronts. On the Western Front, after 1914 they were used mostly for defense and as mobile headquarters. I have created five cars which can arranged in different configurations.
Engines could both push and pull other cars. It was common to have an armed car or two in front of the engine.
Troop cars had quarters for an infantry unit to help defend the train. There is a turret with a light gun. It is currently set for anti-aircraft, but you can change the data file to target ground objects.
Transport cars were used to move troops, munitions, or other supplies into a battle zone or recently conquered territory.
Gun cars were used as mobile light artillery. They can be included in a train or parked on a siding to defend a train station, supply depot, or other strategic location. If you change the target type to ground, they can be used as field guns.
I have included two versions of a heavy, rail mounted artillery gun. In transport mode, the gun is lowered and the car can be included in a train. In deployed mode, there is gun data assigned so the gun will shoot at ground targets. If you place an observation balloon about 2 kilometers down range, the gun will be elevated when it shoots, as if it were shooting at a distant target. There is very little side to side motion, so you have to be pretty accurate when you place the target balloon.
All the cars are the same length for easy placement. Put them 17.25 meters apart and they will line up nicely on the tracks.
There are three complete trains with different skins so you can use them in different terrains or for different forces. I have arbitrarily assigned the grey skin to Germany, the green skin to Russia, and the tan skin to the Ottoman Empire. With a little typing, you can reassign them to whatever forces you want.
These cars are designed to be used with the train tracks from Gepard's Railway Station (available in the Strike Fighter 1 Terrain downloads). Gepard has given me permission to include the tracks with my train. I have made a new skin with the ties farther apart, which I think looks better from the air. If you already have the tracks in your terrain, you don't need this.
All of these need to be included in the targets.ini in order to use them. I have included the data for the types.ini in the folders for each train.
120 downloads
(1 review)0 comments
Updated
-

Armored Train - Ground Level
By Stephen1918 in First Eagles - WWI and Early Years - Object Mods
Armored Trains were used extensively on the Eastern Front and to a lesser extent on the Palestine and Italian Fronts. On the Western Front, after 1914 they were used mostly for defense and as mobile headquarters. I have created five cars which can arranged in different configurations.
Engines could both push and pull other cars. It was common to have an armed car or two in front of the engine.
Troop cars had quarters for an infantry unit to help defend the train. There is a turret with a light gun. It is currently set for anti-aircraft, but you can change the data file to target ground objects.
Transport cars were used to move troops, munitions, or other supplies into a battle zone or recently conquered territory.
Gun cars were used as mobile light artillery. They can be included in a train or parked on a siding to defend a train station, supply depot, or other strategic location. If you change the target type to ground, they can be used as field guns.
I have included two versions of a heavy, rail mounted artillery gun. In transport mode, the gun is lowered and the car can be included in a train. In deployed mode, there is gun data assigned so the gun will shoot at ground targets. If you place an observation balloon about 2 kilometers down range, the gun will be elevated when it shoots, as if it were shooting at a distant target. There is very little side to side motion, so you have to be pretty accurate when you place the target balloon.
All the cars are the same length for easy placement. Put them 17.25 meters apart and they will line up nicely on the tracks.
There are three complete trains with different skins so you can use them in different terrains or for different forces. I have arbitrarily assigned the grey skin to Germany, the green skin to Russia, and the tan skin to the Ottoman Empire. With a little typing, you can reassign them to whatever forces you want.
These cars are designed to be used directly on the terrain, without any track lod. You will need to use them in terrains that have the tracks painted directly on the tiles.
All of these need to be included in the targets.ini in order to use them. I have included the data for the types.ini in the folders for each train.
132 downloads
(1 review)0 comments
Updated
-

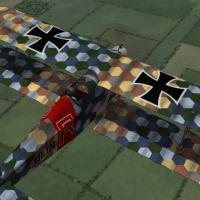
Aviatik-Berg D.I
By Stephen1918 in Other Central Powers Aircraft
Aviatik-Berg D.IDesigned by Julius von Berg for the Aviatik company, the D.I was the first fighter completely built in Austria. The Berg was light and maneuverable, and after structural problems in the early models were overcome, it became a good combat plane.
Although nimble, reasonably fast, and able to reach higher altitudes than many of the planes it fought, the Aviatik D.I was prone to overheating. Many pilots flew with the engine cover panels removed, so I built this plane without the engine cover.
Early versions of the plane had the two Schwarzlose machine guns mounted low on each side of the engine. Later versions put the guns higher and within reach of the pilot to make it easier to clear jammed guns. This is a later version with the guns firing through tubes under the manifolds and projecting through the radiator.
I have included a basic skin along with my skinning templates. I highly recommend the skins made by Quack74, available at CombatACE as a separate download.
Revision 1 - June 12, 2011It appears that I made the original about 20% too large. I have rescaled the plane to the correct size, this involved making some changes in and around the cockpit. Since I was revising the cockpit, I put the correct guns in this version (Schartzlose instead of Spandau.) I have also included the FM written by ojcar, and the sound for the Austro-Daimler engine made by Nix.This version includes all new LODs, new data file, new cockpit ini, and new decal ini. If you have downloaded the previous version, it would be easiest to just delete the whole folder and replace it with this version.
Revision 2 - September 20, 2011I have added a complete set of letter decals so you can set a flight letter in the Loadout screen, or the game will randomly assign a different letter to each plane. There will also be a different serial number randomly assigned to each plane as well.
Revision 3 - June 5, 2012I have made slight changes to the model, especially in the rigging. This revision has all new LODs. Ojcar has made changes to the FM to work with the new model. All the decals are the same as before.
Installation Instructions - New install
For FE1 - Unzip the file and move the folder named "AviatikD1" into the "Aircraft" folder in the FirstEagles/Objects folder. You also need to move the sound file "Austro-daimler200.wav" into the FirstEagles/Sounds folder.
For FE2 - Unzip the file and move the folder named "AviatikD1" into the "Aircraft" folder in the FirstEagles/Objects folder. Then in the FirstEagles/Objects/Decals folder, create a new folder named "AviatikD1". Move the folder named "D" from the Aircraft/AviatikD1 folder into the Decals/AviatikD1 folder you just made.You also need to move the sound file "Austro-daimler200.wav" into the FirstEagles/Sounds folder.
Installation Instructions - Update existing install
For both FE1 and FE2 - Delete the following files and replace them with the new versions: All the LOD files and OUT files - you are deleting three of each and replacing them with four of each. The OUT files are optional and not necessary for the game. AviatikD1.ini - the new one makes use of the extra LOD.AviatikD1_DATA.INI - The new one uses the new rigging and is slightly more compact than the original.Everything else is the same as in the Revision 2 download.
708 downloads
-
Aviatik-Berg D.I (Early)
By Stephen1918 in Other Central Powers Aircraft
Designed by Julius von Berg for the Aviatik company, the D.I was the first fighter completely built in Austria. The Berg was light and maneuverable, and after structural problems in the early models were overcome, it became a good combat plane.
Early versions of the plane had the two Schwarzlose machine guns mounted low on each side of the engine. This is the early version of the plane. This download includes a new cockpit as well as a modified fuselage. Ojcar has made a completely new FM to reflect the different flight characteristics of this plane.
I have included a basic skin and my skinning templates. I highly recommend the skins made by Quack74, available at CombatACE as a separate download. This plane has an extra piece that was not included in Quack's skins, I have included a skin to match Quack's skins which you will need to add to each skin folder.
Credits
My thanks to Ojcar for making the FM. And thanks to Nix for making the engine sound file.
Installation Instructions
For FE1 - Unzip the file and move the folder named "AviatikD1_Early" into the "Aircraft" folder in the FirstEagles/Objects folder. This file uses the same sound file as the original AviatikD1. If you did not install that plane then you will also need to move the sound file "Austro-daimler200.wav" into the FirstEagles/Sounds folder.
For FE2 - Unzip the file and move the folder named "AviatikD1_Early" into the "Aircraft" folder in the FirstEagles/Objects folder. Then in the FirstEagles/Objects/Decals folder, create a new folder named "AviatikD1_Early". Move the folder named "D" from the Aircraft/AviatikD1_Early folder into the Decals/AviatikD1_Early folder you just made. This file uses the same sound file as the original AviatikD1. If you did not install that plane then you will also need to move the sound file "Austro-daimler200.wav" into the FirstEagles/Sounds folder.
466 downloads
(3 reviews)0 comments
Updated
-

Aviatik-Berg D.I 185hp
By Stephen1918 in Other Central Powers Aircraft
The Aviatik-Berg D.I had many variations, with different engines, different radiator configurations, different fuselage shapes, and different gun placements. This is a very early version, with a 185hp Daimler engine and a non-synchronized Schwarzlose machine gun mounted above the wing.
The machine gun is detachable and can be mounted or unmounted in the Loadout screen.
I have included one of Quack74's basic skins and decal sets with a set of serial numbers which will be applied randomly to each plane.
This plane has an extra piece that was not included in Quack's skins, I have included skins for the new part to match each of Quack's skins, which you will need to add to each skin folder.
Historical Notes
This version of the Aviatik did not have a cutout in the upper wing and the fuselage was higher in front of the fuselage. My model is converted from a later version and has not been corrected because I wanted to make sure that all of Quack's skins would still work with this plane.
Credits
My great thanks to Ojcar for making the FM and the Schwarzlose weapon data, and for teaching me how to make weapon stations.
Thanks to Quack 74 for making the skin and decal set for all the Aviatiks, and for allowing me use one as the default skin for this plane.
And thanks to Nix for making the engine sound file.
Installation Instructions
If you are using FE1, you will need to use the Weapons Editor available from the Thirdwire Downloads area. You will also need to use a CAT file extractor utility (SFP1E Extract Utility available in the CombatACE Downloads area.)
For FE1 - Unzip the file and move the folder named "AviatikD1_185" into the FirstEagles/Objects/Aircraft folder. This file uses the same sound file as the original AviatikD1. If you did not install that plane then you will also need to move the sound file "Austro-daimler200.wav" into the FirstEagles/Sounds folder.
To install the gun - If you haven't already done so, extract the WeaponData.INI and the WeaponData.DAT files from the FirstEagles ObjectData.CAT file. Make a new folder named "Weapons" in the FirstEagles/Objects folder. Put the two extracted files into the new folder.
In my download, open the file named "Single_Schwarzlose_Angled_Data.INI," copy everything and paste it at the end of the "WeaponData.INI" you just extracted. Then change the number (WeaponData001) to the next consecutive number. Save the file.
In my downlaod, copy the files named "Schwarzlose.BMP" and "SchwarzloseAngle.LOD" and put them into the FirstEagles/Objects/Weapons folder.
Open the Weapons Editor, Open the WeaponsData.INI, make sure the new weapon (Single_Schwarzlose_Angled) is there, click "Save" and Close the editor.
For FE2 - Unzip the file and move the folder named "AviatikD1_185" into the FirstEagles/Objects/Aircraft folder. Then in the FirstEagles/Objects/Decals folder, create a new folder named "AviatikD1_185". Move the folder named "D" from the Aircraft/AviatikD1_185 folder into the Decals/AviatikD1_185 folder you just made. This file uses the same sound file as the original AviatikD1. If you did not install that plane then you will also need to move the sound file "Austro-daimler200.wav" into the FirstEagles/Sounds folder.
To install the gun - From my download, copy the folder named "Single Schwarzlose Angled" into your Objects/Weapons folder.
389 downloads
-

Beardmore built Nieuport 12
By Stephen1918 in Nieuport
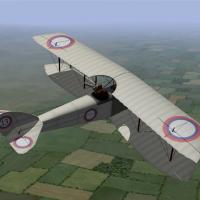
The Nieuport 12 was built under license by Beardmore & Co. Ltd. for both the RNAS and the RFC. The Beardmore version differed from the French version in many small ways; the most obvious differences were - a vertical stabilizer at the tail, a slightly longer lower wing, and a different engine cowling. My version has a Lewis Gun mounted on a Scarff Ring for the observer and a Vickers Gun mounted on the fuselage for the pilot.
The British built Nieuports had the insignia placed differently from the French versions, my decal ini's are British style. I have included two skins, a brown and linen skin for the RFC, and a dark green skin for the RNAS. There is a set of appropriate serial number decals for each. My skinning templates are included with the download. I have also made British faces for the cockpit instruments.
Because of the many minor differences, the skins, cockpit, and data file are not interchangeable with my original Nieuport 12.
Credits:
My thanks to Ojcar for making the data file for the original N12, I have made slight changes for the Beardmore version.
Installation instructions:
For FE1: Unzip the file and move the folder named "Nieuport12Beardmore" into the FirstEagles/Objects/Aircraft folder.
For FE2: Unzip the file and move the folder named "Nieuport12Beardmore" into the FirstEagles/Objects/Aircraft folder. Then in the FirstEagles/Objects/Decals folder, create a new folder named "Nieuport12Beardmore". Move the folder named "D" from the Airplanes/Nieuport12Beardmore folder into the Decals/Nieuport12Beardmore folder you just made.
241 downloads