
Stephen1918
-
Content count
1,168 -
Joined
-
Last visited
-
Days Won
19
Files posted by Stephen1918
-

Decal set for Aviatik-Berg D.I
By Stephen1918 in Other Central Powers Aircraft Skins
This is a complete set of letter decals for the Aviatik-Berg D.I. You can assign them in the Loadout screen or the game will randomly assign a different one to each plane.
This completely replaces the "D" folder and uses a new Decals.ini and Numbers.lst for the skins.
I have also uploaded a new version of the Aviatik which includes this decal set, so if you downloaded the Aviatik-Berg D.I after September 20, 2011, you already have these decals.
Installation Instructions
For FE1 - Unzip the file. In the FirstEagles/Objects/Aircraft/AviatikD1 folder, delete the folder named "D" and replace it with the new one. Next, open the folder named "Texture1". Delete the file named "Decals.ini" and move both the new Decals.ini and Numbers.lst into the folder. Do not delete any other files from the Texture1 folder.
For FE2 - Unzip the file. In the FirstEagles/Objects/Decals/AviatikD1 folder, delete the "D" folder and replace it with the new one. Next, open the FirstEagles/Objects/Aircraft/AviatikD1/Texture1 folder. Delete the file named "Decals.ini" and move the new Decals.ini and Numbers.lst into the folder. Do not delete any other files from the Texture1 folder.
80 downloads
(0 reviews)0 comments
Updated
-

Serial numbers for the Lloyd C.II
By Stephen1918 in Other Central Powers Aircraft Skins
This is a complete set of serial number decals for the Lloyd C.II. The game will randomly assign a different number to each plane.
This completely replaces the "D" folder in the Austro-Hungarian skin and uses a new Decals.ini for the skin.
I have also uploaded a new version of the Lloyd which includes this decal set, so if you downloaded the Lloyd C.II after September 20, 2011, you already have these decals.
Installation Instructions
For FE1 - Unzip the file. In the FirstEagles/Objects/Aircraft/LloydC2/Texture1 folder, delete the folder named "D" and replace it with the new one. Then delete the file named "Decals.ini" and move the new Decals.ini into the folder. Do not delete any other files from the Texture1 folder.
For FE2 - Unzip the file. In the FirstEagles/Objects/Decals/LloydC2/Texture1 folder, delete the "D" folder and replace it with the new one. Then in the FirstEagles/Objects/Aircraft/LloydC2/Texture1 folder, delete the file named "Decals.ini" and move the new Decals.ini into the folder. Do not delete any other files from the Texture1 folder.
84 downloads
(0 reviews)0 comments
Updated
-
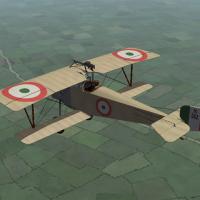
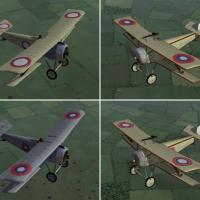
Nieuport 10
By Stephen1918 in Nieuport
The Nieuport 10 was the first of the classic wing-and-a-half, V-strut Nieuports. Designed in 1914, it combined the visibility of a monoplane with with the strength of a biplane. The Nieuport 10 was designed as a two seater, but was underpowered. Many of them were converted to single seat planes and with the addition of a wing mounted machine gun, the Nieuport 10 became an effective fighter for the early years of World War I. My model is configured as a single seat fighter.
I have included three skinning options, which are identical except for the decals. The Italian Linen uses the Italian insignia and includes the red and green underwing panels. The Russian skin uses the Russian insignia and includes the roundels on the tail planes. The Standard Linen can be used for all the other Entente powers. This plane uses the national markings that come with First Eagles, so you can easily change nationalities (in the Standard Linen skin only.)
I have included decals for serial numbers which will be applied randomly.
Historical Notes:
The numbers are fictious, but in the correct range for most Nieuport 10s. British planes carried a four digit serial number on the fuselage, Italian planes used "Ni" instead of "N" in the serial numbers.
Credits:
My thanks once again to Ojcar for making the excellent data.INI file for this plane.
My thanks to Nix for making the realistic sound file for the Le Rhône 80hp engine.
Thanks also to Nix, Sinbad, Whiteknight06604, and 33Lima who provided suggestions and resources for the Nieuport 10.
Version 2
Revised data file by ojcar improves performance and corrects hit box locations for the fuel tanks - thanks to Panama Red for testing.
Installation instructions:
For FE1: Unzip the file and move the folder named "Nieuport10" into the FirstEagles/Objects/Airplanes folder. You also need to move the sound file "LeRhone9c80hp1m4.wav" into the FirstEagles/Sounds folder.
For FE2: Unzip the file and move the folder named "Nieuport10" into the FirstEagles/Objects/Airplanes folder. Then in the FirstEagles/Objects/Decals folder, create a new folder named "Nieuport10". Move the folder named "D" from the Airplanes/Nieuport10 folder into the Decals/Nieuport10 folder you just made. You also need to move the sound file "LeRhone9c80hp1m4.wav" into the FirstEagles/Sounds folder.
715 downloads
-
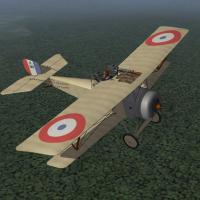
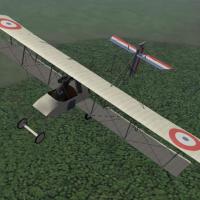
Nieuport 12
By Stephen1918 in Nieuport
The Nieuport 12 was an improved version of the Nieuport 10. It had a more powerful engine, a larger upper wing and a slightly larger tail plane. These features gave the plane the power and performance to fly as a two man fighter. I have fitted my model with an Etévé gun mount holding a Lewis machine gun in the back, and another Lewis gun on the upper wing for the pilot.
I have included three skinning options, identical except for the decals. The Italian Linen uses the Italian insignia and includes the red and green underwing panels. The Russian skin uses the Russian insignia and includes the roundels on the tail planes. The Standard Linen can be used for all the other Entente powers. This plane uses the national markings that come with First Eagles, so you can easily change nationalities (in the Standard Linen skin only.)
I have included decals for serial numbers which will be applied randomly.
Historical Notes:
The numbers are fictious, but in the correct range for most Nieuport 12s. British planes carried the serial number on the fuselage.
The Nieuport 12 wasn't used by the Italians, but I included the skin anyway.
The Etévé gun mount ring should be flush with the fuselage, but because of limits in the way the game animates objects, I had to raise it up to avoid it intersecting the plane when it moved.
Credits:
My thanks once again to Ojcar for making the excellent data.INI file for this plane.
My thanks to Nix for providing the engine sound file.
Thanks also to Nix, Sinbad, Whiteknight06604, and 33Lima who provided suggestions and resources for the Nieuport 12.
Version 2
Revised data file by ojcar improves performance and corrects hit box locations for the fuel tanks - corrects muzzle location for rear gun - engine sound added - thanks to Panama Red for testing
Installation Instructions:
For FE1: Unzip the file and move the folder named "Nieuport12" into the FirstEagles/Objects/Airplanes folder. You also need to move the sound file "clerget9b2m2.wav" into the FirstEagles/Sounds folder.
For FE2: Unzip the file and move the folder named "Nieuport12" into the FirstEagles/Objects/Airplanes folder. Then in the FirstEagles/Objects/Decals folder, create a new folder named "Nieuport12". Move the folder named "D" from the Airplanes/Nieuport12 folder into the Decals/Nieuport12 folder you just made. You also need to move the sound file "clerget9b2m2.wav" into the FirstEagles/Sounds folder.
667 downloads
-
Eastern Front - Skins for 3 of Laton's Planes
By Stephen1918 in Other Entente Aircraft Skins
A set of skins and some file tweaks by Sinbad and Stephen1918 for Laton's MS Type H, MS Type L and Pfalz E.III. You must have Laton's planes in order for these to work.
This download includes - skins for the Eastern front for all the planes - new loadouts, which place the bombs alongside the fuselage for the MS Type L and the Pfalz E.III - a new unarmed version of the MS Type L - new ini files for all the planes which update the way shadows are generated - and new Loading and Hanger screens for all the planes.
Installation instructions:
If you haven't already, download and install the three planes from the CombatACE Download area. (The MS Type L and the Pfalz E.III are each part of a combo pack.)
After the planes are installed, make a copy of the entire "MSTypeL" folder and rename it "MSTypeL_Recon". You will be installing new ini files for this folder later.
My install will replace some of the original files - you might want to make backups before you proceed.
For FE1 - Open each of my plane folders and copy the contents into the appropriate folders in your FirstEagles/Objects/Aircraft folder. Click "Yes" when it asks if you want to replace an existing file.
For FE2 - Open each of my plane folders and copy the contents into the appropriate folders in your FirstEagles/Objects/Aircraft folder. Click "Yes" when it asks if you want to replace an existing file.
109 downloads
(1 review)0 comments
Updated
-
Eastern Front - Skins for Stock Planes
By Stephen1918 in Other Entente Aircraft Skins
This is a few skins for the Eastern Front - I have included two balloons for the Russians, based on the two balloons that come with First Eagles. And I have made three skins each for the stock SPAD 7 and the SPAD 13.
The Caquot style balloon was pretty common in WWI so I made one for the Russians. The kite style balloon (the "Drachen" balloon in the game) was also a common balloon and the Russians purchased several of them from the Parseval-Siegsfeld Company in Germany before the war.
The plane skins are a slight rework of the stock tan skins, most of the change is in the decal placements. I have included decals for some of the Russian squadrons, and I eliminated squadron markings and flight numbers. (One of the SPAD 7 skins uses the SPAD 13 serial numbers because I couldn't find the SPAD 7 numbers in FE Gold.)
The plane skins should work with any of the modded SPADs that use the stock LODs from First Eagles.
The actual skins for each plane are the same, so to save download time, I only included one set with each plane. You will have to copy the 6 bmp files and paste them into the other two folders for each plane.
122 downloads
(1 review)0 comments
Updated
-

Eastern Front - Skins for 3 of Bortdafarm's planes
By Stephen1918 in Other Central Powers Aircraft Skins
A set of skins and some file tweaks for Bortdafarm's OefAlbatrosDII, HalberstadtDII, and Farman MF11c. You must have Bortdafarm's planes in order for these to work.
For the Albatros DII, I have made three skins, one plain linen and two camo schemes. I have also included a new ini file which updates the way shadows are generated. Some of the parts were almost impossible to skin, so I have made decals to cover the entire part. It's kind of a clunky way to work, but the results are pretty good. (Note - The Albatros DII had a wooden stabilizer at the tail, I could not get the wood to look right, so used linen instead.)
For the Halberstadt DII, I have made a green/mauve camo scheme. This plane also required decals to cover some of the parts. And this one also has a new ini file to change the shadows.
For the Farman MF11c, I have made a new linen skin with a set of decals for the Russians. I have included Peter01's FM, which I have modded to take an external bomb load.
Bortdafarm made several versions of each of his planes, I haven't tested them, but I think these skins will work with some the other versions.
Installation instructions:
If you haven't already, download and install the three planes from the CombatACE Download area. This install will replace some of the original files - you might want to make backups before you proceed.
For FE1 - Open each of my plane folders and copy the contents into the appropriate folders in your FirstEagles/Objects/Aircraft folder. Click "Yes" when it asks if you want to replace an existing file.
For FE2 - Open each of my plane folders and copy the contents into the appropriate folders in your FirstEagles/Objects/Aircraft folder. Click "Yes" when it asks if you want to replace an existing file.
Then in your FirstEagles/Objects/Decals folder, make new folders for each of the planes. Folder names must be identical to the folder names in your Aircraft folder. Move the "D" folder from each of the Aircraft folders into the appropriate Decals folder you just made.
99 downloads
(0 reviews)0 comments
Updated
-

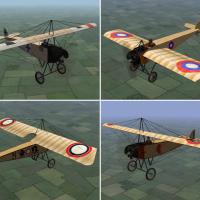
Russian Nieuport 12 - 4 pack
By Stephen1918 in Nieuport Skins
Four Russian skins for the Nieuport 12 - I have included an imported version, with the Russian insignia painted over the French, and three versions manufactured at the Dux factory, two of them with squadron insignia. I have also included a set of decals for all four planes.
Installation instructions
Put the four skin folders into your FirstEagles/Objects/Aircraft/Nieuport12 folder. Next, open my "PutInDFolder" and put all five files into the "D" folder for the Nieuport12 - For FE1, it will be inside the Aircraft/Nieuport12 folder - for FE2, it will be inside the Decals/Nieuport12 folder.
117 downloads
(0 reviews)0 comments
Updated
-
Eastern Front - skins for 2 of Monty CZ's planes
By Stephen1918 in Nieuport Skins
A set of skins and some file tweaks for Monty CZ's Nieuport 11 and Nieuport 17. You must have Monty CZ's planes in order for these to work.
For the Nieuport 11, I have made three skins. One is an imported plane with Russian colors painted over the French markings. The other two a Dux built machines, with the Dux markings and insignia for two squadrons.
For the Nieuport 17, I have made two skins. One is an imported plane with Russian colors painted over the French markings. The other is a Russian built machine with standard markings and squadron insignia.
Monty CZ has made a Russian skin for the Nieuport 11 which works well with these planes. In all of my skins, I used Monty CZ's original skins with some slight alterations. I have included a set of insignia decals with each plane, and a new ini file to update the way shadows are generated.
My thanks to Monty CZ for permission to make new skins for his planes.
Installation instructions:
If you haven't already, download and install the two planes from the CombatACE Download area. This install will replace some of the original files - you might want to make backups before you proceed.
For FE1 - Open each of my plane folders and copy the contents into the appropriate folders in your FirstEagles/Objects/Aircraft folder. Click "Yes" when it asks if you want to replace an existing file. Next, for each plane, open my folder "PutInDFolder" and move the contents into MontyCZ's "D" folder inside the aircraft's folder.
For FE2 - Open each of my plane folders and copy the contents into the appropriate folders in your FirstEagles/Objects/Aircraft folder. Click "Yes" when it asks if you want to replace an existing file.
Next, for each plane, open my folder "PutInDFolder" and move the contents into the appropriate aircraft's "D" folder Which is inside the Decals folder.
119 downloads
(0 reviews)0 comments
Updated
-

Russian Skins for EmID's Nieuport 24
By Stephen1918 in Nieuport Skins
Three Russian skins for the Nieuport 24. You must have EmID's plane in order for these to work.
I have included skins for an imported version, with the Russian colors painted over the French insignia, a version manufactured at the Dux factory, and a version with insignia for the 1st Combat Air Group. In all of my skins, I used EmID's original skins with some slight alterations. I have included a set of decals and a new ini file to update the way shadows are generated.
My thanks to EmID for giving his permission to make skins for his plane.
Installation Instructions
If you haven't already done so, download and install the Nieuport 24 from the CombatACE Download area. My install will replace the original ini file - you might want to make backups before you proceed.
For FE1 - Open my "N24" folder and put all the contents into your FirrstEagles/Objects/Aircraft/N24 folder.
For FE2 - Open my "N24" folder and put all the contents into your FirrstEagles/Objects/Aircraft/N24 folder. Next, in your FirstEagles/Objects/Decals folder, make a folder named "N24". Then move my "D" folder from the Aircraft/N24 folder into the Decals/N24 folder you just made.
109 downloads
(1 review)0 comments
Updated
-
Voisin LAS - 2 pack
By Stephen1918 in Other Entente Aircraft
The Voisin III was developed in 1914 and used throughout the war. It was produced in large numbers and was used by all the Entente powers. Although it was originally used as a fighter, reconnaissance, and ground attack plane, it was most commonly used as a bomber later in the war.
My version is the Voisin LAS with a full chord lower wing, a 9 cylinder water-cooled Salmson engine, and an 8mm Hotchkiss magine gun mounted on a tripod over the pilot.
Ojcar has created two data.ini's for the Voisin LAS, one for the 120hp engine, and one for the 150hp engine. For your convenience, I have created a completely separate plane for each. The models, decals and skins are the same, but the data.ini's and loadouts are different, with lighter bomb loads for the 120hp plane.
I have included three skinning options for each plane, identical except for the decals. The Italian Linen uses the Italian insignia with red and green underwing panels. The Russian Linen uses the Russian insignia and includes stripes on the tail planes. The Standard Linen can be used for all the other Entente powers. This plane uses the national markings that come with First Eagles, so you can easily change nationalities (in the Standard Linen skin only.) I have included my skinning templates.
I have also included decals for serial numbers which will be applied randomly.
There doesn't seem to be any standard way for the Voisin to carry its bombs, so I have included several loadouts with different sized bombs carried in different positions, with appropriate weights for each plane. (The loadout names are based on the size of the bombs, not the total loadout weight.)
Historical Notes:
The serial numbers are fictious, but in the correct range for the Voisin LAS.
The Russians used different national markings on the tail planes, If you use my Russian skin, you will have white, blue, and red stripes on the tail planes. If you use the Standard skin for the Russians, you will get roundels on the tail planes.
Credits:
My thanks once again to Ojcar for making two excellent data.ini files for this plane.
Thanks also to Sinbad, 33Lima, and Dreamk who provided reference materials for the Voisin LAS.
Version 2 - Ojcar has created a new FM which improves the fighting performance of the AI. A fake machine gun has been added which causes the pilot of AI planes to be more active in pursuing enemy aircraft. Installation instructions for the new gun are in a separate file.
Installation instructions:
For FE1: Unzip the file and move the two folders named "Voisin3_120" and "Voisin3_150" into the FirstEagles/Objects/Airplanes folder.
For FE2: Unzip the file and move the two folders named "Voisin3_120" and "Voisin3_150" into the FirstEagles/Objects/Airplanes folder. Then in the FirstEagles/Objects/Decals folder, create two new folders named "Voisin3_120" and "Voisin3_150". Move the folder named "D" from the Airplanes/Voisin3_xxx folders into the corresponding Decals/Voisin3_xxx folders you just made.
To install the gun, follow the instructions in the file named "InstructionsForInstallingGuns".
563 downloads
(3 reviews)0 comments
Updated
-
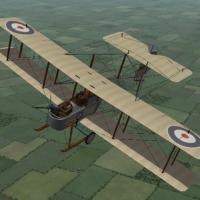
Vickers FB5 "Gunbus"
By Stephen1918 in Other Entente Aircraft
The Vickers FB5 was the first British plane designed specifically as a fighter. It was nicknamed the "Gunbus" because the pusher style aircraft had a factory installed machine gun mounted in the front, giving the gunner a wide angle of fire.
Although underpowered for its size, the large tail surfaces made it quite maneuverable. The Gunbus was an effective fighter for its time and was used to create the first fighter squadron, the RFC No. 11 Squadron. The Vickers FB5 was quickly outclassed and replaced by other fighters but it made a lasting impression on pilots.
I have included two skins with decal ini's for both the Standard Linen used by Britain and France, as well as an early British skin with flags instead of roundels. I have also included a set of serial numbers which will be applied randomly. I have included my skinning templates for the plane and the cockpit.
Historical Notes
The serial numbers are fictitious, but in the correct range for most FB5s.
Details of the instrument panel are mostly conjecture.
Several kinds of gun mounts were used on the Gunbus, most of them required considerable upper body motion for the gunner. In First Eagles, it is not possible to animate the gunner, so my gun mount is fictitious, but at least allows the gunner some freedom of movement.
Credits
My thanks to Ojcar for once again making an excellent data file for the Vickers Gunbus.
My thanks to Nix for providing the sound for the Gnome engine
Version 2 - Ojcar has created a new FM which improves the fighting performance of the AI. A fake machine gun has been added which causes the pilot of AI planes to be more active in pursuing enemy aircraft. Installation instructions for the new gun are in a separate file.
Installation Instructions
For FE1 - Unzip the file and move the folder named "VickersFB5" into the FirstEagles/Objects/Airplanes folder. You also need to move the sound file "gnome80m4.wav" into your FirstEagles/Sounds folder.
For FE2 - Unzip the file and move the folder named "VickersFB5" into the FirstEagles/Objects/Airplanes folder. Then in the FirstEagles/Objects/Decals folder, create a new folder named "VickersFB5". Move the folder named "D" from the Airplanes/VickersFB5 folder into the Decals/VickersFB5 folder you just made. You also need to move the sound file "gnome80m4.wav" into your FirstEagles/Sounds folder.
To install the fake machine gun, follow the instructions in the file named "InstructionsForInstallingGuns".
622 downloads
(4 reviews)0 comments
Updated
-

SPAD A.2
By Stephen1918 in Spad
The much maligned SPAD A.2 was not nearly as dangerous as some people believe. It was actually a good idea in the days before the synchronized gun was perfected, and continued to be used on the Eastern Front throughout the war. The A.2 was SPAD's first fighter and was introduced in mid 1915.
My version is the Russian version which was built at the Dux factory in Moscow. The upper wing has a center panel above the fuselage, and the gunner is equipped with a Colt-Browning 30 caliber machine gun.
I have included four skinning options, identical except for the decals. There are skins for 3 Russian variations, and a skin for the French. I have included my templates and serial numbers for some of the skins, which will be applied randomly.
Historical Notes:
The serial numbers are fictitious.
Credits:
My thanks once again to Ojcar for making the excellent data.INI file for this plane.
My thanks to Nix for providing the engine sound for the LeRhone engine
Thanks also to Sinbad and Whiteknight06604 who provided resources for the SPAD A.2 and for the Colt-Browning machine gun.
Version 2 - Ojcar has created a new FM which improves the fighting performance of the AI. A fake machine gun has been added which causes the pilot of AI planes to be more active in pursuing enemy aircraft. Installation instructions for the new gun are in a separate file.
Installation instructions:
For FE1: Unzip the file and move the folder named "SPADA2" into the FirstEagles/Objects/Aircraft folder. You also need to move the sound file "rhone110bn4nC" into your FirstEagles/Sounds folder.
For FE2: Unzip the file and move the folder named "SPADA2" into the FirstEagles/Objects/Aircraft folder. Then in the FirstEagles/Objects/Decals folder, create a new folder named "SPADA2". Move the folder named "D" from the Aircraft/SPADA2 folder into the Decals/SPADA2 folder you just made. You also need to move the sound file "rhone110bn4nC" into your FirstEagles/Sounds folder.
To install the gun, follow the instructions in the file named "InstructionsForInstallingGuns".
408 downloads
-
Fokker D.II
By Stephen1918 in Fokker
The Fokker D.II was intended to be a replacement for the Eindeckers. It carried a single machine gun and used wing warping instead of ailerons. Production of the plane was slow and by the time large number were available, it had been outclassed by the Nieuport 11s. However it was used on the Eastern Front until late 1917.
I have made three skins for the D.II - a green paint, a two color camo, and a three color camo. I have also incuded a complete set of (ficitious) serial numbers for German planes. I have included my skinning templates for those who wish to make different skins.
Credits
My thanks to Ojcar for making the data file for the Fokker D.II.
Also, my thanks to Nix who provided the sound file for the Oberursel 100hp engine.
Installation Instructions
For FE1 - Unzip the file and move the folders named "FokkerD2" into the FirstEagles/Objects/Aircraft folder. You also need to move the sound file "OberurselUI.wav" into the FirstEagles/Sounds folder.
For FE2 - Unzip the file and move the folder named "FokkerD2" into the FirstEagles/Objects/Aircraft folder. Then in the FirstEagles/Objects/Decals folder, create a new folder named "FokkerD2". Move the folder named "D" from the Aircraft/FokkerD2 folder into the Decals/FokkerD2 folder you just made. You also need to move the sound file "OberurselUI.wav" into the FirstEagles/Sounds folder.
494 downloads
(6 reviews)0 comments
Updated
-
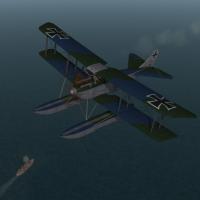
Rumpler 6B-1
By Stephen1918 in Other Central Powers Aircraft
The Rumpler 6B was a float plane version of the Rumpler C.I. It had more forward stagger to the upper wing and a larger rudder than the land version. The fuselage was also modified to make the plane a one man fighter.
I have made an early version, the 6B-1. The 6B-2 was introduced later and was slightly larger, had a different tail, and didn't perform as well as the 6B-1. The Rumpler 6B-1 was a fighter and saw service in the Baltic, the North Sea, and the Black Sea.
Since it's a float plane, the 6B-1 works best in the Flanders, Gibraltar or other terrain that has a lot of water. The plane will actually take off and land from a conventional airfield, but it looks strange to see the floats going under the ground. It would be best to start the missions in the air.
I have included two skins, a standard German "Sea Hex" camo and a mottled green and blue camo. My skinning templates are included with the download. I have also included a set of number decals.
Credits
Thanks to Ojcar for making the data file for the Rumpler 6B-1 and for providing information on the appearance of the plane.
Thanks to Nix for providing the sound for the Mercedes engine.
Installation Instructions
For FE1 - Unzip the file and move the folder named "Rumpler6B1" into the FirstEagles/Objects/Aircraft folder. You also need to move the sound file "mercedes160m2.wav" into the FirstEagles/Sounds folder.
For FE2 - Unzip the file and move the folder named "Rumpler6B1" into the FirstEagles/Objects/Aircraft folder. Then in the FirstEagles/Objects/Decals folder, create new folder named "Rumpler6B1". Move the folder named "D" from the Aircraft/Rumpler6B1 folder into the Decals/Rumpler6B1 folder you just made. You also need to move the sound file "mercedes160m2.wav" into the FirstEagles/Sounds folder.
317 downloads
(6 reviews)0 comments
Updated
-
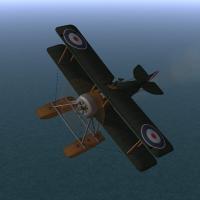
Sopwith Baby
By Stephen1918 in Sopwith
The Sopwith Baby was a British, single seat float plane used for reconnaissance and light bombing. It was built in fairly large numbers and was used by the British, French, Italian, Australian, Canadian, and American navies.
My version carries a Lewis machine gun on the upper wing and a has a loadout for a light bomb load. Some Babys had a Lewis gun mounted at an angle through the upper wing and some had a synchronized Lewis mounted on the fuselage, but the horizontal upper wing mount seems to have been the most common.
Since it's a float plane, the Sopwith Baby works best in the Flanders, Gibraltar or other terrain that has a lot of water. Ojcar has done a great job making this plane take off and land realistically on water.
The plane will actually take off and land from a conventional airfield, but it looks strange to see the floats going under the ground. It would be best to start the missions in the air.
I have included two skins, a generic olive skin for France and Britain, and an Italian linen skin. A full set of decals are included with Italian insignia and (fictitious) serial numbers. My skinning templates are included with the download.
Credits
Thanks to Ojcar for making the data file for the Sopwith Baby.
Thanks to Nix for providing the sound for the engine.
Installation Instructions
For FE1 - Unzip the file and move the folder named "SopwithBaby" into the FirstEagles/Objects/Aircraft folder. You also need to move the sound file "clerget9b2m2.wav" into the FirstEagles/Sounds folder.
For FE2 - Unzip the file and move the folder named "SopwithBaby" into the FirstEagles/Objects/Aircraft folder. Then in the FirstEagles/Objects/Decals folder, create new folder named "SopwithBaby". Move the folder named "D" from the Aircraft/SopwithBaby folder into the Decals/SopwithBaby folder you just made. You also need to move the sound file "clerget9b2m2.wav" into the FirstEagles/Sounds folder.
260 downloads
-

Hanriot HD.2
By Stephen1918 in Other Entente Aircraft
The Hanriot HD.2 was a French, single seat float plane version of the Hanriot HD.1. It had a larger tail, shorter wings, and mounted 2 Vickers machine guns. It was used by the French as an interceptor, defending seaplane bases, and as an escort for reconnaissance planes.
Since it's a float plane, the Hanriot HD.2 works best in the North Sea terrain, or in Flanders, Gibraltar or other terrain that has a lot of water. The plane will actually take off and land from a conventional airfield, but it looks strange to see the floats going under the ground.
I have included two skins, a generic linen skin and a 4 color camo skin. The camo skin may be fictitious and uses the French 4 color camo pattern, but with blue and grey colors instead of greens and browns. I have included a set of decals. My skinning templates are included with the download.
Credits
Thanks to Ojcar for making the data file for the Hanriot HD.2 and for providing information for the cockpit.
Thanks to Nix for providing the sound for the engine.
Installation Instructions
For FE1 - Unzip the file and move the folder named "HanriotHD2" into the FirstEagles/Objects/Aircraft folder. You also need to move the sound file "clerget9b2m2.wav" into the FirstEagles/Sounds folder.
For FE2 - Unzip the file and move the folder named "HanriotHD2" into the FirstEagles/Objects/Aircraft folder. Then in the FirstEagles/Objects/Decals folder, create new folder named "HanriotHD2". Move the folder named "D" from the Aircraft/HanriotHD2 folder into the Decals/HanriotHD2 folder you just made. You also need to move the sound file "clerget9b2m2.wav" into the FirstEagles/Sounds folder.
269 downloads
(2 reviews)0 comments
Updated
-

Field Guns for First Eagles
By Stephen1918 in First Eagles - WWI and Early Years - Object Mods
In World War I, field guns were light artillery weapons used for infantry support on the battlefield. The barrel could be elevated using a mechanism on the carriage, but the entire gun had to be turned to aim it. I have created eight new field guns for First Eagles, each with a two man crew behind a small log and earth barricade.
This download includes - a Russian Putilov 76.2mm, and Austrian Krupp 77mm, A German Krupp 77mm, an Italian Déport 77mm, a French 75mm, a British 75mm, an American 75mm, and a Turkish Krupp 77mm.
The field guns take the role of Tank in First Eagles so they will appear on the battlefield during Army Co-operation missions. All the guns use the stock 75mm gun data from First Eagles.
Installation Instructions
You can install the guns individually or all at once. Unzip the file and move the folders you want into the FirstEagles/Objects/GroundObjects folder. Destroyed versions of all the guns use the same skin as the AAA guns. If you don't already have it, you must also copy the file "DestroyedAAA.bmp" into the FirstEagles/Objects/GroundObjects folder. The file must be placed in root level of the GroundObjects folder (not inside any other folders.)
319 downloads
(3 reviews)0 comments
Updated
-
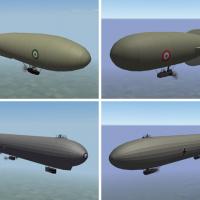
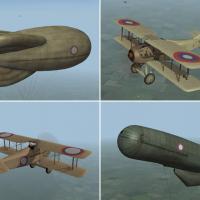
Airships
By Stephen1918 in First Eagles - WWI and Early Years - Object Mods
Dirigibles were used by both sides on all fronts during World War I. Early in the war, they were used for recon and bombing, but were soon replaced by aircraft. However, because they could stay aloft for long periods, and their ability to hover, airships continued to be used for naval operations, especially for scouting and anti-submarine patrols.
I have created five different types of airship. They are all identified as "Balloon" and they are all armed with machine guns. Drop them into your Ground Object folder and they will show up over the battlefields for more challenging balloon busting missions. I have included alternate skins for some of them so you can use them for different nations.
Historical Notes
The R23 and L32 are relatively accurate models of actual airships. The Type M, Type PL, and Type VZ are more or less generic representations of popular airship types which were used by different nations. I have averaged out the national and manufacturer variations, but the overall size and shape is relatively accurate.
I have taken liberties with the gondolas and simplified the rigging in order to keep file size down and frame rate up.
Installation Instructions
Unzip the file and copy the folders you want into your FirstEagles/Objects/GroundObject folder.
362 downloads
-
Galicia - Eastern Front
By Stephen1918 in First Eagles - WWI and Early Years - Terrain and Environmental Mods
NOTE - This terrain is a complete revision of the Galicia Terrain. I recommend that you delete the original before installing Galicia Version 2.
Version 1 Notes:
Galicia was the name of a territory in northern-eastern Hungary and was the scene of major fighting during the First World War. It was invaded by the Russians early in the war, and was then recaptured by the Austro-Hungarians later. It was also a battleground after the war, first in fighting between Poland and the Ukraine, and later between Poland and The Soviet Union. Today the district is part of both Poland and the Ukraine.
My Galicia terrain is based on the Verdun terrain, using the Cambrai.cat file, from First Eagles. It is a cosmetic change and is not geographically correct. Everything is the same as the stock Verdun terrain except for the following changes:
- I have renamed all the locations in the Target.ini and Movement.ini with actual Hungarian place names from World War I. I did my best to match town locations with the terrain coordinates, but I couldn't always find an exact match.
- I modified the terrain tiles to make the trench line narrower. I have included new terrain tiles with all the trenches removed from all the no-mans-land and trench terrain tiles.
- Since the Eastern Front was much more fluid than the Western Front, I added some old battlefields to the terrain. Flying over a cratered area does not necessarily mean that you're flying over the front line!
- I added much more forest and grassland. This terrain requires the Cambtai.cat file because Verdun doesn't have the grassland terrain tiles. I also removed some of the villages and airfields.
- I have added Supply Depots. These use the airfield ground tile, but are covered with warehouses and other buildings, making them high value bombing targets.
- I created new briefing maps with the new place names.
- I swapped "Enemy" and "Friendly" locations to put Russia to the north.
- I replaced two buildings with my own LODs. "vCity7" was a gray cube with rounded corners and randomly scattered windows. I have replaced it with a town hall style building. "FrTownBuilding4" was a three story village building. I have replaced it with something more like a hotel. These building have their own skins.
- I created new buildings to replace most of the tents and canvas hangers. I made a Barracks building, a Headquarters building, a Storage building, and two hangars. I also made a (static) staff car for each airfield.
- I made new skins for some of the buildings. These skins use some components from max188's Hi-Res Buildings and from mauricepiesligeros's Gilbraltar Buildings. I have altered them pretty extensively and added my own details.
- All the airfields have been flattened and the surrounding terrain has been smoothed.
- Since the Eastern Front had less air-to-air combat, I made more ground targets. I added factories to many of the cities to increase the number of bombing targets. I added a few more balloons for balloon busting missions, I added some truck routes for armed recon missions, and I added some ground attack routes for army co-operation missions.
Everything else is the same as the stock Verdun Terrain. I have deliberately kept this as minimal as possible.
Anything that works with Cambrai should also work with this, so you should be able to upgrade however you wish. I haven't tested it, but it should be possible to use the Cambrai seasonal tiles with the Galicia terrain (but the trenches will reappear during the other seasons.)
Version 2 revisions:
- I removed the duplicate airfield
- I revised the hangars so they cast shadows now
- I added SpinyNorman's Air Raid Warning Ambulances to all airfields
- I repositioned some of the Anti Aircraft guns so they're not inside buildings
- I made tweaks to some of the building skins and terrain tiles and I fixed the trees so they only have one trunk
- I revised the Nations.ini, Targets.ini, and Movement.ini to be more compatible with the Eastern Front campaign
- I added some airfields with wider aircraft spacing for bombers to take off without colliding
Installation Instructions:
If you haven't already done so, download and install SpinyNorman's Air Raid Warning Ambulances
Unzip the file and move the folder named "Galicia" into your FirstEagles/Terrain folder.
NOTE - You must have the wwiCambrai terrain installed (which came with FE Gold) in order for the Galicia terrain to work. Any mods you may have made to your Cambrai terrain should not affect Galicia.
OPTIONAL - On my computer I made a separate install of First Eagles for the Eastern Front. I made map icons which use Russian insignia (instead of French) for "Friendly" planes and airfields. I have included those icons with this download and you can install them if you wish. - Warning! - installing these will change the map icons on all your other terrains as well.
To install the map icons, open the folder named "OptionalFlightFolder" and copy the two files into your FirstEagles/Flight folder.
539 downloads
(1 review)0 comments
Updated
-

Pfalz A.II conversion for Laton's E.III
By Stephen1918 in Pfalz Skins
A set of skins and some file tweaks to convert Laton's Pfalz E.III into an A.II You must have Laton's plane in order for this to work.
The Pfalz A.II was identical to the E.III, except that the A.II was unarmed. I have removed the gun and Loadouts from the E.III data file, changed the way shadows are generated in the ini file, and created two new skins for the plane. There is a German skin, with a stripe around the fuselage, and an Austrian skin with red bars on the wingtips and fuselage. The original skins will still work with my conversion. I also made a new hangar screen to display the plane's new name. Everything else is the same as in Laton's original.
Installation instructions:
If you haven't already, download and install Laton's Pfalz E.III pack from the CombatACE Download area. My install is only for the E.III and will replace some of the original files - you might want to make backups before you proceed.
For FE1 - In your FirstEagles/Objects/Aircraft folder, make a copy of the PfalzEIII folder and name it "PfalzAII." Copy all the files from my "PfalzAII" folder into your "PfalzAII" folder. Click "Yes" if it asks if you want to replace an existing file. You can delete the PfalzEIII.ini, PfalzEIII_data.ini, PfalzE.III_Loadout.ini, and PfalzEIII_Hangar.bmp files. All the other files are needed for the conversion.
For FE2 - In your FirstEagles/Objects/Aircraft folder, make a copy of the PfalzEIII folder and name it "PfalzAII." Copy all the files from my "PfalzAII" folder into your "PfalzAII" folder. Click "Yes" if it asks if you want to replace an existing file. You can delete the PfalzEIII.ini, PfalzEIII_data.ini, PfalzE.IIILoadout.ini, and PfalzEIII_Hangar.bmp files. All the other files are needed for the conversion.
Next, in your FirstEagles/Objects/Decals folder, make a new folder named "PfalzAII". Move the folder named "D" from your FirstEagles/Objects/Aircraft/PfalzAII folder into the FirstEagles/Decals/Aircraft/PfalzAII folder you just made.
84 downloads
(1 review)0 comments
Updated
-

Decals for Post War Nations
By Stephen1918 in Other Entente Aircraft Skins
Fighting continued in Eastern Europe and Russia for many years after the end of World War I. These decals are the insignia of many of the nations that were formed in the closing days of the war. Most of them fought against the Bolsheviks in the Russian Civil Wars, but many of them also fought each other at one time or another.
I have included decals for - Czechoslovakia, Estonia, Finland, Greece, Hungary, Latvia, Lithuania, Poland, Russia, Ukraine, and Yugoslavia.
Many nations did not have standardized insignia at first and I have included variations for many of the nations. I have included a text document with notes on how and when they were used. To use these, you will probably need to tweak the decal ini's for existing planes. How and when insignia are reversed on opposite sides of the plane changes from nation to nation, and the horizontal tail stripes will need to be adjusted.
Terms of Use
You may use these decals for your own personal use.
You may include these decals with any skins you upload for First Eagles at Combat Ace. Please give me credit.
You may NOT include these decals with skins you upload at any other site.
86 downloads
-
The Eastern Front
By Stephen1918 in First Eagles - WWI and Early Years - Missions and Campaigns
Fighting on the Eastern Front in World War I was much different from the fighting in the west. The Eastern Front was much longer, troops were spread out more, and there were fewer roads and villages than in northern France and Belgium. The front moved back and forth more quickly and more often in Eastern Europe.
In the air, recon, artillery spotting, and ground attack missions were the most common. There weren't as many dogfights, and squadrons rarely went hunting for enemy planes.
The purpose of my campaigns is to capture a sense of the war on the Eastern Front. I am not trying to re-enact any particular battles. I'm just trying to create the correct mix of planes and missions to approximate the way the war was fought.
This download consists of three campaigns in the Austro-Hungarian province of Galicia, near the Russian Ukraine.
1915, takes place in the late spring and roughly corresponds to the German/Austrian Gorlice-Tarnow Offensive in which the Central Powers took back the land they had lost at the start of the war. (Austria on the offensive.)
1916, takes place in the summer and roughly corresponds to the Russian Brusilov Offensive in which Russian forces took back a lot of what they had lost in 1915. (Russia on the offensive.)
1917, takes place in the fall, after the Kerensky offensive and before the October Revolution and represents the closing months of the war in the east.
Notes:
Everything in these campaigns is available at the CombatAce site.
Installation instructions are in a separate file. Please read the notes for special information about some of the planes.
Credits:
Many people have made this project possible. Some of them worked directly with me, and others have made things which found their way into this campaign. In particular, I wish to thank:
ojcar for his continued support, for making all the FMs for all my planes, and for providing the inspiration for this project.
sinbad, who made some planes and several skins for the Russian planes and who beta-tested the whole thing.
quack74, for making skins, providing resource materials, and for beta testing the campaigns.
whiteknight06604, for making skins and providing resource materials for the Eastern Front.
Monty CZ and EmlD, for letting me make skins and mods for their planes.
Laton, Bortdafarm, p10ppy, christian59, and geo for their planes and ground objects.
von Deutschmark, gumpy, Saltfiskur, and gambit168 for their skins.
Peter01 for his FMs.
And thanks to everyone at Combat Ace for their support, suggestions, and inspiration.
Changes in Version 2:
I have corrected the way Squadrons are named and eliminated duplicates so all aircraft should display correctly in the menu screen.
I have replaced some planes and included new planes, skins, and ground objects.
I have adjusted all the Strategic Nodes to get ground units positioned correctly. There should be no more AA guns or troops inside buildings anymore.
I have made changes to the mission parameters for many of the planes.
I have made new start screens for the campaigns which display while the campaign is loading.
419 downloads
(1 review)0 comments
Updated