
Stephen1918
-
Content count
1,168 -
Joined
-
Last visited
-
Days Won
19
Files posted by Stephen1918
-
New Cockpit for AEG G.IV
By Stephen1918 in First Eagles - WWI and Early Years - Add On Cockpits
This cockpit will convert the stock First Eagles AEG G.IV from an AI plane into a flyable plane. The cockpit features fully functional gauges, throttles, rudder control, and stick.
Acknowledgement
About 10 years ago, ravenclaw_007 made the AEG G.IV flyable by making a cockpit using the cockpit from the SE5a. My thanks to him for leading the way.
Installation Instructions for both FE1 and FE2
If you have already installed ravenclaw's version, you should delete the two ini files ("AEG_G4.ini" and "AEG_G4_COCKPIT.ini") before installing this version.
If you still have the stock version, this install will replace the original AEG-G4.ini file. You should make a backup in case you want to revert to the original AI version.
Open my "AEG_G4" folder and place all the files - 1 folder and 2 ini files - into your "AEG_G4" folder.
155 downloads
-
Wing tip streamer ribbons for FE
By Stephen1918 in First Eagles - General Files - Weapons Mods
As requested, I have made five streamer ribbons for First Eagles. The streamers are identified as fuel tanks and can be attached to weapons stations through the load out.
NOTE - Since these streamers are classed as weapons, they are not animated and do not cast shadows.
Installation is a three part process - you will need to install the streamers as weapons in First Eagles - you will need to change the data.ini for each plane to create weapons stations for the streamers - you will need to create a load out for each plane to attach the streamers to the plane.
Full installation instructions for both FE1 and FE2 are included with the download.
65 downloads
(2 reviews)0 comments
Submitted
-
Cockpit for the DFW C.V
By Stephen1918 in First Eagles - WWI and Early Years - Add On Cockpits
This cockpit will replace Fokker D7 cockpit used until now to make the stock DFW C.V into a flyable plane. I can't find out who first converted the stock DFW into a flyable plane by using the cockpit from the Fokker D7. It seems to have been done several times over the years. I found a mod to convert the DFW C.V into a C.I uploaded by Christian59 in 2007 which used the Fokker cockpit, and it seems to have already been done before. The most recent version I could find was by JacksonM in 2017 and was included with his Hangar Screen pack.
I have used parts of the cockpits I made for other German planes to make a completely new cockpit for the DFW C.V which fits the fuselage better and has the correct placement for the gun. The new cockpit features fully functional gauges, throttle, rudder control, and stick. This cockpit should work with the DFW in both FE1 and FE2.
NOTE - There is a typo in the stock FM for DFW C.V which causes the Fuselage to disappear in the cockpit view. I have included instructions to correct the typo. If you are using one of the modded FMs, you may need to correct the typo there too, check to be sure. Instructions to fix the Data.ini are included in the download in a separate text file.
Installation Instructions for both FE1 and FE2
If you have already have a flyable DFW C.V using the FokkerD7 cockpit, delete the "cockpit" folder if it exists, and delete the DFWC5_cockpit.ini file. Then open my "DFWC5" folder and place all the files - 1 folder and 1 ini file - into your DFWC5 folder. You will also need to change one word in the DFWC5_data.ini. See the file named "ChangeForDFWC5DataIni"
If you still have the stock version, Open my "DFWC5" folder and place all the files - 1 folder and 1 ini file - into your DFWC5 folder.
You will also have to add the following line to the plane's ini file.
CockpitDataFile=DFWC5_cockpit.ini
You will also need to change one word in the DFWC5_data.ini. See the file named "ChangeForDFWC5DataIni"
NOTE - If the DFWC5_data.ini is not in the folder, you may need to extract it from the ObjectData.cat file using one of the utilities found here at CombatAce.
110 downloads
(2 reviews)0 comments
Submitted
-
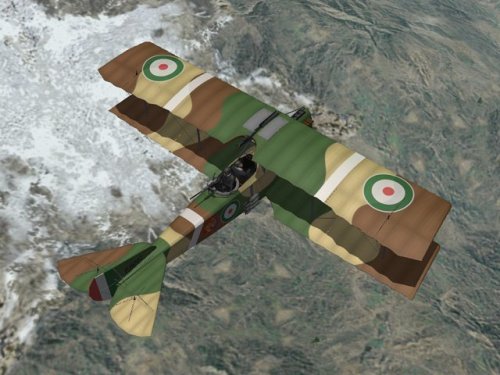
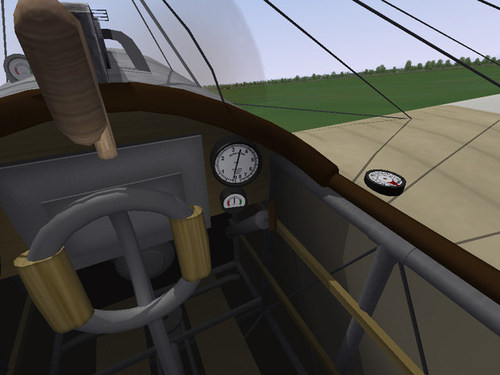
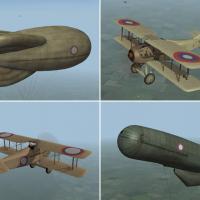
Pomilio PE
By Stephen1918 in Other Entente Aircraft
The Pomilio PE was a two seat, Italian general purpose plane that entered service in 1917. It had a 300hp Fiat 6 cylinder engine with a radiator mounted in the nose of the aircraft. A fin under the fuselage, around the tail skid, helped improve the stability of the plane.
The Pomilio PE was used primarily for reconnaissance and was armed with a fixed Fiat-Revelli machine gun over the wing with a ring mounted machine gun operated by the observer. The Pomilio could carry a light bomb load with 3 bombs mounted on the each side of the plane.
My Pomilio PE includes 2 skins - a green/yellow speckled camo, and a 3 color camo - each with appropriate decals. I have included a small bomb loadout. I have included my skinning templates with the download.
Historical Notes:
- My Pomilio PE uses the later style fuselage with a flatter deck behind the pilot because it allowed me to give greater range to the gunner in the game.
- I have taken extensive liberties with the speckled camo skin version of the plane. When the camouflage was applied at the factory, it usually covered the metal panels around the engine. The speckled camo scheme was not applied to the top of the lower wing. The national insignia on the top wing did not usually extend into the aileron. The 3 color camo version is much more accurate and is the default skin.
Credits:
My thanks to Ojcar for making the data.ini file for this plane.
Installation instructions:
For FE1: Unzip the file and move the folder named "PomilioPE" into the FirstEagles/Objects/Aircraft folder.
For FE2: Unzip the file and move the folder named "PomilioPE" into the FirstEagles/Objects/Aircraft folder. Then in the FirstEagles/Objects/Decals folder, create a new folder named "PomilioPE". Move the folder named "D" from the Aircraft/PomilioPE folder into the Decals/PomilioPE folder you just made.
148 downloads
(2 reviews)0 comments
Submitted
-
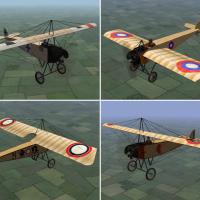
Cockpits for Laton's Fokker E-Types
By Stephen1918 in First Eagles - WWI and Early Years - Add On Cockpits
I modified the cockpit from my Fokker D.II to make new cockpits for all eight of Laton's Fokker Eindeckers. Each cockpit has a fully functional stick, rudder control, throttle, and gauges, including the wing mounted compass. The cockpits are basically the same, but each has been tweaked to make it fit into Laton's fuselage and to reflect differences in the type (like the number of guns in the E.IV planes.)
I have sorted everything into the appropriate folders for easy installation.
My thanks to Laton for having made so many planes that we are still flying today.
Installation Instructions
For both FE1 and FE2- For each plane, delete Laton's original cockpit folder and cockpit.ini file and replace them with mine.
82 downloads
(2 reviews)0 comments
Submitted
-
Halberstadt CL.II
By Stephen1918 in Other Central Powers Aircraft
The Halberstadt CL.II was a German, 2 seat fighter/escort plane. The CL.II was designed to be an escort for reconnaissance flights. Its excellent maneuverability made it a match for single seat fighters and its field of fire made it an excellent ground attack plane. It entered service in August 1917 and was used in large numbers until the end of the war.
The Halberstadt CL.II had a plywood fuselage and was powered by a six-cylinder Mercedes D.III engine. It had a 7.92mm Spandau machine gun in the front fuselage for the pilot and a 7.92mm Parabellum gun on a ring mount for the observer. It could also carry a light bomb load. My version has a rack for 10 stick grenades mounted on the fuselage.
My download includes a hex camo skin, appropriate decals, and a fully functional cockpit. My skinning templates are included with the download.
I have included a sound file for the Mercedes D.III engine. The same sound has been used with other planes and you may already have it installed. I have included the sound file with the download in case you don't have it.
Credits
My thanks to Ojcar for making the data file for the Halberstadt CL.II and for making improvements to the guns.
My thanks to Nixou for making the sound file for the Mercedes engine many years ago.
Installation Instructions
For FE1 - Unzip the file and move the folder named "HalberstadtCL2" into your FirstEagles/Objects/Aircraft folder.
If you don't already have it, move the sound file "mercedes160m2.wav" from my "Sounds" into your "Sounds" folder.
For FE2 - Unzip the file and move the folder named "HalberstadtCL2" into your FirstEagles/Objects/Aircraft folder. Then in the FirstEagles/Objects/Decals folder, create a new folder named "HalberstadtCL2." Move the folder named "D" from the Aircraft/HalberstadtCL2 folder into the Decals/HalberstadtCL2 folder you just made.
If you don't already have it, move the sound file "mercedes160m2.wav" from my "Sounds" into your "Sounds" folder. If you don't have a Sounds folder, you can make one.
182 downloads
(2 reviews)0 comments
Submitted
-

Phönix D.IIa
By Stephen1918 in Other Central Powers Aircraft
The Phönix D.IIa was the same as the D.II but with a more powerful 230 hp Hiero engine, which gave it better speed and better climbing ability.
My model of the D.IIa is based on my model of the D.II but with a different engine - which means all new .LOD files as well as a new cockpit (the engine is part of the cockpit in this model.) I have made a slightly different skin, new decals, and ojcar has made a different FM, so this is a completely new plane. (You do NOT need the D.II in order to install this plane.)
The skins and decals are interchangeable with the D.II.
I have included a set of letter decals so you can set flight letters in the Loadout screen, or the game will randomly assign a different letter to each plane.
The skinning templates are identical to the D.II, but I have included them here anyway. I have also included my .OUT files for the benefit of future modders.
Credits
My thanks to ojcar, who created the FM to capture the improved power and performance of this excellent Austro-Hungarian fighter.
Installation instructions:
For FE1: Unzip the file and move the folder named "PhoenixD2a" into the FirstEagles/Objects/Airplanes folder.
For FE2: Unzip the file and move the folder named "PhoenixD2a" into the FirstEagles/Objects/Airplanes folder. Then in the FirstEagles/Objects/Decals folder, create a new folder named "PhoenixD2a". Move the folder named "D" from the Airplanes/PhoenixD2a folder into the Decals/PhoenixD2a folder you just made.
514 downloads
(1 review)0 comments
Updated
-

Anatra DS "Anasal"
By Stephen1918 in Other Entente Aircraft
This version includes a new FM made by ojcar.
The Anatra DS was a two seat Russian plane powered by a Salmson 9 cylinder, water cooled, radial engine. The plane was therefore called the "Anasal", short for "Anatra Salmson". When the Ukrainian city of Odessa was occupied by Austria-Hungary early in 1918, the Anatra factory was found intact and production continued as the "Anatra C.I". Many of the first Austrian versions had the Austrian cross painted over the Russian insignia.
The Anatra was used mostly for reconnaissance, but also as a fighter and light bomber. Many of them survived the war and were used in the fighting in Eastern Europe after the end of World War I.
In version 2 - I have included a loadout for a light bomb load and three skinning options - A generic Russian skin, and skins for two Russian squadrons - the 19th and the 4th squadrons with decals for the squadron tail markings. I have included my skinning templates for those who want make their own skins.
In version 3 - I improved the details around the nose, completely reskinned the plane and cockpit, and corrected several problems with node names in the data file. New templates are included in the version 3 download.
In version 4 - Ojcar has made a new FM for the plane. I have refined the wings and added some details. Old skins will still work with this revision. I have included the old skinning templates with the download.
Historical Notes:
I found several sources which said that Anatras carried a machine gun mounted on the fuselage for the pilot. I couldn't find any details of the mounting, so I guessed where it might be located.
Credits:
My thanks to Ojcar once again for making a new data.ini file for this revision of the plane.
Installation instructions:
This revision replaces previous versions. If you have an older version, please delete it, then install the new version.
For FE1: Unzip the file and move the folder named "AnatraDS" into the FirstEagles/Objects/Aircraft folder.
For FE2: Unzip the file and move the folder named "AnatraDS" into the FirstEagles/Objects/Aircraft folder. Then in the FirstEagles/Objects/Decals folder, create a new folder named "AnatraDS". Move the folder named "D" from the Aircraft/AnatraDS folder into the Decals/AnatraDS folder you just made.
422 downloads
-
Anatra C.I
By Stephen1918 in Other Central Powers Aircraft
This version includes a new FM made by ojcar.
When the Ukrainian city of Odessa was occupied by Austria-Hungary early in 1918, the Anatra factory was found intact and production of the Anatra DS was continued as the "Anatra C.I". Many of the first Austrian versions had the Austrian cross painted over the Russian insignia.
The Anatra C.I was used mostly for training, but some were used for reconnaissance, as a fighter and light bomber. Many of them survived the war and were used in the fighting in Eastern Europe after the end of World War I.
In version 2 - I have created a separate version for the Austrian plane, with a Schwarzlose machine gun and German bombs in the loadout. There are two Austrian skins, one with crosses painted over the Russian roundels, and one with standard insignia. (I have also included a postwar Yugoslav skin, because I like the insignia.) I have included my skinning templates for those who want make their own skins.
In version 3 - Ojcar has made a new FM for the plane. I have refined the wings and added some details. I created a new cockpit with German gauges and machine gun. I made two Austrian skins for the plane and I kept the Yugoslav skin, because I like the insignia. I have included my skinning templates for those who want make their own skins.
Historical Notes:
The serial numbers are fictitious. I found several sources which said that Anatras carried a machine gun mounted on the fuselage for the pilot. I couldn't find any details of the mounting, so I guessed where it might be located.
Credits:
My thanks to Ojcar once again for making a new data.ini file for this plane.
Installation instructions:
This revision replaces previous versions. If you have an older version, please delete it, then install the new version.
For FE1: Unzip the file and move the folder named "AnatraC1" into the FirstEagles/Objects/Aircraft folder.
For FE2: Unzip the file and move the folder named "AnatraC1" into the FirstEagles/Objects/Aircraft folder. Then in the FirstEagles/Objects/Decals folder, create a new folder named "AnatraC1". Move the folder named "D" from the Aircraft/AnatraC1 folder into the Decals/AnatraC1 folder you just made.
309 downloads
-
Galicia - Eastern Front
By Stephen1918 in First Eagles - WWI and Early Years - Terrain and Environmental Mods
NOTE - This terrain is a complete revision of the Galicia Terrain. I recommend that you delete the original before installing Galicia Version 2.
Version 1 Notes:
Galicia was the name of a territory in northern-eastern Hungary and was the scene of major fighting during the First World War. It was invaded by the Russians early in the war, and was then recaptured by the Austro-Hungarians later. It was also a battleground after the war, first in fighting between Poland and the Ukraine, and later between Poland and The Soviet Union. Today the district is part of both Poland and the Ukraine.
My Galicia terrain is based on the Verdun terrain, using the Cambrai.cat file, from First Eagles. It is a cosmetic change and is not geographically correct. Everything is the same as the stock Verdun terrain except for the following changes:
- I have renamed all the locations in the Target.ini and Movement.ini with actual Hungarian place names from World War I. I did my best to match town locations with the terrain coordinates, but I couldn't always find an exact match.
- I modified the terrain tiles to make the trench line narrower. I have included new terrain tiles with all the trenches removed from all the no-mans-land and trench terrain tiles.
- Since the Eastern Front was much more fluid than the Western Front, I added some old battlefields to the terrain. Flying over a cratered area does not necessarily mean that you're flying over the front line!
- I added much more forest and grassland. This terrain requires the Cambtai.cat file because Verdun doesn't have the grassland terrain tiles. I also removed some of the villages and airfields.
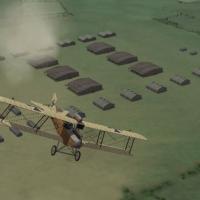
- I have added Supply Depots. These use the airfield ground tile, but are covered with warehouses and other buildings, making them high value bombing targets.
- I created new briefing maps with the new place names.
- I swapped "Enemy" and "Friendly" locations to put Russia to the north.
- I replaced two buildings with my own LODs. "vCity7" was a gray cube with rounded corners and randomly scattered windows. I have replaced it with a town hall style building. "FrTownBuilding4" was a three story village building. I have replaced it with something more like a hotel. These building have their own skins.
- I created new buildings to replace most of the tents and canvas hangers. I made a Barracks building, a Headquarters building, a Storage building, and two hangars. I also made a (static) staff car for each airfield.
- I made new skins for some of the buildings. These skins use some components from max188's Hi-Res Buildings and from mauricepiesligeros's Gilbraltar Buildings. I have altered them pretty extensively and added my own details.
- All the airfields have been flattened and the surrounding terrain has been smoothed.
- Since the Eastern Front had less air-to-air combat, I made more ground targets. I added factories to many of the cities to increase the number of bombing targets. I added a few more balloons for balloon busting missions, I added some truck routes for armed recon missions, and I added some ground attack routes for army co-operation missions.
Everything else is the same as the stock Verdun Terrain. I have deliberately kept this as minimal as possible.
Anything that works with Cambrai should also work with this, so you should be able to upgrade however you wish. I haven't tested it, but it should be possible to use the Cambrai seasonal tiles with the Galicia terrain (but the trenches will reappear during the other seasons.)
Version 2 revisions:
- I removed the duplicate airfield
- I revised the hangars so they cast shadows now
- I added SpinyNorman's Air Raid Warning Ambulances to all airfields
- I repositioned some of the Anti Aircraft guns so they're not inside buildings
- I made tweaks to some of the building skins and terrain tiles and I fixed the trees so they only have one trunk
- I revised the Nations.ini, Targets.ini, and Movement.ini to be more compatible with the Eastern Front campaign
- I added some airfields with wider aircraft spacing for bombers to take off without colliding
Installation Instructions:
If you haven't already done so, download and install SpinyNorman's Air Raid Warning Ambulances
Unzip the file and move the folder named "Galicia" into your FirstEagles/Terrain folder.
NOTE - You must have the wwiCambrai terrain installed (which came with FE Gold) in order for the Galicia terrain to work. Any mods you may have made to your Cambrai terrain should not affect Galicia.
OPTIONAL - On my computer I made a separate install of First Eagles for the Eastern Front. I made map icons which use Russian insignia (instead of French) for "Friendly" planes and airfields. I have included those icons with this download and you can install them if you wish. - Warning! - installing these will change the map icons on all your other terrains as well.
To install the map icons, open the folder named "OptionalFlightFolder" and copy the two files into your FirstEagles/Flight folder.
539 downloads
(1 review)0 comments
Updated
-
Airco DH9
By Stephen1918 in Other Entente Aircraft
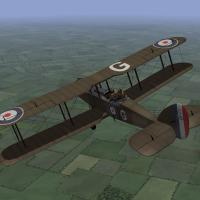
The Airco DH9 was introduced early in 1918 as an intended replacement for the DH4. The pilot was seated closer to the gunner in the DH9 and an internal bomb compartment was provided. However, because of the DH9's low performance and unreliable engine, the DH4 remained the better bomber until the DH9a was introduced a few months later. Nevertheless, the DH9 did operate with better success on the Eastern and Palestinian fronts where it faced fewer enemy fighters.
I have included two skins, a brown and an olive color. Both use the letter decals that come with First Eagles (which you can set in the loadout screen) and I have included a set of serial numbers which will be applied randomly. There are also loadouts for light, medium, and heavy bomb loads.
The skins are rather generic, I have included my skinning templates for those who wish to make better skins.
Credits
My thanks to Ojcar for once again making an excellent data file for the DH9.
My thanks also to Sinbad for providing a great deal of resource information for this plane.
Installation Instructions
For FE1 - Unzip the file and move the folder named "AircoDH9" into the FirstEagles/Objects/Airplanes folder.
For FE2 - Unzip the file and move the folder named "AircoDH9" into the FirstEagles/Objects/Airplanes folder. Then in the FirstEagles/Objects/Decals folder, create a new folder named "AircoDH9". Move the folder named "D" from the Airplanes/AircoDH9 folder into the Decals/AircoDH9 folder you just made.
April 5, 2012 - Replaced data file with new version to fix problem with take offs and landings and to make the plane fly better.
452 downloads
-

Airco DH9a "Ninak"
By Stephen1918 in Other Entente Aircraft
The Airco DH9a, called the "Ninak" ("nine a") was introduced in June 1918 to replace the underpowered DH9. The 400hp Liberty engine required changes to the front of the fuselage, otherwise the plane was pretty much the same as the DH9. Although it was introduced late in the war, the DH9a did see service during the war, and was used extensively afterwards.
I have included two skins, a brown and an olive color. Both use the letter decals that come with First Eagles (which you can set in the loadout screen) and I have included a set of serial numbers which will be applied randomly. There are also loadouts for light, medium, and heavy bomb loads.
The skins are rather generic, I have included my skinning templates for those who wish to make better skins.
Credits
My thanks to Ojcar for once again making an excellent data file for the DH9a.
My thanks also to Sinbad for providing a great deal of resource information for this plane.
Installation Instructions
For FE1 - Unzip the file and move the folder named "AircoDH9a" into the FirstEagles/Objects/Airplanes folder.
For FE2 - Unzip the file and move the folder named "AircoDH9a" into the FirstEagles/Objects/Airplanes folder. Then in the FirstEagles/Objects/Decals folder, create a new folder named "AircoDH9a". Move the folder named "D" from the Airplanes/AircoDH9a folder into the Decals/AircoDH9a folder you just made.
April 5, 2012 - Replaced data file with new version to fix problem with take offs and landings and making the plane fly better.
429 downloads
-
Airco DH4 - 2 pack
By Stephen1918 in Other Entente Aircraft
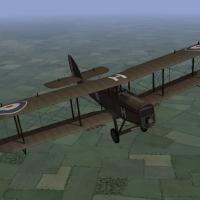
Although best known in its role as a bomber, the Airco DH4 was intended to be a general purpose airplane and was used for recon and ground support as well. Early versions were powered by a 250hp Eagle engine. Later versions were powered with a 375hp Eagle engine, which made them very effective bombers. The biggest problem with the DH4 was the gas tank placed between the pilot and gunner, which made communication between the two almost impossible.
I have uploaded two versions of the DH4 - Ojcar has created two FMs for the plane, one with the early 250hp engine, and one with the later 375hp engine.
Both planes have two skins, a brown and an olive color. Both use the letter decals that come with First Eagles (which you can set in the loadout screen) and a set of serial numbers which will be applied randomly. There are also loadouts for light, medium, and heavy bomb loads. The skins, decals, and loadouts are interchangeable for the two planes.
The skins are rather generic, I have included my skinning templates for those who wish to make better skins.
Credits
My thanks to Ojcar for once again making two excellent data files for the DH4.
My thanks also to Sinbad for providing a great deal of resource information for this plane.
Installation Instructions
The two versions can be installed separately or both together.
For FE1 - Unzip the file and move the folders named "AircoDH4_250" and "AircoDH4_375" into the FirstEagles/Objects/Airplanes folder.
For FE2 - Unzip the file and move the folders named "AircoDH4_250" and "AircoDH4_375" into the FirstEagles/Objects/Airplanes folder. Then in the FirstEagles/Objects/Decals folder, create new folders named "AircoDH4_250" and "AircoDH4_375". Move the folders named "D" from the Airplanes/AircoDH4 folders into the corresponding Decals/AircoDH4 folder you just made.
518 downloads
-
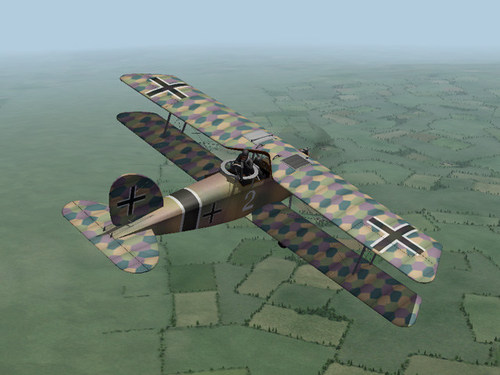
Fokker M.7/B.I
By Stephen1918 in Fokker
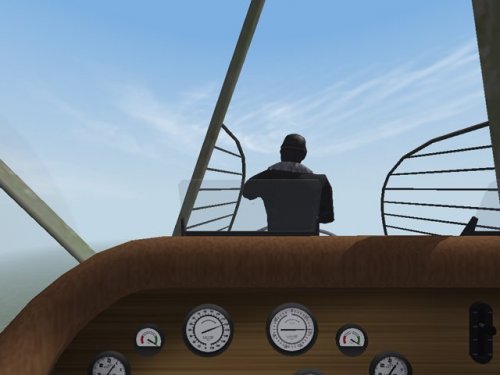
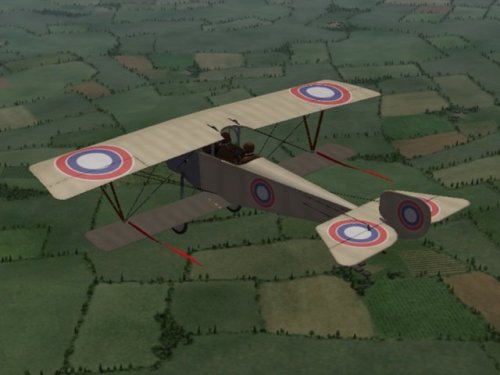
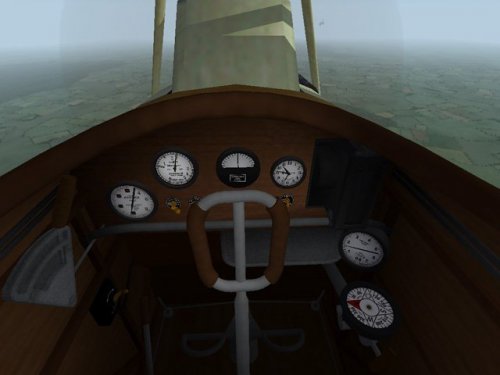
The Fokker Aircraft Company produced several biplanes during the time it was producing it's famous Eindeckers. Two of them, the M.7 and the M.10 were purchased by Austria-Hungary and were both designated the "B.I" My version is the M.7 (I believe Bwf/Bortdafarm's version is the M.10 since it has a wider lower wing.)
The M.7/B.I was a two seater plane for reconnaissance and carried no guns. The pilot was in the rear seat. Later in the war, when the B.I was used for training, some of them were fitted with dual controls.
Mine is unarmed, like most planes used in the early months of the war, but there is a loadout for a couple of handgrenades.
I have included two skins, one Austrian, the other German, with appropriate decals for each. I have included my skinning templates so others can make new skins if they want.
Historical Notes
The serial numbers are fictitious. The cockpit is based on the Eindecker cockpit, since I could find no photo's of the B.I cockpit.
Credits
My thanks to ojcar, who created the FM for the Fokker B.I.
My thanks also to Nix, who provided the sound for the Gnome 80hp engine. (This is the same sound file I uploaded with the Sikorsky. If you already have either of the Sikorsky's you won't need to install the sound.)
Installation instructions
Note: The name uses an "I", not a one. If you type it wrong, the game won't recognize the plane.
For FE1 - Unzip the file and move the folder named "FokkerM7BI" into the "Aircraft" folder in the FirstEagles/Objects folder. You may also need to move the sound file "gnome80m4.wav" into the FirstEagles/Sounds folder.
For FE2 - Unzip the file and move the folder named "FokkerM7BI" into the FirstEagles/Objects/Aircraft folder. Then in the FirstEagles/Objects/Decals folder, create a new folder named "FokkerM7BI". Move the folder named "D" from the Aircraft/FokkerM7BI folder into the Decals/FokkerM7BI folder you just made. You may also need to move the sound file "gnome80m4.wav" into the FirstEagles/Sounds folder.
438 downloads
-
Eastern Front - Skins for Stock Planes
By Stephen1918 in Other Entente Aircraft Skins
This is a few skins for the Eastern Front - I have included two balloons for the Russians, based on the two balloons that come with First Eagles. And I have made three skins each for the stock SPAD 7 and the SPAD 13.
The Caquot style balloon was pretty common in WWI so I made one for the Russians. The kite style balloon (the "Drachen" balloon in the game) was also a common balloon and the Russians purchased several of them from the Parseval-Siegsfeld Company in Germany before the war.
The plane skins are a slight rework of the stock tan skins, most of the change is in the decal placements. I have included decals for some of the Russian squadrons, and I eliminated squadron markings and flight numbers. (One of the SPAD 7 skins uses the SPAD 13 serial numbers because I couldn't find the SPAD 7 numbers in FE Gold.)
The plane skins should work with any of the modded SPADs that use the stock LODs from First Eagles.
The actual skins for each plane are the same, so to save download time, I only included one set with each plane. You will have to copy the 6 bmp files and paste them into the other two folders for each plane.
122 downloads
(1 review)0 comments
Updated
-

Russian Skins for EmID's Nieuport 24
By Stephen1918 in Nieuport Skins
Three Russian skins for the Nieuport 24. You must have EmID's plane in order for these to work.
I have included skins for an imported version, with the Russian colors painted over the French insignia, a version manufactured at the Dux factory, and a version with insignia for the 1st Combat Air Group. In all of my skins, I used EmID's original skins with some slight alterations. I have included a set of decals and a new ini file to update the way shadows are generated.
My thanks to EmID for giving his permission to make skins for his plane.
Installation Instructions
If you haven't already done so, download and install the Nieuport 24 from the CombatACE Download area. My install will replace the original ini file - you might want to make backups before you proceed.
For FE1 - Open my "N24" folder and put all the contents into your FirrstEagles/Objects/Aircraft/N24 folder.
For FE2 - Open my "N24" folder and put all the contents into your FirrstEagles/Objects/Aircraft/N24 folder. Next, in your FirstEagles/Objects/Decals folder, make a folder named "N24". Then move my "D" folder from the Aircraft/N24 folder into the Decals/N24 folder you just made.
109 downloads
(1 review)0 comments
Updated
-
Eastern Front - Skins for 3 of Laton's Planes
By Stephen1918 in Other Entente Aircraft Skins
A set of skins and some file tweaks by Sinbad and Stephen1918 for Laton's MS Type H, MS Type L and Pfalz E.III. You must have Laton's planes in order for these to work.
This download includes - skins for the Eastern front for all the planes - new loadouts, which place the bombs alongside the fuselage for the MS Type L and the Pfalz E.III - a new unarmed version of the MS Type L - new ini files for all the planes which update the way shadows are generated - and new Loading and Hanger screens for all the planes.
Installation instructions:
If you haven't already, download and install the three planes from the CombatACE Download area. (The MS Type L and the Pfalz E.III are each part of a combo pack.)
After the planes are installed, make a copy of the entire "MSTypeL" folder and rename it "MSTypeL_Recon". You will be installing new ini files for this folder later.
My install will replace some of the original files - you might want to make backups before you proceed.
For FE1 - Open each of my plane folders and copy the contents into the appropriate folders in your FirstEagles/Objects/Aircraft folder. Click "Yes" when it asks if you want to replace an existing file.
For FE2 - Open each of my plane folders and copy the contents into the appropriate folders in your FirstEagles/Objects/Aircraft folder. Click "Yes" when it asks if you want to replace an existing file.
109 downloads
(1 review)0 comments
Updated
-
The Eastern Front
By Stephen1918 in First Eagles - WWI and Early Years - Missions and Campaigns
Fighting on the Eastern Front in World War I was much different from the fighting in the west. The Eastern Front was much longer, troops were spread out more, and there were fewer roads and villages than in northern France and Belgium. The front moved back and forth more quickly and more often in Eastern Europe.
In the air, recon, artillery spotting, and ground attack missions were the most common. There weren't as many dogfights, and squadrons rarely went hunting for enemy planes.
The purpose of my campaigns is to capture a sense of the war on the Eastern Front. I am not trying to re-enact any particular battles. I'm just trying to create the correct mix of planes and missions to approximate the way the war was fought.
This download consists of three campaigns in the Austro-Hungarian province of Galicia, near the Russian Ukraine.
1915, takes place in the late spring and roughly corresponds to the German/Austrian Gorlice-Tarnow Offensive in which the Central Powers took back the land they had lost at the start of the war. (Austria on the offensive.)
1916, takes place in the summer and roughly corresponds to the Russian Brusilov Offensive in which Russian forces took back a lot of what they had lost in 1915. (Russia on the offensive.)
1917, takes place in the fall, after the Kerensky offensive and before the October Revolution and represents the closing months of the war in the east.
Notes:
Everything in these campaigns is available at the CombatAce site.
Installation instructions are in a separate file. Please read the notes for special information about some of the planes.
Credits:
Many people have made this project possible. Some of them worked directly with me, and others have made things which found their way into this campaign. In particular, I wish to thank:
ojcar for his continued support, for making all the FMs for all my planes, and for providing the inspiration for this project.
sinbad, who made some planes and several skins for the Russian planes and who beta-tested the whole thing.
quack74, for making skins, providing resource materials, and for beta testing the campaigns.
whiteknight06604, for making skins and providing resource materials for the Eastern Front.
Monty CZ and EmlD, for letting me make skins and mods for their planes.
Laton, Bortdafarm, p10ppy, christian59, and geo for their planes and ground objects.
von Deutschmark, gumpy, Saltfiskur, and gambit168 for their skins.
Peter01 for his FMs.
And thanks to everyone at Combat Ace for their support, suggestions, and inspiration.
Changes in Version 2:
I have corrected the way Squadrons are named and eliminated duplicates so all aircraft should display correctly in the menu screen.
I have replaced some planes and included new planes, skins, and ground objects.
I have adjusted all the Strategic Nodes to get ground units positioned correctly. There should be no more AA guns or troops inside buildings anymore.
I have made changes to the mission parameters for many of the planes.
I have made new start screens for the campaigns which display while the campaign is loading.
419 downloads
(1 review)0 comments
Updated
-

Pfalz A.II conversion for Laton's E.III
By Stephen1918 in Pfalz Skins
A set of skins and some file tweaks to convert Laton's Pfalz E.III into an A.II You must have Laton's plane in order for this to work.
The Pfalz A.II was identical to the E.III, except that the A.II was unarmed. I have removed the gun and Loadouts from the E.III data file, changed the way shadows are generated in the ini file, and created two new skins for the plane. There is a German skin, with a stripe around the fuselage, and an Austrian skin with red bars on the wingtips and fuselage. The original skins will still work with my conversion. I also made a new hangar screen to display the plane's new name. Everything else is the same as in Laton's original.
Installation instructions:
If you haven't already, download and install Laton's Pfalz E.III pack from the CombatACE Download area. My install is only for the E.III and will replace some of the original files - you might want to make backups before you proceed.
For FE1 - In your FirstEagles/Objects/Aircraft folder, make a copy of the PfalzEIII folder and name it "PfalzAII." Copy all the files from my "PfalzAII" folder into your "PfalzAII" folder. Click "Yes" if it asks if you want to replace an existing file. You can delete the PfalzEIII.ini, PfalzEIII_data.ini, PfalzE.III_Loadout.ini, and PfalzEIII_Hangar.bmp files. All the other files are needed for the conversion.
For FE2 - In your FirstEagles/Objects/Aircraft folder, make a copy of the PfalzEIII folder and name it "PfalzAII." Copy all the files from my "PfalzAII" folder into your "PfalzAII" folder. Click "Yes" if it asks if you want to replace an existing file. You can delete the PfalzEIII.ini, PfalzEIII_data.ini, PfalzE.IIILoadout.ini, and PfalzEIII_Hangar.bmp files. All the other files are needed for the conversion.
Next, in your FirstEagles/Objects/Decals folder, make a new folder named "PfalzAII". Move the folder named "D" from your FirstEagles/Objects/Aircraft/PfalzAII folder into the FirstEagles/Decals/Aircraft/PfalzAII folder you just made.
84 downloads
(1 review)0 comments
Updated
-

Decals for Post War Nations
By Stephen1918 in Other Entente Aircraft Skins
Fighting continued in Eastern Europe and Russia for many years after the end of World War I. These decals are the insignia of many of the nations that were formed in the closing days of the war. Most of them fought against the Bolsheviks in the Russian Civil Wars, but many of them also fought each other at one time or another.
I have included decals for - Czechoslovakia, Estonia, Finland, Greece, Hungary, Latvia, Lithuania, Poland, Russia, Ukraine, and Yugoslavia.
Many nations did not have standardized insignia at first and I have included variations for many of the nations. I have included a text document with notes on how and when they were used. To use these, you will probably need to tweak the decal ini's for existing planes. How and when insignia are reversed on opposite sides of the plane changes from nation to nation, and the horizontal tail stripes will need to be adjusted.
Terms of Use
You may use these decals for your own personal use.
You may include these decals with any skins you upload for First Eagles at Combat Ace. Please give me credit.
You may NOT include these decals with skins you upload at any other site.
86 downloads
-

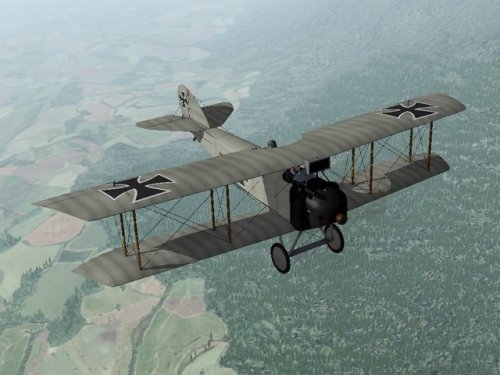
Albatros W.4 (Early)
By Stephen1918 in Albatros
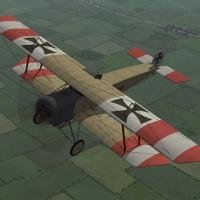
The Albatros W.4 was a float plane version of the D.II. It used the same fuselage, engine, and armament as the D.II, but had a wider wingspan and tail. The W.4 was used for recon and spotting missions in the North Sea, the Baltic, and by Austria-Hungary in the Adriatic Sea.
I have made an early version of the W.4 with the radiators mounted on the sides of the fuselage. I have included a complete set of number decals, and three skins - a basic wood and linen skin for Germany, one for Austria-Hungary, and an early hex camo skin. I have also included my skinning templates. The skins for the early Albatros W.4 are interchangeable with the late version skins.
My version includes a loadout for a light bomb load, even though the W.4 was not used for bombing. You can delete the loadout file if you want more historical accuracy.
Since it's a float plane, the W.4 works best in the Flanders, Gibraltar or other terrain that has a lot of water. The plane will actually take off and land from a conventional airfield, but it looks strange to see the floats going under the ground. It would be best to start the missions in the air. The plane will show up occasionally parked on an airfield, but its availability is listed as "Rare" so it shouldn't happen too often.
Credits
Thanks to Ojcar for making the data file for the Albatros W.4.
Thanks to Nix for providing the sound for the Mercedes engine.
And thanks to Quack74 for giving me the idea for a float plane.
Installation Instructions
For FE1 - Unzip the file and move the folder named "AlbatrosW4" into the FirstEagles/Objects/Aircraft folder. You also need to move the sound file "mercedes160m2.wav" into the FirstEagles/Sounds folder.
For FE2 - Unzip the file and move the folder named "AlbatrosW4" into the FirstEagles/Objects/Aircraft folder. Then in the FirstEagles/Objects/Decals folder, create new folder named "AlbatrosW4". Move the folder named "D" from the Aircraft/AlbatrosW4 folder into the Decals/AlbatrosW4 folder you just made. You also need to move the sound file "mercedes160m2.wav" into the FirstEagles/Sounds folder.
309 downloads
(1 review)0 comments
Updated
-
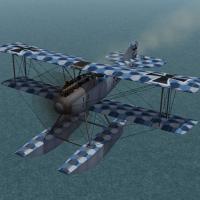
Albatros W.4 (Late)
By Stephen1918 in Albatros
The Albatros W.4 was a float plane version of the D.II. It used the same fuselage, engine, and armament as the D.II, but had a wider wingspan and tail. The W.4 was used for recon and spotting missions in the North Sea, the Baltic, and by Austria-Hungary in the Adriatic Sea.
This is a late version of the W.4 with the radiator mounted on the upper wing. I have included a complete set of number decals, and two skins - a blue hex camo skin for Germany and one for Austria-Hungary. I have also included my skinning templates. The skins for the late Albatros W.4 are interchangeable with the early version skins.
My version includes a loadout for a light bomb load, even though the W.4 was not used for bombing. You can delete the loadout file if you want more historical accuracy.
Since it's a float plane, the W.4 works best in the Flanders, Gibraltar or other terrain that has a lot of water. The plane will actually take off and land from a conventional airfield, but it looks strange to see the floats going under the ground. It would be best to start the missions in the air. The plane will show up occassionally parked on an airfield, but its availability is listed as "Rare" so it shouldn't happen too often.
Credits
Thanks to Ojcar for making the data file for the Albatros W.4.
Thanks to Nix for providing the sound for the Mercedes engine.
And thanks to Quack74 for giving me the idea for a float plane.
Installation Instructions
For FE1 - Unzip the file and move the folder named "AlbatrosW4Late" into the FirstEagles/Objects/Aircraft folder. You also need to move the sound file "mercedes160m2.wav" into the FirstEagles/Sounds folder.
For FE2 - Unzip the file and move the folder named "AlbatrosW4Late" into the FirstEagles/Objects/Aircraft folder. Then in the FirstEagles/Objects/Decals folder, create new folder named "AlbatrosW4Late". Move the folder named "D" from the Aircraft/AlbatrosW4Late folder into the Decals/AlbatrosW4Late folder you just made. You also need to move the sound file "mercedes160m2.wav" into the FirstEagles/Sounds folder.
232 downloads
(1 review)0 comments
Submitted
-

Armored Train - For Tracks
By Stephen1918 in First Eagles - WWI and Early Years - Object Mods
Armored Trains were used extensively on the Eastern Front and to a lesser extent on the Palestine and Italian Fronts. On the Western Front, after 1914 they were used mostly for defense and as mobile headquarters. I have created five cars which can arranged in different configurations.
Engines could both push and pull other cars. It was common to have an armed car or two in front of the engine.
Troop cars had quarters for an infantry unit to help defend the train. There is a turret with a light gun. It is currently set for anti-aircraft, but you can change the data file to target ground objects.
Transport cars were used to move troops, munitions, or other supplies into a battle zone or recently conquered territory.
Gun cars were used as mobile light artillery. They can be included in a train or parked on a siding to defend a train station, supply depot, or other strategic location. If you change the target type to ground, they can be used as field guns.
I have included two versions of a heavy, rail mounted artillery gun. In transport mode, the gun is lowered and the car can be included in a train. In deployed mode, there is gun data assigned so the gun will shoot at ground targets. If you place an observation balloon about 2 kilometers down range, the gun will be elevated when it shoots, as if it were shooting at a distant target. There is very little side to side motion, so you have to be pretty accurate when you place the target balloon.
All the cars are the same length for easy placement. Put them 17.25 meters apart and they will line up nicely on the tracks.
There are three complete trains with different skins so you can use them in different terrains or for different forces. I have arbitrarily assigned the grey skin to Germany, the green skin to Russia, and the tan skin to the Ottoman Empire. With a little typing, you can reassign them to whatever forces you want.
These cars are designed to be used with the train tracks from Gepard's Railway Station (available in the Strike Fighter 1 Terrain downloads). Gepard has given me permission to include the tracks with my train. I have made a new skin with the ties farther apart, which I think looks better from the air. If you already have the tracks in your terrain, you don't need this.
All of these need to be included in the targets.ini in order to use them. I have included the data for the types.ini in the folders for each train.
120 downloads
(1 review)0 comments
Updated
-

Armored Train - Ground Level
By Stephen1918 in First Eagles - WWI and Early Years - Object Mods
Armored Trains were used extensively on the Eastern Front and to a lesser extent on the Palestine and Italian Fronts. On the Western Front, after 1914 they were used mostly for defense and as mobile headquarters. I have created five cars which can arranged in different configurations.
Engines could both push and pull other cars. It was common to have an armed car or two in front of the engine.
Troop cars had quarters for an infantry unit to help defend the train. There is a turret with a light gun. It is currently set for anti-aircraft, but you can change the data file to target ground objects.
Transport cars were used to move troops, munitions, or other supplies into a battle zone or recently conquered territory.
Gun cars were used as mobile light artillery. They can be included in a train or parked on a siding to defend a train station, supply depot, or other strategic location. If you change the target type to ground, they can be used as field guns.
I have included two versions of a heavy, rail mounted artillery gun. In transport mode, the gun is lowered and the car can be included in a train. In deployed mode, there is gun data assigned so the gun will shoot at ground targets. If you place an observation balloon about 2 kilometers down range, the gun will be elevated when it shoots, as if it were shooting at a distant target. There is very little side to side motion, so you have to be pretty accurate when you place the target balloon.
All the cars are the same length for easy placement. Put them 17.25 meters apart and they will line up nicely on the tracks.
There are three complete trains with different skins so you can use them in different terrains or for different forces. I have arbitrarily assigned the grey skin to Germany, the green skin to Russia, and the tan skin to the Ottoman Empire. With a little typing, you can reassign them to whatever forces you want.
These cars are designed to be used directly on the terrain, without any track lod. You will need to use them in terrains that have the tracks painted directly on the tiles.
All of these need to be included in the targets.ini in order to use them. I have included the data for the types.ini in the folders for each train.
132 downloads
(1 review)0 comments
Updated
-
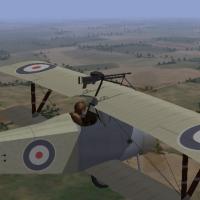
Lewis Gun Mk2
By Stephen1918 in First Eagles - General Files - Weapons Mods
I modified the Lewis Gun I made for my Nieuports to make it a stand alone file, so that modders can use it with other planes. I ran the poly count to reduce file size and I made a new skin. I have included a diagram to help modders figure out the data they need to attach the gun. I have included the data file that Whiteknight made for the Lewis in his Nieuport 17 with Wing Gun. I named it "LewisGunMk2" so that it won't replace the existing Lewis Gun that others have used in their mods.
My thanks to Whiteknight06604 for letting me use his Weapons Data.
The picture shows the gun mounted on MontyCZ's Nieuport 17.
123 downloads
(1 review)0 comments
Submitted