
- Albatros
- Fokker
- Nieuport
- Pfalz
- SE5a
- Sopwith
- Spad
- Other Central Powers Aircraft
- Other Entente Aircraft
- Flight Models
-
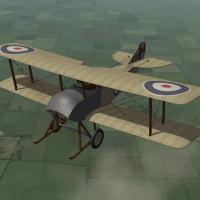
Sopwith Tabloid (Early)
By Stephen1918
The Tabloid was the land based variant of the Schneider developed in 1913. It was quickly adopted by the British military and was used both by the Royal Navy and the Royal Flying Corps. Early versions used wing warping instead of ailerons. My version has no gun, but some were armed with Lewis guns on the upper wing and could carry small bomb loads. The Tabloid was used mostly for recon and light bombing. In September 1914, Tabloids of the RNAS bombed the Zeppelin sheds at Düsseldorf.
An unlicensed copy known as the Lebed VII was built by the Russians and used for recon and later for training.
I have created two skins, a British version and a Russian. I have included a full set of number decals for each. My skinning templates are included with the download.
Credits
Thanks to Ojcar for making the data file for the Sopwith Tabloid and for providing input on the model details.
Thanks also to Nix for creating the sound file for the Gnome 100hp engine.
Installation Instructions
For FE1 - Unzip the file and move the folder named "SopwithTabloidEarly" into the FirstEagles/Objects/Aircraft folder. You also need to move the sound file "gnome100m2.wav" into the FirstEagles/Sounds folder.
For FE2 - Unzip the file and move the folder named "SopwithTabloidEarly" into the FirstEagles/Objects/Aircraft folder. Then in the FirstEagles/Objects/Decals folder, create a new folder named "SopwithTabloidEarly". Move the folder named "D" from the Aircraft/SopwithTabloidEarly folder into the Decals/SopwithTabloidEarly folder you just made. You also need to move the sound file "gnome100m2.wav" into the FirstEagles/Sounds folder.
191 downloads
(2 reviews)0 comments
Updated
-
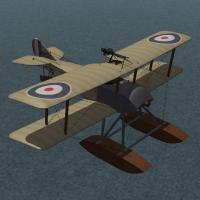
Sopwith Schneider
By Stephen1918
The Sopwith Schneider was the floatplane variant of the Tabloid, and won the Schneider racing trophy in 1914. It was quickly adopted by the British military and was used by the Royal Navy throughout the war. Early versions used wing warping instead of ailerons. Some were armed with Lewis guns on the upper wing and could carry small bomb loads. The Schneider was used mostly for recon, some were used to intercept Zeppelins over the North Sea and some were used to attack land based targets.
Since it's a float plane, the Sopwith Schneider works best in the North Sea terrain, or in Flanders, Gibraltar or other terrain that has a lot of water. The plane will actually take off and land from a conventional airfield, but it looks strange to see the floats going under the ground. Ojcar has included take off instructions in a separate text file.
I have created two skins, an early version with the British flag on the wings, and a later version with roundel markings. I have included a set of number decals. My skinning templates are included with the download.
Credits
Thanks to Ojcar for making the data file for the Sopwith Schneider and for providing instructions for taking off.
Thanks also to Nix for creating the sound file for the Gnome 100hp engine.
Installation Instructions
For FE1 - Unzip the file and move the folder named "SopwithSchneider" into the FirstEagles/Objects/Aircraft folder. You also need to move the sound file "gnome100m2.wav" into the FirstEagles/Sounds folder.
For FE2 - Unzip the file and move the folder named "SopwithSchneider" into the FirstEagles/Objects/Aircraft folder. Then in the FirstEagles/Objects/Decals folder, create new folder named "SopwithSchneider". Move the folder named "D" from the Aircraft/SopwithSchneider folder into the Decals/SopwithSchneider folder you just made. You also need to move the sound file "gnome100m2.wav" into the FirstEagles/Sounds folder.
207 downloads
(2 reviews)0 comments
Updated
-

Hanriot HD.2
By Stephen1918
The Hanriot HD.2 was a French, single seat float plane version of the Hanriot HD.1. It had a larger tail, shorter wings, and mounted 2 Vickers machine guns. It was used by the French as an interceptor, defending seaplane bases, and as an escort for reconnaissance planes.
Since it's a float plane, the Hanriot HD.2 works best in the North Sea terrain, or in Flanders, Gibraltar or other terrain that has a lot of water. The plane will actually take off and land from a conventional airfield, but it looks strange to see the floats going under the ground.
I have included two skins, a generic linen skin and a 4 color camo skin. The camo skin may be fictitious and uses the French 4 color camo pattern, but with blue and grey colors instead of greens and browns. I have included a set of decals. My skinning templates are included with the download.
Credits
Thanks to Ojcar for making the data file for the Hanriot HD.2 and for providing information for the cockpit.
Thanks to Nix for providing the sound for the engine.
Installation Instructions
For FE1 - Unzip the file and move the folder named "HanriotHD2" into the FirstEagles/Objects/Aircraft folder. You also need to move the sound file "clerget9b2m2.wav" into the FirstEagles/Sounds folder.
For FE2 - Unzip the file and move the folder named "HanriotHD2" into the FirstEagles/Objects/Aircraft folder. Then in the FirstEagles/Objects/Decals folder, create new folder named "HanriotHD2". Move the folder named "D" from the Aircraft/HanriotHD2 folder into the Decals/HanriotHD2 folder you just made. You also need to move the sound file "clerget9b2m2.wav" into the FirstEagles/Sounds folder.
269 downloads
(2 reviews)0 comments
Updated
-
Sopwith Baby
By Stephen1918
The Sopwith Baby was a British, single seat float plane used for reconnaissance and light bombing. It was built in fairly large numbers and was used by the British, French, Italian, Australian, Canadian, and American navies.
My version carries a Lewis machine gun on the upper wing and a has a loadout for a light bomb load. Some Babys had a Lewis gun mounted at an angle through the upper wing and some had a synchronized Lewis mounted on the fuselage, but the horizontal upper wing mount seems to have been the most common.
Since it's a float plane, the Sopwith Baby works best in the Flanders, Gibraltar or other terrain that has a lot of water. Ojcar has done a great job making this plane take off and land realistically on water.
The plane will actually take off and land from a conventional airfield, but it looks strange to see the floats going under the ground. It would be best to start the missions in the air.
I have included two skins, a generic olive skin for France and Britain, and an Italian linen skin. A full set of decals are included with Italian insignia and (fictitious) serial numbers. My skinning templates are included with the download.
Credits
Thanks to Ojcar for making the data file for the Sopwith Baby.
Thanks to Nix for providing the sound for the engine.
Installation Instructions
For FE1 - Unzip the file and move the folder named "SopwithBaby" into the FirstEagles/Objects/Aircraft folder. You also need to move the sound file "clerget9b2m2.wav" into the FirstEagles/Sounds folder.
For FE2 - Unzip the file and move the folder named "SopwithBaby" into the FirstEagles/Objects/Aircraft folder. Then in the FirstEagles/Objects/Decals folder, create new folder named "SopwithBaby". Move the folder named "D" from the Aircraft/SopwithBaby folder into the Decals/SopwithBaby folder you just made. You also need to move the sound file "clerget9b2m2.wav" into the FirstEagles/Sounds folder.
260 downloads
-
Rumpler 6B-1
By Stephen1918
The Rumpler 6B was a float plane version of the Rumpler C.I. It had more forward stagger to the upper wing and a larger rudder than the land version. The fuselage was also modified to make the plane a one man fighter.
I have made an early version, the 6B-1. The 6B-2 was introduced later and was slightly larger, had a different tail, and didn't perform as well as the 6B-1. The Rumpler 6B-1 was a fighter and saw service in the Baltic, the North Sea, and the Black Sea.
Since it's a float plane, the 6B-1 works best in the Flanders, Gibraltar or other terrain that has a lot of water. The plane will actually take off and land from a conventional airfield, but it looks strange to see the floats going under the ground. It would be best to start the missions in the air.
I have included two skins, a standard German "Sea Hex" camo and a mottled green and blue camo. My skinning templates are included with the download. I have also included a set of number decals.
Credits
Thanks to Ojcar for making the data file for the Rumpler 6B-1 and for providing information on the appearance of the plane.
Thanks to Nix for providing the sound for the Mercedes engine.
Installation Instructions
For FE1 - Unzip the file and move the folder named "Rumpler6B1" into the FirstEagles/Objects/Aircraft folder. You also need to move the sound file "mercedes160m2.wav" into the FirstEagles/Sounds folder.
For FE2 - Unzip the file and move the folder named "Rumpler6B1" into the FirstEagles/Objects/Aircraft folder. Then in the FirstEagles/Objects/Decals folder, create new folder named "Rumpler6B1". Move the folder named "D" from the Aircraft/Rumpler6B1 folder into the Decals/Rumpler6B1 folder you just made. You also need to move the sound file "mercedes160m2.wav" into the FirstEagles/Sounds folder.
317 downloads
(6 reviews)0 comments
Updated
-
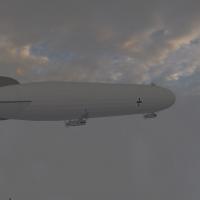
AI flyable rigid Airships
By ojcar
AI FLYABLE RIGID AIRSHIPS:
Well, a quick and dirty work to make AI flyable two of the excellent Stephen1918 airships.
-The real L32 Zeppelin was shot down in 1916 over Horns Reef by the cruisers Galetea and Phaeton while trying to raid England. Before this it made 77 recon missions over North Sea.
The model we have is intended to have a generic German rigid Airship to use in campaign mode (you should create units with one plane and only one pilot).
-The real R23 class was never used in combat, but two of the improved R23X were built in 1918, and in fact one of them, the R29 attacked the UB-115 U-boat (it also was attacked by some ships. The submarine was sunk, and this was the only recoorded success of a British rigid airship.
Both airships are hard to destroy with machine guns, but the AI fighters will try to pass through the Airship sometimes (a game engine limit). Bad idea! The fighter will be destroyed (and the pilot probably will had the VC or Legion d'honneur) and the Airship badly damaged.
To install them you should put the AirshipR23 and ZeppelinL32 folders into your Aircraft folder.
Enjoy it!
Both models and skins by Stephen1918
All FMs, Loadouts and .ini stuff by Ojcar
Special thanks to Peter01 and Hitchingbroke!
381 downloads
-

Albatros W.4 (Early)
By Stephen1918
The Albatros W.4 was a float plane version of the D.II. It used the same fuselage, engine, and armament as the D.II, but had a wider wingspan and tail. The W.4 was used for recon and spotting missions in the North Sea, the Baltic, and by Austria-Hungary in the Adriatic Sea.
I have made an early version of the W.4 with the radiators mounted on the sides of the fuselage. I have included a complete set of number decals, and three skins - a basic wood and linen skin for Germany, one for Austria-Hungary, and an early hex camo skin. I have also included my skinning templates. The skins for the early Albatros W.4 are interchangeable with the late version skins.
My version includes a loadout for a light bomb load, even though the W.4 was not used for bombing. You can delete the loadout file if you want more historical accuracy.
Since it's a float plane, the W.4 works best in the Flanders, Gibraltar or other terrain that has a lot of water. The plane will actually take off and land from a conventional airfield, but it looks strange to see the floats going under the ground. It would be best to start the missions in the air. The plane will show up occasionally parked on an airfield, but its availability is listed as "Rare" so it shouldn't happen too often.
Credits
Thanks to Ojcar for making the data file for the Albatros W.4.
Thanks to Nix for providing the sound for the Mercedes engine.
And thanks to Quack74 for giving me the idea for a float plane.
Installation Instructions
For FE1 - Unzip the file and move the folder named "AlbatrosW4" into the FirstEagles/Objects/Aircraft folder. You also need to move the sound file "mercedes160m2.wav" into the FirstEagles/Sounds folder.
For FE2 - Unzip the file and move the folder named "AlbatrosW4" into the FirstEagles/Objects/Aircraft folder. Then in the FirstEagles/Objects/Decals folder, create new folder named "AlbatrosW4". Move the folder named "D" from the Aircraft/AlbatrosW4 folder into the Decals/AlbatrosW4 folder you just made. You also need to move the sound file "mercedes160m2.wav" into the FirstEagles/Sounds folder.
309 downloads
(1 review)0 comments
Updated
-

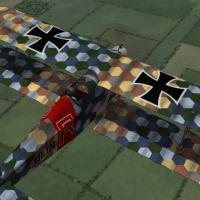
Albatros D.III Oeffag Ba.53
By Jan Tuma
Albatros D.III Oeffag Ba.53
3D model + 2 generic skins + FM (185 HP Austro-Daimler)
by Jan Tuma
294 downloads
(2 reviews)0 comments
Submitted
-

Albatros D.III Ba.53 field mod
By Jan Tuma
Albatros D.III Oeffag Ba.53 field mod
3D model + 2 generic skins + FM (185 HP Austro-Daimler)
by Jan Tuma
217 downloads
(1 review)0 comments
Submitted
-

Albatros D.III Oeffag Ba.153 early
By Jan Tuma
Albatros D.III Oeffag Ba.153 early
3D model + 2 generic skins + FM (200 HP Austro-Daimler)
by Jan Tuma
228 downloads
(1 review)0 comments
Submitted
-

Albatros D.III Oeffag Ba.153 late
By Jan Tuma
Albatros D.III Oeffag Ba.153 late
(It is possible use also like Ba.253 early)
3D model + 2 generic skins + FM (200 HP Austro-Daimler)
by Jan Tuma
210 downloads
(1 review)0 comments
Submitted
-

Albatros D.III Oeffag Ba.253
By Jan Tuma
Albatros D.III Oeffag Ba.253 late
(It is possible use also like Ba.153 late field mod + Ba.253 early field mod)
3D model + 2 generic skins + FM (225 HP Austro-Daimler)
by Jan Tuma
291 downloads
(1 review)0 comments
Submitted
-
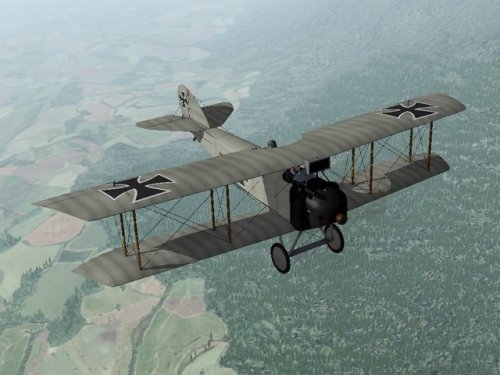
Fokker D.II
By Stephen1918
The Fokker D.II was intended to be a replacement for the Eindeckers. It carried a single machine gun and used wing warping instead of ailerons. Production of the plane was slow and by the time large number were available, it had been outclassed by the Nieuport 11s. However it was used on the Eastern Front until late 1917.
I have made three skins for the D.II - a green paint, a two color camo, and a three color camo. I have also incuded a complete set of (ficitious) serial numbers for German planes. I have included my skinning templates for those who wish to make different skins.
Credits
My thanks to Ojcar for making the data file for the Fokker D.II.
Also, my thanks to Nix who provided the sound file for the Oberursel 100hp engine.
Installation Instructions
For FE1 - Unzip the file and move the folders named "FokkerD2" into the FirstEagles/Objects/Aircraft folder. You also need to move the sound file "OberurselUI.wav" into the FirstEagles/Sounds folder.
For FE2 - Unzip the file and move the folder named "FokkerD2" into the FirstEagles/Objects/Aircraft folder. Then in the FirstEagles/Objects/Decals folder, create a new folder named "FokkerD2". Move the folder named "D" from the Aircraft/FokkerD2 folder into the Decals/FokkerD2 folder you just made. You also need to move the sound file "OberurselUI.wav" into the FirstEagles/Sounds folder.
494 downloads
(6 reviews)0 comments
Updated
-
Albatros D.II - 2 pack
By Stephen1918
Note - This is a complete revision with new LODs, new skins, and new hangar and loading screens. I recommend you delete the older version and replace it with this one.
The Albatros D.II was identical to the D.I, except that the top wing was mounted lower and farther forward to improve visibility. The fuselage, engine, and guns were the same. Early models had two radiators low on either side of the fuselage, later models had the radiator mounted in the upper wing.
I have created both versions of the D.II. I put both radiators on the skins so the same skin can be used for both versions. The download includes two skins, a light camo and a dark camo, and a full set of personal markings for each plane. I have included my skinning templates for those who wish to make different skins.
Credits
My thanks to Ojcar for making the data file for the Albatros D.II.
My thanks also to Nix for making the sound file for the Mercedes 160hp engine.
Installation Instructions
The two versions can be installed separately or both together.
For FE1 - Unzip the file and move the folders named "AlbatrosD2_Early" and "AlbatrosD2_Late" into the FirstEagles/Objects/Aircraft folder. You also need to move the sound file "mercedes160m2.wav" into the FirstEagles/Sounds folder.
For FE2 - Unzip the file and move the folders named "AlbatrosD2_Early" and "AlbatrosD2_Late" into the FirstEagles/Objects/Aircraft folder. Then in the FirstEagles/Objects/Decals folder, create new folders named "AlbatrosD2_Early" and "AlbatrosD2_Late". Move the folders named "D" from the Aircraft/AlbatrosD2 folders into the corresponding Decals/AlbatrosD2 folder you just made. You also need to move the sound file "mercedes160m2.wav" into the FirstEagles/Sounds folder.
720 downloads
-

Nieuport 24 Lewis
By Panama Red
Nieport 24 Lewis v1.0 with 1 overhead Lewis and cockpit
Original N24 3D Model and clean skins by EmlD
FM by peter01
Ini file modification to N24_Lewis by Panama Red
29th Sqn. Skins and Decals by quack74
LeRhone9jb Sound by Nix
Testing by ojcar
This N24_Lewis was created so ojcar could use it in his FE2 Campaign Series.
The real RFC Nieuport 24 Lewis had a very short career on the Western Front before transfering to the Middle Eastern Front. Basicaly only one RFC squadron used it for any length of time on the Western Front, and that was the 29th Squadron from Nov 1917 to Feb 1918.
As a result, quack74 created this set of unique decals for all three flights of the RFC 29th Squadron. Included are two sets of skins, the default "dirty" set, and an alternate "clean" set for those who want a difference.
To install this package, do the following:
FE1:
Install the N24_Lewis folder to your
.../Aircrafts directory
Install LeRhone9jb.wav to Sounds directory
Install Gunsite01 into WeaponData.Dat
FE2:
Install the N24_Lewis folder to your
.../Aircrafts directory
Install N24_Lewis decals folder to your
.../Decals directory
Install LeRhone9jb.wav to Sounds directory
Install Gunsite01 folder into Weapons directory
345 downloads
(1 review)0 comments
Submitted
-

Russian Morane H
By Trotski
Just a little rework of the previously uploaded MS.H in Russian markings, I have just tweaked the skins a little, and added decals instead of the pre printed insignia, just a personal preference.
I have included the sound files, and the decals needed for this aircraft.The only thing I would like to improve is the addition of a windscreen, as per the Pfalz EI , but that is beyond my abilities.
The only little Glitch I have encountered is the decal seems to show slightly on the wing tip, cant seem to solve that problem, but it isnt that bad anyhow. I tried to place the wing decals further inboard, but for some reason the Starboard wing doesnt accept this, but I dont think it looks too shabby.
just follow all the usual malarkey for installing to FE, or indeed just use the skins if you already have the A/C installed.
As I have said, this is just a tweak of the original skin, so all thanks to everyone who went before me in designing the A/C and for giving me the idea to tweak it !!!
166 downloads
(0 reviews)0 comments
Updated
-

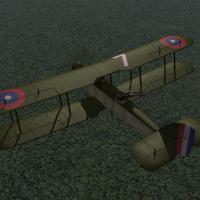
SPAD A.2
By Stephen1918
The much maligned SPAD A.2 was not nearly as dangerous as some people believe. It was actually a good idea in the days before the synchronized gun was perfected, and continued to be used on the Eastern Front throughout the war. The A.2 was SPAD's first fighter and was introduced in mid 1915.
My version is the Russian version which was built at the Dux factory in Moscow. The upper wing has a center panel above the fuselage, and the gunner is equipped with a Colt-Browning 30 caliber machine gun.
I have included four skinning options, identical except for the decals. There are skins for 3 Russian variations, and a skin for the French. I have included my templates and serial numbers for some of the skins, which will be applied randomly.
Historical Notes:
The serial numbers are fictitious.
Credits:
My thanks once again to Ojcar for making the excellent data.INI file for this plane.
My thanks to Nix for providing the engine sound for the LeRhone engine
Thanks also to Sinbad and Whiteknight06604 who provided resources for the SPAD A.2 and for the Colt-Browning machine gun.
Version 2 - Ojcar has created a new FM which improves the fighting performance of the AI. A fake machine gun has been added which causes the pilot of AI planes to be more active in pursuing enemy aircraft. Installation instructions for the new gun are in a separate file.
Installation instructions:
For FE1: Unzip the file and move the folder named "SPADA2" into the FirstEagles/Objects/Aircraft folder. You also need to move the sound file "rhone110bn4nC" into your FirstEagles/Sounds folder.
For FE2: Unzip the file and move the folder named "SPADA2" into the FirstEagles/Objects/Aircraft folder. Then in the FirstEagles/Objects/Decals folder, create a new folder named "SPADA2". Move the folder named "D" from the Aircraft/SPADA2 folder into the Decals/SPADA2 folder you just made. You also need to move the sound file "rhone110bn4nC" into your FirstEagles/Sounds folder.
To install the gun, follow the instructions in the file named "InstructionsForInstallingGuns".
408 downloads
-
Fokker M.7/B.I
By Stephen1918
The Fokker Aircraft Company produced several biplanes during the time it was producing it's famous Eindeckers. Two of them, the M.7 and the M.10 were purchased by Austria-Hungary and were both designated the "B.I" My version is the M.7 (I believe Bwf/Bortdafarm's version is the M.10 since it has a wider lower wing.)
The M.7/B.I was a two seater plane for reconnaissance and carried no guns. The pilot was in the rear seat. Later in the war, when the B.I was used for training, some of them were fitted with dual controls.
Mine is unarmed, like most planes used in the early months of the war, but there is a loadout for a couple of handgrenades.
I have included two skins, one Austrian, the other German, with appropriate decals for each. I have included my skinning templates so others can make new skins if they want.
Historical Notes
The serial numbers are fictitious. The cockpit is based on the Eindecker cockpit, since I could find no photo's of the B.I cockpit.
Credits
My thanks to ojcar, who created the FM for the Fokker B.I.
My thanks also to Nix, who provided the sound for the Gnome 80hp engine. (This is the same sound file I uploaded with the Sikorsky. If you already have either of the Sikorsky's you won't need to install the sound.)
Installation instructions
Note: The name uses an "I", not a one. If you type it wrong, the game won't recognize the plane.
For FE1 - Unzip the file and move the folder named "FokkerM7BI" into the "Aircraft" folder in the FirstEagles/Objects folder. You may also need to move the sound file "gnome80m4.wav" into the FirstEagles/Sounds folder.
For FE2 - Unzip the file and move the folder named "FokkerM7BI" into the FirstEagles/Objects/Aircraft folder. Then in the FirstEagles/Objects/Decals folder, create a new folder named "FokkerM7BI". Move the folder named "D" from the Aircraft/FokkerM7BI folder into the Decals/FokkerM7BI folder you just made. You may also need to move the sound file "gnome80m4.wav" into the FirstEagles/Sounds folder.
438 downloads
-

-

Aviatik-Berg D.I 185hp
By Stephen1918
The Aviatik-Berg D.I had many variations, with different engines, different radiator configurations, different fuselage shapes, and different gun placements. This is a very early version, with a 185hp Daimler engine and a non-synchronized Schwarzlose machine gun mounted above the wing.
The machine gun is detachable and can be mounted or unmounted in the Loadout screen.
I have included one of Quack74's basic skins and decal sets with a set of serial numbers which will be applied randomly to each plane.
This plane has an extra piece that was not included in Quack's skins, I have included skins for the new part to match each of Quack's skins, which you will need to add to each skin folder.
Historical Notes
This version of the Aviatik did not have a cutout in the upper wing and the fuselage was higher in front of the fuselage. My model is converted from a later version and has not been corrected because I wanted to make sure that all of Quack's skins would still work with this plane.
Credits
My great thanks to Ojcar for making the FM and the Schwarzlose weapon data, and for teaching me how to make weapon stations.
Thanks to Quack 74 for making the skin and decal set for all the Aviatiks, and for allowing me use one as the default skin for this plane.
And thanks to Nix for making the engine sound file.
Installation Instructions
If you are using FE1, you will need to use the Weapons Editor available from the Thirdwire Downloads area. You will also need to use a CAT file extractor utility (SFP1E Extract Utility available in the CombatACE Downloads area.)
For FE1 - Unzip the file and move the folder named "AviatikD1_185" into the FirstEagles/Objects/Aircraft folder. This file uses the same sound file as the original AviatikD1. If you did not install that plane then you will also need to move the sound file "Austro-daimler200.wav" into the FirstEagles/Sounds folder.
To install the gun - If you haven't already done so, extract the WeaponData.INI and the WeaponData.DAT files from the FirstEagles ObjectData.CAT file. Make a new folder named "Weapons" in the FirstEagles/Objects folder. Put the two extracted files into the new folder.
In my download, open the file named "Single_Schwarzlose_Angled_Data.INI," copy everything and paste it at the end of the "WeaponData.INI" you just extracted. Then change the number (WeaponData001) to the next consecutive number. Save the file.
In my downlaod, copy the files named "Schwarzlose.BMP" and "SchwarzloseAngle.LOD" and put them into the FirstEagles/Objects/Weapons folder.
Open the Weapons Editor, Open the WeaponsData.INI, make sure the new weapon (Single_Schwarzlose_Angled) is there, click "Save" and Close the editor.
For FE2 - Unzip the file and move the folder named "AviatikD1_185" into the FirstEagles/Objects/Aircraft folder. Then in the FirstEagles/Objects/Decals folder, create a new folder named "AviatikD1_185". Move the folder named "D" from the Aircraft/AviatikD1_185 folder into the Decals/AviatikD1_185 folder you just made. This file uses the same sound file as the original AviatikD1. If you did not install that plane then you will also need to move the sound file "Austro-daimler200.wav" into the FirstEagles/Sounds folder.
To install the gun - From my download, copy the folder named "Single Schwarzlose Angled" into your Objects/Weapons folder.
389 downloads
-
Aviatik-Berg D.I (Early)
By Stephen1918
Designed by Julius von Berg for the Aviatik company, the D.I was the first fighter completely built in Austria. The Berg was light and maneuverable, and after structural problems in the early models were overcome, it became a good combat plane.
Early versions of the plane had the two Schwarzlose machine guns mounted low on each side of the engine. This is the early version of the plane. This download includes a new cockpit as well as a modified fuselage. Ojcar has made a completely new FM to reflect the different flight characteristics of this plane.
I have included a basic skin and my skinning templates. I highly recommend the skins made by Quack74, available at CombatACE as a separate download. This plane has an extra piece that was not included in Quack's skins, I have included a skin to match Quack's skins which you will need to add to each skin folder.
Credits
My thanks to Ojcar for making the FM. And thanks to Nix for making the engine sound file.
Installation Instructions
For FE1 - Unzip the file and move the folder named "AviatikD1_Early" into the "Aircraft" folder in the FirstEagles/Objects folder. This file uses the same sound file as the original AviatikD1. If you did not install that plane then you will also need to move the sound file "Austro-daimler200.wav" into the FirstEagles/Sounds folder.
For FE2 - Unzip the file and move the folder named "AviatikD1_Early" into the "Aircraft" folder in the FirstEagles/Objects folder. Then in the FirstEagles/Objects/Decals folder, create a new folder named "AviatikD1_Early". Move the folder named "D" from the Aircraft/AviatikD1_Early folder into the Decals/AviatikD1_Early folder you just made. This file uses the same sound file as the original AviatikD1. If you did not install that plane then you will also need to move the sound file "Austro-daimler200.wav" into the FirstEagles/Sounds folder.
466 downloads
(3 reviews)0 comments
Updated
-
Anatra C.I
By Stephen1918
This version includes a new FM made by ojcar.
When the Ukrainian city of Odessa was occupied by Austria-Hungary early in 1918, the Anatra factory was found intact and production of the Anatra DS was continued as the "Anatra C.I". Many of the first Austrian versions had the Austrian cross painted over the Russian insignia.
The Anatra C.I was used mostly for training, but some were used for reconnaissance, as a fighter and light bomber. Many of them survived the war and were used in the fighting in Eastern Europe after the end of World War I.
In version 2 - I have created a separate version for the Austrian plane, with a Schwarzlose machine gun and German bombs in the loadout. There are two Austrian skins, one with crosses painted over the Russian roundels, and one with standard insignia. (I have also included a postwar Yugoslav skin, because I like the insignia.) I have included my skinning templates for those who want make their own skins.
In version 3 - Ojcar has made a new FM for the plane. I have refined the wings and added some details. I created a new cockpit with German gauges and machine gun. I made two Austrian skins for the plane and I kept the Yugoslav skin, because I like the insignia. I have included my skinning templates for those who want make their own skins.
Historical Notes:
The serial numbers are fictitious. I found several sources which said that Anatras carried a machine gun mounted on the fuselage for the pilot. I couldn't find any details of the mounting, so I guessed where it might be located.
Credits:
My thanks to Ojcar once again for making a new data.ini file for this plane.
Installation instructions:
This revision replaces previous versions. If you have an older version, please delete it, then install the new version.
For FE1: Unzip the file and move the folder named "AnatraC1" into the FirstEagles/Objects/Aircraft folder.
For FE2: Unzip the file and move the folder named "AnatraC1" into the FirstEagles/Objects/Aircraft folder. Then in the FirstEagles/Objects/Decals folder, create a new folder named "AnatraC1". Move the folder named "D" from the Aircraft/AnatraC1 folder into the Decals/AnatraC1 folder you just made.
309 downloads
-
DH4 USAS "Liberty"
By Stephen1918
In addition to the British built version, the DH4 was also produced by American manufacturers and was equipped with a Liberty 12 cylinder engine. Although slightly less powerful than the British version, The DH4 Liberty was popular with its crews and was produced in large numbers. After the war, it became the standard general purpose plane for the US Air Service.
This upload features the US version, with a new FM by Ojcar. The Liberty engine was slightly heavier than the British version and performance was reduced. To compensate, American DH4s carried a slighty lighter bomb load than the British built planes.
I have included a new skin using the number decals that come with First Eagles (which you can set in the loadout screen) and a set of serial numbers which will be applied randomly. There are also loadouts for light, medium, and heavy bomb loads.
The skins are rather generic, I have included my skinning templates for those who wish to make better skins.
Credits
My thanks to Ojcar for making the data file for the DH4 Liberty.
My thanks also to Sinbad for providing the motivation and a great deal of resource information for this plane.
Installation Instructions
For FE1 - Unzip the file and move the folder named "DH4_Liberty" into the FirstEagles/Objects/Airplanes folder.
For FE2 - Unzip the file and move the folder named "DH4_Liberty" into the FirstEagles/Objects/Airplanes folder. Then in the FirstEagles/Objects/Decals folder, create a new folder named "DH4_Liberty". Move the folder named "D" from the Airplanes/DH4_Liberty folder into the Decals/DH4_Liberty folder you just made.
382 downloads
-
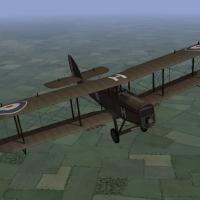
Airco DH4 - 2 pack
By Stephen1918
Although best known in its role as a bomber, the Airco DH4 was intended to be a general purpose airplane and was used for recon and ground support as well. Early versions were powered by a 250hp Eagle engine. Later versions were powered with a 375hp Eagle engine, which made them very effective bombers. The biggest problem with the DH4 was the gas tank placed between the pilot and gunner, which made communication between the two almost impossible.
I have uploaded two versions of the DH4 - Ojcar has created two FMs for the plane, one with the early 250hp engine, and one with the later 375hp engine.
Both planes have two skins, a brown and an olive color. Both use the letter decals that come with First Eagles (which you can set in the loadout screen) and a set of serial numbers which will be applied randomly. There are also loadouts for light, medium, and heavy bomb loads. The skins, decals, and loadouts are interchangeable for the two planes.
The skins are rather generic, I have included my skinning templates for those who wish to make better skins.
Credits
My thanks to Ojcar for once again making two excellent data files for the DH4.
My thanks also to Sinbad for providing a great deal of resource information for this plane.
Installation Instructions
The two versions can be installed separately or both together.
For FE1 - Unzip the file and move the folders named "AircoDH4_250" and "AircoDH4_375" into the FirstEagles/Objects/Airplanes folder.
For FE2 - Unzip the file and move the folders named "AircoDH4_250" and "AircoDH4_375" into the FirstEagles/Objects/Airplanes folder. Then in the FirstEagles/Objects/Decals folder, create new folders named "AircoDH4_250" and "AircoDH4_375". Move the folders named "D" from the Airplanes/AircoDH4 folders into the corresponding Decals/AircoDH4 folder you just made.
518 downloads
-

Airco DH9a "Ninak"
By Stephen1918
The Airco DH9a, called the "Ninak" ("nine a") was introduced in June 1918 to replace the underpowered DH9. The 400hp Liberty engine required changes to the front of the fuselage, otherwise the plane was pretty much the same as the DH9. Although it was introduced late in the war, the DH9a did see service during the war, and was used extensively afterwards.
I have included two skins, a brown and an olive color. Both use the letter decals that come with First Eagles (which you can set in the loadout screen) and I have included a set of serial numbers which will be applied randomly. There are also loadouts for light, medium, and heavy bomb loads.
The skins are rather generic, I have included my skinning templates for those who wish to make better skins.
Credits
My thanks to Ojcar for once again making an excellent data file for the DH9a.
My thanks also to Sinbad for providing a great deal of resource information for this plane.
Installation Instructions
For FE1 - Unzip the file and move the folder named "AircoDH9a" into the FirstEagles/Objects/Airplanes folder.
For FE2 - Unzip the file and move the folder named "AircoDH9a" into the FirstEagles/Objects/Airplanes folder. Then in the FirstEagles/Objects/Decals folder, create a new folder named "AircoDH9a". Move the folder named "D" from the Airplanes/AircoDH9a folder into the Decals/AircoDH9a folder you just made.
April 5, 2012 - Replaced data file with new version to fix problem with take offs and landings and making the plane fly better.
429 downloads
-
Download Statistics
14,212
Files12,494
Comments26,862
Reviews