

Caesar
-
Posts
2,177 -
Joined
-
Last visited
-
Days Won
2
Content Type
Profiles
Forums
Gallery
Downloads
Store
Everything posted by Caesar
-
SF2 Series DACT Reports And Related A2A Discussions (Game only)
Caesar replied to Flanker562's topic in General Discussion
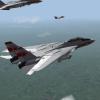
Got a pair of fights today, first is a modern set up, Tomcat vs. Typhoon, second is a look at two light fighters, Tiger II vs. Fishbed. F-14B Tomcat (96) vs. EF-2000 Typhoon I didn't take too many pictures during this fight, expecting to have to do a lot of maneuvering, but it wound up taking about 1 minute and 55 seconds. The Typhoon can be a tricky opponent, since it max performs at lower speeds than most fighters, i.e. it has both higher turn rate and smaller turn radius at closer to 350 KIAS compared to other planes which are typically max performing at around 400-450. Loadouts: F-14B: 4x AIM-9X, gun, 75% fuel, no tanks EF-2000: 8x ASRAAM, 4x AIM-120, 100% fuel, gun, no tanks Fight started with the typical one-circle, but I am surprised that the EF-2000 hasn't pulled harder into me. At my current weight, I'm just below 1:1 TW, but will achieve 1:1 within seconds of the start. I've got a solid 9g turn into the Typhoon, and notice that I not only get nose-on, but am pulling to lead the Typhoon. I relax the turn a bit, then pull hard to try to slide onto his tail. During my pull, I begin burning energy a bit too quickly, and we wind up in a one-circle, with me slightly outside of shooting parameters on the Typhoon. I go nose-low, but rather than do pure vertical, I keep the turn in the horizontal and ease off on the g, letting the Tomcat's GE engines rebuild energy. They do so quickly. The EF-2000 had gained some separation, and then pulled hard across my nose. I have tone and figure this sucker's got 9X's, they should give me an easy kill. FOX 2! The next-gen X-Ray goes stupid. The EF-2000 driver also did not adjust his turn, but kept pressing into me, releasing flares upon my firing. Fortunately, I had good energy and kept my pull into the Typhoon. As we passed, I was burning airspeed and the Typhoon reversed into me. A flat scissors ensued, but I was at just the right energy state for such a fight. I cut the throttle for the first iteration, forcing the Typhoon in front of me, and pulling into him, now modulating the GE motors between military and blower to get the performance I need. Second iteration, I'm still behind the Typhoon, and he reverses again, with me still inside of his circle, this time slightly low. He runs at this point, but is right in front of my Tomcat. This time, I don't waste a shot at angle off - got burned earlier, not gonna let that happen again. I let the Tomcat's nose reach the Typhoon's hot exhaust and get a good tone. The Typhoon has begun to reverse as I fire my second X-Ray, which guides true and is not fooled by the Typhoon's flares. Solid contact, good kill, fight's over. Takeaways: The EF-2000 wasn't the most difficult opponent, but he was also loaded up with more stores and more fuel than me, which undoubtedly affected his performance. I also didn't let the Typhoon use his instantaneous turning advantage against me during most of the fight. When I pulled into the scissors, I suddenly thought "damn, this is stupid!" but by then it was too late. I was fortunate, however, to have the responsive GE engines, and was able to keep the energy where I needed it to best the Typhoon even in that fight. Things just worked for the Turkey today. F-5E Tiger II vs. MiG-21bis These two aircraft are very evenly matched; the F-5E and T-38 were used by TOPGUN to simulate the MiG-21 since the foundation of the school, and the Tiger II is even used to this day by VFC-13. Like the A-4 Super Fox, the Tiger II can be a surprisingly difficult opponent thanks to its instantaneous turn rate and its well-known ability to "snap" its nose around at slow speeds. Loadouts: F-5E: 2x AIM-9J, guns, 100% internal fuel MiG-21bis: 2x AA-2, 4x AA-8, gun, 100% internal fuel The fight starts with a one-circle, and I get nose-on first, but the AIM-9J is a rear-aspect missile and has no chance for a shot. We pass by each other, and begin a nose-low turn. I check my airspeed for a moment and suddenly realize that the MiG-21 has reversed and begun to pull vertical just as I pass him. "Loose Sight, Loose Fight" - oh damn! Well, I pull horizontal into him and the Fishbed begins a yo-yo. I pull high myself and we have the start of a rolling scissors. Because I had made a bit of an extension while the MiG was performing his yo-yo, the scissors is spread literally over a mile of separation, but we're both pulling into each other's lift vector, trying to sustain angular momentum to achieve an advantage. At about the third iteration, I pull back a bit hard on the stick at the top and end up in a position of advantage. The MiG now pulls pure horizontal to run. I put on a sustained turn at about 6g and get onto his six. He's going straight, and begins to pull up. FOX 2! Juliet 1 comes off the rail stupid. FOX 2 again! Same as before. WTFO? Guns it is and I realize I'm going to overshoot. I reef on the stick for all I've got and the F-5 over-alphas and departs. Lucky for me, that rudder's humongous authority is usable and I recover the stricken Tiger very quickly. Post-Recovery Not only that, but the MiG doesn't have time to get to a position of advantage. He's high and going towards my 3 o'clock. I nurse the Tiger's nose back to a threatening position and the MiG is flying fairly straight, probably making up his game plan. He starts a series of maneuvers to try to get me out front, but I've got him saddled and am not going to let him make me (nearly) overshoot again. Take a snap shot with the gun and miss. Still saddled, boresight lock, bit of finessing and take another gun shot. This one saws off the MiG's vertical stab, causing the pilot to punch out. Fight's over. Takeaways: The Tiger is a maneuverable little plane, but you have to be careful with it. I did some fam hops before this fight to re-learn its envelope, and learned that it will depart damn quick in an over-alpha. It can get that nose around quick, but if you pull too hard, expect to go on a ride. Fortunately, it recovers pretty quick too, unlike the Voodoo. It is a very even match for the MiG-21, handles the horizontal slightly better, and like the Skyhawk, should not be underestimated within visual range. -
Happy Birthday, Slarti! And damn that sounds like a journey.
-
.
-
SF2 Series DACT Reports And Related A2A Discussions (Game only)
Caesar replied to Flanker562's topic in General Discussion
Did a 1v1 in the F-14B against an A-4F Super Fox Skyhawk, and a 1v1 in the Super Fox against the F-16A Block 1. The Super Fox was well known for embarrassing fighters that should have gotten the better of it, thanks to the fact that it was stripped down to reduce enough weight to give it a 1:1 thrust to weight ratio (at low internal fuel quantities), and was already a nimble little airplane, difficult to keep sight on, and with the slats unlocked, a horrendous jet to try to kill in close. Its light weight helps it to build available "g" quickly, and the plane can turn quite well. The Super Fox involved in these fights, however, was a "hard wing" version; easier to take on in a tight furball. The first fight lasted for 2 minutes and 38 seconds, the second, 2 minutes and 10 seconds. Fight #1: Loadouts: F-14B: 2x AIM-9L, 2x AIM-7M, gun, no tank, 75% internal fuel: .98:1 T/W, 55.5 lbs/sf WL A-4SF: 2x AIM-9P, no gun, no tank, 100% internal fuel: .71:1 T/W, 71 lb/sf WL Since I can't set the enemy fuel state, I had the better T/W from the start, and better wing loading. One of the things I hadn't realized before the fight is that the gun was stripped too! (I just installed the Super Fox) So, I was vigilant to keep the Scooter's nose away from my Turkey Beast head on. Fight started neutral, and I began a one-circle. Initially I was pulling 8.5g into the threat, which was still bleeding energy a bit at 15,000 feet. Because I was expecting to have to press vertical, I let off to 6.5g which helped regain a bit of energy while still producing a good turn (think the Beast sustains around 6.5-7g at 55,700 at 15k feet, 450KIAS). I start getting nose on, but I'm not going to be in a good firing position, so as we pass, I press vertical. I probably should have done so more aggressively, since putting a 4g pull onto the plane resulted in me burning a lot more altitude/distance and energy. The Fox stayed horizontal, coming slightly high to begin to follow, and I had a bit of energy to rebuild. As I came down from my perch, I had built a respectable amount, but not enough for a full aggressive press. The A-4 was still traveling horizontal, and I pulled into him. He reversed and a flat scissors ensued. Here's where the Fox got the advantage: I'm lower on energy, loaded up, and his instantaneous turn is better than mine at slow speeds. After about two iterations of scissor, the first massively to my disadvantage, the second just barely so, I explode into the vertical again. By now, I'm at better than 1:1 T/W, and the Skyhawk again cannot match me. Since I entered the vertical at lower energy than I had hoped, I dropped the flaps to wing the plane around a bit quicker. It worked, the Fox running out of energy as he attempted to follow pure vertical. He takes long enough to recover the plane that I'm able to ease my nose into a threatening position. Those huge flaps generate a lot of lift, but also a lot of drag, so I bring them from full down to "take off" configuration, full blower to try to continue my press and regain speed. It works, and the Fox doesn't have enough energy to go on. He pulls high and left, but I've got enough speed by now that I'm matching him without the Turkey giving me grief about pulling harder on the stick. The Fox levels off to reverse, putting him in the heart of the Lima envelope, just under a mile from my nose. Fox 2! Kill. Takeaways: I could always modify the Super Fox to carry less internal fuel to get it closer to what the aggressor pilots had, but I also fear that may cause the plane to immediately RTB. The plane starts with roughly 5600 lbs internal, and from what I understand, aggressors flew it at around 2000 lbs. As it stands, I fought the fight as I had to: use the vertical to my advantage. My end fuel state was 9050lbs, still more than 50%, and my total weight at fight's end was somewhere around 52850 lbs (compare to the A-4's 15480 lbs start weight). Will probably try for a 1v2 some time in the next few days. Fight #2: A-4F Super Fox vs. F-16A Blk 1 In Fight #2, since I was the Fox driver, I took off with less gas to better represent the Aggressor Fox. Compared to the F-16, the Super Fox had only slightly worse thrust to weight and wing loading thanks to those damn LERX's the F-16 has making vortex lift. Since I don't know exactly how to calculate it, I won't know his exact wing loading in a turn, but if I remember correctly, its somewhere around 45 lb/sf when the Viper is fast enough in a turn to generate it. Loadouts: A-4SF: 2x AIM-9L, 50% internal fuel, no gun, no tank: .90:1 T/W, 49 lb/sf WL F-16A: 4x AIM-9L, 100% internal fuel, gun, ECM pod: .92:1 T/W, somewhere between 85 and 45 lb/sf WL Having fought the F-16 before, I know that starting two-circle is just asking for a Heater to the face when using 9L or later (usually a 1:1 exchange, but he's got flares and I don't), so one-circle it is! This again illustrated to me the great instantaneous turning capability of the A-4. The little bugger loads an 8.3g turn into the F-16, but because it builds "g" as quickly as it does, can keep that "g" going for a while. By the time I'm down to 350 KIAS, I'm still at about 8g, and am nose-on on the F-16, the Sidewinder tone going in my ears. I could fire, but he's at a bit of angle off, and I only got 2, so I want a better firing solution. I'm initially able to hold my turn with the F-16, but with his afterburner going, the F-16 starts getting away. Rather than try to go over the top, I roll the Super Fox on its back to try to get nose-on quick. This happens about 3 times as the F-16 continues a horizontal descending turn. Each time, I'm going from around 230 up to about 330 KIAS between 4 and 7g. As we run out of altitude, I know I have to take the fight horizontal again, and pull hard into the Viper. I'm feeding in too much rudder, unfortunately, and the Skyhawk begins to depart. I fight it, nose-low at, probably 2500 feet AGL. Skyhawk recovers, but I know that Viper hasn't been wasting his time. He's coming in from high, about 7 o'clock. I pull into him hoping to make the Lawn Dart a Lawn Dart, but it doesn't work. On the other hand, the Scooter's 720-degree per second roll rate and g-build help quite a bit, and I reverse into the F-16. A two-iteration scissors ensues, and we're getting nose-on each other nearly simultaneously. Well, knowing he has a gun and four heaters, I decide to take the initiative. I pull into him at the start of the 3rd iteration as he pulls into me. Just as we get nose-on, I fire an AIM-9L at his snot locker. Closure rate was slow enough, and distance great enough for the heater to acquire and maneuver head-on into the F-16, which detonates just below, nose-on. Good kill, fights over. Takeaways: The one thing to remember about light planes, which also justifies EricJ's beliefs that a lighter fighter can usually give a heavier one a run for its money, is that they can typically build available "g" and turn rate quicker than the big boys (if not sustained). As the screen of my nose-low pull shows, I had about 6.9g on the jet at .59M to curl into the F-16 - that's pretty damn good. And I didn't even have the slats! Suffice to say, NEVER underestimate a Scooter, especially a Super Fox, 'cause he will eat you alive. -
SF2 Series DACT Reports And Related A2A Discussions (Game only)
Caesar replied to Flanker562's topic in General Discussion
Going back to 4th-gen again, this time we've got the F-14A taking on the F-8J, 14 October, 1974. One of the things I've come to notice is that the game handles its older series fighters pretty aggressively. In this instance of a 1v2 against the 2 F-8's, the F-8's survived longer than many modern opposing fighters I've gone up against in DACT, including the MiG-29A, F-15C, Mirage 2000C, F-14B, among others. Loadouts were: F-14A: 4x AIM-7, 4x AIM-9, gun, 75% fuel, no tanks F-8J: 4x AIM-9, 4x gun, 100% fuel, no tanks Fight started off as a one-circle, since I know I've got the performance edge over the F-8's across the board, but also that I'm huge and if one of 'em gets nose-on in a two-circle, he's a lot more likely to hit me than I him. At 15,000 feet at my weight, I've got a 5.5g sustained turn available. I initially go slightly nose-low to get about 8g going into the threat. As I get closer, I know I want to try to snap the nose around quick, so I don't want to loose too much energy and drop the turn to 5.5g. I get nose-on way before the F-8's and close, performing a Max-g pull to try to get a firing solution. I have pulled a bit too late, and push nose-low to build energy. As I pull up, the Crusaders have split. One of them is coming nose-on, the other is working to my six. Again, big plane vs. small plane nose to nose = bad for me. High g barrel roll over the F-8 and continue vertical press, this time to try to wing the nose around quicker than my opponent. He gets some separation (about 1.5 miles, too close for AIM-7, and head on so no heater shot). Now its a one-circle, and I go for a sustained 6g turn (full blower, about 5.5k feet) - this is higher than the F-8 can do by a bit, and I'm gaining pretty rapidly. F-8 wingman had abandoned his press and was back with F-8 lead. I maintain my turn into the F-8's. I see that the wingman is trying to hold position on his lead's tail, which makes him a bit of an easy target. I bring the turn again to around 8g, which bleeds off my airspeed, and plants me onto his six. Lead can't do anything. Perfect firing parameters, Fox 2, AIM-9 Golf to the tail. With the wing finished off, I make some minor adjustments and lead's on my nose. I get tone, but this has to end correctly. Select gun, get a good tracking solution, and guns on the F-8! Total fight time was about 3 minutes, 10 seconds. Again, the AI fights pretty hard with those Vietnam-era aircraft. I had a better thrust to weight, better wing loading, and could outperform the F-8 across the envelope, but they put forth a valiant effort, and worked pretty well to try to hit me from multiple angles at one point. -
SF2 Series DACT Reports And Related A2A Discussions (Game only)
Caesar replied to Flanker562's topic in General Discussion
One thing to remember: weight isn't everything. The F-14B has a far superior thrust to weight ratio compared to most versions of the Skyhawk (between .92 and 1.08:1 compared to about .61:1; the one exception being the Super Fox, which was about the same) and better wing loading (roughly 55lb/sf compared to 71lb/sf). This equates to better sustained turning performance, higher sustained "g", better acceleration, climb, and performance in rolling and flat scissors. I do wonder to myself how to make the F-14 and F-15 tougher opponents, because like you show in your DACT, I eat them alive when I fly the Scooter, and that's not typically what I hear or read when it involves a Scooter fighting an F-14B or F-15 in the real world. -
SF2 Series DACT Reports And Related A2A Discussions (Game only)
Caesar replied to Flanker562's topic in General Discussion
For me, it depends on the plane. I've noticed ThirdWire American fighters like to press vertical, as do the Soviet MiG-17, -19 and -21 if they're offensive. Not sure what defines it, but there are planes that do it, and others that usually don't. -
SF2 Series DACT Reports And Related A2A Discussions (Game only)
Caesar replied to Flanker562's topic in General Discussion
This time we're going to the Summer of '69. F-8J Crusader vs. F-100D Super Saber, 2 fights. Loadouts (Both Fights): F-8J: 4x AIM-9G, 4x 20mm, 100% fuel F-100D: 4x AIM-9B, 4x 20mm, 100% fuel Fight #1 The F-8J Crusader handled the F-100D a heck of a lot better than the Voodoo. The MiG Master doesn't have great thrust to weight, but I've found that it can sustain its turns better, and regain energy faster than the Super Saber. The fight started neutral, then went into a one-circle. I wanted to be sure that I didn't burn away my energy, so I put the Crusader into a 5g turn against the Super Saber. The Saber pilot was pulling harder and began getting nose on, so I pushed to a 6g turn. The Saber did get nose on, but I was too low and he didn't have a firing solution. He kept pressing horizontal, so I went vertical. As I reached the apex of my loop, I attempted to rudder-roll and force the nose to slice down into the Saber. This did not work very well; I did get nose on for a second, but was too far away, and entirely out of energy. I did have a positional advantage, however, and decided to exchange altitude for airspeed, bringing the nose down. Once at the Saber's altitude, I had built enough energy to turn with him. I had the Sidewinder tone, but the bandit was still turning too hard for me to employ it. I had been pulling a bit hard to keep up with the Saber and we both began to run out of energy. We began a downward one-circle spiral. I was trying to figure out where I needed the Crusader energy-wise, so as not to give the Saber the advantage by pulling too little and widening my loop, but also needed to ensure I didn't get too slow and make myself a sitting duck. I had built some speed, but trying to get on the Saber's tail had burnt it down again. The Crusader can't sustain "g" as well as later or more powerful fighters, so it wound up being about a 2.5g turn at 250KIAS at about 3000 feet AGL that kept me gaining on the Saber, ever so slowly. The Saber couldn't even sustain this speed, and was falling down into the 210KIAS region as I slooooowly rebuilt speed and continued gaining. Eventually, the Saber tried to press vertical as my nose was coming on his six. He didn't have the energy to start, nor the thrust to push himself through and he pulled back horizontal just as I achieved nose-on. I gave a bit of lead and took a snap shot. The Saber detonated off the Crusader's nose. Racks of 4 20mm guns on planes like the Crusader, Saber and Voodoo are pretty friggin' devistating! Fight #1 over in 3 and a half minutes. Fight #2 This one took about 2 minutes and 40 seconds. Using what I learned from the last fight, I knew I had the Super Saber in both acceleration, climb, and turn rate, especially if I beat him down on energy. I started this fight with a more aggressive two-circle, loading 8.3g, turning towards the Saber's nose. I got nose on a few seconds before the Saber, but his plane is pretty small, and I know the AI is better at getting "face shots" than I am. I perform a moderate-g barrel roll over the Saber to prevent him from shooting me. This time, I pull horizontal and the Saber goes vertical. I figure, he's gonna run out of energy. It's an exact opposite of last time - the Saber rudder-rolls his nose onto me, but more precisely. Fortunately, I'm speeding along and can put on some "g" to prevent him from shooting me. He's low enough on airspeed that he can't effectively shoot, and doesn't ever take a single shot. He blasts through my altitude, and I press vertical. Rudder roll, get nose on, this time I don't have the energy and I pull to get co-altitude. During my fall, I've regained power. We both come through our turns and barely miss nose-on. We continue the one-circle, but I've got the Power (and The Touch - get it? get it? HARRR!) to get towards his six. I get within parameters to send an AIM-9G his way, which fires and tracks, but then looses its target. Fire a second and it goes stupid. I was at some angle-off, actually. In this case, it doesn't matter. My energy state gets me on his six and I have him saddled. Get him in the center of the pipper, shoot and miss the first time. Second time the burst tears the Saber apart (doesn't blow up like the first one, though). Game over! Takeaways: The Crusader is a pretty good gunfighter compared to the Saber, and far more maneuverable than the Voodoo. It primarily lacks power and sustained turning performance, but it does beat those other Century-Series fighters even there. The package of 4x AIM-9's and 4x 20mm cannons is a pretty effective loadout for blasting bandits outta' the sky. -
SF2 Series DACT Reports And Related A2A Discussions (Game only)
Caesar replied to Flanker562's topic in General Discussion
@Daddyairplanes - yeah, I knew the Voodoo was prone to departures, but I had forgotten how much so! Really is a hand full WVR! I was also anticipating slightly worse performance out of the Super Saber, but it had a pretty good showing in spite of its lack of thrust. Will have to go some more Century Series fights. I hear good things about the -102...but if only it had a gun! @Slarti - Nice kill on the Phantom! -
You want to make one, go ahead! Your skins are higher quality than mine, Sid. Thanks for zee compliment, though!
-
SF2 Series DACT Reports And Related A2A Discussions (Game only)
Caesar replied to Flanker562's topic in General Discussion
Okay, gang, we're goin' back to the past! Specifically, July of 1964, where we find the duels of the F-101A against the F-100D (and vice-versa!) This is more of a learning experience than an instruction, so bear with me; and anyone good with the century fighters, feel free to chime in. One thing's for damn sure, after getting into a furball with these planes, it really makes you appreciate the leap forward in technology with later aircraft. True stick and rudder planes, where limits must be honored and understood. Fights #1 and 2 were me in the F-101A, while #3 and 4 were me in the F-100D. General takeaways are that the F-101A, for being equipped with 4 guns, is not a good fighter for close range, thanks to that T-tail configuration and deep stall/departure characteristics, but man, can it GO! The F-100D feels heavily underpowered, but at least is manageable at slow speeds. All fights were done on HARD FM. Fight #1 & 2: F-101A: 4x 20mm cannon, 100% internal fuel F-100D: 4x 20mm cannon, 4x AIM-9B, 100% internal fuel Fight started with a one-circle fight, with me having the disadvantage early on (the F-100D pulling inside of my circle). The key factor for this was something I remembered about the One-Oh-Wonder: 1G per 100KIAS; so at 400KIAS, don't press beyond 4G; at 600KIAS, don't press beyond 6G. At 1.2M, the plane handled 10G well (not intended, but the plane peaked a few times at those numbers). Anyhow, after we pass, I begin to roll into the vertical (or list lazily to the vertical, as the Voodoo has a pretty poor roll rate). This starts a series of loops. The loops go from about 12k to about 26k, back to about 12k feet. After about three loops, the Super Saber is out of energy...now's my chance! I'm still high above him, low on energy, so I begin to pull into the bandit at about 3.5g. Unfortunately, I can see him regaining energy, and he's pulling away. I figure I'm building smack pretty good, I should be able to press harder. Well at about 380KIAS, 5g, the Voodoo departs. The aircraft is flopping around in the wind, then enters a spin. Oh damn, we've got a problem. Loopin' Departure The Super Saber sees this and calmly comes around horizontally as I spin through his altitude, continuing to descend. He rolls in to finish me off while I'm still trying to recover the damn Wonder. Unfortunately for him, the flat spin makes him have to dive and somewhat corkscrew as my plane is a bit unpredictable. He fires a burst which catches the tail end of the Voodoo. Plugging in the blower, he's trying to maintain his solution diving. He fires again, missing, and again, missing, and I suddenly realize something: we're gonna collide! The flailing Voodoo is still non-responsive and the Saber driver is so focused on killing me that he has taken a course that will put his plane through mine. His attack lops off both his starboard wing and my vertical stabilizer, as well as my port wing. Then, something happens that I never expect...he plows into the ground and Red Crown clears me with a "Mission Complete." Wow; won with half of an airplane, still spiraling out of control. Fight #2 started similarly, but after my initial vertical loop press, I realized the Super Saber wasn't running outta' energy fast enough. I changed tactics to start an energy circle. Not good, with the limits of the Voodoo, I can't press much beyond 8g effectively at high speeds. At speeds below .92M, I'm limited to between 4 and 6g. I start looping again, and this finally does bring his energy down. Again, I try for a press, this time being sure not to let the "g" or alpha build too much. This meant I couldn't get a solution, and the -100 got away. The fight went on like this for no-kidding 10 minutes and included at least one more departure, but which I recovered from, until, thanks to the Voodoo's huge internal fuel supply, I ran the -100 outta gas. He began to run, no blower, away from me. Now I can get him. Get on his tail, but have too much closure. And he's still survival-oriented, because as I get into gun parameters, he pulls hard into me. I overshoot, and begin a high yo-yo to get back on the Saber's tail. It works, and I set up again. Same deal, but I've cut throttles and worked into a good firing solution. The Saber again breaks into me hard, and I basically say "screw it!" - I got lead and pull back on the trigger to those four big 20mm's. The Super Saber's turn put it right in the path of the bullets and his plane is torn apart in front of the Voodoo. Good Kill Okay, time to try the Super Saber. One-circle and me and the Voodoo are jockying for position as we pass twice in an extended horizontal scissors. The Saber's superior turn performance start to show through at about the third iteration, which I also gave some vertical to. I end up on the Voodoo's tail and get tone from the AIM-9B. FOX 2! The first one guides, but runs outta smack before it hits the One-Oh-Wonder. I try to close, but the Saber does NOT have the thrust of the Voodoo. The -101 is trying to run, so I send another -9B his way, which strikes him and takes off his rudder. Good! A stick and rudder plane without a rudder ought to be easy to kill! Would that that were the case. The Voodoo driver is smart - full blower and run like a bitch. I will admit, I've used that one before, but in a 1v1? Boooo! He's predictable, but I can't climb with him. Fire the remaining -9B's, both come off the rails stupid, and I can't catch the Voodoo. End result: Voodoo damaged, Saber fine, but not definite end. Hit, No Kill, Knock It Off Fight #2 I damn well was making sure that Voodoo was going down! Start the fight as a two-circle engagement and...what? The Voodoo's got nose-on first? Well, whatever, roll low and ruin his gun shot. Horizontal scissors ensues and I again end up on his tail. FOX 2 twice! Nothing. Great. Well, fortunately, the Voodoo driver has been wasting his energy maneuvering to shake the heaters, and I've now actually closed on him with the Saber (not an easy feat). Get him inside of gun range, boresight, lead and shoot. The Voodoo detonates off of my nose. Fox 2, Twice! Nuthin'! Gettin' a gun solution Good Kill on the Voodoo! Takeaways: I love the Voodoo, but it is far from a turning fighter, or even a vertical fighter. I can see the plane making slashing attacks, or sneaking up on someone (if they manage to miss the huge jet) and gunning them in the ass. On the other hand, the Super Saber's lack of thrust was heavily impairing. I'm starting to think I ought to take it up against a MiG Master (F-8) since the major reason I was able to beat the Voodoo so easily in it was because of its superior turning performance. All of these jets were flying before all-aspect missiles, which means that getting onto an opponent's tail for a gun solution or IR-missile shot was imperative. It seems to me that the Super Saber was the better jet to do so (at least in the world of SF2). -
SF2 Series DACT Reports And Related A2A Discussions (Game only)
Caesar replied to Flanker562's topic in General Discussion
Hrmmm...good point. Well, I did have a hankerin' for a Century-Series brawl (it will probably end in disaster for me) - will see what happens tonight! -
View File VF-74 Be-Devilers F-14A+ This skin is designed for The Mirage Factory F-14B Tomcat. The contained paint scheme is representative of the Be-Devilers shortly after they received the F-14A+ Tomcat, roughly around the 1988 timeframe. Looking at pictures of the Be-Devilers Turkeys from 1988-1991, I found the birds to be consistently painted in a lighter grey, which I found was similar to Dave's VF-41 MiG killers, so giving credit where it's due: I used his skin as the starting point. VF-74's Tomcats, during this timeframe, were very lo-viz; A/C #101 would eventually wear a red lightning bolt later on (and the Olympic rings during ODS). I also made the F110 "turkey feathers" a bit shinier, as the majority of the pictures I've seen of VF-74's F-14A+'s between 1988 and 1990 have pretty darn shiny feathers. VF-74 Be-Devilers were one of the later squadrons to receive the Tomcat, beginning transition from the F-4S in 1983. Aboard the USS Saratoga, VF-74 gained notoriety when their aircraft were assigned to force down a hijacked Egypt Air Boeing 737 in 1985 (this incident inspiring a similar scene in the movie Executive Decision). In 1988, VF-74 and VF-103 received the F-14A-Plus Tomcat, and flew these aircraft during Operation Desert Storm. Following the Navy's decision to draw down their Tomcat fleet (going from two squadrons to one per carrier) VF-74 wound up shore-side, directly under the command of COMFITWINGLANT, while their sister squadron (VF-103 Sluggers), whose Tomcats were equipped with TARPS, continued to go on cruise. The Be-Devilers became an aggressor squadron starting in 1993, flying against both Navy and Air Force blue forces during exercises and training. The following year, the Be-Devilers made one last cruise before being disestablished on 30 April, 1994. I was able to find 10 of the aircraft which served with VF-74 in the late 1980s-ODS. (Thanks also to EricJ for assistance here). Aircraft found herein: 162925 AA100 162919 AA101 161434 AA102 162923 AA103 162924 AA104 163221 AA105 161435 AA106 161432 AA107 161870 AA110 163408 AA111 Install Instructions: Open your Strike Fighters 2 Mod Folder Drag the "Objects" file from VF-74 archive into the base mod folder (e.g. StrikeFighters2 Europe). I have the folder set up so it should go to the right place. If you don't trust that, navigate through Objects->Aircraft->F-14B and drag the VF74 folder into the aircraft folder. Then, go back, get to decals, and drop the VF74 decal file into your F-14B Decal folder. Texture Set is: [TextureSetxxx] Directory=VF74 Name=VF-74 Be-Devilers Nation=USN Squadron=VF-74 Specular=0.200000 Glossiness=0.350000 Reflection=0.000000 Good Hunting...Always, Baby! Submitter Caesar Submitted 06/26/2011 Category F-14
-

241 downloads
This skin is designed for The Mirage Factory F-14B Tomcat. The contained paint scheme is representative of the Be-Devilers shortly after they received the F-14A+ Tomcat, roughly around the 1988 timeframe. Looking at pictures of the Be-Devilers Turkeys from 1988-1991, I found the birds to be consistently painted in a lighter grey, which I found was similar to Dave's VF-41 MiG killers, so giving credit where it's due: I used his skin as the starting point. VF-74's Tomcats, during this timeframe, were very lo-viz; A/C #101 would eventually wear a red lightning bolt later on (and the Olympic rings during ODS). I also made the F110 "turkey feathers" a bit shinier, as the majority of the pictures I've seen of VF-74's F-14A+'s between 1988 and 1990 have pretty darn shiny feathers. VF-74 Be-Devilers were one of the later squadrons to receive the Tomcat, beginning transition from the F-4S in 1983. Aboard the USS Saratoga, VF-74 gained notoriety when their aircraft were assigned to force down a hijacked Egypt Air Boeing 737 in 1985 (this incident inspiring a similar scene in the movie Executive Decision). In 1988, VF-74 and VF-103 received the F-14A-Plus Tomcat, and flew these aircraft during Operation Desert Storm. Following the Navy's decision to draw down their Tomcat fleet (going from two squadrons to one per carrier) VF-74 wound up shore-side, directly under the command of COMFITWINGLANT, while their sister squadron (VF-103 Sluggers), whose Tomcats were equipped with TARPS, continued to go on cruise. The Be-Devilers became an aggressor squadron starting in 1993, flying against both Navy and Air Force blue forces during exercises and training. The following year, the Be-Devilers made one last cruise before being disestablished on 30 April, 1994. I was able to find 10 of the aircraft which served with VF-74 in the late 1980s-ODS. (Thanks also to EricJ for assistance here). Aircraft found herein: 162925 AA100 162919 AA101 161434 AA102 162923 AA103 162924 AA104 163221 AA105 161435 AA106 161432 AA107 161870 AA110 163408 AA111 Install Instructions: Open your Strike Fighters 2 Mod Folder Drag the "Objects" file from VF-74 archive into the base mod folder (e.g. StrikeFighters2 Europe). I have the folder set up so it should go to the right place. If you don't trust that, navigate through Objects->Aircraft->F-14B and drag the VF74 folder into the aircraft folder. Then, go back, get to decals, and drop the VF74 decal file into your F-14B Decal folder. Texture Set is: [TextureSetxxx] Directory=VF74 Name=VF-74 Be-Devilers Nation=USN Squadron=VF-74 Specular=0.200000 Glossiness=0.350000 Reflection=0.000000 Good Hunting...Always, Baby! -
SF2 Series DACT Reports And Related A2A Discussions (Game only)
Caesar replied to Flanker562's topic in General Discussion
Thank you good sir, will check it out. -
SF2 Series DACT Reports And Related A2A Discussions (Game only)
Caesar replied to Flanker562's topic in General Discussion
Thanks! It's still a WIP - finding the aircraft BuNo's right now and making some adjustments. Will upload sometime within...say...2 weeks? HARR! -
SF2 Series DACT Reports And Related A2A Discussions (Game only)
Caesar replied to Flanker562's topic in General Discussion
Okay, we're in 1v4 territory this time. A brand spankin' new F-14B from VF-74 Bedevilers is going to go at it with four MiG-23MLA Floggers over Israel. Loadouts: F-14B Tomcat: 4x AIM-9L, 4x AIM-7M, gun, 75% fuel, no tanks MiG-23 MLA's: 4x AA-8, 2x AA-7, gun, 100% fuel, no tanks Honestly, this one isn't very exciting for the simple fact that all the weapons worked perfectly (good news for me!) Looking over my shoulder, I see the formation to my 7 o'clock and immediately begin turning hard into them (7g or so). Three of the Floggers pull away, while the fourth begins to wind around to my tails. As I continue through the turn, I select AIM-9 and get visual on one of the bandits. FOX 2! Wait a minute, that sucker's going for a different one...FOX 2 again! I boresight the third flogger and let a Sparrow loose on him - immediately goes stupid, so I send a second. At this point, I began cycling visual on the opposing fighters to try to find which one has headed for my six, and am pleasantly surprised as I cycle through, to find that two of the four have been hit and killed, the third hit and wounded. I send a heater his way to finish the job. At this point, I start getting RHAW gear warnings - seems like MiG leader, who broke into me at the beginning, has just gotten himself into a firing position. I angle my Turkey Beast to put him on my 9 o'clock, only to find him closing to within visual range. If he can get an AA-8 off, I might be in a bit of trouble (all aspect). As I'm pulling into him, now to close inside of minimum range, he lets loose an AA-7, which does not track. We pass, and I roll the F-14 to pull into a one-circle fight. I've got one heater, two sparrow and 676 rounds of 20mm left, so I'm feeling pretty good. Continue the turn and get on MiG leader's tail pretty quick. FOX 2; he deploys flares, but the missile isn't fooled. Shot down, game over. Crews looking at the carnage Takeaways: MiG leader's wingmen really could have pressed harder this match. As it stands, the Flogger's overall poor turn rate kept lead from capitalizing on his potential advantage while I was shooting down his wingmen. Also, like I said, all of my missiles worked right except for one, which just about nullified the number advantage within the first 30 to 45 seconds of the fight. It'd have been a LOT harder if I had been missing and wound up in a 1v3 with no heaters left. Not too shabby, baby! -
Really sucks (loved his antics on the Jackass show/movies), but mixing alcohol and automobiles usually has disastrous results. RIP!
-
SF2 Series DACT Reports And Related A2A Discussions (Game only)
Caesar replied to Flanker562's topic in General Discussion
True! I'll have to try to screw with the ranges and try again. It's a bit strange to me that some aircraft press pretty hard in a 1v2(F-16, F-29, Su-27) but others don't (at least for me, F-14, F-15, Mirage 2000C and some others). From what I gather, the Mirage 2000 handles similarly to the F-16 IRL, but with worse sustained turn performance (bleeds speed like a delta, since it is a delta). Will do some changes to range later and see how that affects the fight. EDIT: My typical start is neutral (i.e. we're both facing away from each other) about 2 miles apart. You use something similar? -
SF2 Series DACT Reports And Related A2A Discussions (Game only)
Caesar replied to Flanker562's topic in General Discussion
Okay, we're doing a classic one this time (no video). After reading EricJ's F/A-18F vs. Mirage 2000C, I figured I'd give the Big Cat a shot at it. I've fought against the 2000 1v1 with success, so what's another one? In this case, I fought a 1v2 twice in an F-14A Tomcat (using SidDogg's awesome VF-51 skin). Both fights were complete inside of 2 mins. Fight 1: F-14A: 4x AIM-9M, 4x AIM-7F, 75% fuel, gun, no tanks Mirage 2000C-S1: 2x Matra 550, 2x Super 530, 100% fuel, gun, no tanks Fight started with an initial one-circle pull into the threat. Sustained turn of about 7g, Mirage lead begins pulling into me, wing man keeps going straight. I get on wingie's tail and fire a pair of Mikes at him, both hitting and killing. I now go searching for lead. Start getting intermittent RHAW gear warnings, but no lock. Spot him to my ten o'clock, and pull hard into him. He's not going for a sustained turn, for some reason and is doing a moderate pull/release/pull/release to ease his nose onto me. The Ironworks bird smoothly gets nose-on before the Mirage, Fox 2! AWG-9 gets boresight right after I fire Mike 3. Because the Mirage initially is coming nose-on, I pull away and deploy flares, then notice he starts pulling away from his attack to evade the heater. I begin to roll back into him to shoot again if necessary, but it is not. The heater hits him in the face. Initial Pull Fox 2! Good Kill Fox 2, roll away Pull back, good kill Fight 2: F-14A: 4x AIM-9L, 4x AIM-7F, 75% fuel, gun, no tanks Mirage 2000C-S1: 2x Matra 550, 2x Super 530, 100% fuel, gun, no tanks Exact same as above, no joke. It simply takes 20 seconds less for me to acquire and shoot Mirage lead. Tone, Fox 2 at Wingman Splash 1 Splash 2 Good Kills, RTB Takeaways: Maybe I need to take on the S5, because the S1 didn't seem to be fighting as much as lazing on a Sunday afternoon. "Oh, there's a Tomcat in the air? Really? He's trying to kill us? We can't have that, can....oh dear, #2 just bought it. Well, that, good sir, shall not stand as gentlemanlyCONFOUND IT! Bastard has now shot at me! Certainly my flares can save...*STATIC*" Antics aside, it seems to me anyhow that the AI doesn't handle the Mirage 2000C very well. -
SF2 Series DACT Reports And Related A2A Discussions (Game only)
Caesar replied to Flanker562's topic in General Discussion
F-14B vs. Flankers #2 -
Well, DanW, for your situational awareness, I happen to enjoy the new patch and continue to support TK's decisions, so you can tell him that. Gets me higher frame rates consistently and that's what I need in the air to air fight! (Or bombing from 30K feet). Suffice to say, I do hope our terrain gurus do find a workaround, but I'm pretty satisfied with the patch.
-
Best of luck to those who are being affected by this! We did some tornado relief for Tuscaloosa while I was down at Maxwell - never before had I seen such destruction. Words couldn't describe it. Having lived in the northern part of the US for nearly all my life, we don't see weather like this; huge blizzards, sure, and the random tornado that takes out a line of trees, whoop-i-dee-doo. Down south, damn. Stay safe down there!
-
SF2 Series DACT Reports And Related A2A Discussions (Game only)
Caesar replied to Flanker562's topic in General Discussion
Sierra Hotel stuff, Eric. I've gotta go up against the Flanker a few more times, since (as the video illustrates) the energy circle doesn't work well in the Turkey vs. Flanker, yet is my preferred method of fighting - at best keeping the fight even (bad, when I could have done something to give myself the advantage!) I also botched the hell out of my unload-roll, which should have put me in a position of advantage. Your bringing the fight into the vertical at the right time worked well for you and was the smart thing to do - something I should have done against the Su-27; would have been better than dragging him into the dirt and waiting for the right moment to pounce! -
SF2 Series DACT Reports And Related A2A Discussions (Game only)
Caesar replied to Flanker562's topic in General Discussion
F-14B vs. Su-27 1v1 DACT Video - re-post; last one had music owned by WMG - killed the vid right quick! Pretty darn big, actually. After I post the vid, I usually delete the original file. The 7 minute fight vs. the Flanker was recorded at half size, 50 fps, and took about 4 GB. The final video, which I use Vegas for, is a hell of a lot smaller (bout 63 MB) in .wma format, 93% video quality, and still looks great.