


swambast
-
Posts
661 -
Joined
-
Last visited
-
Days Won
13
Content Type
Profiles
Forums
Gallery
Downloads
Store
Everything posted by swambast
-
Weapon Effect / Behavior - Create a "Consistent" Impact Effect?
swambast replied to swambast's topic in General Discussion
EMCON360...THANK YOU for your reply and providing this insight, this is really helpful. The info you provided below certainly helps clarify some things and gives me enough I think to begin experimenting more - really appreciate it! If anyone else has additional thoughts to share, including having already achieved a similar result and would be willing to share, please feel free to PM me or post here would be great! -
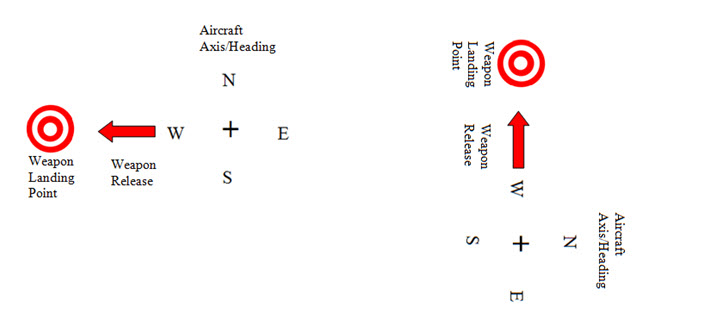
Hi all, perhaps more appropriate question for hard core weapons modders with experience...? But anyway, what .ini entries or reference points do we have in order to make a weapon's behavior be absolutely non-random and "FIXED" when released. For example, there would be no tossing and tumbling such as with a bomb effect. The desired outcome is that once the weapon is loaded into the aircraft and released of course on the ground, it does not deviate at all (ideally). It always "lands" in the same general direction and distance. I've tried to illustrate an example below of the effect I'm after. Any insight or suggested starting points would be greatly appreciated...!
-
Great job as always Dels, really looking nice and good variety including the Electronic Combat Group...keep rocking!
-
Hi everyone… I’m struggling with an issue that I just can’t seem to resolve. When I try to add another area to my _Targets.ini file, it never shows up. I’ve done the typical trouble shooting such as double-checking numeric sequencing. But, the odd thing is that when I run a test mission and place an object exactly at the center of the new target area I’ve added (US Army Infantry Camp), it never shows up! Looking in debug mode brings even more strange results. For example, under “Nearest Target Area” instead of seeing my new target area, there is always another area that is overriding it (Pleiku in this case). I then test it using Mue’s tool, and there it is properly listed at the end of the _Targets.ini and displays everything exactly as I placed it (and as it should be)! Could this be something to do with radius issues? Any ideas on why this is happening? What can be done to resolve it? Appreciate any tips, this one is driving me nuts! [TargetArea059] Name=Pleiku Position=632000.00,366000.00 Radius=5657 ActiveYear=0 Location=1 Alignment=FRIENDLY [TargetArea202] Name=US Army Infantry Camp Position=641050.00,347050.00 Alignment=FRIENDLY Location=1 ActiveYear=0 Radius=5657
-
Adding mesh to existing Cockpit Node?
swambast replied to swambast's topic in Mods & Skinning Discussion
Thanks Dels for the reply, appreciate it. I wonder if anyone has ever been able to come up with an innovative way to add components to the cockpit, as it looks like it's still not possible without the source .max file of course. But I'm thinking we probably would have heard something about it after all these years...so I guess not! -
I know it's possible to remove cockpit mesh components using _.ini edits, but is it possible to add new mesh .lods to a cockpit? For example, use a different pilot model .lod and "import" him into the cockpit mesh? Or would you need to edit the source 3ds max file?
-
Target Object Animation transfer to GroundObject
swambast replied to swambast's topic in Mods & Skinning Discussion
Hi Wrench, thanks for hanging in there with me on this. I think the example you illustrated with the truck while interesting, wouldn't apply in my case. I'm familiar with self-illumination effects and modeling actually. The difference Wrench, is that those headlights are static - there are no animation effects at all. It's simply a mesh cone mapped with a transparent texture that is permanently attached to the model, but does NOT have any animation key frames/effects applied (at least none that I'm aware of). I'm kind of surprised other modelers haven't chimed in - surely someone with much more experience than me on this would be able to provide a simple answer as there is no way I can be the only person that ran into this, so we'll see what other feedback might be shared. -
Target Object Animation transfer to GroundObject
swambast replied to swambast's topic in Mods & Skinning Discussion
Wrench, thanks again for your reply, appreciated. Well honestly I picked a bad example, and should have been more clear. Here really is where I'm hitting a brickwall: I need it as a groundobject because it has to move (using the _data.ini) and I want to include in a mission. So it's a firetruck as a more appropriate example. That truck needs to move around and go places. But if I use it as a groundobject, - from my understanding - the animation within the model will not work. And you can see now the brickwall. I can't seem to do both. If I use as groundobject then I lose the animation effect. If I place as terrain object I can't get it to move. If I try to do both, I have a moving firetruck that was in such a hurry, it ripped off it's emergency light and left it hovering in space... -
Target Object Animation transfer to GroundObject
swambast replied to swambast's topic in Mods & Skinning Discussion
Hi Wrench, correct - that works for a targetobject placed in the terrain. For example: ...\Terrains\[TerrainName]\Lighthouse But how can the same object, with the same animation effects, work as a GroundObject here: ......\Objects\GroundObject\Lighthouse -
Hey there Modders, Let's say I have a target object defined in the _Types.ini with an animation slot such as ID1. For example, a simple rotating light that goes around in a circle from a lighthouse. Can you, or how can you, transfer that animation effect to turn it into a GroundObject target that still preserves that animation effect?
-
Attempting bringing the A-37B into SF2 Vietnam
swambast replied to Jug's topic in Mods & Skinning Discussion
Hey guys, is this out yet...? -
Attempting bringing the A-37B into SF2 Vietnam
swambast replied to Jug's topic in Mods & Skinning Discussion
How's this coming along, looks awesome! -
Keep rocking on it Dels!!!
-
I think the reason for the lack of stacking is because it would require a different approach to actually creating the base 3d model. But in fact, IF my testing trials prove out, it would actually result in a more optimized model that should either prevent or limit far distance flicker. I'm only testing on one model right now, generically similar to the example I've shown...and it seems quite encouraging even with aggressive horizon distance settings But more to come.
-
Wow, only one reply...thanks Mue. Couldn't handle the limitations of not stacking so thought of some creative ways that I think show great potential but more testing is needed on my end...
-
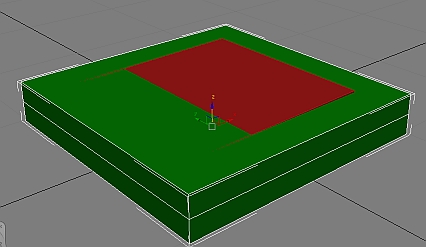
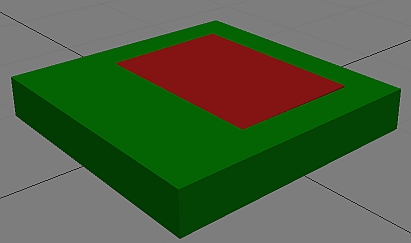
Hi 3D Modelers, I need some help understanding the game engine rendering on 3d objects. Especially those that are “stacked” in height. Assume I have the following basic model. When I stack these models like so, and put into the SF2 Vietnam game I have a very undesired effect. What happens is when you look at the model from a far distance… The red box/model begins to shimmer horribly. It looks like the red box is actually moving down the Z-axis into the green box…sort of giving a result like in the picture below. Question: what can be done to prevent this from happening? Would adding another height segment help (like in pic below)? Would adjusting the Z-buffer offset in the .ini help (didn’t appear to do so)? Would adjusting the pivot points on either model help (experimented with this but not much difference noted)? Other ideas? What else has worked (other than of course directly extruding from the base mesh)? Would like to solve this using the proper 3d technique as opposed to other work arounds.

-
Attempting bringing the A-37B into SF2 Vietnam
swambast replied to Jug's topic in Mods & Skinning Discussion
Damn gents, this is looking awesome - way to pick it up and move it forward, can't wait. -
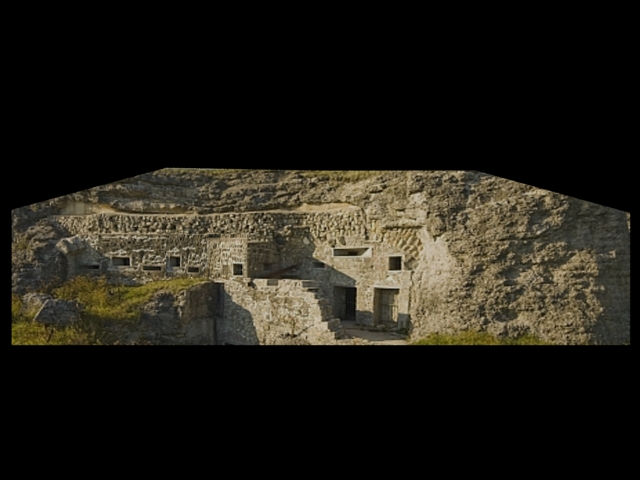
Hi there. i was practicing my low-poly 3d modeling skills and for some strange reason decided to try my hand at a WW1 fort. It still needs some tweaks, but taps out as a single texture map and only 40 polygons, extremely FPS friendly. Then I got to thinking, maybe someone could actually use this practice model...

-
Need a couple of simple tree 3d models.
swambast replied to Stratos's topic in Mods & Skinning Discussion
Totally Agree... -
Need a couple of simple tree 3d models.
swambast replied to Stratos's topic in Mods & Skinning Discussion
Performance hog...watch your FPS crap out using this approach. -
Hi Mue, the rest of the notes can wait but as previously shared way back… The "copy/paste" functionality of an existing object will absolutely be one of the most significant and best features to implement first. I learned that when working on the old STT and wish I would have done this much earlier; absolutely encourage and would be grateful for it in your superior tool. I don’t mean just being able to duplicate the last object though. It should be easy enough to simply copy ANY existing object already placed. Then as we spoke about already, it gets pasted slightly offset from the original copied object (.5 – 1m away or whatever) and takes the focus so you know it’s the newly copied object and can work with it immediately. I can’t recall off the top of my head, but if the TAE references the listbox of the currently selected object, then it should be very easy to simply use this current object info as the basis for the copy. Read in that “currently selected object” line and offset the currently selected object x-axis by -1 or whatever, “append as new” this new object info to the bottom of the list and issue the draw call. I'm sure you already have insight into this, but I'd say let's get this one in next please!!!
-
Damn, I really need to get my notes over to you Mue. Almost everything mentioned on this list i've already got covered (bugs/errors) along with proposed improvements. In this case the CTD is often the result of the program not properly handling comments and/or improper sequencing (usually the latter). I'll work on my list this weekend Mue, I really apologize but hopefully it will be worth the wait. And thanks again for one of the greatest modder tools ever created in my opinion!
-
Eole, this works - THANK YOU VERY MUCH!!!!!
-
Request for Le Missioneur Update with SP4 Support
swambast replied to swambast's topic in General Discussion
Eole, this works - THANK YOU VERY MUCH!!!!! -
Request for Le Missioneur Update with SP4 Support
swambast replied to swambast's topic in General Discussion
Hi Eole, thank you for your offer to help. Unfortunately that is the old version, and cannot be updated anymore. Someone would actually have to zip up the entire contents of the program that already has been updated.