swambast
-
Posts
661 -
Joined
-
Last visited
-
Days Won
13
Content Type
Profiles
Forums
Gallery
Downloads
Store
Everything posted by swambast
-
Hey Ant, I find some of this info confusing and there are obviously varying opinions. I started writing a long explanation but decided to stay on the "bump map" topic and add another opinion to the mix: For a majority of bump maps, in my opinion I would recommend .bmp esp. if you are trying to preserve "pixel accuracy" of the original texture. Any other lossy format can result in smear/blur artifacts as pixels get sampled during compression and by far the greatest impact would be to areas that have contrasting brightness/luminescence - say like brighter rivets contrasted against a "shadow". So there you have another viewpoint.
-
Distance Lod´s for Weapons not Working
swambast replied to ravenclaw_007's topic in Mods & Skinning Discussion
Volker, I thought material mappings have to remain consistent between each .LOD. I'm guessing perhaps this is not the case with what you have now. I might suggest double-checking the hierarchy of course, but also ensure that you are applying the exact same 3ds max material settings to BOTH .LODS. I think this should solve your issue, good luck. For example on your LOD1: ( 5) 03 - Default: Specular=0.25, Glossiness=0.12, Color:<229,229,229> ALQ-184_3Band_02.jpg And on your Lod2: ( 5) 07 - Default: Specular=0.80, Glossiness=0.40, Color:<229,229,229> ALQ-184_3Band.jpg -
Cold East Ground Objects Bonanza.
swambast replied to yakarov79's topic in Mods & Skinning Discussion
Nice. Check scale of jeep guys, looks off to me (guys too big) but might just be screenshot. -
Cold East Ground Objects Bonanza.
swambast replied to yakarov79's topic in Mods & Skinning Discussion
Got it - if you're looking for something in particular that you could leverage just PM me. Decent chance I might have something already permissible that I could share. -
Cold East Ground Objects Bonanza.
swambast replied to yakarov79's topic in Mods & Skinning Discussion
Great stuff Yakarov. Just curious, are these 100% from scratch builds or "borrowed" models? Wondering because there's a ton of "cold war model packs" already existing (perhaps you already leveraged) and could easily be converted. -
Gmail warning message about combatace
swambast replied to GKABS's topic in Site Support / Bug Reports / Suggestions
Gkabs, interesting! I'm getting the exact same thing with my Yahoo account and continuously flagging it as "not spam" as well. I even set up a custom filter and it's still getting trapped into the Spam folder, frustrating indeed! -
Russ, keep at it man - you're acquiring a ton of knowledge and experience and doing great work! In my opinion, one genius that can write the book on cockpit building by far is @logan4
-
Not quite. High-poly cockpits, using complex hierarchies, excessive individual mesh pieces and esp. those using multiple high res texture maps (meaning more GPU draw calls) absolutely impact performance - period. Mirrors on/off has been known as one of the worst FPS impacts for a long time now. A decent rule of thumb in my opinion for performance testing is never just test by taking the plane up on it's own and flying it around "empty space". You need to test during the heat of battle with SAM launches, AAA flying around, etc. (assuming that's a standard scenario the aircraft would be used for) and another good test is approaching a fairly populated airbase and testing frame rates on approach and landing.
-
Huh? Doesn't make any sense and seems wrong to me - but what am I misunderstanding?
-
Soulfreak - looking nice, love your skinning work, keep it up!
-
Russ, really cool choice on this chopper - nice work m8!
-
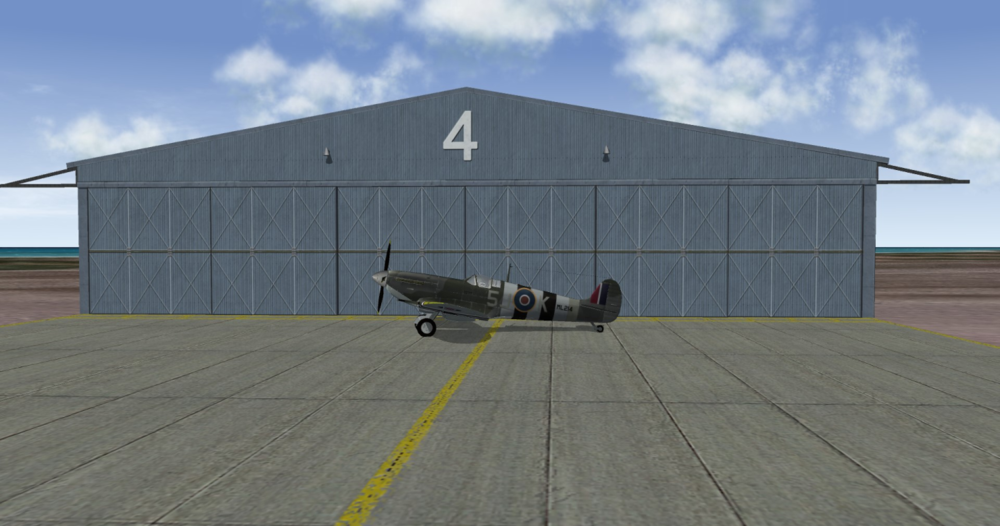
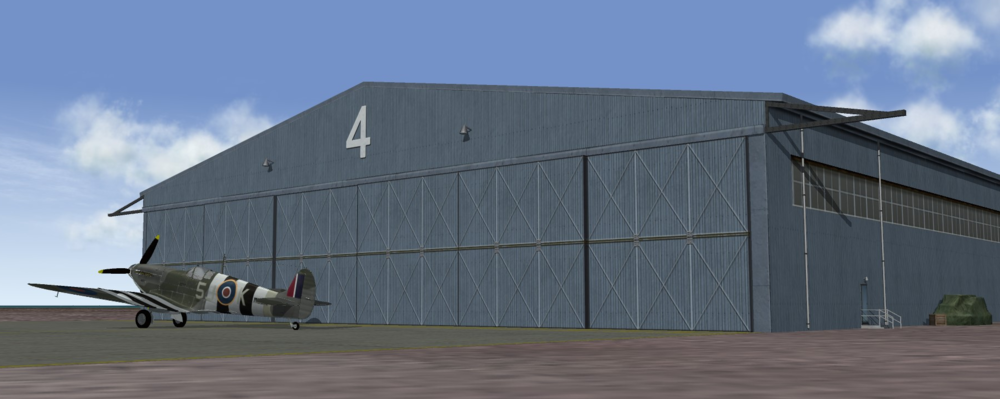
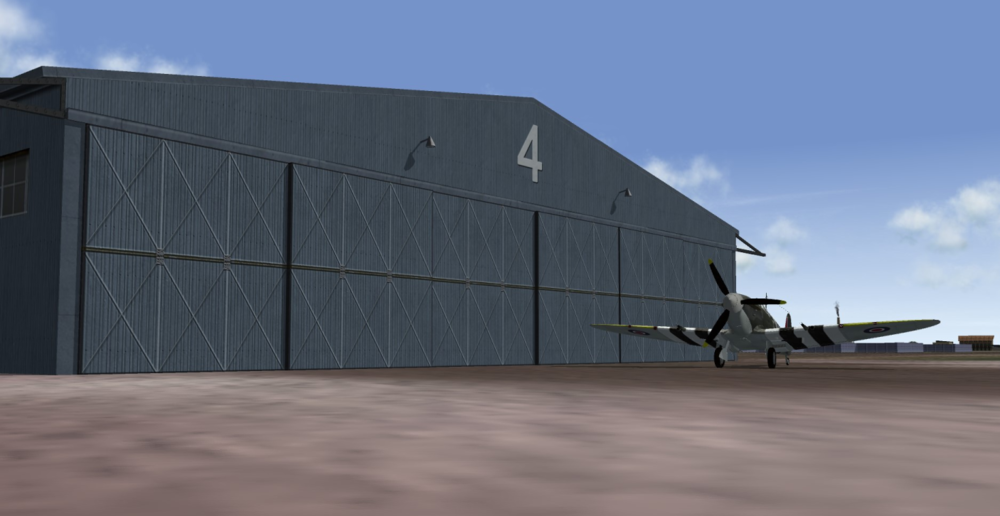
New Model: UK "Type 2" WWII Hangars
swambast replied to swambast's topic in Mods & Skinning Discussion
Thanks everyone, appreciate the comments. I've had a few requests to make different versions of the Type 2 so I'll work on those shortly and post some more progress pics then. -
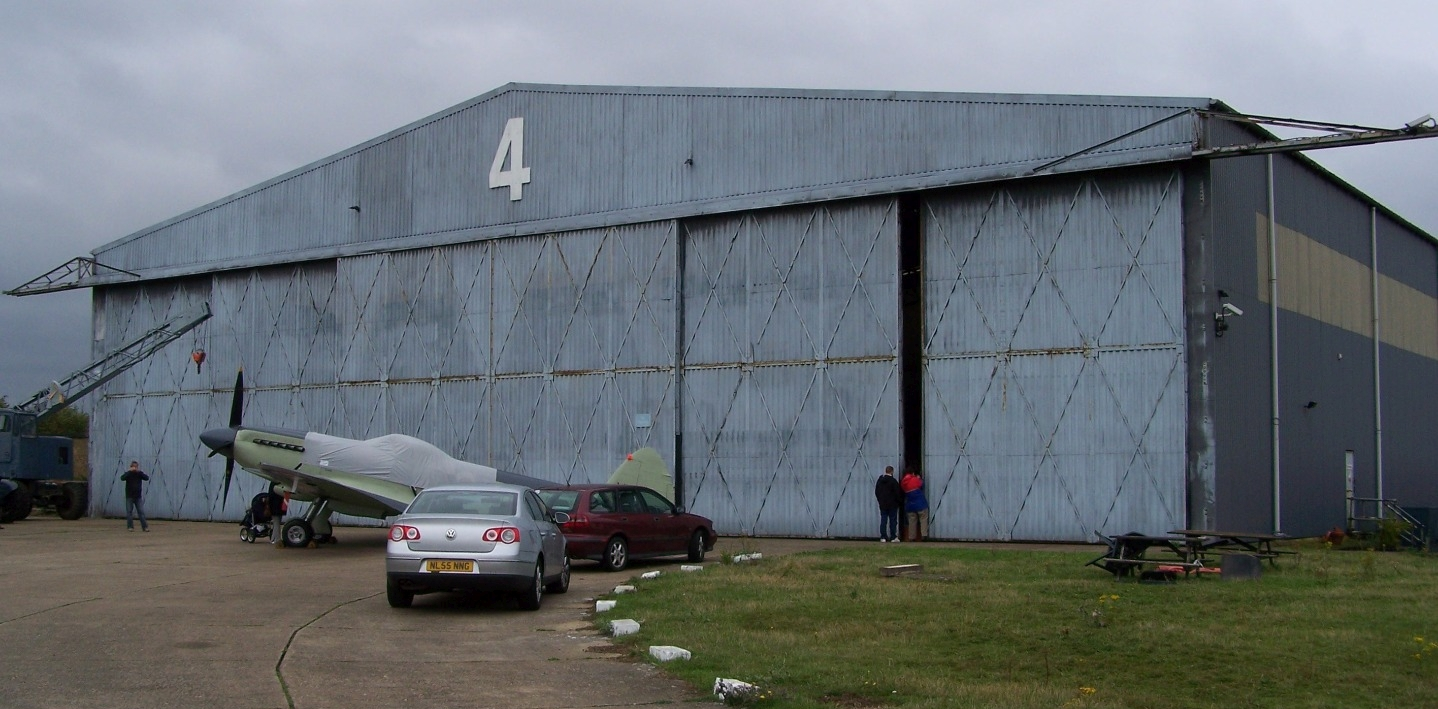
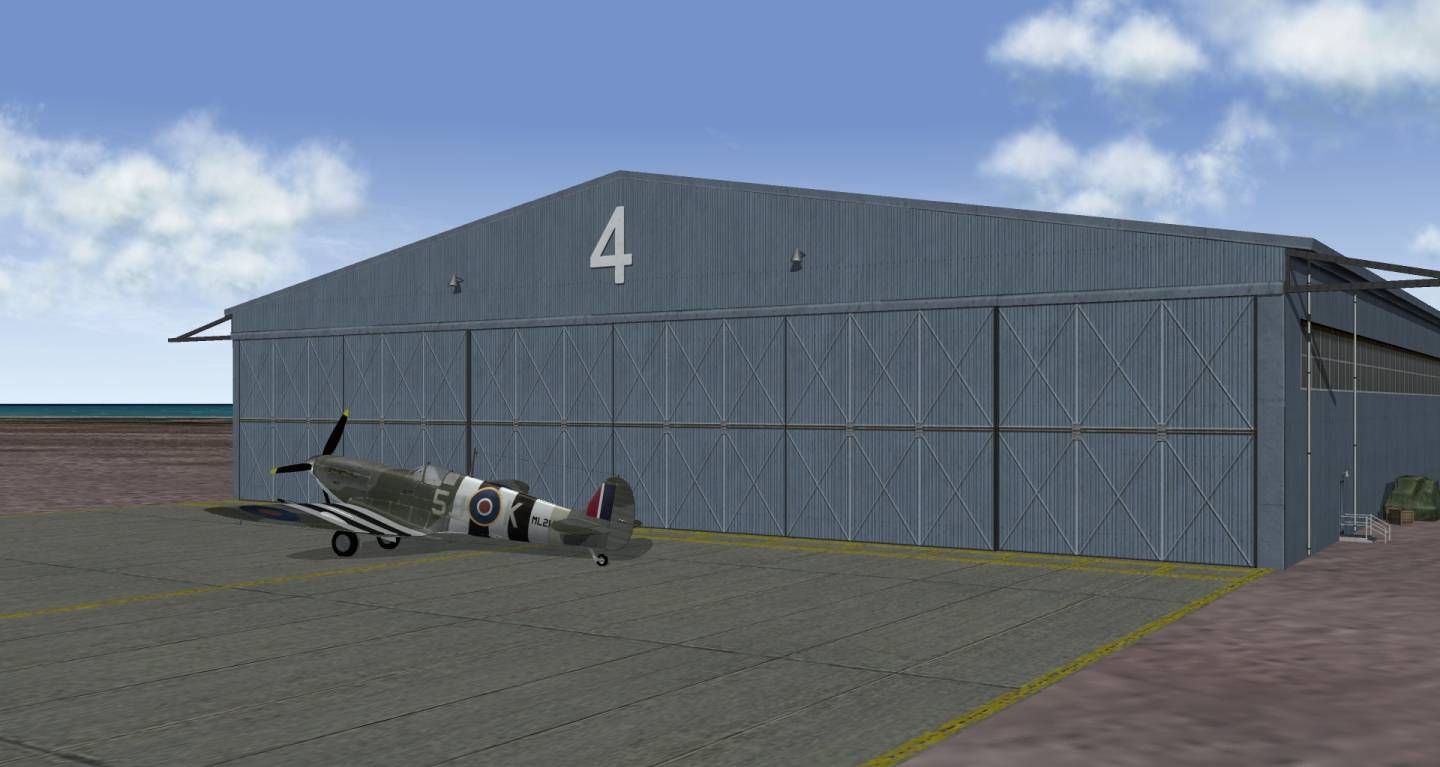
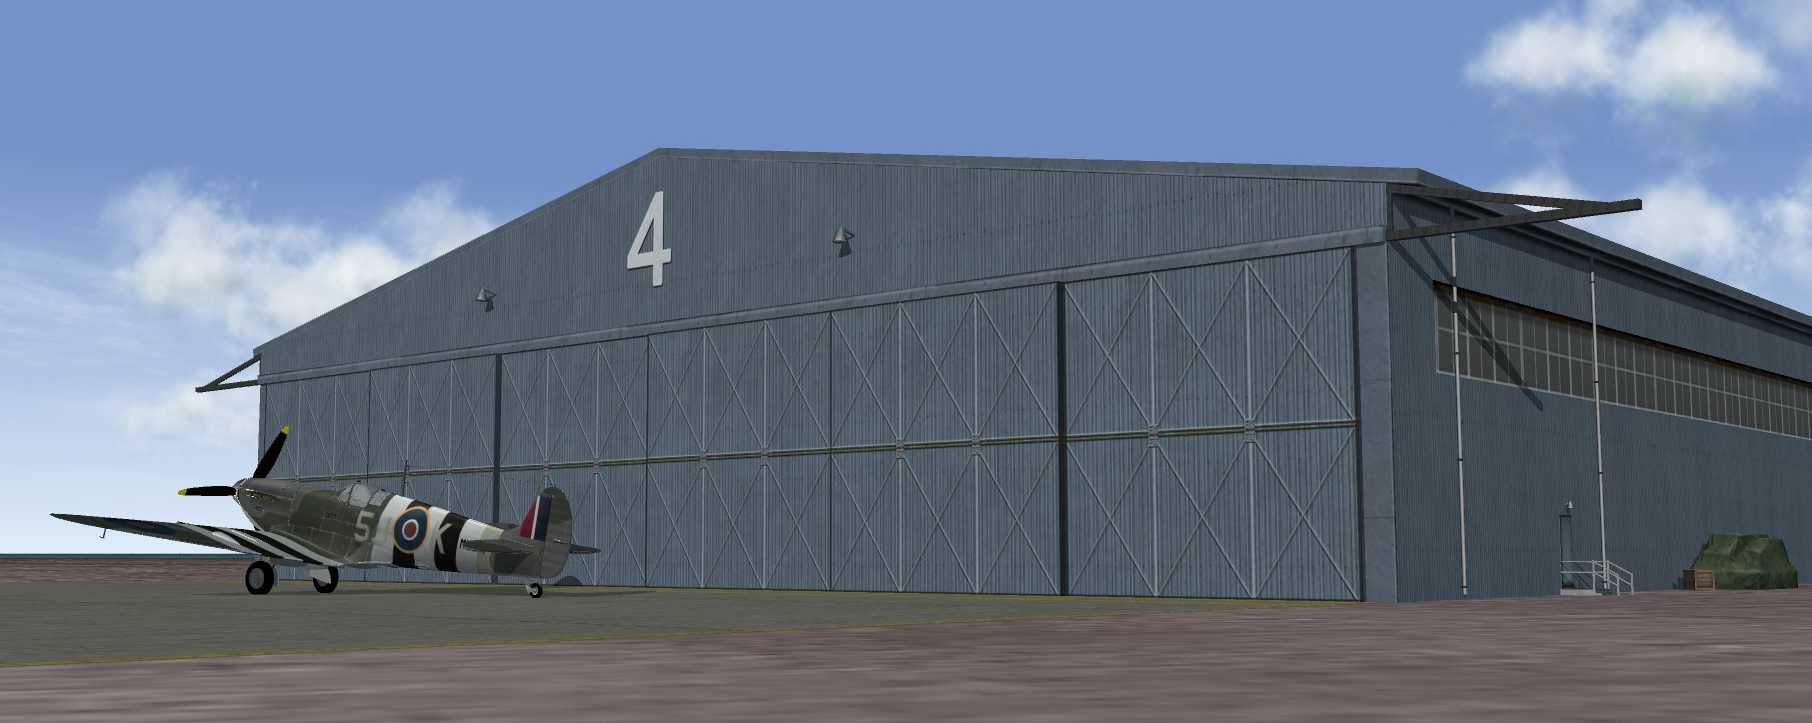
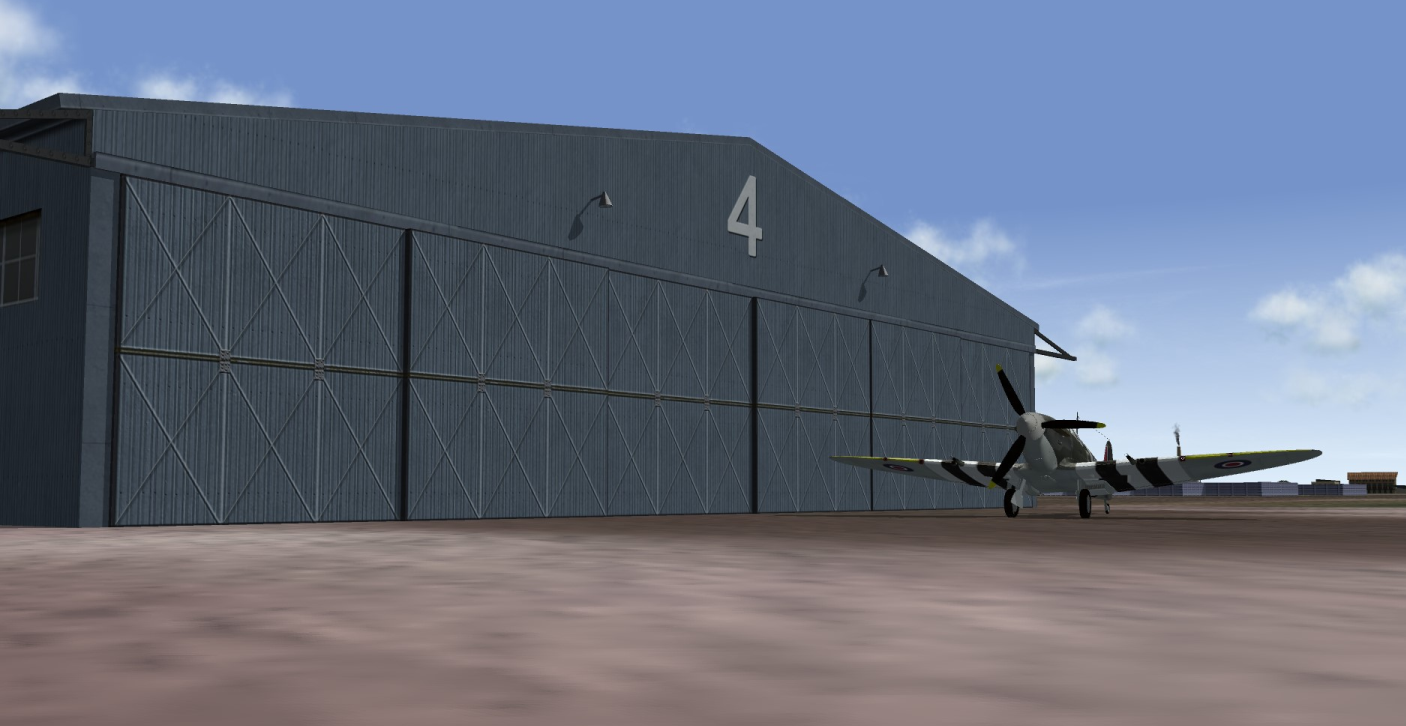
All, again with the excitement growing around Gepard's Operation Seelöwe project, I noticed an opportunity to make another contribution. This time, it's around supporting the outstanding UK airfields phase he is currently working on. So, I made a UK Type 2 WWII Hangar, which was a type of temporary military aircraft hangar introduced in early 1940. It was steel welded and bolted construction typically clad in galvanized corrugated iron sheets. The T2 became the standard temporary hangar and one of the most mass produced hangars for the RAF throughout WW2. Here is one version I came up, all mesh and textures built from scratch, based on this particular reference photo mainly. Spent a lot of time especially trying to get the textures compelling and making it extremely frame rate friendly - under 2000 polys with just a few textures and lower detail version just 200 polys. You should be able to place a lot of these to amp up the eye candy with minimal frame rate hit is the idea of course. Anyway, still have some texture tweaks and other mesh updates to do, but getting closer to finalizing so hope you like it for now.


- 5 replies
-
- 16
-

-
Russ, send me a texture file you're using if you'd like - I might have an idea I could try.
-
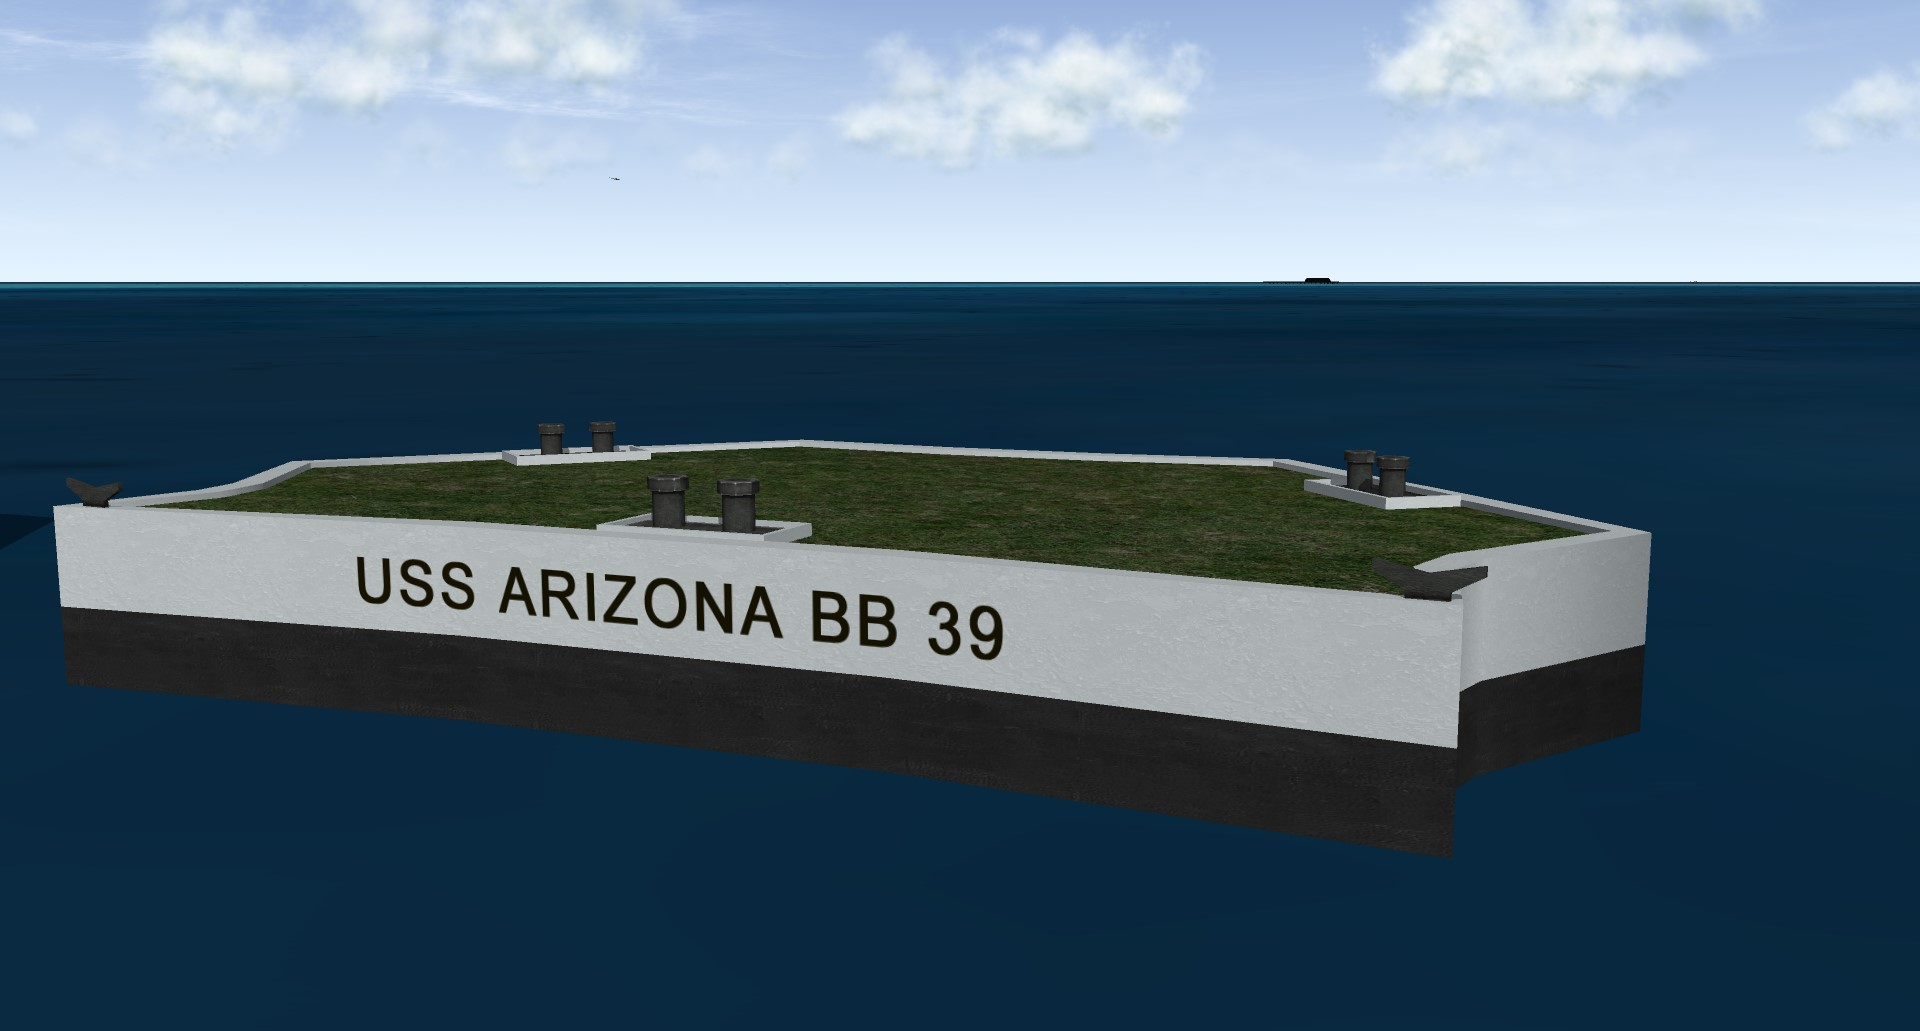
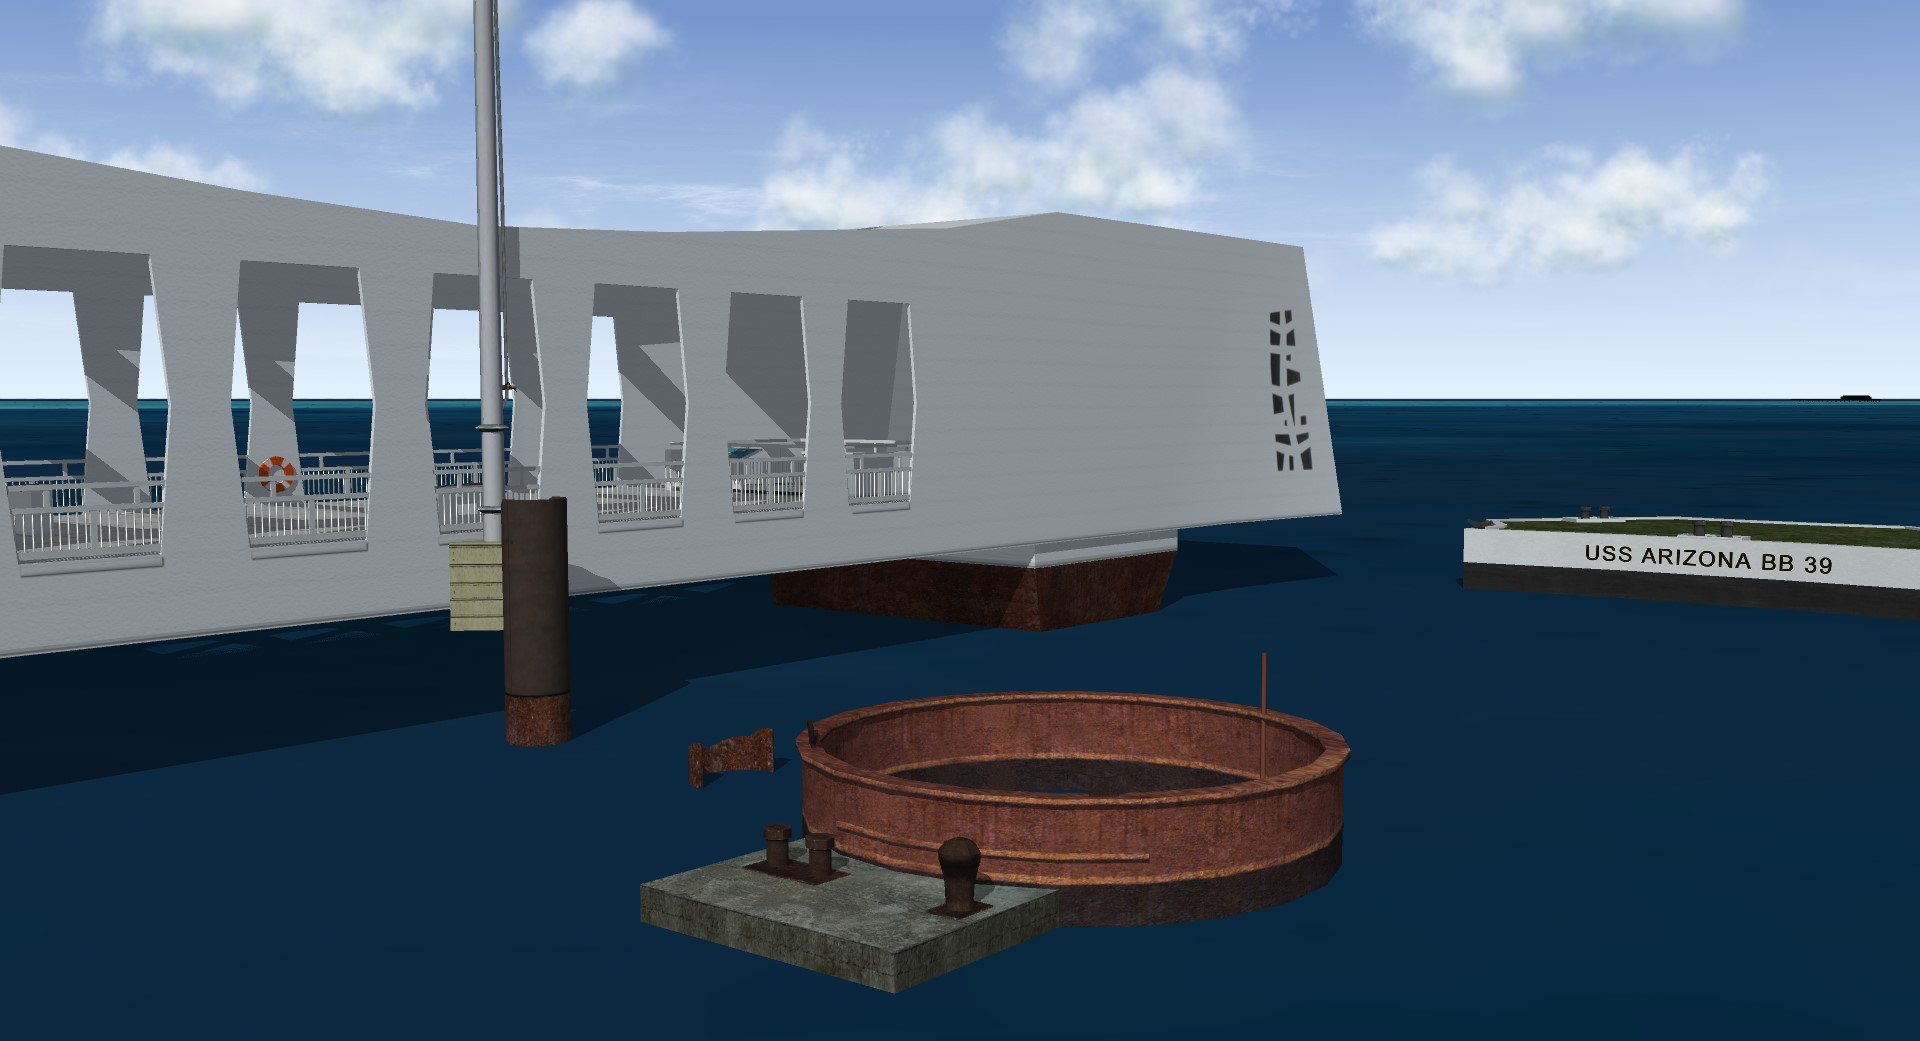
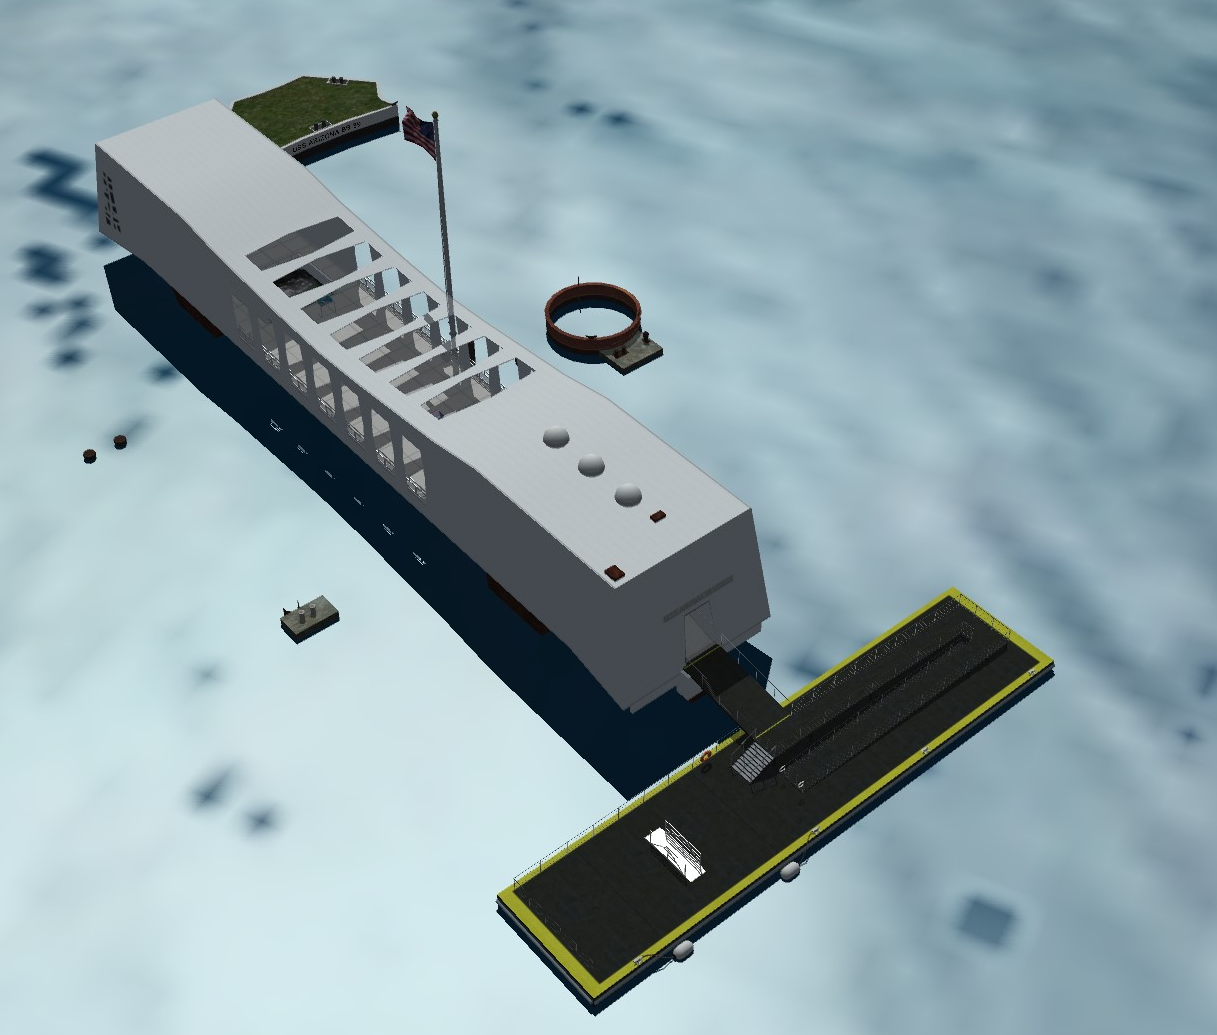
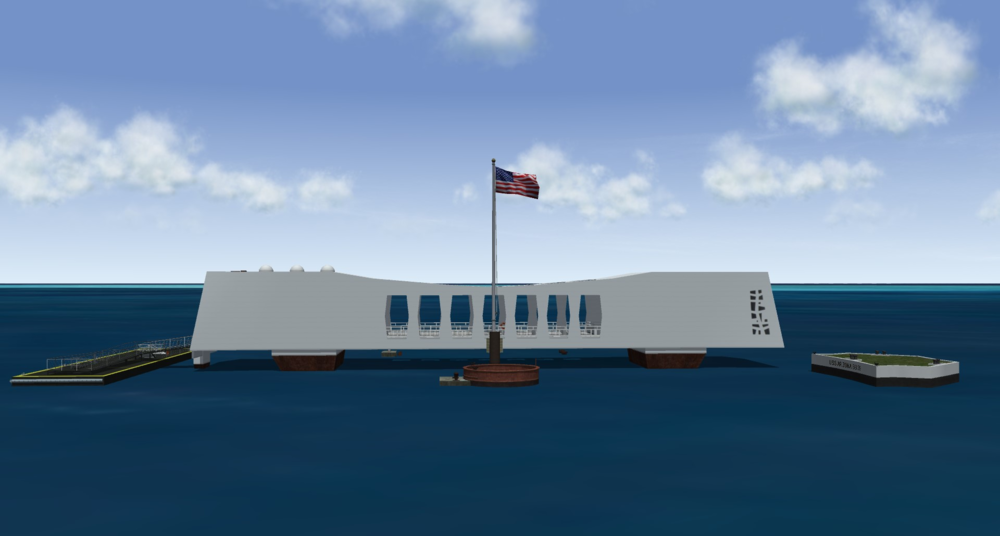
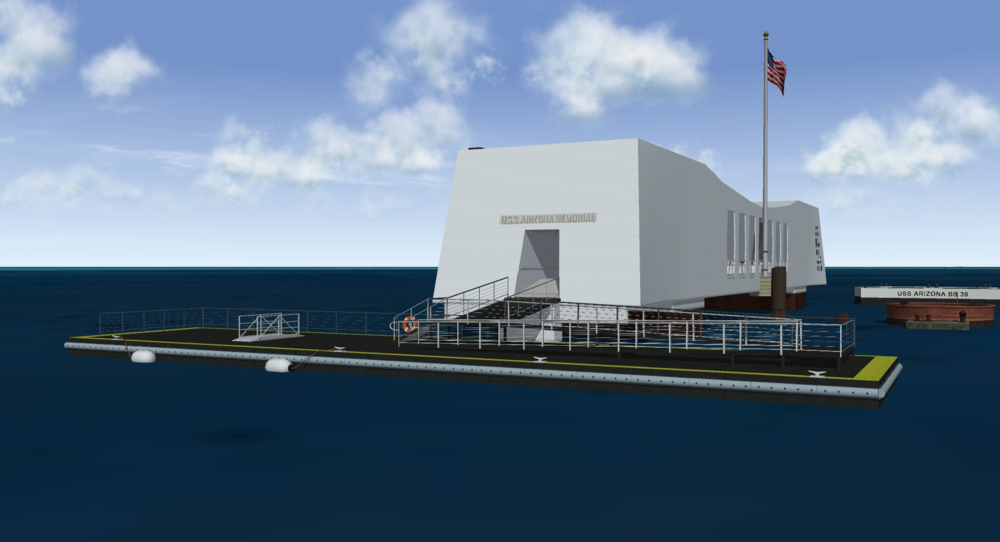
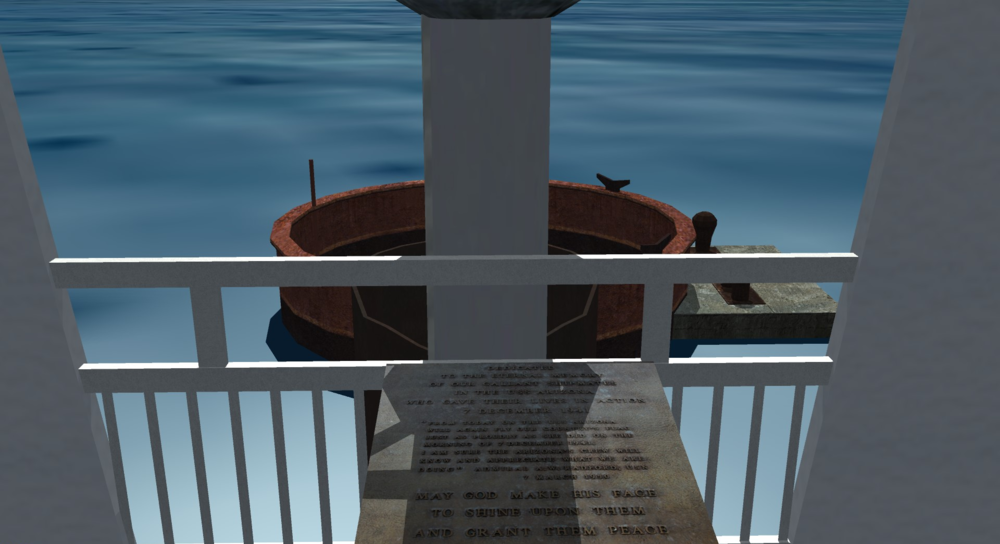
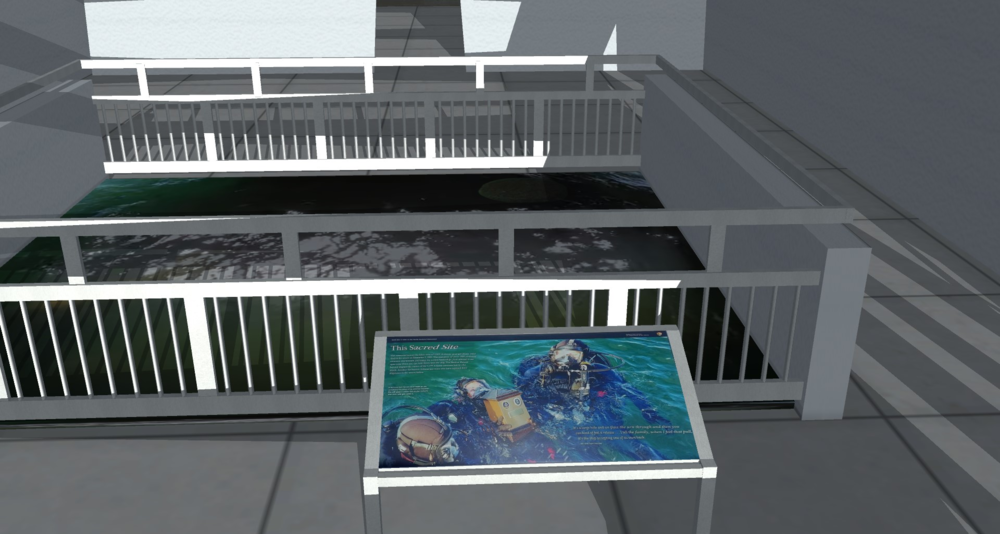
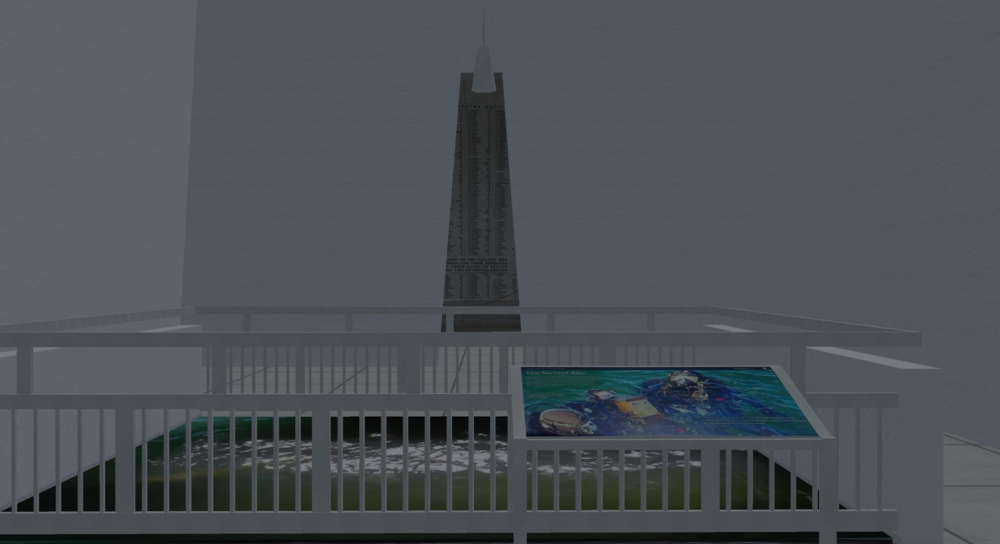
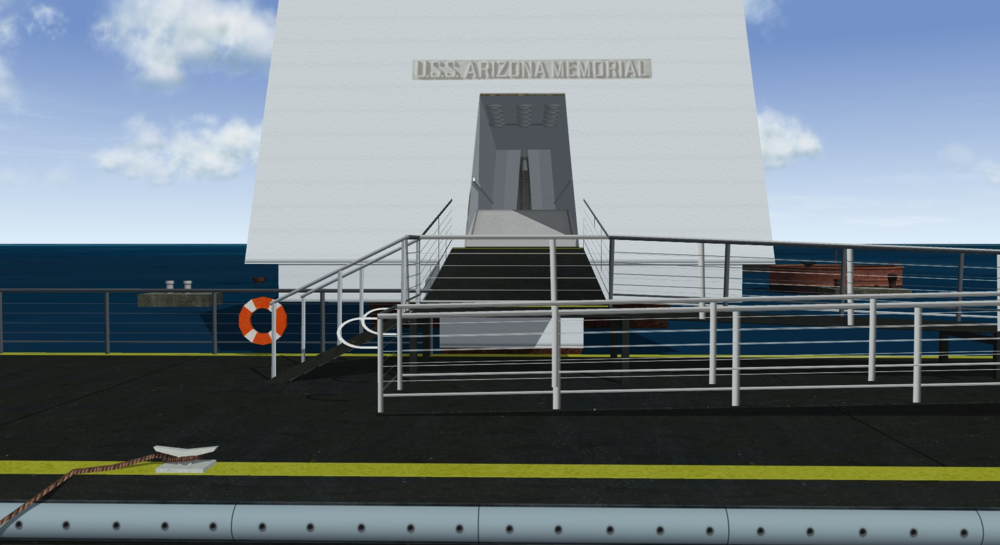
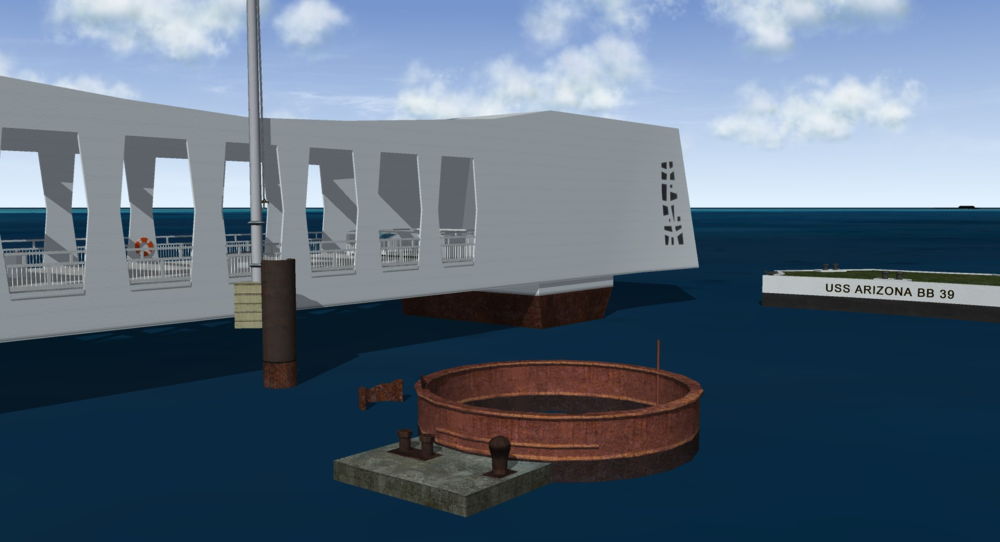
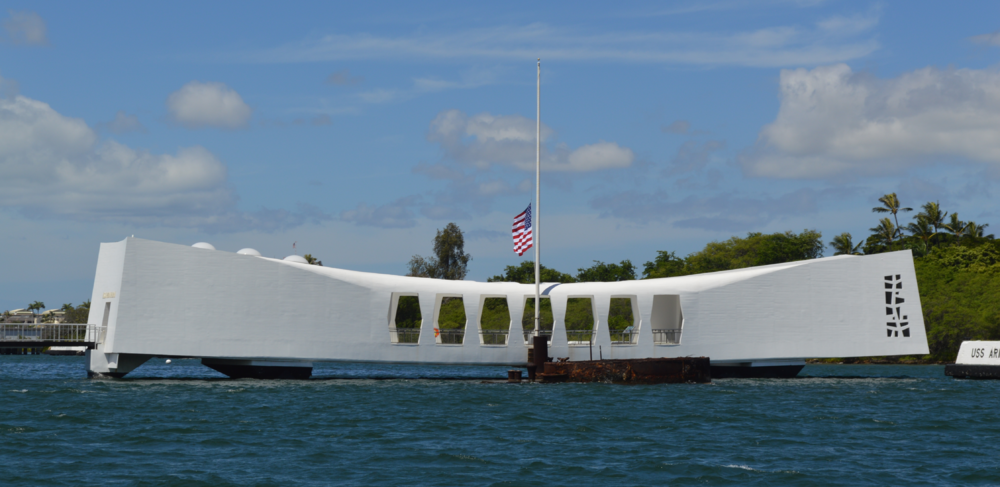
The original request for the Pearl Harbor National Memorial came from Wrench here: https://combatace.com/forums/topic/94790-3d-object-request/?tab=comments#comment-767482 Today in the United States it is Memorial Day. A time to remember and honor those who have died in service to our great nation. And specific to this request, “The USS Arizona Memorial, at Pearl Harbor in Honolulu, Hawaii, marks the resting place of 1,102 of the 1,177 sailors and Marines killed on USS Arizona during the attack on Pearl Harbor on December 7, 1941, and commemorates the events of that day.” I unexpectedly found some free time, and have been working relentlessly to get my version in a decent condition so I could post an update today. Everything has been scratch built including most of the texture work. It started off as just a quick hull mesh, but as time went on, I felt a sense of honor and patriotism in creating this – and that’s when things evolved. With the state it’s in, dare I say you can even take a fairly convincing virtual walk-through of the memorial – overkill perhaps but I found it extremely gratifying. I’m still making some overall form tweaks and other updates, but am proud to be sharing the latest progress especially today and hope it is a proper tribute.


- 4 replies
-
- 19
-
-

-
I dread cylinder mapping, not to mention the risk of distortion but also having to figure out the seam lines, etc. Anyway, one suggestion definitely to try is using the "Relax" tool. Under Edit UVWs, goto "Tools..." and choose "Relax..." - that tool for sure gets me out of a jam every now and then! Edit - I see you mentioned it was between segs, then I would start by trying "Relax by Edge Angles" specifically.
-
LukeCH, seriously? What the hell kind of first post is this - asking how to convert the game models?
-
@Sundowner Thanks m8, I was having a hell of time deciphering what it actually looked like during that time because most of the reference photos were in black and white, appreciate your feedback! Do you have any reference photos you could share, or alternatively I can just make a swag at it. Thanks again for the feedback.
-
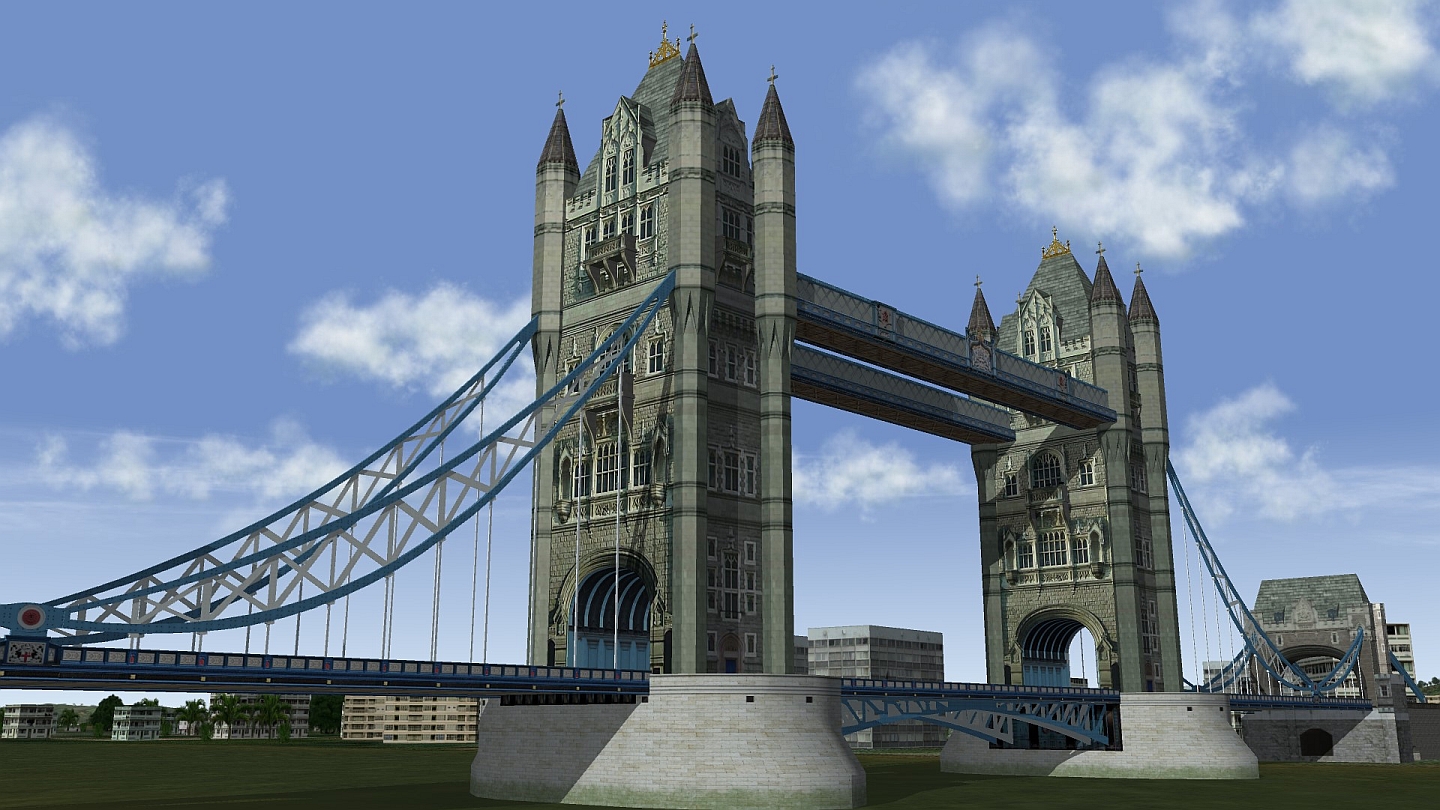
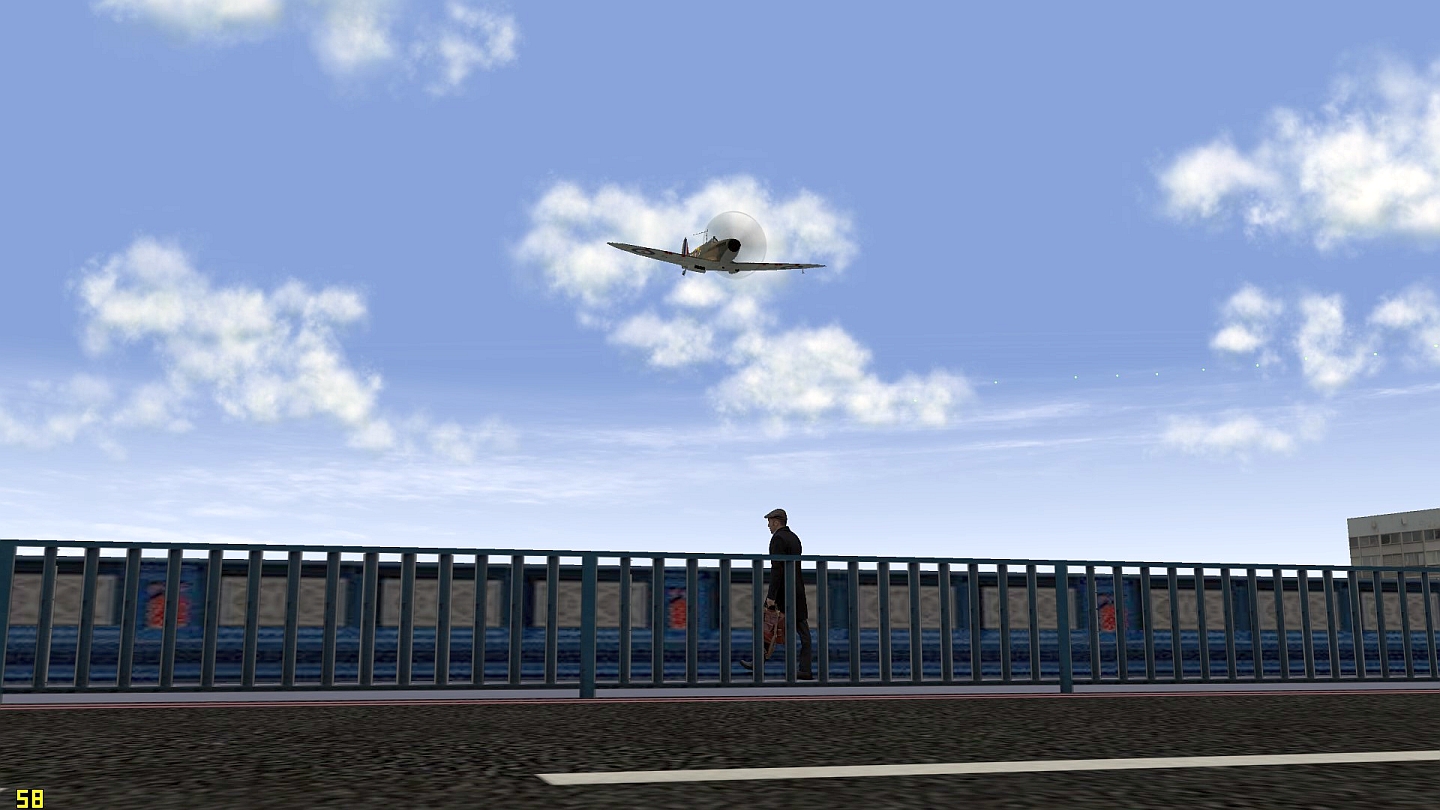
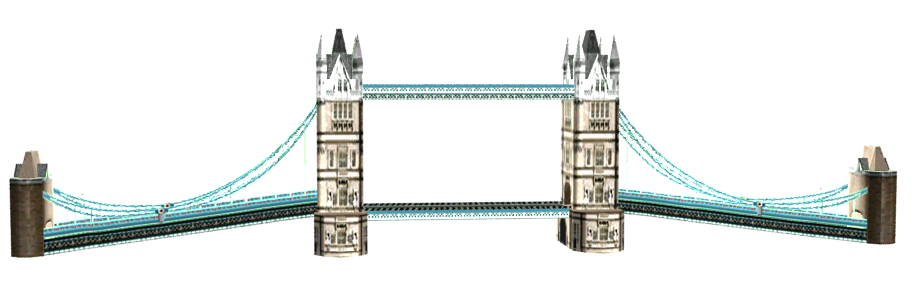
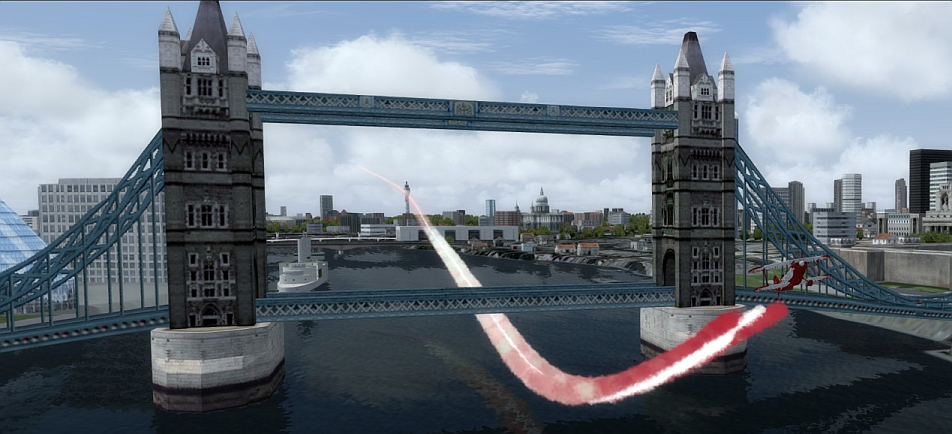
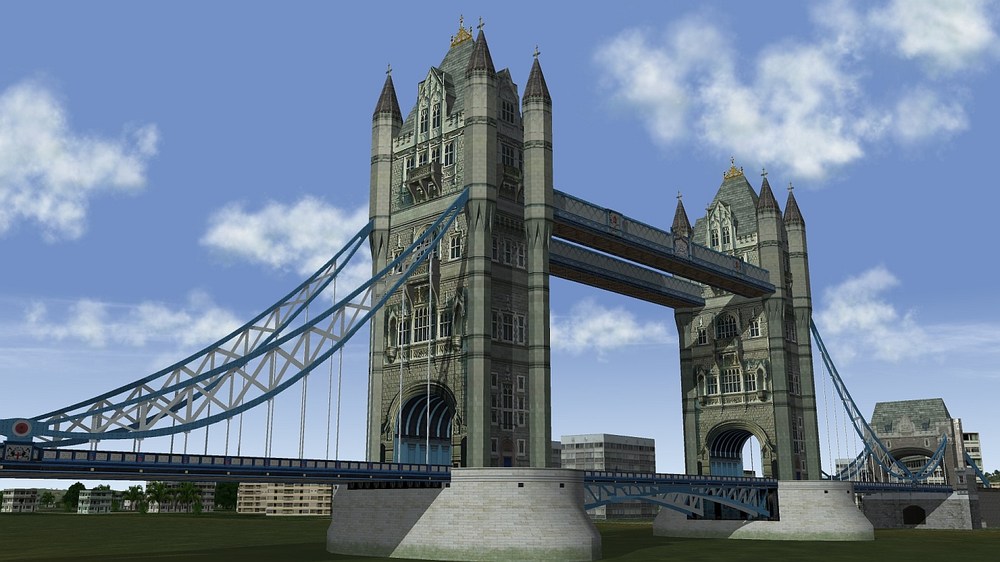
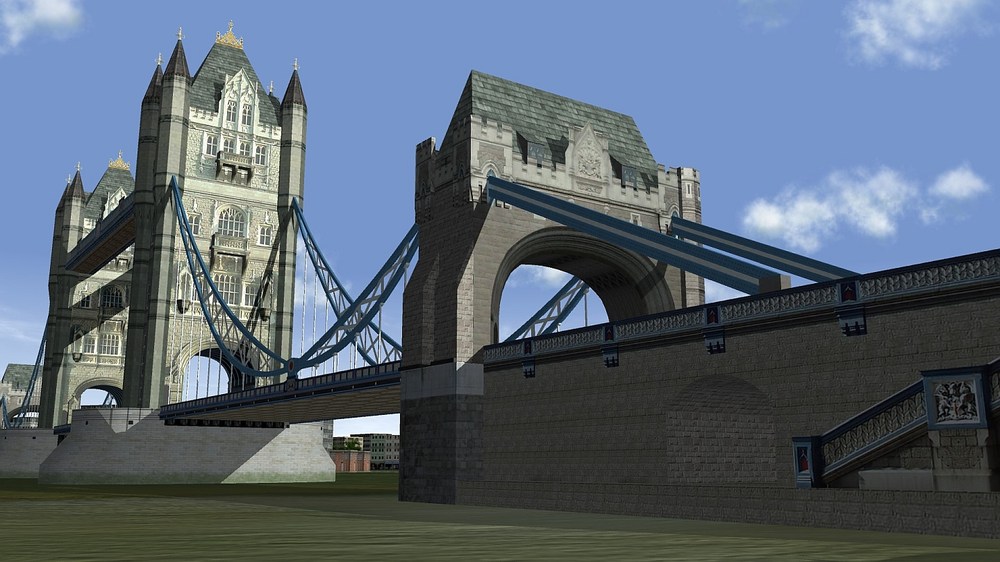
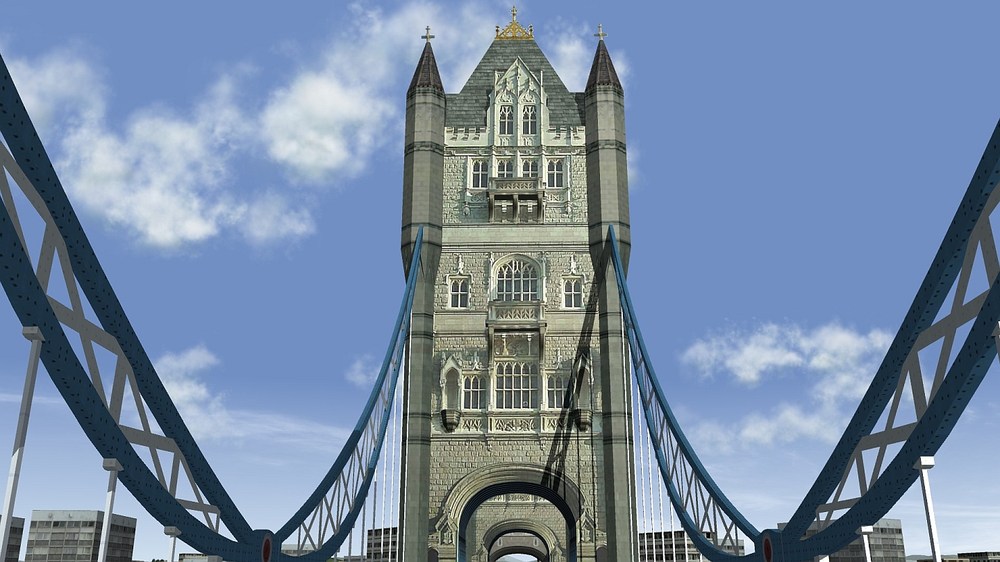
Ok, some more details. Completely inspired by Gepard’s Operation Seelöwe work, a comment alluded to needing an upgraded London Bridge. Rightfully so, the one we have is archaic and definitely needs an overhaul. First – full disclosure and acknowledgement that the original base model mesh is not my work. It is based on a publicly available free source model with no author attributed. Next, that being said – like many free models, you get what you pay for. This model was an absolute bastard to work with and had countless issues. I mean endless open edges / unwelded verts, massive 8K+ poly pieces, double-faced/overlapping polys, incorrect texture mapping and God knows what else. So I created new scratch mesh pieces, brand new textures, new UVW mappings, fixed shadow issues and basically re-worked the whole thing over. Why? Well, I invested a lot of time researching and gathering reference photos/textures – but kept coming back to this option especially because it had some really great main texture pieces. This model will most likely never meet the level of quality I was hoping for, and I’m sure there will be some issues here and there. Unlike most of my stuff, this one is definitely tipping on the higher poly side but I plan to make some lower level .LODs and tune up performance eventually. In hindsight, wish I would have taken my friend Del’s advice when he said, sometimes the time to fix issues is better spent starting over – wise words indeed in this case. Having just started from scratch would have resulted in cleaner mesh topography and probably given me more satisfaction in the end. But it's good to at least be at a place where it's feeling "decent enough" and dare I say even rivaling some other flight sim payware additions like this one... OK, enough of all the boring details, right? On to the screenshots for you to enjoy! This will be available as an exclusive feature in Gepard’s Operation Seelöwe project – so stay tuned as his work progresses! As for future ideas – I eventually would really like to add in vehicle and pedestrian traffic on the bridge (but would need help researching era-specific vehicles) so more to come. In-Game Shots

- 12 replies
-
- 12
-
-
For goodness sakes, why not just take a "good" wheel, clone it and rotate it as needed! In my opinion, you don't need to be messing around with symmetry, mirroring, or any of those other modifiers that are just more likely to make things worse - to me this seems like the easiest and "safest" way unless I'm misunderstanding something?
-
OK, good luck - and as Russ says send to us via PM if you want a different perspective on things.. And Russ is right, your final modifier should really be editable mesh and the recommended way to export properly is to collapse the entire stack to editable mesh.
-
Russ, looking good. One suggestion though, it might just be the screenshot perspective,...some of the cockpit accessories esp. the switches look like they're out of scale (too big in my opinion). Not sure if that's the case but something to consider, it's nice to have this included and love the Pilot model
-
Well if you XFormed it and it had errors in it you're basically stuck as you can't really undo that - if the orig mesh has issues and you Xform it will definitely make your problem worse. Before Xform, go back to your original mesh and ensure you don't have issues such as open edges, unwelded verts, double-faces that kind of thing. Then I would suggest converting the wheel to editable mesh (not editable poly as there is a difference) - and see if that works. Or just upload your max file or just the wheel or whatever if you want and I'm sure between one of us we can take a quick look.
-
Yeah, if you've used modifiers like XForm esp. collapse your modifier stack so it's editable mesh only - and sometimes helpful is the Unify function.
-
Congrats Russ, know it was a long haul. And you're absolutely right - Logan's brain power on these kind of challenges is a God Send!