33LIMA
-
Posts
3,749 -
Joined
-
Last visited
-
Days Won
7
Content Type
Profiles
Forums
Gallery
Downloads
Store
Everything posted by 33LIMA
-
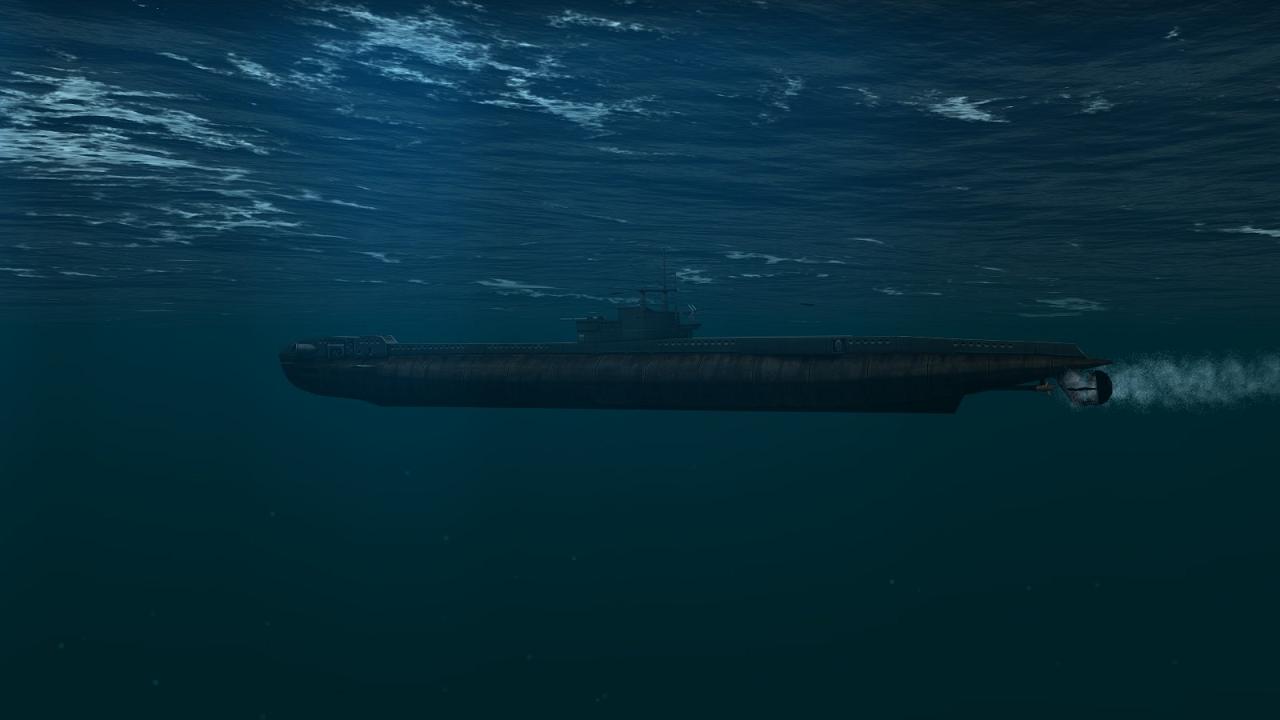
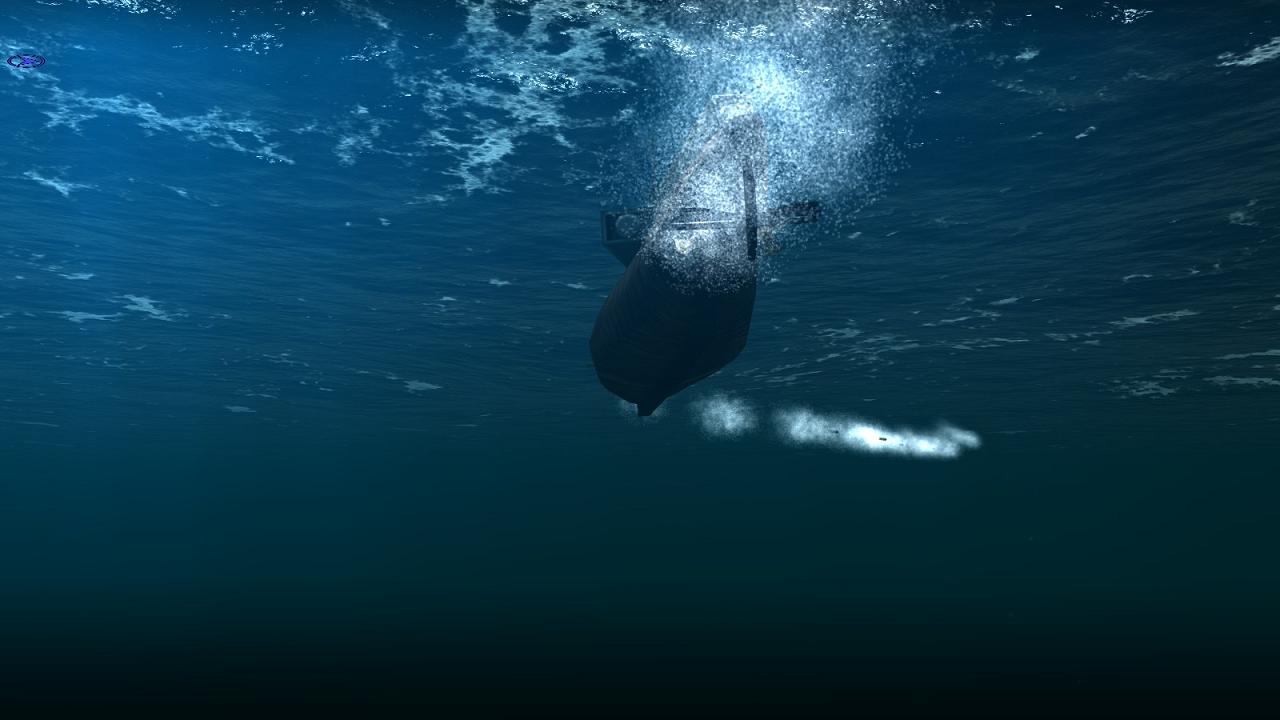
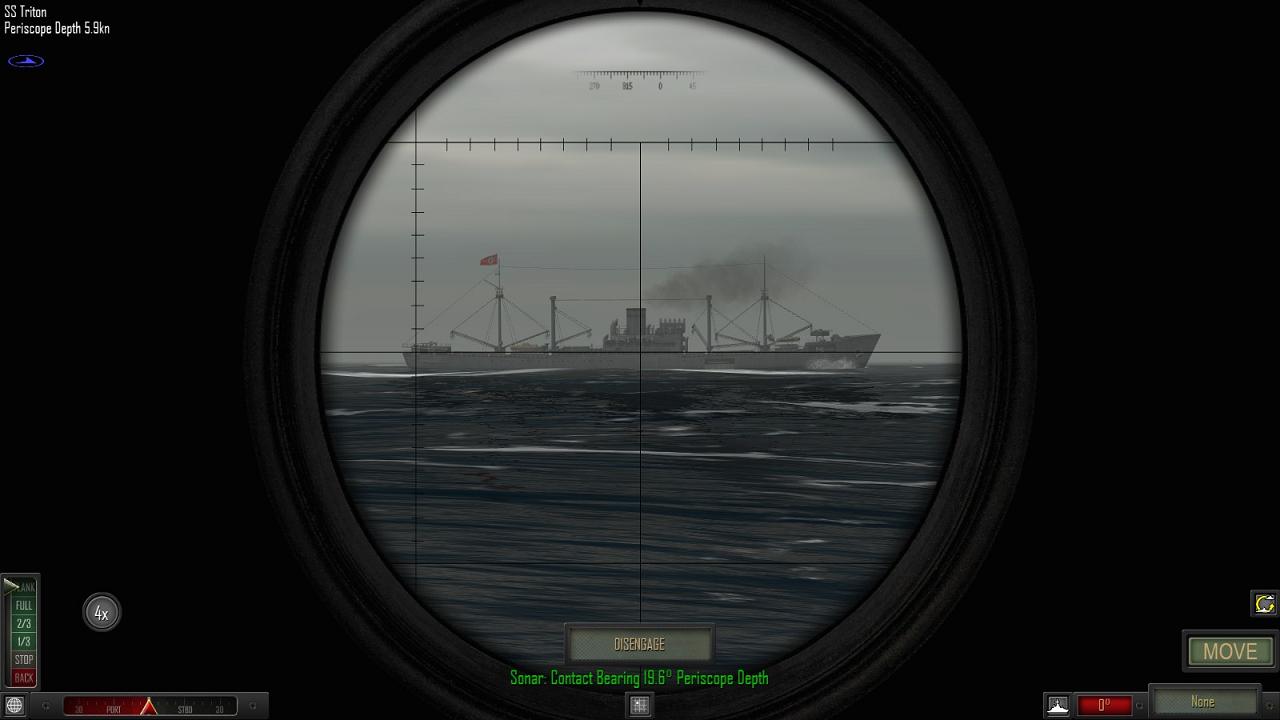
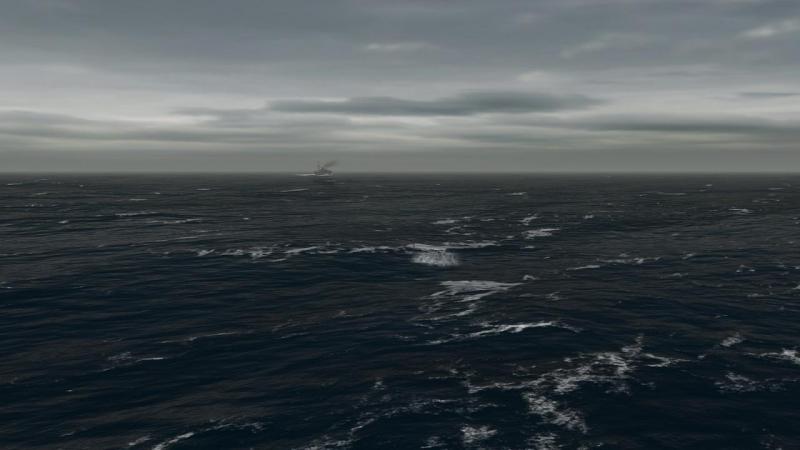
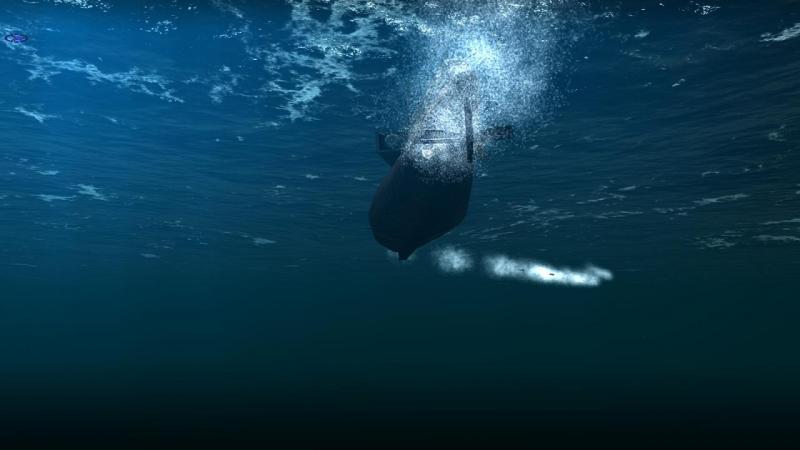
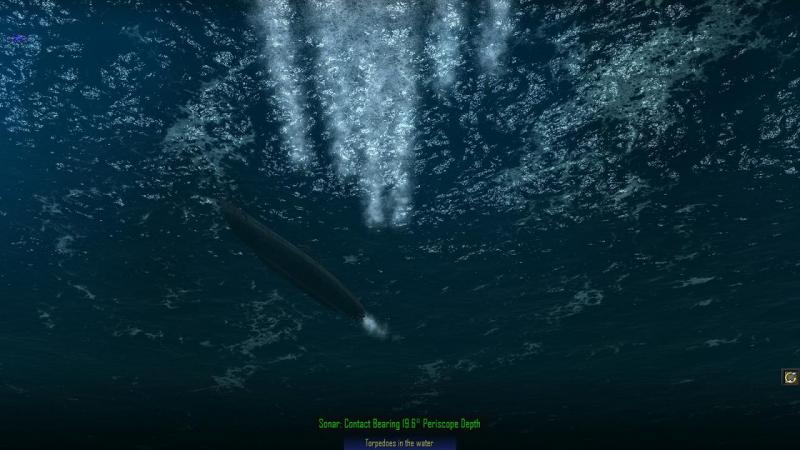
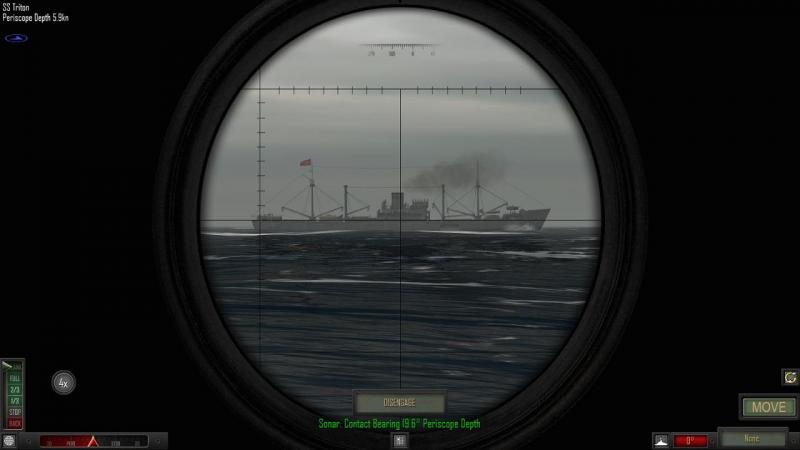
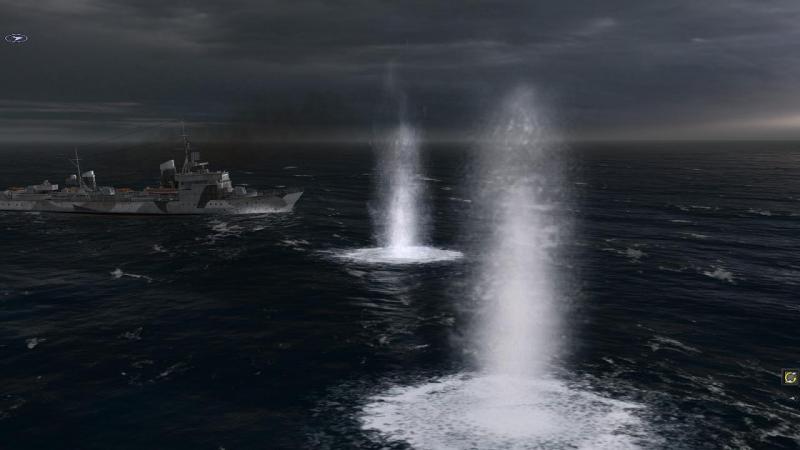
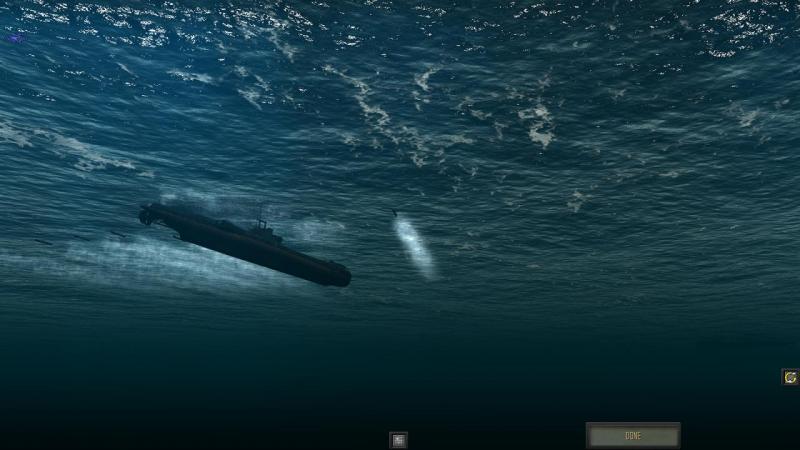
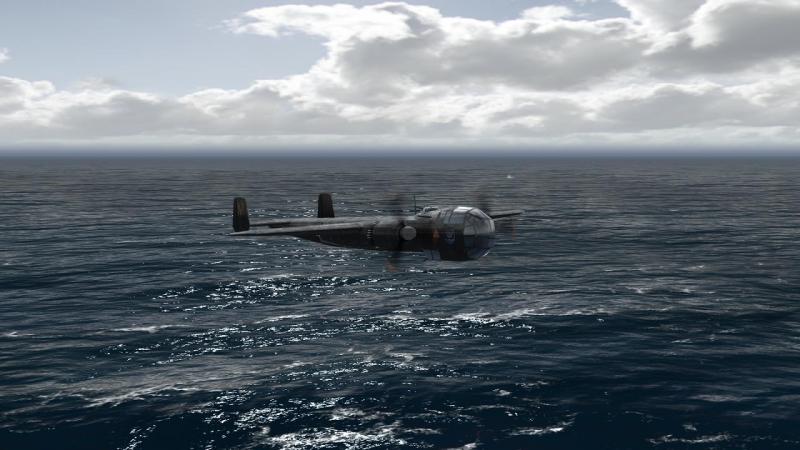
The 'destroyer disaster', when it came, was as sudden as it was unexplained. I kicked off the next mission...and found that my two destroyers were no longer listed! I have a vague recollection of selecting both ships but clicking the button to remove them, instead of the one to add another ship, which I wanted to buy with my renown points. AF warns you that you're doing this but, doubtless distracted by some real world events, I evidently clicked the wrong option and accepted their deletion. At least, that's the only thing I can think of. The net result was that when the distraction went away and I tried to resume where I had left off, Echo and Encounter had gone. I went back a few missions, which AF will let you do, but as I discovered, you re-start with what you have now, not what you had then. Doh! All was not lost! It was now time to spend the renown points I had been building up. I found that could afford an 8-inch cruiser so I went for one of these - the 'County' Class HMS Berwick. I knew that I was at the stage in the campaign that I could expect to be facing more than a destroyer or two, by way of surface opposition, so a heavy cruiser was, I felt, the best choice open to me. I used much of what little I had left to buy a submarine, as these can be great force equalisers if you find that you are really badly overmatched on the surface. The enemy must have been thinking along similar lines, for my opposition on the next outing was a U-boat and a cruiser. Fortunately, the cruiser was only an auxiliary one - a gun-armed merchantman, in this case a disguised surface raider. In fact, she was no less than Kormoran, famous for surprising and then sinking the light cruiser HMAS Sydney in the Pacific, in late 1941. Forewarned by the 'briefing map' what I was up against, this was not an outcome that especially worried me, even if - as was not the case this time - the Germans had the initiative/first move. However, I was was still facing something of a dilemma. My heavy cruiser was a good choice for making short work of Kormoran in a surface action. But I would be at grave risk of losing her, to the accompanying U-37. I did not ponder for long. This, I decided, would be a solo mission for Triton, my 'T' Class submarine. My opening position was off Kormoran's starboard bow. She was still at or just outside extreme range, where the slightest turn or zig-zag would be enough to evade my torpedoes, if launched now. As she was heading my way, I could, however, bide my time. For now, that left the U-boat. My 'sonar' - for a sub, this should really be 'hydrophones', although perhaps is just that in the static campaign, late-war kit like sonar in allied subs is available from the start - had picked her up to starboard, not too far off. I turned into her and let fly at once with a full savlo of torpedoes - the 'T' Class has no less than eight forward tubes, plus two external (the latter effectively non reloadable). Viewed from behind and below my boat, the visual effect was quite impressive, as the fish veered right and headed off towards their quarry. This was my first demonstration that fans of torpedoes from a submerged submarine can be just as effective as those from a surface ship, against a sub at periscope depth. U-37 took no eavsive action that I noticed, and paid a fatal price for her own hydrophone operator's lack of vigilance. While I don't think a surface ship ever succeeded in torpedoing a submerged submarine, a British submarine, HMS Venturer, managed to sink the submerged U-864 in early 1945 in such a fashion, in a remarkable (and for WW2 possibly unique) underwater battle. So far, so good. Now, it was Kormoran's turn. The hapless U-37 hadn't even faded from my hydrophones by the time I had swung my periscope onto my new target. ...to be continued!

-
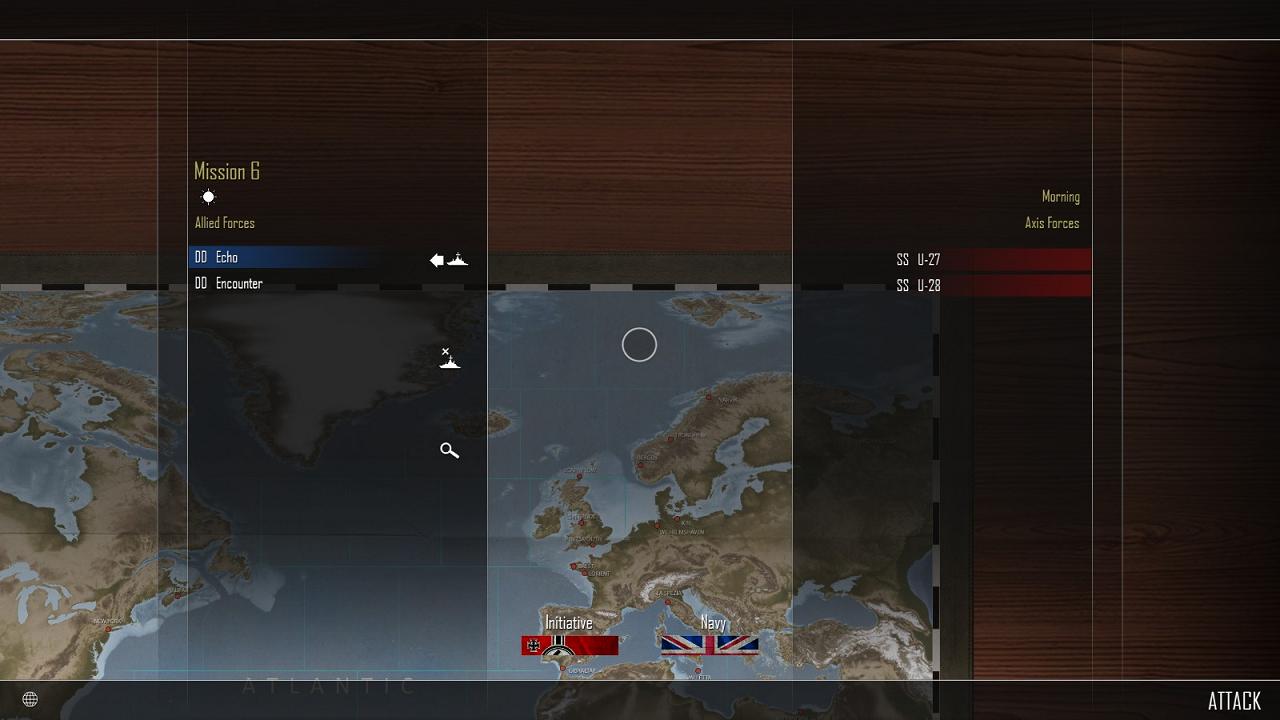
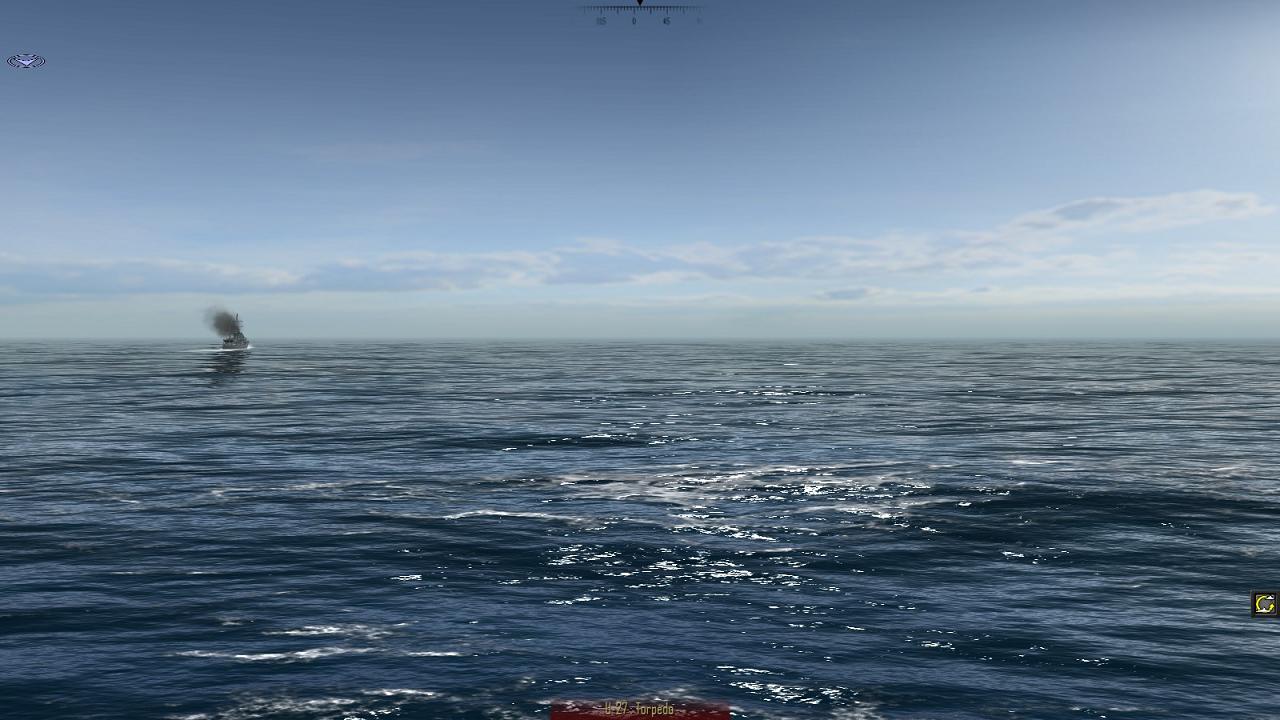
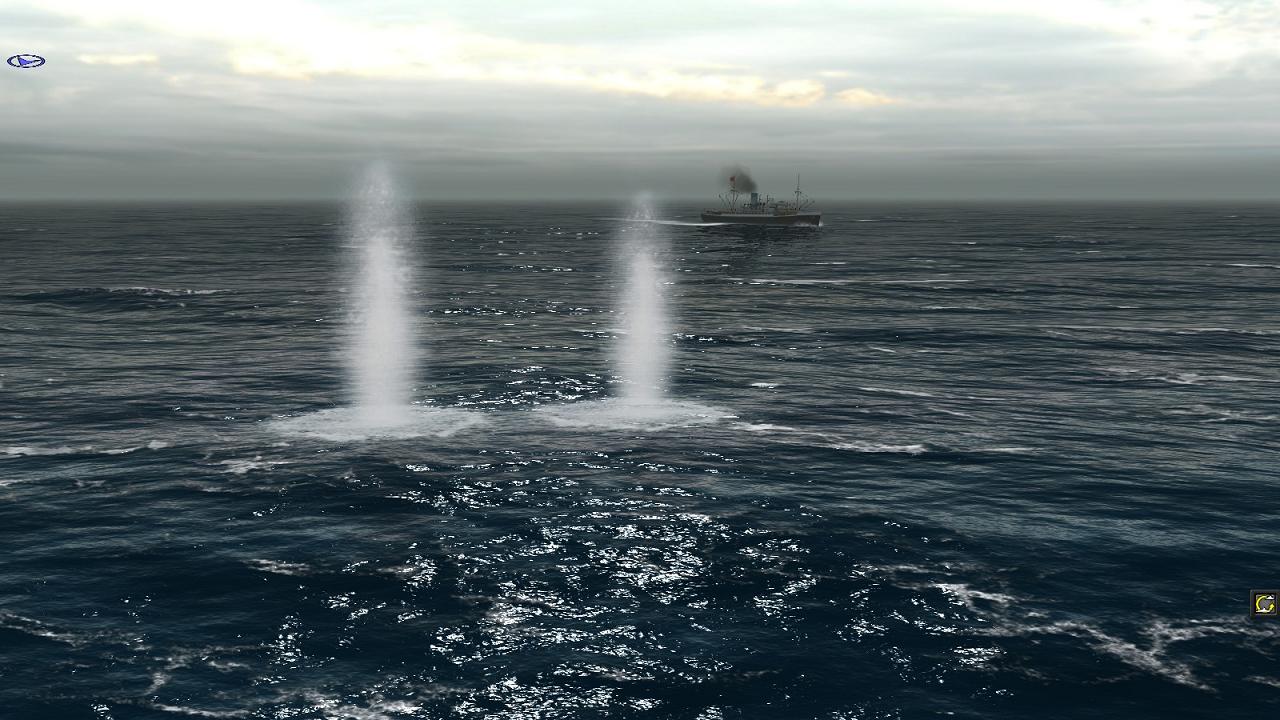
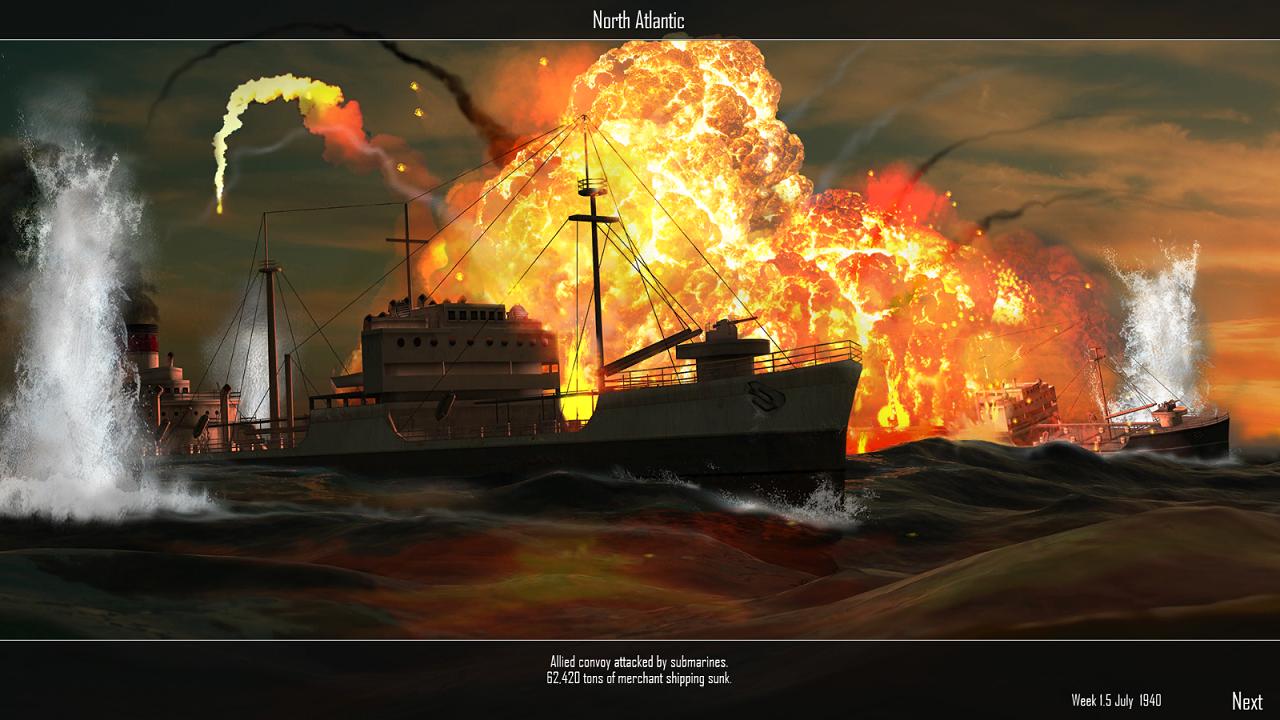
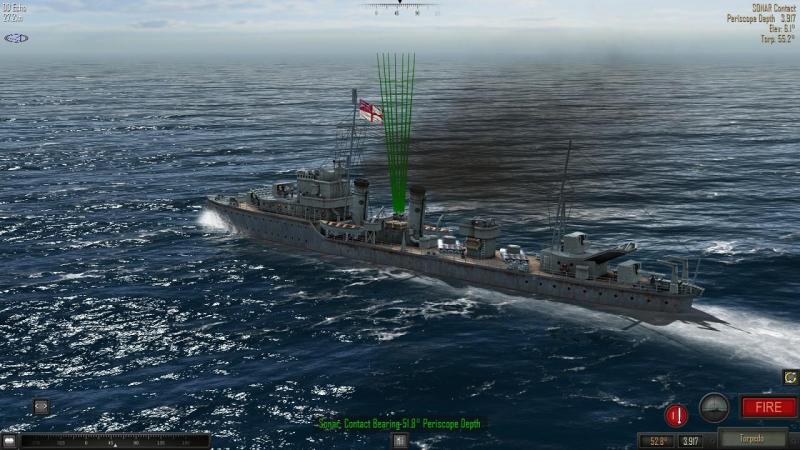
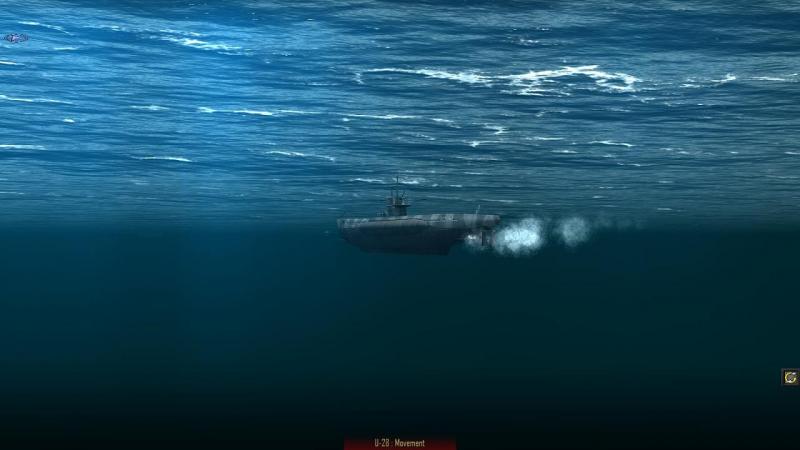
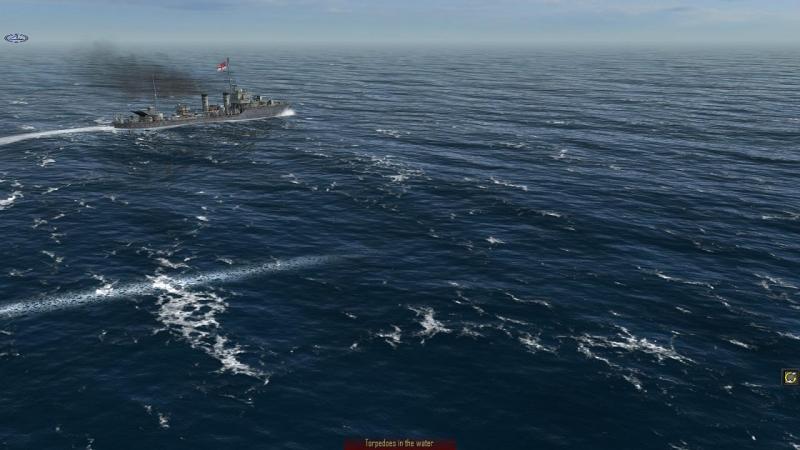
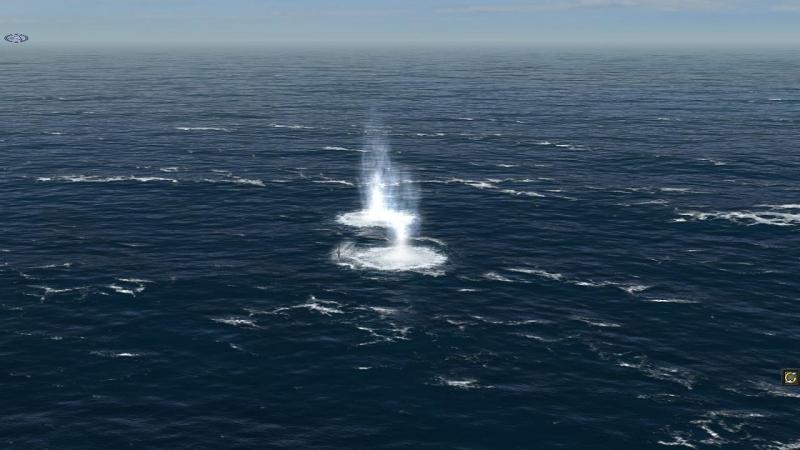
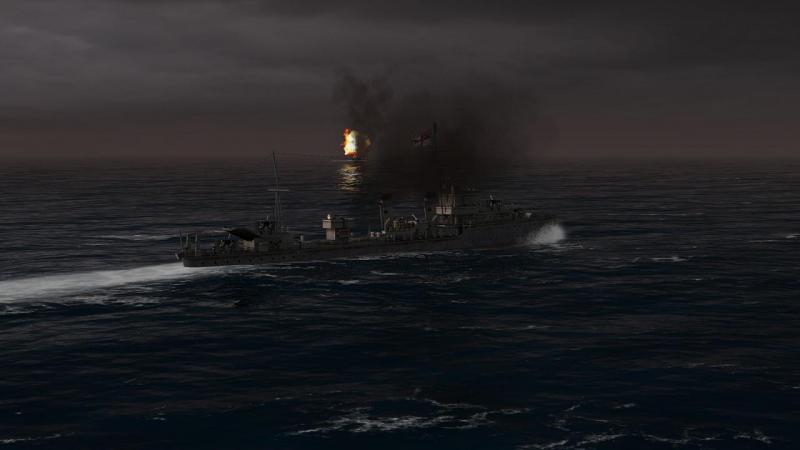
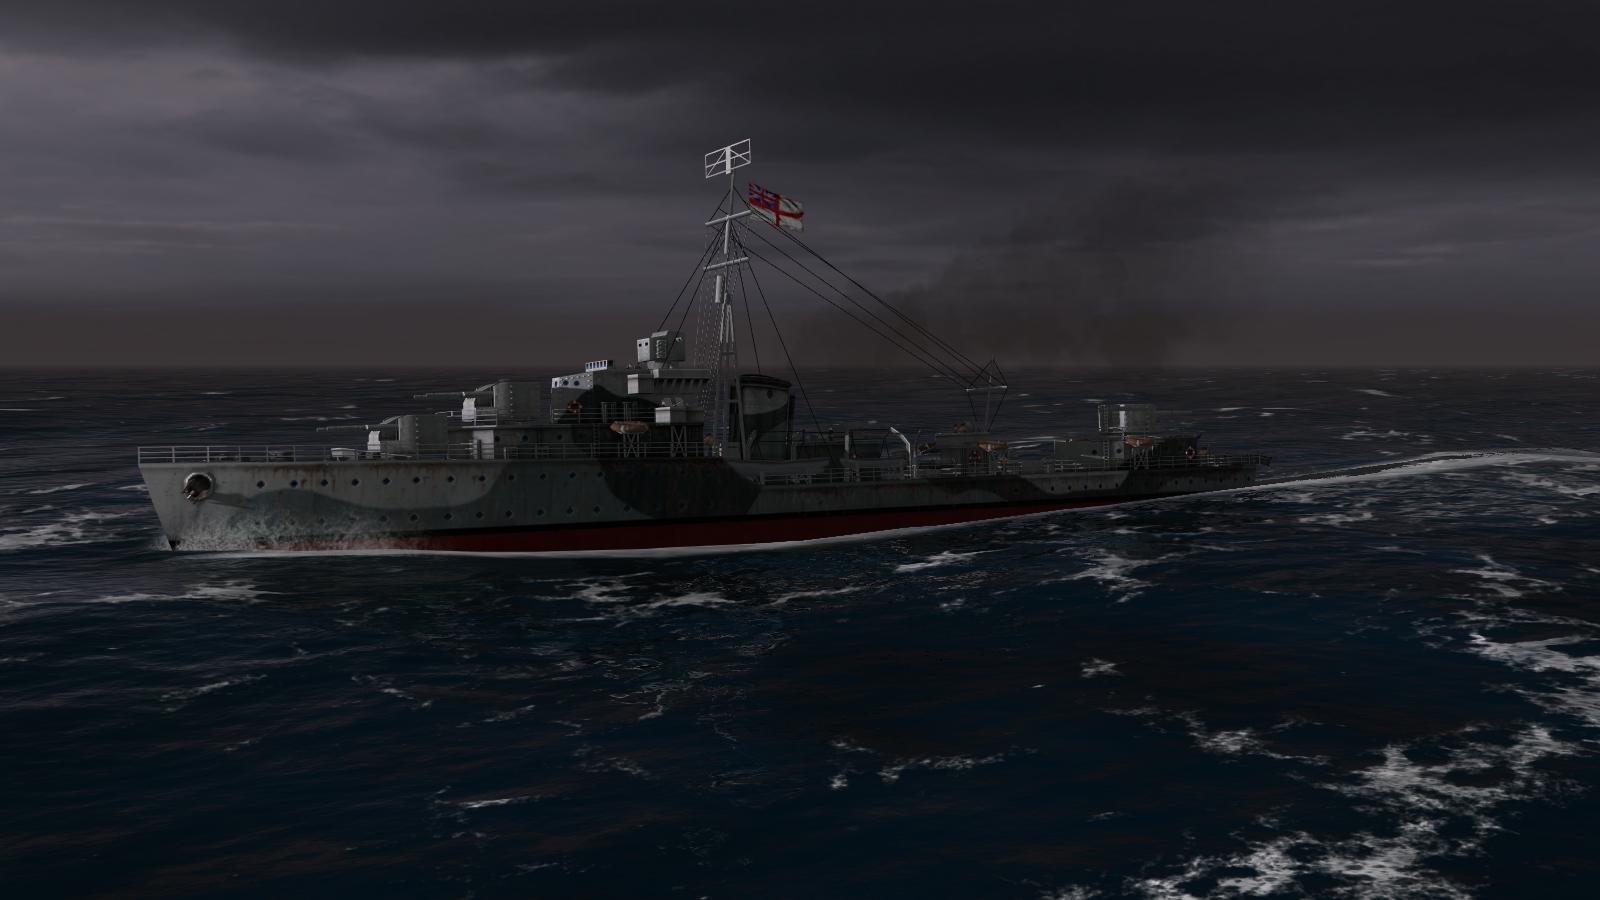
Destroyer disaster, submarine success... My next mission was one of those I like least - surface ships on my side, pitted against submarines. The only good thing about these missions is that - less realistically than in Atlantic Fleet's surface actions - the 'briefing' map, as seen above, tells you what you're up against, and you have a chance to pick your forces accordingly, beforehand. In this case, I had earned enough renown points to buy more than the two destroyers I had left from last time. But I decided I wasn't going to risk losing ships on this one, so just committed one destroyer, Echo, whose game plan would be simple - vacate the premises, so to speak. The problem is that in AF, subs - whose suurfaced maximum speed is generally about the same as a warships cruising speed - nevertheless and much too often start a battle in good firing positions - frequently, within the 'magic range' when a torpedo will travel far enough to hit you in one turn. If the subs have the initiative (=first move), this means they will put a tin fish into your ship before you can so much as move, let alone shoot back. And so it came to pass. The U-boats had the first turn! U-25 was almost directly astern of Echo and let fly with a fan of torpedoes from her four bow tubes. As it happened, U-25 was fractionally outside the 'magic range' - about 2,500 yards - and I would have a chance to evade...a slim chance, by the look of it... But that wasn't all. The second sub, U-28, was off Echo's starboard bow and she, too, let loose upon the hapless destroyer. Fortunately, U-28 was also just outside guaranteed hit range. Now, at last, it was my turn. I went to full speed and put on twenty degrees of so of port rudder, to turn parallel to the torpedo tracks coming in from my starboard quarter. This did the trick... ...but it took me directly into the path of one of the incoming tin fish from the second U-Boat. This hit Echo just abaft the second funnel. Realistically enough, torpedo strikes in AF seem to do varying degrees of damage. One will often sink a destroyer...but not always. On this occasion, Echo shook off the strike and stayed afloat. Now, I had a fighting chance! As AF often gives subs an unrealistic initial advantage, I will not refrain in using the even less realistic counter-move AF gives destroyers, as if in return. This is that a sub at periscope depth is something of a sitting target for a fan of torpedoes from a surface ship. Once or twice I have seen them dive away, but usually, the sub is an easy target. With two U-Boats hunting me, I could not afford to make many mistakes. To be certain of a kill, I usually attack a sub with a fan of at least six torpedoes. As warships can't reload torpedoes during a battle and my 'E' Class ship only had two banks of four, this meant I'd have only one good shot at my tormentors. While the enemy torpedo hit would undoubtedly slow me down, I might still be able to out-run the submerged sub astern. So I set up my torpedo attack on the beggar to starboard... ...who, as the asdic operator had reported, was obligingly still stooging about at periscope depth... That did the trick. Down went U-28! But U-25 was still in the fight, as another torpedo track not too far to starboard now reminded me. Sub reload time is quite short in AF, though they seem to manage only one tube reloaded, per turn. So I was still in grave danger. I did the only thing I could, which was to blaze away at his periscope with my after 4.7 inch mountings. Fortunately, this was one of those occasions when my shooting was not too bad. Again, that did the trick. The U-boat dived away, lighty damaged, and disengaged! I had been lucky. If even one of the subs had been within the 'magic range', I would probably have caught a couple of tin fish, which would certainly have been fatal. As it was, I had been lucky that the one I didn't avoid hadn't sunk me and that my counterattack had been so effective. The icing on the cake was that as damage is cumulative in AF's dynamic ('Battle of the Atlantic') campaign but not in this static one, I knew that good old Echo would be fully operational for the next mission. So, where was the 'destroyer disaster' of the title? Well, not too far away, is the answer to that! ...to be continued!


-
A great boxer, and more importantly, a great man.
-
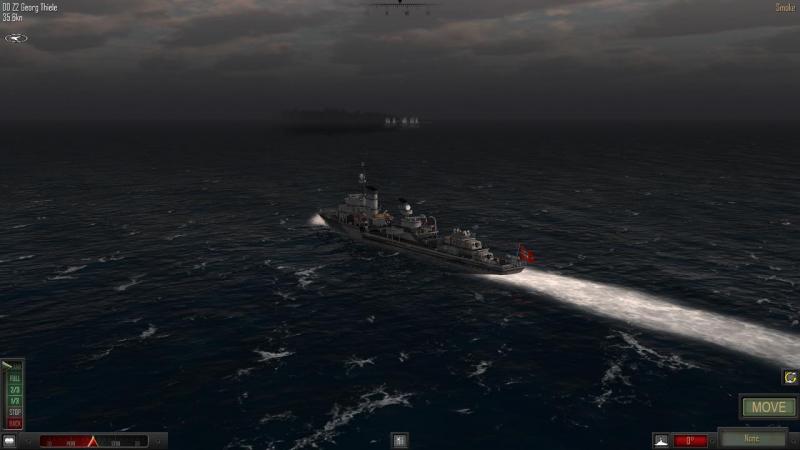
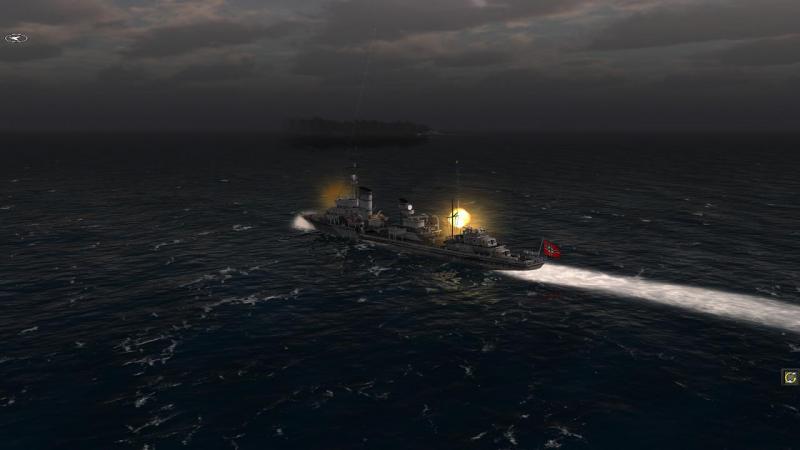
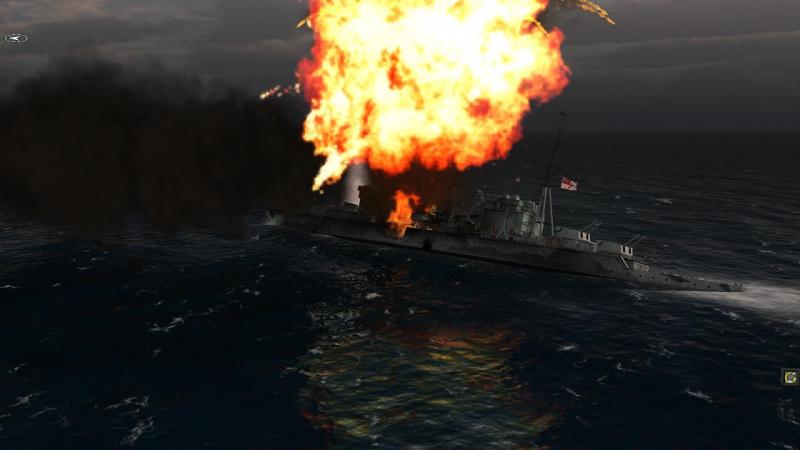
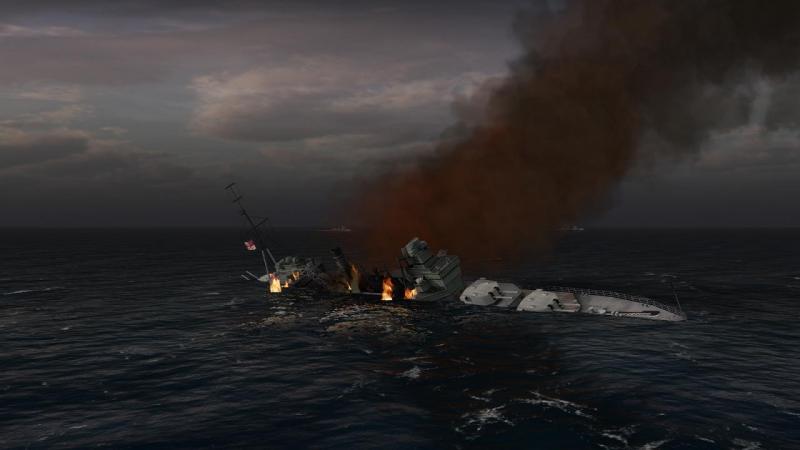
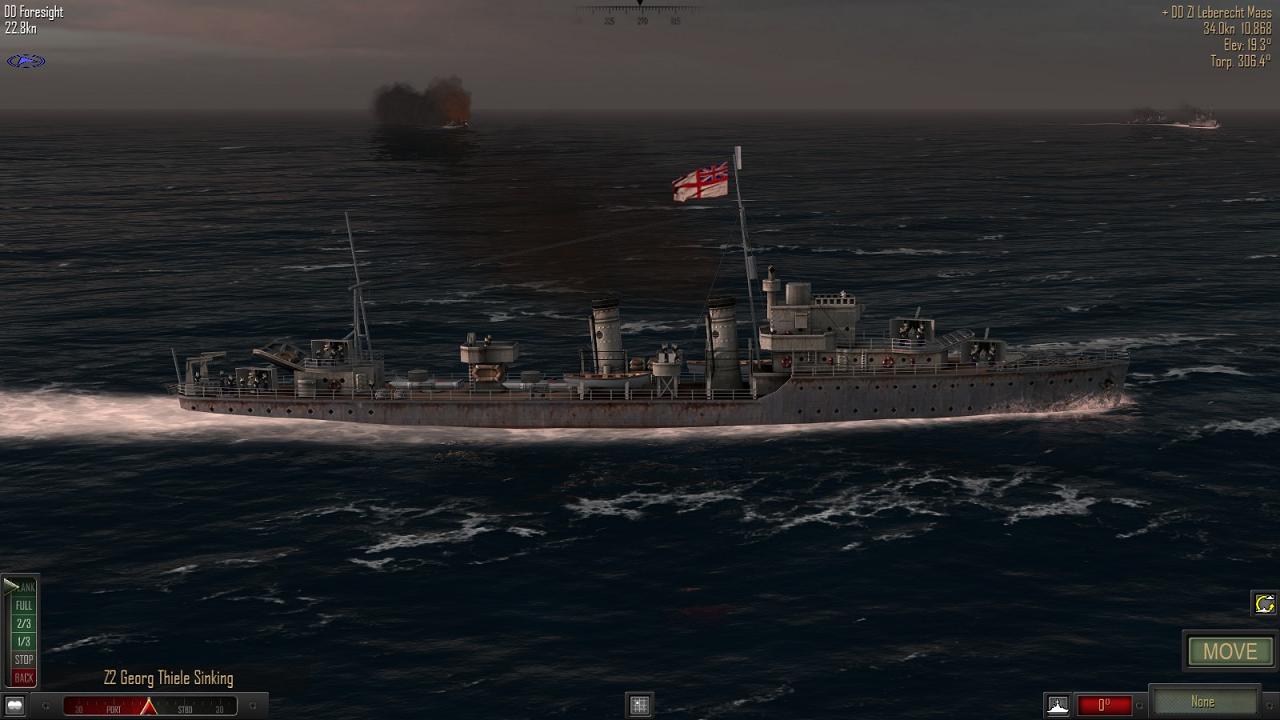
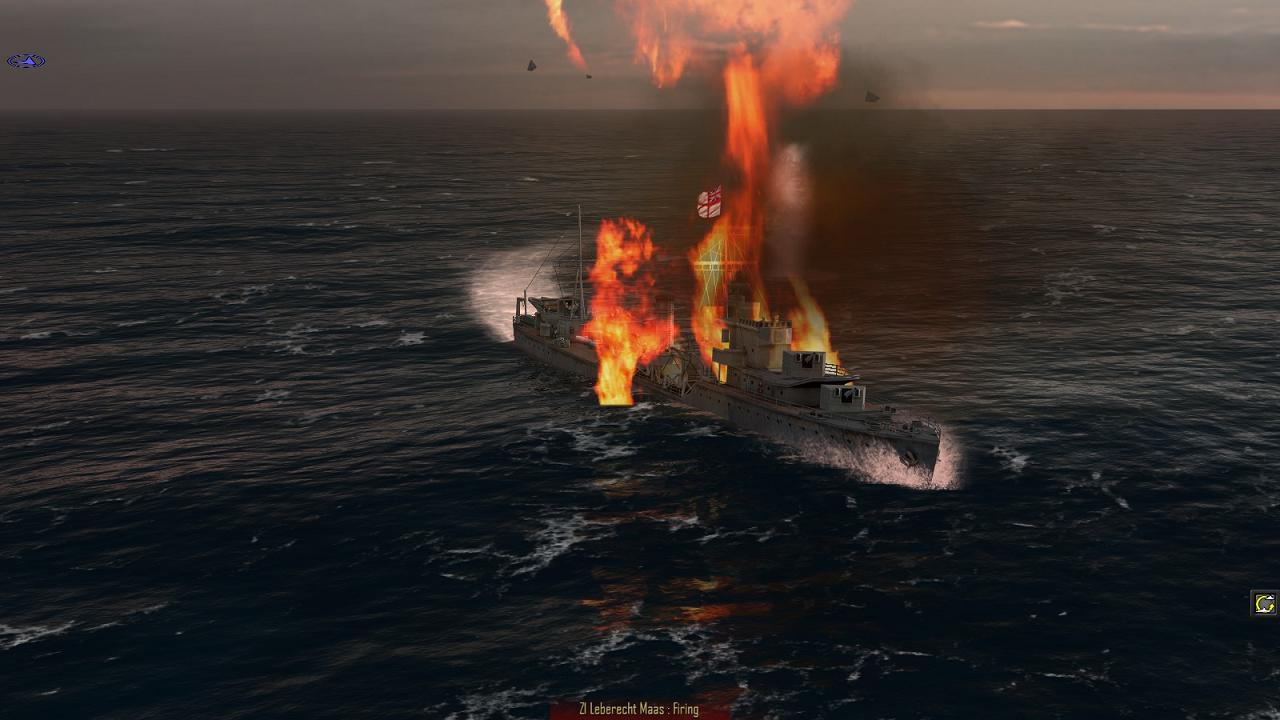
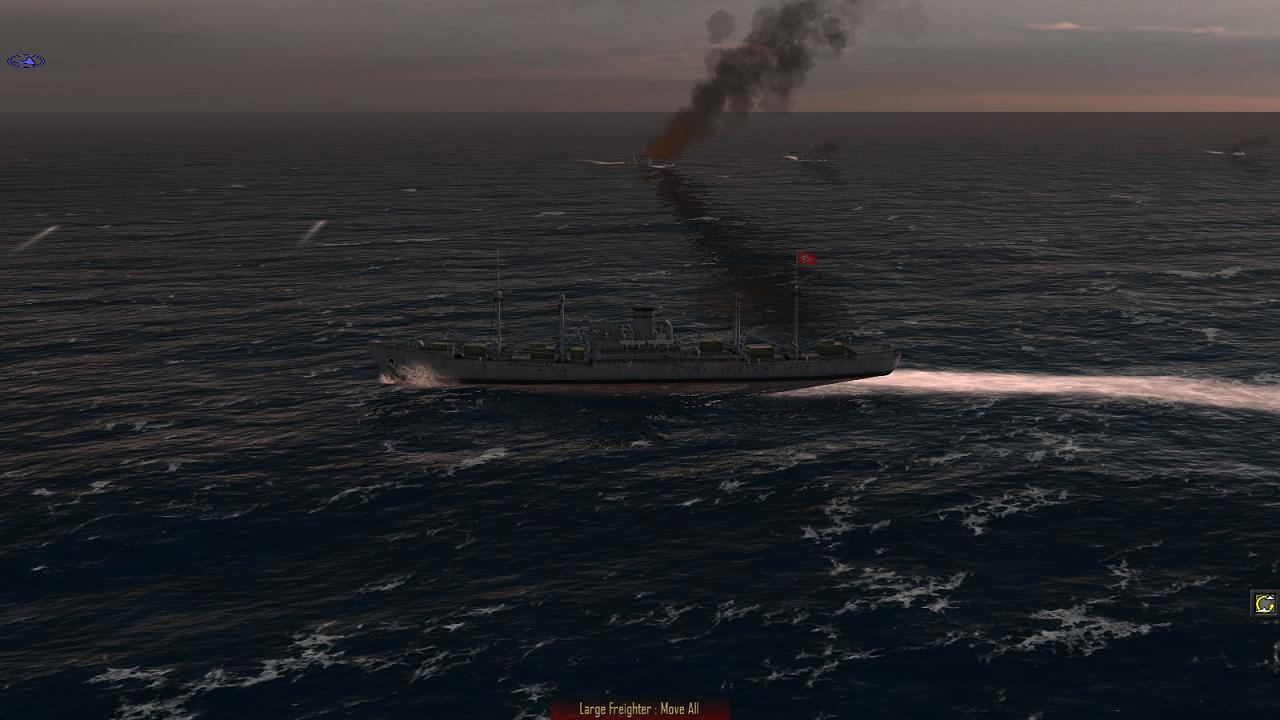
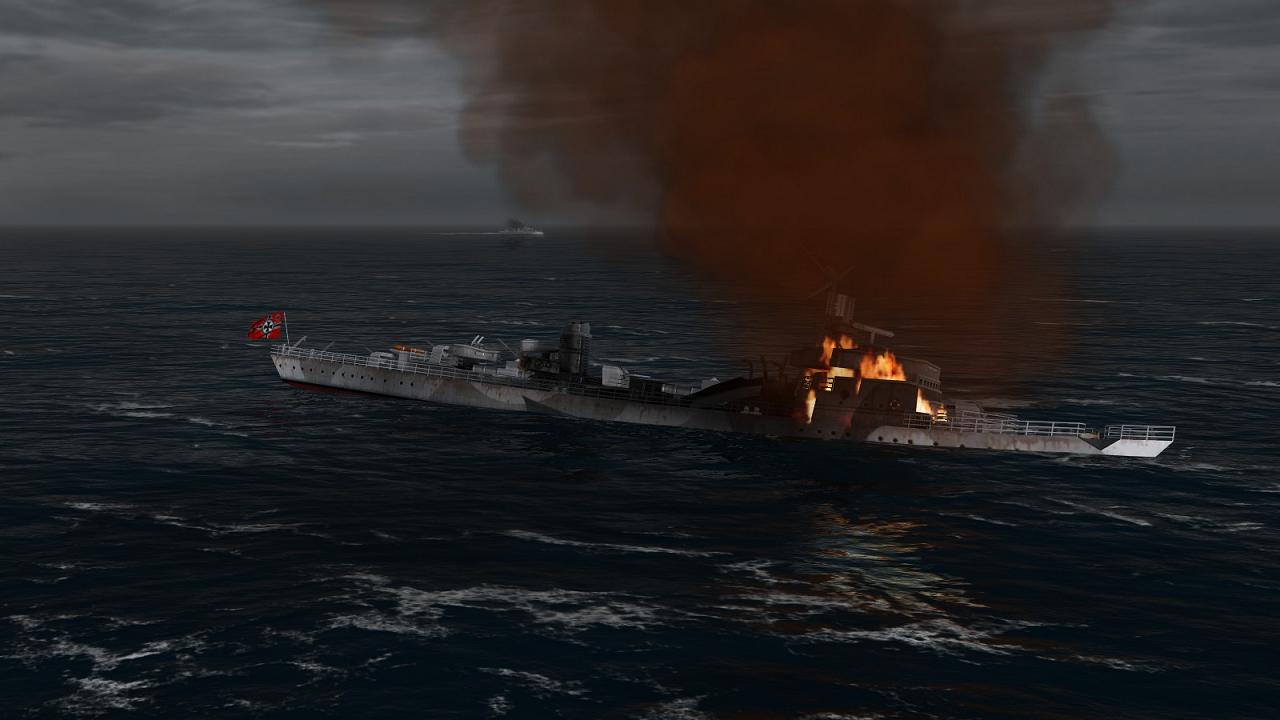
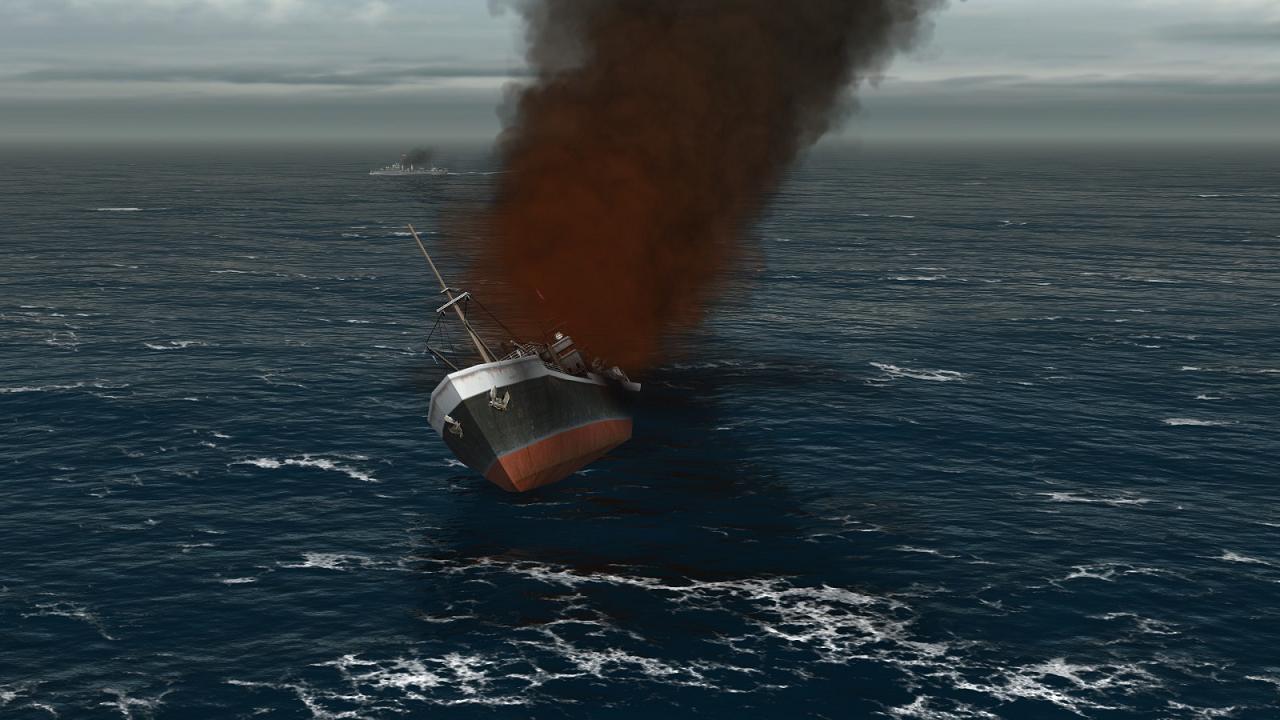
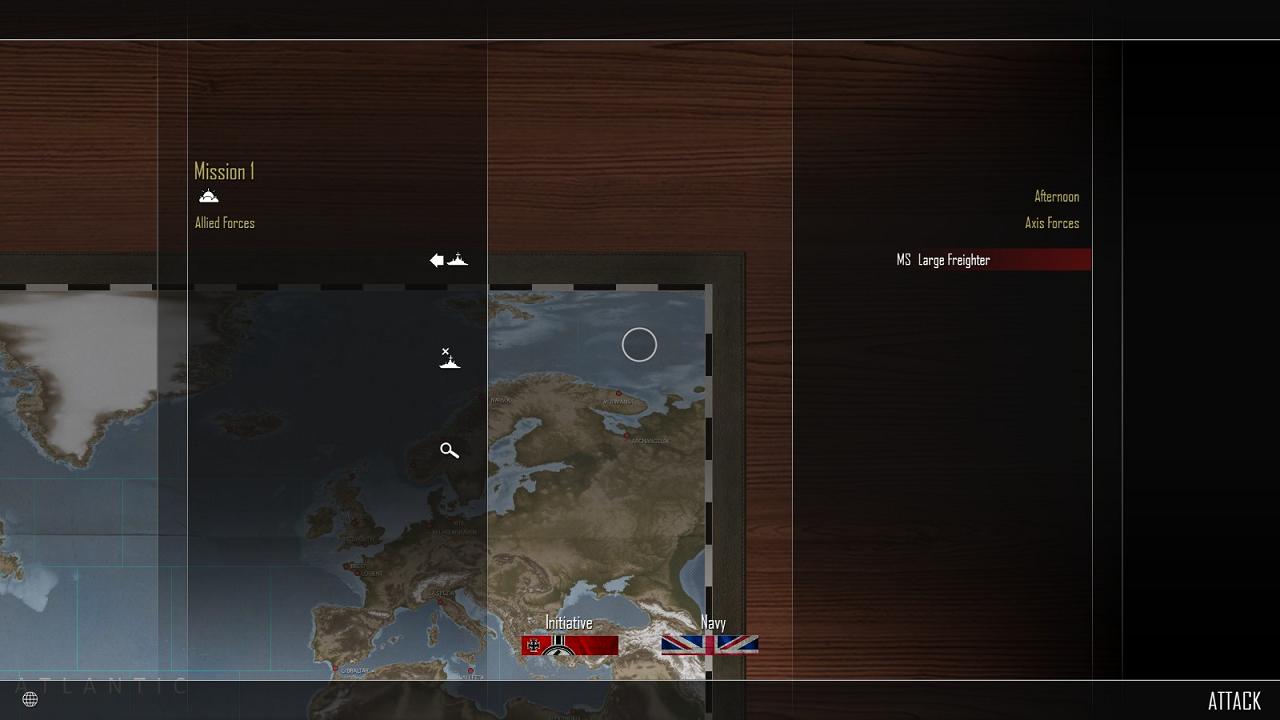
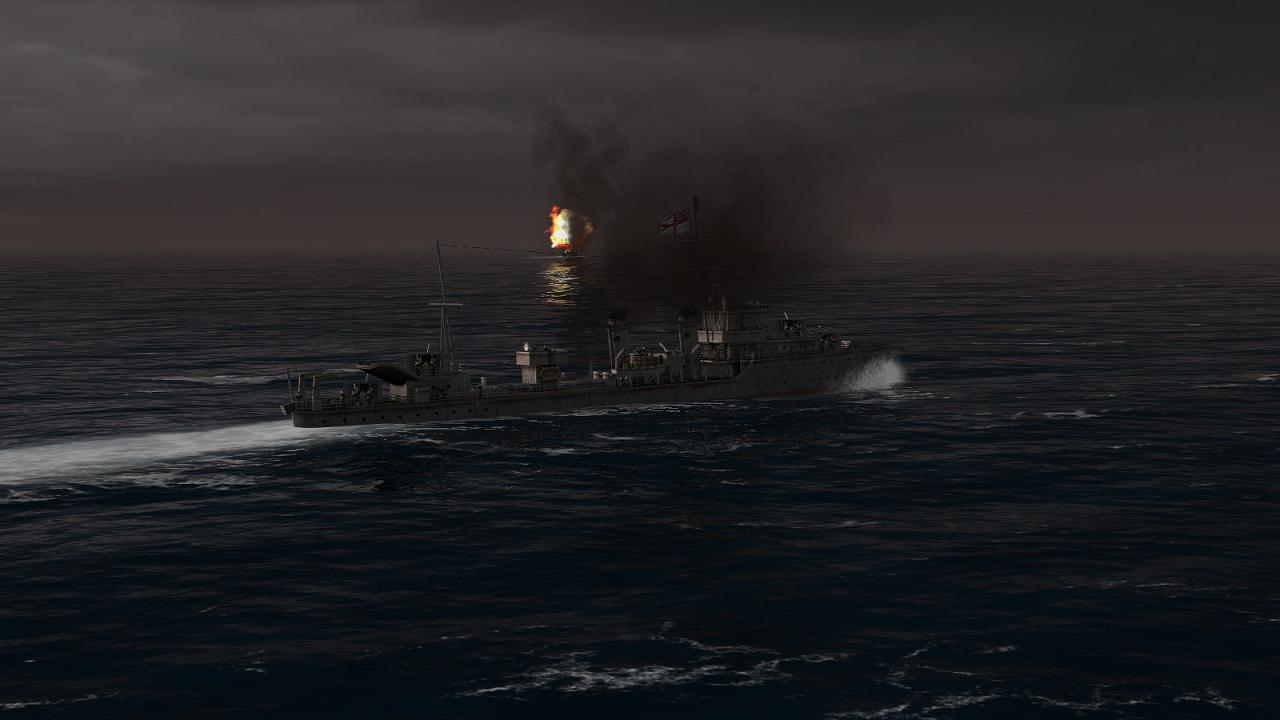
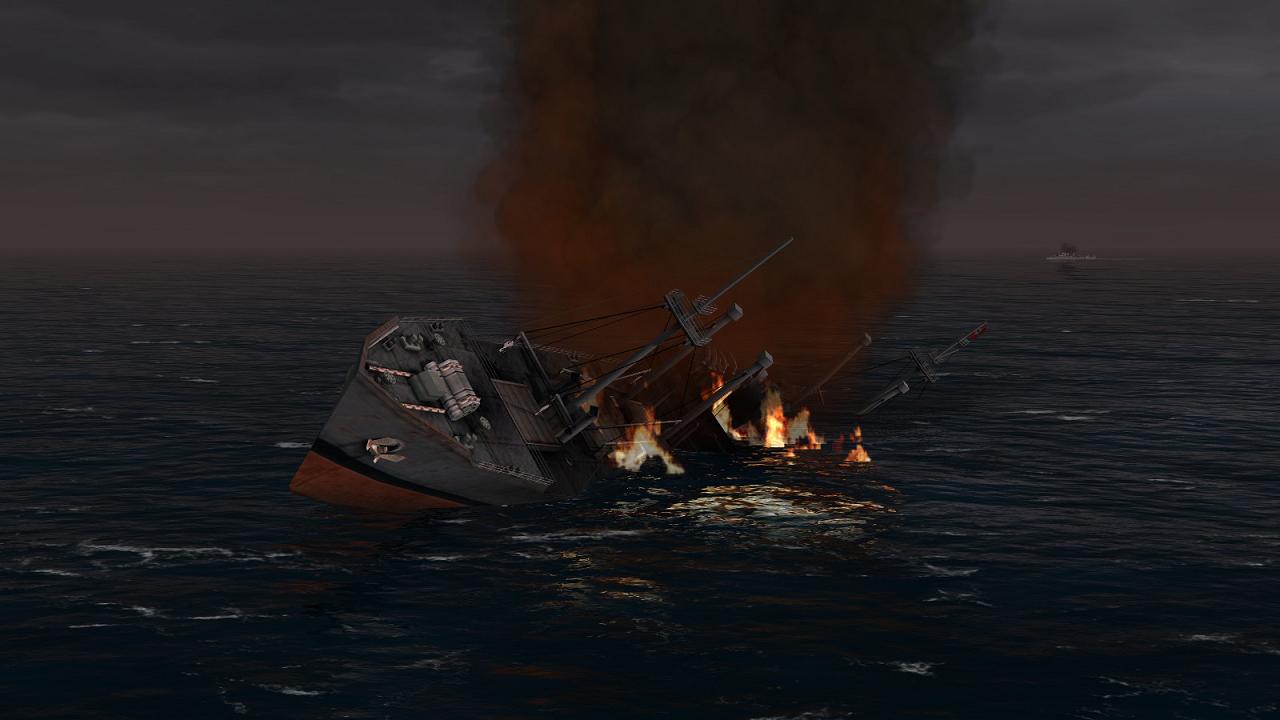
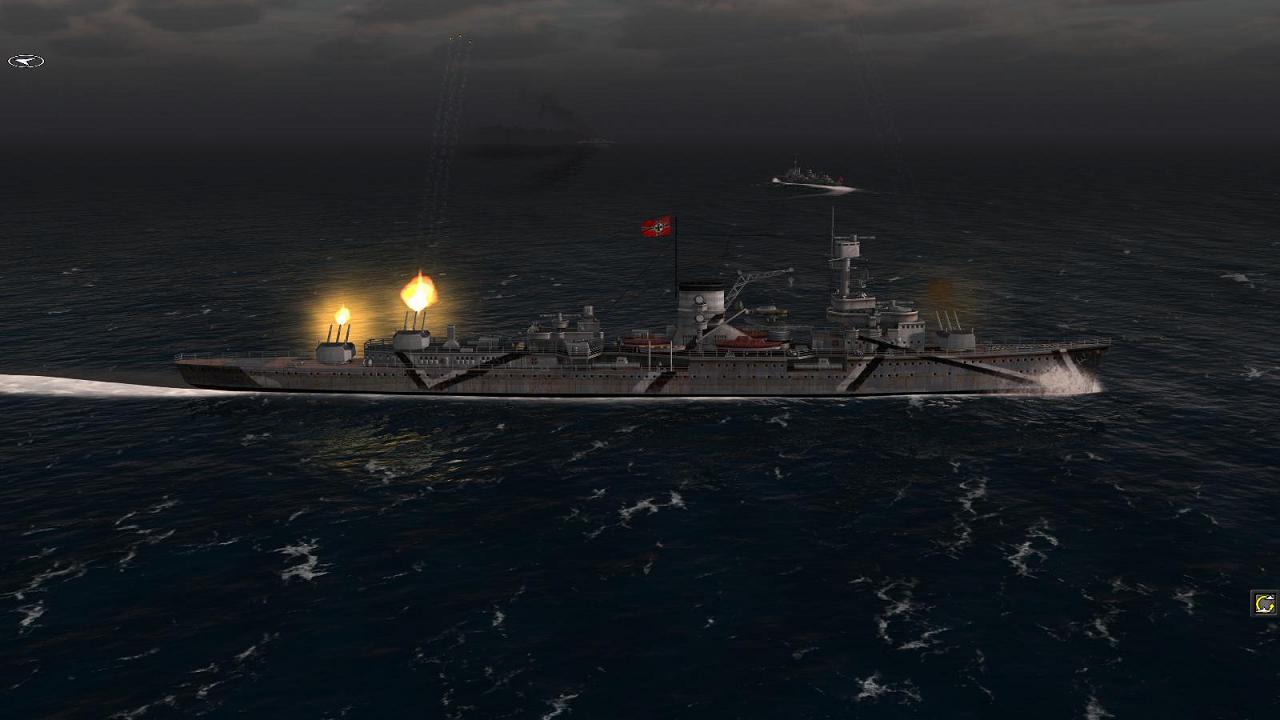
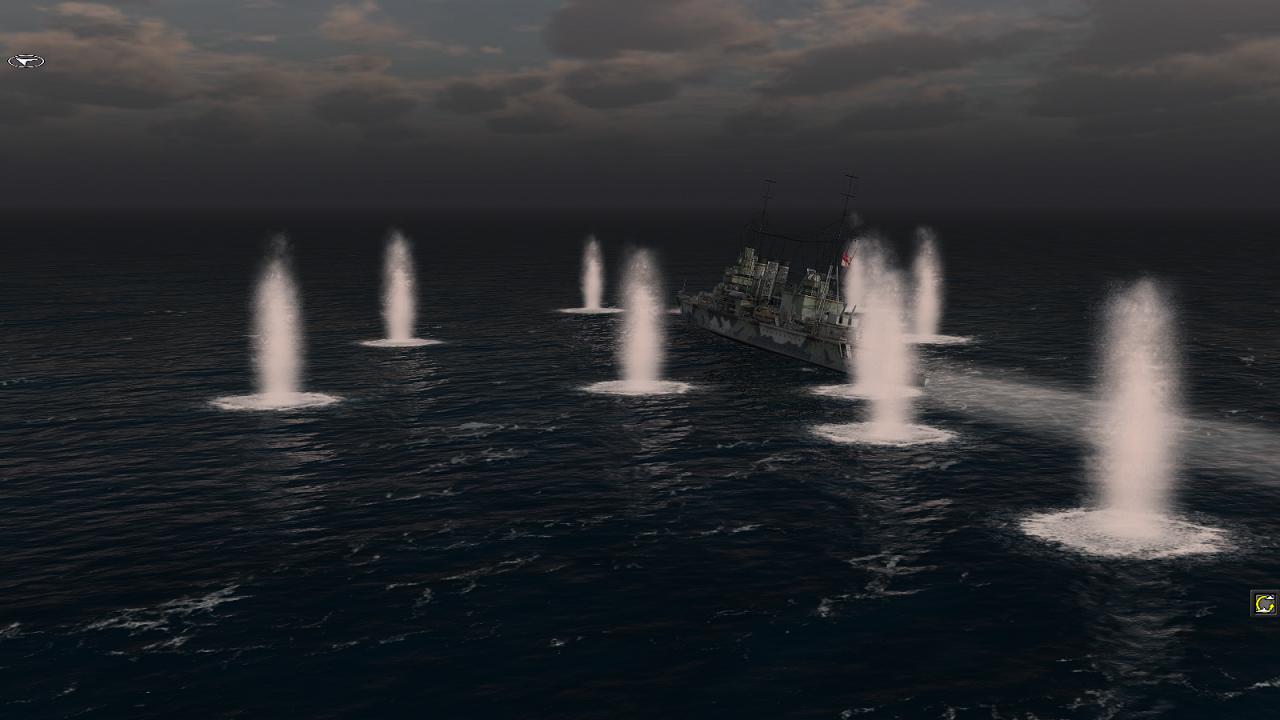
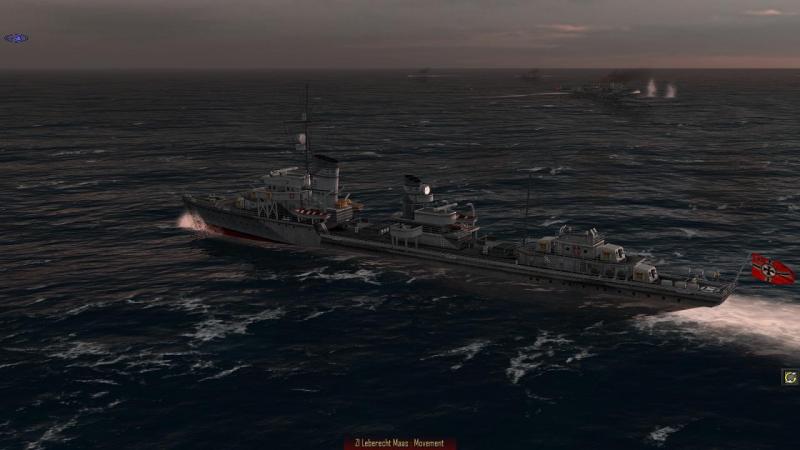
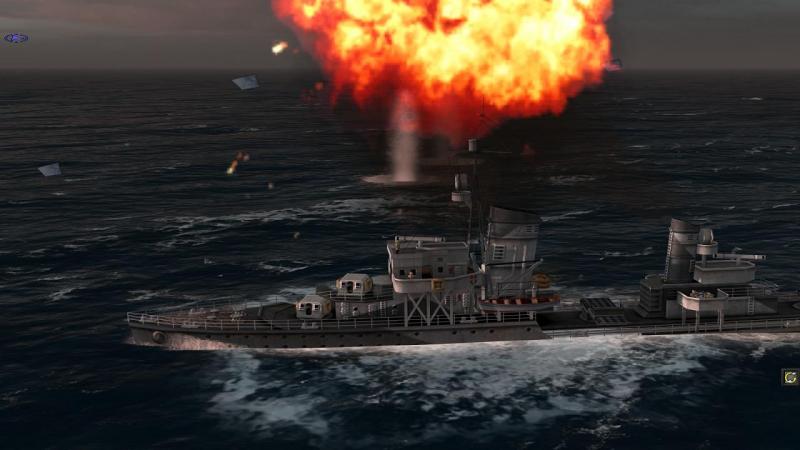
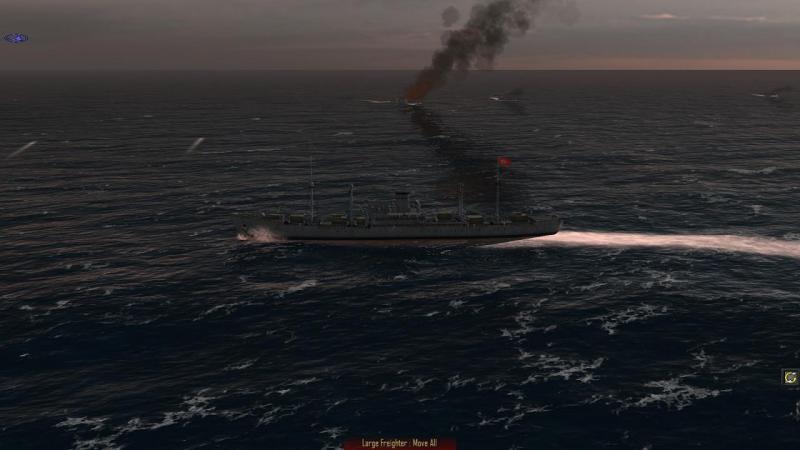
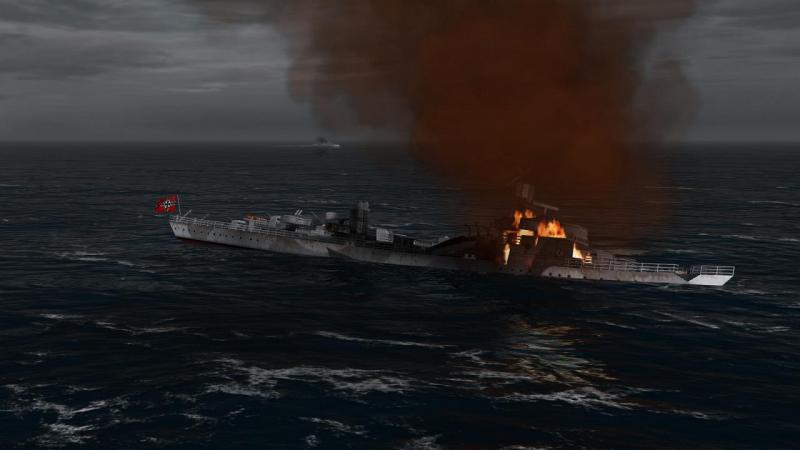
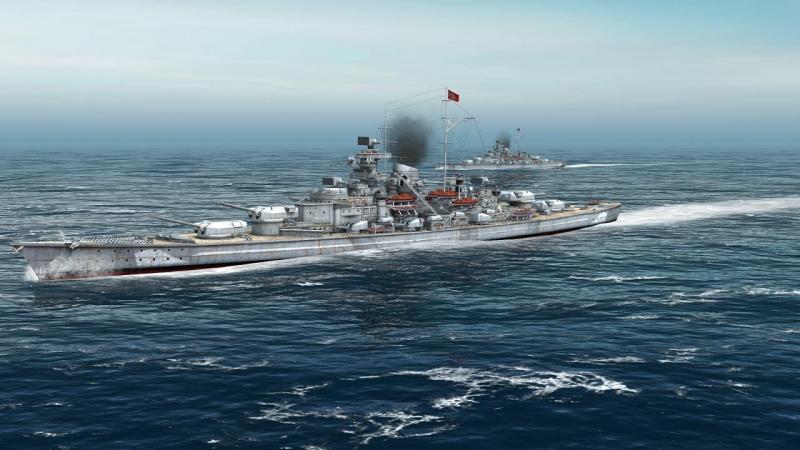
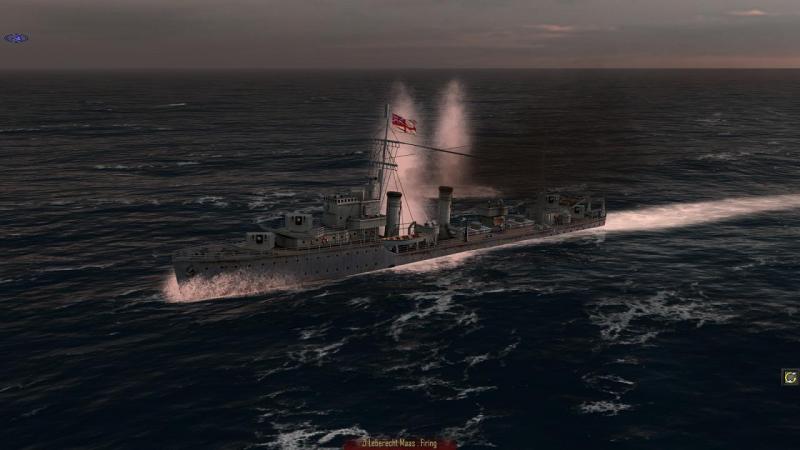
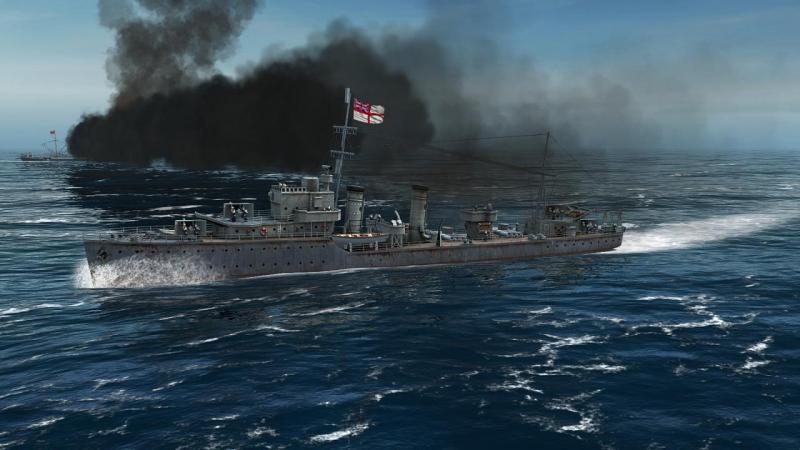
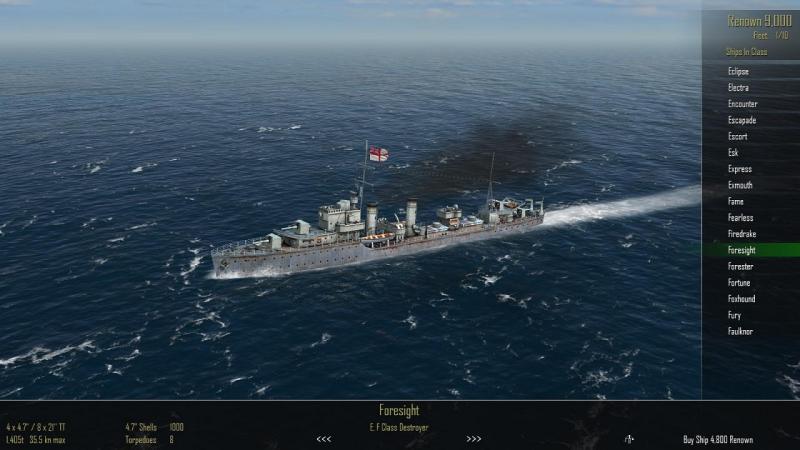
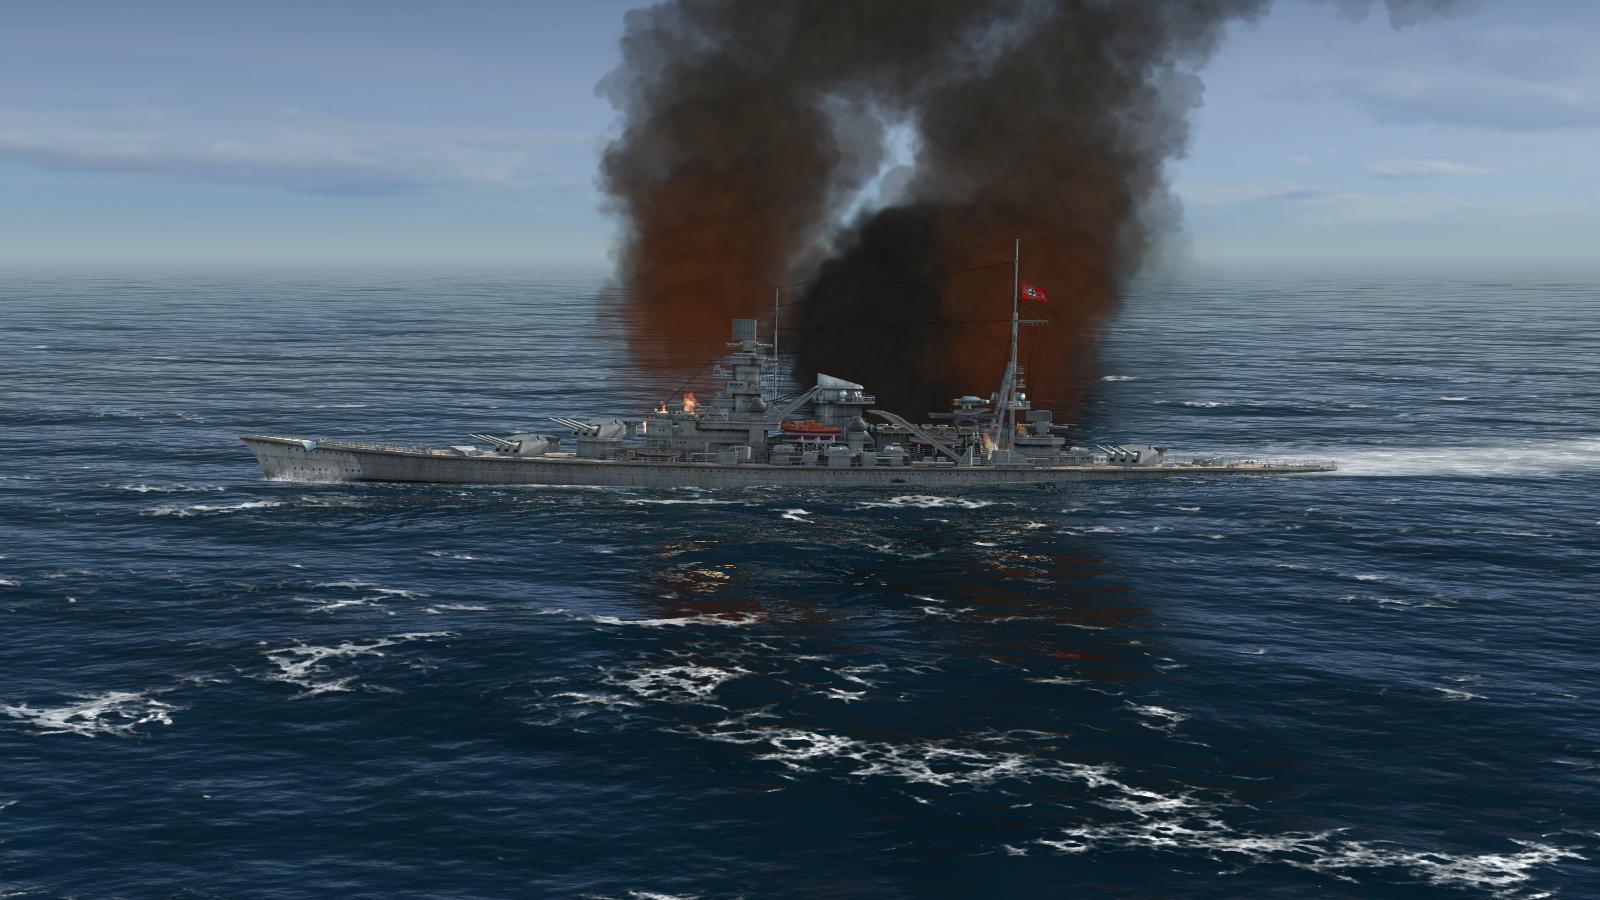
Destroyer versus destroyer! Mission # 5 saw me inteccepting two German destroyers, Leberecht Maas and Georg Thiele, who were escorting a large freighter, off the north-eastern coast of Brazil. This definitely called for the deployment of all three destroyers of my own. I had the initiative and used this to turn two destoyers to starboard, the other to port, and started shooting at once. The enemy were steaming straight towards us and there was a moderate crosswind. I decided ,for as long as I dared, to concentrate all my fire on the leading enemy warship, hoping thus to gain a decisive advantage early on. I didn't need to sink him; just damage him enough to cause him to disengage, before the fire of his more distant comrade posed a serious threat. This is fairly classic 'divide and conquer' stuff, owing something, I think to 'Lanchester's Law', whereby I would try to divide the battle into two fights of 3 -vs- 1, not one fight of 3 -vs- 2. Somewhat as Nelson did at Trafalgar; not that I'm comparig my grasp of naval tactics with such a Grand Master's! My first salvoes were well over, falling harmlessly into the sea between the two oncoming enemy destroyers. The enemy frighter unwisely held his course, standing on towards us. The enemy warships sensibly turned left and right and Thiele, the nearest one, started shooting back. Mass would not be long, in doing likewise, I knew. At this point, we began landing hits on Thiele, with results that were spectacular, but by no means immediately fatal. . Another salvo had the desired effect. Thiele turned away and started making smoke. He was out of the fight, for the time being at least, and was sunk soon afterward. I immediately turned my attention to the hitherto-unengaged Maas, about the time he passed behind the enemy frieghter, moving left to right across our arcs of fire. I allowed this to distract me, to the extent my nearest destroyer cracked off a broadside at the merchantman. Things now took a decided turn for the worse. Before I could do Maas any damage, she landed a devastating broadside on Foresight. Up to then, I had got away lightly, but my second 3 -vs- 1 battle had started rather badly. Foresight was still in the fight but badly damaged. To make matters worse, the fiercely-battling Maas, though soon herself hit again, also launched a fan of torpedoes. This forced me to take violent evasive action. It was fortunate indeed that Foresight, though burning, was still answering the helm. By this time, the German frieghter captain had woken up and was turning hard to get away. At this point, Foresight's luck ran out, all at once and emphatically. There was a violent explosion, presumably a propellant fire reaching a magazine, and down she went. By now, Maas was also burning, and the tin fish were her last hostile act. She too sank, soon after this picture was taken. All that remained now was to run down the fleeing freighter. This presented no particular problem, for my two surviving destroyers. Losing Foresight was a sad blow, but over 13,000 renown points from the battle was some compensation. Which came in handy, for my next battle was to be a very different kettle of fish. ...to be continued!


-
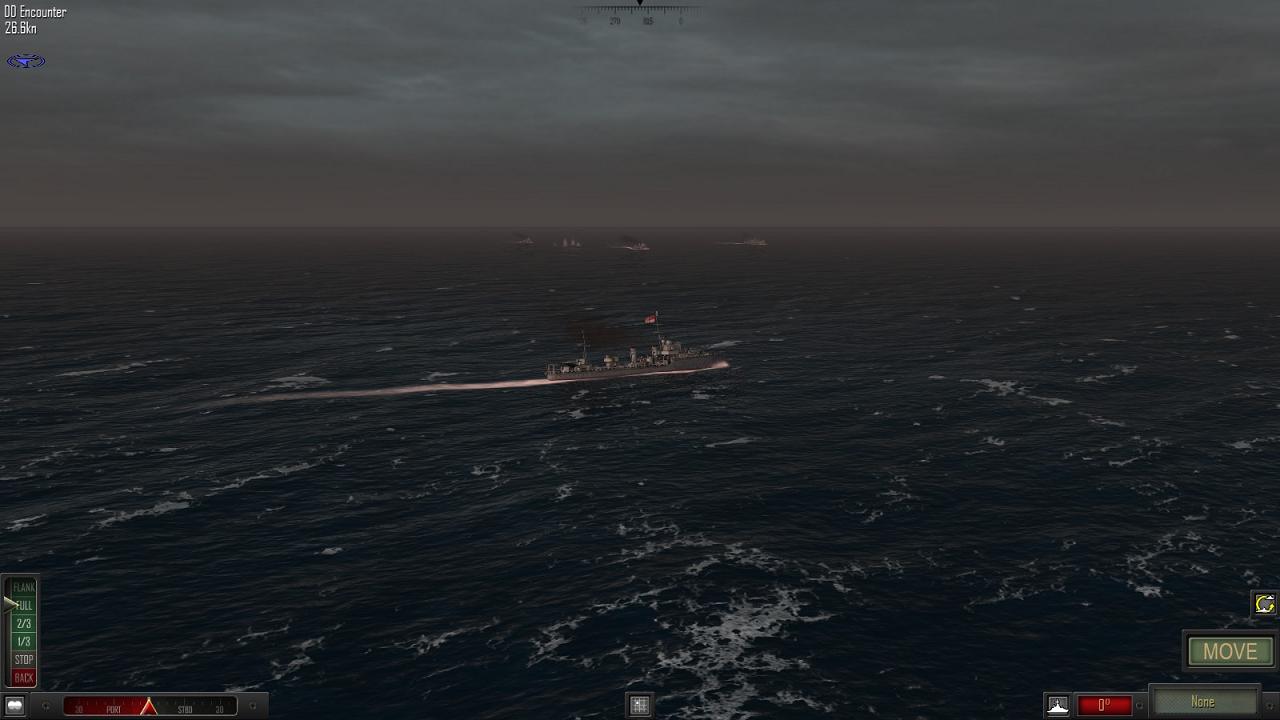
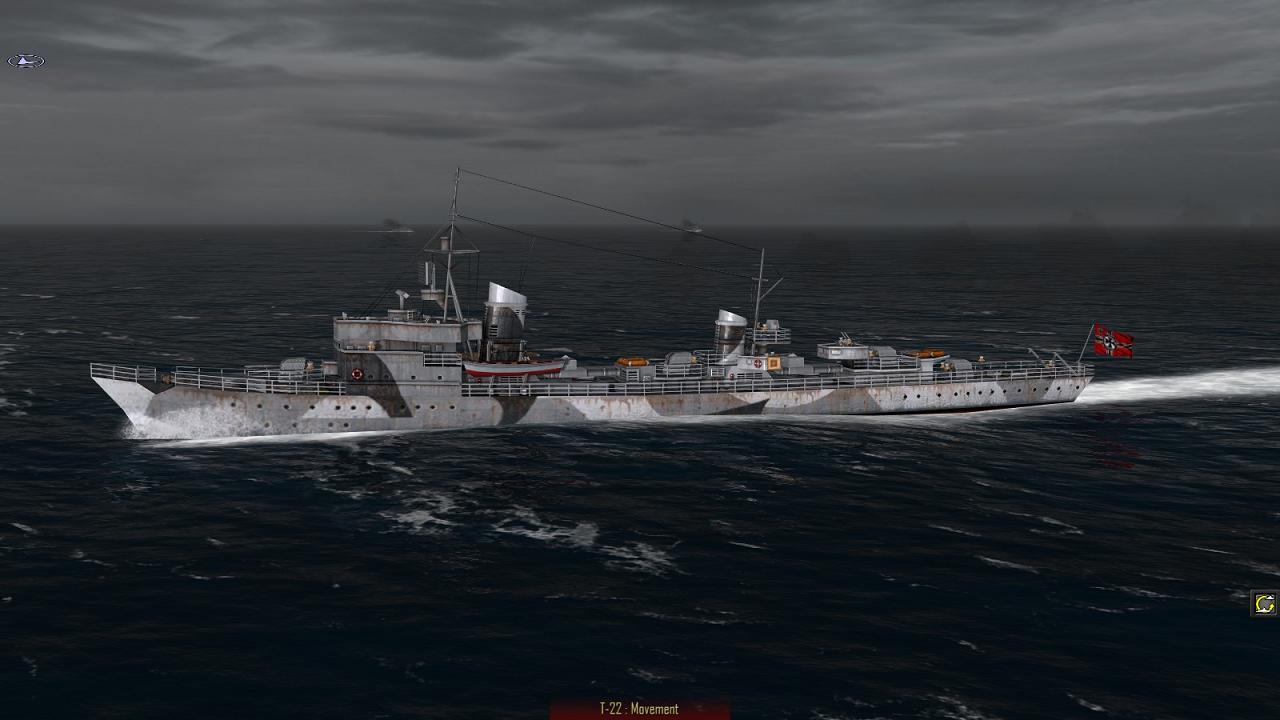
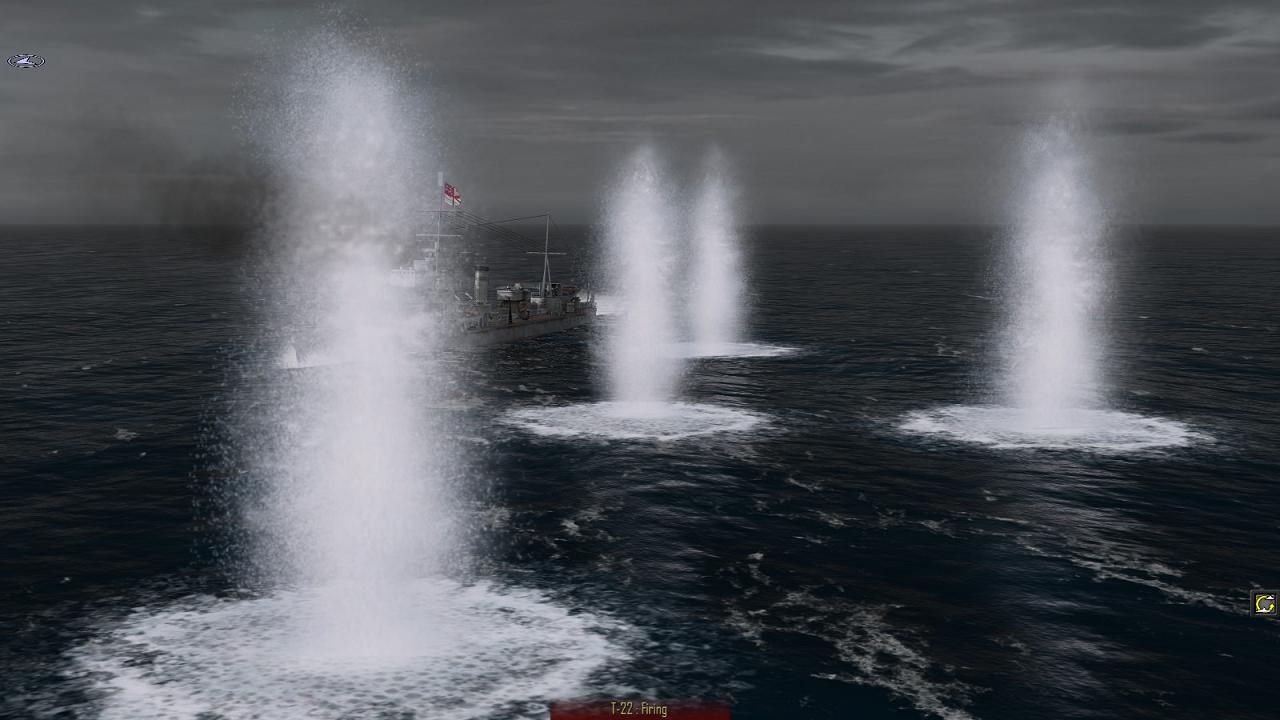
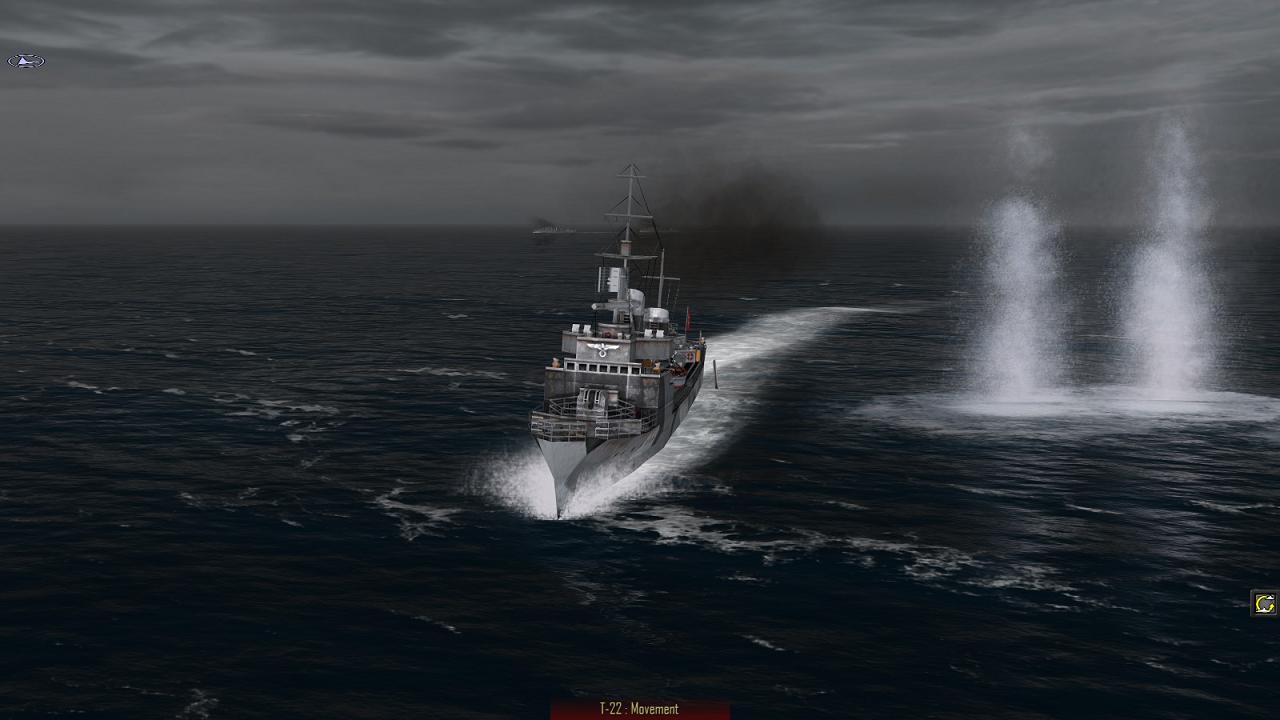
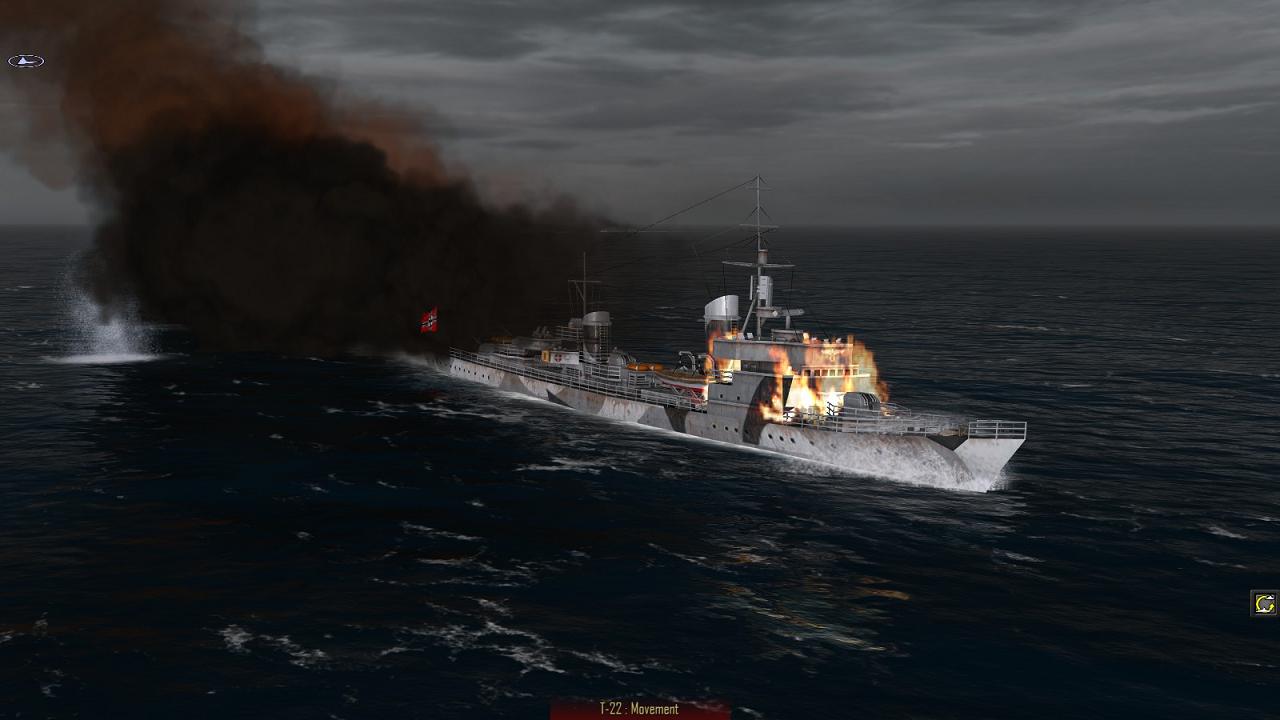
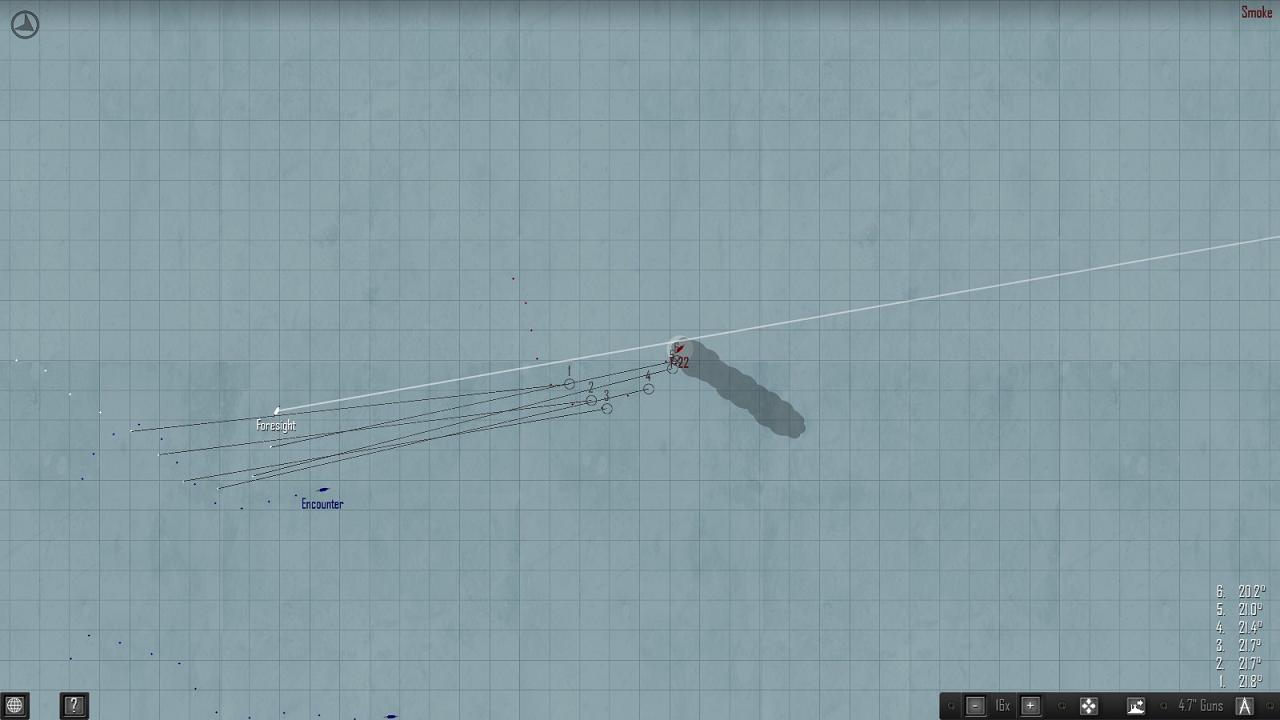
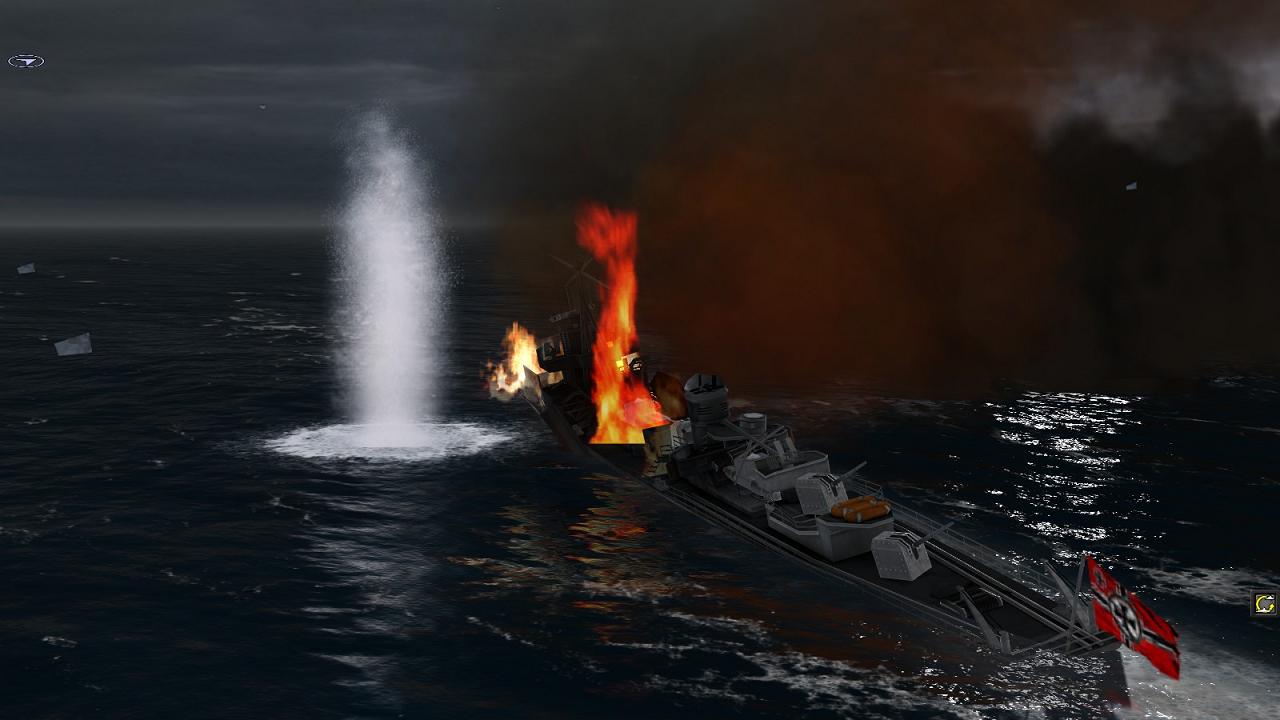
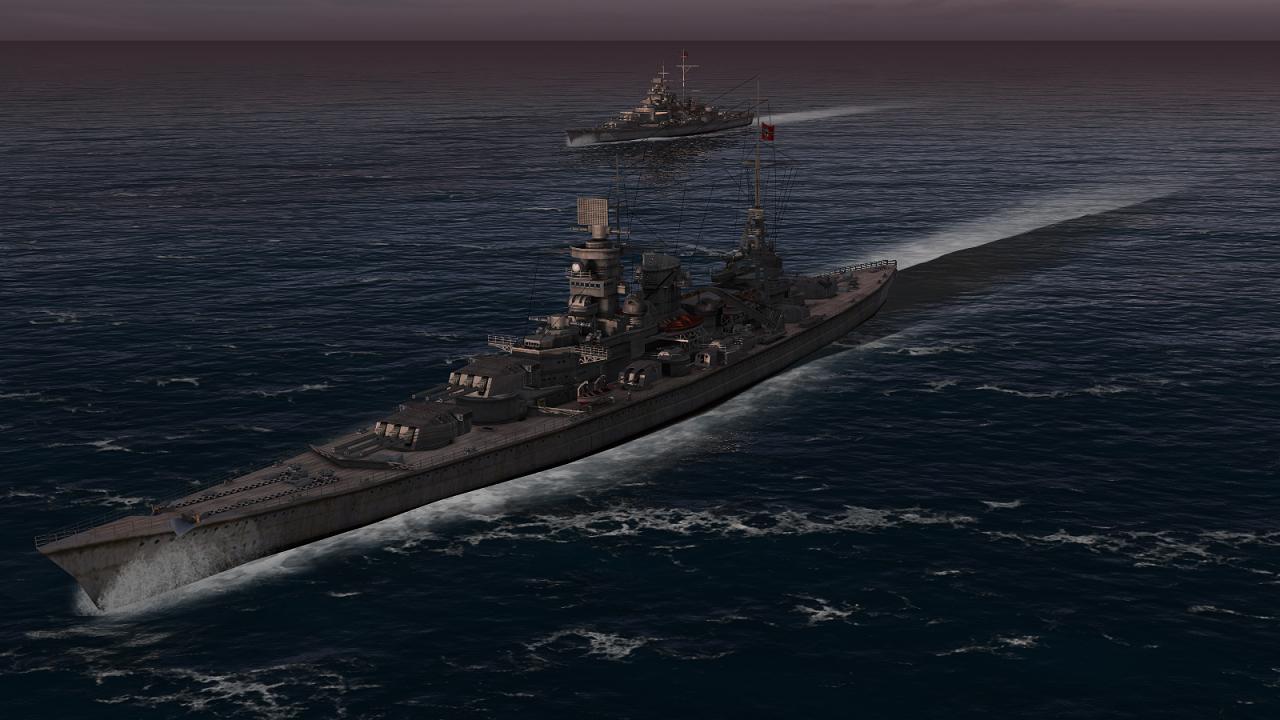
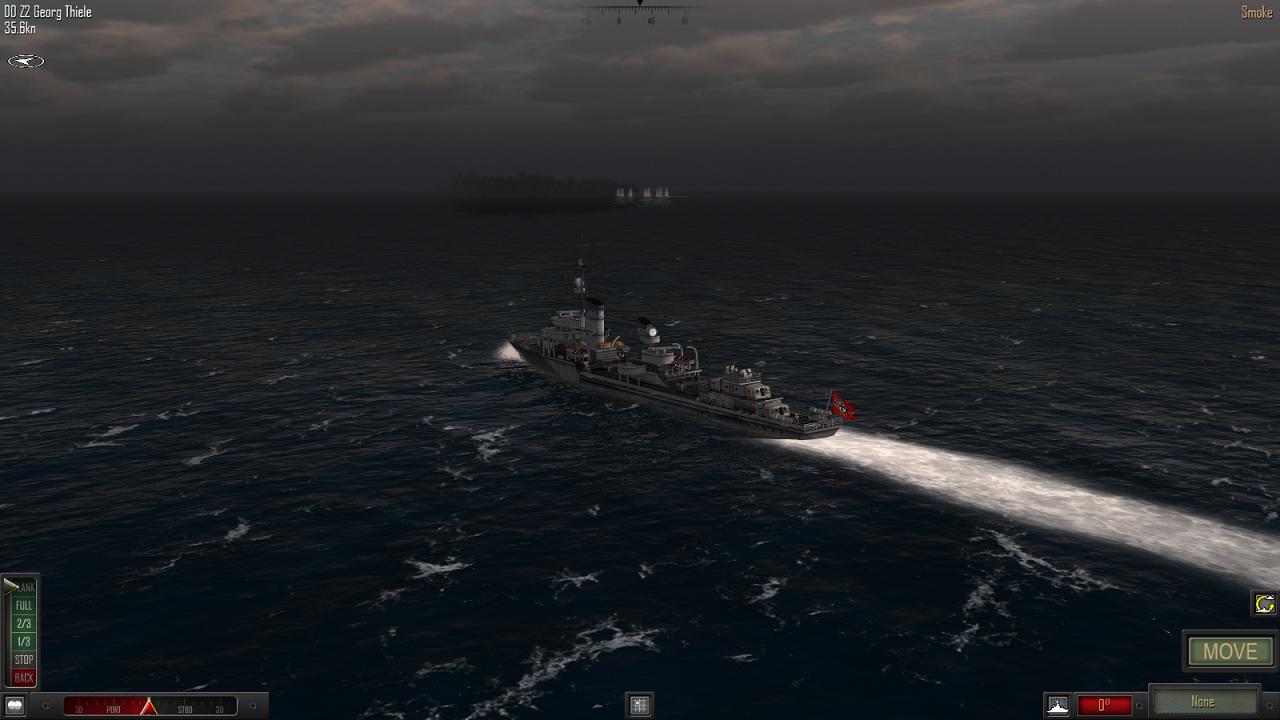
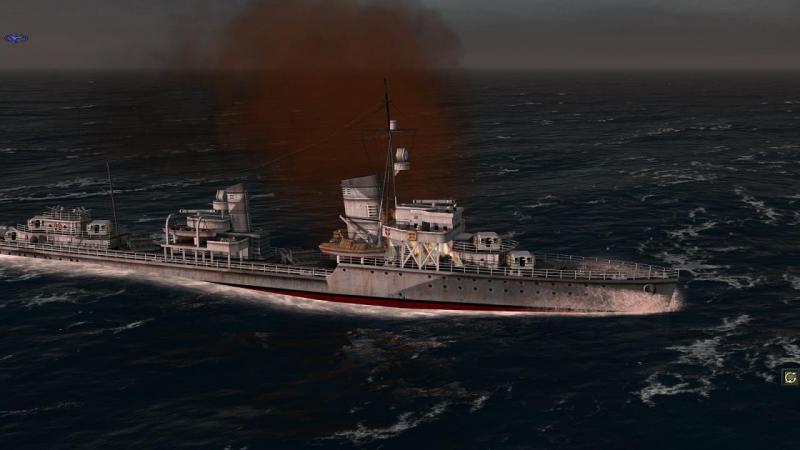
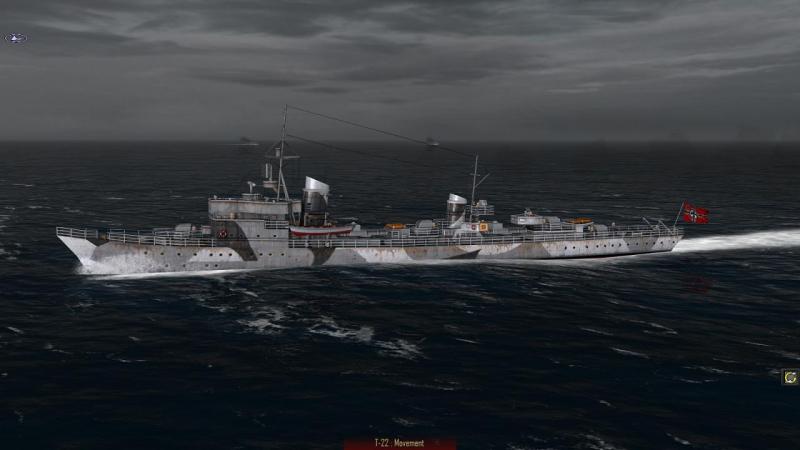
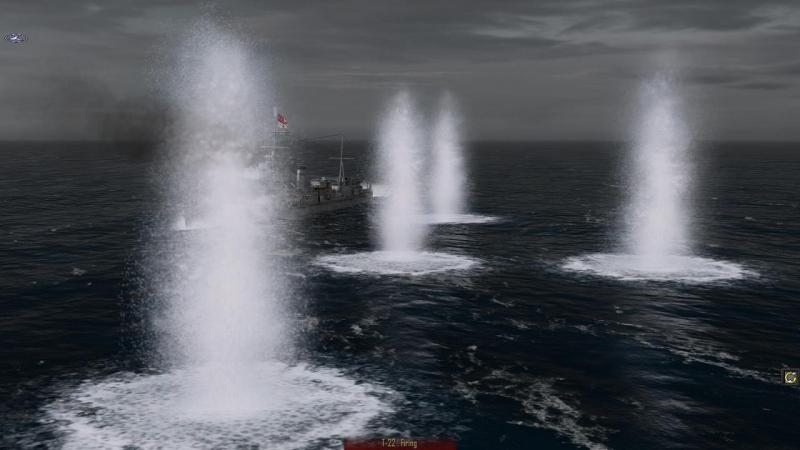
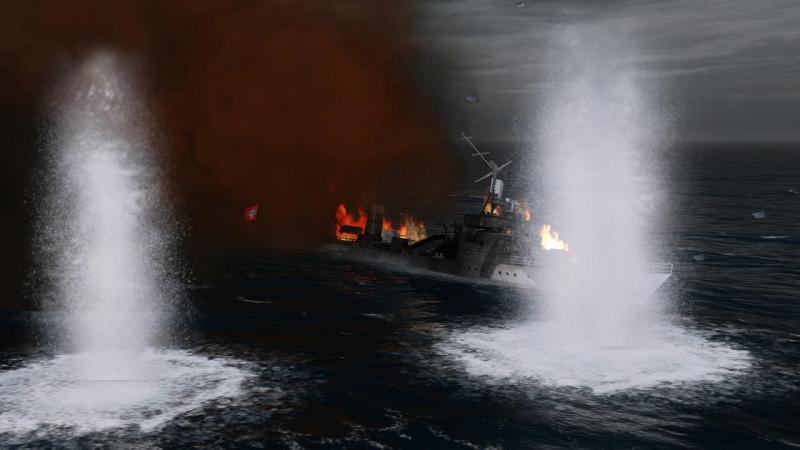
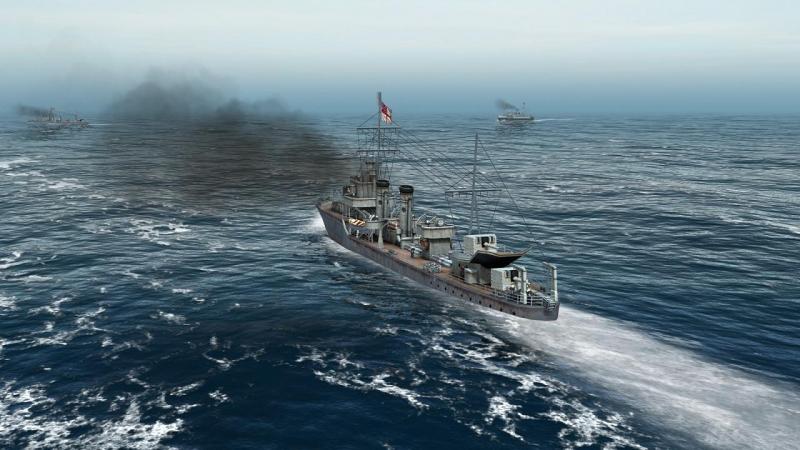
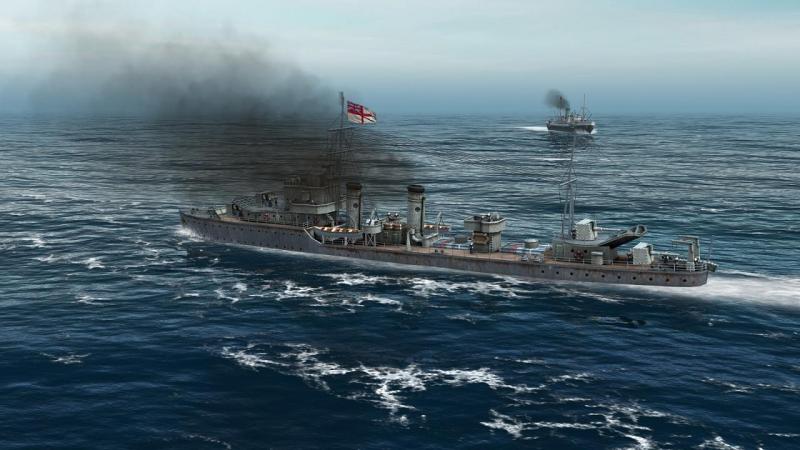
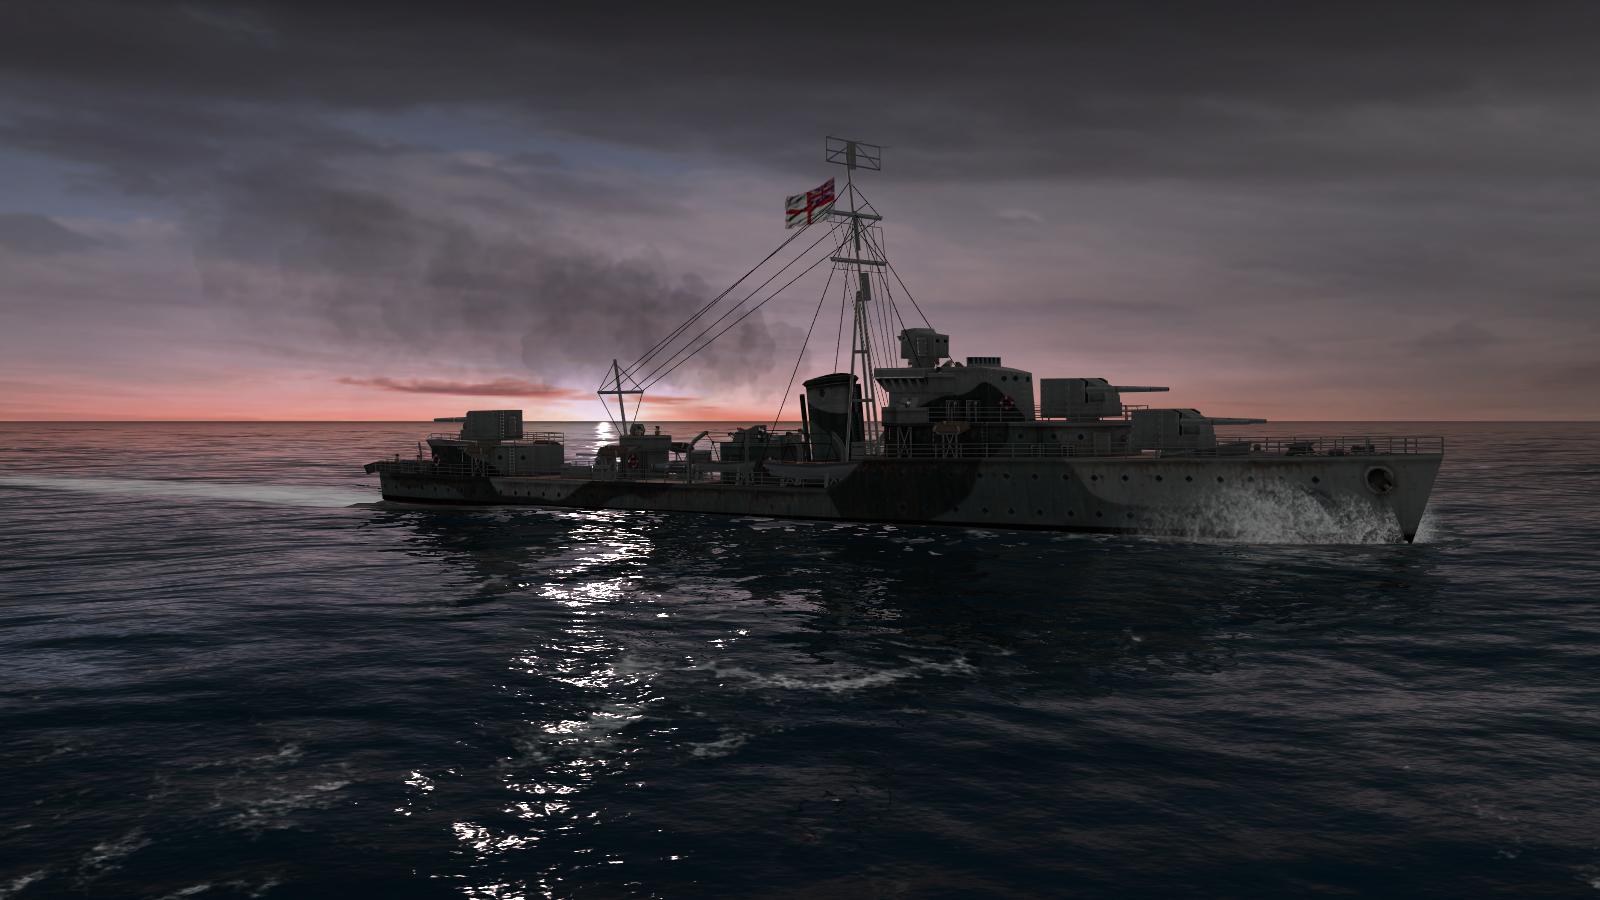
Torpedo boats...and torpedo boat destroyers Before describing the next missions in my Royal Navy static campaign, I should say that this is my second play-through, and that I have the impression that while the enemy generally starts out as helpless merchant shipping, there is some replay variability, as missions progress. You can certainly get some variety by acquiring different ships as you earn the necessary renown. Or by deploying different ships for each battle (the maximum is three, out of the ten you can have in your mini-fleet, though the enemy may have slightly more). Suffice to say that my second time around is proving just as much fun as the first. It helps that you have the sense of being in an arms race, needing to acquire enough or better warships at least to keep abreast of the stepping up of the opposition, in each successive battle. Lose ships or otherwise fall behind, and you might find yourself in a downward spiral. It's useful that you can replay any given fight, before moving on to the next one. My next battle brought me up against a sleek German torpedo boat, T-22. The Kriegsmarine was one of the navies which persisted in building these vessels, essentially small destroyers with a light gun armament, but a heavy torpedo battery. The Kriegsmarine's torpedo boats saw much service and had their successes, but were not as versatile or powerful as the destroyers (originally developed and known as torpedo boat destroyers) favoured by the USN and RN, or as effective as escorts as more specialised craft (Atlantic Fleet is essentially open water warfare so there are no motor torpedo boats or other coastal warfare craft). With enemy air power unlikely to intervene - the location was mid-Atlantic - I had no qualms about deploying all three destroyers for this fight. You get no choice of placement in AF, and in most cases the battle starts with both parties inside gun range...which is fine in most cases, except that – especially relevant, if you’re playing any sort of German surface raider - a longer start range option (which is ‘in the works’, apparently) would give you the chance of running when you met a more powerful opponent. Not a problem in this case! I was awarded first move and one ship at a time, I went to full speed and turned to approach the enemy at an angle. One advantage of my early destroyers in this sort of battle is that their rear guns have a wide arc of fire forward, more than most warships. My shooting was terrible. There are generally four reasons this happens. First, while relishing gunnery in AF, I secretly long for the option to role-play the skipper and just order targets that are then engaged by an AI gunnery officer, as per Fighting Steel; I think this subliminally affects my shooting accuracy! Second, if you have the relevant option selected, getting the correct ‘aim off’ for a crosswind can be tricky, something the enemy doesn’t have to worry about, even if like me you don’t enable ‘elite enemy gunnery’. Third, if I have multiple ships against a weaker enemy, I tend to take less care, thinking, ‘Well, with sufficient volume of fire, one of us will get him before long’. Finally, and related to that, I’m impatient. If in a dangerous position, I will take my time and use mainly the map-based shot history (the best but slowest option, and the only one if the target is obscured by smoke). But if not in a tight corner, I will rush things, probably just using the splash history, which enables me to stay in the 3d world (there is no ‘mini-map') where things look better. Including the impressive if dissapointing spectacle of your shell splashes falling repeatedly off target. Just as I was now seeing. Close, often, but although in AF near misses can realistically cause damage, not close enough. Three destroyers of torpedo boats against one of their classic quarry should have been over pretty quickly. But a combination of poor shooting by me and evasive action by the enemy, meant that I seemed to be in as much danger as my opponent. He turned around and while broadside on, let us have a full salvo. Fortunately, his shooting was no better than ours. Soon he was making a run for it with Echo, Foresight and Encounter snapping at his heels. This reduced his weight of fire to the aft-mounted guns. I kept my 'A' arcs open from two of my ships to give him full broadsides, while the other headed straight for him. Finally I got some hits, starting a fire. He began making smoke, forcing me to rely on the map-based shot history to adjust my fire, but also forcing him to stop shooting. This seemed like more than a fair exchange. By now, we were hitting him fairly regularly and he began to lose way. I sensed victory, but was still wary of a late fight-back. We kept on pounding, as the range wound down. Finally we drew level. Still, there was no return fire, and the action ended up more like an execution by firing squad. So perished T-22, flying her colours to the last. Greater numbers and weight of fire had made up for lack-lustre shooting on my part. Would I be so lucky, in the next action? ...to be continued!


-
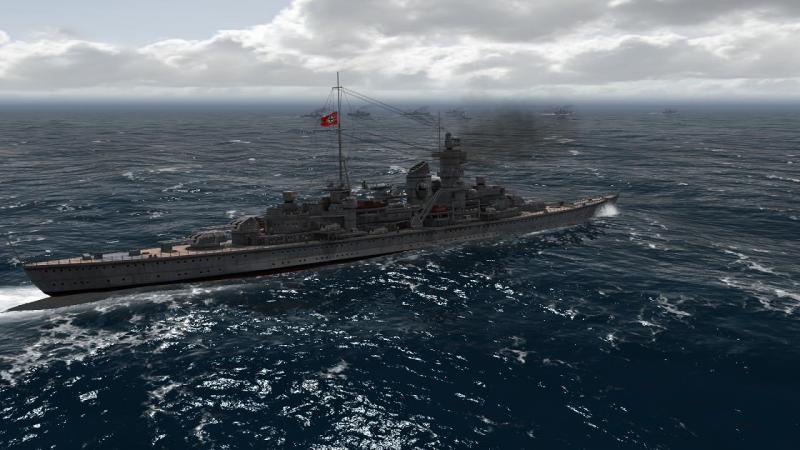
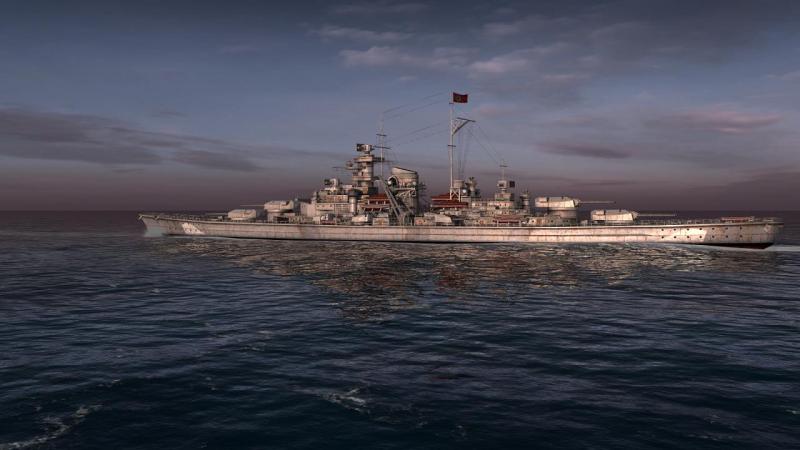
My sentiments exactly, guys! Playing the German static campaign, I quickly added a Type XXI U-boat to my mini-fleet, then a couple more. With its high submerged speed, it is a great force leveller against the heaviest of enemy units. In the later battles, where the RN typically deploys a surface force you just can't match, I shamelessly countered the Nelsons and USN North Carolinas with a trio of Type XXIs. They were definitely campaign-winners. However, as long as I dared, I used the Bismarck and Scharnhorst class, unless totally outmatched, because while the simplified subs enjoy the unrealistic deployment advantage and are highly effective, slugging it out with those big battlewagons is just so satisfying a challenge... I enjoy my tanksims and a range of combat flightsims so while I have grown up knowing my 'County' Class from my Southamptons and Leanders and am not impressed by arcade 'warship shooters', I'm by no means a total freak for WW2 naval warfare games. But now that I've been playing Atlantic Fleet solidly over several weeks, having quickly got used to the turn-based gameplay, I think I can now confidently state that I have never, ever got more fun from any PC game or sim I have played since I started (with European Air War, about 16 years ago), For all the simplification (eg representation of aircraft), limitations (eg inability to use main and secondary batteries concurrently) and weaknesses (eg sub ambushes of warships, and dangerous starting placement of carriers and their lack of a CAP) in the present release, this is still an amazingly immersive and more than adequately convincing simulation of WW2 naval warfare with great gameplay, sounds and visuals and a fantastic breadth and depth of content at a knock-down price. I just cannot recommend Atlantic Fleet too highly. I freely confess, I'm hooked and loving it. Gotta go...have another appointment to keep with the Kriegsmarine, specifically a prowling torpedo boat that needs some taming...
-
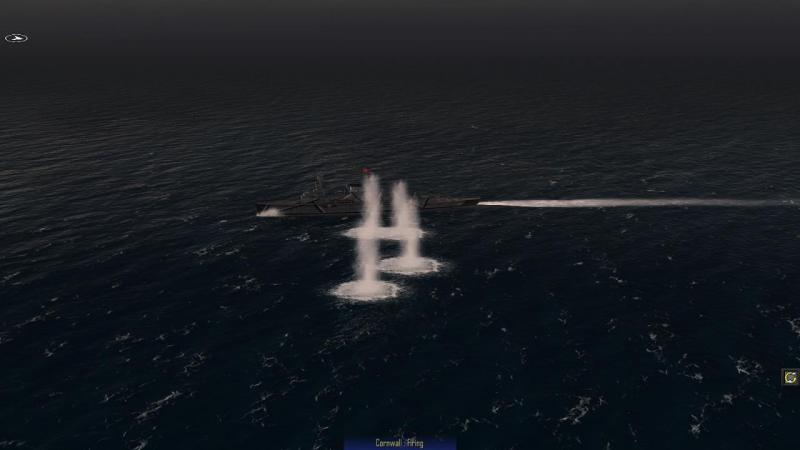
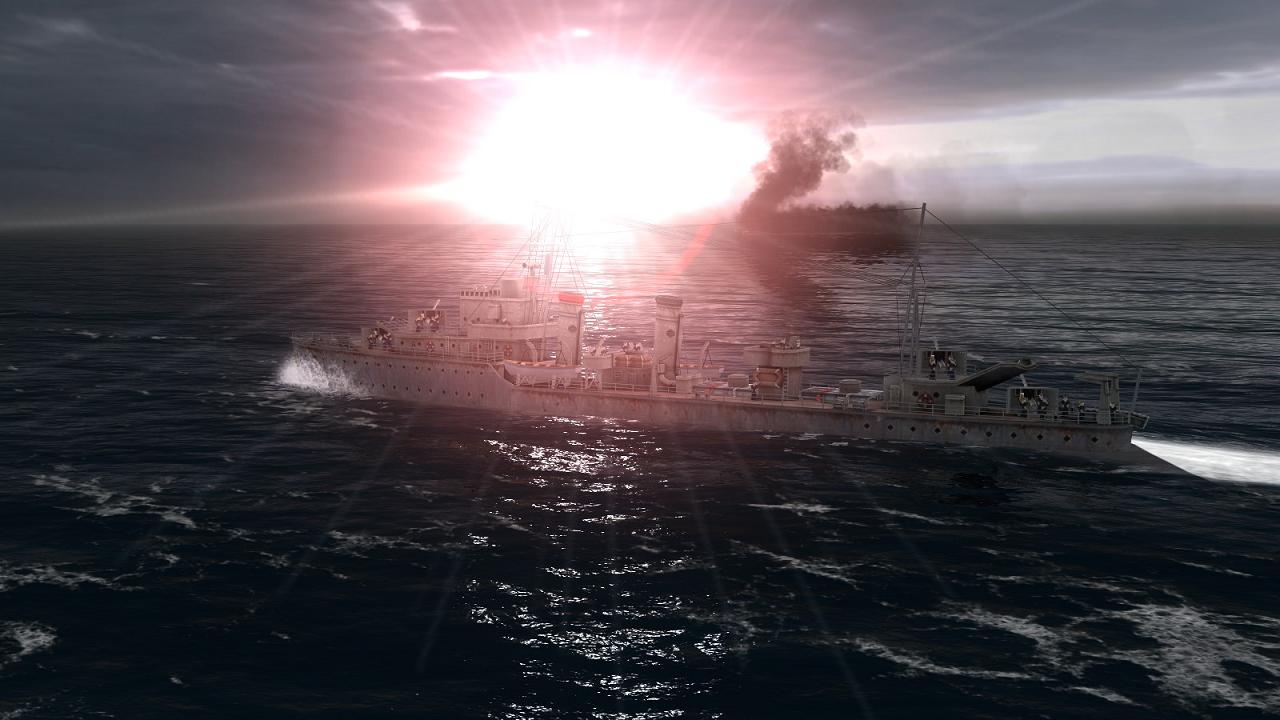
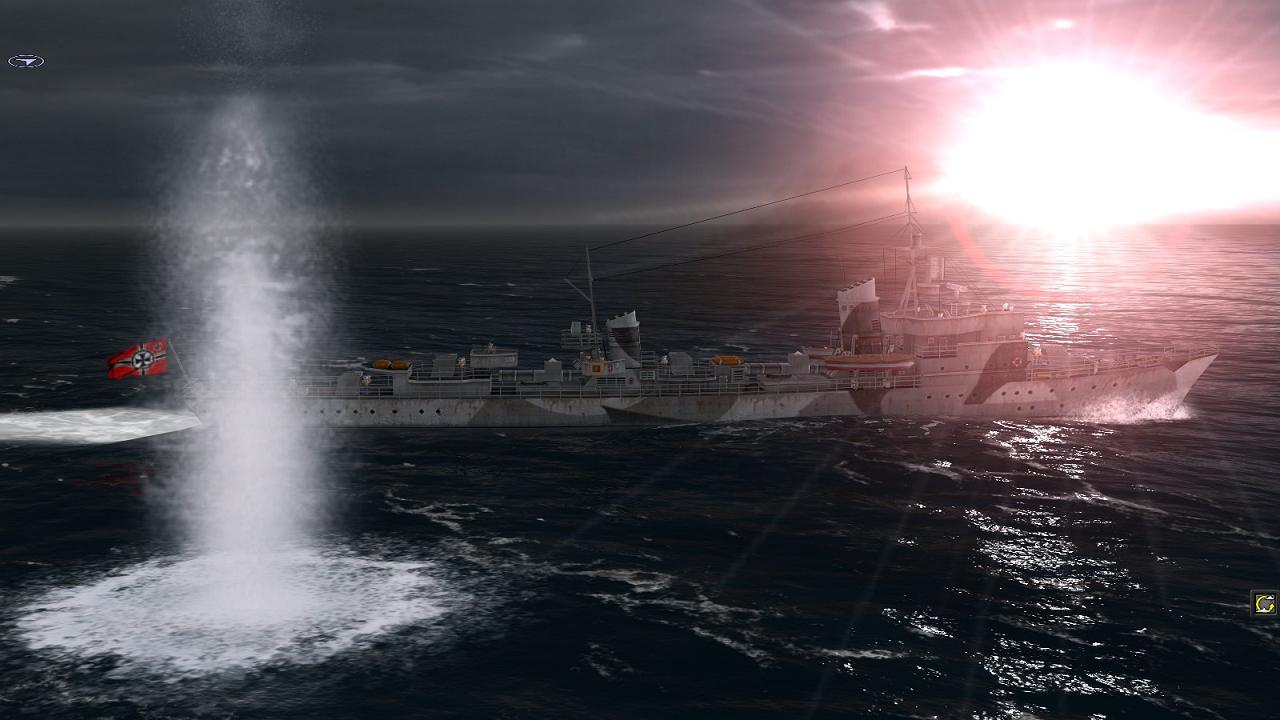
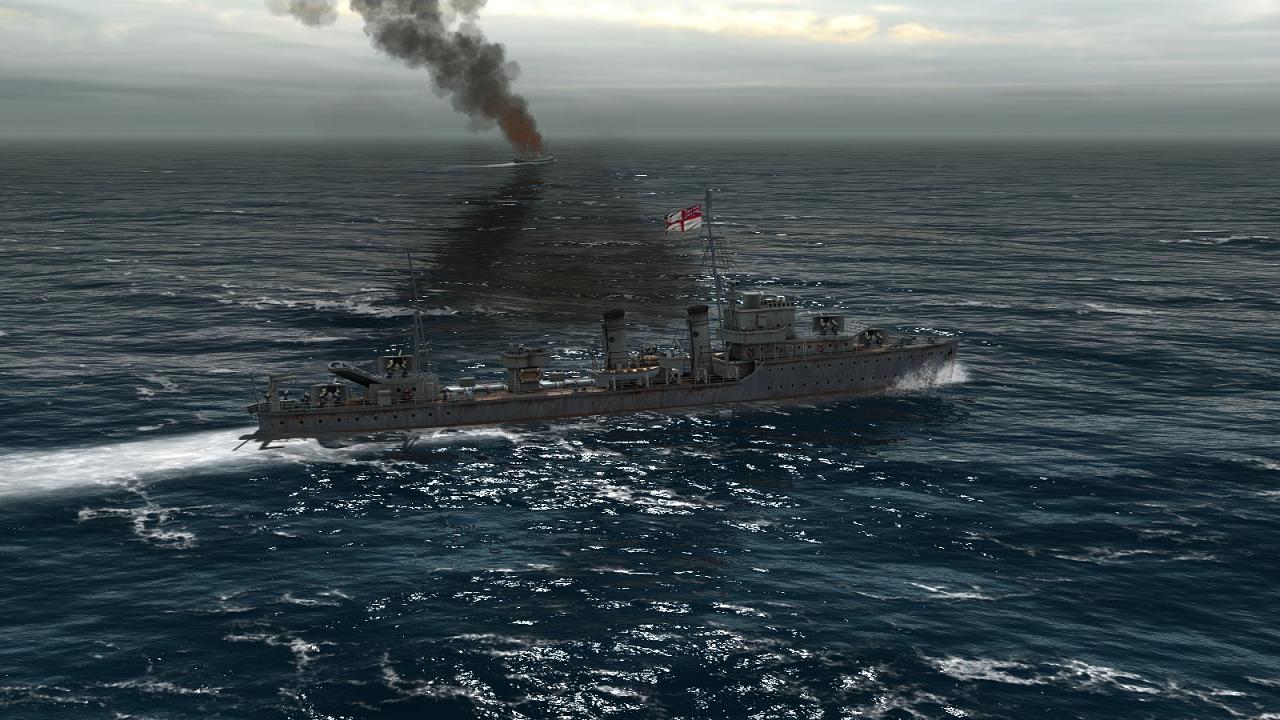
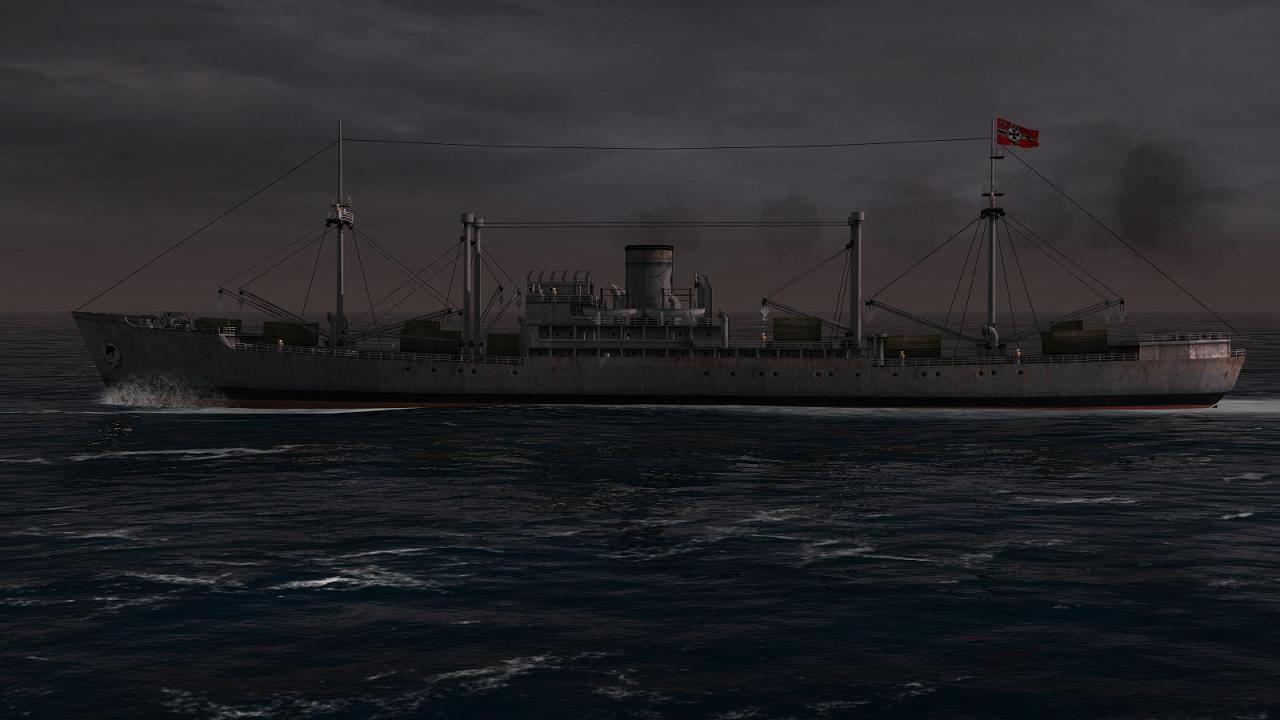
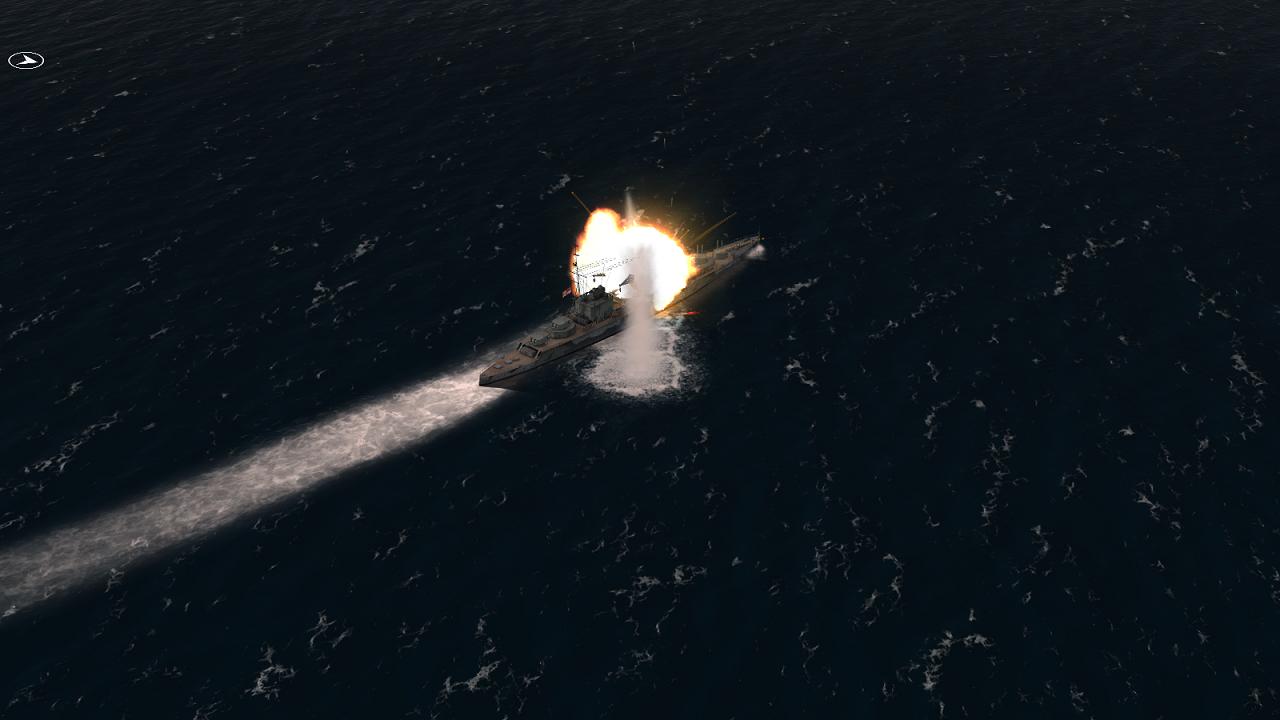
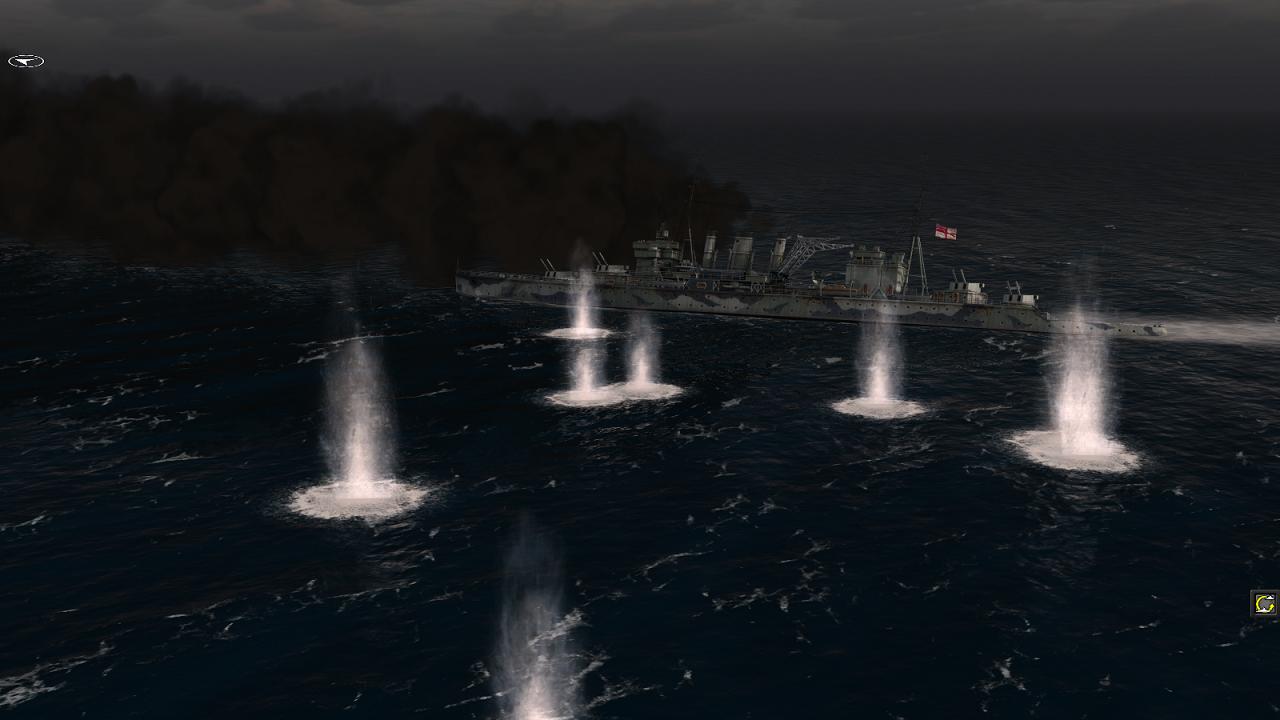
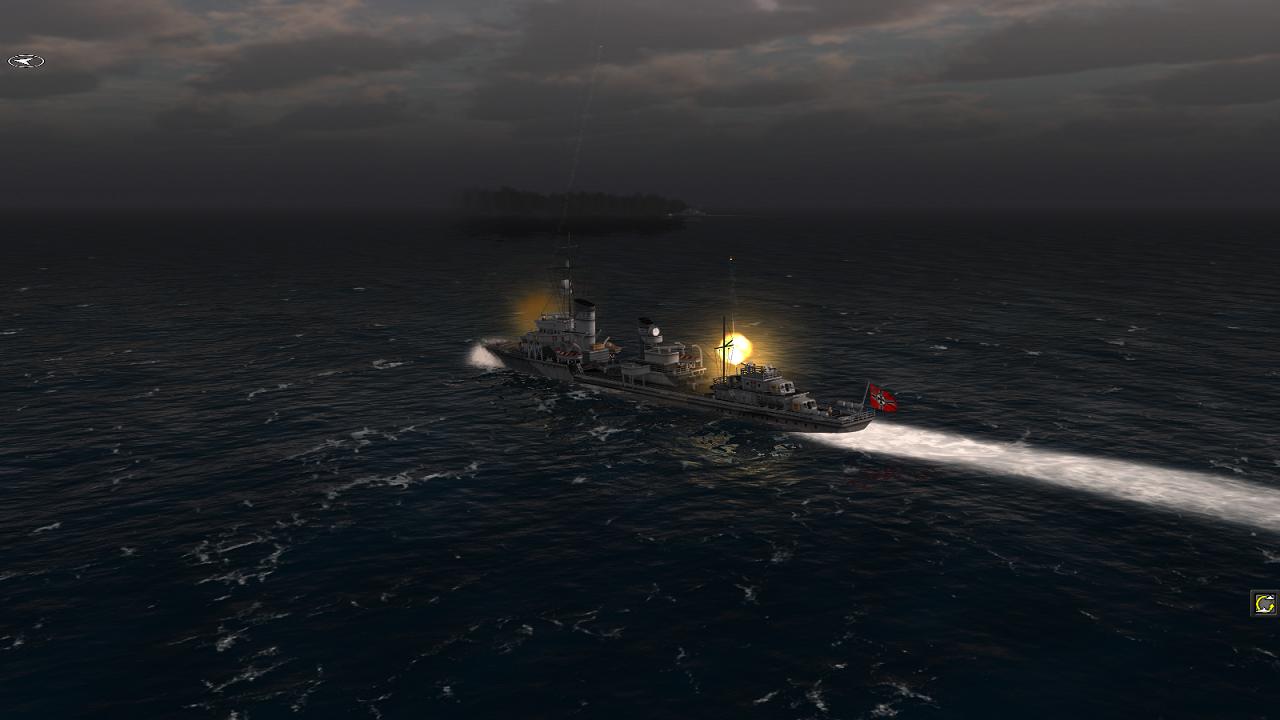
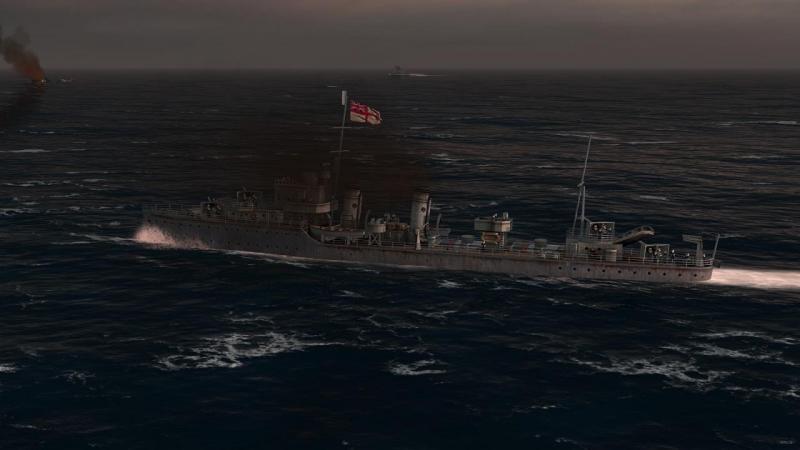
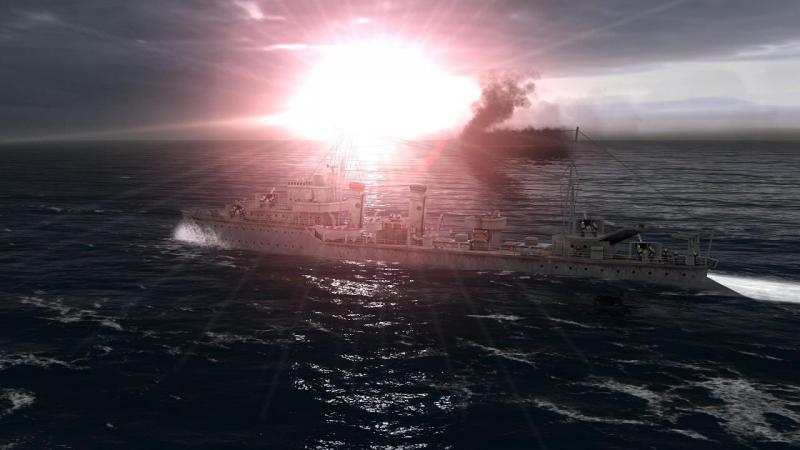
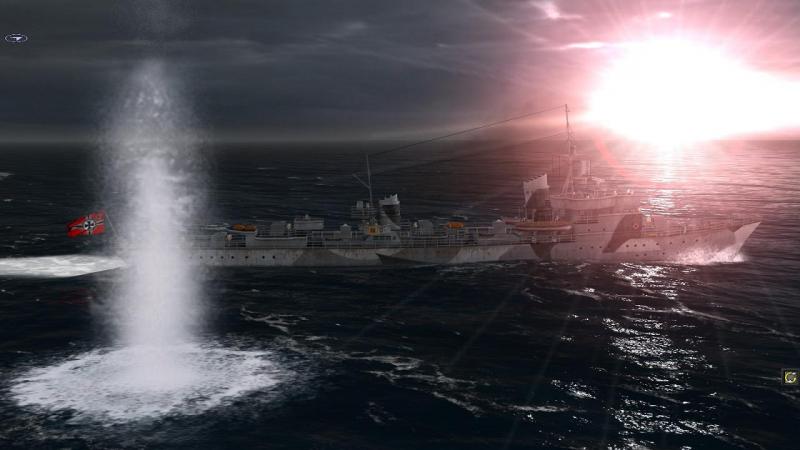
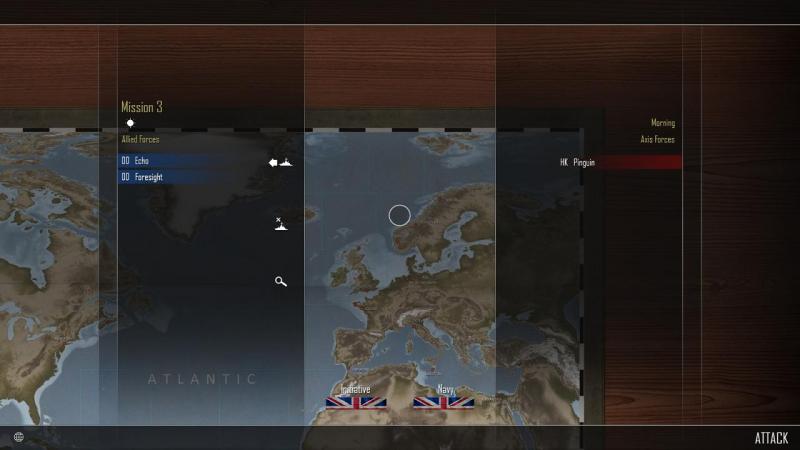
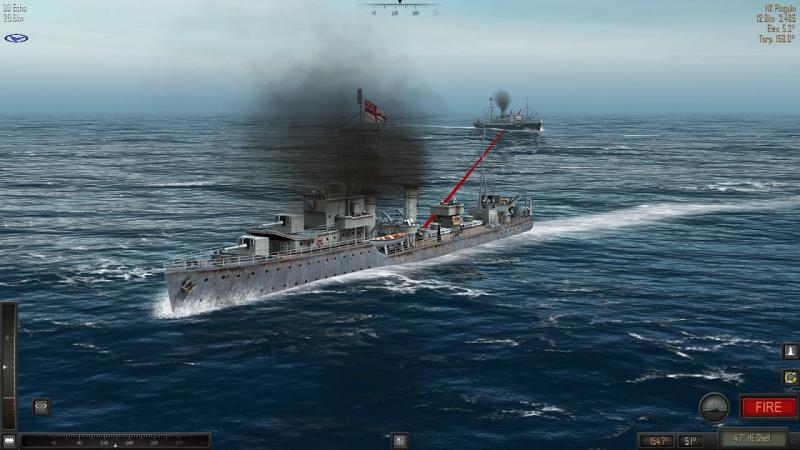
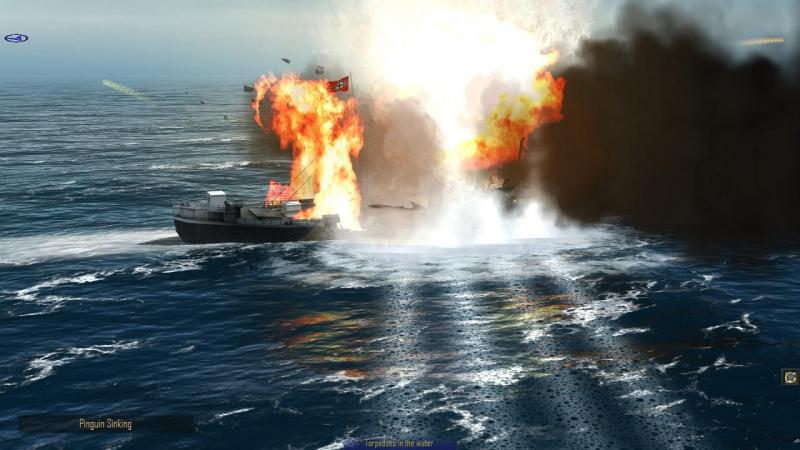
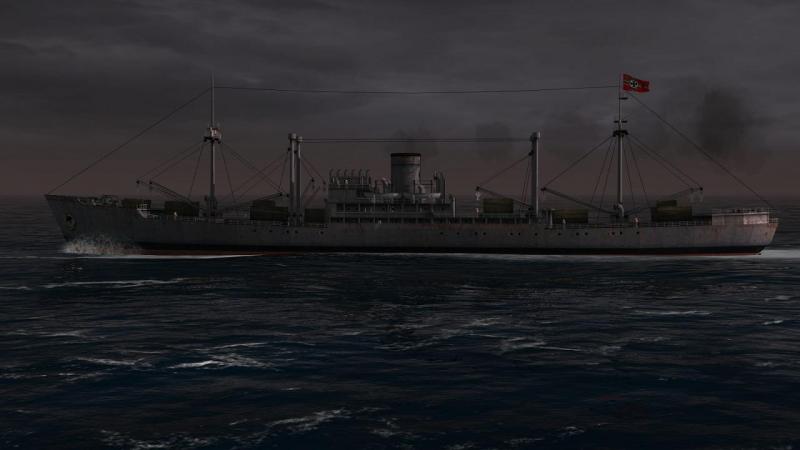
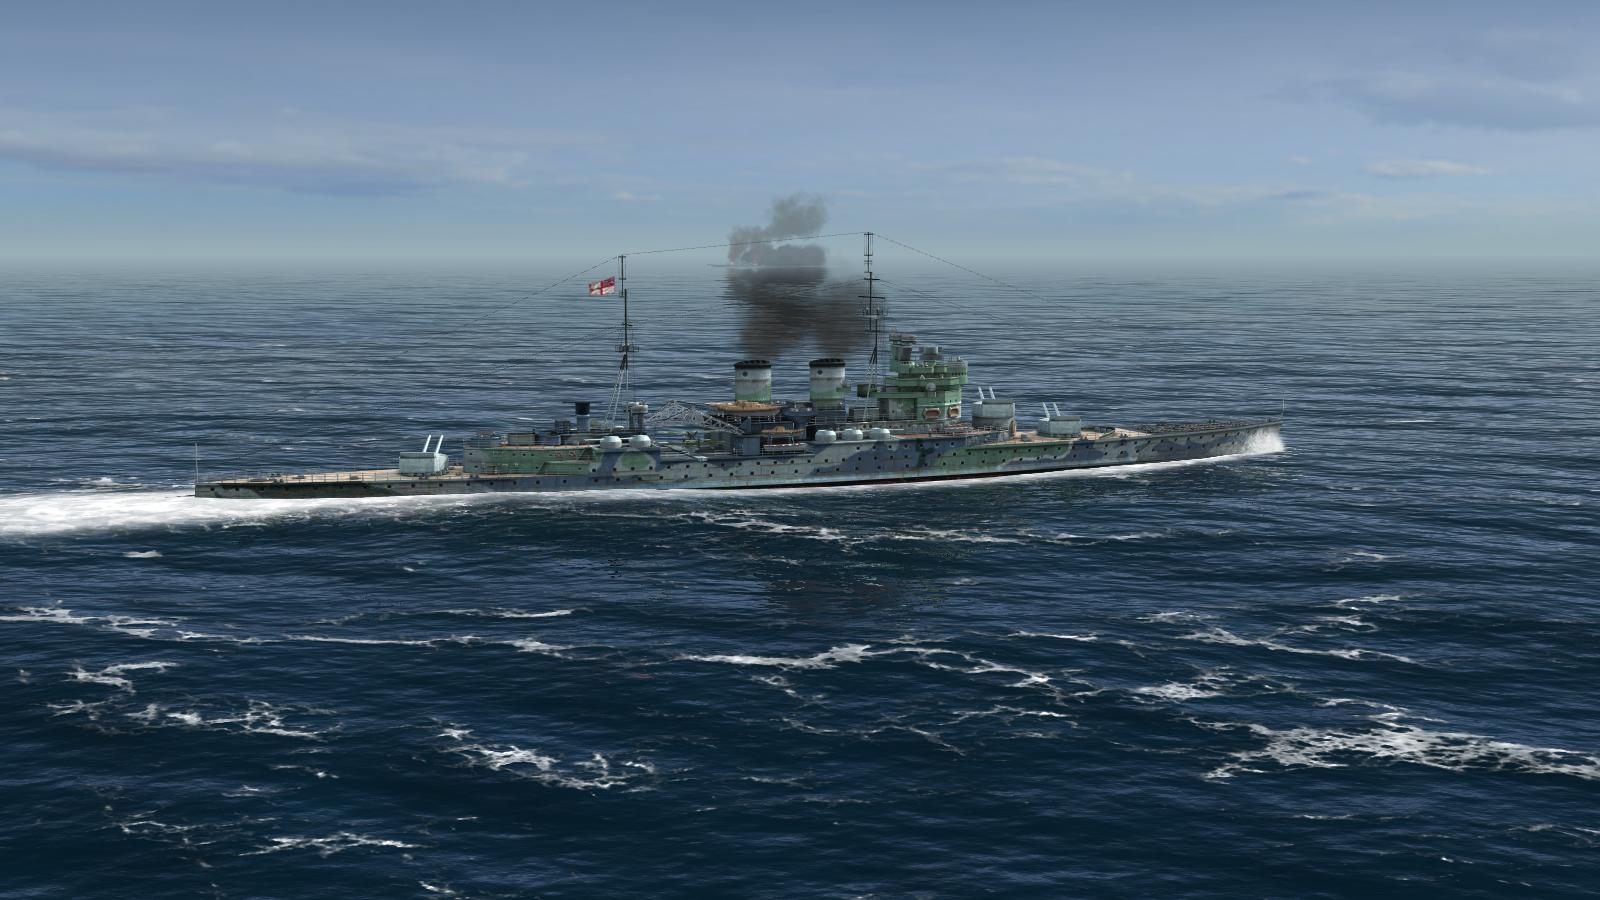
The enemy starts shooting back! In the next mission, I found employment for both of my destroyers. The battle was in the same general area, off the western coast of Norway, but this time, the enemy was the disguised merchant raider HK (Hilfskreuzer, Auxiliary Cruiser) Pinguin. The real Pinguin had a very successful career but was blown up in a duel with HMS Cornwall, with heavy loss of life, including many merchant seamen prisoners. Now, it would be up to Foresght and Echo to end the virtual Pinguin's depredations. Realistically but scarily, Pinguin had suceeded in getting quite close by the start of the engagement. The most famous example of a Germain raider maintaining her disguise until she was close enough to hit an enemy warship hard is of course Kormoran, which managed thus to sink HMAS Sydney. Now, here was Pinguin close abeam of Echo, too close for comfort. Perhaps indicating that we had seen Pinguin unmask her guns and torpedo tubes in good enough time (you can perhaps see the dropped screens in her sides, fore and aft), we had the first move. With this, I needed to blow Pinguin out of the water, before she torpedoed us or hit us hard with her 5.9" guns. I should probably have kept my nerve and launched torpedoes. But because AF won't let you do that and fire guns in the same turn, I was wary of being shot in return, while my tin fish were in the water. So, out of funk, I began a defensive turn to bring Echo's stern towards Pinguin, and from that position, let fly with 'X' and 'Y' 4.7" mounts. And missed. Even at close range, with just the initial 'firing solution' estimate available, your first salvo in AF is always likely to be a bit hit or miss...more than a bit miss, in this case. Both rounds went over. Now, it was down to Foresight. She was astern of Echo, with Pinguin on her starboard bow, and for no particular reason except my poor show with Echo, I decided that she should do something different. What that 'something different' turned out to be was a sharp turn to starboard, by which, as intended, I managed to open my 'A' arcs so as to give the enemy the benefit of a full broadside. This worked tolerably well and we soon had Pinguin burning. She got off two inaccurate rounds from her forward 5.9 inchers but took further hits from both destroyers. Pinguin then began making smoke and turned away. I swung Echo back onto a parallel course and thus set up a torpedo attack. In AF, I have quite often seen an enemy who is making smoke switch back to shooting, which can be a tad disconcerting and is always a risk. This time, I took that risk. It paid off. Pinguin didn't seem to take any evasive action and the four torpedoes I launched were more than enough to finish the fight, in dramatic style reminiscent of the real raider's end, when a four-gun salvo from Cornwall set off her mine store. AF's super sounds and visuals did the scene full justice. I love the look and sound of this great game! Despite a shakey start, we had turned up trumps and I had earned enough renown to buy another destroyer, the aptly-named HMS Encounter. I was quite glad to have all three ships in my next battle. ...to be continued!

-
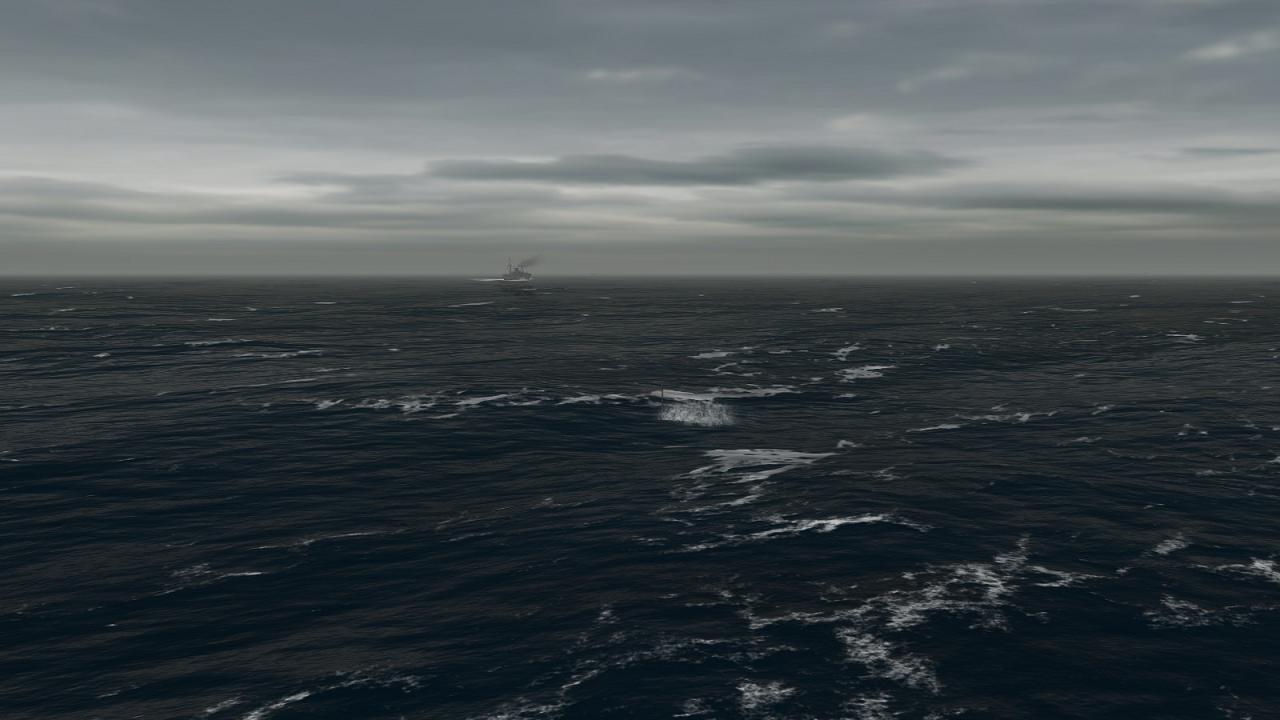
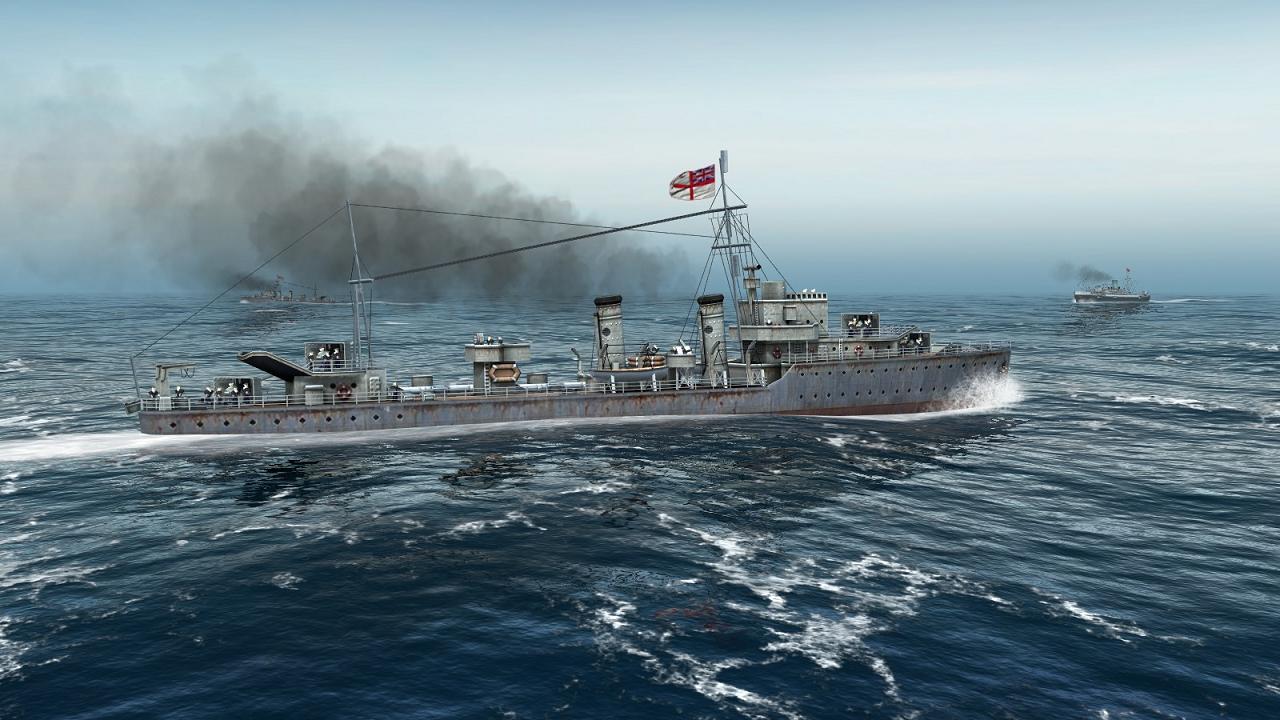
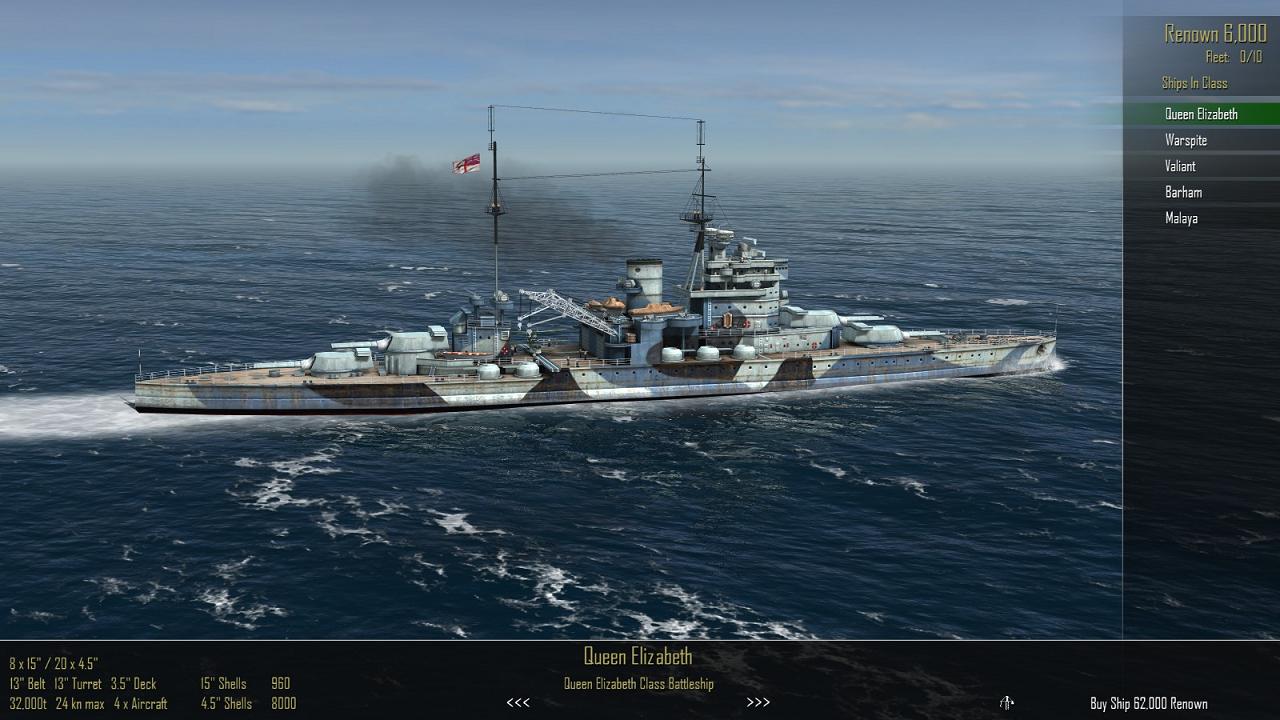
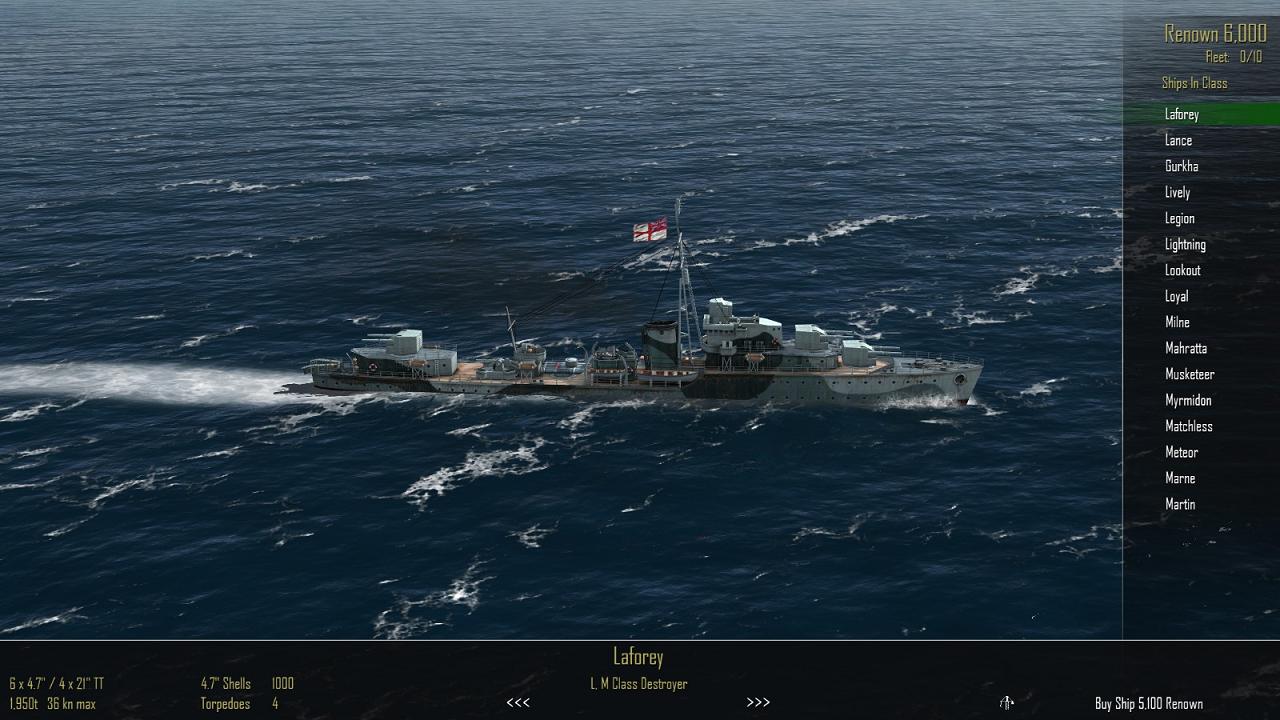
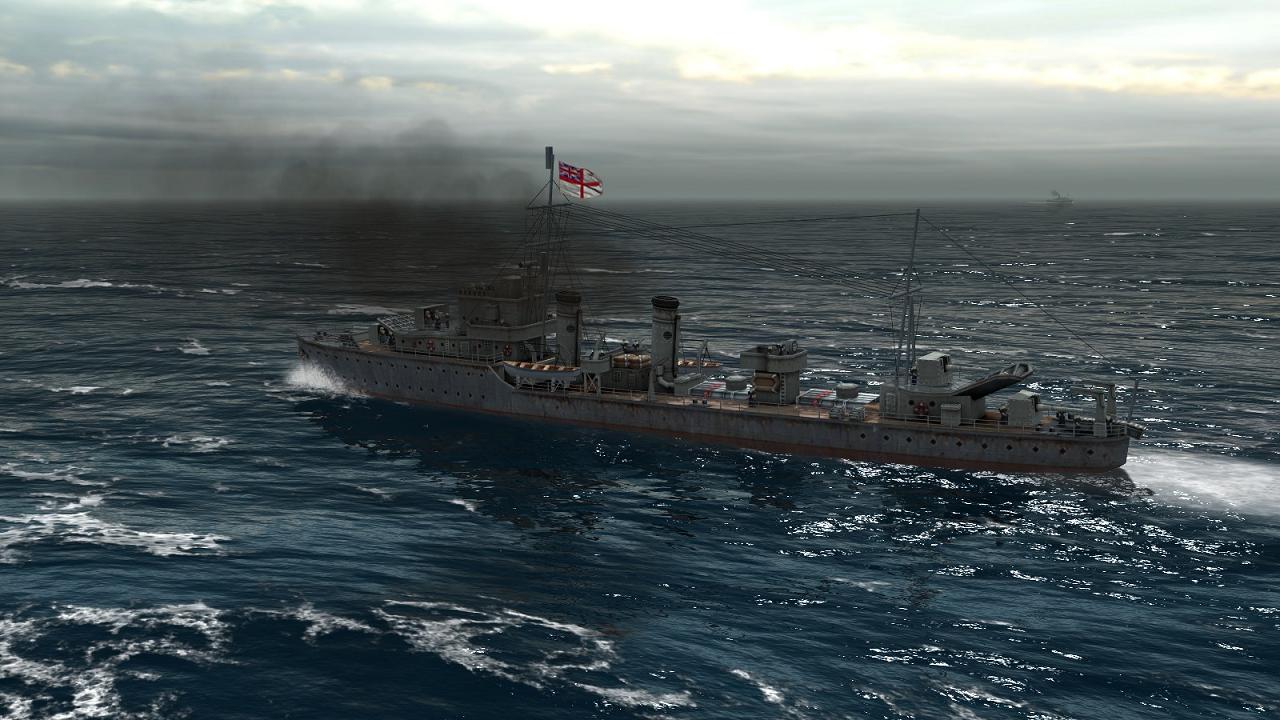
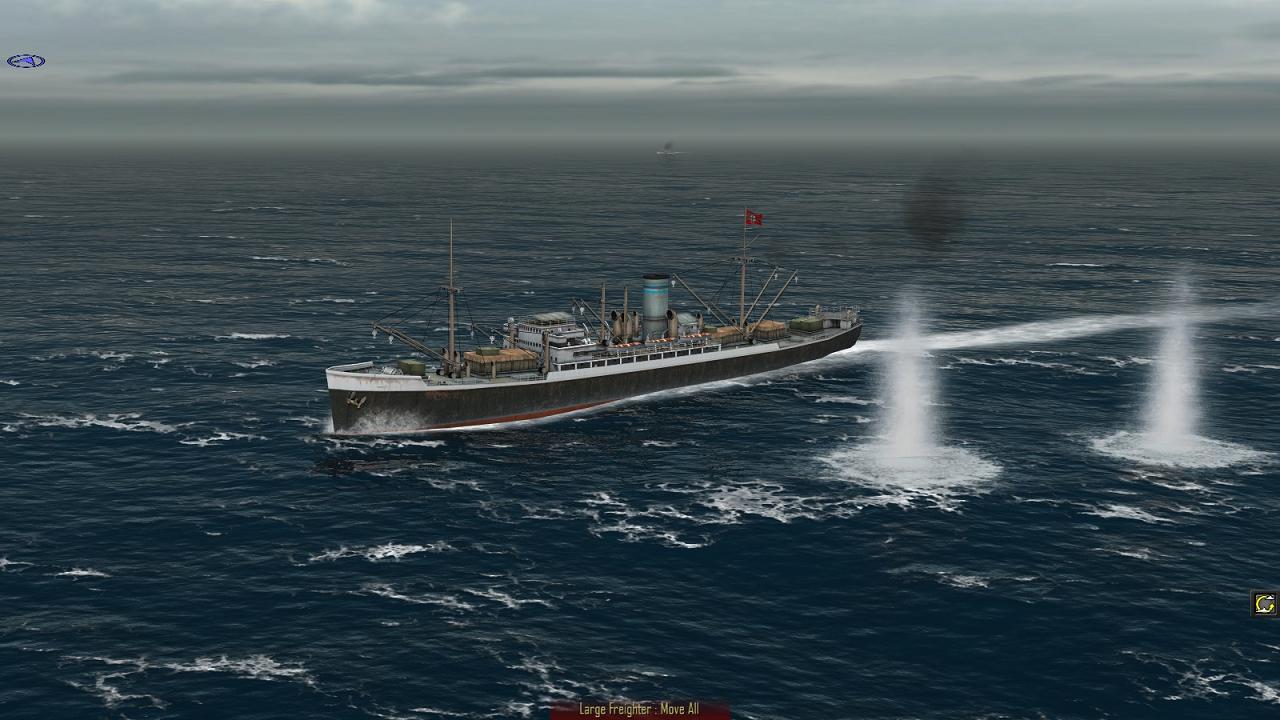
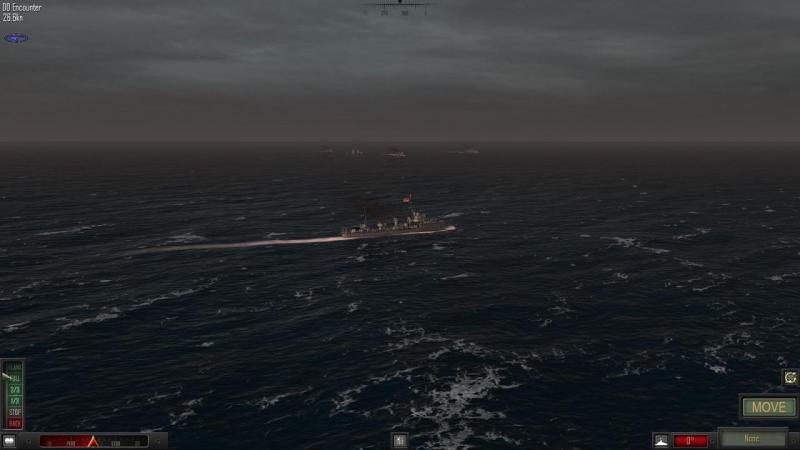
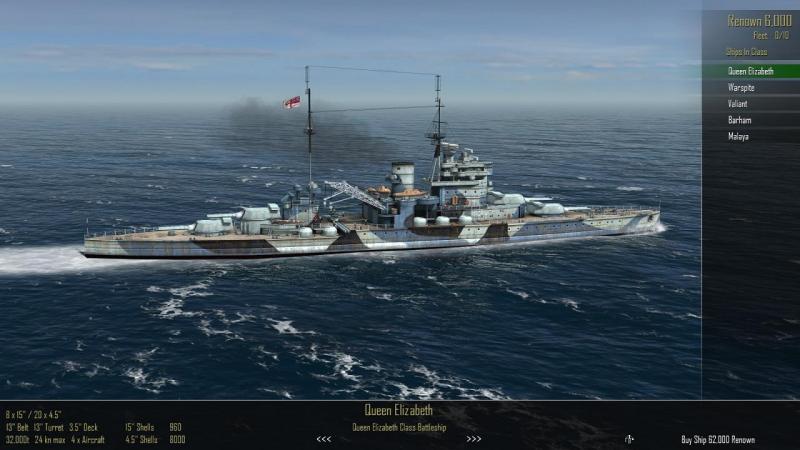
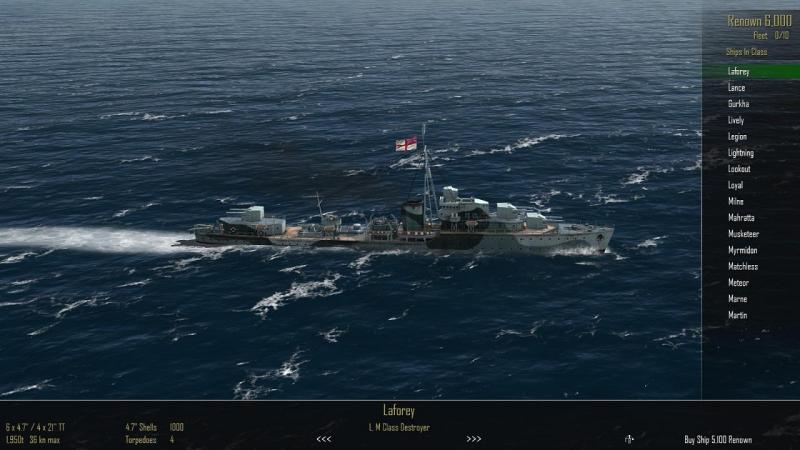
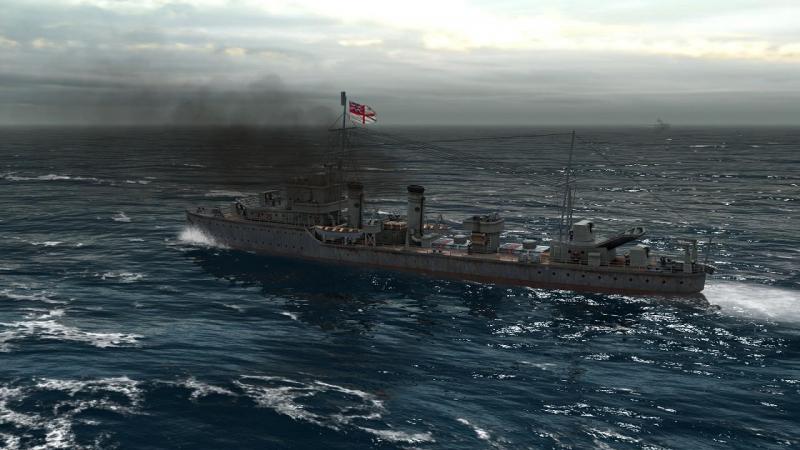
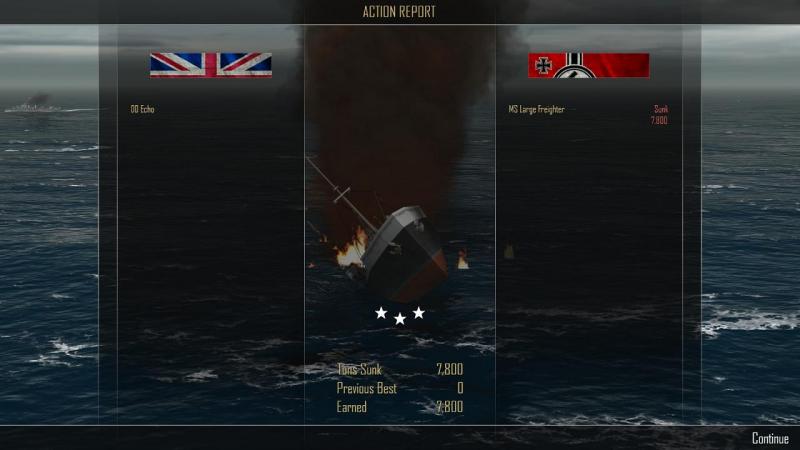
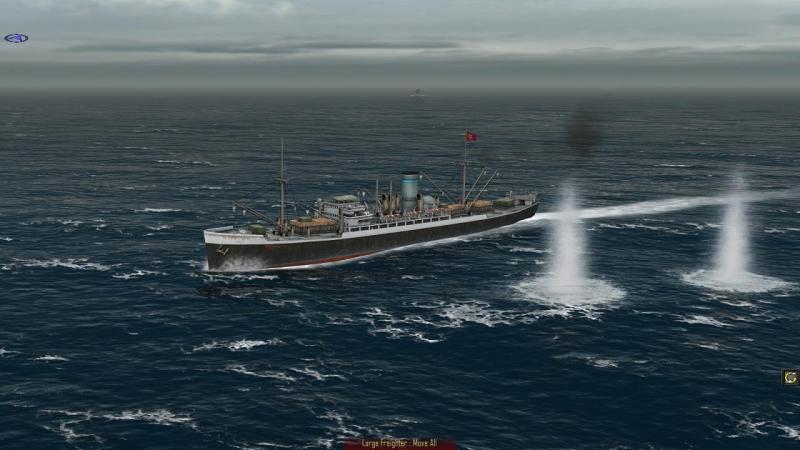
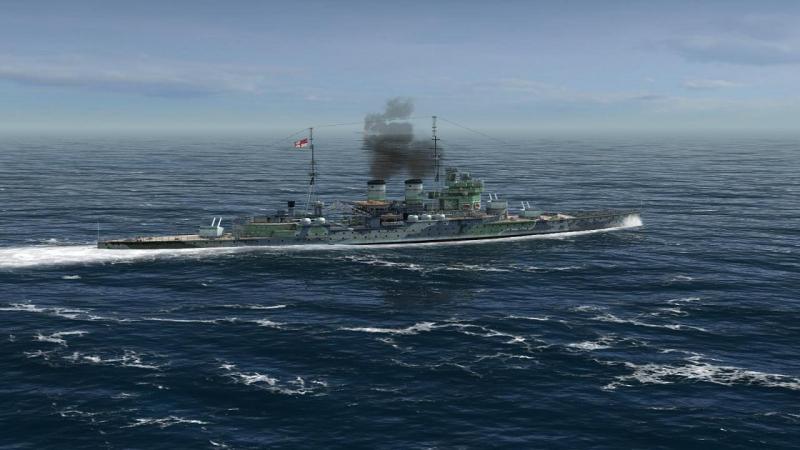
The first missions The first couple of missions in the fifty-battle static campaign are basically target practice...which, having been offline for a week, I rather badly needed. For my RN campaign, here's where things kicked off - an encounter with a single enemy freighter, in the arctic seas north of Scandinavia. Not that AF does land, outside of the campaign maps, but weather, sea state and visibility do seem to reflect geography, as well as time of day if not also season. Merchantmen in AF are all unarmed, so this won't be too difficult, even for rusty ol' me. And though the enemy is displayed as having the initiative (= first move), it 'ain't gonna do him much good. The reason that there is no ship for my side visible on the LH side of the screen above is because I have not yet chosen one. Doing this is your first action. Not that you have much to choose from, to begin with. 'Renown' is what gives you ships in AF and at this stage, you have just your initial allowance - 6,000 points. The good news is that because the static campaign has no historical timeline, late war kit is available from the outset. The bad news is that 6,000 renown points doesn't buy you much of any sort of kit. To put this in context, if you fancy yourself at the helm of a 'Queen Elizabeth' Class battleship - state-of-the-art at the Battle of Jutland, whose 100th anniversary is at time of writing nearly upon us, with rennovations to HMS Caroline nearly complete, but even modernised, not the toughest RN battleship available in AF - you are 56,000 points short, at this early stage. Well OK, at least there is no danger of exceeding my ten ship active fleet allowance, or even my three-ships-per-battle limit. So, if I have to sink enemies to earn renown and have to start with just 6,000 points, how about a cruiser, then? No dice. Even a lightly-armed 'Leander' Class is well out of reach. All that I can afford is destroyers, escorts and subs. Even a modern destroyer is going to be a stretch, at over 5,000 points for a 'Tribal' or the 'L' or 'M' Class seen below; the later but slightly less exotic 'wartime emergency' builds are not much cheaper: Looking around, I decide to go for an inter-war destroyer. Starting with the 'A' Class and running up to the 'I' Class over the 1920s and early 1930s, these differed in detail but looked and performed much the same. I picked HMS Echo, four 4.7'' guns in single mounts and two banks of four 21" torpedoes. It's also worth noting that in the static campaign, RN destroyers also get a forward-firing Hedgehog anti-submarine weapon from the get-go, as well as depth charges, the former not at the cost of a forward gun. Anyway, I reckoned that at 4,800 points, these neat little ships were better value than the later destroyers available. I'd start by building up a small flotilla of these early destroyers, then start saving for a cruiser. The sooner I could meet the escalating enemy forces with like for like or better, the happier I would be. So I picked Echo and, Hobson's Choice, selected her for the fight. And there we were, seas light, visibility good, and this unarmed enemy ship about 18,000 yards off our starboard beam, on an opposite course. I went to full ahead and turned onto an intercepting course. My first rounds were soon on the way from the fowward guns, short at this extreme range but sending the enemy heeling into a turn to port. Despite the lack of a crosswind, it took rather a lot of rounds before I began to get hits. The merchantman completed her turn and then just ran for it. With my top speed of over thirty knots I was soon overhauling her, and after that it didn't last long. In this campaign mode, merchant and warship tonnage you sink earns your renown, on a points for tons basis. The extra 7,800 points from this easy prey would soon come in handy. I was still rather a long way short of a cruiser, but as planned, I added another pre-war destroyer to my budding flotilla; HMS Foresight, this time. She didn't have long to wait, for her first action. This was in the form of another enemy freighter, this time off Noway's North Sea coast. I committed her on her own - there is no possibility of an un-mentioned enemy ship appearing, but you can be hit unexpectedly by enemy aircraft. And I didn't want to risk both my warships, in an action that one would be able to handle. Which Foresight duly did. The enemy vessel was a rather more modern steamer this time. Seemed a shame to smash her up, but virtual war is virtual war. So far, so good. I didn't know it yet, but the next opponent was to mark the point from which things began to get dangerous. For me, there would be no more target practice. ...to be continued!


-
A Royal Navy campaign in Killerfish's peerless WW2 naval wargame! In my first campaign mission report with Atlantic Fleet, I played for the German Kriegsmarine, and in the dynamic version of the AF campaign. This time, I'm playing for the other side, the Royal Navy (whose signature march is 'Heart of Oak', hence this mission report's title). And I'm playing the 'static' campaign. This is a fixed set of fifty missions, whose difficulty increases as you go, inasmuch as the opponents gradually become more numerous, more dangerous, or both. Knowledgeable enthusiast Ramjb has already released a long series of gameplay videos featuring this same campaign, but this report is the (illustrated) book of that movie, as it were; starts at the beginning; and is more in the nature of a taster, than a replay. Of AF's two campaign types, the dynamic variant - dubbed appropriately 'Battle of the Atlantic' - is my favourite - for the German side. It is dynamic in several respects, starting with the objective. This is not to win battles as such, but to win a tonnage war, German subs and surface raiders against British convoys and warship patrols. Merchant shipping tonnage sent to the bottom, or getting through, is what counts towards victory, over an extended period. And that victory, if and when it comes, I find is immensely satisfying...and announced in style. Losses are also cumulative - lose a ship and it's gone, with replacements only available within the other, real-life members of the class, if any sister ships there were. And your choice of ships to send to sea as the war progresses is limited to those available when they actually entered service. Real-life events affect the battle, for example the conquests of Norway and France giving the Germans additional bases, at about the correct period of the war. Damaged ships can be docked for repairs, but may be damaged again in bombing raids. The tonnage war is not entirely reliant on the player's efforts - in the background, the underlying wargame may generate battles and losses in which the player does not participate. However, playing from the Royal Navy side, I find that of the battles I DO see, far too high a proportion are U-Boat 'area ambushes' against groups of warships in open waters. Rare exceptions notwithstanding, the latter is simply not where submarines managed to attack warships outside of convoy escorts. With a maximum surface speed about the same as most warship's cruising speed, it's not surprising successful encounters were rare, for subs against warships. And when they did happen, generally did so in choke points, not the open sea encounters we see in AF. Maybe every third or fourth battle in AF's dynamic campaign for the RN, the warships I have painfully built up are ambushed by typically three subs, at least two in good firing positions and some inside 'guaranteed hit' range, firing before I can even move or shoot. Yes, depending on your chosen view options, you can often spot those torps that could be evaded and yes, a friendly destroyer - if not hit immediately - can often hit back by pulling off a party trick of its own, a torpedo salvo that is unrealistically effective. An upcoming patch might somewhat lessen this problem, by allowing a longer start range to be set. This should at least give the player a chance to react...as in, like Brave Sir Robin, bravely running away, my preferred tactic in such cases. But in its present form, I dislike these unrealistic ambushes so much I'm just not finding the RN dynamic campaign much fun. And 'fun' is what AF delivers everywhere else, by the big gun broadside, so for my RN campaign fix of said fun, I'm glad I can get this from the static campaign alternative. Here's how my latest try went! ...to be continued!
-

Did the Battle of Jutland Really Matter...?
33LIMA replied to Hauksbee's topic in WOFF UE/PE - General Discussion
As John Keegan records in 'The Price of Admiralty', 'At 9.45 that evening [1 June, after the Grand Fleet was back at Scapa and Rosyth] Jellicoe reported to the admiralty that his warships were ready to steam at four hours' notice. That signal writes the strategic verdict on Jutland. Britain's navy remained fit for renewed action, however soon it should come. Germany's did not...Warspite, Barham and Malaya had suffered damage requiring dockyard attention but the battleship fleet itself was almost unscathed; and despite losses, the Battlecruiser fleet on 1 June still outnumbered the German 1st Scouting Group which, moreover, was crippled by damage. The German dreadnought battleships had also suffered grievously. Koenig, Markgraf and Grosser Kurfurst all needed major refits...and the German battle line could not have met the British at four weeks' notice, let alone four hours, except at risk of outright defeat.' With Scheer's basic plan of a U-boat ambush having completely fallen flat, Jutland doesn't much read like even a tactical victory for the High Seas Fleet, more an inconclusive battle, where better German tactical control and battlecruiser equipment denied the Grand Fleet the victory their intelligence and numbers advantages should have enabled. This is the best book I've read on Jutland - 'The Rules of the Game' by Andrew Gordon: https://www.amazon.co.uk/Rules-Game-Jutland-British-Command/dp/014198032X Like Peter Townsend's 'Duel of Eagles' on the Battle of Britain, the neat thing is the author's fascinating recounting of the history which led to the battle and which in turn, explains why the Grand Fleet fought as it did, and not as Nelson had done in a different era. Notably, there had developed an obsession with the latest version of the same signal book (Popham's) that had helped, but not so circumscribed, Nelson. This was thought to be so good that it enabled Admirals to excercise complete and effective control of fleets in action, so fostering that culture. Gordon recounts how, with supreme irony, the one man who might have led the Navy down a different path in time for Jutland, Admiral Sir George Tryon, had developed an approach to more imaginative, independent action that would have led to Jutland being fought very differently, but died in the famous collision between Camperdown & Victoria, caused by his own misjudgment in orders for a fleet manoeuvre, compounded by the reluctance of his captains to question him. From Wikipedia, as per Gordon's account: 'Tryon's TA system — and with it his attempt to restore Nelsonian initiative into the Victorian-era Royal Navy — died with him. Whether or not Tryon had intended the system to be in effect at the time of the accident, traditionalist enemies of the new system used the collision as an excuse to discredit and bury it...Heavy reliance upon detailed signalling — and the ethos of reliance upon precise orders — continued within the navy right through to the First World War. Several incidents occurred where reliance upon specific orders or signal failures allowed lucky escapes by the enemy in that war, so that had the sinking not occurred and Tryon survived to continue his campaign, there might have been a significant improvement in British performance.' -
IIRC, to get rid of the 'AWACS effect' of the map view displaying icons for friendly and enemy aircraft, which I think is the single most important map mod because it is not merely cosmetic, I commented out the lines in the [Map] section of the file [user-name]/Saved Games/ThirdWire/FirstEagles2/Flight/MISSIONCONTROL.INI, shown in bold below, by adding two forward slashes to the start of each line after opening the file in Wordpad: [Map] UseRelativeAlignment=FALSE RotateRunwayHeading=FALSE MapIconSize=32 //FriendlyIcon=MapFriendlyIcon.tga //EnemyIcon=MapEnemyIcon.tga FriendlyRunwayIcon=MapFriendlyRunwayIcon.tga EnemyRunwayIcon=MapEnemyRunwayIcon.tga RadarIcon=MapRadarIcon.tga WaypointIconSize=16 WaypointIcon=MapWaypointIcon.tga IPIcon=MapIPIcon.tga TargetIcon=MapTargetIcon.tga WaypointLineColor=0.914,0.777,0.230 GridLineColor=0.0,0.0,0.0 GridTextColor=0.0,0.0,0.0 MinorGridLineColor=0.0,0.0,0.0,0.8 MinorGridTextColor=0.0,0.0,0.0,0.4 TextFontName=Arial TextSize=12 I don't know about the text labels, but I THINK they may not appear in my FE2 maps because instead of using Ctrl+D (or whatever it is, that turns off labels and target info in the 3d world) I edited another .ini file somewhere, in a similar fashion, so that they and the target cone/marker box are permanently disabled - these are leftovers from the jet-age base game that I also consider should be completely absent in a WW1 sim. I'll post again here when I work out what that was.
-
Could be a complete co-incidence, but last night, flying home from Spain to UK in an A320, they announced at the start of the flight that the forward toilet was out of service, due to a 'mechanical' fault. I wonder if it was just this aircraft, or if some operators are disconnecting something up there, as a precaution pending more info.
-
Yeah, looks quite interesting! But they really need to get rid of German sailors acknowledging orders with 'Copy!', which instantly flushes the immersion down the U-Boat toilet, for me anyway. What's wrong with 'Jahol'! or 'Verstanden!', or whatever it would have been in real life?
-
Battle of Britian Simulators for 75th anniversary
33LIMA replied to sixstrings's topic in General Discussion
Hopefully you have also found this, essential to get the best from BoB2/WoV: http://www.a2asimulations.com/forum/viewtopic.php?f=10&t=51298 Despite also being something of a nut for 'The Battle' I have not so far really warmed to BoB, now BoB2. Despite now having the ability to fly something resembling a conventional virtual pilot, historical squadron-based career, the 'sim within a wargame' aspect never really caught my imagination. And the graphics, though better now, still look a bit primitive and/or washed out, compared even to Il 2 '46 with its still rather beautiful lighting effects. And the rather un-natural formation-keeping still jars a bit. Still, BoB2 looks good enough and the air-to-air AI feels incredibly human. And the breadth and depth of its coverage of the Battle beats everything else into a pretty distant second place.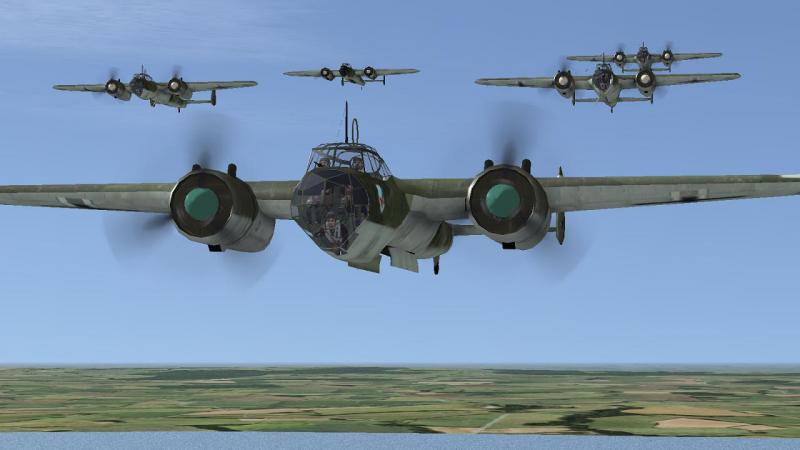


-
There's some discussion of RAF Fighter Command squadron strengths 1941-42 here: http://www.rafcommands.com/forum/showthread.php?9472-RAF-Fighter-Squadron-structure ...and here: http://www.classicwarbirds.co.uk/articles/typical-royal-air-force-squadron-and-tactics-during-the-battle-of-britain.php I once had a photocopy, now lost, of an RAF manual describing the 'Fighter Area Attacks' - 'Johnny' Johnston also covers them in 'Full Circle' - and they are exactly as described in the second link - three-plane 'vics' lining up astern of 3-plane vics of bombers and shooting until ammo was gone, targets or attackers shot down then the next vic going in, rinse and repeat. There was also stuff based on 'Lanchester's Law', concentrating attackers against defenders. Twelve aircraft was probably the ideal flying strength but more stringent post-war conditions notwithstanding, I doubt an RAF WW2 fighter squadron would have had just 12 aircraft on its books, if at full strength - the figure given above of 16 seems about right. No way could they routinely have put 12 planes in the air in wartime, with no reserve. Anyway, I understand the German operational unit was the gruppe not the staffel, and that German staffel size tended to be below an RAF squadron (certainly a USAAF one, I recall from Richard E Turner's 'Mustang Pilot' that the USAAF squadrons of 1944 had what I recall read like a huge number of pilots and aircraft, rotating the former for any given mission). Comparing 'squadron for squadron' is probably one of the less useful ways of looking at the BoB. The common practice of Park's 11 Group of sending squadrons into action singly, compared to Leigh Mallory's advocacy (supported by Bader) of 'big wing' tactics, was more of an issue. The famous (ironic) jagdflieger September 1940 comment 'Here come the last fifty Spitfires!' when running into serious oposition on one of the big London daylight raids stems not from comparative squadron strengths but from several factors, mainly (i) that the British aircraft industry was in 1940 seriously out-producing the Germans, as far as single seat fighters was concerned (ii) serious Luftwaffe underestimation of that and overestimation of Fighter Command losses (blame Beppo Schmidt?) and (iii) as 'the narrow margin' wasn't really that narrow, Fighter Command had plenty of fighter squadrons based further north which were able not only to relieve hard-pressed 11 Group units, but to pitch in to defend London, just about the time the 109 pilots were waiting for their red fuel warning lights to come on. Back to reaching for the sky, I was interested to read a few years back in an issue of 'After the Battle' that it's now suspected that Bader wasn't brought down by a colliding 109 as in the movie, nor indeed shot down by one, but from astern without warning by a fellow Spitfire pilot, in error obviously. It's said Bader worked out as much while in Colditz, but kept quiet as he saw no point in raising hackles or blushes.
-

From the album: Combat Sims
-
From the album: Combat Sims
-
From the album: Combat Sims
-
From the album: Combat Sims
-
From the album: Combat Sims
-
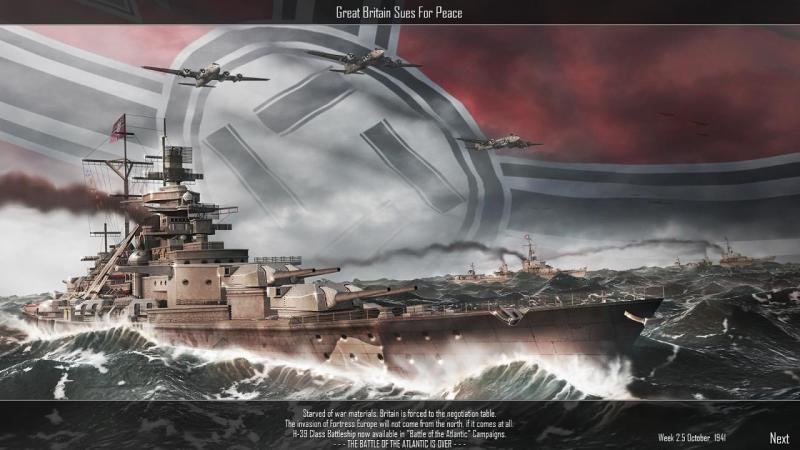
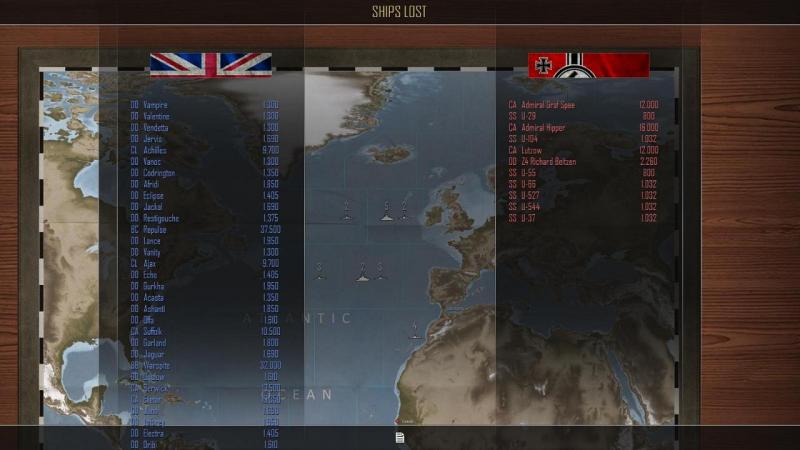
It's late October 1941 and we've won - Britain has sued for peace! Might have been sooner, but for the first few months, I didn't bother building up my fleet and fought on with what I had at the start. On one of the last missions, my North Sea patrol ran into an 'R' class battleship with a destroyer escort and I thought we were done for! However, by putting about immediately and making smoke, we out-ran the old battleship, called in the Stukas and then turned on and sank the destroyer, which had unwisely kept in contact, after the bomb-damaged battleship fell further behind. The final stats were reasonably satisfactory and the balance sheet well in the Kriegsmarine's favour. All hands, slice the mainbrace! Unsurprisingly, some elements of the campaign are not entirely historicaly, from smaller and rather badly-escorted convoys which don't scatter when they should and have un-manned stern guns on merchantmen, to Do 217s and Liberators in service a bit too early. And it's basically a wargame not a warship simulator, with a lot of things dealt with in the abstract. But the Atlantic Fleet dynamic campaign certainly captures the look and feel of the real thing and as something of a minor student of the period and its ships and battles, I have very thoroughly enjoyed playing it. Now, to try it from the opposite side, and see if Britannia can indeed rule the waves!


-
Mission reports, further illustrating single battle, dynamic & static campaign gameplay, are here: Battles of Sept Iles and the North Cape Battle of the Atlantic RN static campaign

-
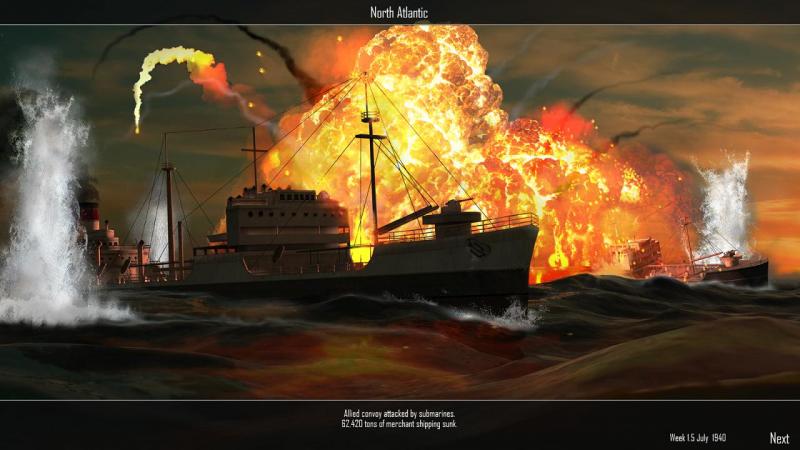
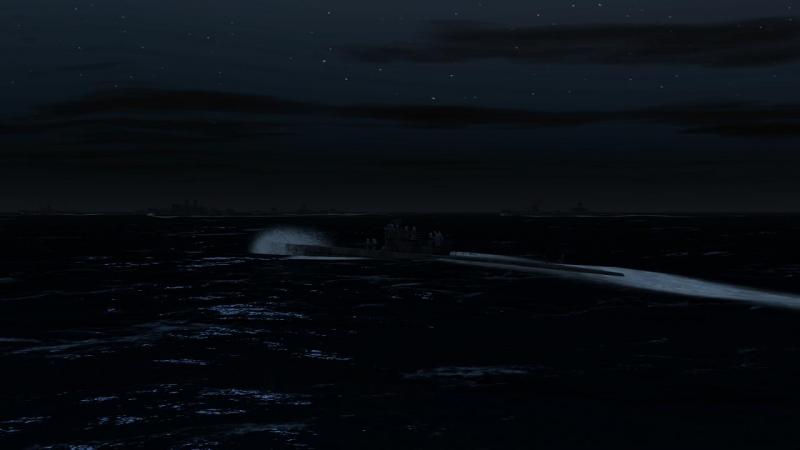
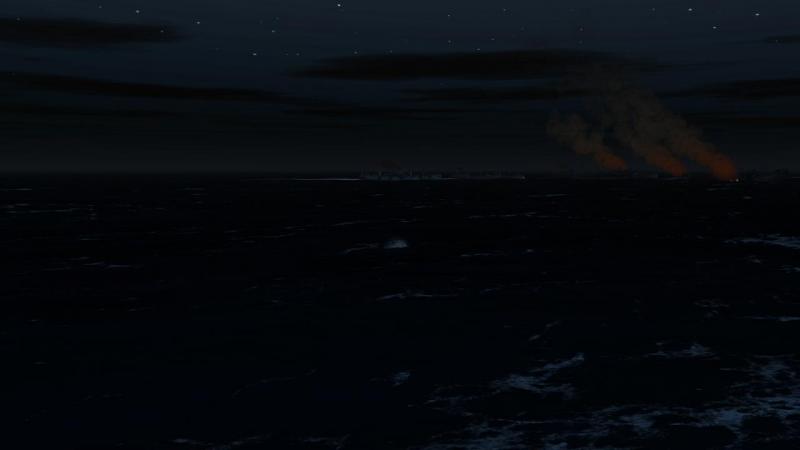
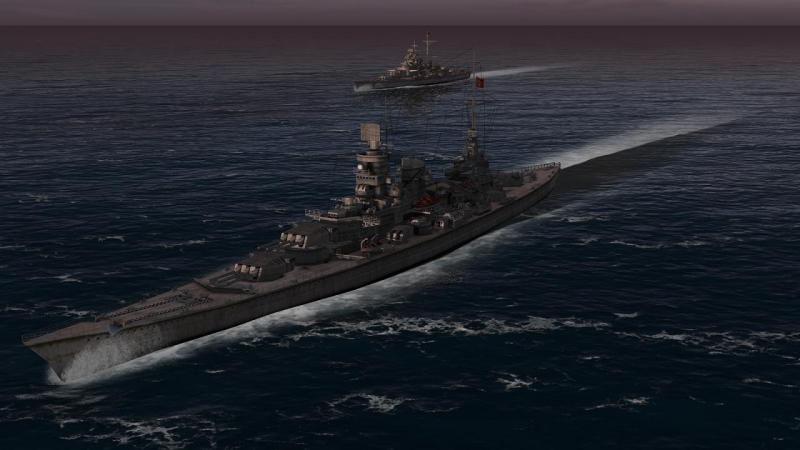
Victory can't be far away now...the progress bar has been entirely in the red for the last couple of turns, indicating we have reached and sustained our target rate for the destruction of enemy shipping. Emboldened, while a submerged U-Boat attacks the far side of a convoy, I attempt a Kretschmer-style night surface attack in another boat, from the far side... ...but am forced to dive when an escort on the oposite side spots me and starts shooting. I have evidently forgotten my Silent Hunter/Das Boot...I should have waited till the moon had gone behind a cloud! We still manage to wreak considerable havoc upon the convoy, in concentric submerged attacks... Over the waves, my strike rate is improving with torpedo bombers, even against destroyers, which I usually manage to hit only with Stukas. I even manage to set up an attack with one Do 217 dropping a second fish from starboard while another one is in the water, coming in from port. The confused destroyer doesn't seem to know whether to dodge left or right and in the end he does neither; both torps hit home. On the surface, Bismarck and Gneisenau have been repaired and are back in the Atlantic, each one now operating with the other's sister ship (Tirpitz and Scharnhorst). We patrol the seas fearlessly, as so many of the Royal Navy's battleships and battlecruisers are now under the waves, snapping up several convoys. Truly, these are red letter days for the Kriegsmarine. soon I think, we will be dictating our terms to Mister Churchill!

-
This may be worth a try. With Wordpad or similar, open the file (Vista path follows, adapt for Win 7 if/as needed) [your user name]/Saved Games/ThirdWire/FirstEagles2/Options.ini. In the section [GraphicsOptions], check this line: UseAdvancedShaders=1, as shown below. If it reads 'UseAdvancedShaders=0', overtype the 0 with a 1, save and close. [GraphicsOptions] DisplayDeviceID=0 DisplayWidth=1600 DisplayHeight=900 DisplayDepth=32 AspectRatio=1.777778 AntiAliasing=0 UseAdvancedShaders=1 ForceDX9=FALSE ForceVSyncOff=FALSE LensFlare=0 DetailLevel=4 ObjectDetail=2 ObjectTexture=3 CockpitTexture=2 CockpitMirrors=1 CockpitReflection=1 EffectsDetail=2 TerrainDetail=2 TerrainTexture=2 HorizonDistance=1 GroundObjectDensity=2 WaterDetail=2 CloudsDetail=2 Shadow=2 Setting a shorter horizon distance may help - IIRC, setting for setting, FE2's settings are more, well, distant. IIRC there is an unresolved issue that if you have the shadows set to high (the one that gives dynamic shading in the cockpit view), the FPS takes a nose dive in that view if you are close to the ground and your own aircraft's shadow is in view/being rendered. The above settings are for a GTS 250 and give about 20-30 FPS with stock terrain
-
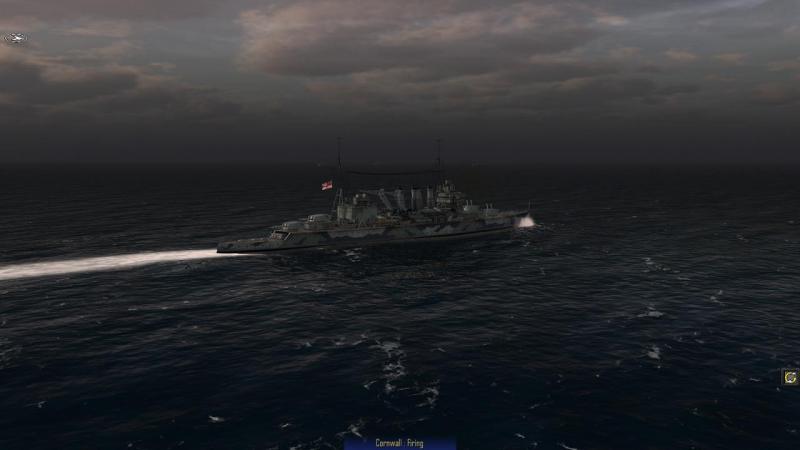
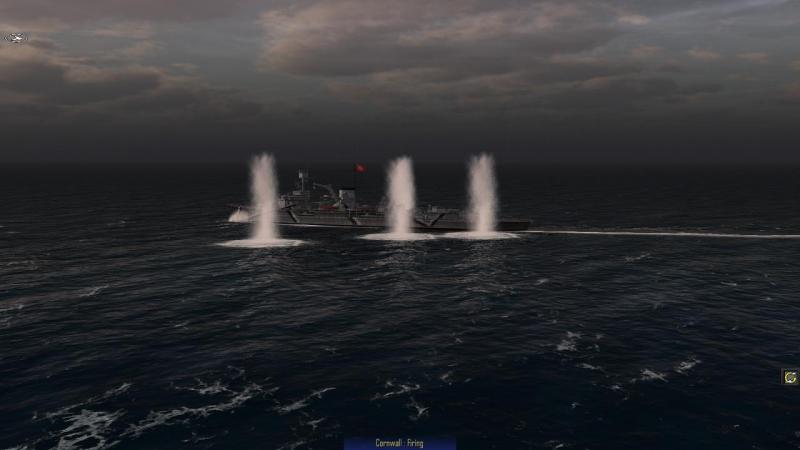
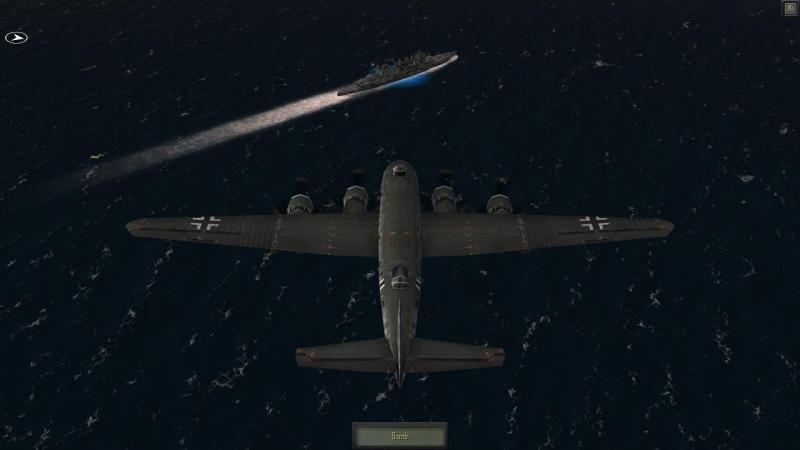
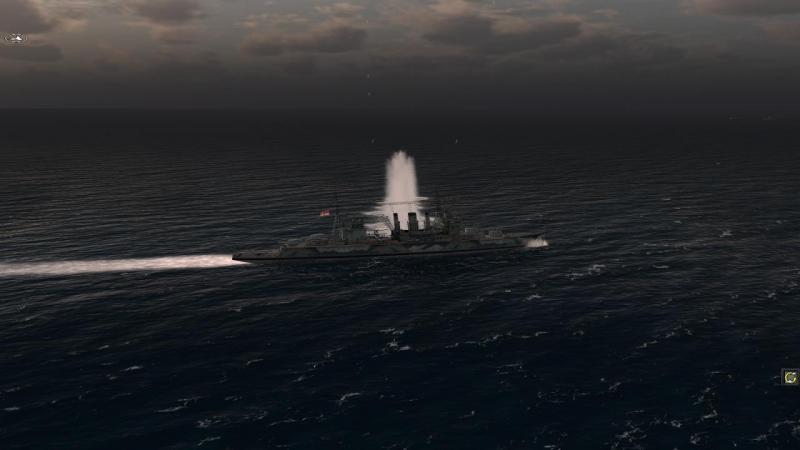
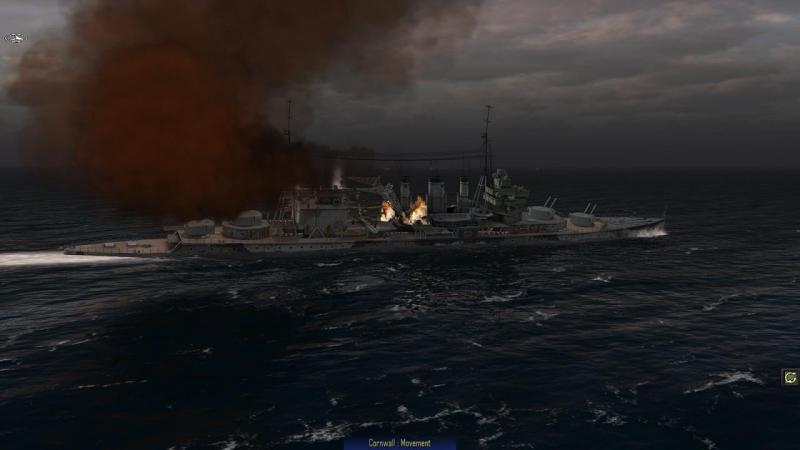
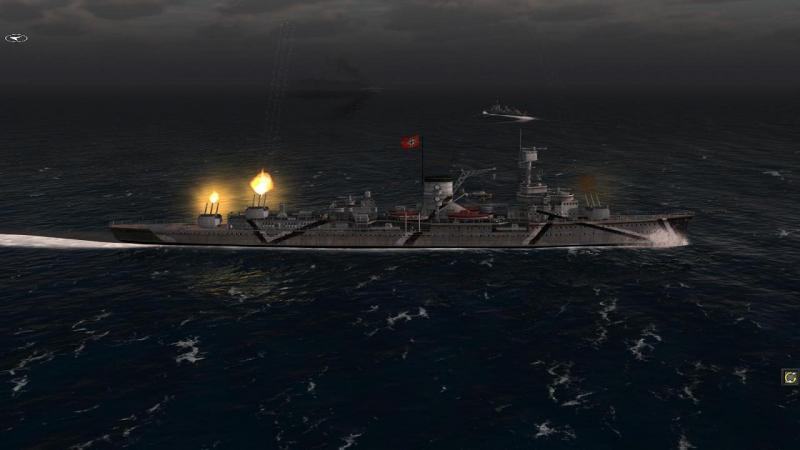
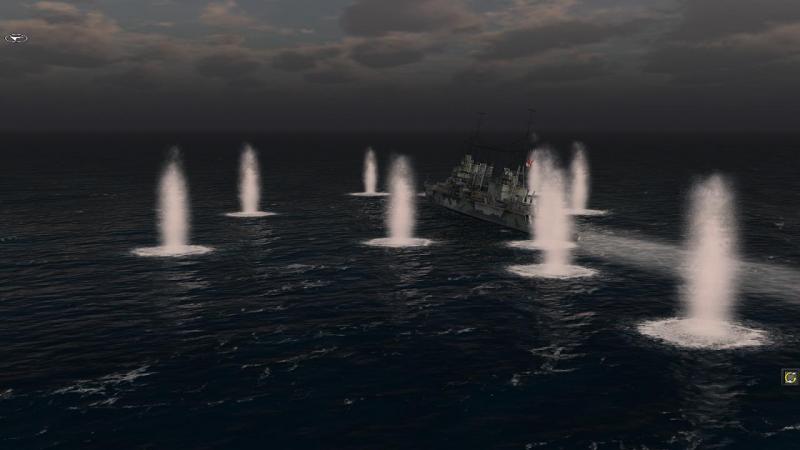
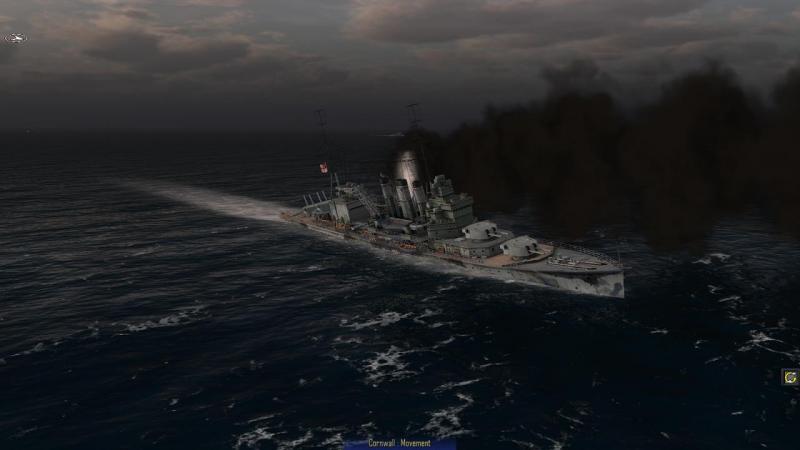
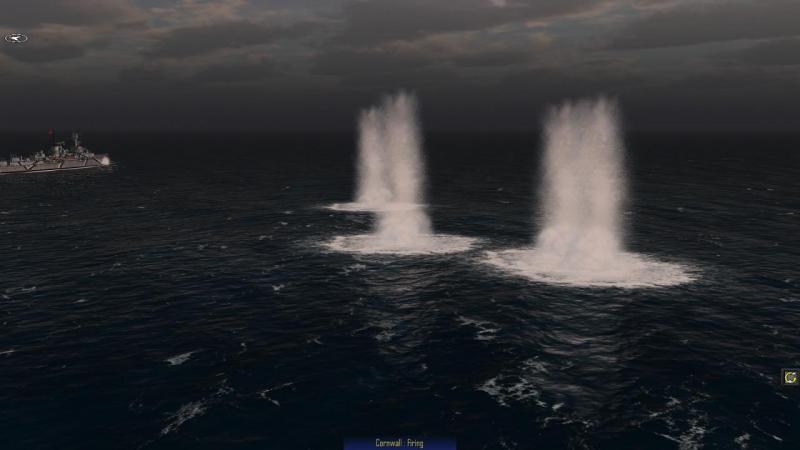
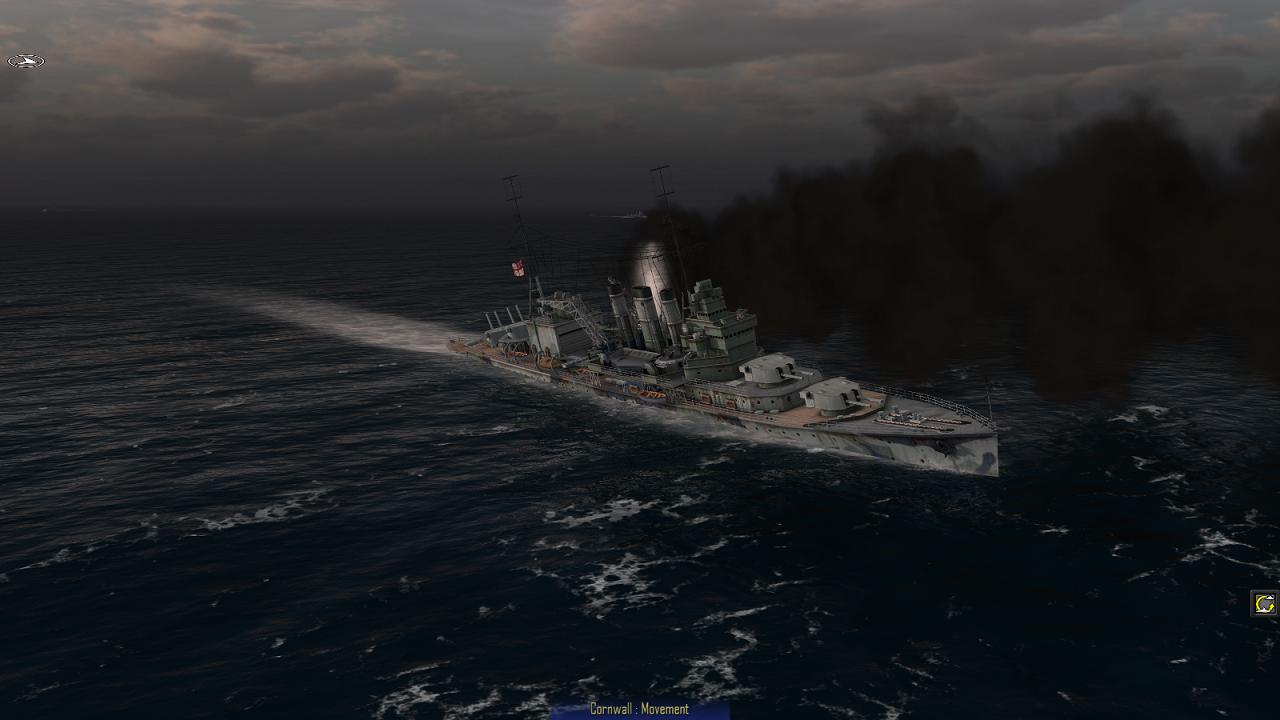
Condors to the rescue! So, my German Bight patrol, well used to beating up enemy destroyer patrols, is now in a spot of bother, facing an 8-inch cruiser. I'm rather too close to risk running for it, but luckily, close enough for Nurnberg's 5.9-inch guns to return fire, while destroyers Theile and Schulze manoeuvre independently to get into range of their 5-inchers, and later if they're lucky, their torpedoes. And I'll need all the help I can get, as Cornwall's shooting is rather accurate, from the first salvoes... Fortunately, we are all within range of friendly air cover and a couple of FW 200 Condors is in fact providing cover just for us. We call them in, for a strike on Cornwall. The first bombing run misses, allowing Cornwall to get in some more accurate shooting at Nurnberg, fortunately without doing any damage... I take a bit more care judging the bomb release point next time, and the second Condor's bombing run is bang on... Cornwall has been hard hit and her fire drops off. She sheers away, still burning. Now's my chance, to press home this unexpected advantage. My destroyers close for the kill as Nurnberg showers Cornwall with full 5.9-inch salvoes... Cornwall gets the fires out but is still in trouble. We already have her range, so her belated smoke screen doesn't help her much. I sense victory! The only question now seems to be, will Cornwall survive the barrage of gunfire long enough for the destroyers to get into torpedo range? It looks unlikely. With no return fire, Nurnberg closes the range cautiously, salvo after salvo straddling the now-listing Cornwall. As the range winds down, the destroyers start shooting, too, adding to Cornwall's misery. There's a moment of alarm as Cornwall's two rear turrets resume firing. But her shooting is now erratic and soon she is simply fleeing, under cover of another smokescreen. Suddenly, there's a massive explosion admidships, as another salvo from Nurnberg finds its mark. Just as my two destroyers are coming abeam for their torpedo attack, Cornwall slows to a halt, rolls over to starboard, and begins to slip beneath the waves. Thank goodness that co-operation between the Luftwaffe and the Kriegsmarine in Atlantic Fleet seems to be better than it sometimes was, in real life! At any rate, I'm finding the Battle of the Atlantic compaign utterly addictive, like no game I can remember, in fact. There are certainly elements which depart somewhat from historical events, but it's more than sufficiently close to capture the look and feel of its real-life setting. Brilliant! Some more recent scenes from my Kriegsmarine dynamic campaign... ...a wolf pack completes the destruction of a small convoy on the surface, after sinking its escort (which is a bit too easy to do, and those merchantmen with stern guns just have them for show)... Here's one less brand-new King George V class battleship for the kinder in the big ships to worry about... I gave into temptation when Spring 1941 arrived, commissioned both Bismarck and Tirpitz, and sent them out into the North Atlantic together, with a couple of destroyers for company... The little battlefleet's destroyers come in handy, running down merchantmen whose escorts the big battlewagons have smashed... We fall in with a fleet carrier, and screened by smoke from escorting cruiser and destroyers, she manages to scramble some Swordfish before going under... The 'stringbags' who get off have no-where to land, but that doesn't stop them from attacking... Another new day, another battle, somewhere up ahead... One time, it's a convoy with a KG V class battleship for company, HMS Prince of Wales. Disengaging well within her range is risky, so even though it's against standing orders to risk a fight with a battleship, we take her on... ...and win! In the previous battle, against escort destroyers, my shooting was all over the place. But this time, admittedly against a bigger target, I can hardly miss. All but the first salvo gets at least one hit, with only a single 14-inch shell reaching Bismarck, in return. I make full use of air cover, where I have it, including Stukas near friendly territory... Our Dornier 217s can come with bombs (released in a shallow dive) or torpedoes, but though they are longer-legged, they're not as accurate as the Stukas... Longest-ranged of all the friendly aircraft we may have available are the FW 200 Condors... As for the enemy, in addition to Sunderland flying boats, we have already started to see some Liberators, even though the USA is still months away from entering the war! Serves them right, if our flak puts paid to them... It's May 1941 and while we have lost Scheer, Hipper, Lutzow and several U-Boats, we have sunk two battlecruisers, several carriers, about half-a-dozen battleships, a bevy of cruisers and many destroyers and escorts. And most importantly, the tonnage war seems to be going well for us. Whatever the morrow will bring, both U-Boats and the high seas fleet are ready to meet it.