
Stephen1918
-
Content count
1,168 -
Joined
-
Last visited
-
Days Won
19
Files posted by Stephen1918
-

Armored Train - For Tracks
By Stephen1918 in First Eagles - WWI and Early Years - Object Mods
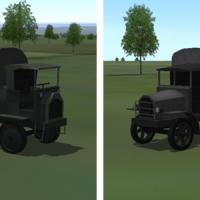
Armored Trains were used extensively on the Eastern Front and to a lesser extent on the Palestine and Italian Fronts. On the Western Front, after 1914 they were used mostly for defense and as mobile headquarters. I have created five cars which can arranged in different configurations.
Engines could both push and pull other cars. It was common to have an armed car or two in front of the engine.
Troop cars had quarters for an infantry unit to help defend the train. There is a turret with a light gun. It is currently set for anti-aircraft, but you can change the data file to target ground objects.
Transport cars were used to move troops, munitions, or other supplies into a battle zone or recently conquered territory.
Gun cars were used as mobile light artillery. They can be included in a train or parked on a siding to defend a train station, supply depot, or other strategic location. If you change the target type to ground, they can be used as field guns.
I have included two versions of a heavy, rail mounted artillery gun. In transport mode, the gun is lowered and the car can be included in a train. In deployed mode, there is gun data assigned so the gun will shoot at ground targets. If you place an observation balloon about 2 kilometers down range, the gun will be elevated when it shoots, as if it were shooting at a distant target. There is very little side to side motion, so you have to be pretty accurate when you place the target balloon.
All the cars are the same length for easy placement. Put them 17.25 meters apart and they will line up nicely on the tracks.
There are three complete trains with different skins so you can use them in different terrains or for different forces. I have arbitrarily assigned the grey skin to Germany, the green skin to Russia, and the tan skin to the Ottoman Empire. With a little typing, you can reassign them to whatever forces you want.
These cars are designed to be used with the train tracks from Gepard's Railway Station (available in the Strike Fighter 1 Terrain downloads). Gepard has given me permission to include the tracks with my train. I have made a new skin with the ties farther apart, which I think looks better from the air. If you already have the tracks in your terrain, you don't need this.
All of these need to be included in the targets.ini in order to use them. I have included the data for the types.ini in the folders for each train.
120 downloads
(1 review)0 comments
Updated
-
North Sea Terrain
By Stephen1918 in First Eagles - WWI and Early Years - Terrain and Environmental Mods
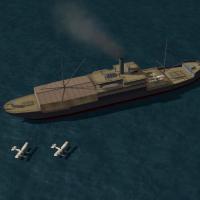
North Sea Terrain for First Eagles
June 2013
Terrain and ground objects by by Stephen1918
Testing, modding for FE2, and help with effects and data files by ojcar
Ojcar's AI Flyable Airships are included in the download - LODs by Stephen1918 - data, loadouts, and ini files by ojcar
This terrain was made just so I would have a place to fly my sea planes. It's realistic, but not historical. The ships are all generic. I didn't attempt to recreate actual ships, but the types are similar to World War I era ships. All nations have the same ships, but with different flags and skins. My intention was to make it look reasonable from the cockpit.
There is no land at all in this terrain, so it will require a separate install of First Eagles. Otherwise you will find trucks and tanks driving over the water and land based aircraft taking off from the sea. I have included installation instructions.
There are no campaigns (yet), but you can fly all the mission types as single missions. Supply ships replace trucks in armed recon missions. Torpedo boats replace the tanks in army co-operation missions. Airships replace balloons in the balloon busting missions. All of the ships and airships are armed with anti-aircraft weapons. There are a few neutral country merchant ships cruising around the edges, be careful not to create a diplomatic incident by attacking a non-combatant.
I created a new kind of airfield (WWI_SeaPlaneBase.ini) which uses seaplane tenders. The tenders had hangars on the decks and planes were moved in and out of the water using cranes. WWI seaplane tenders carried small numbers of planes, usually 4 to 6, rarely more than 8. But my "airfields" have take off positions for 16 planes because First Eagles sometimes assigns large numbers of planes to missions.
I have included ojcars AI airships in this terrain. I have adjusted the formations to keep them from colliding.
This download includes all the ground objects for the North Sea terrain. I have created two new effects which make the static ships appear to be moving when they're really just sitting still. I have made new formations to spread the "trucks" "tanks" and "bombers" out more. I have made a new view list so you can use the F7 key to see all the ground objects. And I have made new icons for the in-flight map.
All the ships have a separate skin for the flags, so you should be able to quickly make Austrian, Italian, Russian, or Turkish ships for different sea terrains.
Installation Instructions:
Start by making a new install of the game. In FE1 the following changes will be made directly in the game folder. In FE2, the changes will be made in the game's mod folder.
If you haven't already done so, download the seaplanes from Combat Ace/Downloads/First Eagles Add-On Aircraft.
Open the Objects folder. Delete the entire GroundObject folder and replace it with mine.
Open the Aircraft folder. Delete all the planes, do NOT delete the pilot skins. Copy the two folders from my Aircraft folder into yours. Then install the seaplanes following the instructions in each download.
In the new game folder, open the Effects folder. Copy the three files from my Effects folder into yours.
Open the Flight folder. Copy the five files from my Flight folder into yours.
Open the terrain folder. Delete all the terrains EXCEPT "wwiVerdun." You need the Verdun cat file for my terrain to work.
Copy my wwiNorthSea folder into your Terrain folder.
If you have FE2, open my "TerrainDataForFE2" folder, copy the wwiNorthSea_Data file and use it to replace the data file in the new North Sea folder.
** A note about the water - In the download, I have included a water tile (FRLAKE.tga) which is intended to look good in Medium graphics mode. It will still work in High graphics mode, or you can delete it and the stock Verdun water will be used instead.
Ojcar has made a new data file which takes advantage of the graphics effects in FE2. This only works in FE2. If you are running FE1, use the original wwiNorthSea_Data in my terrain folder.
** Other notes - The stock campaigns and missions from the original game don't work anymore because you have deleted all the planes and terrains for them. When you run the new version of the game, it will hang if you click the "Campaign" or "Instant Action" buttons on the Main Menu Screen.
339 downloads
-
Albatros W.4 (Late)
By Stephen1918 in Albatros
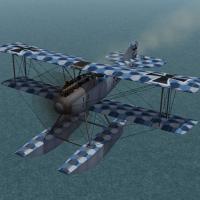
The Albatros W.4 was a float plane version of the D.II. It used the same fuselage, engine, and armament as the D.II, but had a wider wingspan and tail. The W.4 was used for recon and spotting missions in the North Sea, the Baltic, and by Austria-Hungary in the Adriatic Sea.
This is a late version of the W.4 with the radiator mounted on the upper wing. I have included a complete set of number decals, and two skins - a blue hex camo skin for Germany and one for Austria-Hungary. I have also included my skinning templates. The skins for the late Albatros W.4 are interchangeable with the early version skins.
My version includes a loadout for a light bomb load, even though the W.4 was not used for bombing. You can delete the loadout file if you want more historical accuracy.
Since it's a float plane, the W.4 works best in the Flanders, Gibraltar or other terrain that has a lot of water. The plane will actually take off and land from a conventional airfield, but it looks strange to see the floats going under the ground. It would be best to start the missions in the air. The plane will show up occassionally parked on an airfield, but its availability is listed as "Rare" so it shouldn't happen too often.
Credits
Thanks to Ojcar for making the data file for the Albatros W.4.
Thanks to Nix for providing the sound for the Mercedes engine.
And thanks to Quack74 for giving me the idea for a float plane.
Installation Instructions
For FE1 - Unzip the file and move the folder named "AlbatrosW4Late" into the FirstEagles/Objects/Aircraft folder. You also need to move the sound file "mercedes160m2.wav" into the FirstEagles/Sounds folder.
For FE2 - Unzip the file and move the folder named "AlbatrosW4Late" into the FirstEagles/Objects/Aircraft folder. Then in the FirstEagles/Objects/Decals folder, create new folder named "AlbatrosW4Late". Move the folder named "D" from the Aircraft/AlbatrosW4Late folder into the Decals/AlbatrosW4Late folder you just made. You also need to move the sound file "mercedes160m2.wav" into the FirstEagles/Sounds folder.
232 downloads
(1 review)0 comments
Submitted
-

Albatros W.4 (Early)
By Stephen1918 in Albatros
The Albatros W.4 was a float plane version of the D.II. It used the same fuselage, engine, and armament as the D.II, but had a wider wingspan and tail. The W.4 was used for recon and spotting missions in the North Sea, the Baltic, and by Austria-Hungary in the Adriatic Sea.
I have made an early version of the W.4 with the radiators mounted on the sides of the fuselage. I have included a complete set of number decals, and three skins - a basic wood and linen skin for Germany, one for Austria-Hungary, and an early hex camo skin. I have also included my skinning templates. The skins for the early Albatros W.4 are interchangeable with the late version skins.
My version includes a loadout for a light bomb load, even though the W.4 was not used for bombing. You can delete the loadout file if you want more historical accuracy.
Since it's a float plane, the W.4 works best in the Flanders, Gibraltar or other terrain that has a lot of water. The plane will actually take off and land from a conventional airfield, but it looks strange to see the floats going under the ground. It would be best to start the missions in the air. The plane will show up occasionally parked on an airfield, but its availability is listed as "Rare" so it shouldn't happen too often.
Credits
Thanks to Ojcar for making the data file for the Albatros W.4.
Thanks to Nix for providing the sound for the Mercedes engine.
And thanks to Quack74 for giving me the idea for a float plane.
Installation Instructions
For FE1 - Unzip the file and move the folder named "AlbatrosW4" into the FirstEagles/Objects/Aircraft folder. You also need to move the sound file "mercedes160m2.wav" into the FirstEagles/Sounds folder.
For FE2 - Unzip the file and move the folder named "AlbatrosW4" into the FirstEagles/Objects/Aircraft folder. Then in the FirstEagles/Objects/Decals folder, create new folder named "AlbatrosW4". Move the folder named "D" from the Aircraft/AlbatrosW4 folder into the Decals/AlbatrosW4 folder you just made. You also need to move the sound file "mercedes160m2.wav" into the FirstEagles/Sounds folder.
309 downloads
(1 review)0 comments
Updated
-
Sopwith Schneider
By Stephen1918 in Sopwith
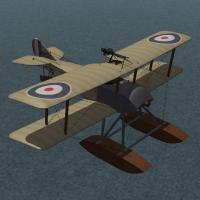
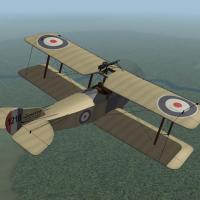
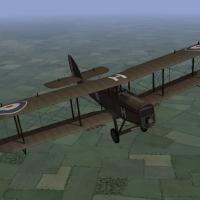
The Sopwith Schneider was the floatplane variant of the Tabloid, and won the Schneider racing trophy in 1914. It was quickly adopted by the British military and was used by the Royal Navy throughout the war. Early versions used wing warping instead of ailerons. Some were armed with Lewis guns on the upper wing and could carry small bomb loads. The Schneider was used mostly for recon, some were used to intercept Zeppelins over the North Sea and some were used to attack land based targets.
Since it's a float plane, the Sopwith Schneider works best in the North Sea terrain, or in Flanders, Gibraltar or other terrain that has a lot of water. The plane will actually take off and land from a conventional airfield, but it looks strange to see the floats going under the ground. Ojcar has included take off instructions in a separate text file.
I have created two skins, an early version with the British flag on the wings, and a later version with roundel markings. I have included a set of number decals. My skinning templates are included with the download.
Credits
Thanks to Ojcar for making the data file for the Sopwith Schneider and for providing instructions for taking off.
Thanks also to Nix for creating the sound file for the Gnome 100hp engine.
Installation Instructions
For FE1 - Unzip the file and move the folder named "SopwithSchneider" into the FirstEagles/Objects/Aircraft folder. You also need to move the sound file "gnome100m2.wav" into the FirstEagles/Sounds folder.
For FE2 - Unzip the file and move the folder named "SopwithSchneider" into the FirstEagles/Objects/Aircraft folder. Then in the FirstEagles/Objects/Decals folder, create new folder named "SopwithSchneider". Move the folder named "D" from the Aircraft/SopwithSchneider folder into the Decals/SopwithSchneider folder you just made. You also need to move the sound file "gnome100m2.wav" into the FirstEagles/Sounds folder.
207 downloads
(2 reviews)0 comments
Updated
-
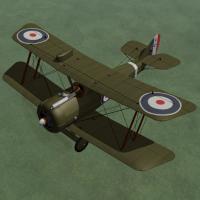
Sopwith Tabloid (Early)
By Stephen1918 in Sopwith
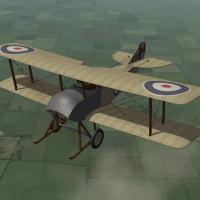
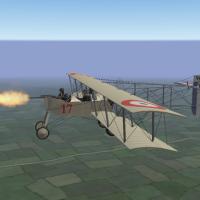
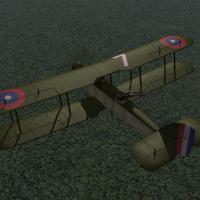
The Tabloid was the land based variant of the Schneider developed in 1913. It was quickly adopted by the British military and was used both by the Royal Navy and the Royal Flying Corps. Early versions used wing warping instead of ailerons. My version has no gun, but some were armed with Lewis guns on the upper wing and could carry small bomb loads. The Tabloid was used mostly for recon and light bombing. In September 1914, Tabloids of the RNAS bombed the Zeppelin sheds at Düsseldorf.
An unlicensed copy known as the Lebed VII was built by the Russians and used for recon and later for training.
I have created two skins, a British version and a Russian. I have included a full set of number decals for each. My skinning templates are included with the download.
Credits
Thanks to Ojcar for making the data file for the Sopwith Tabloid and for providing input on the model details.
Thanks also to Nix for creating the sound file for the Gnome 100hp engine.
Installation Instructions
For FE1 - Unzip the file and move the folder named "SopwithTabloidEarly" into the FirstEagles/Objects/Aircraft folder. You also need to move the sound file "gnome100m2.wav" into the FirstEagles/Sounds folder.
For FE2 - Unzip the file and move the folder named "SopwithTabloidEarly" into the FirstEagles/Objects/Aircraft folder. Then in the FirstEagles/Objects/Decals folder, create a new folder named "SopwithTabloidEarly". Move the folder named "D" from the Aircraft/SopwithTabloidEarly folder into the Decals/SopwithTabloidEarly folder you just made. You also need to move the sound file "gnome100m2.wav" into the FirstEagles/Sounds folder.
191 downloads
(2 reviews)0 comments
Updated
-
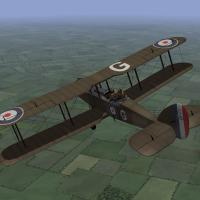
Sopwith Tabloid (Late)
By Stephen1918 in Sopwith
The Tabloid was the land based variant of the Schneider developed in 1913. It was quickly adopted by the British military and was used both by the Royal Navy and the Royal Flying Corps. Later versions had ailerons on both wings and a larger vertical stabilizer on the tail. Most were armed with Lewis guns on the upper wing and could carry small bomb loads. The Tabloid was used mostly for recon and light bombing missions. I have included my skinning templates and a full set of number decals.
Credits
Thanks to Ojcar for making the data file for the Sopwith Tabloid and for providing input on the model details.
Thanks also to Nix for creating the sound file for the Gnome 100hp engine.
Installation Instructions
For FE1 - Unzip the file and move the folder named "SopwithTabloidLate" into the FirstEagles/Objects/Aircraft folder. You also need to move the sound file "gnome100m2.wav" into the FirstEagles/Sounds folder.
For FE2 - Unzip the file and move the folder named "SopwithTabloidLate" into the FirstEagles/Objects/Aircraft folder. Then in the FirstEagles/Objects/Decals folder, create new folder named "SopwithTabloidLate". Move the folder named "D" from the Aircraft/SopwithTabloidLate folder into the Decals/SopwithTabloidLate folder you just made. You also need to move the sound file "gnome100m2.wav" into the FirstEagles/Sounds folder.
274 downloads
(2 reviews)0 comments
Submitted
-
Phönix D.II
By Stephen1918 in Other Central Powers Aircraft
The Austro-Hungarian Phönix D.II was an improved version of the D.I, both of which appeared in 1917. The D.II included changes to the ailerons, elevators, and engine which improved the performance over the D.I. The Phönix was a stable plane and slow to maneuver but could handle steep dives and was considered an excellent fighter.
I have included a set of letter decals so you can set flight letters in the Loadout screen, or the game will randomly assign a different letter to each plane.
I have included my skinning templates so others can make new skins if they want. I have also included my .OUT files for the benefit of future modders.
Credits
My thanks to ojcar, who created the FM to capture the power and performance of this sturdy plane.
Historical Notes
I couldn't find any photos of the D.II cockpit. The cockpit of my model is based on the D.I with a little speculation. I believe it is reasonably accurate.
Installation instructions:
For FE1: Unzip the file and move the folder named "PhoenixD2" into the FirstEagles/Objects/Airplanes folder.
For FE2: Unzip the file and move the folder named "PhoenixD2" into the FirstEagles/Objects/Airplanes folder. Then in the FirstEagles/Objects/Decals folder, create a new folder named "PhoenixD2". Move the folder named "D" from the Airplanes/PhoenixD2 folder into the Decals/PhoenixD2 folder you just made.
485 downloads
(2 reviews)0 comments
Updated
-

Phönix D.IIa
By Stephen1918 in Other Central Powers Aircraft
The Phönix D.IIa was the same as the D.II but with a more powerful 230 hp Hiero engine, which gave it better speed and better climbing ability.
My model of the D.IIa is based on my model of the D.II but with a different engine - which means all new .LOD files as well as a new cockpit (the engine is part of the cockpit in this model.) I have made a slightly different skin, new decals, and ojcar has made a different FM, so this is a completely new plane. (You do NOT need the D.II in order to install this plane.)
The skins and decals are interchangeable with the D.II.
I have included a set of letter decals so you can set flight letters in the Loadout screen, or the game will randomly assign a different letter to each plane.
The skinning templates are identical to the D.II, but I have included them here anyway. I have also included my .OUT files for the benefit of future modders.
Credits
My thanks to ojcar, who created the FM to capture the improved power and performance of this excellent Austro-Hungarian fighter.
Installation instructions:
For FE1: Unzip the file and move the folder named "PhoenixD2a" into the FirstEagles/Objects/Airplanes folder.
For FE2: Unzip the file and move the folder named "PhoenixD2a" into the FirstEagles/Objects/Airplanes folder. Then in the FirstEagles/Objects/Decals folder, create a new folder named "PhoenixD2a". Move the folder named "D" from the Airplanes/PhoenixD2a folder into the Decals/PhoenixD2a folder you just made.
514 downloads
(1 review)0 comments
Updated
-
Hansa-Brandenburg C.I - 3 pack
By Stephen1918 in Other Central Powers Aircraft
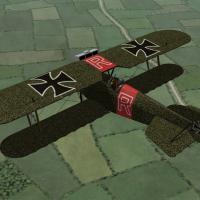
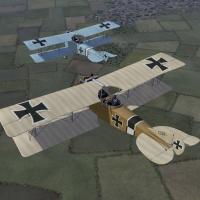
The Hansa-Brandenburg C.I was an Austro-Hungarian two seater, similar in size and configuration to the German Albatros. It was introduced in 1916 and used throughout the war, with more powerful engines in later versions. The HB C.I was used primarily for reconnaissance and light bombing, although it saw service as a fighter early in the war. Early versions of the plane carried a gun pod on the upper wing. After a better synchronization system was developed, the gun was moved down to the left side of the fuselage.
I have included three different versions of the plane with this download. Ojcar has created FM's for the 160hp, 200hp, and 230hp engines, and Nix has provided the engine sounds for all three. There are three slightly different models, with different loadouts, different serial number decals, and different skins for each plane, so there are three complete planes which can be installed individually or all together.
The skins are interchangeable, except for the serial numbers, but you may see some stretching on the nose of the 230hp version. Each skin has a "Standard" version which will allow you to change nationalities, and an "Austrian" version with the cross at mid wing. The Austrian version won't let you change the national insignia. I have included my skinning templates.
Ojcar has also provided two new guns for this plane. For FE1, we have included Peter01's GunData.ini with Ojcar's guns added. To load the new guns you will need the Gun Editor available from the Combat Ace download area, (I have provided a link at the end of this page.) For FE2, Ojcar has provided the necessary files.
Credits:
My thanks once again to Ojcar for making three excellent data.ini files and two new gun data files for this plane - and for teaching me how to add guns to First Eagles.
My thanks to Nix who created the engine sound files for the Austro-Daimler 160, 200, and 230 horse-power engines.
Thanks also to Sinbad and Quack74 who provided reference materials for the Hansa-Brandenburg C.I
Installation instructions:
For FE1: Unzip the file and move the three folders named "HBC1_160" "HBC1_200" and "HBC1_230" into the FirstEagles/Objects/Airplanes folder. Move the three sound files named "Austro-daimler160.wav" "Austro-daimler200.wav" and "Austro-daimler230.wav" into the FirstEagles/Sounds folder.
To add guns you'll need the Gun Editor program (available in the Combat Ace Downloads area.) Move the newGundata.ini file into the FirstEagles/Objects folder. Open the Gun Editor and click the Open button. Find the Gundata.ini you just installed and open it. Make sure the new guns are there (the last one in the list should be "8MM_SCHWARZLOSE_M0712" Click the Save button and close the Gun Editor. You have the new guns!
For FE2: Unzip the file and move the three folders named "HBC1_160" "HBC1_200" and "HBC1_230" into the FirstEagles/Objects/Airplanes folder. Then in the FirstEagles/Objects/Decals folder, create three new folders named "HBC1_160" "HBC1_200" and "HBC1_230". Move the folder named "D" from the Airplanes/HBC1_xxx folders into the corresponding Decals/HBC1_xxx folders you just made. Move the three sound files named "Austro-daimler160.wav" "Austro-daimler200.wav" and "Austro-daimler230.wav" into the FirstEagles/Sounds folder.
To add the guns move both gun folders ("8MM_SCHWARZLOSE_M0712" and "8MM_SCHWARZLOSE_M0712_Gunner") into your Guns folder (in your mod files folder) and you're done!
This is the URL for Gun Editor I use for FE1:
http://combatace.com/files/file/103-sf-gun-editor-for-strike-fighters/
608 downloads
(2 reviews)0 comments
Updated
-
Voisin Type V with 37mm cannon
By Stephen1918 in Other Entente Aircraft
The Voisin Type V was a slightly improved version of the Voisin III, with minor changes to the 150hp Salmson engine, a more streamlined nacelle, and staggered wings. It was first used in 1915, but was not a significant improvement over the Voisin III and served alongside it rather than replacing it. Some Type Vs were equipped with a a 37mm Hotchkiss cannon mounted in the nose and were successfully used for ground attack missions.
In my model, the 37mm cannon is rigged as an internal gun, so the pilot can fire it. The gunner would normally sit or stand directly behind the cannon, but I have placed him to the side so you can get a clear view of your target. As a result, some of the cockpit details have been altered, but are still reasonable.
Ojcar has created the data file for the plane, and spent some time tweaking the gun data to get it to perform more realistically. (You will have to reload between shots.)
I have included three skinning options for the plane, identical except for the decals. The Italian Linen uses the Italian insignia with red and green underwing panels. The Russian Linen uses the Russian insignia and includes stripes on the tail planes. The Standard Linen can be used for all the other Entente powers. This plane uses the national markings that come with First Eagles, so you can easily change nationalities (in the Standard Linen skin only.) I have included all my skinning templates. This is slightly different from the Voisin III and the skins are not interchangeable.
I have also included decals for serial numbers which will be applied randomly.
Historical Notes:
The serial numbers are fictious, but more or less in the correct range for the Voisin Type V.
The Russians used different national markings on the tail planes, If you use my Russian skin, you will have white, blue, and red stripes on the tail planes. If you use the Standard skin for the Russians, you will get roundels on the tail planes.
Details of the gunner and gunner's cockpit have been altered to make it possible for the pilot to fire the gun.
Credits:
My thanks to Ojcar for making the data file for this plane, and for massaging the data for the gun to get a more realistic effect.
Installation instructions:
For FE1: Unzip the file and move the folder named "Voisin5" into the FirstEagles/Objects/Airplanes folder.
For FE2: Unzip the file and move the folder named "Voisin5" into the FirstEagles/Objects/Airplanes folder. Then in the FirstEagles/Objects/Decals folder, create a new folder named "Voisin5". Move the folder named "D" from the Airplanes/Voisin5 folder into the Decals/Voisin5 folder you just made.
A note about Effects -
I have used the 37mm Hotchkiss 1885 cannon in my plane. In First Eagles, this is usually used as a ground object and the gun fire animation is quite large. If you have a slow computer, you may not be able to see the fire effect unless you have shadows turned off.
If you have downloaded p10ppy's SPAD XII, then you already have a nice fire effect for an aircraft mounted cannon (with smoke blowing back over the cockpit). The effect is in a file named "37mmSPAD.ini" in your Effects folder and is named "37mmFireEffectEnH". You can edit the GunData.ini for the 37MM_HOTCHKISS_1885 to use the better effect by changing the effect name to read:
GunFireEffect=37mmFireEffectEnH
497 downloads
(3 reviews)0 comments
Updated
-

Aviatik-Berg D.I 185hp
By Stephen1918 in Other Central Powers Aircraft
The Aviatik-Berg D.I had many variations, with different engines, different radiator configurations, different fuselage shapes, and different gun placements. This is a very early version, with a 185hp Daimler engine and a non-synchronized Schwarzlose machine gun mounted above the wing.
The machine gun is detachable and can be mounted or unmounted in the Loadout screen.
I have included one of Quack74's basic skins and decal sets with a set of serial numbers which will be applied randomly to each plane.
This plane has an extra piece that was not included in Quack's skins, I have included skins for the new part to match each of Quack's skins, which you will need to add to each skin folder.
Historical Notes
This version of the Aviatik did not have a cutout in the upper wing and the fuselage was higher in front of the fuselage. My model is converted from a later version and has not been corrected because I wanted to make sure that all of Quack's skins would still work with this plane.
Credits
My great thanks to Ojcar for making the FM and the Schwarzlose weapon data, and for teaching me how to make weapon stations.
Thanks to Quack 74 for making the skin and decal set for all the Aviatiks, and for allowing me use one as the default skin for this plane.
And thanks to Nix for making the engine sound file.
Installation Instructions
If you are using FE1, you will need to use the Weapons Editor available from the Thirdwire Downloads area. You will also need to use a CAT file extractor utility (SFP1E Extract Utility available in the CombatACE Downloads area.)
For FE1 - Unzip the file and move the folder named "AviatikD1_185" into the FirstEagles/Objects/Aircraft folder. This file uses the same sound file as the original AviatikD1. If you did not install that plane then you will also need to move the sound file "Austro-daimler200.wav" into the FirstEagles/Sounds folder.
To install the gun - If you haven't already done so, extract the WeaponData.INI and the WeaponData.DAT files from the FirstEagles ObjectData.CAT file. Make a new folder named "Weapons" in the FirstEagles/Objects folder. Put the two extracted files into the new folder.
In my download, open the file named "Single_Schwarzlose_Angled_Data.INI," copy everything and paste it at the end of the "WeaponData.INI" you just extracted. Then change the number (WeaponData001) to the next consecutive number. Save the file.
In my downlaod, copy the files named "Schwarzlose.BMP" and "SchwarzloseAngle.LOD" and put them into the FirstEagles/Objects/Weapons folder.
Open the Weapons Editor, Open the WeaponsData.INI, make sure the new weapon (Single_Schwarzlose_Angled) is there, click "Save" and Close the editor.
For FE2 - Unzip the file and move the folder named "AviatikD1_185" into the FirstEagles/Objects/Aircraft folder. Then in the FirstEagles/Objects/Decals folder, create a new folder named "AviatikD1_185". Move the folder named "D" from the Aircraft/AviatikD1_185 folder into the Decals/AviatikD1_185 folder you just made. This file uses the same sound file as the original AviatikD1. If you did not install that plane then you will also need to move the sound file "Austro-daimler200.wav" into the FirstEagles/Sounds folder.
To install the gun - From my download, copy the folder named "Single Schwarzlose Angled" into your Objects/Weapons folder.
389 downloads
-
Albatros C.III
By Stephen1918 in Albatros
The Albatros C.III was a general purpose two-seat plane and was based on the C.I and C.II models. An improved tail structure made it more agile than its predecessors and it was produced in large numbers.
The plane was armed with a Parabellum machine gun mounted on a pivot in the rear cockpit along with a synchronized machine gun mounted beside the engine. The C.III was used for reconnaissance, aerial photography, and light bombing.
The gun ring had limited movement, especially in the vertical direction, which I have tried to reproduce in my model.
I have included two loadouts, one for four 12.5 kilo bombs carried internally, and another for six 12.5 kilo bombs carried externally under the wings.
I have also included three skinning options - an unpainted standard wood and linen, a light blue paint, and a green paint. All of these are pretty basic so I have included my skinning templates for those who want make their own skins.
This plane uses the national markings that come with First Eagles, so you can change nationalities to fly for Bulgaria or the Turks.
I have included decals for serial numbers and for personal markings. These will be applied randomly. Some of the personal markings include crosses, I don't know if that would be appropriate if you're flying for the Ottoman Empire.
Historical Notes:
The serial numbers are fictious, but in the correct range for the 1916 Albatros C.III.
The personal markings are completely fictious, but I think reasonable for German markings early in the war.
I have not found an example of the Albatros C.III in green paint, but many German planes on the Eastern Front were painted green later in the war, so the color is not unrealistic.
If historical accuracy is important to you, you can delete the offending files.
Credits:
My thanks to Ojcar for making the excellent data.INI file for this plane.
My thanks to Nix for making the realistic engine sound file for the Mercedes 6 cylinder engine.
Thanks also to Sinbad, Whitekinght06604, and Wrench who provided me with valuable resouces and information for the cockpit details.
Installation instructions:
For FE1: Unzip the file and move the folder named "AlbatrosC3" into the FirstEagles/Objects/Airplanes folder. You also need to move the sound file "mercedes160m2.wav" into the FirstEagles/Sounds folder.
For FE2: Unzip the file and move the folder named "AlbatrosC3" into the FirstEagles/Objects/Airplanes folder. Then in the FirstEagles/Objects/Decals folder, create a new folder named "AlbatrosC3". Move the folder named "D" from the Airplanes/AlbatrosC3 folder into the Decals/AlbatrosC3 folder you just made. You also need to move the sound file "mercedes160m2.wav" into the FirstEagles/Sounds folder.
March 12, 2012 - Uploaded a new version with an improved FM by ojcar.
790 downloads
-
Airco D.H.5
By Stephen1918 in Other Entente Aircraft
The Airco D.H.5 was intended to be an improved version of the D.H.2, combining the power of a forward facing prop with the forward visibility of a pusher. The reverse stagger of the wings was an unusual configuration and the strange appearance of the plane may have contributed to false rumors of its bad performance. Although a slow climber, the D.H.5's strength and maneuverability made it excellent for ground attack and light bombing missions.
I have included two skins with decal ini's for both British and Australian markings. Both use the letter decals that come with First Eagles, which you can set in the Loadout screen. The British skin allows you to also set the squadron. (The Australians all used a white stripe on the tail instead of squadron markings.) I have included a set of serial numbers which will be applied randomly.
You can also choose a light bomb load in the Loadout screen.
Historical Notes
The serial numbers are fictious, but in the correct range for most D.H.5s.
Credits
My thanks to Ojcar for once again making an excellent data file for the D.H.5.
My thanks also to Nix for providing the realistic sound file for the Le Rhône engine.
Installation Instructions
For FE1 - Unzip the file and move the folder named "AircoDH5" into the FirstEagles/Objects/Airplanes folder. You also need to move the sound file "rhone110bn4nC" into the FirstEagles/Sounds folder.
For FE2 - Unzip the file and move the folder named "AircoDH5" into the FirstEagles/Objects/Airplanes folder. Then in the FirstEagles/Objects/Decals folder, create a new folder named "AircoDH5". Move the folder named "D" from the Airplanes/AircoDH5 folder into the Decals/AircoDH5 folder you just made. You also need to move the sound file "rhone110bn4nC" into the FirstEagles/Sounds folder.
551 downloads
-
Airco DH9
By Stephen1918 in Other Entente Aircraft
The Airco DH9 was introduced early in 1918 as an intended replacement for the DH4. The pilot was seated closer to the gunner in the DH9 and an internal bomb compartment was provided. However, because of the DH9's low performance and unreliable engine, the DH4 remained the better bomber until the DH9a was introduced a few months later. Nevertheless, the DH9 did operate with better success on the Eastern and Palestinian fronts where it faced fewer enemy fighters.
I have included two skins, a brown and an olive color. Both use the letter decals that come with First Eagles (which you can set in the loadout screen) and I have included a set of serial numbers which will be applied randomly. There are also loadouts for light, medium, and heavy bomb loads.
The skins are rather generic, I have included my skinning templates for those who wish to make better skins.
Credits
My thanks to Ojcar for once again making an excellent data file for the DH9.
My thanks also to Sinbad for providing a great deal of resource information for this plane.
Installation Instructions
For FE1 - Unzip the file and move the folder named "AircoDH9" into the FirstEagles/Objects/Airplanes folder.
For FE2 - Unzip the file and move the folder named "AircoDH9" into the FirstEagles/Objects/Airplanes folder. Then in the FirstEagles/Objects/Decals folder, create a new folder named "AircoDH9". Move the folder named "D" from the Airplanes/AircoDH9 folder into the Decals/AircoDH9 folder you just made.
April 5, 2012 - Replaced data file with new version to fix problem with take offs and landings and to make the plane fly better.
452 downloads
-

Airco DH9a "Ninak"
By Stephen1918 in Other Entente Aircraft
The Airco DH9a, called the "Ninak" ("nine a") was introduced in June 1918 to replace the underpowered DH9. The 400hp Liberty engine required changes to the front of the fuselage, otherwise the plane was pretty much the same as the DH9. Although it was introduced late in the war, the DH9a did see service during the war, and was used extensively afterwards.
I have included two skins, a brown and an olive color. Both use the letter decals that come with First Eagles (which you can set in the loadout screen) and I have included a set of serial numbers which will be applied randomly. There are also loadouts for light, medium, and heavy bomb loads.
The skins are rather generic, I have included my skinning templates for those who wish to make better skins.
Credits
My thanks to Ojcar for once again making an excellent data file for the DH9a.
My thanks also to Sinbad for providing a great deal of resource information for this plane.
Installation Instructions
For FE1 - Unzip the file and move the folder named "AircoDH9a" into the FirstEagles/Objects/Airplanes folder.
For FE2 - Unzip the file and move the folder named "AircoDH9a" into the FirstEagles/Objects/Airplanes folder. Then in the FirstEagles/Objects/Decals folder, create a new folder named "AircoDH9a". Move the folder named "D" from the Airplanes/AircoDH9a folder into the Decals/AircoDH9a folder you just made.
April 5, 2012 - Replaced data file with new version to fix problem with take offs and landings and making the plane fly better.
429 downloads
-
Airco DH4 - 2 pack
By Stephen1918 in Other Entente Aircraft
Although best known in its role as a bomber, the Airco DH4 was intended to be a general purpose airplane and was used for recon and ground support as well. Early versions were powered by a 250hp Eagle engine. Later versions were powered with a 375hp Eagle engine, which made them very effective bombers. The biggest problem with the DH4 was the gas tank placed between the pilot and gunner, which made communication between the two almost impossible.
I have uploaded two versions of the DH4 - Ojcar has created two FMs for the plane, one with the early 250hp engine, and one with the later 375hp engine.
Both planes have two skins, a brown and an olive color. Both use the letter decals that come with First Eagles (which you can set in the loadout screen) and a set of serial numbers which will be applied randomly. There are also loadouts for light, medium, and heavy bomb loads. The skins, decals, and loadouts are interchangeable for the two planes.
The skins are rather generic, I have included my skinning templates for those who wish to make better skins.
Credits
My thanks to Ojcar for once again making two excellent data files for the DH4.
My thanks also to Sinbad for providing a great deal of resource information for this plane.
Installation Instructions
The two versions can be installed separately or both together.
For FE1 - Unzip the file and move the folders named "AircoDH4_250" and "AircoDH4_375" into the FirstEagles/Objects/Airplanes folder.
For FE2 - Unzip the file and move the folders named "AircoDH4_250" and "AircoDH4_375" into the FirstEagles/Objects/Airplanes folder. Then in the FirstEagles/Objects/Decals folder, create new folders named "AircoDH4_250" and "AircoDH4_375". Move the folders named "D" from the Airplanes/AircoDH4 folders into the corresponding Decals/AircoDH4 folder you just made.
518 downloads
-
DH4 USAS "Liberty"
By Stephen1918 in Other Entente Aircraft
In addition to the British built version, the DH4 was also produced by American manufacturers and was equipped with a Liberty 12 cylinder engine. Although slightly less powerful than the British version, The DH4 Liberty was popular with its crews and was produced in large numbers. After the war, it became the standard general purpose plane for the US Air Service.
This upload features the US version, with a new FM by Ojcar. The Liberty engine was slightly heavier than the British version and performance was reduced. To compensate, American DH4s carried a slighty lighter bomb load than the British built planes.
I have included a new skin using the number decals that come with First Eagles (which you can set in the loadout screen) and a set of serial numbers which will be applied randomly. There are also loadouts for light, medium, and heavy bomb loads.
The skins are rather generic, I have included my skinning templates for those who wish to make better skins.
Credits
My thanks to Ojcar for making the data file for the DH4 Liberty.
My thanks also to Sinbad for providing the motivation and a great deal of resource information for this plane.
Installation Instructions
For FE1 - Unzip the file and move the folder named "DH4_Liberty" into the FirstEagles/Objects/Airplanes folder.
For FE2 - Unzip the file and move the folder named "DH4_Liberty" into the FirstEagles/Objects/Airplanes folder. Then in the FirstEagles/Objects/Decals folder, create a new folder named "DH4_Liberty". Move the folder named "D" from the Airplanes/DH4_Liberty folder into the Decals/DH4_Liberty folder you just made.
382 downloads
-
Armored Cars
By Stephen1918 in First Eagles - WWI and Early Years - Object Mods
Tanks did not appear on the battlefield until mid 1917 and were used mostly on the Western Front. But cars and trucks with steel plating and machine guns were used from the beginning of the war and were used in large numbers on all fronts.
I have made a set of five armored cars which can be used to replace the tanks in Army Co-operation missions. The tanks in First Eagles have a start date of 5/1917, these armored cars have a start date of 5/1914, so they will automatically replace the tanks in missions dated 1916 or before.
This download includes:
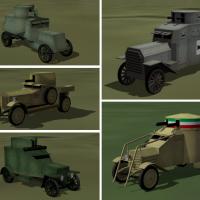
A British Rolls Royce, built on a Silver Ghost car chassis and armed with a Vickers Machine Gun in the turret. If you've seen the movie "Lawrence of Arabia," this is the car they used in some of the battle sequences.
A German Ehrhardt, with two Maxim Machine Guns in the turret. These were used mostly on the Eastern Front.
A French Peugeot, with a Hotchkiss Machine Gun in the Turret. Peugeots didn't have turrets until very late in the war, but I thought this looked better than an open truck, and it was easier to build.
An Italian Lancia, with two Fiat-Revelli Machine Guns in the turret. The rails on the front were for ripping up barbed wire.
A Russian Putilov, built on a British Austin truck chassis, with Vickers Machine Guns in two turrets. The steel trough around the gun and the multiple turrets are fairly typical of Russian armored vehicles.
I have included destroyed versions of all the trucks. They explode and burn quite nicely.
Installation Instructions
Unzip the file and drag the five armored car folders and the file named "DestroyedArmoredCar.bmp" into your FirstEagles/Objects/GroundObject folder. All the destroyed vehicles use the same skin and the BMP file must be in root level of the GroundObject folder.
434 downloads
-

Infantry Units
By Stephen1918 in First Eagles - WWI and Early Years - Object Mods
I have created 10 new infantry units for First Eagles. They are all pretty much identical except for their helmets and uniform colors. Each unit is a five man squad (three riflemen and two runners.) The units will move around and the riflemen will aim and fire independently.
I have created a dust effect for when they are moving and I've created a gunshot sound for their rifles. The rifles are based on Peter01's rifle data, with my sound effect and a few other minor changes. All the Entente units use the Lee Enfield rifle, and all the Central units use the Mauser.
This download includes infantry units for: Britain, France, Germany, Italy, Austria, Belgium, Russia, America, Australia, and Turkey.
I couldn't bring myself to kill the poor guys, so they just disappear when they get shot.
Credits
My thanks to Heck and Geo for leading the way!
Thanks also to Peter01 for his original rifle data files.
Installation Instructions
Unzip the file and copy the units you want from my GroundObjects folder into your FirstEagles/Objects/GroundObjects folder. Copy the sound file "InfantryRifle.wav" from my Sounds folder into your FirstEagles/Sounds folder. Copy the dust effect "RunningInfantryEmitter.ini" from my Effects folder into your FirstEagles/Effects folder.
Follow the instructions for installing the guns and sound in the two other instruction files included with the download.
514 downloads
(4 reviews)0 comments
Updated
-
Anti-aircraft Guns
By Stephen1918 in First Eagles - WWI and Early Years - Object Mods
Most of the anti-aircraft guns in World War One were converted field guns, especially during the early years. Some modifications were necessary however to make an effective anti-aircraft weapon. I have created four new anti-aircraft guns for First Eagles.
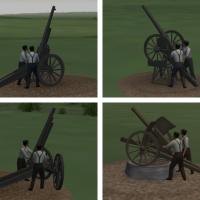
A French 75mm field gun, mounted on a 120mm gun carriage. This allowed the barrel to be elevated quite high without danger of the breech hitting the ground on the recoil.
A Russian Putilov 76.2mm field gun. The turntable mount and variations of it were common in WWI because the gun could be quickly dismounted and used as a field gun again.
A German Krupp 77mm gun on a special anti-aircraft gun carriage. The axles were hinged and the tail had an anchor to allow the gun to be easily rotated. The gap in the carriage allowed the gun to be elevated higher than a normal field gun.
An Italian Déport 77mm field gun. The recoil mechanism remained horizontal so the breech couldn't hit the ground no matter how high the gun was aimed. An improvised mount gave the gun a higher elevation.
Captured field guns were often used as anti-aircraft weapons. I have left the helmets and tunics off the gun crews so you can easily convert them to whatever nation you want. It wouldn't be unusual to see Austrians using an Italian gun, Germans using a French gun, or Russians using a German gun.
All guns use the stock 75mm gun data from First Eagles.
My thanks to Hansa for providing reference material for World War I anti-aircraft guns.
Installation Instructions
You can install the guns individually or all at once. Unzip the file and move the folders you want into the FirstEagles/Objects/GroundObjects folder. You must also copy the file "DestroyedAAA.bmp" into the FirstEagles/Objects/GroundObjects folder.
Destroyed versions of all the guns use the same skin. The file named "DestroyedAAA.bmp" must be placed in the root level of the GroundObjects folder (not inside any other folders.)
378 downloads
-
Trucks for First Eagles
By Stephen1918 in First Eagles - WWI and Early Years - Object Mods
I have made two generic trucks for First Eagles. Both have cabs, so it isn't so obvious that they don't have drivers when you see them from the air.
The Russian Truck is loosely based on the Russian Garford-Putilov but is similar to the WFD and the Jeffrey. It had a high ground clearance and the engine was in the middle, under the bed, which made it good for driving on poor roads.
The Austrian Truck is loosely based on the German Daimler-Marienfelde but is similar to many other trucks of the era.
I have provided alternate skins, an olive color for the Russian, and a tan color for the Austrian, so you can convert them to use for other nations if you want.
Installation Instructions
You can install the trucks individually or both together. Unzip the file and move the folders you want into the FirstEagles/Objects/GroundObjects folder.
273 downloads
-
Fokker M.7/B.I
By Stephen1918 in Fokker
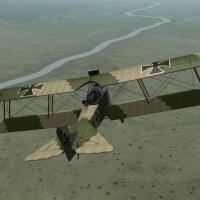
The Fokker Aircraft Company produced several biplanes during the time it was producing it's famous Eindeckers. Two of them, the M.7 and the M.10 were purchased by Austria-Hungary and were both designated the "B.I" My version is the M.7 (I believe Bwf/Bortdafarm's version is the M.10 since it has a wider lower wing.)
The M.7/B.I was a two seater plane for reconnaissance and carried no guns. The pilot was in the rear seat. Later in the war, when the B.I was used for training, some of them were fitted with dual controls.
Mine is unarmed, like most planes used in the early months of the war, but there is a loadout for a couple of handgrenades.
I have included two skins, one Austrian, the other German, with appropriate decals for each. I have included my skinning templates so others can make new skins if they want.
Historical Notes
The serial numbers are fictitious. The cockpit is based on the Eindecker cockpit, since I could find no photo's of the B.I cockpit.
Credits
My thanks to ojcar, who created the FM for the Fokker B.I.
My thanks also to Nix, who provided the sound for the Gnome 80hp engine. (This is the same sound file I uploaded with the Sikorsky. If you already have either of the Sikorsky's you won't need to install the sound.)
Installation instructions
Note: The name uses an "I", not a one. If you type it wrong, the game won't recognize the plane.
For FE1 - Unzip the file and move the folder named "FokkerM7BI" into the "Aircraft" folder in the FirstEagles/Objects folder. You may also need to move the sound file "gnome80m4.wav" into the FirstEagles/Sounds folder.
For FE2 - Unzip the file and move the folder named "FokkerM7BI" into the FirstEagles/Objects/Aircraft folder. Then in the FirstEagles/Objects/Decals folder, create a new folder named "FokkerM7BI". Move the folder named "D" from the Aircraft/FokkerM7BI folder into the Decals/FokkerM7BI folder you just made. You may also need to move the sound file "gnome80m4.wav" into the FirstEagles/Sounds folder.
438 downloads
-

Decal set for Phönix D.II
By Stephen1918 in Other Central Powers Aircraft Skins
This is a complete set of letter decals for the Phönix D.II. You can assign them in the Loadout screen or the game will randomly assign a different one to each plane.
This completely replaces the "D" folder and uses a new Decals.ini and Numbers.lst for the skins.
I have also uploaded a new version of the Phönix which includes this decal set, so if you downloaded the Phönix D.II after September 20, 2011, you already have these decals.
Installation Instructions
For FE1 - Unzip the file. In the FirstEagles/Objects/Aircraft/PhoenixD2 folder, delete the folder named "D" and replace it with the new one. Next, open the folder named "Texture1". Delete the file named "Decals.ini" and move both the new Decals.ini and Numbers.lst into the folder. Do not delete any other files from the Texture1 folder.
For FE2 - Unzip the file. In the FirstEagles/Objects/Decals/PhoenixD2 folder, delete the "D" folder and replace it with the new one. Next, open the FirstEagles/Objects/Aircraft/PhoenixD2/Texture1 folder. Delete the file named "Decals.ini" and move the new Decals.ini and Numbers.lst into the folder. Do not delete any other files from the Texture1 folder.
66 downloads
(0 reviews)0 comments
Updated
-

Decal set for Phönix D.IIa
By Stephen1918 in Other Central Powers Aircraft Skins
This is a complete set of letter decals for the Phönix D.IIa. You can assign them in the Loadout screen or the game will randomly assign a different one to each plane.
This completely replaces the "D" folder and uses a new Decals.ini and Numbers.lst for the skins.
I have also uploaded a new version of the Phönix which includes this decal set, so if you downloaded the Phönix D.IIa after September 20, 2011, you already have these decals.
Installation Instructions
For FE1 - Unzip the file. In the FirstEagles/Objects/Aircraft/PhoenixD2a folder, delete the folder named "D" and replace it with the new one. Next, open the folder named "Texture1". Delete the file named "Decals.ini" and move both the new Decals.ini and Numbers.lst into the folder. Do not delete any other files from the Texture1 folder.
For FE2 - Unzip the file. In the FirstEagles/Objects/Decals/PhoenixD2a folder, delete the "D" folder and replace it with the new one. Next, open the FirstEagles/Objects/Aircraft/PhoenixD2a/Texture1 folder. Delete the file named "Decals.ini" and move the new Decals.ini and Numbers.lst into the folder. Do not delete any other files from the Texture1 folder.
68 downloads
(0 reviews)0 comments
Updated