
Stephen1918
-
Posts
1,187 -
Joined
-
Last visited
-
Days Won
19
Content Type
Profiles
Forums
Gallery
Downloads
Store
Everything posted by Stephen1918
-
Thanks guys, this helps a lot. It looks like I'll be doing two loadouts. I've also noticed differences in wings and other details from plane to plane. Maybe because of different manufacturers or because of field modifications. Mine will be an average (actually I'm including the features I like ) Thanks for the help. Stephen1918
-
Thanks gentlemen, this is helpful. Any ideas on how many bombs or what weight? Sinbad - I don't have the datafile, but I did find some of those photos online. The last one has nice details of the undercarriage just barely visible. 33Lima - I may need to do two loadouts, one for side mounted bombs and one for bombs underneath. A scan or two would be helpful, but don't damage your book to get it. The verbal description is very helpful.
-
I'm researching the Voisin III and I'm finding conflicting information about the bomb loads - somewhere between 200 and 300 lbs. I also don't know how the bombs were carried, under the fuselage? or internal? Can anyone help or direct me to some good resources? Photos or sketches of the bomb racks or with bombs loaded would help a lot. Thanks Stephen1918
-
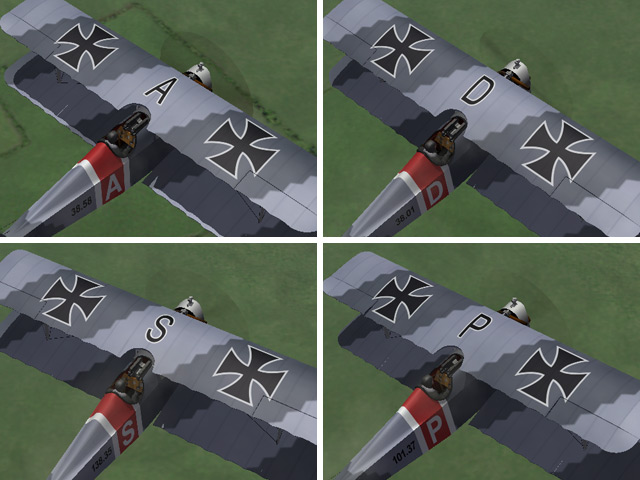
While making my last few planes, I learned a lot about how First Eagles handles the decals. Because I was getting tired of seeing a squadron of my older planes all with identical markings, I made decal sets for some of them. I made a set of letters for the Aviatik-Berg D.I, the Phönix D.II, and the Phönix D.IIa which you can set in the Loadout screen. For the Lloyd C.II I made a set of serial numbers which the game will apply randomly. They all have installation instructions for both FE1 and FE2. All the decal sets are available for individual download in the Download-Skins area. I also updated all four planes in the Download-Aircraft area so if you download them after today, the decals will be included. My apologies to Dave the moderator who had to review and approve all the uploads in the same afternoon. Thanks Dave.
-
View File Serial numbers for the Lloyd C.II This is a complete set of serial number decals for the Lloyd C.II. The game will randomly assign a different number to each plane. This completely replaces the "D" folder in the Austro-Hungarian skin and uses a new Decals.ini for the skin. I have also uploaded a new version of the Lloyd which includes this decal set, so if you downloaded the Lloyd C.II after September 20, 2011, you already have these decals. Installation Instructions For FE1 - Unzip the file. In the FirstEagles/Objects/Aircraft/LloydC2/Texture1 folder, delete the folder named "D" and replace it with the new one. Then delete the file named "Decals.ini" and move the new Decals.ini into the folder. Do not delete any other files from the Texture1 folder. For FE2 - Unzip the file. In the FirstEagles/Objects/Decals/LloydC2/Texture1 folder, delete the "D" folder and replace it with the new one. Then in the FirstEagles/Objects/Aircraft/LloydC2/Texture1 folder, delete the file named "Decals.ini" and move the new Decals.ini into the folder. Do not delete any other files from the Texture1 folder. Submitter Stephen1918 Submitted 09/21/2011 Category Other Central Powers Aircraft Skins
-
View File Decal set for Aviatik-Berg D.I This is a complete set of letter decals for the Aviatik-Berg D.I. You can assign them in the Loadout screen or the game will randomly assign a different one to each plane. This completely replaces the "D" folder and uses a new Decals.ini and Numbers.lst for the skins. I have also uploaded a new version of the Aviatik which includes this decal set, so if you downloaded the Aviatik-Berg D.I after September 20, 2011, you already have these decals. Installation Instructions For FE1 - Unzip the file. In the FirstEagles/Objects/Aircraft/AviatikD1 folder, delete the folder named "D" and replace it with the new one. Next, open the folder named "Texture1". Delete the file named "Decals.ini" and move both the new Decals.ini and Numbers.lst into the folder. Do not delete any other files from the Texture1 folder. For FE2 - Unzip the file. In the FirstEagles/Objects/Decals/AviatikD1 folder, delete the "D" folder and replace it with the new one. Next, open the FirstEagles/Objects/Aircraft/AviatikD1/Texture1 folder. Delete the file named "Decals.ini" and move the new Decals.ini and Numbers.lst into the folder. Do not delete any other files from the Texture1 folder. Submitter Stephen1918 Submitted 09/21/2011 Category Other Central Powers Aircraft Skins
-

86 downloads
This is a complete set of serial number decals for the Lloyd C.II. The game will randomly assign a different number to each plane. This completely replaces the "D" folder in the Austro-Hungarian skin and uses a new Decals.ini for the skin. I have also uploaded a new version of the Lloyd which includes this decal set, so if you downloaded the Lloyd C.II after September 20, 2011, you already have these decals. Installation Instructions For FE1 - Unzip the file. In the FirstEagles/Objects/Aircraft/LloydC2/Texture1 folder, delete the folder named "D" and replace it with the new one. Then delete the file named "Decals.ini" and move the new Decals.ini into the folder. Do not delete any other files from the Texture1 folder. For FE2 - Unzip the file. In the FirstEagles/Objects/Decals/LloydC2/Texture1 folder, delete the "D" folder and replace it with the new one. Then in the FirstEagles/Objects/Aircraft/LloydC2/Texture1 folder, delete the file named "Decals.ini" and move the new Decals.ini into the folder. Do not delete any other files from the Texture1 folder. -

81 downloads
This is a complete set of letter decals for the Aviatik-Berg D.I. You can assign them in the Loadout screen or the game will randomly assign a different one to each plane. This completely replaces the "D" folder and uses a new Decals.ini and Numbers.lst for the skins. I have also uploaded a new version of the Aviatik which includes this decal set, so if you downloaded the Aviatik-Berg D.I after September 20, 2011, you already have these decals. Installation Instructions For FE1 - Unzip the file. In the FirstEagles/Objects/Aircraft/AviatikD1 folder, delete the folder named "D" and replace it with the new one. Next, open the folder named "Texture1". Delete the file named "Decals.ini" and move both the new Decals.ini and Numbers.lst into the folder. Do not delete any other files from the Texture1 folder. For FE2 - Unzip the file. In the FirstEagles/Objects/Decals/AviatikD1 folder, delete the "D" folder and replace it with the new one. Next, open the FirstEagles/Objects/Aircraft/AviatikD1/Texture1 folder. Delete the file named "Decals.ini" and move the new Decals.ini and Numbers.lst into the folder. Do not delete any other files from the Texture1 folder. -
View File Decal set for Phönix D.IIa This is a complete set of letter decals for the Phönix D.IIa. You can assign them in the Loadout screen or the game will randomly assign a different one to each plane. This completely replaces the "D" folder and uses a new Decals.ini and Numbers.lst for the skins. I have also uploaded a new version of the Phönix which includes this decal set, so if you downloaded the Phönix D.IIa after September 20, 2011, you already have these decals. Installation Instructions For FE1 - Unzip the file. In the FirstEagles/Objects/Aircraft/PhoenixD2a folder, delete the folder named "D" and replace it with the new one. Next, open the folder named "Texture1". Delete the file named "Decals.ini" and move both the new Decals.ini and Numbers.lst into the folder. Do not delete any other files from the Texture1 folder. For FE2 - Unzip the file. In the FirstEagles/Objects/Decals/PhoenixD2a folder, delete the "D" folder and replace it with the new one. Next, open the FirstEagles/Objects/Aircraft/PhoenixD2a/Texture1 folder. Delete the file named "Decals.ini" and move the new Decals.ini and Numbers.lst into the folder. Do not delete any other files from the Texture1 folder. Submitter Stephen1918 Submitted 09/20/2011 Category Other Central Powers Aircraft Skins
-
View File Decal set for Phönix D.II This is a complete set of letter decals for the Phönix D.II. You can assign them in the Loadout screen or the game will randomly assign a different one to each plane. This completely replaces the "D" folder and uses a new Decals.ini and Numbers.lst for the skins. I have also uploaded a new version of the Phönix which includes this decal set, so if you downloaded the Phönix D.II after September 20, 2011, you already have these decals. Installation Instructions For FE1 - Unzip the file. In the FirstEagles/Objects/Aircraft/PhoenixD2 folder, delete the folder named "D" and replace it with the new one. Next, open the folder named "Texture1". Delete the file named "Decals.ini" and move both the new Decals.ini and Numbers.lst into the folder. Do not delete any other files from the Texture1 folder. For FE2 - Unzip the file. In the FirstEagles/Objects/Decals/PhoenixD2 folder, delete the "D" folder and replace it with the new one. Next, open the FirstEagles/Objects/Aircraft/PhoenixD2/Texture1 folder. Delete the file named "Decals.ini" and move the new Decals.ini and Numbers.lst into the folder. Do not delete any other files from the Texture1 folder. Submitter Stephen1918 Submitted 09/20/2011 Category Other Central Powers Aircraft Skins
-

68 downloads
This is a complete set of letter decals for the Phönix D.IIa. You can assign them in the Loadout screen or the game will randomly assign a different one to each plane. This completely replaces the "D" folder and uses a new Decals.ini and Numbers.lst for the skins. I have also uploaded a new version of the Phönix which includes this decal set, so if you downloaded the Phönix D.IIa after September 20, 2011, you already have these decals. Installation Instructions For FE1 - Unzip the file. In the FirstEagles/Objects/Aircraft/PhoenixD2a folder, delete the folder named "D" and replace it with the new one. Next, open the folder named "Texture1". Delete the file named "Decals.ini" and move both the new Decals.ini and Numbers.lst into the folder. Do not delete any other files from the Texture1 folder. For FE2 - Unzip the file. In the FirstEagles/Objects/Decals/PhoenixD2a folder, delete the "D" folder and replace it with the new one. Next, open the FirstEagles/Objects/Aircraft/PhoenixD2a/Texture1 folder. Delete the file named "Decals.ini" and move the new Decals.ini and Numbers.lst into the folder. Do not delete any other files from the Texture1 folder. -

66 downloads
This is a complete set of letter decals for the Phönix D.II. You can assign them in the Loadout screen or the game will randomly assign a different one to each plane. This completely replaces the "D" folder and uses a new Decals.ini and Numbers.lst for the skins. I have also uploaded a new version of the Phönix which includes this decal set, so if you downloaded the Phönix D.II after September 20, 2011, you already have these decals. Installation Instructions For FE1 - Unzip the file. In the FirstEagles/Objects/Aircraft/PhoenixD2 folder, delete the folder named "D" and replace it with the new one. Next, open the folder named "Texture1". Delete the file named "Decals.ini" and move both the new Decals.ini and Numbers.lst into the folder. Do not delete any other files from the Texture1 folder. For FE2 - Unzip the file. In the FirstEagles/Objects/Decals/PhoenixD2 folder, delete the "D" folder and replace it with the new one. Next, open the FirstEagles/Objects/Aircraft/PhoenixD2/Texture1 folder. Delete the file named "Decals.ini" and move the new Decals.ini and Numbers.lst into the folder. Do not delete any other files from the Texture1 folder. -
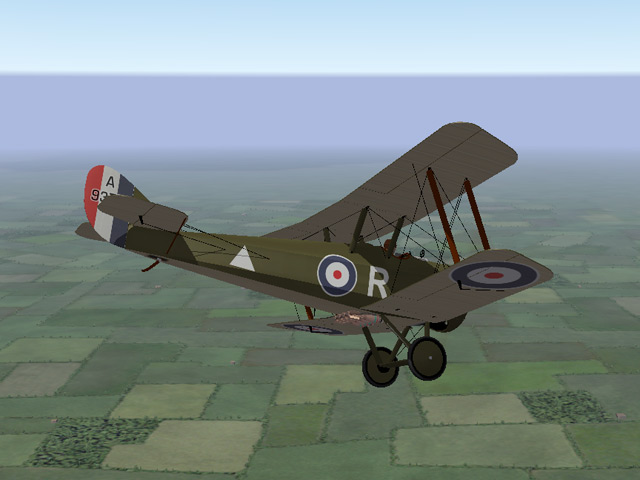
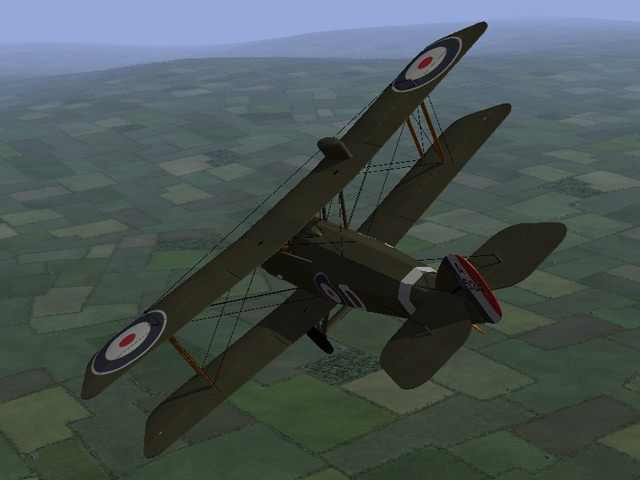
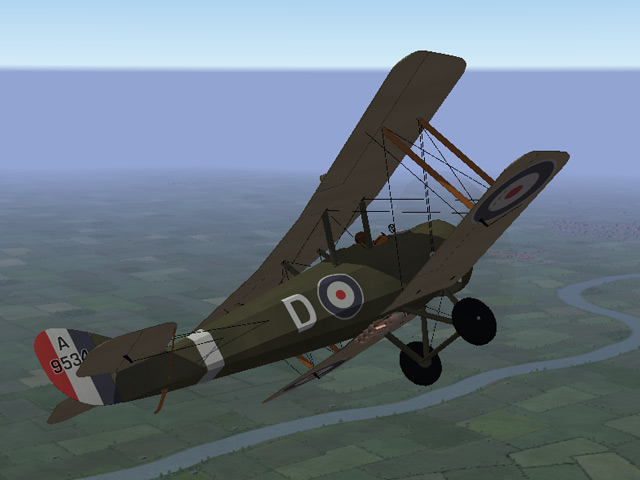
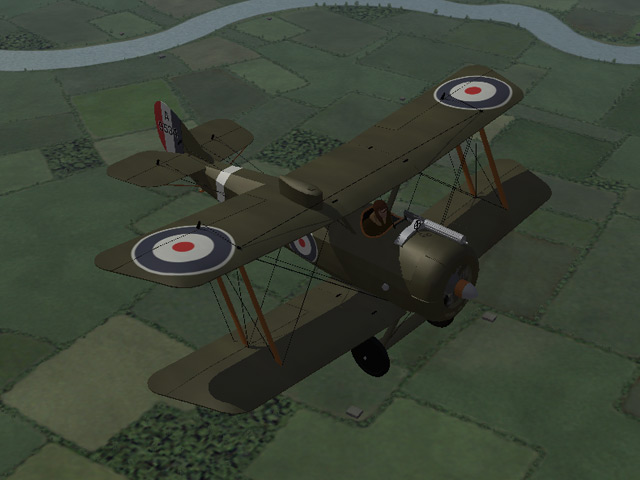
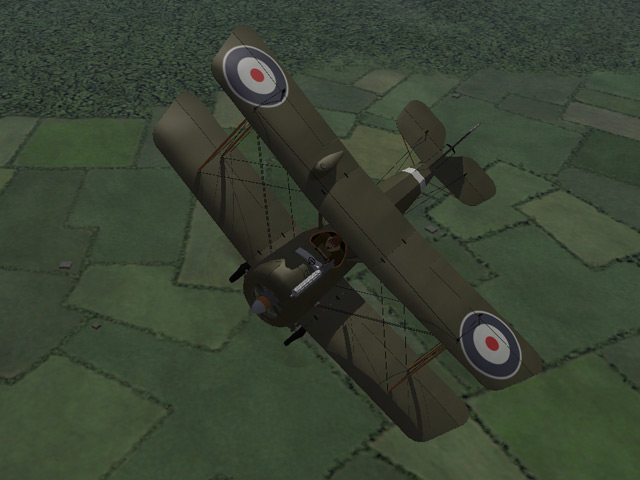
Many of you have already noticed that I uploaded the DH5 before I went to work today. It includes markings for both British and Australian planes. The RAF plane lets you apply the squadron markings that come with First Eagles. There is also a loadout for bombs. My thanks to Ojcar for the FM and to Nix for the engine sound.

-
View File Airco D.H.5 The Airco D.H.5 was intended to be an improved version of the D.H.2, combining the power of a forward facing prop with the forward visibility of a pusher. The reverse stagger of the wings was an unusual configuration and the strange appearance of the plane may have contributed to false rumors of its bad performance. Although a slow climber, the D.H.5's strength and maneuverability made it excellent for ground attack and light bombing missions. I have included two skins with decal ini's for both British and Australian markings. Both use the letter decals that come with First Eagles, which you can set in the Loadout screen. The British skin allows you to also set the squadron. (The Australians all used a white stripe on the tail instead of squadron markings.) I have included a set of serial numbers which will be applied randomly. You can also choose a light bomb load in the Loadout screen. Historical Notes The serial numbers are fictious, but in the correct range for most D.H.5s. Credits My thanks to Ojcar for once again making an excellent data file for the D.H.5. My thanks also to Nix for providing the realistic sound file for the Le Rhône engine. Installation Instructions For FE1 - Unzip the file and move the folder named "AircoDH5" into the FirstEagles/Objects/Airplanes folder. You also need to move the sound file "rhone110bn4nC" into the FirstEagles/Sounds folder. For FE2 - Unzip the file and move the folder named "AircoDH5" into the FirstEagles/Objects/Airplanes folder. Then in the FirstEagles/Objects/Decals folder, create a new folder named "AircoDH5". Move the folder named "D" from the Airplanes/AircoDH5 folder into the Decals/AircoDH5 folder you just made. You also need to move the sound file "rhone110bn4nC" into the FirstEagles/Sounds folder. Submitter Stephen1918 Submitted 09/19/2011 Category Other Entente Aircraft
-
571 downloads
The Airco D.H.5 was intended to be an improved version of the D.H.2, combining the power of a forward facing prop with the forward visibility of a pusher. The reverse stagger of the wings was an unusual configuration and the strange appearance of the plane may have contributed to false rumors of its bad performance. Although a slow climber, the D.H.5's strength and maneuverability made it excellent for ground attack and light bombing missions. I have included two skins with decal ini's for both British and Australian markings. Both use the letter decals that come with First Eagles, which you can set in the Loadout screen. The British skin allows you to also set the squadron. (The Australians all used a white stripe on the tail instead of squadron markings.) I have included a set of serial numbers which will be applied randomly. You can also choose a light bomb load in the Loadout screen. Historical Notes The serial numbers are fictious, but in the correct range for most D.H.5s. Credits My thanks to Ojcar for once again making an excellent data file for the D.H.5. My thanks also to Nix for providing the realistic sound file for the Le Rhône engine. Installation Instructions For FE1 - Unzip the file and move the folder named "AircoDH5" into the FirstEagles/Objects/Airplanes folder. You also need to move the sound file "rhone110bn4nC" into the FirstEagles/Sounds folder. For FE2 - Unzip the file and move the folder named "AircoDH5" into the FirstEagles/Objects/Airplanes folder. Then in the FirstEagles/Objects/Decals folder, create a new folder named "AircoDH5". Move the folder named "D" from the Airplanes/AircoDH5 folder into the Decals/AircoDH5 folder you just made. You also need to move the sound file "rhone110bn4nC" into the FirstEagles/Sounds folder. -
Thank you! This will make it more realistic!
-

I'm going to do some photorealistic textures for Nieuport 10
Stephen1918 replied to Hansa's topic in General Discussion
There's a Nieuport 10 at The Old Rhinebeck Aerodrome in New York. Sometimes you can find photos on Flickr or a similar site. -
Alb C.III Hi Res Skin - Bohme plus Wood & Linen
Stephen1918 replied to sinbad's topic in General Discussion
Great skins Sinbad! -
Yes, I can't stop! You gave me the LeRhone 9c 80hp, but I don't have the 9j 110hp.
-
The Airco D.H.5 is built and rigged. The cockpit is done and I've started working on the skins. It should be done in a week or two. It uses the flight letters and squadron markings that come with First Eagles. It seems like a strange plane at first, but I've come to really like the reversed offset of the wings. My monitor crashed a week ago and I'm still haven't got the color adjusted on the new monitor.

-
Excellent skins! The first few times I tried to upload something, I forgot to choose a category on the left side of the screen and I got the same message. Stephen1918
-
I'm still here. I try to get here every day and I've made some bug fixes lately. I posted in another thread that I'm currently working on the DH5, I should have that finished in a few weeks. I agree with Hansa that an eastern front would be a good addition to FE. That would also allow us to expand into the 1920's and cover the Russian Revolution, the Polish-Bolshevik War, and other fighting that took place in Eastern Europe which used surplus WWI aircraft. I like Ojcar's idea of making short campaigns. That sounds like a good way to learn the ropes before trying to open another front. I've been getting more and more interested in how the game works and what's going on "behind the scenes". Eventually I will do more with the game-play aspects, but right now I'm having too much fun making planes!
-
Thank you all! It's nice to be appreciated. I have really enjoyed making planes for First Eagles, I've learned a lot and I think I'm getting better with each one. You should also thank Ojcar who has been making the FMs for all my planes. A plane that doesn't fly is no good at all and I don't know enough about the data files yet to make my own. So thank him too. And also thank Quack74. He tracked me down and invited me to make planes for FE in the first place. If he hadn't introduced me to First Eagles, I wouldn't even be here. So thank him too. Thanks for making me welcome and thanks to those of you have helped me get started and who have helped with details and bug fixing. You've been generous with your resouces, photos and expertise. That's what makes Combat Ace such a good place. I'm working on the Airco DH5. The exterior is pretty much done, I'm working on the cockpit and skins. I have a real world job and responsibilities so I'm going slower than before. I haven't stopped, I've just slowed down.
-
I'm sure it has something to do with the way the model is made, because it only happens on the guns. It did happen in FE1 in High graphics mode. If I can figure out what is causing it, I can build better models in the future. So I'm assuming that you're still seeing the lines?
-
Did the patch take care of the lines too? I wasn't seeing them, but I have a pretty low graphics card. I'm glad you like the N12, I really enjoyed making it.