krfrge
-
Posts
1,052 -
Joined
-
Last visited
-
Days Won
6
Content Type
Profiles
Forums
Gallery
Downloads
Store
Everything posted by krfrge
-

From the album: KRFRGE's work
-
Alternate TFD Terrain Tilemap editor/viewer
krfrge replied to gerwin's topic in Mods & Skinning Discussion
Gerwin, Thanks so very much for this upgrade. It is greatly appreciated. Krfrge -
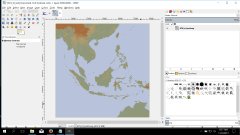
Chinese territorial claims
krfrge replied to Ice Man's topic in Mission & Campaign Building Discussion
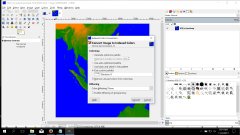
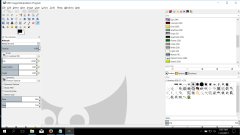
Menrva, I sent you the terrain palette I am using which was taken from the original TW terrain palette. Unfortunately I have not figured out how to import a Photoshop .act file into GIMP -
Chinese territorial claims
krfrge replied to Ice Man's topic in Mission & Campaign Building Discussion
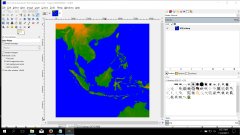
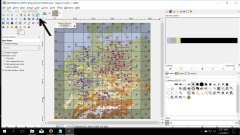
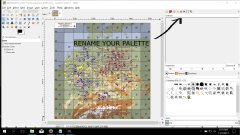
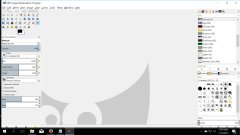
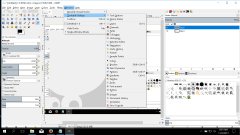
Wrench, I was only able to do it once with Photoshop and it was using the replace function after I was able to import the TW terrain palette. As soon as I can get Photoshop restored I will build a tutorial on it. In the meantime here is a simple GIMP tutorial. Gimp Tutorial for making a Thirdwire style map. Here is how I make Thirdwire style terrain maps using GIMP. Make sure to open one of the TW maps for this tutorial. It requires use of the TW terrain editor. 1. Open GIMP. I have my floating windows set as dockable dialogs. 2. Select WINDOWS on the top toolbar, then select DOCKABLE DIALOGS. Scroll down the call out list for PALETTES and click on it. That will add the default palettes to your dockable window. 3. Now you have to add a new palette to the collection. Within the list of palettes, choose any palette and right click and select NEW PALETTE. 4. A blank new palette named untitled will open. Change untitled to a name of your choice. 5. Open your TW map. Grab the eye dropper tool and you will want to build the colors starting from the lowest elevation (blue) to highest elevation dark brown. In certain cases the highest color you may need could be white as is seen on the Germany map. 6. Start with blue. Click then drag it to the palette. Do this until you have the color range you want. 7. You have now built your palette. ----- Making a new terrain map with your custom palette ----- 1. Create a heightmap with the TW terrain editor. 2. Open the height map. 3. Select IMAGE, then MODE, the map should have a dot next to indexed. Change indexed to RGB then change it back to indexed. A dialogue box opens asking you to Convert Image to Indexed Colors. Under the Colomap, select use custom palette and use your newly created palette. Press CONVERT, and you should see a new map. 4. Save your work, i.e. PlanningMap1, PlanningMap2, PlnningMap3. 5. Resize to 512, 1024 and 2048. 6. That's it. -
From the album: KRFRGE's work
-
From the album: KRFRGE's work
-
From the album: KRFRGE's work
-
From the album: KRFRGE's work
-
From the album: KRFRGE's work
-
From the album: KRFRGE's work
-
From the album: KRFRGE's work
-
From the album: KRFRGE's work
-
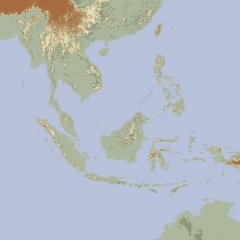
Chinese territorial claims
krfrge replied to Ice Man's topic in Mission & Campaign Building Discussion
Menrva, The map was before the computer crashed when I had Photoshop. I basically took the TW color palette and did a "replace" option. Now I am using GIMP and am relearning everything. If I can figure it out with GIMP you will be the first to know! Krfrge -
Chinese territorial claims
krfrge replied to Ice Man's topic in Mission & Campaign Building Discussion
It includes the Philippines, Malaysia, Brunei, Indonesia, Vietnam, southern-most China, Singapore, Laos, Cambodia, eastern Myanmar, a portion of northwest Australia. -
From the album: KRFRGE's work
-
Chinese territorial claims
krfrge replied to Ice Man's topic in Mission & Campaign Building Discussion
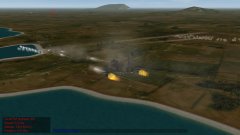
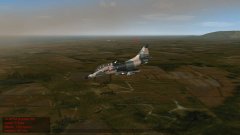
Nyghtfall's Skyhawk defending a ground attack. https://combatace.com/gallery/image/35161-img00053jpg/ South China Sea project continues slowly. I had a computer crash but was able to recover my work. However, the primary (250m) version is giving me issues when loading. I am in the process of building a standard 3000x3000 (2km) version and have to targetize it. -
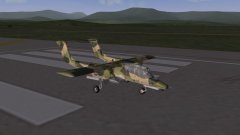
From the album: KRFRGE's work
A-4PTM_85 #1 -
Nice work
-
ravenclaw_007, Take care of your health. You have done a lot for the community here and many appreciate your work.
-
make fakepilot invisible in cockpit view
krfrge replied to Nyghtfall's topic in Mods & Skinning Discussion
Thanks for the assist. Your work is great! Thanks for sharing the tips. I will let you know if I have any success on getting the image into one of the cockpit dials -
From the album: KRFRGE's work
-
From the album: KRFRGE's work
-
From the album: KRFRGE's work