Nyghtfall
-
Posts
976 -
Joined
-
Last visited
-
Days Won
20


About Nyghtfall

Recent Profile Visitors
18,585 profile views


Nyghtfall's Achievements
")


-
Hey Guys, after thinking some time about it now, I decided, to just quit SF2 and Modding entirely. I had a long break last year for some reason and tried to return to SF2 again this year. But things have changed over time - I have changed, CA has changed. I'm simply not finding my spot here anymore. Modding for me was something to chill after work, do some mods with cool and helpful people, learn interesting stuff about planes and come up with something, the community may like in return. Not anymore. People, that were important parts of this community are gone or are passive and since I'm not a great networker, those people left empty spots (for me) and there is not much left. If your not a 3D-guy these days, it's getting harder and harder to come up with something interesting. Most things I'm interested in, are done or are already in the making. Combine that with my slow workspeed and it just leads to much wasted time and sometimes frustration. Yakarovs F-100s were the final straw now, that finalized my decision. To be clear: This is not his fault! I simply underestimated the workload for creating a new template for this plane and combined with my slow workspeed, I was still at the template-finishing phase, while his' are downloadable now. Well, that's life. *shrug* Nevertheless, life goes on. 3D-printing is a lot of fun and this is a great substitute for SF2Modding. It's chill, you can be creative too. Btw: There are some nice printable aircraft models available from ErikGen - a name I remember from CA. So, to make a long story short: Farewell, stay healthy and have fun and thank you all for your work, time and patience! To all modders, non-modders, interested people: Feel free to do whatever you like with the mods I released. Use whatever you like for whatever reason. Best Regards René/Nyghtfall
- 16 replies
-
- 20
-

-

-

-
 Thanks. I guess, I can stop my work then.
 -
Holy crap, that was close. I'm glad nobody got hurt! I also hope, your neighbor and his family has a place to stay now.
-
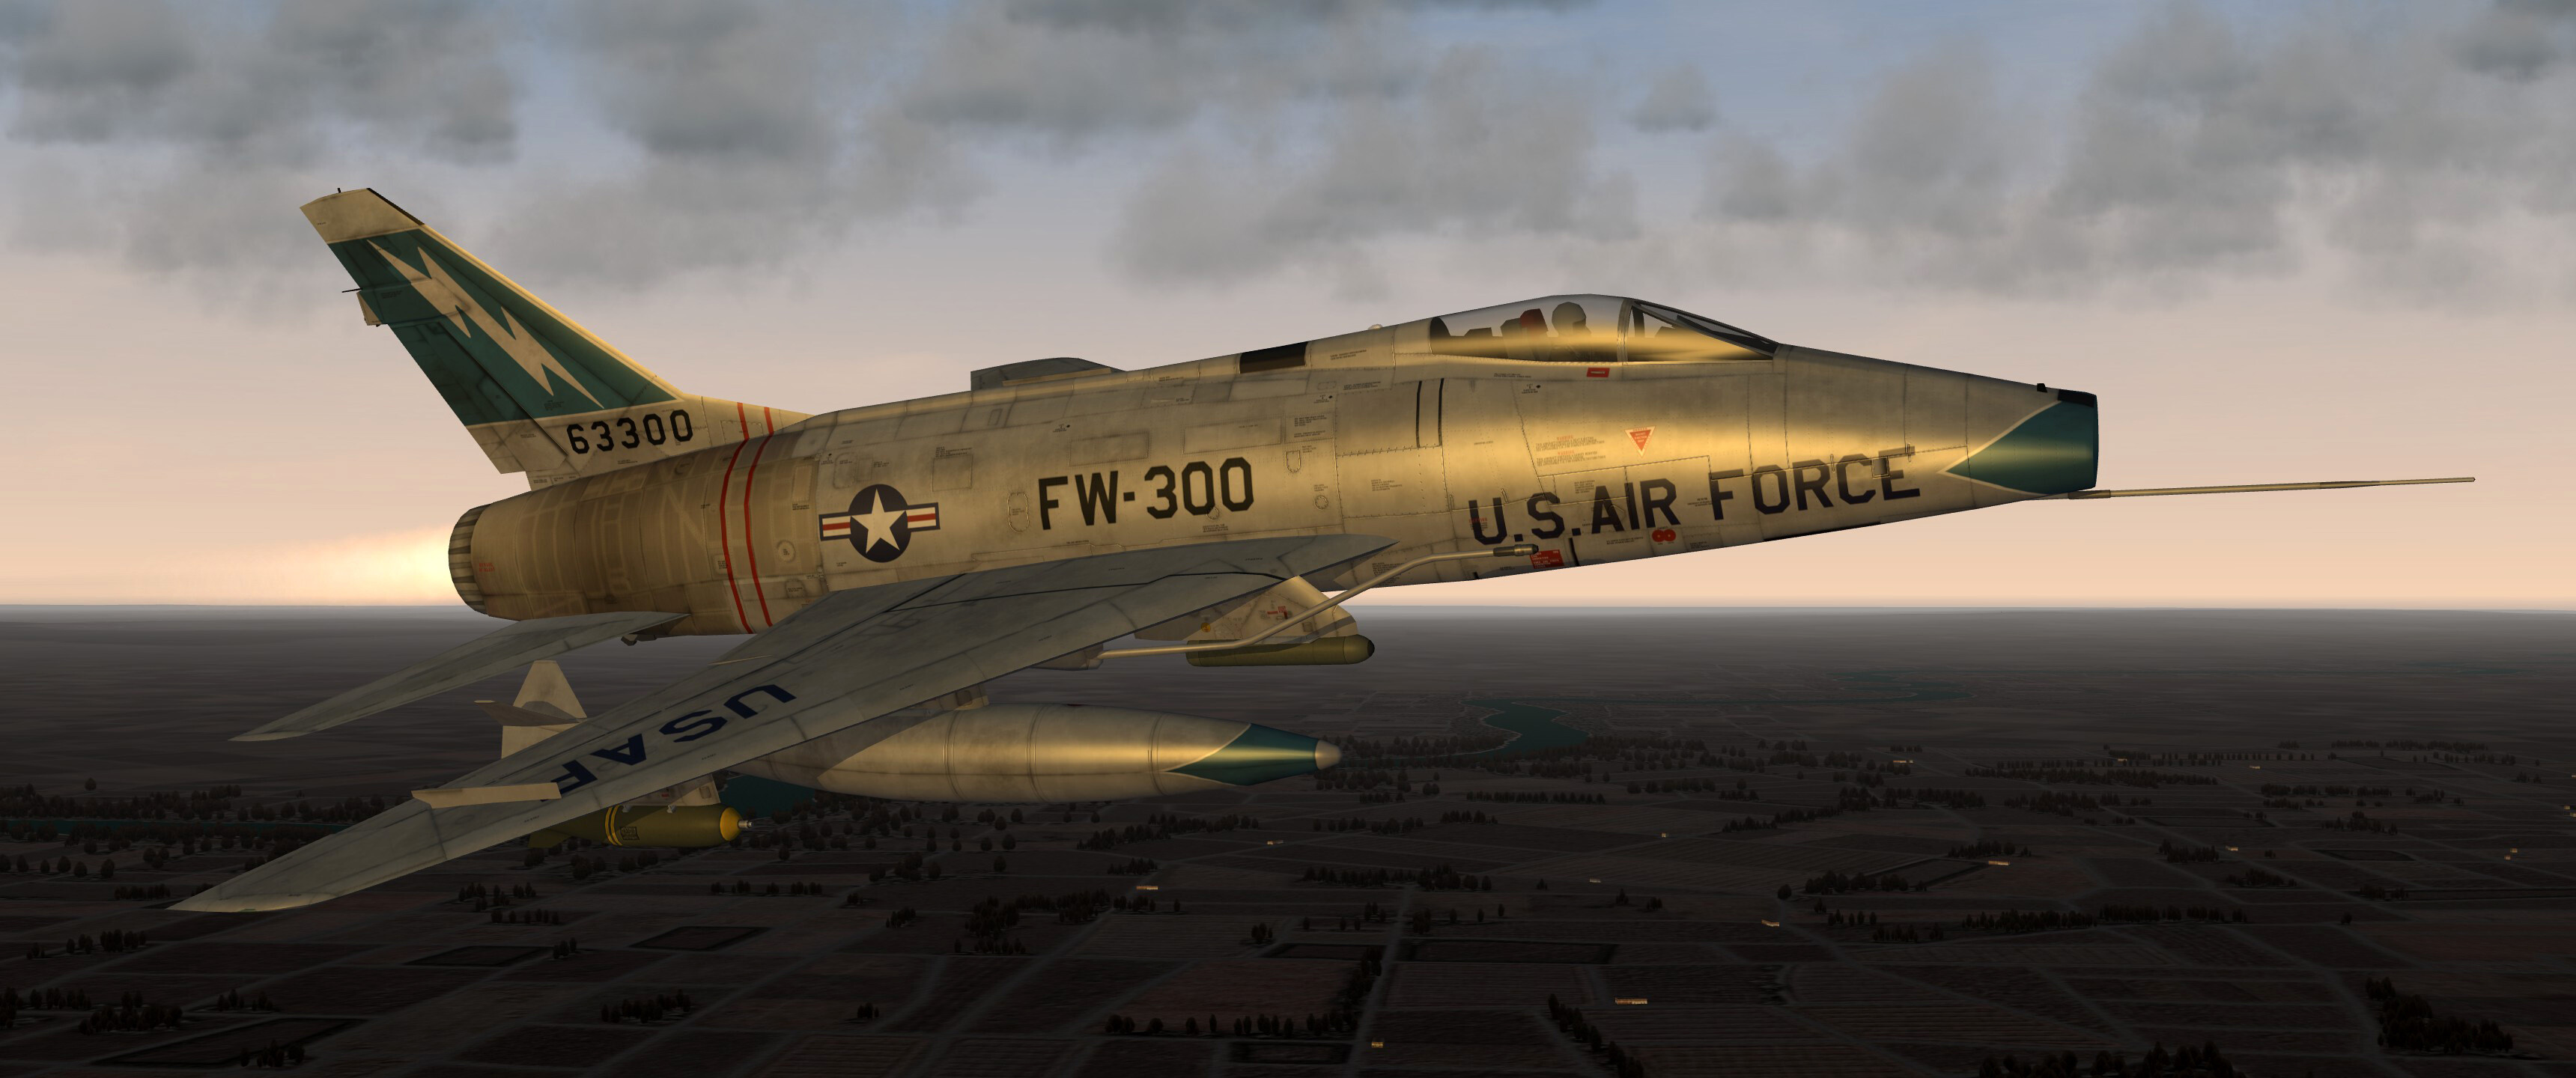
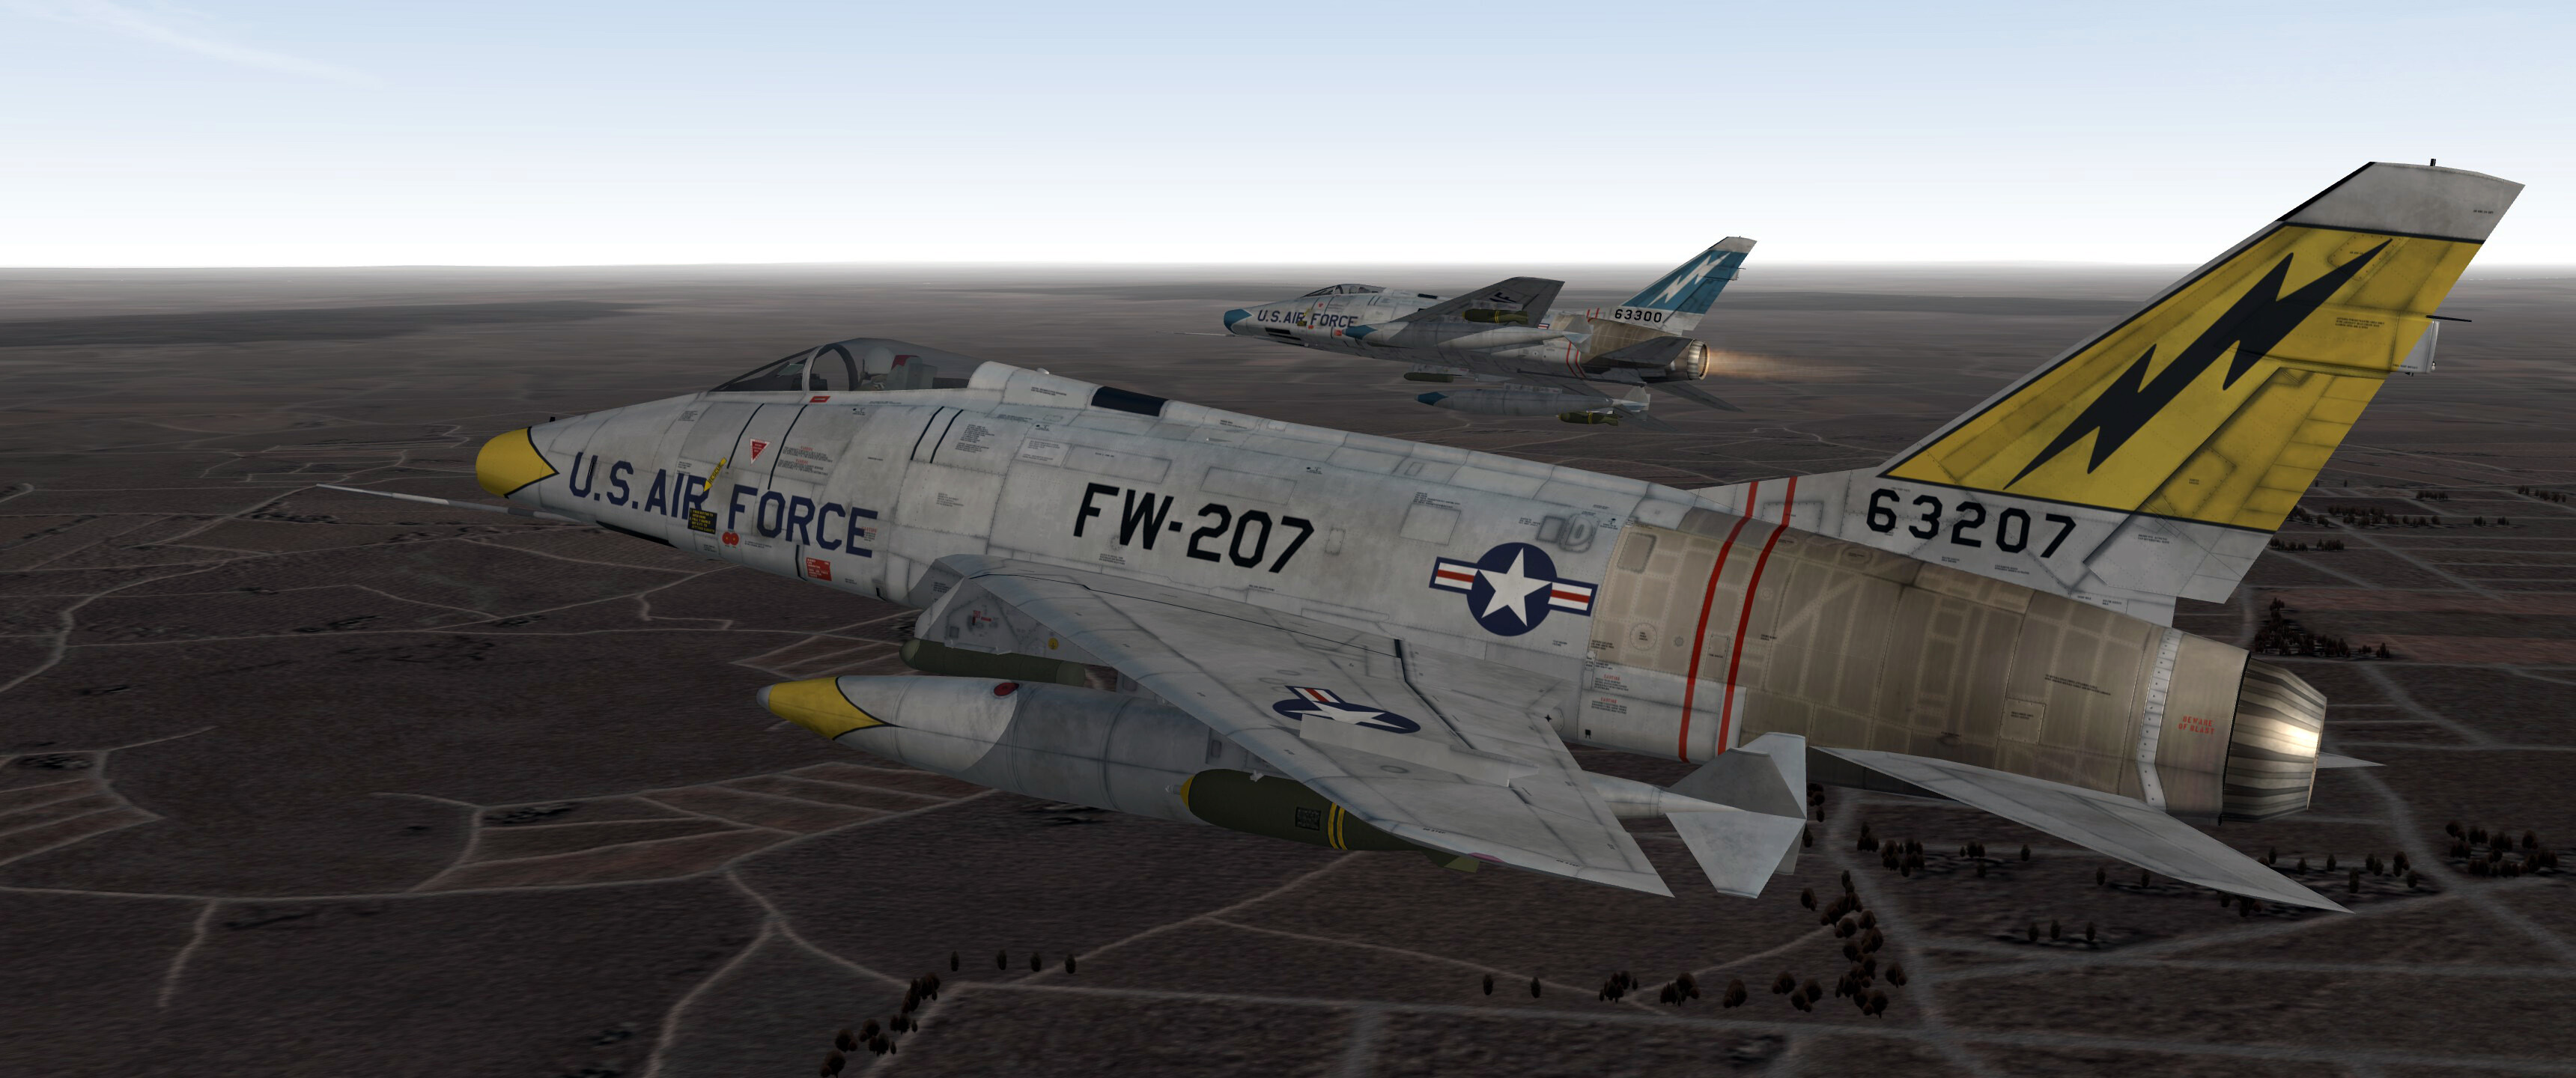
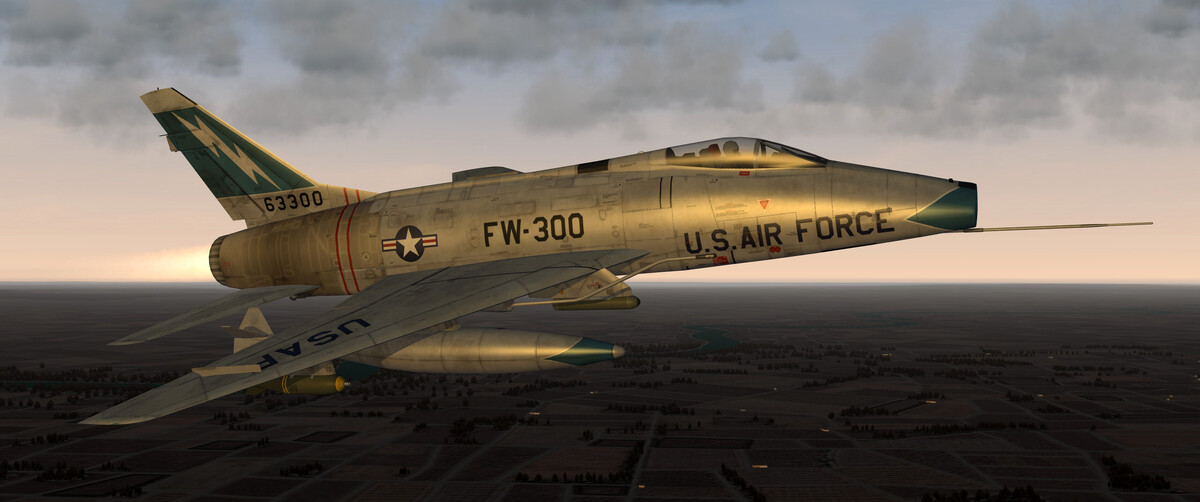
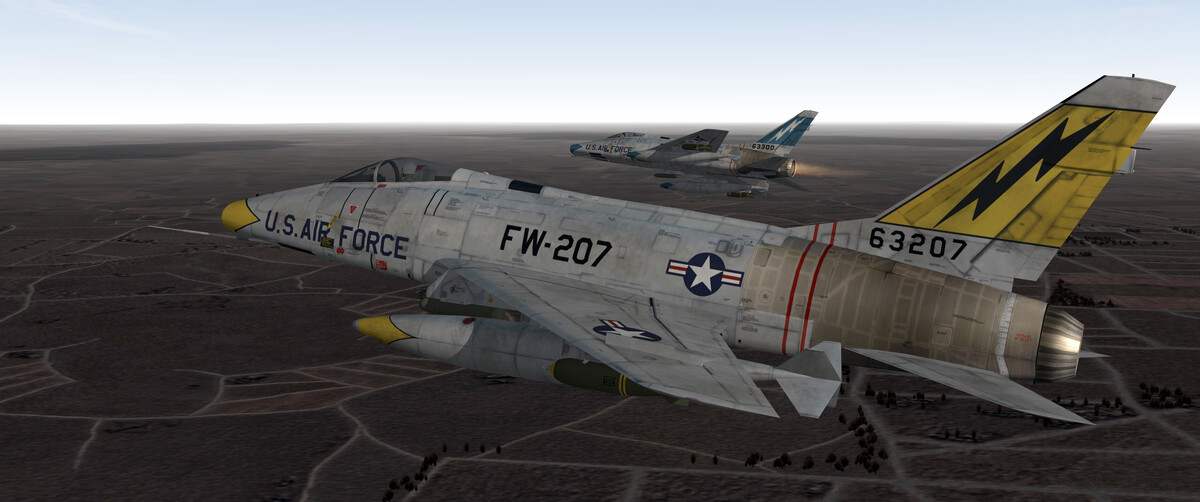
Super Sabres from 49th TFW from Spangdahlem AB, Germany, 1959
-
VA-94 A-4C Skyhawk 1965 USS Enterprise
Nyghtfall replied to Crusader's topic in Military and General Aviation
I know, few people probably care for such details. Not in the past and especially not now. I started doing those skins for myself. I liked the plane and simply wanted good, realistic skins. With time came more and more details. And I'm sure for some of them nobody cares - but they are there and for me, they have to be that way. For example: In the movie, you can see the VA-94-birds with the bobtailed-variant of the 300gal-droptank and the topside of the bobtail is black. I've never seen that combination, so I'll do it. *shrug* Looking back now, I do those Vietnam-era skins now for more than 10 years (the original skin for VA-93_67 is from 2014 I think) and I'm still not done yet (I think around 20 are left). I guess, when I would've reduced it to just skins and nothing special, all skins were finished 5 years ago But who cares. I guess, everyone is a bit crazy in his or her own way. I can only say, I'm sorry for bothering you all those years with the same plane over and over again. -
VA-94 A-4C Skyhawk 1965 USS Enterprise
Nyghtfall replied to Crusader's topic in Military and General Aviation
Hey Crusader, thanks for sharing this! A very interesting close-up view to the men combined with personal background, the aircrafts and the Enterprise. Very cool! I try to find as much information and pictures as reference for the skins I do. And a long time ago, I found, that cruisebooks are also an interesting source for pictures and especially the names of the pilots. Unfortunately what is left of it on the skins are only the names below the canopy. Most people probably don't care sbout it. So I guess, it's more a thing for myself, than for others. But I like it, that you can actually add a face to the name. So for me, this link is pure gold! It's also very interesting, how young those guys are and of course always very sad to see, that some of them didn't came home. I haven't done this skin for VA-94 yet, but it will be the next. -
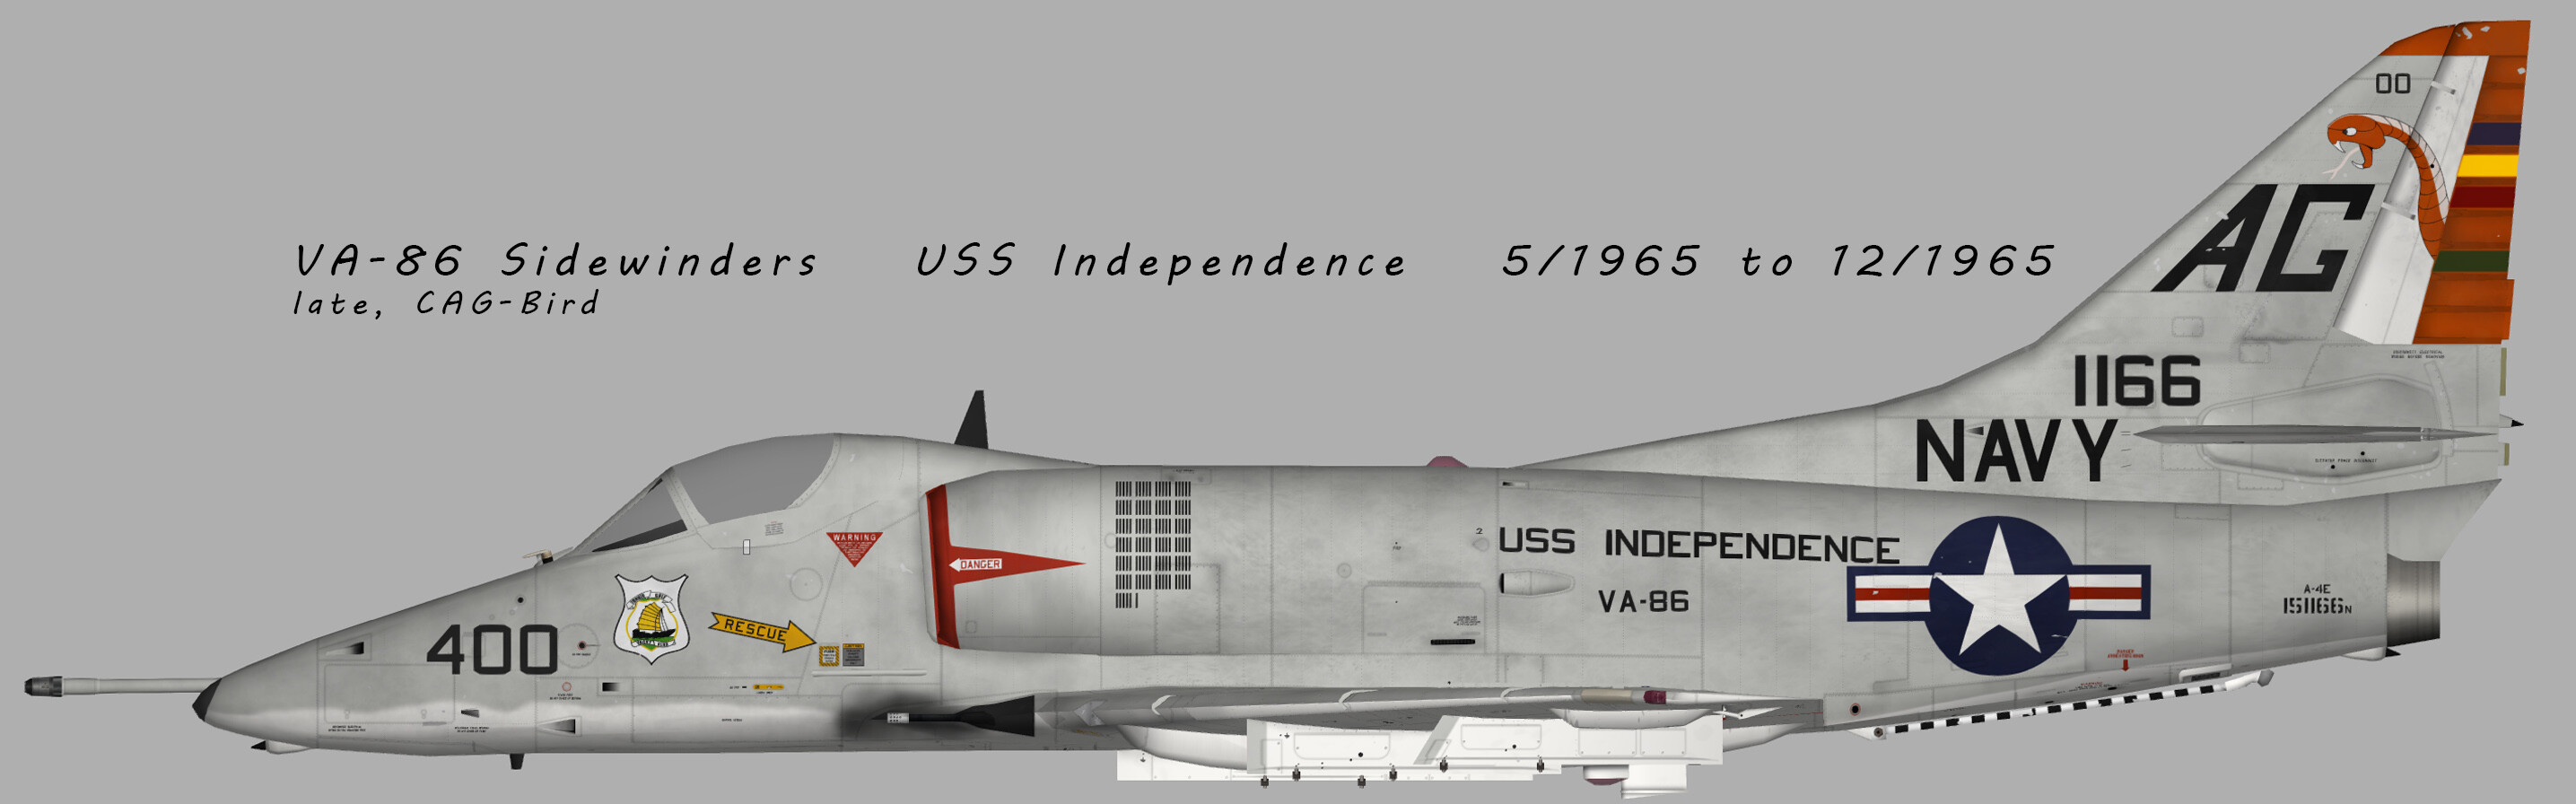
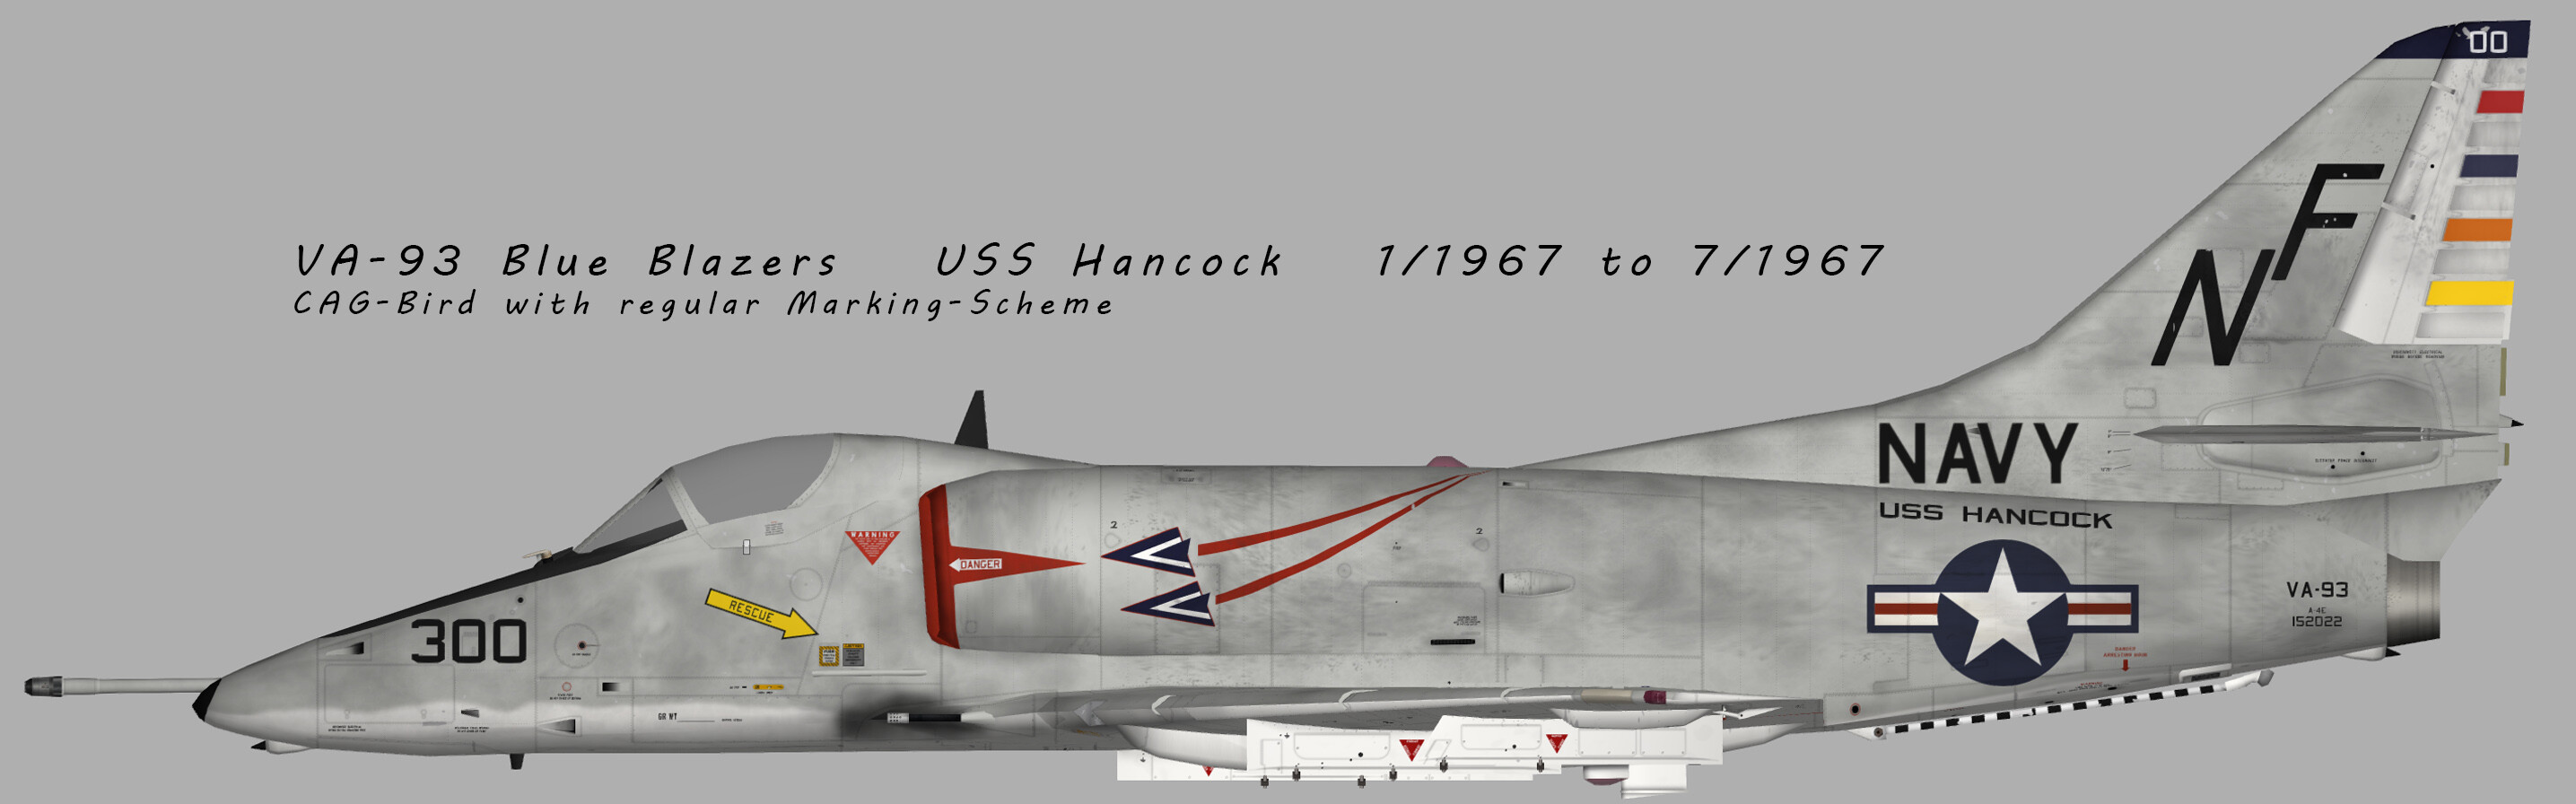
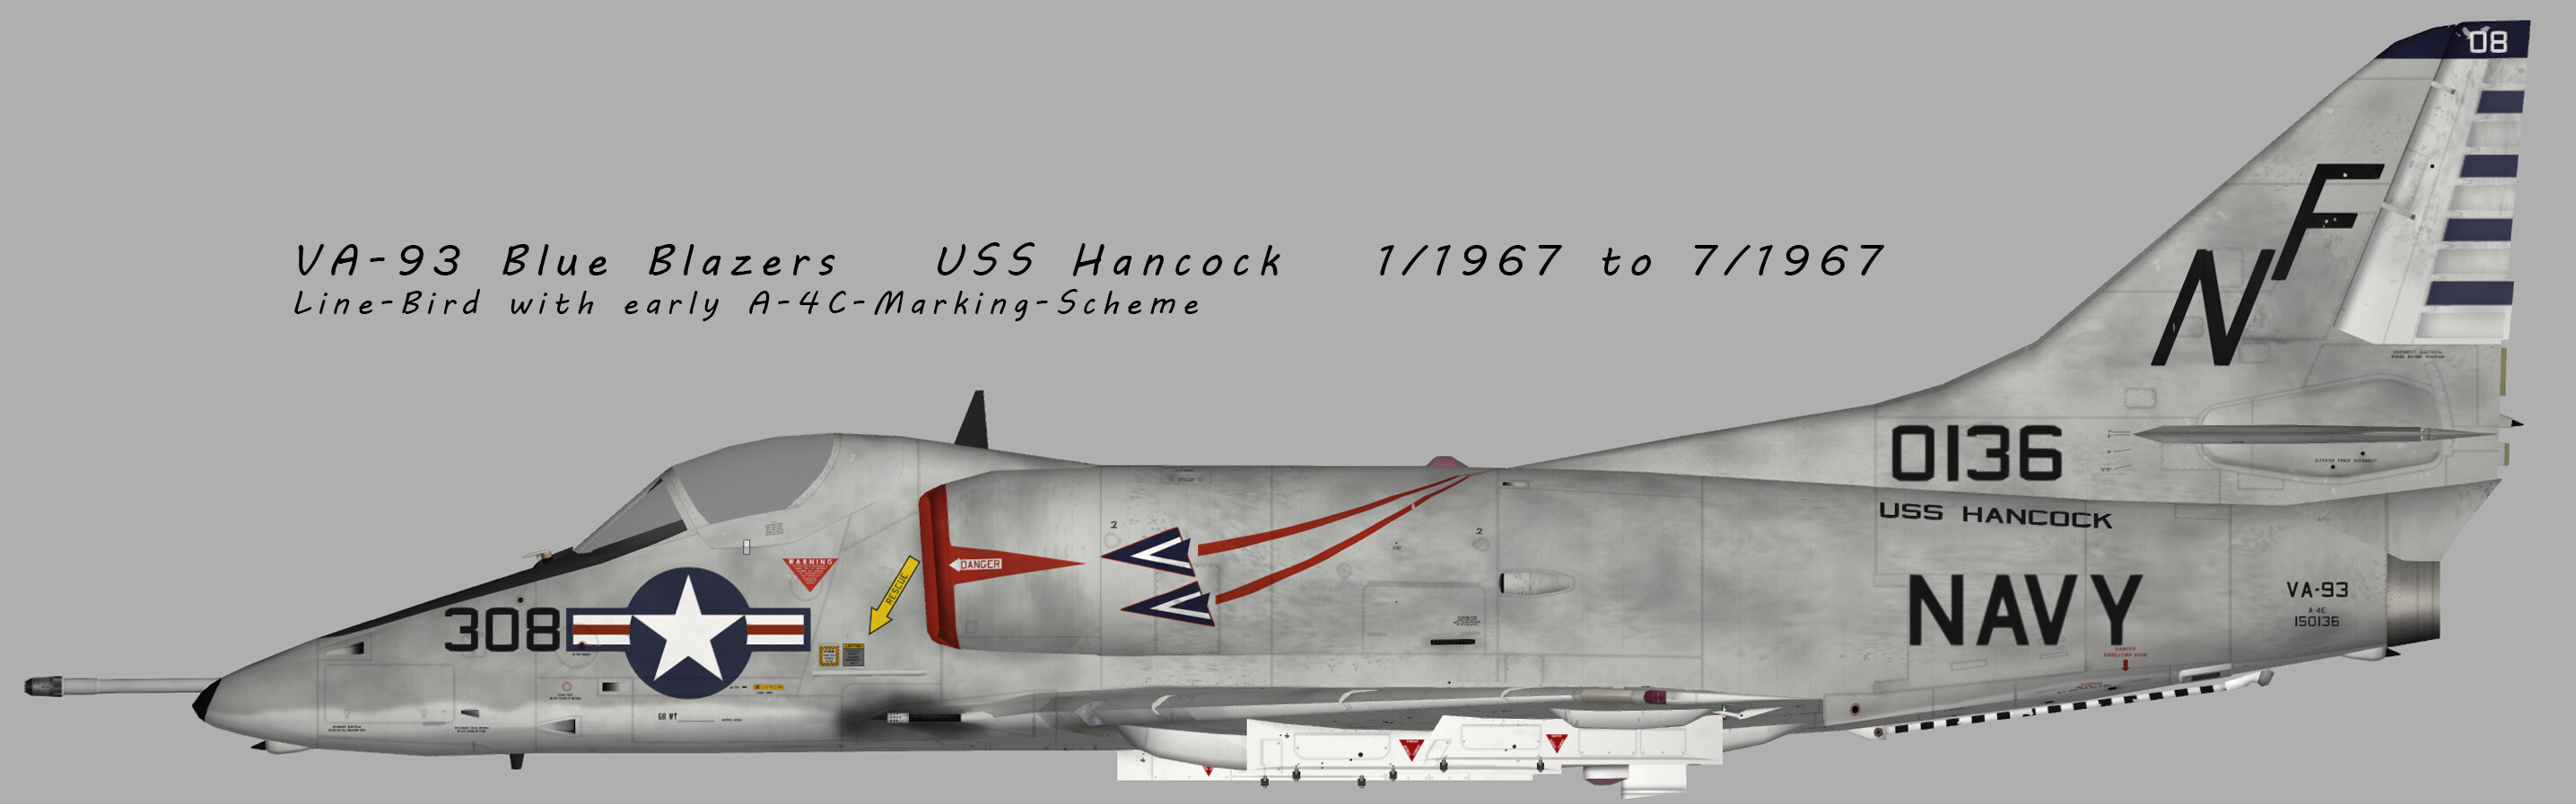
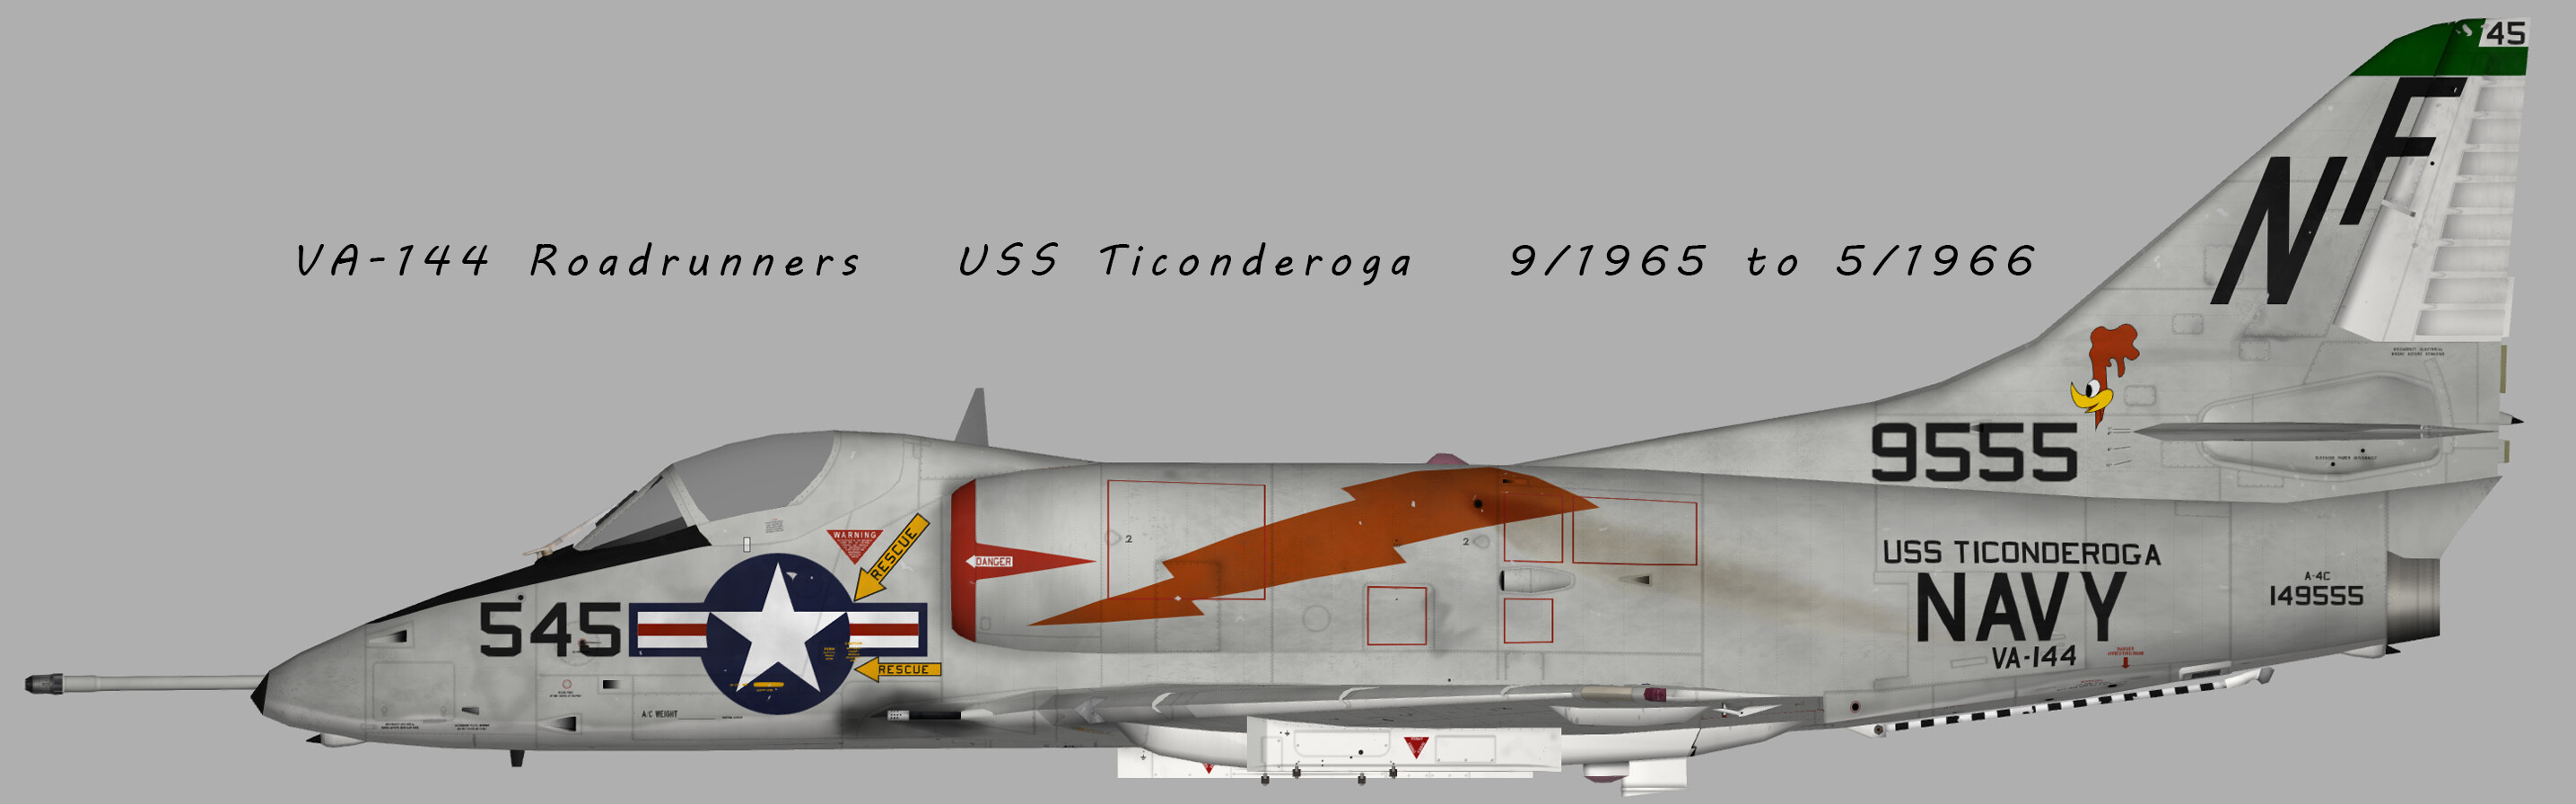
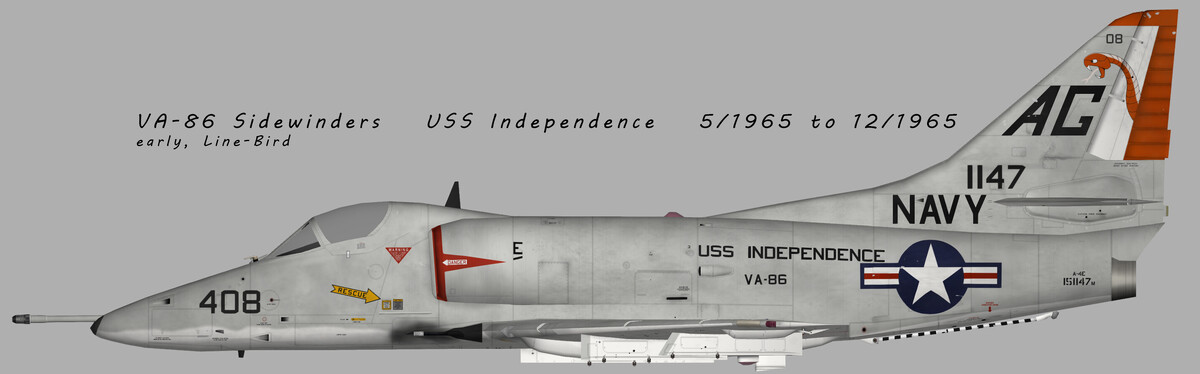
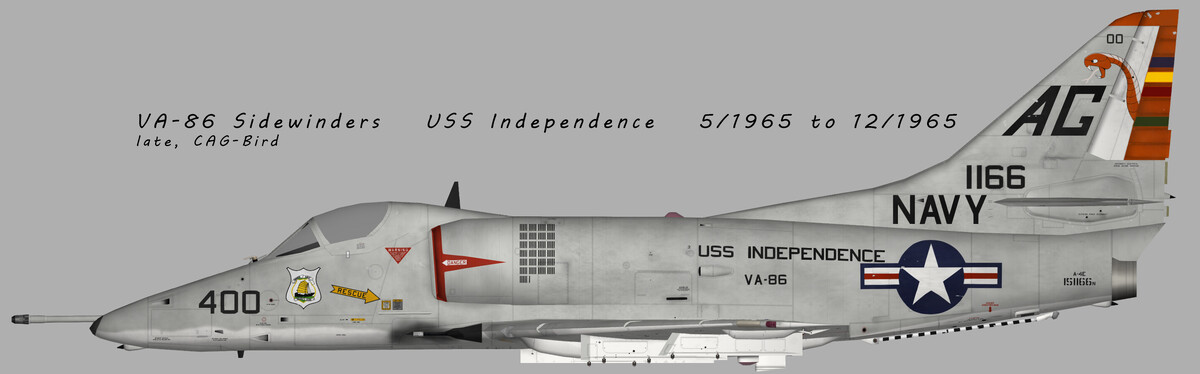
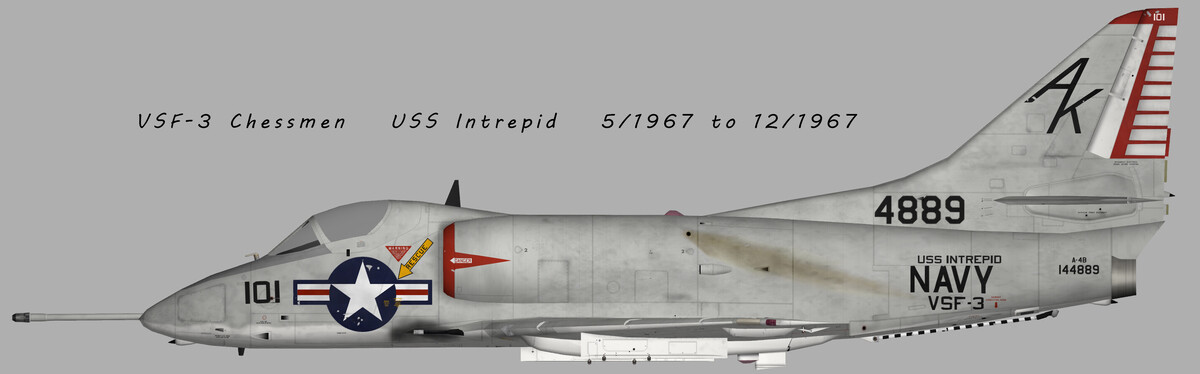
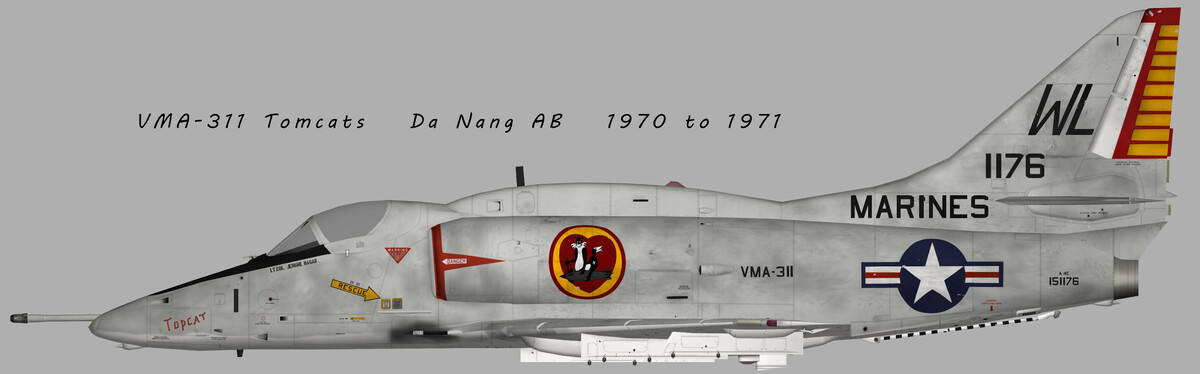
Some new Vietnam-Scooters: VA-86 Sidewinders. This was one of the first skins, I wanted to do. I started some attempts, but I always failed at the Snake on the tail. Finally done. VA-93 Blue Blazers - the first skin I uploaded here, now redone in 4k. and some others:


- 91 replies
-
- 12
-
-
-
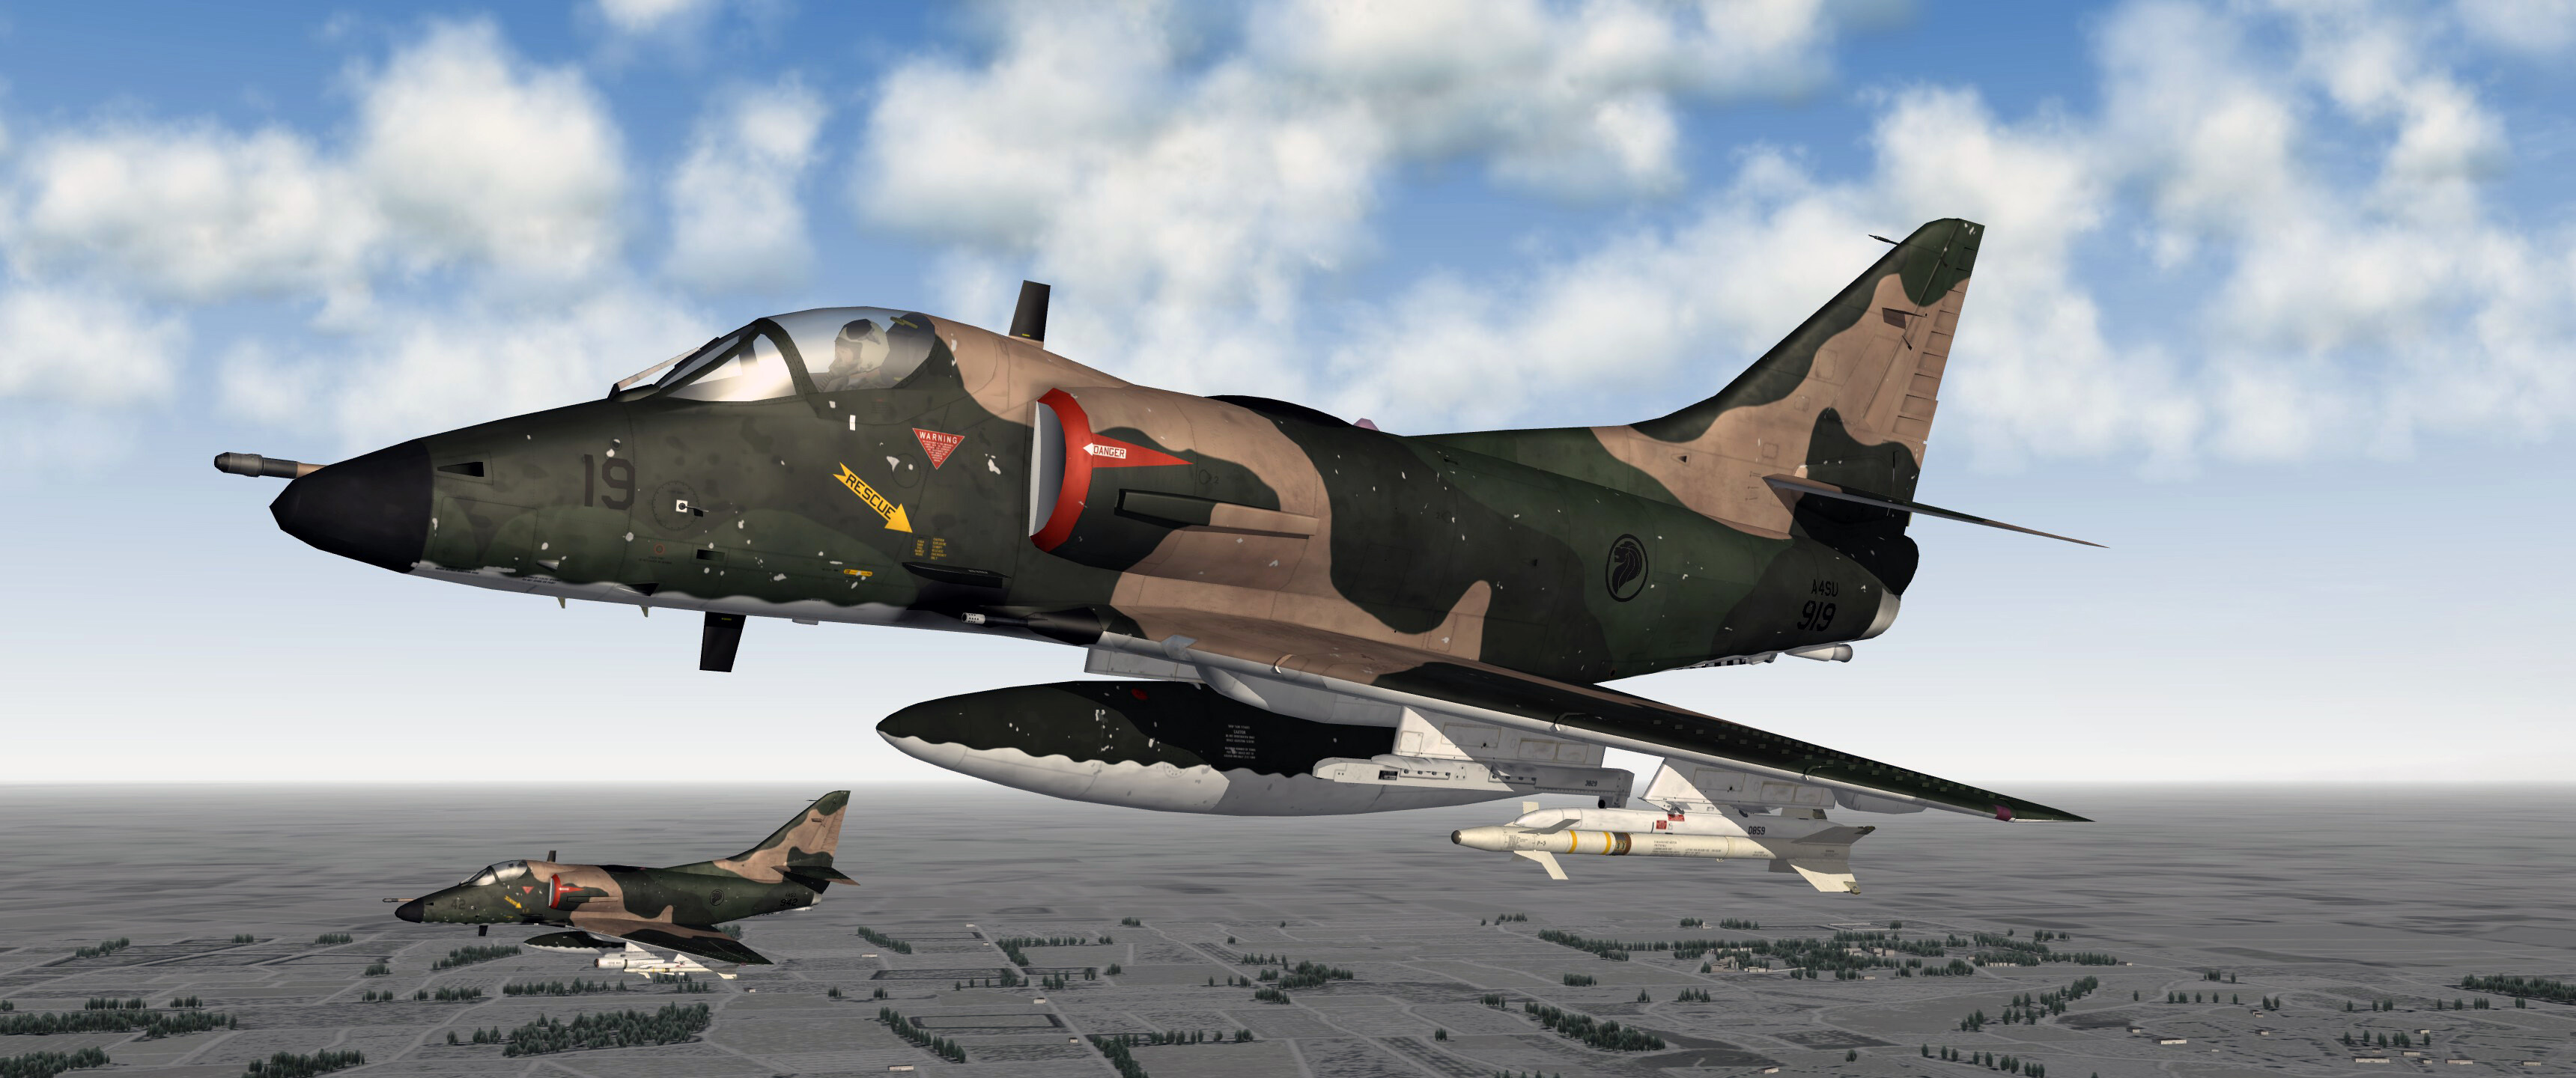
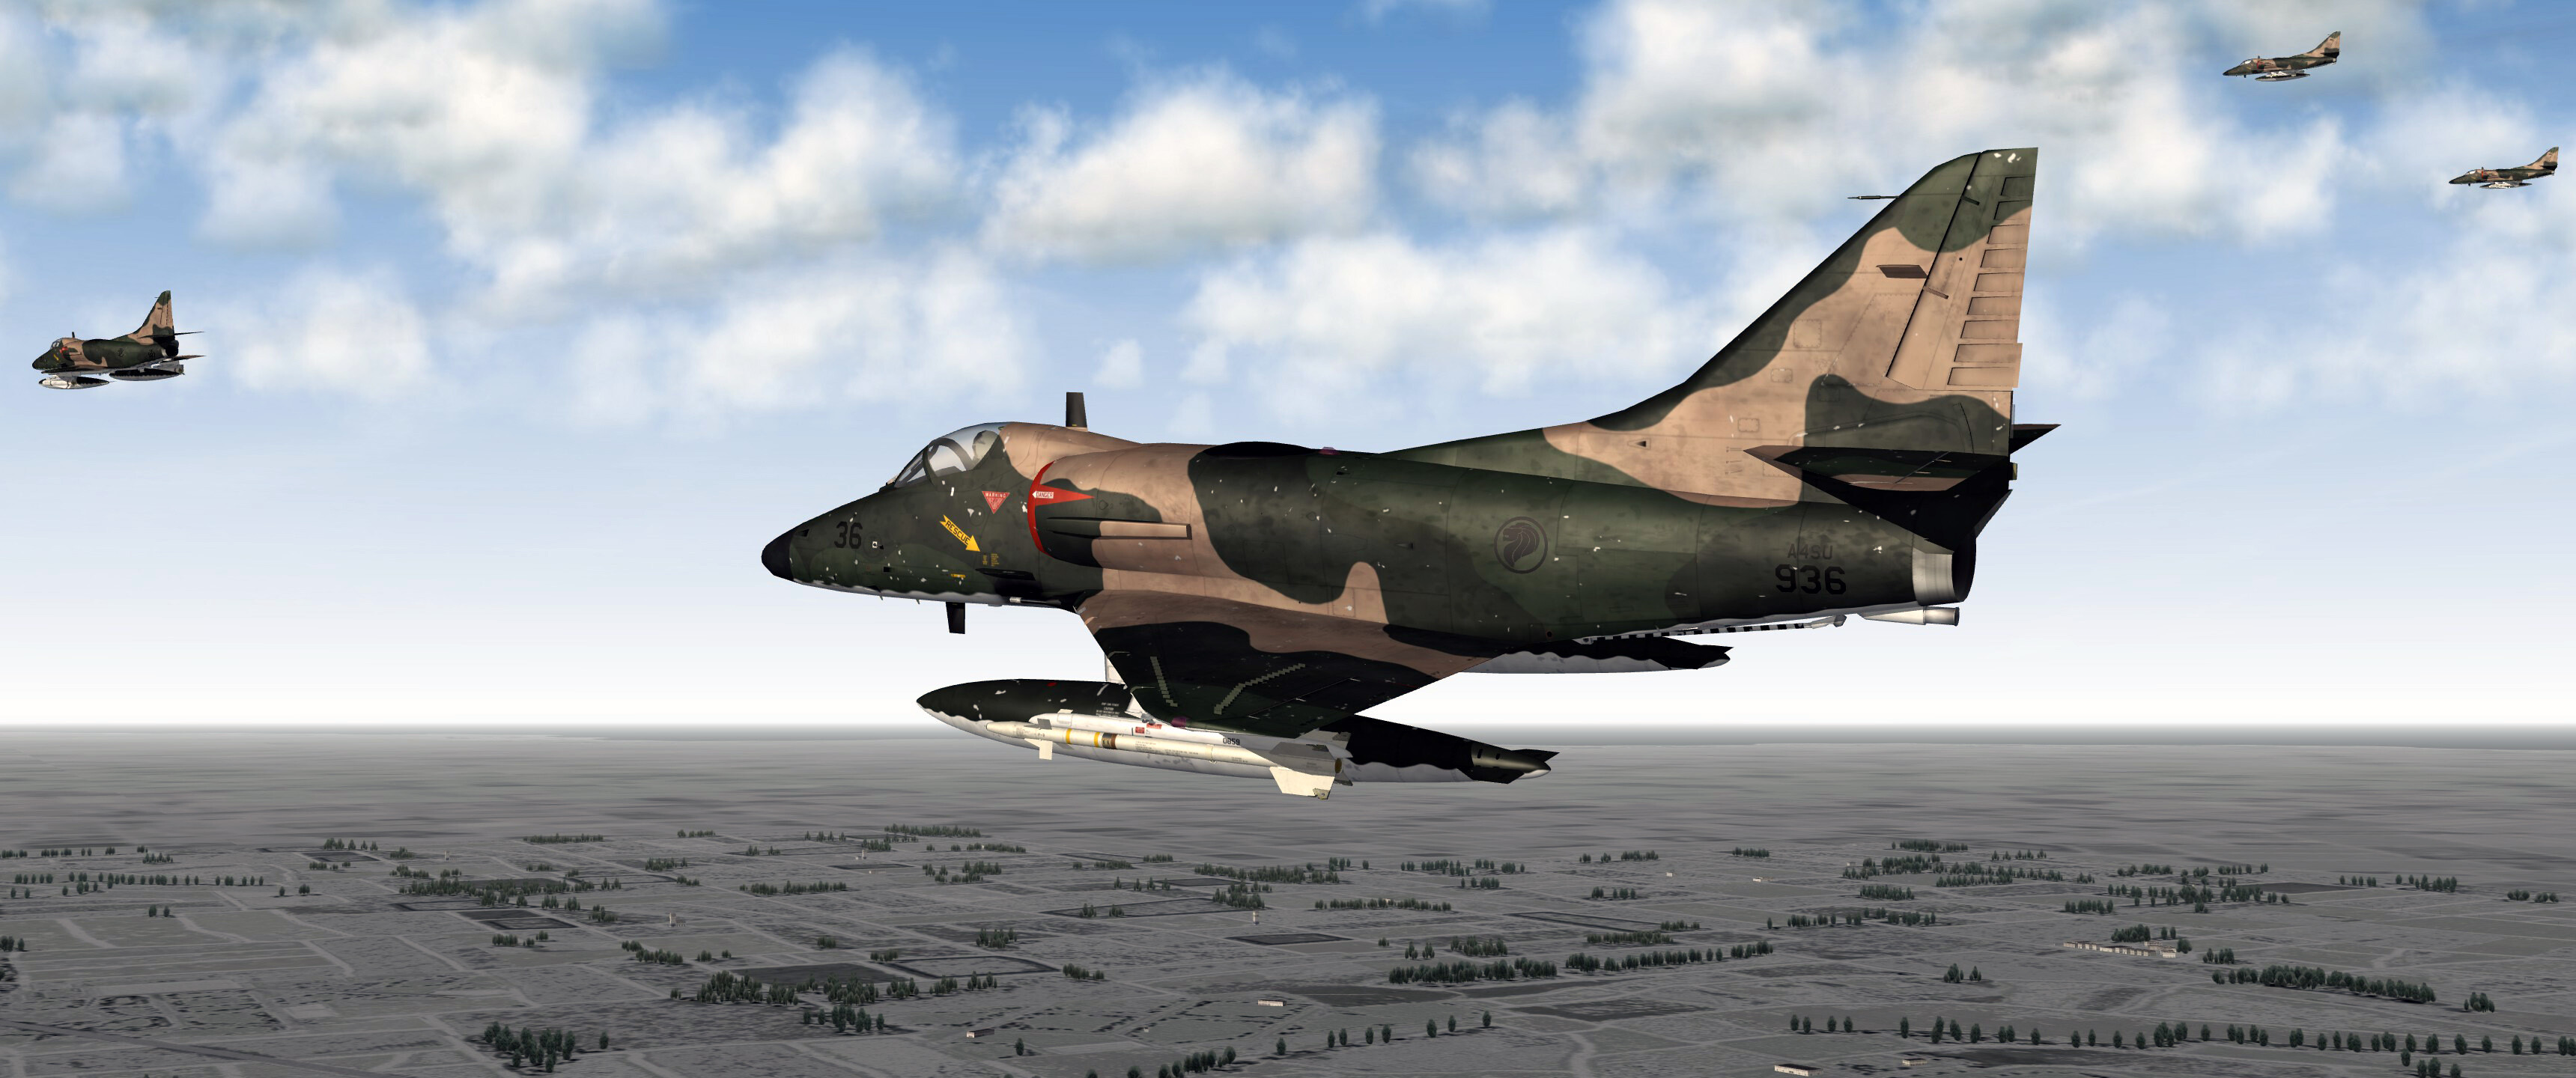
A-4SU Super Skyhawk - based at Cazaux Air Base (France), Trainingflight over Europe


-
Welcome to the club. Move on to SF2 and you will feel just 10 years late into that game.
-
Get well soon!
-
If the model calls for BMP, it first looks for BMP, but also uses JPG, if BMP is not available. It's been that way for years. Be aware though: If you want to redo stock-skins (for example: those "USNGrey1"- or "USAFSilver1"-folders) and the TW's model looks for BMP, you have to redo your new skins in BMP, because otherwise the older skins are taken from the CAT-archives - these are BMP and are then priorized over JPG in your MOD-folder.
-
View File SF2 EF-10B_CAF UpdatePack SF2 EF-10B_CAF UpdatePack v1.0 ============================== *** Tested in full 5-merged installation *** This is an Update for: SF2 F3D-2/EF-10B Skyknight by Coyote Aerospace 1.0.0 and you will need to download and install it first. The UpdatePack includes 2 parts: 1. Skins-only ------------- 4 new skins in 4k (resize to your liking if needed) for the EF-10B-variant that comes with the original-mod by CAF: VMCJ-1 Golden Hawks, Da Nang AB, ca. 1966 (6 planes*) VMCJ-1 Golden Hawks, Da Nang AB, 1969 (6 planes*) VMCJ-2 Playboys, MCAS CHerry Point, 1959 (6 planes) VMCJ-3, MCAS El Toro, ca. 1957 (9 planes) * VMCJ-squadrons were composite-squadrons, that means, that they used a mix of different planes. Usually these were RF-8 Crusaders, RF-4B Phantoms and later EA-6A Electric Intruders. So VMCJ-1, when based in Da Nang AB, had only 6 EF-10Bs. BuNos are correct for the planes and squadrons and mostly for the given timeframe. 2. Optional Files ----------------- My take on a rework of the EF-10B-variant, that comes with the original-mod by CAF. The mapping of the model was challenging, so some areas on the skins are as is. I also did some new 3D-parts to add more details and get rid of mapping issues (new pylons, new droptanks, some antennas). By default the Antenna-set for the standard-EF-10B, called "Whale", is selected. By 1967 some planes where upgraded to the "Super Whale"-variant by adding different antennas and upgrading some electronics. You can select the version you like in the loadout-menu. Unpacking and installation: =========================== !!! IMPORTANT !!! !!! Backup your EF-10B_CAF planefolder! !!! 1. Skins only-Installation -------------------------- 1. Unpack ALL zip-files to a temporary directory 2. open "Put_Contents_In_Your_MOD_Folder" from the temporary folder and copy the contents you want to your MOD-Folder, which should contain the original EF-10B-mod by CAF! 3. Thats it! 2. Skins + optional Files ------------------------- 1. Unpack ALL zip-files to a temporary directory 2. open "Put_Contents_In_Your_MOD_Folder" from the temporary folder and copy the contents you want to your MOD-Folder, which should contain the original EF-10B-mod by CAF! 3. open "Optional Files" from the temporary folder and copy the contents you want to your MOD-Folder, which should contain the original EF-10B-mod by CAF! 3. if asked to overwrite, say 'yes' (EF10B_data.ini, F3D_userlist.ini and EF10B_loadout.ini WILL be overwritten) 4. Thats it! Credits ======= - Coyote Aerospace (CAF), Wrench, AngelP - Mod-Pack this is based upon. - me - template, skins, decals, ini- and 3D-work of tanks, antennas, pylons P.S. ==== This MOD or parts of it may not be included in any PAYWARE-packs, PAYWARE-mods or whatever. It is free! If you use the MOD or parts of it, you should give proper credits. This pack is based upon hours of research and work - if you want to rip it apart to do stuff different, but not better, please don't use any of my work and create your own mod from scratch. Submitter Nyghtfall Submitted 03/18/2026 Category Other
-

Version 1.0.0
56 downloads
SF2 EF-10B_CAF UpdatePack v1.0 ============================== *** Tested in full 5-merged installation *** This is an Update for: SF2 F3D-2/EF-10B Skyknight by Coyote Aerospace 1.0.0 and you will need to download and install it first. The UpdatePack includes 2 parts: 1. Skins-only ------------- 4 new skins in 4k (resize to your liking if needed) for the EF-10B-variant that comes with the original-mod by CAF: VMCJ-1 Golden Hawks, Da Nang AB, ca. 1966 (6 planes*) VMCJ-1 Golden Hawks, Da Nang AB, 1969 (6 planes*) VMCJ-2 Playboys, MCAS CHerry Point, 1959 (6 planes) VMCJ-3, MCAS El Toro, ca. 1957 (9 planes) * VMCJ-squadrons were composite-squadrons, that means, that they used a mix of different planes. Usually these were RF-8 Crusaders, RF-4B Phantoms and later EA-6A Electric Intruders. So VMCJ-1, when based in Da Nang AB, had only 6 EF-10Bs. BuNos are correct for the planes and squadrons and mostly for the given timeframe. 2. Optional Files ----------------- My take on a rework of the EF-10B-variant, that comes with the original-mod by CAF. The mapping of the model was challenging, so some areas on the skins are as is. I also did some new 3D-parts to add more details and get rid of mapping issues (new pylons, new droptanks, some antennas). By default the Antenna-set for the standard-EF-10B, called "Whale", is selected. By 1967 some planes where upgraded to the "Super Whale"-variant by adding different antennas and upgrading some electronics. You can select the version you like in the loadout-menu. Unpacking and installation: =========================== !!! IMPORTANT !!! !!! Backup your EF-10B_CAF planefolder! !!! 1. Skins only-Installation -------------------------- 1. Unpack ALL zip-files to a temporary directory 2. open "Put_Contents_In_Your_MOD_Folder" from the temporary folder and copy the contents you want to your MOD-Folder, which should contain the original EF-10B-mod by CAF! 3. Thats it! 2. Skins + optional Files ------------------------- 1. Unpack ALL zip-files to a temporary directory 2. open "Put_Contents_In_Your_MOD_Folder" from the temporary folder and copy the contents you want to your MOD-Folder, which should contain the original EF-10B-mod by CAF! 3. open "Optional Files" from the temporary folder and copy the contents you want to your MOD-Folder, which should contain the original EF-10B-mod by CAF! 3. if asked to overwrite, say 'yes' (EF10B_data.ini, F3D_userlist.ini and EF10B_loadout.ini WILL be overwritten) 4. Thats it! Credits ======= - Coyote Aerospace (CAF), Wrench, AngelP - Mod-Pack this is based upon. - me - template, skins, decals, ini- and 3D-work of tanks, antennas, pylons P.S. ==== This MOD or parts of it may not be included in any PAYWARE-packs, PAYWARE-mods or whatever. It is free! If you use the MOD or parts of it, you should give proper credits. This pack is based upon hours of research and work - if you want to rip it apart to do stuff different, but not better, please don't use any of my work and create your own mod from scratch. -
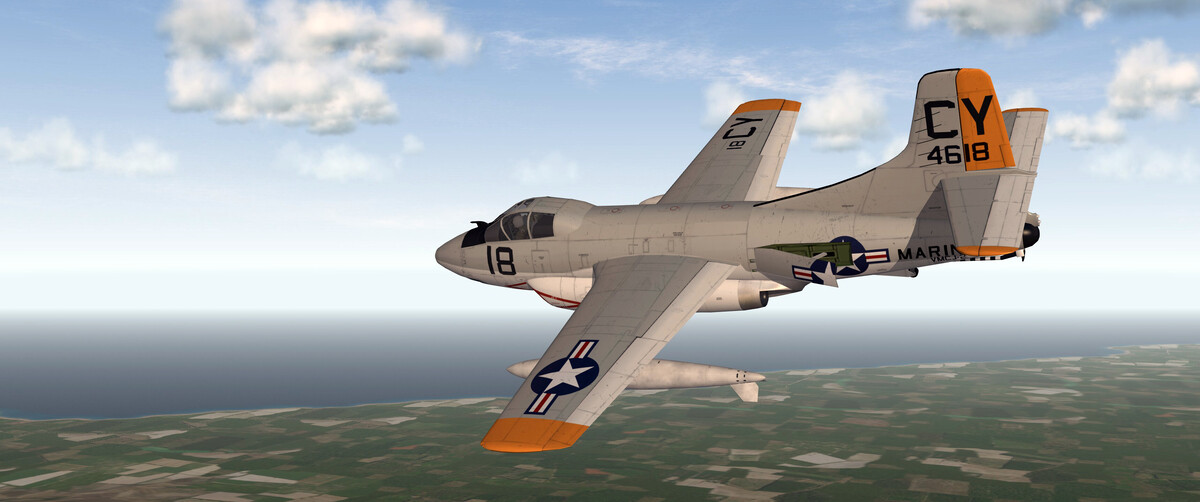
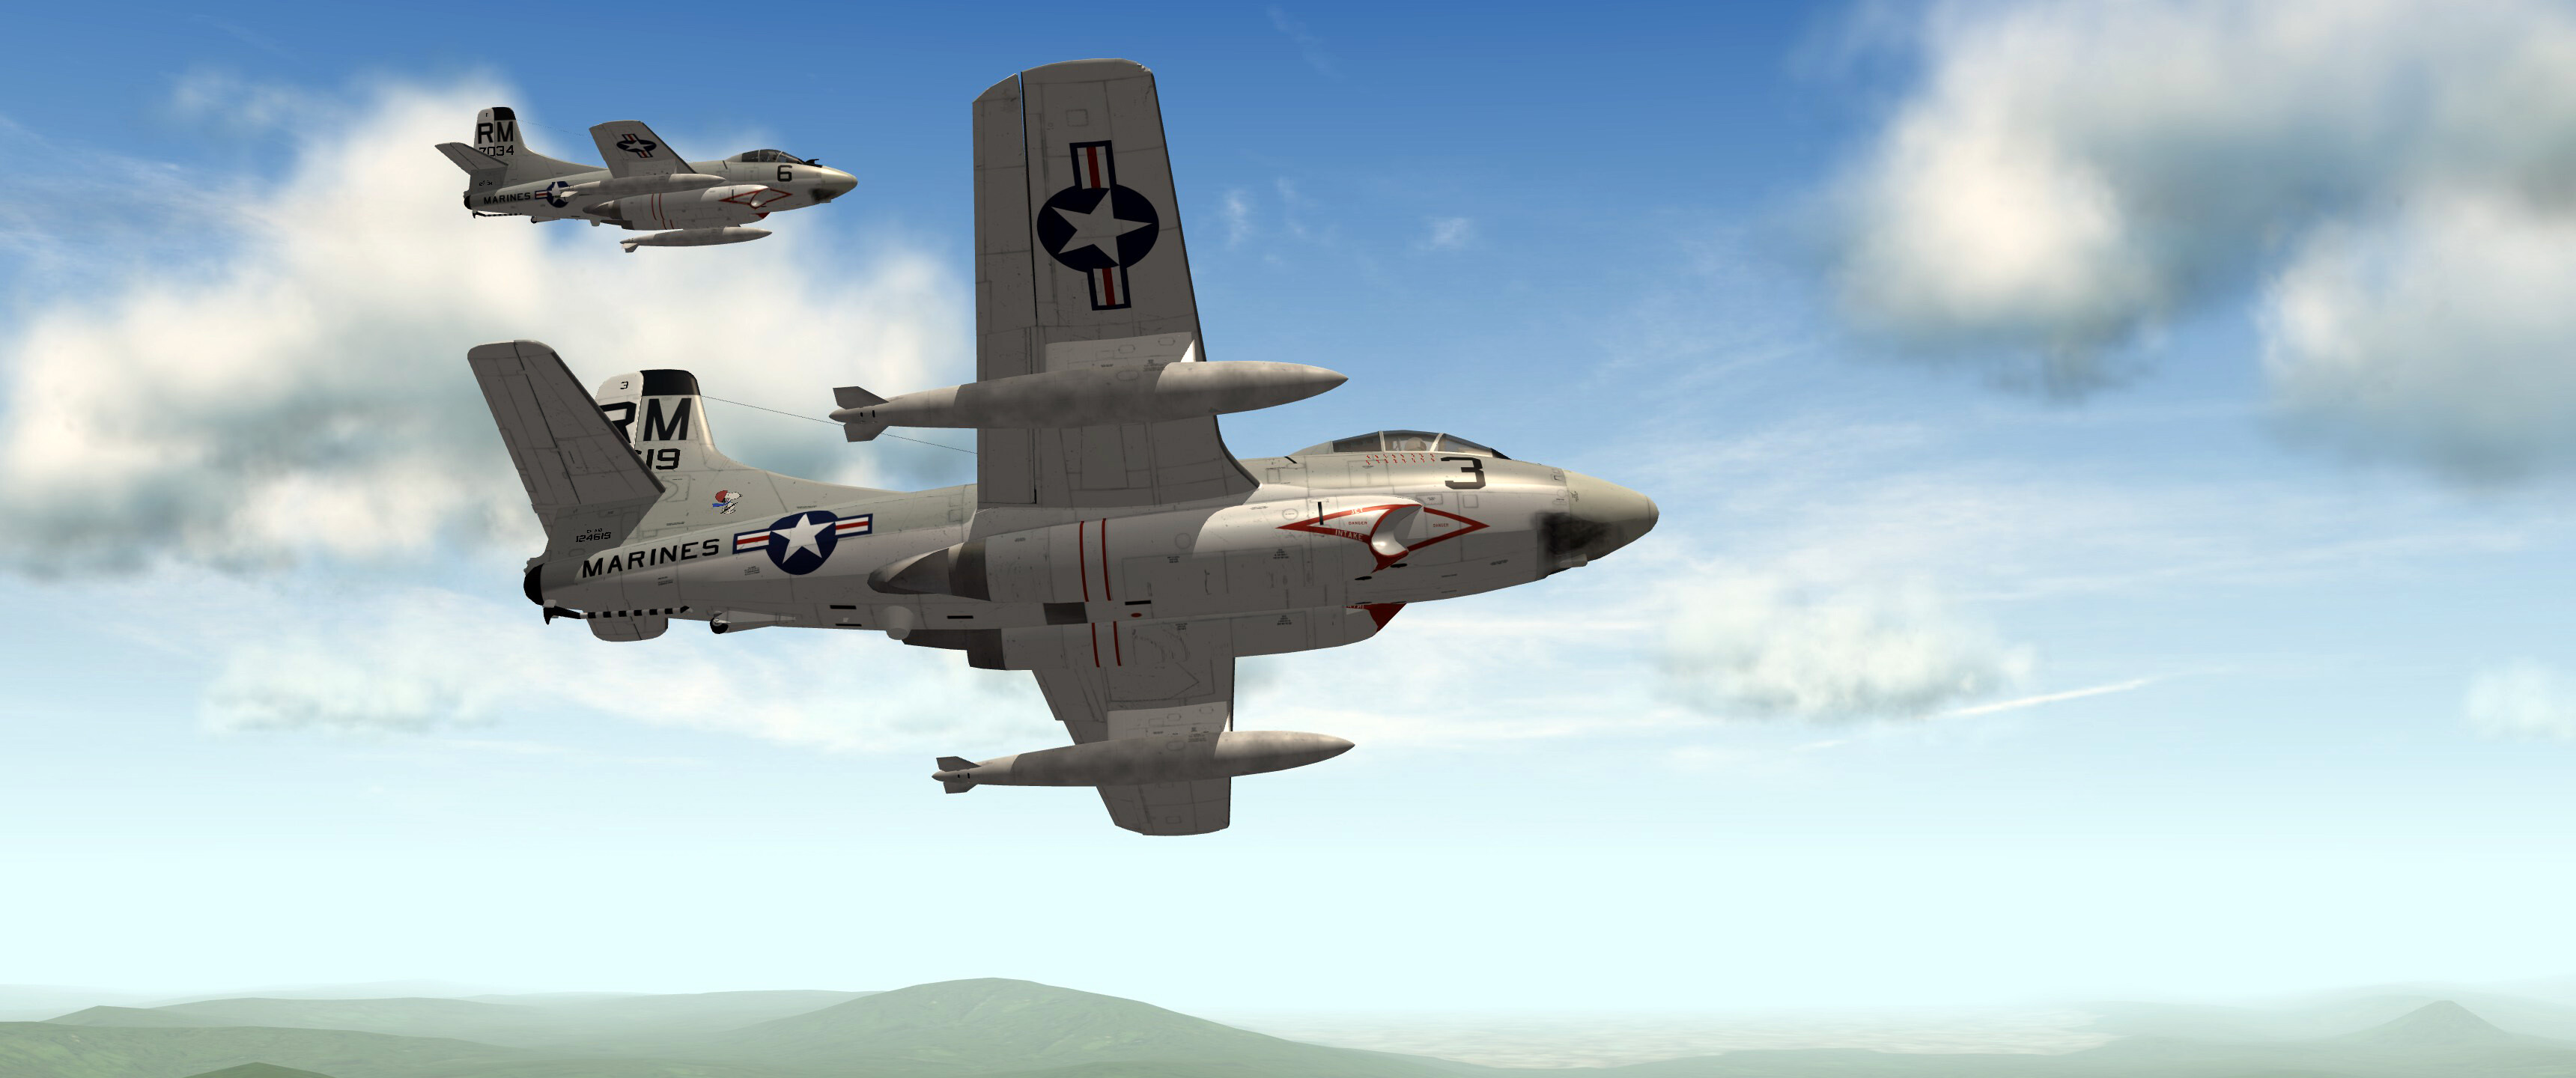
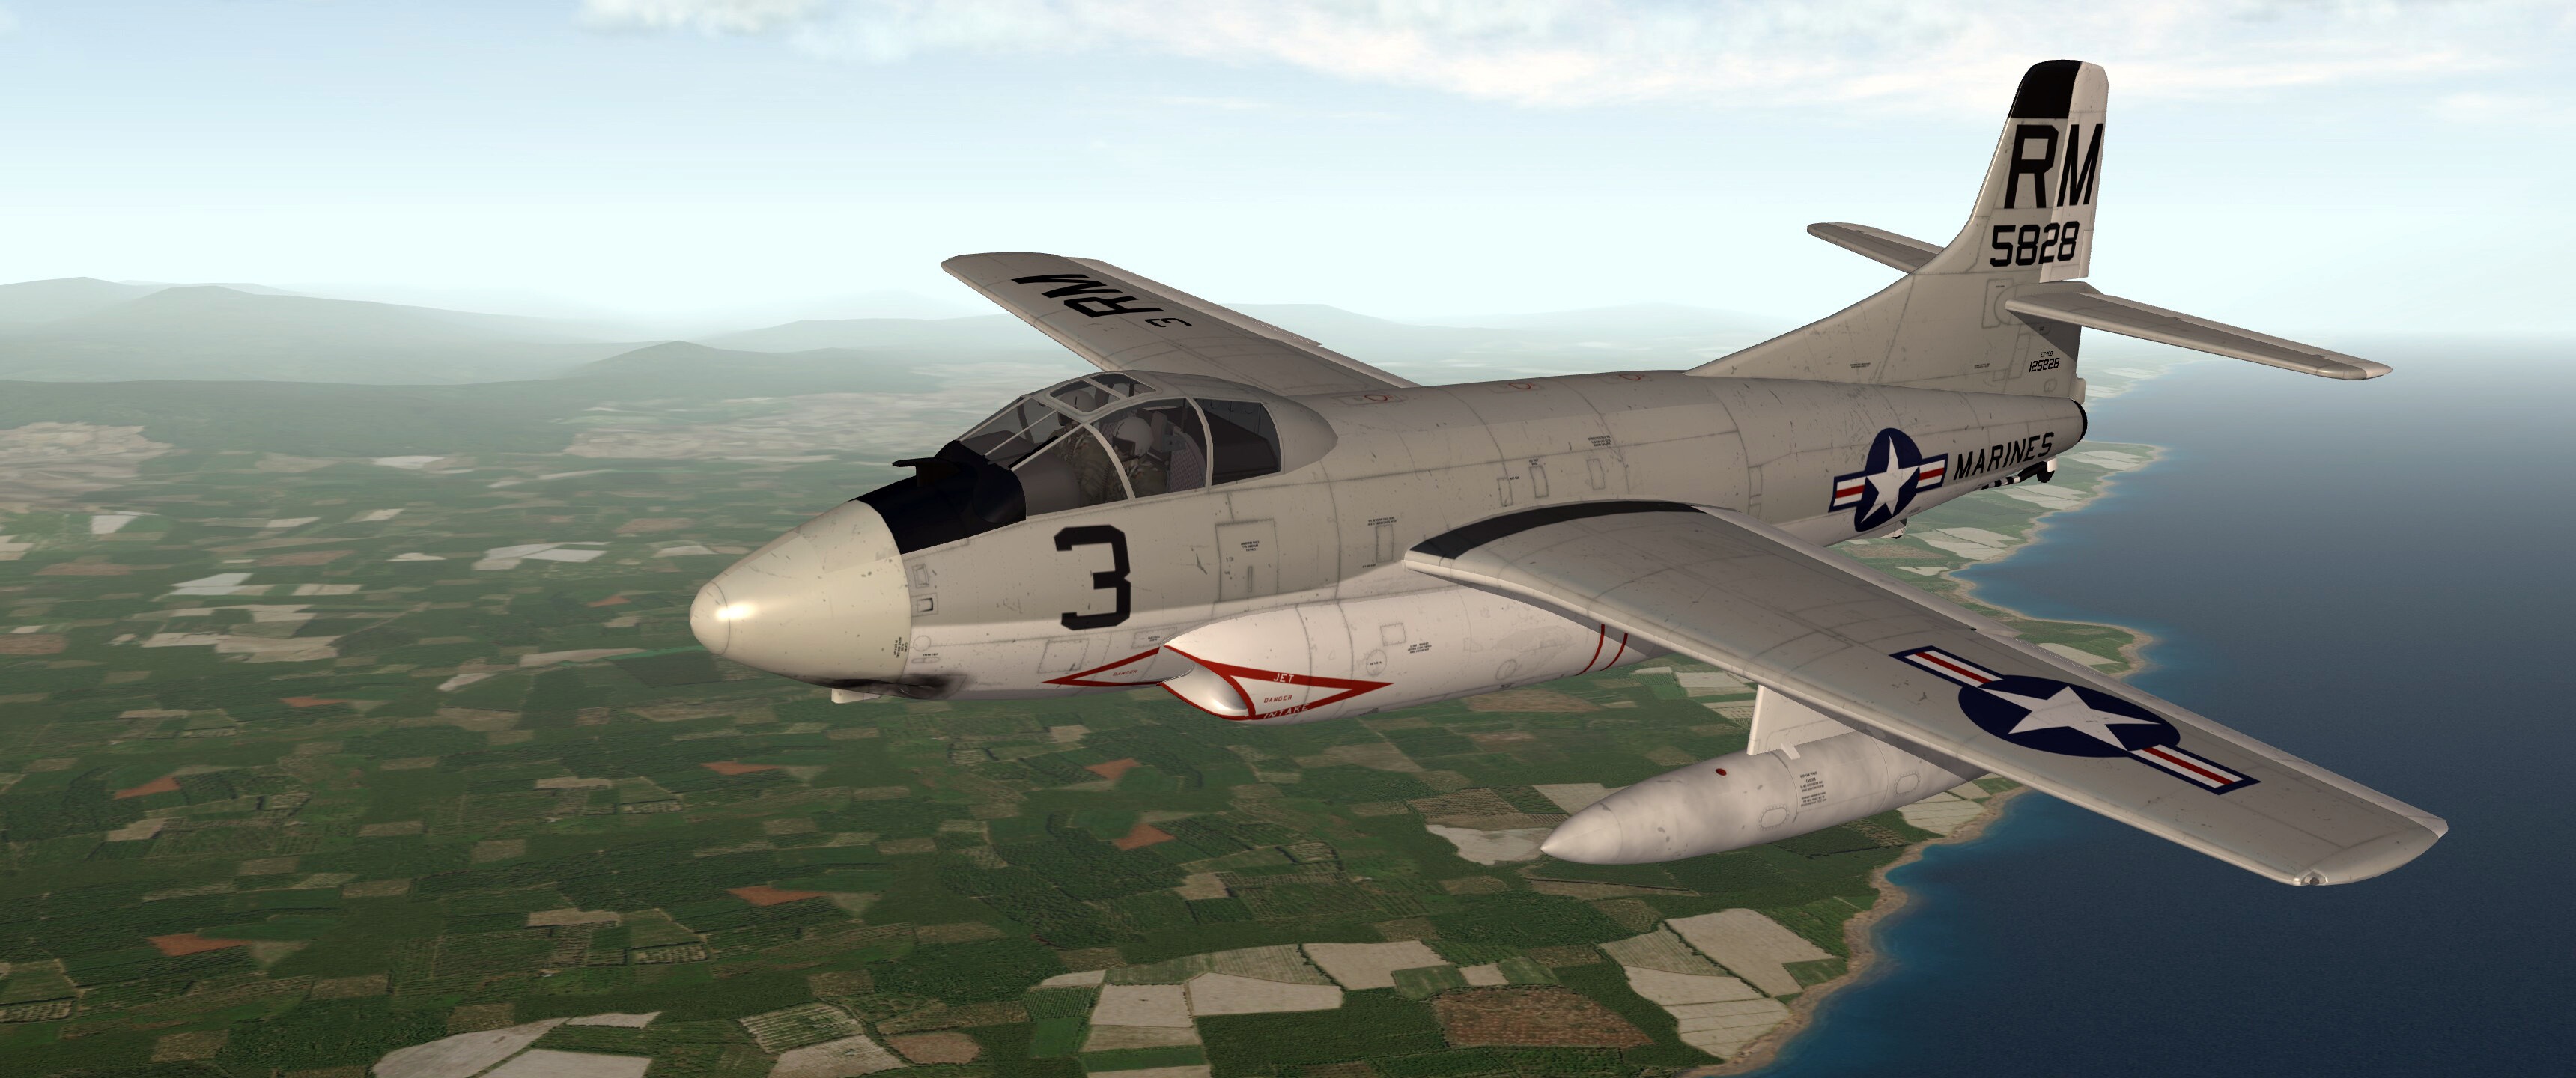
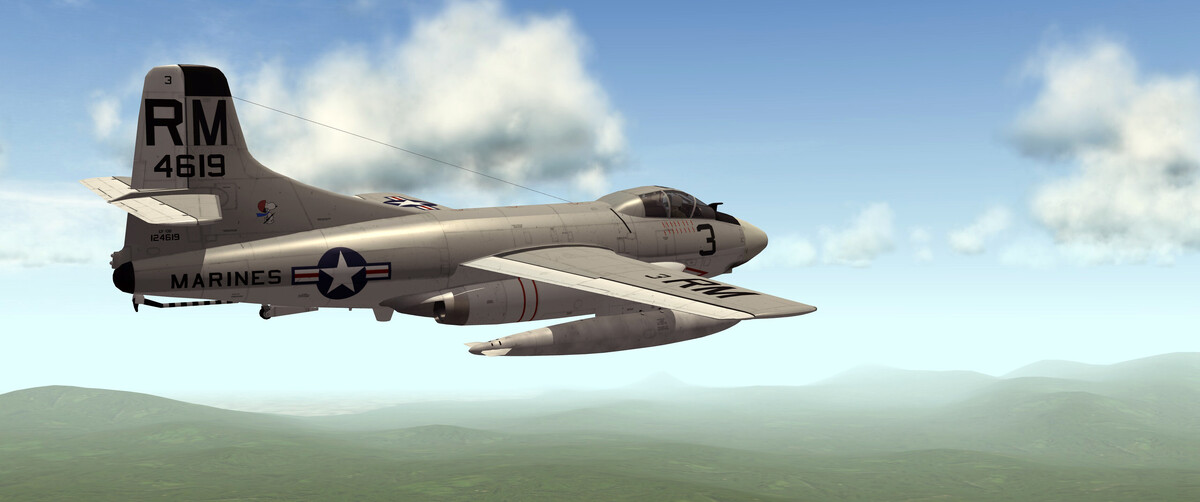
End of the Line - EF-10B Super Whale Last upgrade to the EF-10B. Visible differences to the regular EF-10B were the Wireantenna and the steerable antenna between the Exhaustpipes.

-
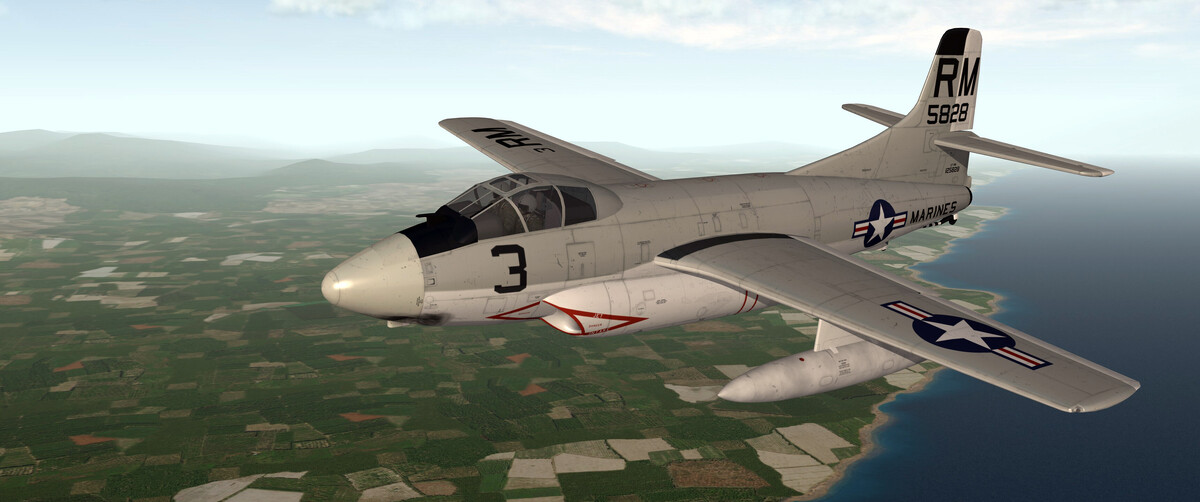
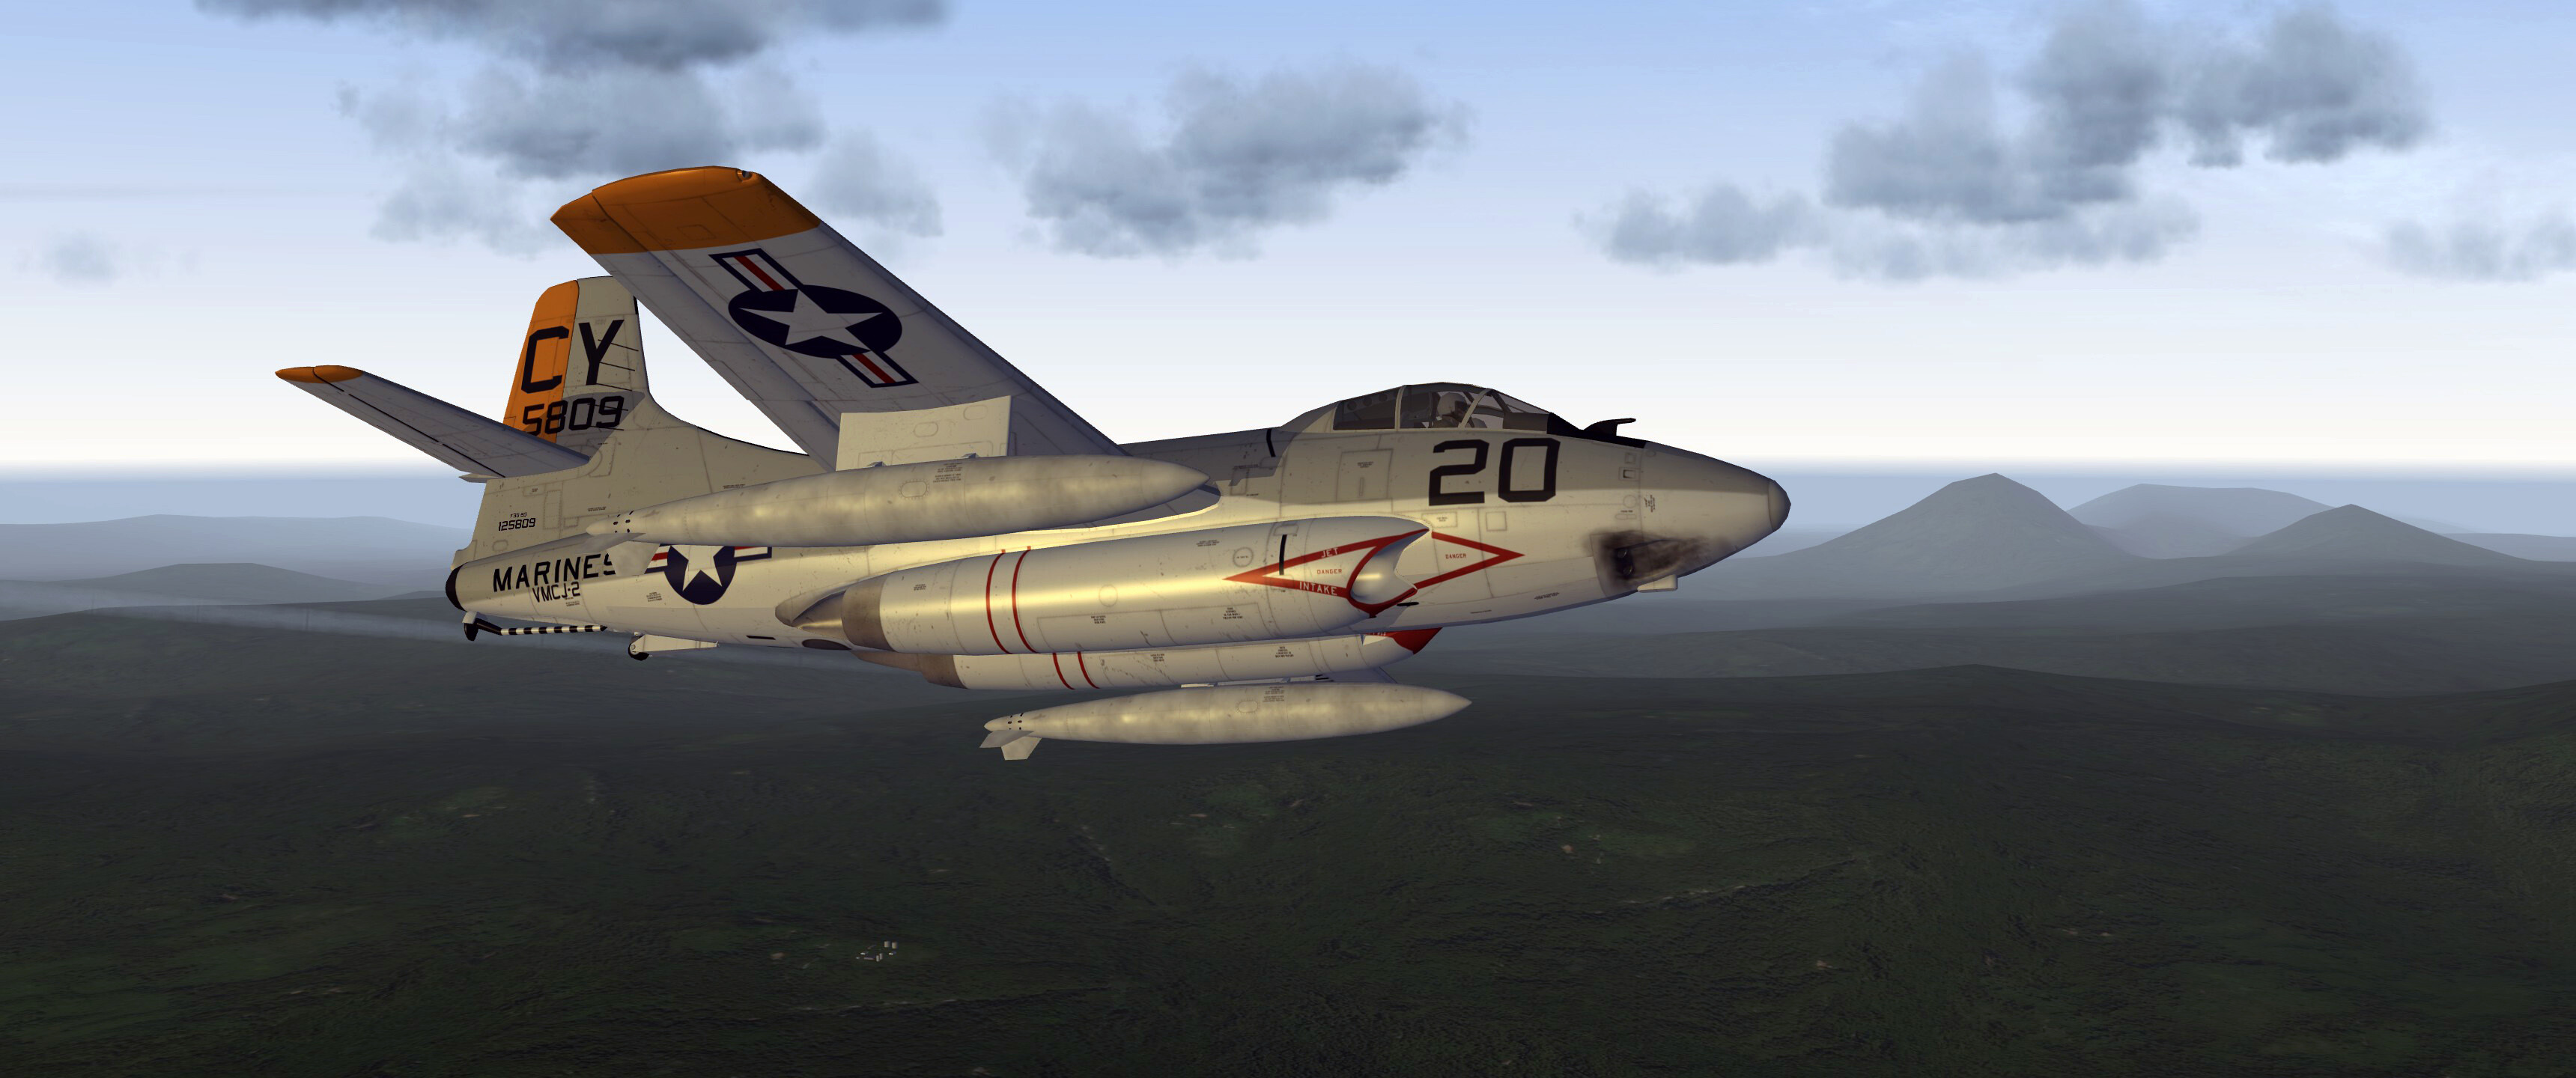
Citing Osprey Combat Aircraft 143's closing line... "...for an aircraft, that is arguably the most unsung hero of its two major wars." For some reason this one has a special place in my heart, so I had to polish it a bit. Thanks to CAF for the model.