Welcome WWI buffs! This is a mammoth compilation of a series covering the (mostly) complete air war in Italian Front in WWI.
The entire war is divided in mini-campaigns of a month-10 missions. I'm using the shockingly beautiful CaporettoV2 map by Gterl. You'll have about 25 mini-campaigns and 250 missions per pilot!
The beauty of this approach is that you can simulate unit transfers for your pilot. You can start as a two seater pilot (as most Austro-Hungarians did), and then be "transferred" to a fighter unit.
This mod is intended for FE2. FE1 pilots will need to edit the campaigns to fly them, for example changing the name of the planes like AlbatrosD5_170 to AlbatrosD5 or something like that....Please, don't ask me for a FE1 version. I'm doing 117 campaigns for the entire series and it's a lot of work!!!! Nevertheless, if someone want to make an FE1 version it has my agreement (if it's free for the people, of course).
So, be ready for a downloading fest.
Before installing this mod it's better you have an Italy only install for your FE2
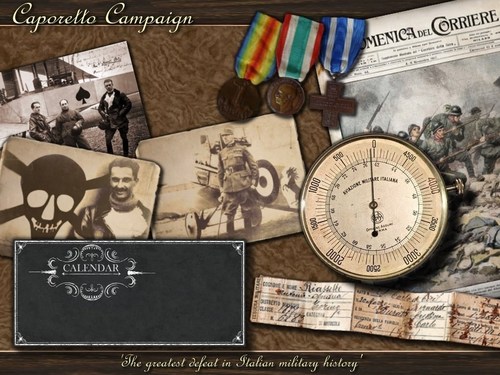
Caporetto Terrain WW1 V2.0
*******************************
INTRODUCTION
The Italian Front during WW1 refers to a series of battles fought between 1915 and 1918 in northern Italy between the armies of Austria-Hungary and Germany against Italy.
Italy hoped that by joining the countries of the Triple Entente against the Central Powers it would gain Cisalpine Tyrol (today's provinces of Trentino and South Tyrol), the Austrian Littoral, northern Dalmatia and some areas of western Carniola.
Italy had hoped to begin the war with a surprise offensive intended to move quickly and capture several Austrian cities.
Well, the war soon bogged down into trench warfare similar to the Western Front fought in France.
The included terrain represents the situation around September/October 1917, just before the battle of Caporetto.
The Battle of Caporetto (also known as the Twelfth Battle of the Isonzo, the Battle of Kobarid or the Battle of Karfreit) was the greatest defeat in Italian military history. The battle was fought between the Entente and the Central Powers and took place from 24 October to 19 November 1917, near the town of Kobarid (now in north-western Slovenia, then part of the Austrian Littoral). The battle was named after the Italian name of the town (also known as Karfreit in German).
Austro-Hungarian forces, reinforced by German units, were able to break into the Italian front line and rout the Italian forces opposing them. The battle was a demonstration of the effectiveness of the use of stormtroopers and the infiltration tactics developed in part by Oskar von Hutier. The use of poison gas by the Germans also played a key role in the collapse of the Italian Second Army.
INCLUDED
- Italian terrain/front WW1, situaton around summer/late summer 1917
- 544 unique tiles
- 10798 targets and 589 target areas
- Terrain represents the most important battlegrounds on the Italian front (Monfalcone, Mt. Hermada, Doberdo and Doberdo Lake, Mt. Fajiti Hrib, Gorizia, Mt. Sabotino, Bainsizza plateau, Caporetto, Mt. Krn, Mt. Tre Cime, Mt. Cristallo, Mt. Lagazuoi, Mt. Col di Lana, Mt. Marmolada, Mt. Ortigara, Mt. Pasubio...and many other historical places)
- Needed ground objects are also included
- Important mountains where done via satellite images (the tiles), like Marmolada, Mount Krn, Monte Cristallo, etc. all unique
- All historical fortifications are included (mountain bunkers, etc.) and locations/naming correct (as good as it gets)
- Major railroad lines included
- Port of Triest acts as port of Pola with all the major Austro-Hungarian Dreadnoughts stationed there
- Flying boat stations included with stationary Lohners and Macchi aircrafts
PREREQUISITES
- FE Gold or FE2
- Very strong PC and GPU
INSTALLATION
1. PRELIMINARY WORK
1.1 Extract file into a temporary folder like 'c:\temp'
1.2 You'll find a new folder called 'caporettoV20' within 'c:\temp'
1.3 For the campaign to work properly you'll need the following aircraft (you'll find them at the usual places)
--- AlbatrosC3
--- AlbatrosD3OAW
--- AviatikC2
--- AviatikD1
--- Ca3
--- Dfwci
--- Hanriot_HD1_CAM
--- Hansa_BrandenburgDI
--- LloydC2
--- Nieuport12
--- Nieuport17
--- oefD3_ba53a
--- oefD3_ba153a
--- oefD3_ba253
--- PhoenixD2a
--- PomilioPE
--- RumplerC1
--- SAMLS2
--- SP3
--- SPAD7_150
--- SPAD7_180
--- SPAD13
--- SVA5
2. TERRAIN INSTALLATION
2.1 FIRST EAGLES 2
- This terrain uses the stock wwiCambrai.CAT file, You must have the "wwiCambrai" terrain from First Eagles for the wwiCaporetto terrain to work properly.
- Look into your personal Windows folder like 'C:\Users\<username>\Saved Games\ThirdWire\FirstEagles2', e.g. your MODS Folder - create the folder 'terrains' within if not already there
- Move the 'wwiCaporetto' directory from your temporary folder (like 'c:\temp\caporettoV20\Terrain\wwiCaporetto') to 'C:\Users\<username>\Saved Games\ThirdWire\FirstEagles2\terrains\', e.g. your MODS Folder
- Move the folders within 'GroundObject' directory from your temporary folder (like 'c:\temp\caporettoV20\Objects\GroundObject') to 'C:\Users\<username>\Saved Games\ThirdWire\FirstEagles2\Objects\GroundObjects', e.g. your MODS Folder
2.2 FIRST EAGLES GOLD
- This terrain uses the stock wwiCambrai.CAT file, You must have the "wwiCambrai" terrain from First Eagles for the wwiCaporetto terrain to work properly.
- Move the 'wwiCaporetto' directory from your temporary folder (like 'c:\temp\caporettoV20\Terrain\wwiCaporetto') into your FirstEagles installation directory (like 'c:\Program Files\First Eagles\Terrain')
- Move the folders within 'GroundObject' from your temporary folder (like 'c:\temp\caporettoV20\Objects\GroundObject') into your FirstEagles installation directory (like 'c:\Program Files\First Eagles\Objects\GroundObject')
- If you've already my previous Italian WWI terrain, then you probably don't need these objects. In any case if asked to 'owerwrite', click NO.
3. CAMPAIGN INSTALLATION
3.1 FIRST EAGLES 2
- Look into your personal Windows folder like 'C:\Users\<username>\Saved Games\ThirdWire\FirstEagles2', e.g. your MODS folder - create the folder 'Campaigns' within if not already there
- Move the 'wwiCaporetto01' directory from your temporary folder (like 'c:\temp\caporettoV20\Campaings') to C:\Users\<username>\Saved Games\ThirdWire\FirstEagles2\Campaigns\', e.g. your MODS Folder
- Move the files (bmp's) from your your temporary folder (like 'c:\temp\caporettoV20\Menu') to your FirstEagles2 installation directory (like 'c:\Program Files\First Eagles2\Menu')
Aircraft Skins
- All needed aircraft skins are included. Look for them into your temporary folder (like 'c:\temp\caporettoV20\Objects\Aircraft') add them like any other FE2 aircraft skins. You'll already have the majority probably.
3.2 FIRST EAGLES GOLD
- Move the 'wwiCaporetto01' directory from your temporary folder (like 'c:\temp\caporettoV20\Campaings') into your FirstEagles installation directory (like 'c:\Program Files\First Eagles\Campaigns')
- Move the files (bmp's) from your your temporary folder (like 'c:\temp\caporettoV20\Menu') into your FirstEagles installation directory (like 'c:\Program Files\First Eagles\Menu')
Aircraft Skins
- All needed aircraft skins are included. Look for them into your temporary folder (like 'c:\temp\caporettoV20\Objects\Aircraft') add them like any other FE aircraft skins. You'll already have the majority probably.
4. EXTRAS
- You'll find several ZIP files within the temporary 'Extras' folder (like 'c:\temp\caporettoV20\Extras')
Description:
Terrain_wwiCaporettoFolder_oldCarst.zip
- I've repainted the carst region tiles to make them look more like limestone in this new version. If you like more the previous look, then just extract this file and overwrite the tiles within the wwiCaporetto folder.
Terrain_wwiCaporettoFolder_oldIsonzo_trench_dry.zip
- I've added wet fields and water filled shell holes in this new version. If you like more the previous look, then just extract this file and overwrite the tiles within the wwiCaporetto folder.
MenuFolder_Music_MainScreen.zip
- If you like a bit more exciting musing in the main menue. Just drop this file into your 'Menue' folder.
PilotDataFolder_Additional_PilotImages.zip
- These are all the portraits of all aces on the Italian front during 1915-1918. Quite a lot of work went into this. If you like a more historical approach then use these and drop them into your 'PilotData' folder.
CREDITS
As usually I want to say thank you to all guys who helped me to create the Italian terrain, to TK, Jan Tuma, Stephen1918, ojcar, Gepard, Heck, geo, quack74, Edward, and specially Geezer. Sorry guys, can't remember all the names. Please contact me if you want to be named here. Thanks for files, suggestions, bug fixing, etc.
DISCLAIMER
The Italian terrain is freeware.
You are free to modify and share it, BUT Commercial use is prohibited.
If you find bugs please post them in First Eagles section of Combatace.com forum.
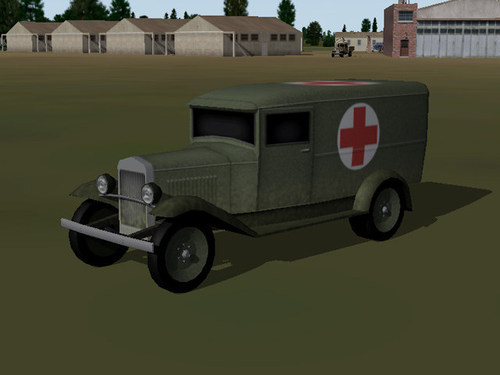
Three vehicles which modders can add to airfields using the target.ini. I have included the data for the types.ini in the download.
Ambulance - based on the 1932 Ford Model A panel truck.
Starter Truck - based on the Soviet AS-1 starter truck, which was a Soviet built version of the Ford Model A.
Crash Response Truck - loosely based on a variety of WW2 era RAF crash trucks.
Each truck has a high and low poly LOD as well as a destroyed version. I have organized everything into folders for convenience, but you'll need to take them out of the folders when you install them.
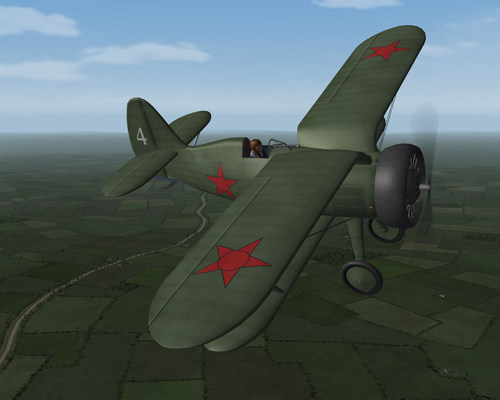
Soviet Green I-15
This skin is for the Polikarpov I-15 made by Stephen1918. I took the original texture that came with the plane and added a few details, some weathering, as well as the Soviet red stars.
Installation:
Drop the 'SovietGreen1' folder in the 'PolikarpovI15' folder. It can be used both in FE & FE2.
Credits go to Stephen1918 for the I-15 and the original green skin.
Freeware use only. Thank you.
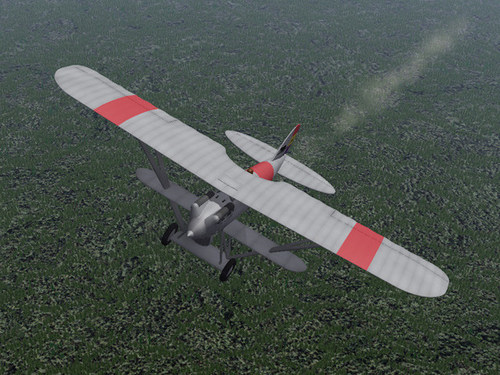
In 1928, Spain purchased a license to produce the Nieuport-Delage NiD 52. The Spanish version was produced at the Hispano-Suiza factory at Guadalajara and was known as the Hispano Nieuport NiD 52. It had an all metal frame with cloth covering over the wings and parts of the fuselage. It was powered by a V12, 500 hp engine, and was armed with two Vickers machine guns mounted in the fuselage.
The Spanish version was slower than expected and was considered difficult to fly. About 125 were produced between 1930 and 1933. 56 remained in service at the beginning of the Civil War; most of them remained in government (Republican) hands, only 11 went to the rebel (Nationalist) forces. Although it was an unpopular plane, the Nid 52 was an important fighter until better planes became available.
I have made two versions of the Hispano Nieuport NiD 52 - one for each side. Each version has a functional cockpit, appropriate skins, and decal sets. My skinning templates are included with the download.
Credits
Thanks to Ojcar for making the data file for the NiD 52.
Ojcar has added a gunsight to the NiD 52. He made a weapon station and loadout to add the gunsight which came with Emld's Nieuport 24 Lewis. I am including the gunsight with this download. Instructions for installing it are included in a separate file.
Installation Instructions
For FE1 - Unzip the file. Move the folders named "NatNid52" and "RepNiD52" into your FirstEagles/Objects/Aircraft folder.
For FE2 - Unzip the file. Move the folders named "NatNiD52" and "RepNiD52" into your FirstEagles/Objects/Aircraft folder. Then in the FirstEagles/Objects/Decals folder, create two new folders named "NatNiD52" and "RepNiD52". Move the folder named "D" from your Aircraft/NiD52 folders into the appropriate Decals/NiD52 folders you just made.
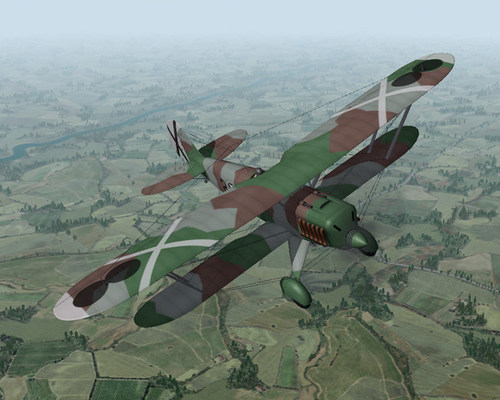
The Heinkel He.51 was introduced in 1935. It was a German, one man biplane with a V-12, 750 hp engine. It was developed as a fighter and carried two machine guns mounted in the fuselage. The He.51 began serving in the Spanish Civil War in 1936, used by the Nationalists, and was used by both Spanish and German (Legion Condor) squadrons. The He.51 was a superior plane at first, but was soon outclassed by newer Soviet planes. It was then used as a ground attack plane and served in that role until the end of the war.
My Heinkel He.51 includes a basic camo skin, decals, a fully functional cockpit, fuel tank, and a 10kg bomb. Instructions for installing the fuel tank and bomb are included in a separate file. I have included my skinning templates with the download.
Credits
Thanks to Ojcar for making the data file for the Heinkel He.51, and for providing resources and advice, especially for the weapons.
Ojcar has found the data for a more accurate machine gun, we don't know where it came from, but I am including the data for the 7.9mm_MG17 machine gun for your use. Instructions for installing the gun are included in a separate file.
Ojcar has added a gunsight to the He.51. He made a weapon station and loadout to add the gunsight which came with Emld's Nieuport 24 Lewis. I am including the gunsight with this download. Instructions for installing it are included in a separate file.
Ojcar has also taught me how to add controls to jettison the fuel tank (along with other features, like landing gear, flaps, and wheel brakes.) I am including instructions for adding controls to First Eagles in a separate file.
Installation Instructions
For FE1 - Unzip the file. Move the folder named "HeinkelHe51" into your FirstEagles/Objects/Aircraft folder. You will also need to install the bomb, machine gun, and fuel tank, instructions for installing them are included as a separate file.
For FE2 - Unzip the file. Move the folder named "HeinkelHe51" into your FirstEagles/Objects/Aircraft folder. Then in the FirstEagles/Objects/Decals folder, create a new folder named "HeinkelHe51". Move the folder named "D" from your Aircraft/HeinkelHe51 folder into the Decals/HeinkelHe51 folder you just made.
You will also need to install the bomb, machine gun, gunsight, and fuel tank, instructions for installing them are included as a separate file.
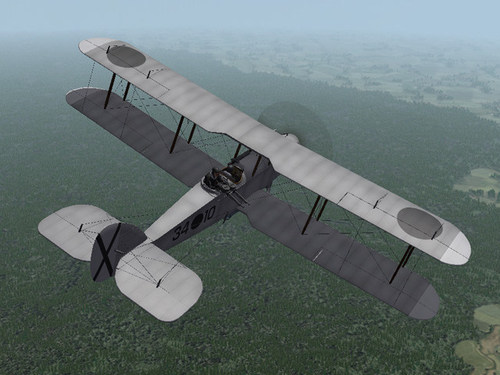
After World War I, Spain purchased several surplus Airco DH.9's from Britain. In the 1920's a Spanish version was built, under license, by the Hispano-Suiza Company. The Spanish DH.9 was fitted with a 300hp Hispano-Suiza 8 cylinder engine. About 500 were produced during the 20's and at least 25 were still in service when the civil war started in 1936. The Hispano-Suiza DH.9 was used by both sides during the war and some remained in service until the end of the war in 1939.
I have made two versions, one for each side, with appropriate skins, decals, and loadouts. My skinning templates are included.
Each version has two bomb loadouts, one with eight 25kg bombs mounted under the wings, and one with two 100kg bombs carried under the fuselage. One of the bombs was included with the Polikarpov I-15. Two of them were included in Geezer's 1930's bomb pack. I have included all the necessary bombs with this download, but you may not need to install all of them. I have included instructions for installing the bombs in a separate text file.
Credits
Thanks to Ojcar for making the original data file for the DH.9. I have made slight modifications for the Spanish Civil War versions.
Thanks to Geezer for making the two Italian bombs as part of his 1930's Bomb Pack for First Eagles. I have included them in this download in case you don't already have them.
Installation Instructions
For FE1 - Unzip the file. Move the folders named "NatDH9" and "RepDH9" into your FirstEagles/Objects/Aircraft folder.
You will need to install some or all of the bombs. See the Instructions For Installing Bombs, included with this download.
For FE2 - Unzip the file. Move the folders named "NatDH9" and "RepDH9" into your FirstEagles/Objects/Aircraft folder. Then in the FirstEagles/Objects/Decals folder, create two new folders named "NatDH9" and "RepDH9". Move the folder named "D" from your Aircraft/DH9 folders into the appropriate Decals/DH9 folders you just made.
You will need to install some or all of the bombs. See the Instructions For Installing Bombs, included with this download.
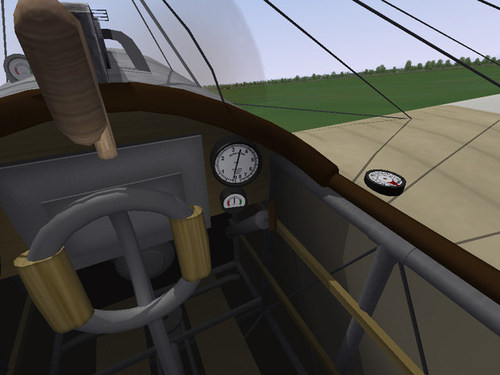
I modified the cockpit from my Fokker D.II to make new cockpits for all eight of Laton's Fokker Eindeckers. Each cockpit has a fully functional stick, rudder control, throttle, and gauges, including the wing mounted compass. The cockpits are basically the same, but each has been tweaked to make it fit into Laton's fuselage and to reflect differences in the type (like the number of guns in the E.IV planes.)
I have sorted everything into the appropriate folders for easy installation.
My thanks to Laton for having made so many planes that we are still flying today.
Installation Instructions
For both FE1 and FE2- For each plane, delete Laton's original cockpit folder and cockpit.ini file and replace them with mine.

