simonmiller416 Posted July 26, 2023 Author Posted July 26, 2023 6 hours ago, logan4 said: RussoUk's tutorial is good in the knowledge base: Don't forget you do vertex animation not poly or mesh... --------------- As for the pit problem, if you have flipped faces then you should make them face correctly. If not solves, send me over in PM then I can try to take a look at it, might be material or other settings issue. Max and case references have been sent
Flanker562 Posted July 26, 2023 Posted July 26, 2023 10 hours ago, simonmiller416 said: So this thread might become kinda personal WIP mini-dev thing, hope this is permitted lol Yeah and if you really want you can get a hold of Wrench and he can probably rename it for you as well. 1
simonmiller416 Posted July 26, 2023 Author Posted July 26, 2023 48 minutes ago, Wrench said: (rubs hands together and cackles in evil delight) Nooooooooooooo! Don't do that!!!!!!!!!! 2
simonmiller416 Posted July 27, 2023 Author Posted July 27, 2023 With the help of logan4 the main body of this cockpit may not have a big problem. I will keep his suggestions for future reference. Now I will start to completely design the MFD graphics in the cockpit 6 1
simonmiller416 Posted July 27, 2023 Author Posted July 27, 2023 (edited) About outside Edited July 27, 2023 by simonmiller416 8
simonmiller416 Posted July 28, 2023 Author Posted July 28, 2023 Some more WIP thing I want to ask everyone's opinion, J-20 is a Chinese bird, so I incorporated a lot of Chinese pictographs into the cockpit design, which is obviously not the English that everyone is familiar with, is it okay for everyone? 2
Flanker562 Posted July 28, 2023 Posted July 28, 2023 It doesn't bother me since it's not on the level of clicky cockpits of say, DCS. So if it's not in English I'll survive by pressing buttons and seeing what happens. 1
simonmiller416 Posted July 28, 2023 Author Posted July 28, 2023 Glad to hear that. And maybe it's true that if it's not DCS lish cockpit so won't be big problem. BTW some of these system is reference F-35's, it may helpful for that project
simonmiller416 Posted July 28, 2023 Author Posted July 28, 2023 Some more pics Basically, it is still in the design of interactive logic and screens. After the basic interface is designed, it needs to be polished to ensure that it appears in front of everyone's eyes with the highest possible quality. 6
simonmiller416 Posted July 30, 2023 Author Posted July 30, 2023 Some external parts updated, Rebuilt an EOTS with translucent windows and highly reflective specular textures. 7 1
simonmiller416 Posted July 30, 2023 Author Posted July 30, 2023 (edited) But I'm having issues building the slimer lights, they don't actually glow in the game as I expect (Or just not bright enough? I don't know, because it's not as bright as other mods in nighttime environment, it looks like it doesn't glow at all,from the pictures below it can be seen that the slimer on the vertical tail does not shine at all) About my settings [RightVertailSlimer1] SystemType=LIGHT LightNodeName=Slimer_RVT1_On CanFlash=FALSE Brightness=0.04 ←← LightSrcRange=0.002 ←← I tried to add this, but it didn't work too (Of course, I refer to the data of other mods, they haven't added it, I just tried it) And I think it's probably for the same reason: MFD images seem to get very dark in shadows, but RWR and radar images can stay bright regardless of lighting, I guess this may be related to the setting of the layer channel, but I don't know where to start Can someone give me some hints? ======================================================================================================================================================================== Edited July 30, 2023 by simonmiller416 2
Sundowner Posted July 30, 2023 Posted July 30, 2023 Slimers can be separate parts of the model, no need to use .tga, just paint them on an area of your map as you would any other parts. I usually paint the "off" light straight onto the skin itself and the "on" version is a separate mesh so paint somewhere else. You need to get the game to call for the "On" light by using its mesh name in the data ini.Brightness can be controlled by settings in max. Take a look at some of Ravenclaw's F-4's to see how the data ini's are set up. There are probably other ways too, this is just how I do it & I'm still learning too. 1
simonmiller416 Posted July 30, 2023 Author Posted July 30, 2023 (edited) 3 hours ago, Sundowner said: Slimers can be separate parts of the model, no need to use .tga, just paint them on an area of your map as you would any other parts. I usually paint the "off" light straight onto the skin itself and the "on" version is a separate mesh so paint somewhere else. You need to get the game to call for the "On" light by using its mesh name in the data ini.Brightness can be controlled by settings in max. Take a look at some of Ravenclaw's F-4's to see how the data ini's are set up. There are probably other ways too, this is just how I do it & I'm still learning too. Err yeah they are separated models, I created them in 3dsmax, that's why I don't very sure how "Brightness can be controlled by settings in max." I miss this step ,thank you your the hint! Edited July 30, 2023 by simonmiller416
Sundowner Posted July 30, 2023 Posted July 30, 2023 21 minutes ago, simonmiller416 said: Err yeah they are separated models, I created them in 3dsmax, that's why I don't very sure how Ahhh yes, I missed that bit. it was too early on a Sunday morning for me.... 1
simonmiller416 Posted July 30, 2023 Author Posted July 30, 2023 1 minute ago, GKABS said: Nice work Simonmiller416 Thanks, I still have a lot of details to learn
simonmiller416 Posted July 30, 2023 Author Posted July 30, 2023 (edited) [Edited] We need to add a "self-illumination" texture to the Material interface, successfully Edited July 30, 2023 by simonmiller416 4
simonmiller416 Posted July 30, 2023 Author Posted July 30, 2023 I once discussed this with EricJ, I think this validates my guess, if we need a "night vision compatible" cockpit, then we first consider lowering the light sources in the cockpit during the modeling stage, so that in the renderer, they will become visible, without “Blooming”. But if the map and ADI with a bright background perform such an operation, I think it should not be suitable for daytime combat... 2
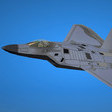
simonmiller416 Posted July 31, 2023 Author Posted July 31, 2023 More appearance detail upgrade , no problem today. I think basically only the cockpit needs to be improved, it can take off in CA 7
PeacePuma Posted August 3, 2023 Posted August 3, 2023 Excellent model, congratulations... if you don't get bored of the dragon, you have the source to make the 2-headed dragon debut in a sim ... (I don't really know which version was left, if the canopy with the central frame or the bubble canopy) 2
PeacePuma Posted August 3, 2023 Posted August 3, 2023 (edited) On 01-08-2023 at 10:18 PM, simonmiller416 said: Some small progress What if??? Edited August 3, 2023 by PeacePuma
Recommended Posts
Create an account or sign in to comment
You need to be a member in order to leave a comment
Create an account
Sign up for a new account in our community. It's easy!
Register a new accountSign in
Already have an account? Sign in here.
Sign In Now