Dels
-
Posts
704 -
Joined
-
Last visited
-
Days Won
30
Content Type
Profiles
Forums
Gallery
Downloads
Store
Everything posted by Dels
-
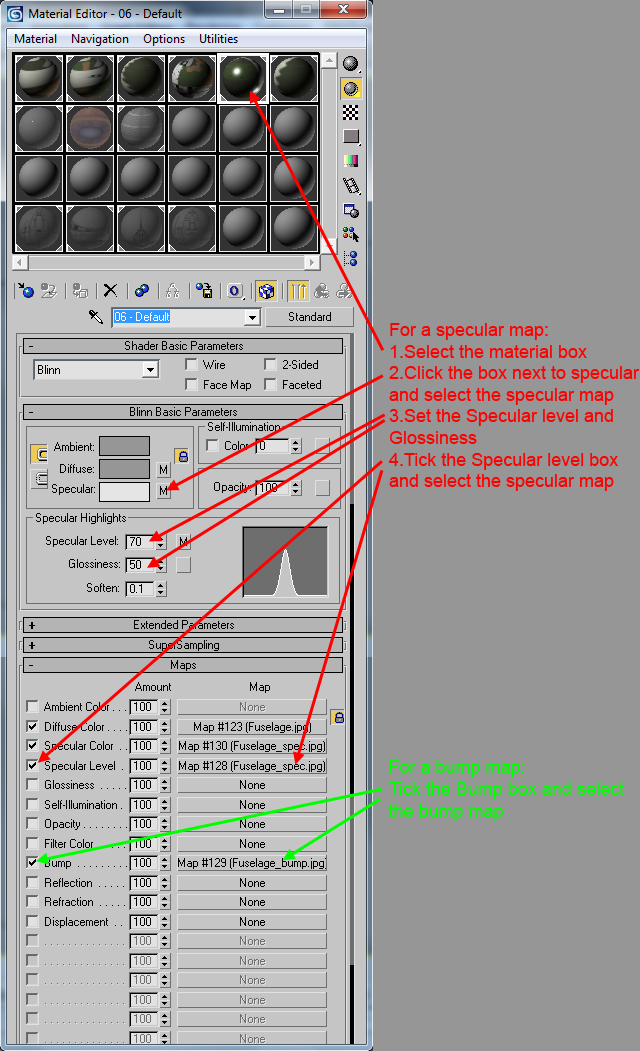
Yes I do have the 32-bit version of Max 2009 installed. I have installed the Feb2010 and Jun2010 directx runtimes. I have re-installed visual basic C++ 2005. I have tried uninstalling Max7 (including all the registry entries) and Max 2009 and then re-installed Max 2009 32-bit. I have tried the atio6axx.dll fix. I've used the Dependency Walker to load up the exporter and see what errors were present and then copied all the missing files into my windows/system32 directory. After all this, the only thing I'm closer to is an insane asylum. Are bump and specular maps really worth all this pain?
-
Yeah maybe, but I hope uninstalling Max 7 will do the trick. Will try tonight...
-
Thanks for all the suggestions guys. So far I have had no luck. The only thing left is to uninstall Max 7, re-install Max 9, or worst case full re-install. As a side note, I tried installing it on my XP computer and it worked fine. So it must be something about my Win 7 computer. Dels
-
G'Day all, I just upgraded to 3ds max 2009 so that I could use the Dec 2010 Thirdwire Object Exporter and I am having problems. I get this error message when max loads up: 3ds max 2009\plugins\twObjectExporter Dec2010-C.dlu> failed to intialize. error code 126 - specific module could not be found. The Feb 2010 exporter works fine, it's just this one that doesn't. My OS is Win 7 64-bit but I've installed Max 2009 as 32-bit because the Exporter readme said so. Google searches for other plugins have suggested installing DX9 but I don't think that's right. Has anyone had this problem or know how to fix it? Dels
-
Looks like you're taking off with a quartering tail wind...?
-
Thanks russo. I will keep it in mind but I'm looking into getting Max 9 at the moment. Dels
-
If there's no extra faces in there then I'm usually left with only one option: 1. Create a new mesh (simple box or something like that) 2. Attach the old canopy glass to it. 3. Delete the verticies or faces of the box you made leaving the canopy glass behind. 4. Move the pivot to where you want it. 5. Re-link the object to the right place in the heirarchy. 6. Assign the canopy glass texure to it. 7. Re-map if required. It's a bit long-winded but it saves building the mesh from scratch again. Dels
-
I think I've got the setup in max correct but I'm guessing the max 7 plugin/exporter doesn't support specular or bump maps. From the excerpt you posted russo, it looks like the only support it offers for specular levels is to define it for the entire material (so a map defining different specular levels for that material won't be displayed). BTW, I tried the max 8, 9 and the 2010-C exporters but my max 7 won't load them. Thanks for the help. Dels
-
G'Day all, I've decided to start getting into specular and bump maps for my modelling but am having no luck at all. Firstly, I'm using 3ds max 7. Can you export a LOD with specular and bump maps using 3ds max 7? If you can't, can you use one of the later Thirdwire exporter tools (2008,2009 or 2010) with max 7? If you also can't, I guess I'll stick with what I've got. BUT if you can use max 7 or one of the later plugins, in the below picture I've shown what I've done so far (without success) to try and set up both a specular map (red) and a bump map (green). Is this correct? Thanks in advance to anyone who can help. Regards Dels

-
I've had the same setup for years (WCS2 instead of TQS). A couple of years ago I did a rewire and USB conversion using the BU0836 (see link below). Took me two days of soldering but I'm happy now! http://www.leobodnar.com/products/BU0836/ So I'd say, money NOT wasted. Dels
-
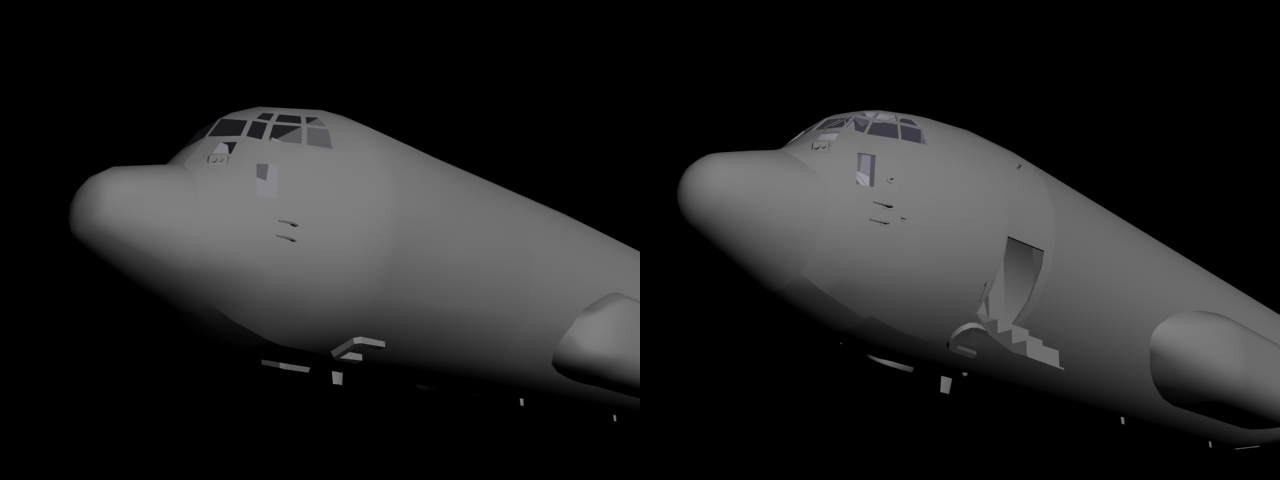
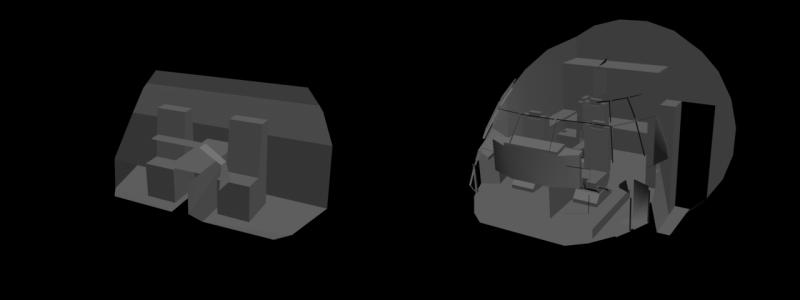
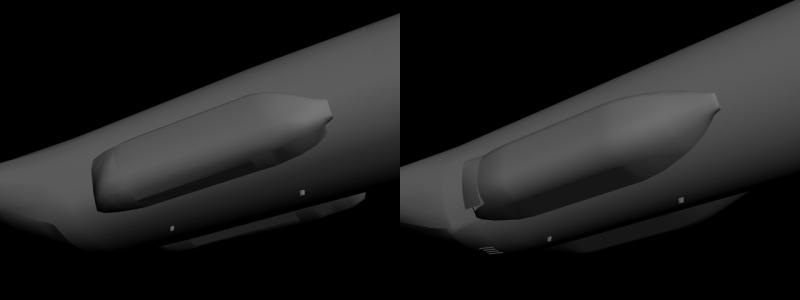
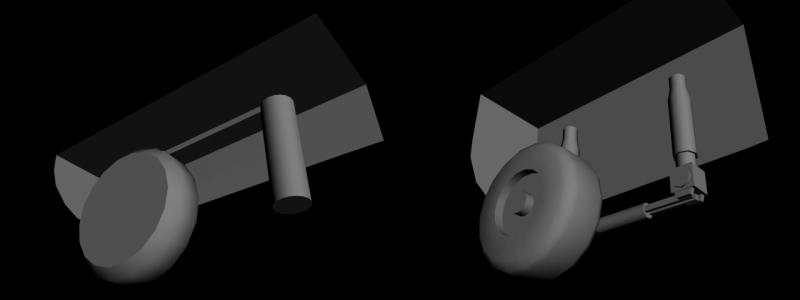
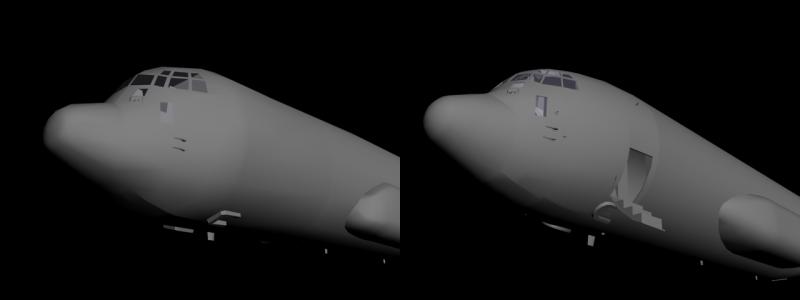
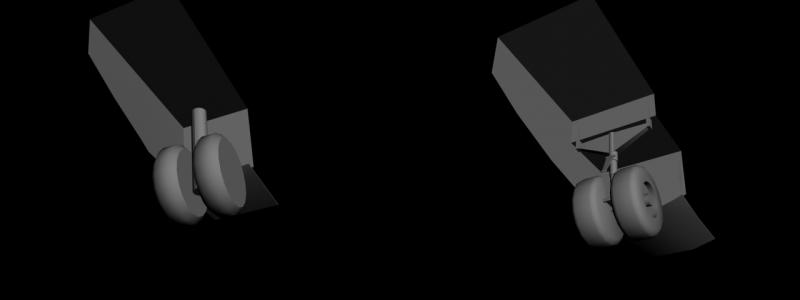
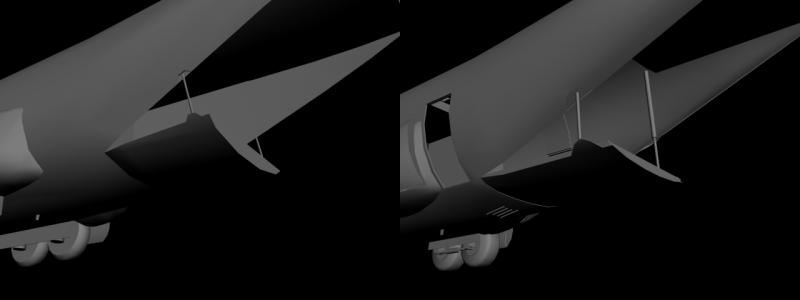
G'Day again, Here's another update. The modelling is pretty much finished so I will be moving on to re-painting now. Hopefully it won't drag on. The full detail LOD weighs in at just under 25000 polys so you should be able to drop an entire battalion in formation without the game becoming a slide show. In the meantime, here's some more comparison shots: Rear Fuselage: Nose: Landing Gear Pod: Cargo compartment: Flight Deck: Main Landing Gear (rear wheel removed to show detail): Nose Landing Gear: Dels

- 168 replies
-
- 18
-

-
Which post? I'm not sure what you mean. Dels
-
Did you just want the glass to shine in the same way that the canopy does, or did you want the glass to reflect the image similar to a mirror? If you want the first, just make a transparent mesh like glass in front of the mesh with similar properties to canopy glass. If you want the second, I'm pretty sure it's only coded for cockpit use and won't work for an external model. Dels
-
Looking good.
-
Sorry for the delay getting back to you russo, I check the net infrequently over the weekends. Anyway, as Crusader said, the gunner cannot engage ground targets so the gun on my Apache just points and shoots straight ahead. However because I also produced a ground object version of the Apache, and with vain hope that TK might include some coding for Air-to-Ground turrets, I did set up the pivots for both the gun and TADS. They would have to move independently but you could have two "gunner" controllers for them. (BTW, I didn't bother to animate the TADS for my ground object Apache). I accepted the fact that the ammunition link wasn't going to be flexible and just had the whole gun pivot vertically (minus the two pronged mount which is the horizontal pivot similar to what you've done). Dels
-
RAVEN, if you take "rule" to mean: The way things must be regardless of what happens in reality, then yes. And this game has bucket loads of them... Russo, happy to help. (I'm sure it won't be long before I'm posting a similar topic due to short term memory loss) Dels
-
You're gonna kick yourself but the mesh for all engines need to be set with the Y axis aligned for their rotation regardless of their real world position. This is because the game will always spin them around their Y axis. So in this case you will need to have the radome mesh pivot with the Y axis pointing up. (or the radome motor mesh if you want that to spin too) Dels
-
What a shame...all that extra drag 100% of the time for the 5-10% of missions where you need it. Oh well, all my C-130's will have the ability to load external tanks so that should cover the RAF J's in the future. Dels
-
Veltro, You need the Canopy Animation ID in the pilot section also. Dels
-
Already done. Sorry forgot to mention that. Dels
-
News? Yes: I'm working. I will upload some more progress pics soon. Dels
-
Thanks for the offer russo, but I think I will stick with my model. The skin on that looks good but I think the model is lower on polys. Besides, I use 3ds max 7 and haven't had much luck with models made in later versions (.fbx or not). Dels
-
Acesfakia, From my quick research, the C-130H2 and C-130B models will suit for the Hellenic Air Force Hercs so you will be able to release the skins as a package after I've released the templates. As for the cockpit... Once the package for the aircraft is finally complete and released I will be going back to upgrade the C-130J cockpit. This will be released separately later. Once that is done, depending on my workload at that time, I may consider building a 1960's era cockpit for use in the early C-130s. I don't make any promises as cockpits (especially ones with lots of instruments) are a PITA to build and I will need a lot of motivation to do it. Dels
-
As the C-130 has been produced in so many variants and for so many countries, my plan is that once the models are complete and the templates are out there, I will produce specific additional models at people's request. So for example: You want a RAF C-130K but aren't happy using the C-130H2 model because it doesn't have a refuel probe. You make the skin from the C-130H template. I add the refuel probe (and anything else you're particularly attached to) I will release it with full credit to you for the skin. If one of my updated models fits your purpose, you can release the skin on your own. <- Yes this is permission to do that in the future, no need to ask. Finally, I am also planning on building a C-130H-30 so if someone wants to volunteer to paint it, I will send them the templates earlier so it can be included in the final release. Dels
-
Here's the list of additional (i.e. in addition to updating the existing parts of the model) details that I am including in the update: Engines: Exhaust/Intake Oil cooler Animated oil cooler flaps Drain mast Fuselage: Animated crew entrance door and handle (ground animation) Complete flight deck connected to the crew entrance and cargo compartment Paratroop doors and deflectors (separate animation to ramp and door) External lights and covers (Taxi, IR, Nav and Strobes) Refuel probe (for applicable models) Windscreen wipers Tail strike indicators Wing: Flap bay ribs and guides Fuel dump masts External lights and covers (Landing, Taxi, IR and Nav) External tanks included as part of 3d model <- Added 18Sep14 This is a list of all the models I will be releasing (at this stage): C-130A roman nose (USAF silver) C-130A (RAAF silver) AC-130A (USAF SEA) C-130B (USAF SEA) C-130E (RAAF grey) C-130E (USAF SEA) <- Added 04Sep14 C-130E ASE* (USAF grey) C-130H2 (RAAF camo) C-130H2 ASE* (RAAF camo and grey) EC-130H (USAF grey) C-130K (2 x RAF Camo) <- Added 03Feb17 C-130K ASE* (RAF Camo and Green) <- Added 03Feb17 C-130K-30 (2 x RAF Camo) <- Changed 03Feb17 C-130K-30 ASE* (RAF Camo and Green) <- Added 03Feb17 CC-130H SAR Paradoors (RCAF Grey) <- Added 03Feb17 C-130H3 ASE* (USAF grey) KC-130T ASE* (USMC grey) AC-130U ASE* (USAF grey) C-130J ASE* with and without refuel probe (fictional RAAF grey x 2) C-130J-30 ASE* with and without refuel probe (RAAF grey x 2) KC-130J ASE* (USMC grey) MC-130J ASE* (USAF grey) AC-130J ASE* (fictional RAAF grey) *ASE - Aircraft Self Protection Equipment Dels