
117 files
-

F-16C Eielson AFB 18th Aggressor SQ Skins
21 Skins covering 18 tail numbers of the 18th Aggressor Squadron and 6 different patterns.
86-286 - Flogger
86-301 - Flogger
86-310 - Flogger
86-263 - Arctic
86-268 - Arctic
86-270 - Arctic
86-290 - Arctic (18 AGRS)
86-304 - Arctic
86-305 - Arctic
86-308 - Arctic
86-314 - Arctic (354 FW)
86-282 - Flanker
86-293 - Flanker
86-298 - Flanker
86-322 - Flanker
86-355 - Flanker (354 OG)
86-295 - BDU Splinter
*86-263 - Arctic Splinter
*86-290 - Arctic Splinter (18 AGRS)
*86-314 - Arctic Splinter (354 FW)
86-335 - Flanker Splinter
Install by dropping these folders into the bazar/liveries/f-16c bl.52d/ folder
55 downloads
- f-16c
- 64th aggressors
- (and 2 more)
-
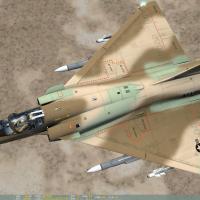
M-2000C: US Marine Corps Adversary Squadron VMFT-401 "Snipers"
By HomeFries
M-2000C: US Marine Corps Adversary Squadron VMFT-401 "Snipers"
for DCS World 1.5.6 and later
VMFT-401 was commissioned in 1986 and in 1987 received the IAI Kfir (designated F-21A) under lease from the Israeli government. The "Snipers" flew the Kfir until 1989, when it transitioned to the F-5E Tiger II. This skin is inspired by the 1987-89 timeframe in which USN and USMC flew the Kfir, a delta-wing aircraft of French origin.
The Kfir was built by IAI based on the Mirage V airframe. The closest flyable substitute to the Kfir in DCS is the M-200C, so this is a fictional skin that paints the M-2000C as a USMC adversary. This skins uses the traditional Israeli Air Force desert pattern that was used on some of the VMFT-401 adversary aircraft. Since the original aircraft were leased and kept much of their original markings, so is the case with the M-2000C skins. No original markings (e.g. rescue arrows and safety markings) were subdued to match US paint schemes. However, minor liberties were taken with the pilot skins in order to make the pilots look more American.
For Compact Installations - A Note About Autoexec.cfg:
Rather than copying texture files to their respective livery folders, I prefer to use a series of common texture folders along with unique filenames. This allows a single instance of many of my common textures, and keeps the hard drive footprint to a minimum (especially nice if you run a SSD for your system drive).
The installer will add a series of folders to the DCS Texture path; if you do not have these folders created, then it is no problem. The autoexec.cfg included will automatically point to the Texture folder in your Saved Games\DCS folder, and regardless of whether you run the Open Alpha, Open Beta, or Release version of DCS, the path will always point to your Saved Games\DCS\Texture folder. Again, this saves space on your hard drive.
If you use your own Autoexec.cfg, then when prompted to overwrite you can click "no". This will create a file called autoexec.new, and you can manually make the updates as you like. Just don't modify the top line with the file date; this is used by the installer for version control. However, feel free to include it in your existing autoexec.cfg, so you don't get prompted to overwrite until there's another update to the autoexec.cfg.
If you inadvertently overwrite your autoexec.cfg, it is actually backed up as autoexec.old. Just open it and copy the appropriate information to the new file.
For Traditional Installations or JSGME Compatible Extractions:
If you don't wish to use the shared texture folder and custom autoexec.cfg, you have a couple of other options available. Selecting the Traditional Install copies all textures to each livery folder, then copies each livery to each version of DCS detected (up to three versions, including release, open alpha and open beta). As a result, the listed hard disk space requirement assumes all three DCS versions are installled. Each skin is independent and portable.
If you wish to install to a location other than your Saved Games folder, you must select the Single JSGME Extraction, or else the installation will fail for not detecting existing Saved Games\DCS folders. Selecting this option will create a JSGME compatible install that can be dropped directly into your JSGME _MODS folder for installation. Each skin is independent and portable.
For either of these installation options, if there is an issue with textures not displaying, then it is likely a problem with the installer. Please let me know what textures are missing so that I can troubleshoot the issue.
If you have any squadron requests, please PM me. If possible, provide top and profile views of the aircraft, preferably line art (much easier to extract color), and for CAG/CO birds, a close up of the tail fin is greatly appreciated.
You are free to use any of these skins in other projects as long as proper credit is provided in the readme file.
Fly Navy!
-Home Fries
41 downloads
(0 reviews)0 comments
Updated
-
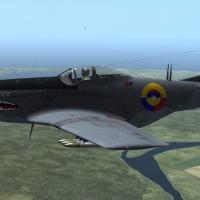
P-51D Colombian Air Force Skin Pack (Fictional)
By HomeFries
This is a package of two P-51D skins using the current Fuerza Aérea Colombiana grey paint scheme used for the Super Tucano. One version of the skin has a "shark mouth" on the nose. Nationalities are USA and Spain.
Installation Instructions:
Copy the folders to your Saved Games\DCS\Liveries\P-51D folder.
Optional:
The release of DCS World 1.2.4 added the ability to add texture paths using the file "autoexec.cfg" in your Saved Games\DCS\Config folder. This will allow you to save hard drive space as long as the skin filenames are unique. My skins support this, so any DDS file with the same name will be identical.
In order to enable this feature, add the following line to autoexec.cfg (be sure to create the file if it doesn't exist):
table.insert(options.graphics.VFSTexturePaths, "C:/Users/<username>/Saved Games/DCS/Textures")
You can use any path (even a different drive), but you must use forward slashes for your path. Backslashes won't work here.
Then, you can move all of the DDS files from each of the skin folders to this new folder you've added to your path. Allowing overwrites is not a problem, as I use unique names for each file. Finally, be sure to go into each description.lua file and change all "false" entries to "true."
You are free to use any of these skins in other projects as long as proper credit is provided in the readme file.
-Home Fries
7 downloads
- p-51
- colombian air force
- (and 4 more)
-
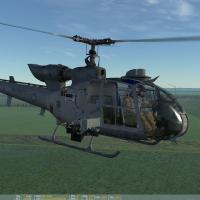
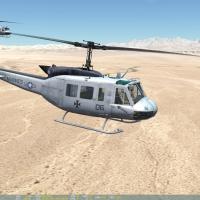
SA342 USMC HMLA-167 "Warriors" Skin Pack
By HomeFries
Marine Light Helicopter Squadron (HML) 167 was commissioned in April 1968 in Vietnam, and flew the UH-1E in combat operations until June 1971, where it was the last Marine helicopter squadron in Vietnam. Of note, HML-167 was the first unit to drop a bomb from a helicopter, accomplished with the use of the Helicopter Trap Weapon (HTW). In June 1971, HML-167 returned stateside to MCAS New River, North Carolina, as part of the 2nd Marine Air Wing.
In 1972, HML-167 received the UH-1N Twin Huey, which it would fly until 2012 when the UH-1N was replaced by the UH-1Y Venom. In 1984, HML-167 received its first AH-1T Cobras and became a composite squadron of Cobras and Hueys. HML-167 was redesignated Marine Light Attack Helicopter Squadron (HMLA) 167 in April 1986, and as such designated as a permanent composite squadron of both Cobras and Hueys. HMLA-167 began upgrading to the AH-1W Super Cobra in late 1989.
Today the HMLA-167 "Warriors" fly the UH-1Y Venom and the AH-1W Super Cobra.
This is a fictional skin pack of SA342L/M/Mistral Gazelles with HMLA-167 markings. Each SA342 variant has five different BuNos (USN/USMC serial numbers) allowing you to create packages of different aircraft. You still provide your own two digit MODEX (side number) in the mission editor. Each skin has a "normal" version and a weathered version. Weathered skins have a bleached effect as if the aircraft were heavily exposed to the sun for months on end. Normal skins include pilots with green flightsuits, while weathered skins include pilots with desert flightsuits. This skin pack is intended to satisfy one's "cobra itch" until the AH-1 is released.
Note: this skin pack uses an EXE installer that creates common texture folders and an autoexec.cfg (if you already have one, you can make manual changes). I would like your feedback on this system; if it works I intend to apply it to my other skin packs.
For Compact Installations - A Note About Autoexec.cfg:
Rather than copying texture files to their respective livery folders, I prefer to use a series of common texture folders along with unique filenames. This allows a single instance of many of my common textures, and keeps the hard drive footprint to a minimum (especially nice if you run a SSD for your system drive).
The installer will add a series of folders to the DCS Texture path; if you do not have these folders created, then it is no problem. The autoexec.cfg included will automatically point to the Texture folder in your Saved Games\DCS folder, and regardless of whether you run the Open Alpha, Open Beta, or Release version of DCS, the path will always point to your Saved Games\DCS\Texture folder. Again, this saves space on your hard drive.
If you use your own Autoexec.cfg, then when prompted to overwrite you can click "no". This will create a file called autoexec.new, and you can manually make the updates as you like. Just don't modify the top line with the file date; this is used by the installer for version control. However, feel free to include it in your existing autoexec.cfg, so you don't get prompted to overwrite until there's another update to the autoexec.cfg.
If you inadvertently overwrite your autoexec.cfg, it is actually backed up as autoexec.old. Just open it and copy the appropriate information to the new file.
For Traditional Installations:
If there is an issue with textures not displaying, it is likely a problem with the installer. Please let me know what textures are missing so that I can troubleshoot the issue.
Special thanks to Upuaut for his templates that were used to create the flightsuit torso and legs.
You are free to use any of the textures in other skins or projects as long as proper credit is provided in the readme file.
-Home Fries
19 downloads
(0 reviews)0 comments
Updated
-
SA342 USMC HMLA-169 "Vipers" Skin Pack
By HomeFries
Marine Attack Helicopter Squadron (HMA) 169 was commissioned in 1971 as part of Marine Aircraft Group 39 (Camp Pendleton, cA), and unlike most HMLA squadrons began with the Cobra (AH-1G) before becoming a composite squadron. By 1976, the AH-1G was replaced by the AH-1J Sea Cobra, which were eventually replaced by the AH-1T.
In 1986, HMA-169 was redesignated Marine Light Attack Helicopter Squadron (HMLA) 169, and replaced its AH-1Ts with the AH-1W Super Cobra. As a composite squadron, it also received its complement of UH-1N Hueys.
Today HMLA-169 flies the UH-1Y Venom and the AH-1Z Viper.
This is a fictional skin pack of SA342L/M/Mistral Gazelles with HMLA-169 markings. Each SA342 variant has four different BuNos (USN/USMC serial numbers), including one high color Commanding Officer's bird, allowing you to create packages of different aircraft. You still provide your own two digit MODEX (side number) in the mission editor. Each skin has a "normal" version and a weathered version. Weathered skins have a bleached effect as if the aircraft were heavily exposed to the sun for months on end. Normal skins include pilots with green flightsuits, while weathered skins include pilots with desert flightsuits. This skin pack is intended to satisfy one's "cobra itch" until the AH-1 is released.
Note: this skin pack uses an EXE installer that creates common texture folders and an autoexec.cfg (if you already have one, you can make manual changes). I would like your feedback on this system; if it works I intend to apply it to my other skin packs.
For Compact Installations - A Note About Autoexec.cfg:
Rather than copying texture files to their respective livery folders, I prefer to use a series of common texture folders along with unique filenames. This allows a single instance of many of my common textures, and keeps the hard drive footprint to a minimum (especially nice if you run a SSD for your system drive).
The installer will add a series of folders to the DCS Texture path; if you do not have these folders created, then it is no problem. The autoexec.cfg included will automatically point to the Texture folder in your Saved Games\DCS folder, and regardless of whether you run the Open Alpha, Open Beta, or Release version of DCS, the path will always point to your Saved Games\DCS\Texture folder. Again, this saves space on your hard drive.
If you use your own Autoexec.cfg, then when prompted to overwrite you can click "no". This will create a file called autoexec.new, and you can manually make the updates as you like. Just don't modify the top line with the file date; this is used by the installer for version control. However, feel free to include it in your existing autoexec.cfg, so you don't get prompted to overwrite until there's another update to the autoexec.cfg.
If you inadvertently overwrite your autoexec.cfg, it is actually backed up as autoexec.old. Just open it and copy the appropriate information to the new file.
For Traditional Installations:
If there is an issue with textures not displaying, it is likely a problem with the installer. Please let me know what textures are missing so that I can troubleshoot the issue.
pecial thanks to Upuaut for his templates that were used to create the flightsuit torso and legs.
You are free to use any of the textures in other skins or projects as long as proper credit is provided in the readme file.
-Home Fries
15 downloads
(0 reviews)0 comments
Updated
-
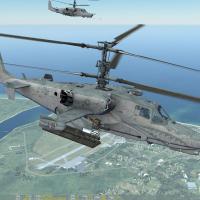
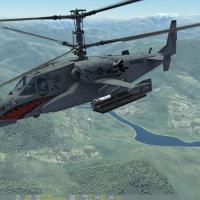
Ka-50 USMC HMLA-167 "Warriors" Skin Pack
By HomeFries
Marine Light Helicopter Squadron (HML) 167 was commissioned in April 1968 in Vietnam, and flew the UH-1E in combat operations until June 1971, where it was the last Marine helicopter squadron in Vietnam. Of note, HML-167 was the first unit to drop a bomb from a helicopter, accomplished with the use of the Helicopter Trap Weapon (HTW). In June 1971, HML-167 returned stateside to MCAS New River, North Carolina, as part of the 2nd Marine Air Wing.
In 1972, HML-167 received the UH-1N Twin Huey, which it would fly until 2012 when the UH-1N was replaced by the UH-1Y Venom. In 1984, HML-167 received its first AH-1T Cobras and became a composite squadron of Cobras and Hueys. HML-167 was redesignated Marine Light Attack Helicopter Squadron (HMLA) 167 in April 1986, and as such designated as a permanent composite squadron of both Cobras and Hueys. HMLA-167 began upgrading to the AH-1W Super Cobra in late 1989.
Today the HMLA-167 "Warriors" fly the UH-1Y Venom and the AH-1W Super Cobra.
This is a fictional skin pack of Ka-50 Black Sharks with HMLA-167 markings. There are five different Modexes (USN/USMC side numbers) allowing you to create packages of different aircraft. Each skin has a "normal" version and a weathered version. Weathered skins have a bleached effect as if the aircraft were heavily exposed to the sun for months on end. Normal skins include pilots with green flightsuits, while weathered skins include pilots with desert flightsuits.
Note: this skin pack uses an EXE installer that creates common texture folders and an autoexec.cfg (if you already have one, you can make manual changes). I would like your feedback on this system; if it works I intend to apply it to my other skin packs.
For Compact Installations - A Note About Autoexec.cfg:
Rather than copying texture files to their respective livery folders, I prefer to use a series of common texture folders along with unique filenames. This allows a single instance of many of my common textures, and keeps the hard drive footprint to a minimum (especially nice if you run a SSD for your system drive).
The installer will add a series of folders to the DCS Texture path; if you do not have these folders created, then it is no problem. The autoexec.cfg included will automatically point to the Texture folder in your Saved Games\DCS folder, and regardless of whether you run the Open Alpha, Open Beta, or Release version of DCS, the path will always point to your Saved Games\DCS\Texture folder. Again, this saves space on your hard drive.
If you use your own Autoexec.cfg, then when prompted to overwrite you can click "no". This will create a file called autoexec.new, and you can manually make the updates as you like. Just don't modify the top line with the file date; this is used by the installer for version control. However, feel free to include it in your existing autoexec.cfg, so you don't get prompted to overwrite until there's another update to the autoexec.cfg.
If you inadvertently overwrite your autoexec.cfg, it is actually backed up as autoexec.old. Just open it and copy the appropriate information to the new file.
For Traditional Installations:
If there is an issue with textures not displaying, it is likely a problem with the installer. Please let me know what textures are missing so that I can troubleshoot the issue.
Special thanks to EricJ for his USMC Ka-50 skin, which I used as the basis for this skin pack as well as the bleaching effects for weathered skins.
You are free to use any of the textures in other skins or projects as long as proper credit is provided in the readme file.
-Home Fries
8 downloads
(0 reviews)0 comments
Updated
-
Ka-50 USMC HMLA-169 "Vipers" Skin Pack
By HomeFries
Marine Attack Helicopter Squadron (HMA) 169 was commissioned in 1971 as part of Marine Aircraft Group 39 (Camp Pendleton, CA), and unlike most HMLA squadrons began with the Cobra (AH-1G) before becoming a composite squadron. By 1976, the AH-1G was replaced by the AH-1J Sea Cobra, which were eventually replaced by the AH-1T.
In 1986, HMA-169 was redesignated Marine Light Attack Helicopter Squadron (HMLA) 169, and replaced its AH-1Ts with the AH-1W Super Cobra. As a composite squadron, it also received its complement of UH-1N Hueys.
Today HMLA-169 flies the UH-1Y Venom and the AH-1Z Viper.
This is a fictional skin pack of Ka-50 Black Sharks with HMLA-169 markings. There are four different Modexes (USN/USMC side numbers) allowing you to create packages of different aircraft. Each skin has a "normal" version and a weathered version. Weathered skins have a bleached effect as if the aircraft were heavily exposed to the sun for months on end. Normal skins include pilots with green flightsuits, while weathered skins include pilots with desert flightsuits.
Note: this skin pack uses an EXE installer that creates common texture folders and an autoexec.cfg (if you already have one, you can make manual changes). I would like your feedback on this system; if it works I intend to apply it to my other skin packs.
For Compact Installations - A Note About Autoexec.cfg:
Rather than copying texture files to their respective livery folders, I prefer to use a series of common texture folders along with unique filenames. This allows a single instance of many of my common textures, and keeps the hard drive footprint to a minimum (especially nice if you run a SSD for your system drive).
The installer will add a series of folders to the DCS Texture path; if you do not have these folders created, then it is no problem. The autoexec.cfg included will automatically point to the Texture folder in your Saved Games\DCS folder, and regardless of whether you run the Open Alpha, Open Beta, or Release version of DCS, the path will always point to your Saved Games\DCS\Texture folder. Again, this saves space on your hard drive.
If you use your own Autoexec.cfg, then when prompted to overwrite you can click "no". This will create a file called autoexec.new, and you can manually make the updates as you like. Just don't modify the top line with the file date; this is used by the installer for version control. However, feel free to include it in your existing autoexec.cfg, so you don't get prompted to overwrite until there's another update to the autoexec.cfg.
If you inadvertently overwrite your autoexec.cfg, it is actually backed up as autoexec.old. Just open it and copy the appropriate information to the new file.
For Traditional Installations:
If there is an issue with textures not displaying, it is likely a problem with the installer. Please let me know what textures are missing so that I can troubleshoot the issue.
Special thanks to EricJ for his USMC Ka-50 skin, which I used as the basis for this skin pack as well as the bleaching effects for weathered skins.
You are free to use any of the textures in other skins or projects as long as proper credit is provided in the readme file.
-Home Fries
10 downloads
(0 reviews)0 comments
Updated
-
SA342 USMC HMLA-269 "Gunrunners" Skin Pack
By HomeFries
Marine Attack Helicopter Squadron (HMA) 269, commissioned in July 1971 at MCAS New River, NC, has the distinction of being the first Attack hHelicopter squadron in the Marine Corps. HMA-269 flew the AH-1J until December 1977, when it received the AH-1T. The Gunrunners then made history again in 1979 by being the first Marine Squadron to fire a TOW missile from an airborne platform.
In the early 1980s, HMA-269 received its first UH-1N Hueys, and as a permanent composite squadron was redesignated HMLA-269. Since then, the Gunrunners have deployed to hotspots such as Iraq, Kosovo, Somalia, Liberia, Haiti, and Afghanistan.
Today the HMLA-269 "Gunrunners" fly the UH-1Y Venom and the AH-1W Super Cobra.
This is a fictional skin pack of SA342L/M/Mistral Gazelles with HMLA-167 markings. Each SA342 variant has six different BuNos (USN/USMC serial numbers) allowing you to create packages of different aircraft. You still provide your own two digit MODEX (side number) in the mission editor. Each skin has a "normal" version and a weathered version. Weathered skins have a bleached effect as if the aircraft were heavily exposed to the sun for months on end. Normal skins include pilots with green flightsuits, while weathered skins include pilots with desert flightsuits. This skin pack is intended to satisfy one's "cobra itch" until the AH-1 is released.
Note: this skin pack uses an EXE installer that creates common texture folders and an autoexec.cfg (if you already have one, you can make manual changes). I would like your feedback on this system; if it works I intend to apply it to my other skin packs.
For Compact Installations - A Note About Autoexec.cfg:
Rather than copying texture files to their respective livery folders, I prefer to use a series of common texture folders along with unique filenames. This allows a single instance of many of my common textures, and keeps the hard drive footprint to a minimum (especially nice if you run a SSD for your system drive).
The installer will add a series of folders to the DCS Texture path; if you do not have these folders created, then it is no problem. The autoexec.cfg included will automatically point to the Texture folder in your Saved Games\DCS folder, and regardless of whether you run the Open Alpha, Open Beta, or Release version of DCS, the path will always point to your Saved Games\DCS\Texture folder. Again, this saves space on your hard drive.
If you use your own Autoexec.cfg, then when prompted to overwrite you can click "no". This will create a file called autoexec.new, and you can manually make the updates as you like. Just don't modify the top line with the file date; this is used by the installer for version control. However, feel free to include it in your existing autoexec.cfg, so you don't get prompted to overwrite until there's another update to the autoexec.cfg.
If you inadvertently overwrite your autoexec.cfg, it is actually backed up as autoexec.old. Just open it and copy the appropriate information to the new file.
For Traditional Installations:
If there is an issue with textures not displaying, it is likely a problem with the installer. Please let me know what textures are missing so that I can troubleshoot the issue.
Special thanks to Upuaut for his templates that were used to create the flightsuit torso and legs.
You are free to use any of the textures in other skins or projects as long as proper credit is provided in the readme file.
-Home Fries
4 downloads
(0 reviews)0 comments
Updated
-
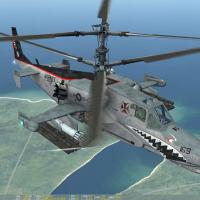
Ka-50 USMC HMLA-269 "Gunrunners" Skin Pack
By HomeFries
Marine Attack Helicopter Squadron (HMA) 269, commissioned in July 1971 at MCAS New River, NC, has the distinction of being the first Attack hHelicopter squadron in the Marine Corps. HMA-269 flew the AH-1J until December 1977, when it received the AH-1T. The Gunrunners then made history again in 1979 by being the first Marine Squadron to fire a TOW missile from an airborne platform.
In the early 1980s, HMA-269 received its first UH-1N Hueys, and as a permanent composite squadron was redesignated HMLA-269. Since then, the Gunrunners have deployed to hotspots such as Iraq, Kosovo, Somalia, Liberia, Haiti, and Afghanistan.
Today the HMLA-269 "Gunrunners" fly the UH-1Y Venom and the AH-1W Super Cobra.
This is a fictional skin pack of Ka-50 Black Sharks with HMLA-269 markings. There are six different Modexes (USN/USMC side numbers) allowing you to create packages of different aircraft. Each skin has a "normal" version and a weathered version. Weathered skins have a bleached effect as if the aircraft were heavily exposed to the sun for months on end. Normal skins include pilots with green flightsuits, while weathered skins include pilots with desert flightsuits.
Note: this skin pack uses an EXE installer that creates common texture folders and an autoexec.cfg (if you already have one, you can make manual changes). I would like your feedback on this system; if it works I intend to apply it to my other skin packs.
For Compact Installations - A Note About Autoexec.cfg:
Rather than copying texture files to their respective livery folders, I prefer to use a series of common texture folders along with unique filenames. This allows a single instance of many of my common textures, and keeps the hard drive footprint to a minimum (especially nice if you run a SSD for your system drive).
The installer will add a series of folders to the DCS Texture path; if you do not have these folders created, then it is no problem. The autoexec.cfg included will automatically point to the Texture folder in your Saved Games\DCS folder, and regardless of whether you run the Open Alpha, Open Beta, or Release version of DCS, the path will always point to your Saved Games\DCS\Texture folder. Again, this saves space on your hard drive.
If you use your own Autoexec.cfg, then when prompted to overwrite you can click "no". This will create a file called autoexec.new, and you can manually make the updates as you like. Just don't modify the top line with the file date; this is used by the installer for version control. However, feel free to include it in your existing autoexec.cfg, so you don't get prompted to overwrite until there's another update to the autoexec.cfg.
If you inadvertently overwrite your autoexec.cfg, it is actually backed up as autoexec.old. Just open it and copy the appropriate information to the new file.
For Traditional Installations:
If there is an issue with textures not displaying, it is likely a problem with the installer. Please let me know what textures are missing so that I can troubleshoot the issue.
Special thanks to EricJ for his USMC Ka-50 skin, which I used as the basis for this skin pack as well as the bleaching effects for weathered skins.
You are free to use any of the textures in other skins or projects as long as proper credit is provided in the readme file.
-Home Fries
9 downloads
(0 reviews)0 comments
Updated
-

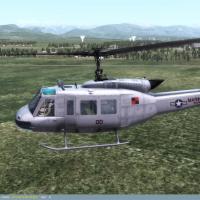
UH-1 USMC HMLA-269 "Gunrunners" Skin Pack
By HomeFries
Marine Attack Helicopter Squadron (HMA) 269, commissioned in July 1971 at MCAS New River, NC, has the distinction of being the first Attack hHelicopter squadron in the Marine Corps. HMA-269 flew the AH-1J until December 1977, when it received the AH-1T. The Gunrunners then made history again in 1979 by being the first Marine Squadron to fire a TOW missile from an airborne platform.
In the early 1980s, HMA-269 received its first UH-1N Hueys, and as a permanent composite squadron was redesignated HMLA-269. Since then, the Gunrunners have deployed to hotspots such as Iraq, Kosovo, Somalia, Liberia, Haiti, and Afghanistan.
Today the HMLA-269 "Gunrunners" fly the UH-1Y Venom and the AH-1W Super Cobra.
This is a collection of six UH-1 skins representing HMLA-269. The skins included are:
HF-00 (2010)
HF-01
HF-04
HF-07 (ca. 2009)
HF-22
HF-44
Each skin has a "normal" version and a weathered version. Weathered skins have a bleached effect as if the aircraft were heavily exposed to the sun for months on end. Normal skins include pilots with green flightsuits, while weathered skins include pilots with desert flightsuits.
Note: this skin pack uses an EXE installer that creates common texture folders and an autoexec.cfg (if you already have one, you can make manual changes). I would like your feedback on this system; if it works I intend to apply it to my other skin packs.
Skinner's Philosophy:
Because the 3D models used for the aircrew utilize modern flight gear I have chosen to model the skins as "modern aircraft with nostalgic patterns", as opposed to actual historical skins.. The significance of this is that I have chosen to skin the aircrew in contemporary flight uniforms. I felt that this was more fitting in a setting that involves modern orders of battle, and is also less of an immersion-killer than seeing Vietnam era "uniforms" on clearly modern objects.
A note about the Crew Chief & Door Gunner:
Since enlisted US troops don't wear rank/rate insignia on flightsuits, their rank/rate is displayed on their nametag. Since there are no specific nametag textures for the crew chief/door gunner texture, I have added a nametag to the velcro on the chest armor (as is standard practice).
In choosing names for the texture, I opted for US servicemembers who received the Medal of Honor. CPL Jason Dunham was posthumously awarded the Medal of Honor in the Global War on Terror, and represents the Unites States Marine Corps in these skins. The following is his Medal of Honor citation:
For conspicuous gallantry and intrepidity at the risk of his life above and beyond the call of duty while serving as Rifle Squad Leader, 4th Platoon, Company K, Third Battalion, Seventh Marines (Reinforced), Regimental Combat Team 7, First Marine Division (Reinforced), on 14 April 2004. Corporal Dunham's squad was conducting a reconnaissance mission in the town of Karabilah, Iraq, when they heard rocket-propelled grenade and small arms fire erupt approximately two kilometers to the west. Corporal Dunham led his Combined Anti-Armor Team towards the engagement to provide fire support to their Battalion Commander's convoy, which had been ambushed as it was traveling to Camp Husaybah. As Corporal Dunham and his Marines advanced, they quickly began to receive enemy fire. Corporal Dunham ordered his squad to dismount their vehicles and led one of his fire teams on foot several blocks south of the ambushed convoy. Discovering seven Iraqi vehicles in a column attempting to depart, Corporal Dunham and his team stopped the vehicles to search them for weapons. As they approached the vehicles, an insurgent leaped out and attacked Corporal Dunham. Corporal Dunham wrestled the insurgent to the ground and in the ensuing struggle saw the insurgent release a grenade. Corporal Dunham immediately alerted his fellow Marines to the threat. Aware of the imminent danger and without hesitation, Corporal Dunham covered the grenade with his helmet and body, bearing the brunt of the explosion and shielding his Marines from the blast. In an ultimate and selfless act of bravery in which he was mortally wounded, he saved the lives of at least two fellow Marines. By his undaunted courage, intrepid fighting spirit, and unwavering devotion to duty, Corporal Dunham gallantly gave his life for his country, thereby reflecting great credit upon himself and upholding the highest traditions of the Marine Corps and the United States Naval Service.
CPL Dunham is also the namesake of the USS Jason Dunham (DDG-109), the Marine Corps Security Force barracks in Kings Bay, GA, and Crucible stations at both MCRD Parris Island and MCRD San Diego.
A Note About Autoexec.cfg:
Rather than copying texture files to their respective livery folders, I prefer to use a series of common texture folders along with unique filenames. This allows a single instance of many of my common textures, and keeps the hard drive footprint to a minimum (especially nice if you run a SSD for your system drive).
The installer will add a series of folders to the DCS Texture path; if you do not have these folders created, then it is no problem. The autoexec.cfg included will automatically point to the Texture folder in your Saved Games\DCS folder, and regardless of whether you run the Open Alpha, Open Beta, or Release version of DCS, the path will always point to your Saved Games\DCS\Texture folder. Again, this saves space on your hard drive.
If you use your own Autoexec.cfg, then when prompted to overwrite you can click "no". This will create a file called autoexec.new, and you can manually make the updates as you like. Just don't modify the top line with the file date; this is used by the installer for version control. However, feel free to include it in your existing autoexec.cfg, so you don't get prompted to overwrite until there's another update to the autoexec.cfg.
If you inadvertently overwrite your autoexec.cfg, it is actually backed up as autoexec.old. Just open it and copy the appropriate information to the new file.
Special thanks to upuaut for assistance with the more "exotic" material names, as well as the assistance with custom rotor colors.
You are free to use any of the textures in other skins or projects as long as proper credit is provided in the readme file.
-Home Fries
13 downloads
(0 reviews)0 comments
Submitted
-
UH-1 USMC HMLA-169 "Vipers" Skin Pack
By HomeFries
Marine Attack Helicopter Squadron (HMA) 169 was commissioned in 1971 as part of Marine Aircraft Group 39 (Camp Pendleton, cA), and unlike most HMLA squadrons began with the Cobra (AH-1G) before becoming a composite squadron. By 1976, the AH-1G was replaced by the AH-1J Sea Cobra, which were eventually replaced by the AH-1T.
In 1986, HMA-169 was redesignated Marine Light Attack Helicopter Squadron (HMLA) 169, and replaced its AH-1Ts with the AH-1W Super Cobra. As a composite squadron, it also received its complement of UH-1N Hueys.
Today HMLA-169 flies the UH-1Y Venom and the AH-1Z Viper.
This is a fictional skin pack of SA342L/M/Mistral Gazelles with HMLA-169 markings. Each SA342 variant has four different BuNos (USN/USMC serial numbers), including one high color Commanding Officer's bird, allowing you to create packages of different aircraft. You still provide your own two digit MODEX (side number) in the mission editor. Each skin has a "normal" version and a weathered version. Weathered skins have a bleached effect as if the aircraft were heavily exposed to the sun for months on end. Normal skins include pilots with green flightsuits, while weathered skins include pilots with desert flightsuits. This skin pack is intended to satisfy one's "cobra itch" until the AH-1 is released.
Note: this skin pack uses an EXE installer that creates common texture folders and an autoexec.cfg (if you already have one, you can make manual changes). I would like your feedback on this system; if it works I intend to apply it to my other skin packs.
A Note About Autoexec.cfg:
Rather than copying texture files to their respective livery folders, I prefer to use a series of common texture folders along with unique filenames. This allows a single instance of many of my common textures, and keeps the hard drive footprint to a minimum (especially nice if you run a SSD for your system drive).
The installer will add a series of folders to the DCS Texture path; if you do not have these folders created, then it is no problem. The autoexec.cfg included will automatically point to the Texture folder in your Saved Games\DCS folder, and regardless of whether you run the Open Alpha, Open Beta, or Release version of DCS, the path will always point to your Saved Games\DCS\Texture folder. Again, this saves space on your hard drive.
If you use your own Autoexec.cfg, then when prompted to overwrite you can click "no". This will create a file called autoexec.new, and you can manually make the updates as you like. Just don't modify the top line with the file date; this is used by the installer for version control. However, feel free to include it in your existing autoexec.cfg, so you don't get prompted to overwrite until there's another update to the autoexec.cfg.
If you inadvertently overwrite your autoexec.cfg, it is actually backed up as autoexec.old. Just open it and copy the appropriate information to the new file.
9 downloads
(1 review)0 comments
Updated
-
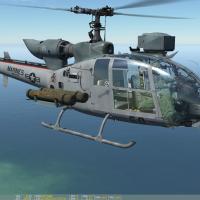
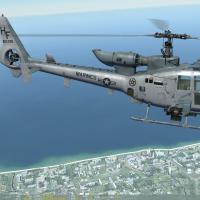
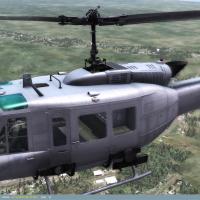
UH-1 USMC HMLA-167 "Warriors" Skin Pack
By HomeFries
Marine Light Helicopter Squadron (HML) 167 was commissioned in April 1968 in Vietnam, and flew the UH-1E in combat operations until June 1971, where it was the last Marine helicopter squadron in Vietnam. Of note, HML-167 was the first unit to drop a bomb from a helicopter, accomplished with the use of the Helicopter Trap Weapon (HTW). In June 1971, HML-167 returned stateside to MCAS New River, North Carolina, as part of the 2nd Marine Air Wing.
In 1972, HML-167 received the UH-1N Twin Huey, which it would fly until 2012 when the UH-1N was replaced by the UH-1Y Venom. In 1984, HML-167 received its first AH-1T Cobras and became a composite squadron of Cobras and Hueys. HML-167 was redesignated Marine Light Attack Helicopter Squadron (HMLA) 167 in April 1986, and as such designated as a permanent composite squadron of both Cobras and Hueys. HMLA-167 began upgrading to the AH-1W Super Cobra in late 1989.
Today the HMLA-167 "Warriors" fly the UH-1Y Venom and the AH-1W Super Cobra.
This is a collection of eleven UH-1 skins representing HMLA-167. The skins included are:
TV-30 (1969 as HML-167)* TV-29 (1970 as HML-167)* "Santa 1" (1969 as HML-167) TV-30 (1982 as HML-167) TV-11 (1999) TV-03 (ca. 2003) TV-06 (ca. 2003) TV-04 (ca. 2005) TV-06 (ca. 2005) TV-05 (CO bird ca. 2008) TV-00 (UH-1Y CO bird ca. 2013)
* TV-29 and 30 (1969-70) are also included in my USMC Vietnam Skin Pack version 1.21 and later.
Each skin (1999 and later) has a "normal" version and a weathered version. Weathered skins have a bleached effect as if the aircraft were heavily exposed to the sun for months on end. Normal skins include pilots with green flightsuits, while weathered skins include pilots with desert flightsuits.
Note: this skin pack uses an EXE installer that creates common texture folders and an autoexec.cfg (if you already have one, you can make manual changes). I would like your feedback on this system; if it works I intend to apply it to my other skin packs.
Skinner's Philosophy:
Because the 3D models used for the aircrew utilize modern flight gear I have chosen to model the skins as "modern aircraft with nostalgic patterns", as opposed to actual historical skins.. The significance of this is that I have chosen to skin the aircrew in contemporary flight uniforms. I felt that this was more fitting in a setting that involves modern orders of battle, and is also less of an immersion-killer than seeing Vietnam era "uniforms" on clearly modern objects.
A note about the Crew Chief & Door Gunner:
Since enlisted US troops don't wear rank/rate insignia on flightsuits, their rank/rate is displayed on their nametag. Since there are no specific nametag textures for the crew chief/door gunner texture, I have added a nametag to the velcro on the chest armor (as is standard practice).
In choosing names for the texture, I opted for US servicemembers who received the Medal of Honor. CPL Jason Dunham was posthumously awarded the Medal of Honor in the Global War on Terror, and represents the Unites States Marine Corps in these skins. The following is his Medal of Honor citation:
For conspicuous gallantry and intrepidity at the risk of his life above and beyond the call of duty while serving as Rifle Squad Leader, 4th Platoon, Company K, Third Battalion, Seventh Marines (Reinforced), Regimental Combat Team 7, First Marine Division (Reinforced), on 14 April 2004. Corporal Dunham's squad was conducting a reconnaissance mission in the town of Karabilah, Iraq, when they heard rocket-propelled grenade and small arms fire erupt approximately two kilometers to the west. Corporal Dunham led his Combined Anti-Armor Team towards the engagement to provide fire support to their Battalion Commander's convoy, which had been ambushed as it was traveling to Camp Husaybah. As Corporal Dunham and his Marines advanced, they quickly began to receive enemy fire. Corporal Dunham ordered his squad to dismount their vehicles and led one of his fire teams on foot several blocks south of the ambushed convoy. Discovering seven Iraqi vehicles in a column attempting to depart, Corporal Dunham and his team stopped the vehicles to search them for weapons. As they approached the vehicles, an insurgent leaped out and attacked Corporal Dunham. Corporal Dunham wrestled the insurgent to the ground and in the ensuing struggle saw the insurgent release a grenade. Corporal Dunham immediately alerted his fellow Marines to the threat. Aware of the imminent danger and without hesitation, Corporal Dunham covered the grenade with his helmet and body, bearing the brunt of the explosion and shielding his Marines from the blast. In an ultimate and selfless act of bravery in which he was mortally wounded, he saved the lives of at least two fellow Marines. By his undaunted courage, intrepid fighting spirit, and unwavering devotion to duty, Corporal Dunham gallantly gave his life for his country, thereby reflecting great credit upon himself and upholding the highest traditions of the Marine Corps and the United States Naval Service.
CPL Dunham is also the namesake of the USS Jason Dunham (DDG-109), the Marine Corps Security Force barracks in Kings Bay, GA, and Crucible stations at both MCRD Parris Island and MCRD San Diego.
A note about Autoexec.cfg:
Rather than copying texture files to their respective livery folders, I prefer to use a series of common texture folders along with unique filenames. This allows a single instance of many of my common textures, and keeps the hard drive footprint to a minimum (especially nice if you run a SSD for your system drive).
The installer will add a series of folders to the DCS Texture path; if you do not have these folders created, then it is no problem. The autoexec.cfg included will automatically point to the Texture folder in your Saved Games\DCS folder, and regardless of whether you run the Open Alpha, Open Beta, or Release version of DCS, the path will always point to your Saved Games\DCS\Texture folder. Again, this saves space on your hard drive.
If you use your own Autoexec.cfg, then when prompted to overwrite you can click "no". This will create a file called autoexec.new, and you can manually make the updates as you like. Just don't modify the top line with the file date; this is used by the installer for version control. However, feel free to include it in your existing autoexec.cfg, so you don't get prompted to overwrite until there's another update to the autoexec.cfg.
If you inadvertently overwrite your autoexec.cfg, it is actually backed up as autoexec.old. Just open it and copy the appropriate information to the new file.
Special thanks to upuaut for assistance with the more "exotic" material names, as well as the assistance with custom rotor colors.
You are free to use any of the textures in other skins or projects as long as proper credit is provided in the readme file.
-Home Fries
13 downloads
(0 reviews)0 comments
Updated
-
UH-1 USMC Marine Expeditionary Unit Skin Pack
By HomeFries
Note: this skin pack uses an EXE installer that creates common texture folders and an autoexec.cfg (if you already have one, you can make manual changes). I would like your feedback on this system; if it works I intend to apply it to my other skin packs.
The Marine Expeditionary Unit (MEU) is a deployable, quick reaction air-ground task force of the United States Marine Corps (USMC) that includes both a battalion sized ground and support force as well as a group sized composite air component. The air assets are pulled from various stateside Marine squadrons and take on the squadron name and tail code of the medium lift squadron (formerly the CH-46 helicopter squadron, now the V-22 tiltrotor squadron), and the medium lift squadron is designated as "Reinforced" (e.g. "VMM-263 (Rein)"). Among the helicopter assets in the MEU are the UH-1N Huey (now the UH-1Y Venom) and the AH-1W Super Cobra or AH-1Z Viper, themselves taken from composite Marine Light Attack Helicopter (HMLA) squadrons.
Since the HMLA assets that comprise the Light Utility/Attack portion of the MEU are "on loan" to the medium lift squadron, they tend to paint their aircraft strictly to regulation, applying the tail code and modex (side number), painting over their own squadron insignia but not taking on the insignia of their host squadron. This may make for less interesting aircraft, but it makes for very easy skinning. As a result, I was able to create tails of each Reinforced HMM/VMM squadron that has deployed in a MEU, as well as modexes 30-47 (3x and 4x are normally the modexes used for HMLA assets in a MEU with one range for the UH-1 and the other for the AH-1). All of this allows for 168 separate combinations realistically representing the UH-1s that have deployed over the past 20 years, all with a minimum of textures. This allows the mission editor to create larger scale missions with unique skins for the UH-1 while keeping the texture overhead to a minimum, and allowing for realism at the same time!
Each of the Hueys in the reinforced squadrons use the proper modexes in their proper timeframes (with possible exceptions of a single isolated deployment or detachment during the timeframe), and where a reinforced squadron's UH-1 modex has shifted from 3x to 4x, a separate timeframe has been indicated in the skin name. In these instances, the skins spanning only the 1990s will feature Marines in green flightgear with all other skins featuring Marines in desert gear.
The following reinforced medium lift squadrons are represented (HMM are helicopter squadrons, H/VMM indicates both HMM and VMM tiltrotor squadrons):
HMM-161 (Rein) Greyhawks HMM-162 (Rein) Golden Eagles HMM-163 (Rein) Ridge Runners (aka Evil Eyes) HMM-164 (Rein) Knightriders H/VMM-165 (Rein) White Knights H/VMM-166 (Rein) Sea Elk H/VMM-261 (Rein) Raging Bulls HMM-262 (Rein) Flying Tigers H/VMM-263 (Rein) Thunder Eagles HMM-264 (Rein) Black Knights H/VMM-266 (Rein) Fighting Griffins HMM-268 (Rein) Red Dragons HMM-364 (Rein) Purple Foxes HMM-365 (Rein) Blue Knights
A note about the Crew Chief & Door Gunner:
Since enlisted US troops don't wear rank/rate insignia on flightsuits, their rank/rate is displayed on their nametag. Since there are no specific nametag textures for the crew chief/door gunner texture, I have added a nametag to the velcro on the chest armor (as is standard practice).
In choosing names for the texture, I opted for US servicemembers who received the Medal of Honor. CPL Jason Dunham represents the Unites States Marine Corps in these skins. The following is his Medal of Honor citation:
For conspicuous gallantry and intrepidity at the risk of his life above and beyond the call of duty while serving as Rifle Squad Leader, 4th Platoon, Company K, Third Battalion, Seventh Marines (Reinforced), Regimental Combat Team 7, First Marine Division (Reinforced), on 14 April 2004. Corporal Dunham's squad was conducting a reconnaissance mission in the town of Karabilah, Iraq, when they heard rocket-propelled grenade and small arms fire erupt approximately two kilometers to the west. Corporal Dunham led his Combined Anti-Armor Team towards the engagement to provide fire support to their Battalion Commander's convoy, which had been ambushed as it was traveling to Camp Husaybah. As Corporal Dunham and his Marines advanced, they quickly began to receive enemy fire. Corporal Dunham ordered his squad to dismount their vehicles and led one of his fire teams on foot several blocks south of the ambushed convoy. Discovering seven Iraqi vehicles in a column attempting to depart, Corporal Dunham and his team stopped the vehicles to search them for weapons. As they approached the vehicles, an insurgent leaped out and attacked Corporal Dunham. Corporal Dunham wrestled the insurgent to the ground and in the ensuing struggle saw the insurgent release a grenade. Corporal Dunham immediately alerted his fellow Marines to the threat. Aware of the imminent danger and without hesitation, Corporal Dunham covered the grenade with his helmet and body, bearing the brunt of the explosion and shielding his Marines from the blast. In an ultimate and selfless act of bravery in which he was mortally wounded, he saved the lives of at least two fellow Marines. By his undaunted courage, intrepid fighting spirit, and unwavering devotion to duty, Corporal Dunham gallantly gave his life for his country, thereby reflecting great credit upon himself and upholding the highest traditions of the Marine Corps and the United States Naval Service.
CPL Dunham is also the namesake of the USS Jason Dunham (DDG-109), the Marine Corps Security Force barracks in Kings Bay, GA, and Crucible stations at both MCRD Parris Island and MCRD San Diego.
A Note about Autoexec.cfg:
Rather than copying texture files to their respective livery folders, I prefer to use a series of common texture folders along with unique filenames. This allows a single instance of many of my common textures, and keeps the hard drive footprint to a minimum (especially nice if you run a SSD for your system drive).
The installer will add a series of folders to the DCS Texture path; if you do not have these folders created, then it is no problem. The autoexec.cfg included will automatically point to the Texture folder in your Saved Games\DCS folder, and regardless of whether you run the Open Alpha, Open Beta, or Release version of DCS, the path will always point to your Saved Games\DCS\Texture folder. Again, this saves space on your hard drive.
If you use your own Autoexec.cfg, then when prompted to overwrite you can click "no". This will create a file called autoexec.new, and you can manually make the updates as you like. Just don't modify the top line with the file date; this is used by the installer for version control. However, feel free to include it in your existing autoexec.cfg, so you don't get prompted to overwrite until there's another update to the autoexec.cfg.
If you inadvertently overwrite your autoexec.cfg, it is actually backed up as autoexec.old. Just open it and copy the appropriate information to the new file.
Special thanks to upuaut for assistance with the more "exotic" material names, as well as the assistance with custom rotor colors.
You are free to use any of the textures in other skins or projects as long as proper credit is provided in the readme file.
-Home Fries
10 downloads
(0 reviews)0 comments
Updated
-
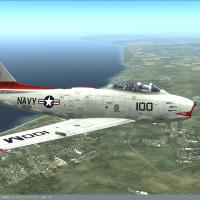
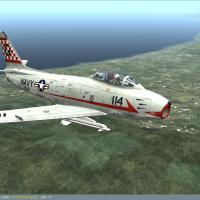
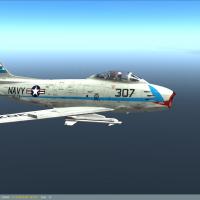
FJ-3 VF-24 Corsairs Skin for DCS F-86F
By HomeFries
This is part of a series of US Navy and Marine Corps skin packs for the FJ-3/FJ-3M Fury, the navalized variant of the F-86 Sabre (the M version being Sidewinder capable).
Fighter Squadron 24 (the Corsairs which were later redesignated the VF-211 Checkmates, not to be confused with the VF-24 Renegades designated in 1959) flew the FJ-3 Fury for a short time (1956-1957) before transitioning to the F3H Demon. This skin pack features skins from the 1956-57 deployment aboard the USS Shangri-La (CVA 38) as part of Carrier Air Group 2 (CVG-2, Tailcode M).
Note: this skin pack uses an EXE installer that creates common texture folders and an autoexec.cfg (if you already have one, you can make manual changes). I would like your feedback on this system; if it works I intend to apply it to my other skin packs. If you have a 1.x version of this skin installed, then the installer will remove the old 1.x liveries and obsolete texture folders. Be sure to update any missions that used 1.x series skins.
A Note About Autoexec.cfg:
Rather than copying texture files to their respective livery folders, I prefer to use a series of common texture folders along with unique filenames. This allows a single instance of many of my common textures, and keeps the hard drive footprint to a minimum (especially nice if you run a SSD for your system drive).
The installer will add a series of folders to the DCS Texture path; if you do not have these folders created, then it is no problem. The autoexec.cfg included will automatically point to the Texture folder in your Saved Games\DCS folder, and regardless of whether you run the Open Alpha, Open Beta, or Release version of DCS, the path will always point to your Saved Games\DCS\Texture folder. Again, this saves space on your hard drive.
If you use your own Autoexec.cfg, then when prompted to overwrite you can click "no". This will create a file called autoexec.new, and you can manually make the updates as you like. Just don't modify the top line with the file date; this is used by the installer for version control. However, feel free to include it in your existing autoexec.cfg, so you don't get prompted to overwrite until there's another update to the autoexec.cfg.
If you inadvertently overwrite your autoexec.cfg, it is actually backed up as autoexec.old. Just open it and copy the appropriate information to the new file.
Updating from the 1.x series of FJ-3 Skins:
With the release of DCS World 1.5.4 and 2.0.3, the decal layer that once covered the entire model has been removed by Belsimtek. As such, organizational specific modex placement as well as modex placement on the wing is no longer possible. The modex (1xx-3xx) is now selected in the Mission Editor rather than by skin selection. For skins that have the BuNo on the tail, the last two digits of the modex are also used for the BuNo (this is not accurate, but just to allow a dynamic number on the tail).
Detail placement in textures based on USN skins by Crazyeddie.
Special thanks to SkateZilla for the awesome Photoshop template.
You are free to use any of the textures in other skins or projects as long as proper credit is provided in the readme file.
-Home Fries
9 downloads
(0 reviews)0 comments
Updated
-
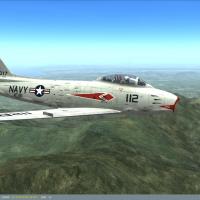
FJ-3M VF-211 Red Checkertails Skin for DCS F-86F
By HomeFries
This is part of a series of US Navy and Marine Corps skin packs for the FJ-3/FJ-3M Fury, the navalized variant of the F-86 Sabre (the M version being Sidewinder capable).
Fighter Squadron 211 (the Red Checkertails which were later redesignated the VF-24 Renegades, not to be confused with the VF-211 Checkmates designated in 1959) flew the FJ-3M Fury from 1956-1957 before transitioning to the F8U-1 Crusader. This skin pack features skins from the 1956-57 deployment aboard the USS Bon Homme Richard (CVA-31) as part of Carrier Air Group 21 (CVG-21, Tailcode G).
Note: this skin pack uses an EXE installer that creates common texture folders and an autoexec.cfg (if you already have one, you can make manual changes). I would like your feedback on this system; if it works I intend to apply it to my other skin packs. If you have a 1.x version of this skin installed, then the installer will remove the old 1.x liveries and obsolete texture folders. Be sure to update any missions that used 1.x series skins.
A Note About Autoexec.cfg:
Rather than copying texture files to their respective livery folders, I prefer to use a series of common texture folders along with unique filenames. This allows a single instance of many of my common textures, and keeps the hard drive footprint to a minimum (especially nice if you run a SSD for your system drive).
The installer will add a series of folders to the DCS Texture path; if you do not have these folders created, then it is no problem. The autoexec.cfg included will automatically point to the Texture folder in your Saved Games\DCS folder, and regardless of whether you run the Open Alpha, Open Beta, or Release version of DCS, the path will always point to your Saved Games\DCS\Texture folder. Again, this saves space on your hard drive.
If you use your own Autoexec.cfg, then when prompted to overwrite you can click "no". This will create a file called autoexec.new, and you can manually make the updates as you like. Just don't modify the top line with the file date; this is used by the installer for version control. However, feel free to include it in your existing autoexec.cfg, so you don't get prompted to overwrite until there's another update to the autoexec.cfg.
If you inadvertently overwrite your autoexec.cfg, it is actually backed up as autoexec.old. Just open it and copy the appropriate information to the new file.
Updating from the 1.x series of FJ-3 Skins:
With the release of DCS World 1.5.4 and 2.0.3, the decal layer that once covered the entire model has been removed by Belsimtek. As such, organizational specific modex placement as well as modex placement on the wing is no longer possible. The modex (1xx-3xx) is now selected in the Mission Editor rather than by skin selection. For skins that have the BuNo on the tail, the last two digits of the modex are also used for the BuNo (this is not accurate, but just to allow a dynamic number on the tail).
Detail placement in textures based on USN skins by Crazyeddie.
Special thanks to SkateZilla for the awesome Photoshop template.
You are free to use any of the textures in other skins or projects as long as proper credit is provided in the readme file.
-Home Fries
20 downloads
(0 reviews)0 comments
Updated
-
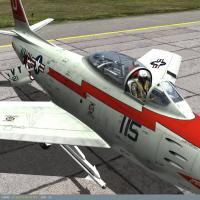
FJ-3 VF-191 Satan's Kittens Skin for DCS F-86F
By HomeFries
This is part of a series of US Navy and Marine Corps skin packs for the FJ-3/FJ-3M Fury, the navalized variant of the F-86 Sabre (the M version being Sidewinder capable).
Fighter Squadron 191 flew the FJ-3 Fury from 1956-1957 before transitioning to the F11F-1 Tiger. This skin pack features skins from the 1957 deployment aboard the USS Yorktown (CVA-10) as part of Carrier Air Group 19 (CVG-19, Tailcode B).
Note: this skin pack uses an EXE installer that creates common texture folders and an autoexec.cfg (if you already have one, you can make manual changes). I would like your feedback on this system; if it works I intend to apply it to my other skin packs. If you have a 1.x version of this skin installed, then the installer will remove the old 1.x liveries and obsolete texture folders. Be sure to update any missions that used 1.x series skins.
A Note About Autoexec.cfg:
Rather than copying texture files to their respective livery folders, I prefer to use a series of common texture folders along with unique filenames. This allows a single instance of many of my common textures, and keeps the hard drive footprint to a minimum (especially nice if you run a SSD for your system drive).
The installer will add a series of folders to the DCS Texture path; if you do not have these folders created, then it is no problem. The autoexec.cfg included will automatically point to the Texture folder in your Saved Games\DCS folder, and regardless of whether you run the Open Alpha, Open Beta, or Release version of DCS, the path will always point to your Saved Games\DCS\Texture folder. Again, this saves space on your hard drive.
If you use your own Autoexec.cfg, then when prompted to overwrite you can click "no". This will create a file called autoexec.new, and you can manually make the updates as you like. Just don't modify the top line with the file date; this is used by the installer for version control. However, feel free to include it in your existing autoexec.cfg, so you don't get prompted to overwrite until there's another update to the autoexec.cfg.
If you inadvertently overwrite your autoexec.cfg, it is actually backed up as autoexec.old. Just open it and copy the appropriate information to the new file.
Updating from the 1.x series of FJ-3 Skins:
With the release of DCS World 1.5.4 and 2.0.3, the decal layer that once covered the entire model has been removed by Belsimtek. As such, organizational specific modex placement as well as modex placement on the wing is no longer possible. The modex (1xx-3xx) is now selected in the Mission Editor rather than by skin selection. For skins that have the BuNo on the tail, the last two digits of the modex are also used for the BuNo (this is not accurate, but just to allow a dynamic number on the tail).
Detail placement in textures based on USN skins by Crazyeddie.
Special thanks to SkateZilla for the awesome Photoshop template.
You are free to use any of the textures in other skins or projects as long as proper credit is provided in the readme file.
-Home Fries
11 downloads
(0 reviews)0 comments
Updated
-
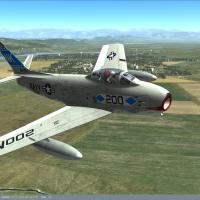
FJ-3M VF-142 Fighting Falcons Skin Pack for DCS F-86F
By HomeFries
This is the first in a series of US Navy and Marine Corps skin packs for the FJ-3/FJ-3M Fury, the navalized variant of the F-86 Sabre (the M version being Sidewinder capable). The idea of this series is to have a single skin for each squadron, and separate decals for each side number (Modex). The last 4 digits of the serial number (BuNo) use the USAF serial number to allow for dynamic BuNos, though the side number must be selected by choosing the skin itself. This will allow a common Modex pool and a single texture for each squadron, thereby allowing you to employ an entire squadron in a mission while keeping the hard drive and in-mission RAM footprint to a minimum.
Fighter Squadron 142 (the Fighting Falcons, not to be confused with the VF-142 Ghostriders that was designated in 1963) flew the FJ-3M Fury for a short time (1956-1958), including a deployment on the USS Hornet (CVA-12) as part of Carrier Air Group 14 (CVG-14) before returning to NAS Miramar and transitioning to the F8L1-1 Crusader. This skin pack features skins from the 1957 Hornet deployment (CVG-14 Tailcode A) and the return to Miramar (1958) prior to transitioning to the Crusader. The 1958 skin displays the CVG-14 Tailcode NK, which replaced A once the US Navy went to 2 letter tailcodes.
Note: this skin pack uses an EXE installer that creates common texture folders and an autoexec.cfg (if you already have one, you can make manual changes). I would like your feedback on this system; if it works I intend to apply it to my other skin packs. If you have a 1.x version of this skin installed, then the installer will remove the old 1.x liveries and obsolete texture folders. Be sure to update any missions that used 1.x series skins.
A Note About Autoexec.cfg:
Rather than copying texture files to their respective livery folders, I prefer to use a series of common texture folders along with unique filenames. This allows a single instance of many of my common textures, and keeps the hard drive footprint to a minimum (especially nice if you run a SSD for your system drive).
The installer will add a series of folders to the DCS Texture path; if you do not have these folders created, then it is no problem. The autoexec.cfg included will automatically point to the Texture folder in your Saved Games\DCS folder, and regardless of whether you run the Open Alpha, Open Beta, or Release version of DCS, the path will always point to your Saved Games\DCS\Texture folder. Again, this saves space on your hard drive.
If you use your own Autoexec.cfg, then when prompted to overwrite you can click "no". This will create a file called autoexec.new, and you can manually make the updates as you like. Just don't modify the top line with the file date; this is used by the installer for version control. However, feel free to include it in your existing autoexec.cfg, so you don't get prompted to overwrite until there's another update to the autoexec.cfg.
If you inadvertently overwrite your autoexec.cfg, it is actually backed up as autoexec.old. Just open it and copy the appropriate information to the new file.
Updating from the 1.x series of FJ-3 Skins:
With the release of DCS World 1.5.4 and 2.0.3, the decal layer that once covered the entire model has been removed by Belsimtek. As such, organizational specific modex placement as well as modex placement on the wing is no longer possible. The modex (1xx-3xx) is now selected in the Mission Editor rather than by skin selection. For skins that have the BuNo on the tail, the last two digits of the modex are also used for the BuNo (this is not accurate, but just to allow a dynamic number on the tail).
Detail placement in textures based on USN skins by Crazyeddie.
Special thanks to SkateZilla for the awesome Photoshop template.
You are free to use any of the textures in other skins or projects as long as proper credit is provided in the readme file.
-Home Fries
8 downloads
(0 reviews)0 comments
Updated
-
FJ-3M VF-121 Pacemakers Skin for DCS F-86F
By HomeFries
This is part of a series of US Navy and Marine Corps skin packs for the FJ-3/FJ-3M Fury, the navalized variant of the F-86 Sabre (the M version being Sidewinder capable).
Fighter Squadron 121 flew the FJ-3M Fury operationally in 1957 before being redesignated as a Replacement Air Group (RAG). Of note, it was VF-121's status as a F-4 Phantom RAG at NAS Miramar that helped provide the squadron's reknown as the original host unit for the US Navy Fighter Weapons School ("Top Gun"). This skin pack features skins from the 1957 deployment aboard the USS Lexington (CV-16) as part of Carrier Air Group 12 (CVG-12, Tailcode D).
Note: this skin pack uses an EXE installer that creates common texture folders and an autoexec.cfg (if you already have one, you can make manual changes). I would like your feedback on this system; if it works I intend to apply it to my other skin packs. If you have a 1.x version of this skin installed, then the installer will remove the old 1.x liveries and obsolete texture folders. Be sure to update any missions that used 1.x series skins.
A Note About Autoexec.cfg:
Rather than copying texture files to their respective livery folders, I prefer to use a series of common texture folders along with unique filenames. This allows a single instance of many of my common textures, and keeps the hard drive footprint to a minimum (especially nice if you run a SSD for your system drive).
The installer will add a series of folders to the DCS Texture path; if you do not have these folders created, then it is no problem. The autoexec.cfg included will automatically point to the Texture folder in your Saved Games\DCS folder, and regardless of whether you run the Open Alpha, Open Beta, or Release version of DCS, the path will always point to your Saved Games\DCS\Texture folder. Again, this saves space on your hard drive.
If you use your own Autoexec.cfg, then when prompted to overwrite you can click "no". This will create a file called autoexec.new, and you can manually make the updates as you like. Just don't modify the top line with the file date; this is used by the installer for version control. However, feel free to include it in your existing autoexec.cfg, so you don't get prompted to overwrite until there's another update to the autoexec.cfg.
If you inadvertently overwrite your autoexec.cfg, it is actually backed up as autoexec.old. Just open it and copy the appropriate information to the new file.
Updating from the 1.x series of FJ-3 Skins:
With the release of DCS World 1.5.4 and 2.0.3, the decal layer that once covered the entire model has been removed by Belsimtek. As such, organizational specific modex placement as well as modex placement on the wing is no longer possible. The modex (1xx-3xx) is now selected in the Mission Editor rather than by skin selection. For skins that have the BuNo on the tail, the last two digits of the modex are also used for the BuNo (this is not accurate, but just to allow a dynamic number on the tail).
Detail placement in textures based on USN skins by Crazyeddie.
Special thanks to SkateZilla for the awesome Photoshop template.
You are free to use any of the textures in other skins or projects as long as proper credit is provided in the readme file.
-Home Fries
9 downloads
(0 reviews)0 comments
Updated
-
FJ-3 VF-73 Jesters Skin Pack for DCS F-86F
By HomeFries
This is part of a series of US Navy and Marine Corps skin packs for the FJ-3/FJ-3M Fury, the navalized variant of the F-86 Sabre (the M version being Sidewinder capable).
Fighter Squadron 73 flew the FJ-3 Fury from 1956 until its decommissioning in 1958. Originally part of Carrier Air Group 7 (CVG-7, Tailcode L), VF-73 was transferred to CVG-4 (Tailcode AD) for its 1957 deployment on the USS Randolph (CVA-15). This skin pack features skins from CVG-7 and the 1957 Randolph deployment with CVG-4.
Note: this skin pack uses an EXE installer that creates common texture folders and an autoexec.cfg (if you already have one, you can make manual changes). I would like your feedback on this system; if it works I intend to apply it to my other skin packs. If you have a 1.x version of this skin installed, then the installer will remove the old 1.x liveries and obsolete texture folders. Be sure to update any missions that used 1.x series skins.
A Note About Autoexec.cfg:
Rather than copying texture files to their respective livery folders, I prefer to use a series of common texture folders along with unique filenames. This allows a single instance of many of my common textures, and keeps the hard drive footprint to a minimum (especially nice if you run a SSD for your system drive).
The installer will add a series of folders to the DCS Texture path; if you do not have these folders created, then it is no problem. The autoexec.cfg included will automatically point to the Texture folder in your Saved Games\DCS folder, and regardless of whether you run the Open Alpha, Open Beta, or Release version of DCS, the path will always point to your Saved Games\DCS\Texture folder. Again, this saves space on your hard drive.
If you use your own Autoexec.cfg, then when prompted to overwrite you can click "no". This will create a file called autoexec.new, and you can manually make the updates as you like. Just don't modify the top line with the file date; this is used by the installer for version control. However, feel free to include it in your existing autoexec.cfg, so you don't get prompted to overwrite until there's another update to the autoexec.cfg.
If you inadvertently overwrite your autoexec.cfg, it is actually backed up as autoexec.old. Just open it and copy the appropriate information to the new file.
Updating from the 1.x series of FJ-3 Skins:
With the release of DCS World 1.5.4 and 2.0.3, the decal layer that once covered the entire model has been removed by Belsimtek. As such, organizational specific modex placement as well as modex placement on the wing is no longer possible. The modex (1xx-3xx) is now selected in the Mission Editor rather than by skin selection. For skins that have the BuNo on the tail, the last two digits of the modex are also used for the BuNo (this is not accurate, but just to allow a dynamic number on the tail).
Detail placement in textures based on USN skins by Crazyeddie.
Special thanks to SkateZilla for the awesome Photoshop template.
You are free to use any of the textures in other skins or projects as long as proper credit is provided in the readme file.
-Home Fries
7 downloads
(0 reviews)0 comments
Updated
-

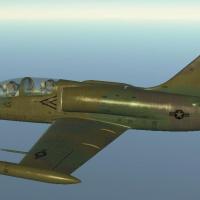
L-39C Fictional USN Desert Aggressor
By EricJ
Based on an A-4 VA-126 scheme (loosely I might add but the colors are correct) and adapted for the L-39C airframe. To install simply copy and paste the Livery folder in DCSWorld/CoreMods/aircraft/L-39/Liveries folder, select Ukraine and in the Payload Editor select “Fictional USN Desert Aggressor” and go fly
8 downloads
(0 reviews)0 comments
Submitted
-

L-39C USAF Aggressor
By EricJ
This scheme is an adaptation of an F-15C scheme. To install simply copy and paste the Livery folder in DCSWorld/CoreMods/aircraft/L-39/Liveries folder, select USA and in the Payload Editor select “USAF Aggressor Splinter” and go fly.
10 downloads
(0 reviews)0 comments
Submitted
-

L-39C VFC-12 Aggressor Splinter
By EricJ
This scheme is an adaptation of an F/A-18A VFC-12 scheme. To install simply copy and paste the Livery folder in DCSWorld/CoreMods/aircraft/L-39/Liveries folder, select USA and in the Payload Editor select “VFC-12 Aggressor Splinter” and go fly. Additional help from HomeFries, particularly his adjusted decals and warning stickers.
7 downloads
(1 review)0 comments
Submitted
-

L-39C Fictional CoNA Scheme
By EricJ
This scheme is an adaptation of an EA-18G VAQ-129 scheme for the Centennial of Naval Aviation observance. To install simply copy and paste the Livery folder in DCSWorld/CoreMods/aircraft/L-39/Liveries folder, select USA and in the Payload Editor select “Fictional CoNA Scheme” and go fly.
7 downloads
(0 reviews)0 comments
Updated
-

L-39C Fictional Czech Winter Scheme
By EricJ
This scheme is a simple “Winter” scheme that I made based on the previous European 1 scheme, with some modifications. To install simply copy and paste the Livery folder in DCSWorld/CoreMods/aircraft/L-39/Liveries folder, select Czech Republic and in the Payload Editor select “Fictional Czech Winter Scheme” and go fly.
5 downloads
(0 reviews)0 comments
Submitted
-
L-39C Fictional European 1
By EricJ
This scheme is a simple “Aggressor” scheme that is based on the basic European 1 scheme found on early A-10s. To install simply copy and paste the Livery folder in DCSWorld/CoreMods/aircraft/L-39/Liveries folder, select USA and in the Payload Editor select “Fictional European 1” and go fly.
6 downloads
(1 review)0 comments
Submitted
-
Download Statistics
14,380
Files12,635
Comments27,020
Reviews