
- First Eagles - WWI and Early Years - Skins
- First Eagles - WWI and Early Years - Add-On Aircraft
- First Eagles - WWI and Early Years - Add On Cockpits
- First Eagles - WWI and Early Years - Object Mods
- First Eagles - WWI and Early Years - Terrain and Environmental Mods
- First Eagles - WWI and Early Years - Missions and Campaigns
-

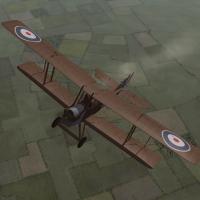
RAF BE12
By Stephen1918
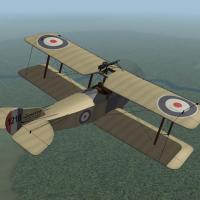
The BE12 was a single seat version of the BE2c introduced in 1916. It had the wings of the BE2c, but had a larger, 12 cylinder (RAF4a) engine. There was a synchronized Vickers gun mounted on the side of the fuselage and it could carry up to 230 pounds of bombs. The more powerful engine made the BE12 a faster plane, but it didn't have the maneuverability required for a fighter. The BE12 was used mostly for recon and light bombing missions.
My BE12 has three loadouts for light, medium, amd heavy bombs. I have included two skins, a green paint (PC10), and a clear doped linen skin. A full set of number decals and my skinning templates are included in the download.
Credits
Thanks to Ojcar for making the data file for the BE12, and for providing reference materials for the plane.
Installation Instructions
For FE1 - Unzip the file and move the folder named "RAFBE12" into the FirstEagles/Objects/Aircraft folder.
For FE2 - Unzip the file and move the folder named "RAFBE12" into the FirstEagles/Objects/Aircraft folder. Then in the FirstEagles/Objects/Decals folder, create new folder named "RAFBE12". Move the folder named "D" from the Aircraft/RAFBE12 folder into the Decals/RAFBE12 folder you just made.
243 downloads
(3 reviews)0 comments
Submitted
-
RAF BE2e
By Stephen1918
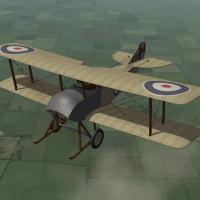
The BE2e was an improved variant of the BE2c introduced in 1916. It had a longer upper wing and a shorter lower wing with a single set of struts. It also had a slightly smaller horizontal tail. The new configuration improved the plane's maneuverability, but did little to improve its overall performance. I have included a light bomb load, but the plane's rate of climb suffers somewhat when carrying bombs.
I have included two skins, a green paint (PC10), and a brown paint (PC12). A full set of number decals and my skinning templates are included in the download.
The gunner in the BE2e sat in front of the pilot and either had multiple guns, or was able to move the gun between multiple mounts. The game engine does not allow this, so I set up the data file to limit the gunner's aim to the upper rear of the plane. However, I provided alternate lines in the FM which will allow you to widen the gunner's aim, but that makes the gun pass through the struts, and sometimes shoot through the wing.
Instructions for changing the gunner's range of motion are included in the download.
Credits
Thanks to Ojcar for making the data file for the BE2e and for testing and helping with details of the model.
Thanks to Mike Dora for identifying and helping me fix problems with the gunner.
Thanks to Nicholas Bell for correcting the hit box coordinates for this plane.
Installation Instructions
For FE1 - Unzip the file and move the folder named "RAFBE2E" into the FirstEagles/Objects/Aircraft folder.
For FE2 - Unzip the file and move the folder named "RAFBE2E" into the FirstEagles/Objects/Aircraft folder. Then in the FirstEagles/Objects/Decals folder, create new folder named "RAFBE2E". Move the folder named "D" from the Aircraft/RAFBE2E folder into the Decals/RAFBE2E folder you just made.
324 downloads
(4 reviews)0 comments
Updated
-

Beardmore built Nieuport 12
By Stephen1918
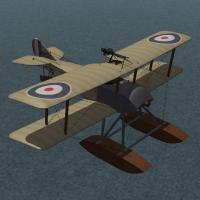
The Nieuport 12 was built under license by Beardmore & Co. Ltd. for both the RNAS and the RFC. The Beardmore version differed from the French version in many small ways; the most obvious differences were - a vertical stabilizer at the tail, a slightly longer lower wing, and a different engine cowling. My version has a Lewis Gun mounted on a Scarff Ring for the observer and a Vickers Gun mounted on the fuselage for the pilot.
The British built Nieuports had the insignia placed differently from the French versions, my decal ini's are British style. I have included two skins, a brown and linen skin for the RFC, and a dark green skin for the RNAS. There is a set of appropriate serial number decals for each. My skinning templates are included with the download. I have also made British faces for the cockpit instruments.
Because of the many minor differences, the skins, cockpit, and data file are not interchangeable with my original Nieuport 12.
Credits:
My thanks to Ojcar for making the data file for the original N12, I have made slight changes for the Beardmore version.
Installation instructions:
For FE1: Unzip the file and move the folder named "Nieuport12Beardmore" into the FirstEagles/Objects/Aircraft folder.
For FE2: Unzip the file and move the folder named "Nieuport12Beardmore" into the FirstEagles/Objects/Aircraft folder. Then in the FirstEagles/Objects/Decals folder, create a new folder named "Nieuport12Beardmore". Move the folder named "D" from the Airplanes/Nieuport12Beardmore folder into the Decals/Nieuport12Beardmore folder you just made.
241 downloads
-

Moska MB bis
By Stephen1918
The Moska MB bis was a Russian single wing fighter, first deployed in 1916 and produced throughout the rest of World War I. It did not have a synchronized gun and the stock plane had the gun mounted at an angle to fire over the prop. I have created a "field modded" version with a horizontal gun and with deflector plates on the prop. Both versions use the same skins.
I have included my skinning templates with the download. The planes uses the stock decals, so there is no "D" folder with this plane.
One of the distinctive features of the Moska MB was that its wings could be folded for shipping and transport. I have included a static model, with folded wings, that can be used by modders in their terrains. The static version has a destroyed version and includes the Types.ini data.
Credits
Thanks to Ojcar for making the data file for the Moska MB bis.
Thanks also to Nix for creating the sound file for the Gnome 80hp engine.
Installation Instructions
For FE1 - Unzip the file and move the folders named "MoskaMBbis" and "MoskaMBbisMod"into the FirstEagles/Objects/Aircraft folder. You also need to move the sound file "gnome80m4.wav" into the FirstEagles/Sounds folder.
For FE2 - Unzip the file and move the folders named "MoskaMBbis" and "MoskaMBbisMod"into the FirstEagles/Objects/Aircraft folder. You also need to move the sound file "gnome80m4.wav" into the FirstEagles/Sounds folder.
196 downloads
-
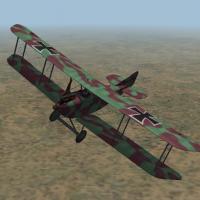
AEG C.IV
By Stephen1918
The AEG C.IV was a German 2 seater that was introduced in 1916 and saw service until the end of the war. It served on the Western, Eastern, and Palestine fronts and was operated by Bulgaria and Turkey as well as by Germany. It was primarily a reconnaissance plane, but was also used as a bomber escort, although not very successfully. It had a fixed Spandau machine gun for the pilot, a Parabellum on a ring mount for the observer, and could carry a small bomb load.
I have included two skins, a green and lilac camo, and a green and brown camo. I have also included a full set of number decals. My skinning templates are included in the download.
There are two bomb loadouts, one internal, and one external mounted under the wings. It is doubtful that the AEG C.IV carried external bombs, but I liked the look of it. For historical accuracy, you probably shouldn't use the External Bombs loadout.
Credits
Thanks to Ojcar for making the data file for the AEG C.IV and for providing valuable information, especially for the cockpit details.
Thanks also to Nix, who made the sound file for the Mercedes 160hp engine.
Thanks to Ojcar (again) for pointing out the problem with the decals.
Installation Instructions
For FE1 - Unzip the file and move the folder named "AEGC4" into your FirstEagles/Objects/Aircraft folder. You also need to move the sound file "mercedes160m2.wav" into the FirstEagles/Sounds folder.
For FE2 - Unzip the file and move the folder named "AEGC4" into the FirstEagles/Objects/Aircraft folder. Then in the FirstEagles/Objects/Decals folder, create new folder named "AEGC4". Move the folder named "D" from the Aircraft/AEGC4 folder into the Decals/AEGC4 folder you just made. You also need to move the sound file "mercedes160m2.wav" into the FirstEagles/Sounds folder.
333 downloads
-

Caudron G.4
By Stephen1918
The Caudron G.4 was a twin engine French bomber. It was introduced late in 1915, it used wing warping for banking and had four rudders. The plane was widely used, and saw service on most of the fronts. After 1916, it was used mostly for night bombing and reconnaissance.
I have included four skins, a French linen, an Italian linen, a Russian grey, and a British brown. I have included some personal markings, but the serial number is so hard to see on this plane, that I only made one. My skinning templates are included in the download.
There are three bomb loadouts, including one internal, and two external bomb loads. I had to make a special pilot, because the stock FE pilot would not fit in the Caudron cockpit. The new pilot is included in the download.
Historical Note
All of the examples I found had linen skins, except for some Russian grey or light blue planes. I have included a British brown skin because it seemed likely that other colors than plane linen were used, although I found no evidence of it.
Credits
Thanks to Ojcar for making the data file for the Caudron G.4.
Thanks also to Whiteknight06604 who originally suggested this plane more than a year ago, and provided some resources at that time. Thanks also to Jeanba, who helped research skins for the Caudron G.4.
Installation Instructions
For FE1 - Unzip the file. Open the folder named "PutInAircraftFolder." Move the folder named "CaudronG4" and the two pilot files into your FirstEagles/Objects/Aircraft folder. The files named "CaudronPilot.lod" and "CaudronPilot.bmp" should be in the Aircraft folder, but not in any other folder. Open the "PutInSoundsFolder" and move the file named "LeRhone9c80hp1m4.wav" into your FirstEagles/Sounds folder.
For FE2 - Unzip the file. Open the folder named "PutInAircraftFolder." Move the folder named "CaudronG4" into your FirstEagles/Objects/Aircraft folder. Move the files named "CaudronPilot.lod" and "CaudronPilot.bmp" into the FirstEagles/Objects/Pilots folder. Then in the FirstEagles/Objects/Decals folder, create a new folder named "CaudronG4". Move the folder named "D" from the Aircraft/CaudronG4 folder into the Decals/CaudronG4 folder you just made. Open the "PutInSoundsFolder" and move the file named "LeRhone9c80hp1m4.wav" into your FirstEagles/Sounds folder.
365 downloads
-

FE AA Objects
By Geezer
Steven1918 and I have put together a comprehensive collection of WW1 anti-aircraft guns. A noteworthy feature is, for the first time, a selection of medium-level 37/40mm auto cannons that bridge the gap between low-level MGs and high-level 75mm AA cannons. The Maxim 37/40mm auto cannon, dubbed the "pom-pom" by the Brits, was used in various versions by all the major powers and was still in limited service early in WW2. Pom-poms will significantly affect a gamer's experience when flying below 5,000 feet, and could motivate a gamer to replay old campaigns - especially if he used to like balloon-busting. Now that balloons can be realistically defended, he may not like balloon-busting anymore.
In addition to the pom-poms, there are multiple types of AA MGs. Also included are two types of optional gun pits: a C-shaped pit intended for use with AA guns, and a U-shaped pit intended for use with artillery, plus balloon winches for the major powers.
252 downloads
-
Armchair Aces over Palestine
By ojcar
Welcome WWI buffs! This is a new series of campaings, covering the air war over Palestine Front in WWI
The entire war is divided in mini-campaigns of a month-10 missions. I'm using the fantastic Palestine map. You'll have about 20 mini-campaigns and 200 missions per pilot!
You'll fly as British, Australian, German or Ottoman pilot.
This series is made for FE2, but you also have a FE1 version.
244 downloads
(1 review)0 comments
Updated
-
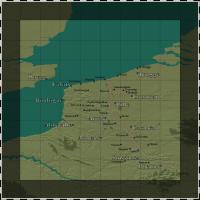
Palestine Terrain
By Stephen1918
Palestine Terrain - June 2014
(Summary of the ReadMe file included in the download.)
I highly recommend that you make a new install of First Eagles for this terrain. The ground objects, planes, and nations involved are different from the stock game.
This terrain works best using the Desert.cat file from Strike Fighters. It is possible to run this using the Cambrai.cat file from First Eagles. Instructions for installing either option are in the ReadMe file.
NOTE - In FE2, this terrain has a problem with shadows for some areas. The only solution is to ratchet down the shadow settings until the problem goes away. I have included notes in the ReadMe file which go into more detail.
CREDITS
Gepard made a Palestine terrain for Strike Fighters some time ago. I have kept many of the objects he included in the original, including the Pyramids of Giza.
Wrench made a World War I version of Gepard's terrain. I have kept a lot of his work - you will still find many of Wrench's "Easter Eggs" in my version.
Wingwiner gave me permission to use some of the buildings he made for Strike Fighters.
Geezer gave me permission to use his ground crew and airfield objects, AA guns and balloon winches. Geezer also made the skin for the city buildings.
Everyone whose work is included in this download has given me permission to use their work. I thank them.
Gerwin made a TFD Tool which I used for a lot of the terrain map tweaking and target placement. I thank him for sharing it.
Ojcar shared many resources for the history of WWI in Palestine. I thank him for his help.
I wish to thank Geezer, Panama Red and Ojcar for beta testing. They all did multiple installs and tweaking as we tried to figure out the shadow problem. Geezer and Panama Red installed the game on different computers to see how the game performed on different platforms. I also wish to thank Wrench whose input was helpful during the testing phase.
THIS VERSION
I have made many minor changes to the terrain - I made new terrain tiles, (most based on Gepard's) and I have leveled the airfields and train stations, and smoothed out the height map around cities.
I changed a lot of place names, and I added places that were significant in WWI. I added a lot of (unnamed) small towns and villages to fill out the landscape.
I made a lot of new objects - bridges, trains, tents, trucks, cavalry units, city buildings, etc. I also reskinned some buildings, vehicles, and ships that I made for other terrains.
In my version I used the "ActiveDate/InactiveDate" feature of the target.ini to make airfields and targets change sides as the war proceeds. So different flags, AAA guns, vehicles, and planes will show up in the locations depending on the month and year.
The dates I used match the dates Ojcar uses in his campaigns. You should fly Ojcar's campaigns to get the real benefit of this terrain.
I have included a new title screen for this terrain.
Complete installation instructions are included in the ReadMe file in the download.
I highly recommend that you install Panama Red's sky mods. It adds a whole new level to the experience.
I also recommend that you install Ojcar's Palestine campaigns. This terrain was built for his campaigns and you will get the best gameplay using them.
366 downloads
-
New Linen Skins For Steven1918's BE2c
By Geezer
These are new BE2c skins made for the Palestine mod. To install, replace the existing five bmp files in the BE2cRAFLinen folder with these five new bmp files.
113 downloads
-
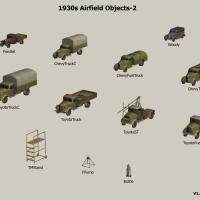
1930s Ground And Terrain Objects
By Geezer
Kudos to Wrench! He massaged the basic elements I sent him, and created a complete DL ready to drop into your game folders. He set it up for SF2 but it should work OK for FE2. As usual, pay attention to the ReadMe. This pack does not include airfield figures - they are still in-work so a separate pack will be released when they are complete. The floor of the large hangar is a separate object, similar to the parking ramp. Hopefully, you can tweak the height and angle of these objects if you encounter problems with a game map that is not completely flat and level.
151 downloads
(3 reviews)0 comments
Updated
-
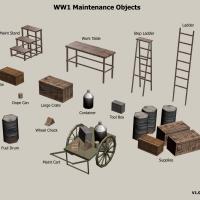
WW1 Airfield Maintenance Objects
By Geezer
This pack contains all new WW1 maintenance objects.
4/24/2014:
revised the pack to include missing .bmp for the maintenance equipment.
241 downloads
(5 reviews)0 comments
Updated
-
-
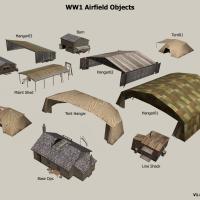
WW1 Airfield Objects
By Geezer
This pack contains all new airfield objects - hangars, barn, farmhouse, shed, barracks, etc. Just updated the pack to V1.1 - it now includes the missing Barracks and Base Ops files.
These objects use hi-res graphics and may not run well on older computers.
285 downloads
-
dogfight 1.0.zip
By Nippy
Dogfight for Thirdwire Simulators (Series 1)
Dogfight is a quick mission generator much like Microsofts Quick Combat and
Ubisofts Quick Mission Builder.
This simple little program is an attempt to add similar facility to Thirdwire products
without editing Mission files by hand, or struggling with a complex Mission Editor.
So, using it you should be up and flying against a selected opponent within a few
seconds (once you're use to the system anyway!).
As a template for the Missions I used a standard 1v1 fighter encounter so the action
begins very close together (2 km seperation for WWI types, slightly further for faster types).
To use you:
1)Start Dogfight.
2)Setup mission.
3)Press the Red GENERATE button.
4)LEAVE Dogfight running.
5)Start the Thirdwire Simulator.
6)Go to the Single Mission page and then Load Mission Menu.
7)Click on the name of the mission that you just created in dogfight(default is "0 Dogfight").
8)When you want to change the mission click on Alt and Tab simultaneously.
9)Select Dogfight, make your changes and then press the red GENERATE button.
10)Return to the Thirdwire Simulator by clicking it on the task bar (or alt tabbing if you prefer).
11)ALWAYS RESELECT THE MISSION from the Single Mission-Load Misiion Menu to update the information.
12)Play the mission!
Repeat 8-12 as many times as you want
This sounds a bit long winded but you do soon get used to it.
Testing
DogFight has been tested with FE1 extensively (with virtually all the add on aircraft from
CombatAce, the Skunkworks and Peter01 fms), SFP1 (chiefly SCW) and WOE1 (chiefly WOR and WOA).
I've also tried it with some early Korean War era jets (SFP1).
I have only briefly tried it with more modern types (WOE) and though it works I'm not too sure
how useful regular fliers of these types will find it (it's the one period that I never really fly).
I have no access to any Thirdwire Series 2 sims so I really don't know if it will work with them.
The program was written using Microsoft Visual Studio Express 2010 C++ and FLTK.
FLTK (Fast Light Toolkit) is a great free package for constructing GUIs really quickly and easily.
Without it I doubt that I would have had time to write this program.
Thanks
Thanks to TK for creating a marvellous set of Sims. I love the way they work with TrackIR.
I would also like to take this opportunity to thank the many add on creators at Combatace and
the Skunkworks who have given me many hours of great gaming.
I hope Dogfight helps to provide some entertainment for Thirdwire Simulator Users.
Gary Ireland
116 downloads
-
Planing Maps
By gterl
Hi Everyone
I always thought that the planing maps needed a bit of a more 'historical' (oldish) touch.
Here are three planing maps for the following terrains:
- Flanders
- Verdun
- Cambrai
Installation:
1) Make a backup copy of your existing planing maps (only overwrite if asked if you've already a backup)
2) Drop the files (*.bmp) into the respective terrain folders, like (..\First Eagles\Terrain\Flanders, ...\First Eagles\Terrain\wwiVerdun, etc.)
If you don't like....well just delete and replace with the old ones!
Cheers
gterl
155 downloads
-
Castillac SPAD XII
By gterl
Hi
and now something completely different!
Taken out of a comic strip (btw, highly recomendet ->
).
A rather special skin for the SPAD XII (the one with the cannon, which can be found here on combatace).
Installation:
- Drop whole folder 'Edelweiss' in the SPAD_XII folder (..\objects\Aircraft\SPAD_XII)
- Add the lines below into your SPAD_XII.ini at the bottom, of course change the XXX to the next number
[TextureSetXXX] <-- Change number
Directory=Edelweiss
Name=Castillac
Nation=FRANCE
Squadron=unknown
Specular=0.400000
Glossiness=0.300000
Reflection=0.100000
cheers
gterl
85 downloads
(1 review)0 comments
Submitted
-

Armored Train - Ground Level
By Stephen1918
Armored Trains were used extensively on the Eastern Front and to a lesser extent on the Palestine and Italian Fronts. On the Western Front, after 1914 they were used mostly for defense and as mobile headquarters. I have created five cars which can arranged in different configurations.
Engines could both push and pull other cars. It was common to have an armed car or two in front of the engine.
Troop cars had quarters for an infantry unit to help defend the train. There is a turret with a light gun. It is currently set for anti-aircraft, but you can change the data file to target ground objects.
Transport cars were used to move troops, munitions, or other supplies into a battle zone or recently conquered territory.
Gun cars were used as mobile light artillery. They can be included in a train or parked on a siding to defend a train station, supply depot, or other strategic location. If you change the target type to ground, they can be used as field guns.
I have included two versions of a heavy, rail mounted artillery gun. In transport mode, the gun is lowered and the car can be included in a train. In deployed mode, there is gun data assigned so the gun will shoot at ground targets. If you place an observation balloon about 2 kilometers down range, the gun will be elevated when it shoots, as if it were shooting at a distant target. There is very little side to side motion, so you have to be pretty accurate when you place the target balloon.
All the cars are the same length for easy placement. Put them 17.25 meters apart and they will line up nicely on the tracks.
There are three complete trains with different skins so you can use them in different terrains or for different forces. I have arbitrarily assigned the grey skin to Germany, the green skin to Russia, and the tan skin to the Ottoman Empire. With a little typing, you can reassign them to whatever forces you want.
These cars are designed to be used directly on the terrain, without any track lod. You will need to use them in terrains that have the tracks painted directly on the tiles.
All of these need to be included in the targets.ini in order to use them. I have included the data for the types.ini in the folders for each train.
132 downloads
(1 review)0 comments
Updated
-

Armored Train - For Tracks
By Stephen1918
Armored Trains were used extensively on the Eastern Front and to a lesser extent on the Palestine and Italian Fronts. On the Western Front, after 1914 they were used mostly for defense and as mobile headquarters. I have created five cars which can arranged in different configurations.
Engines could both push and pull other cars. It was common to have an armed car or two in front of the engine.
Troop cars had quarters for an infantry unit to help defend the train. There is a turret with a light gun. It is currently set for anti-aircraft, but you can change the data file to target ground objects.
Transport cars were used to move troops, munitions, or other supplies into a battle zone or recently conquered territory.
Gun cars were used as mobile light artillery. They can be included in a train or parked on a siding to defend a train station, supply depot, or other strategic location. If you change the target type to ground, they can be used as field guns.
I have included two versions of a heavy, rail mounted artillery gun. In transport mode, the gun is lowered and the car can be included in a train. In deployed mode, there is gun data assigned so the gun will shoot at ground targets. If you place an observation balloon about 2 kilometers down range, the gun will be elevated when it shoots, as if it were shooting at a distant target. There is very little side to side motion, so you have to be pretty accurate when you place the target balloon.
All the cars are the same length for easy placement. Put them 17.25 meters apart and they will line up nicely on the tracks.
There are three complete trains with different skins so you can use them in different terrains or for different forces. I have arbitrarily assigned the grey skin to Germany, the green skin to Russia, and the tan skin to the Ottoman Empire. With a little typing, you can reassign them to whatever forces you want.
These cars are designed to be used with the train tracks from Gepard's Railway Station (available in the Strike Fighter 1 Terrain downloads). Gepard has given me permission to include the tracks with my train. I have made a new skin with the ties farther apart, which I think looks better from the air. If you already have the tracks in your terrain, you don't need this.
All of these need to be included in the targets.ini in order to use them. I have included the data for the types.ini in the folders for each train.
120 downloads
(1 review)0 comments
Updated
-

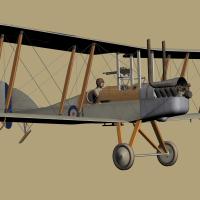
RAF BE2c
By Stephen1918
Several variations of the BE2 were produced by the Royal Aircraft Factory from 1912 until the end of World War 1. The BE2c was introduced in 1914 and was produced in large numbers. It was designed to be a very stable plane, which was desirable in a reconnaissance plane, but not very effective for a fighter. During its service, the BE2c was used mostly for recon missions, but it sometimes served as a fighter and as a light bomber.
I have included two skins, a stock linen, and a brown paint. A full set of number decals are included for each skin. My skinning templates are included in the download.
The gunner in the BE2c sat in front of the pilot and either had multiple guns, or was able to move the gun between multiple mounts. The game engine does not allow this, so I set up the data file to limit the gunner's aim to the upper rear of the plane. However, I provided alternate lines in the FM which will allow you to widen the gunner's aim, but that makes the gun pass through the struts, and sometimes shoot through the wing.
Instructions for changing the gunner's range of motion are included in the download.
Credits
Thanks to Ojcar for making the data file for the BE2c and for providing resources for the model.
Thanks also to 33Lima and Hansa who provided resources for the cockpit and help with details of the model.
Thanks to Mike Dora for identifying and helping me fix problems with the gunner.
Thanks to Nicholas Bell for correcting the hit box coordinates for this plane.
Installation Instructions
For FE1 - Unzip the file and move the folder named "RAFBE2C" into the FirstEagles/Objects/Aircraft folder.
For FE2 - Unzip the file and move the folder named "RAFBE2C" into the FirstEagles/Objects/Aircraft folder. Then in the FirstEagles/Objects/Decals folder, create a new folder named "RAFBE2C". Move the folder named "D" from the Aircraft/RAFBE2C folder into the Decals/RAFBE2C folder you just made.
491 downloads
-
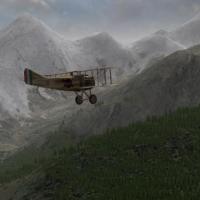
Italian Terrain (incl. 1915-1917 campaign)
By gterl
Italian Terrain WW1 V2.0
*******************************
Update (2.0):
- Removed ships that show up on land
- Added fortresses (Austrian & Italian)
- Changed ocean tiles
- Minor corrections
INTRODUCTION
The Italian Front during WW1 refers to a series of battles fought between 1915 and 1918 in northern Italy between the armies of Austria-Hungary and Germany against Italy.
Italy hoped that by joining the countries of the Triple Entente against the Central Powers it would gain Cisalpine Tyrol (today's provinces of Trentino and South Tyrol), the Austrian Littoral, northern Dalmatia and some areas of western Carniola.
Italy had hoped to begin the war with a surprise offensive intended to move quickly and capture several Austrian cities.
Well, the war soon bogged down into trench warfare similar to the Western Front fought in France.
INCLUDED
- Italian terrain/front WW1
- Ground objects
- Italian campaign 1915-1917 (incl. needed skins)
FAQs
Q: Is the scale of the map correct
A: No
Q: Why not the Piave river front, in order to create late 1917/1918 scenarios?
A: Because
Q: Are all the named towns and cities correct (placement and naming)
A: Yes as good as it gets.
Q: Does it include more than one season?
A: No, currently not. Might be released with version 2
Q: Is the frontline correct?
A: Yes as good as it gets, representing late 1917 with certain omissions in order to get targets for the campaigns (like Monfalcone being Austro-Hungarian)
Q: The river Isonzo seems to cut through the mountains, is that correct?
A: To a certain degree, but I had to modify massively the heightmap in order to make things look right (e.g. river not flowing up/down the mountains)
Q: The northern part of the map, e.g. toward Munich, seems without further towns?
A: Correct. All forests and lakes are there but apart from the major cities (Salzburg & Munich) I've not yes included smaller towns.
INSTALLATION
1. Make a backup copy of your First Eagles folder (just in case)
2. Extract the file into a temporary folder (like c:\temp\)
3. Copy all the relevant folders into the respective First Eagles game folders
(example: c:\temp\First Eagles\Terrain\wwiItaly into your c:\Program Files\First Eagles\Terrain folder)
4. Drop the skin folders into the respective aircraft folders and add the included lines into the aircraft ini file
PREREQUISITES
- FE Gold (might work also with FE2, sorry guys don't know), with the latest patch
- Aircraft for the included campaign:
Voisin3_120
Voisin3_150
Nieuport11
Nieuport17
SVA5
MSTypeL
MSTypeLAO
PfalzEV
FokkerD2
HBC1_160
HBC1_200
HBC1_230
oefD3_ba53a
oefD3_ba153a
oefD3_ba253
LloydC2
Hansa_BrandenburgDI
AviatikD1
AlbatrosD3OAW
PhoenixD2
RumplerC1
AviatikC2
Farman MF11c
SP3
Ca3
Dfwci
FokkerM7BI
CREDITS
As usual i want to say thank you to all guys who helped me to create the Italian terrain, to TK, Jan Tuma, Stephen1918, ojcar, Gepard, Heck, geo, quack74, Edward, A-Team (airplanes not included), Guitarclassic55 (for the wonderful menu) and a lot of others.
Sorry guys, at the moment i have forgotten the names. Please contact me if you want to be named at this place.
Thanks for files, suggestions, bug findings etc.
DISCLAIMER
The Italian terrain is freeware.
You are free to modify and share it, BUT Commercial use is prohibited.
If you find bugs please post them in First Eagles section of Combatace.com forum.
Hope you enjoy it.
Sincerely
gterl
680 downloads
- fe
- first eagles
- (and 3 more)
-
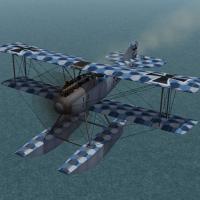
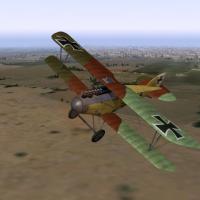
Albatros W.4 (Late)
By Stephen1918
The Albatros W.4 was a float plane version of the D.II. It used the same fuselage, engine, and armament as the D.II, but had a wider wingspan and tail. The W.4 was used for recon and spotting missions in the North Sea, the Baltic, and by Austria-Hungary in the Adriatic Sea.
This is a late version of the W.4 with the radiator mounted on the upper wing. I have included a complete set of number decals, and two skins - a blue hex camo skin for Germany and one for Austria-Hungary. I have also included my skinning templates. The skins for the late Albatros W.4 are interchangeable with the early version skins.
My version includes a loadout for a light bomb load, even though the W.4 was not used for bombing. You can delete the loadout file if you want more historical accuracy.
Since it's a float plane, the W.4 works best in the Flanders, Gibraltar or other terrain that has a lot of water. The plane will actually take off and land from a conventional airfield, but it looks strange to see the floats going under the ground. It would be best to start the missions in the air. The plane will show up occassionally parked on an airfield, but its availability is listed as "Rare" so it shouldn't happen too often.
Credits
Thanks to Ojcar for making the data file for the Albatros W.4.
Thanks to Nix for providing the sound for the Mercedes engine.
And thanks to Quack74 for giving me the idea for a float plane.
Installation Instructions
For FE1 - Unzip the file and move the folder named "AlbatrosW4Late" into the FirstEagles/Objects/Aircraft folder. You also need to move the sound file "mercedes160m2.wav" into the FirstEagles/Sounds folder.
For FE2 - Unzip the file and move the folder named "AlbatrosW4Late" into the FirstEagles/Objects/Aircraft folder. Then in the FirstEagles/Objects/Decals folder, create new folder named "AlbatrosW4Late". Move the folder named "D" from the Aircraft/AlbatrosW4Late folder into the Decals/AlbatrosW4Late folder you just made. You also need to move the sound file "mercedes160m2.wav" into the FirstEagles/Sounds folder.
232 downloads
(1 review)0 comments
Submitted
-
Sopwith Tabloid (Late)
By Stephen1918
The Tabloid was the land based variant of the Schneider developed in 1913. It was quickly adopted by the British military and was used both by the Royal Navy and the Royal Flying Corps. Later versions had ailerons on both wings and a larger vertical stabilizer on the tail. Most were armed with Lewis guns on the upper wing and could carry small bomb loads. The Tabloid was used mostly for recon and light bombing missions. I have included my skinning templates and a full set of number decals.
Credits
Thanks to Ojcar for making the data file for the Sopwith Tabloid and for providing input on the model details.
Thanks also to Nix for creating the sound file for the Gnome 100hp engine.
Installation Instructions
For FE1 - Unzip the file and move the folder named "SopwithTabloidLate" into the FirstEagles/Objects/Aircraft folder. You also need to move the sound file "gnome100m2.wav" into the FirstEagles/Sounds folder.
For FE2 - Unzip the file and move the folder named "SopwithTabloidLate" into the FirstEagles/Objects/Aircraft folder. Then in the FirstEagles/Objects/Decals folder, create new folder named "SopwithTabloidLate". Move the folder named "D" from the Aircraft/SopwithTabloidLate folder into the Decals/SopwithTabloidLate folder you just made. You also need to move the sound file "gnome100m2.wav" into the FirstEagles/Sounds folder.
274 downloads
(2 reviews)0 comments
Submitted
-
Sopwith Tabloid (Early)
By Stephen1918
The Tabloid was the land based variant of the Schneider developed in 1913. It was quickly adopted by the British military and was used both by the Royal Navy and the Royal Flying Corps. Early versions used wing warping instead of ailerons. My version has no gun, but some were armed with Lewis guns on the upper wing and could carry small bomb loads. The Tabloid was used mostly for recon and light bombing. In September 1914, Tabloids of the RNAS bombed the Zeppelin sheds at Düsseldorf.
An unlicensed copy known as the Lebed VII was built by the Russians and used for recon and later for training.
I have created two skins, a British version and a Russian. I have included a full set of number decals for each. My skinning templates are included with the download.
Credits
Thanks to Ojcar for making the data file for the Sopwith Tabloid and for providing input on the model details.
Thanks also to Nix for creating the sound file for the Gnome 100hp engine.
Installation Instructions
For FE1 - Unzip the file and move the folder named "SopwithTabloidEarly" into the FirstEagles/Objects/Aircraft folder. You also need to move the sound file "gnome100m2.wav" into the FirstEagles/Sounds folder.
For FE2 - Unzip the file and move the folder named "SopwithTabloidEarly" into the FirstEagles/Objects/Aircraft folder. Then in the FirstEagles/Objects/Decals folder, create a new folder named "SopwithTabloidEarly". Move the folder named "D" from the Aircraft/SopwithTabloidEarly folder into the Decals/SopwithTabloidEarly folder you just made. You also need to move the sound file "gnome100m2.wav" into the FirstEagles/Sounds folder.
191 downloads
(2 reviews)0 comments
Updated
-
Sopwith Schneider
By Stephen1918
The Sopwith Schneider was the floatplane variant of the Tabloid, and won the Schneider racing trophy in 1914. It was quickly adopted by the British military and was used by the Royal Navy throughout the war. Early versions used wing warping instead of ailerons. Some were armed with Lewis guns on the upper wing and could carry small bomb loads. The Schneider was used mostly for recon, some were used to intercept Zeppelins over the North Sea and some were used to attack land based targets.
Since it's a float plane, the Sopwith Schneider works best in the North Sea terrain, or in Flanders, Gibraltar or other terrain that has a lot of water. The plane will actually take off and land from a conventional airfield, but it looks strange to see the floats going under the ground. Ojcar has included take off instructions in a separate text file.
I have created two skins, an early version with the British flag on the wings, and a later version with roundel markings. I have included a set of number decals. My skinning templates are included with the download.
Credits
Thanks to Ojcar for making the data file for the Sopwith Schneider and for providing instructions for taking off.
Thanks also to Nix for creating the sound file for the Gnome 100hp engine.
Installation Instructions
For FE1 - Unzip the file and move the folder named "SopwithSchneider" into the FirstEagles/Objects/Aircraft folder. You also need to move the sound file "gnome100m2.wav" into the FirstEagles/Sounds folder.
For FE2 - Unzip the file and move the folder named "SopwithSchneider" into the FirstEagles/Objects/Aircraft folder. Then in the FirstEagles/Objects/Decals folder, create new folder named "SopwithSchneider". Move the folder named "D" from the Aircraft/SopwithSchneider folder into the Decals/SopwithSchneider folder you just made. You also need to move the sound file "gnome100m2.wav" into the FirstEagles/Sounds folder.
207 downloads
(2 reviews)0 comments
Updated
-
Download Statistics