
Stephen1918
-
Posts
1,187 -
Joined
-
Last visited
-
Days Won
19
Content Type
Profiles
Forums
Gallery
Downloads
Store
Everything posted by Stephen1918
-
Excellent models and skins. These will be a great addition to FE. I especially like the Brit AA gunners in their shorts. I'm looking forward to these.
-
There's a file in the FlightData.cat called the ViewList.ini that contains all the specs for all the views.
-
Wonderful work! I admire the level of detail you're putting into the model and the skins.
-
ROF, FE2, or WOFF? (and a question or 2 about FE2)
Stephen1918 replied to MrGoTime's topic in General Discussion
The planes will fly in pretty good formation until enemy planes come into range or AA starts firing, then everyone starts to take evasive maneuvers, flying in zig zags - thats probably the buzzing around you're seeing. -
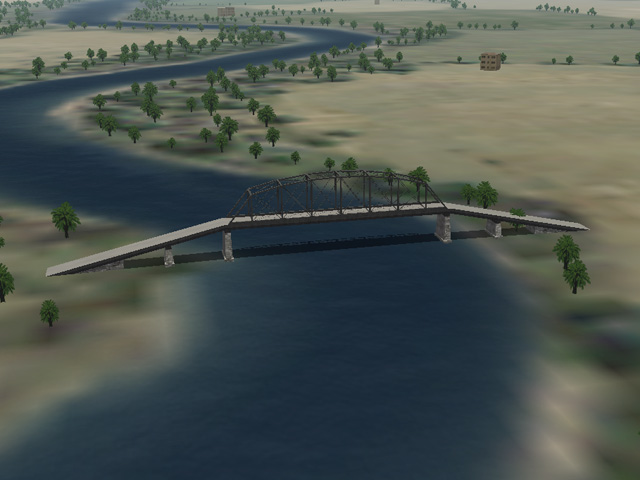
Thank you, gentleman! The bridge you see is one piece and it fits nicely on the river tiles, I'm using it over the Jordan. I've also made a larger one in sections that can be as long as you want, I'm using that one over the Nile and Suez. The tiles now are all 256 x 256. But I'm working on larger ones for the cities and farms. Ojcar - I'm looking forward to your campaigns. I've made a few changes to the Target.ini. I'll send it to you when it's done.
-
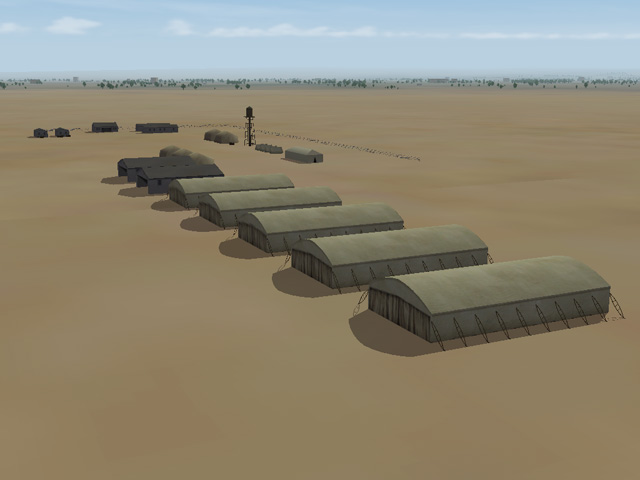
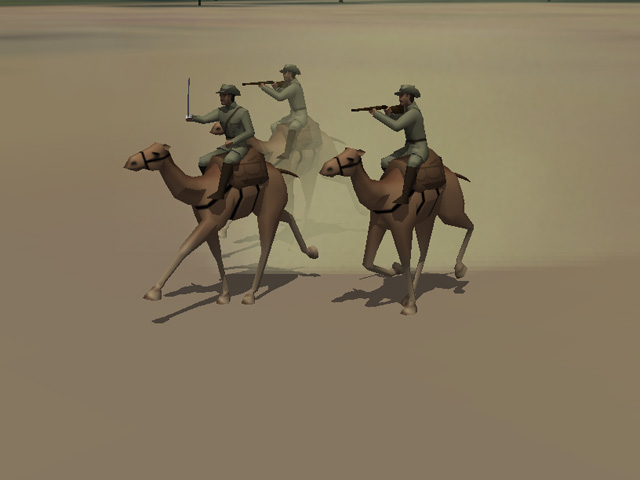
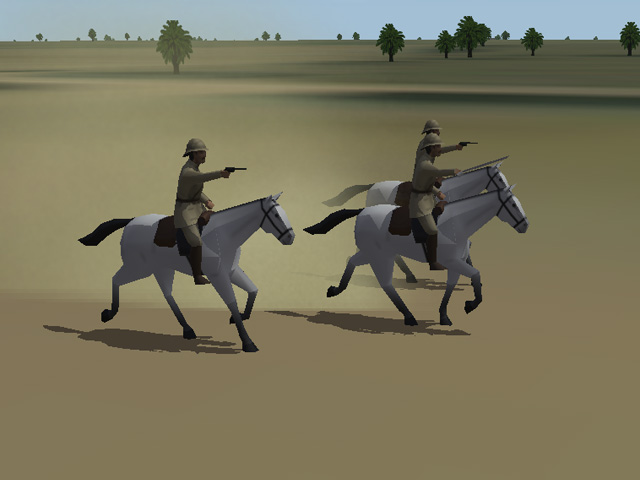
I've been working on a revision of Wrench's Palestine, which is based on Gepard's Suez terrain. I've done some work on the tiles, a lot of work on the targets, and I've made quite a few new ground objects. I've redone all the ports, train stations, airfields, camps, and movements, and I've made some new ground units. There is still a lot of tweaking and testing to do, but it's getting close.


-
No destroyed model yet. I started making the airship hangars and moored airships back when I did the airships last March, but I got distracted by other things. There are moored versions of some of the others too, and different sized hangars for them. By the way, Edward included a moored zeppelin in the Flanders terrain.
-
Congratulations on your retirement. (I'm starting to think along those lines myself.) I'm also a models/texture guy. I'm sure it will all come back to you, but if you need help remembering details about rigging, unwrapping, etc. let me know. Welcome back. I look forward to some great additions to First Eagles from you.
-
From time to time, when ending a mission, instead of a black screen, I get a mostly black screen with pieces of other screens showing - like a quilt. It doesn't happen often and it fixes itself pretty quickly. I've just assumed it was a memory issue since I have a pretty basic video card. I haven't tried to track when it happens.
-
The nice thing about Armchair Aces is that it's a series of campaigns and can be installed a little at a time. May I also suggest the Galicia Terrain and the Eastern Front campaign, this will give you a chance to fly a lot of Russian and Austro-Hungarian planes.
-
Very nice work! Good looking terrain too. The guns should be able to track while the train is moving.
-
Very nice!
-
While working on my next project, I noticed that the armored train cars started showing in place of tanks in Army Co-operation missions. I don't know why, since the GroundObjectRole was set to WAREHOUSE. I changed the setting to RECON for all the cars and the problem seems to be fixed. I still don't know why it happened. I have uploaded a new version with everything corrected. Still waiting for administrator approval. (Look for v2) I also fixed a problem with the rear wheel of the gun car in both versions.
-
- 1
-

-
These look fantastic! Even with no trains on them, they add a new level of realism to FE. (Of course, trains would be better!) I'm looking forward to the new Verdun!
-
First Eagles only has line-of-sight aiming, and that looked so wrong for big guns. I played around with making an object to be a target that would hover over the terrain... then I realized we already had balloons!
-
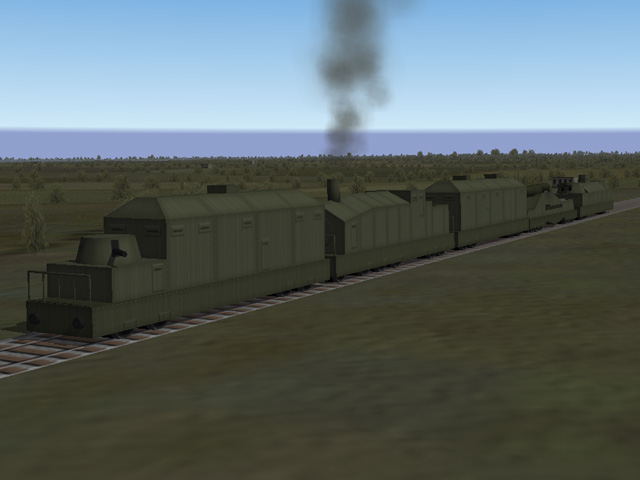
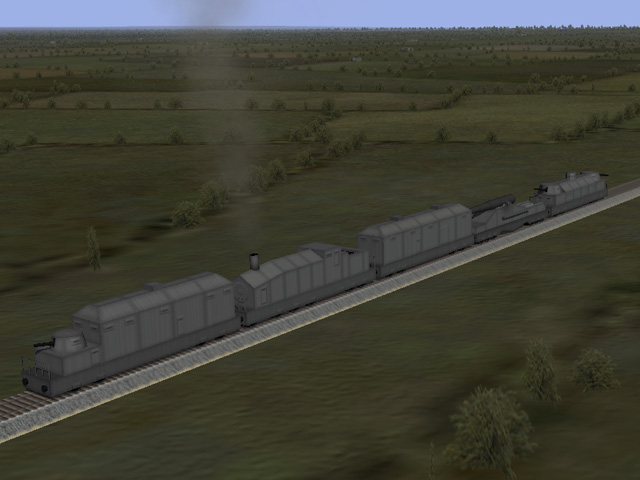
I uploaded two versions of an armored train. One for the tracks from Gepard's Railway Station, and another version that sits directly on the terrain. (Quack has mentioned that he is making some terrain tiles with railroad tracks on them.) There are five different cars, and three skins. I also made a rail mounted artillery gun that shoots at ground targets. I've included instructions in the Read Me that explain how to make it look like it's shooting at a distant target. All the cars are the same length to make it easier to place them in the terrain.

-
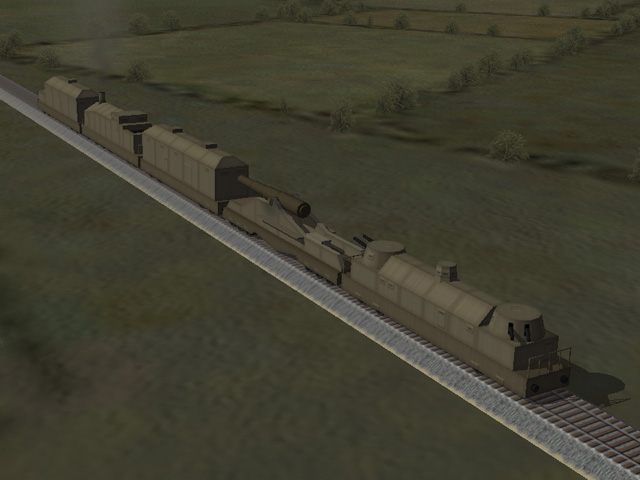
View File Armored Train - For Tracks Armored Trains were used extensively on the Eastern Front and to a lesser extent on the Palestine and Italian Fronts. On the Western Front, after 1914 they were used mostly for defense and as mobile headquarters. I have created five cars which can arranged in different configurations. Engines could both push and pull other cars. It was common to have an armed car or two in front of the engine. Troop cars had quarters for an infantry unit to help defend the train. There is a turret with a light gun. It is currently set for anti-aircraft, but you can change the data file to target ground objects. Transport cars were used to move troops, munitions, or other supplies into a battle zone or recently conquered territory. Gun cars were used as mobile light artillery. They can be included in a train or parked on a siding to defend a train station, supply depot, or other strategic location. If you change the target type to ground, they can be used as field guns. I have included two versions of a heavy, rail mounted artillery gun. In transport mode, the gun is lowered and the car can be included in a train. In deployed mode, there is gun data assigned so the gun will shoot at ground targets. If you place an observation balloon about 2 kilometers down range, the gun will be elevated when it shoots, as if it were shooting at a distant target. There is very little side to side motion, so you have to be pretty accurate when you place the target balloon. All the cars are the same length for easy placement. Put them 17.25 meters apart and they will line up nicely on the tracks. There are three complete trains with different skins so you can use them in different terrains or for different forces. I have arbitrarily assigned the grey skin to Germany, the green skin to Russia, and the tan skin to the Ottoman Empire. With a little typing, you can reassign them to whatever forces you want. These cars are designed to be used with the train tracks from Gepard's Railway Station (available in the Strike Fighter 1 Terrain downloads). Gepard has given me permission to include the tracks with my train. I have made a new skin with the ties farther apart, which I think looks better from the air. If you already have the tracks in your terrain, you don't need this. All of these need to be included in the targets.ini in order to use them. I have included the data for the types.ini in the folders for each train. Submitter Stephen1918 Submitted 12/22/2013 Category First Eagles - WWI and Early Years - Object Mods
-
- 1
-
-
View File Armored Train - Ground Level Armored Trains were used extensively on the Eastern Front and to a lesser extent on the Palestine and Italian Fronts. On the Western Front, after 1914 they were used mostly for defense and as mobile headquarters. I have created five cars which can arranged in different configurations. Engines could both push and pull other cars. It was common to have an armed car or two in front of the engine. Troop cars had quarters for an infantry unit to help defend the train. There is a turret with a light gun. It is currently set for anti-aircraft, but you can change the data file to target ground objects. Transport cars were used to move troops, munitions, or other supplies into a battle zone or recently conquered territory. Gun cars were used as mobile light artillery. They can be included in a train or parked on a siding to defend a train station, supply depot, or other strategic location. If you change the target type to ground, they can be used as field guns. I have included two versions of a heavy, rail mounted artillery gun. In transport mode, the gun is lowered and the car can be included in a train. In deployed mode, there is gun data assigned so the gun will shoot at ground targets. If you place an observation balloon about 2 kilometers down range, the gun will be elevated when it shoots, as if it were shooting at a distant target. There is very little side to side motion, so you have to be pretty accurate when you place the target balloon. All the cars are the same length for easy placement. Put them 17.25 meters apart and they will line up nicely on the tracks. There are three complete trains with different skins so you can use them in different terrains or for different forces. I have arbitrarily assigned the grey skin to Germany, the green skin to Russia, and the tan skin to the Ottoman Empire. With a little typing, you can reassign them to whatever forces you want. These cars are designed to be used directly on the terrain, without any track lod. You will need to use them in terrains that have the tracks painted directly on the tiles. All of these need to be included in the targets.ini in order to use them. I have included the data for the types.ini in the folders for each train. Submitter Stephen1918 Submitted 12/22/2013 Category First Eagles - WWI and Early Years - Object Mods
-
- 1
-
-

Version v2
137 downloads
Armored Trains were used extensively on the Eastern Front and to a lesser extent on the Palestine and Italian Fronts. On the Western Front, after 1914 they were used mostly for defense and as mobile headquarters. I have created five cars which can arranged in different configurations. Engines could both push and pull other cars. It was common to have an armed car or two in front of the engine. Troop cars had quarters for an infantry unit to help defend the train. There is a turret with a light gun. It is currently set for anti-aircraft, but you can change the data file to target ground objects. Transport cars were used to move troops, munitions, or other supplies into a battle zone or recently conquered territory. Gun cars were used as mobile light artillery. They can be included in a train or parked on a siding to defend a train station, supply depot, or other strategic location. If you change the target type to ground, they can be used as field guns. I have included two versions of a heavy, rail mounted artillery gun. In transport mode, the gun is lowered and the car can be included in a train. In deployed mode, there is gun data assigned so the gun will shoot at ground targets. If you place an observation balloon about 2 kilometers down range, the gun will be elevated when it shoots, as if it were shooting at a distant target. There is very little side to side motion, so you have to be pretty accurate when you place the target balloon. All the cars are the same length for easy placement. Put them 17.25 meters apart and they will line up nicely on the tracks. There are three complete trains with different skins so you can use them in different terrains or for different forces. I have arbitrarily assigned the grey skin to Germany, the green skin to Russia, and the tan skin to the Ottoman Empire. With a little typing, you can reassign them to whatever forces you want. These cars are designed to be used directly on the terrain, without any track lod. You will need to use them in terrains that have the tracks painted directly on the tiles. All of these need to be included in the targets.ini in order to use them. I have included the data for the types.ini in the folders for each train.- 1 review
-
- 1
-
-

Version v2
124 downloads
Armored Trains were used extensively on the Eastern Front and to a lesser extent on the Palestine and Italian Fronts. On the Western Front, after 1914 they were used mostly for defense and as mobile headquarters. I have created five cars which can arranged in different configurations. Engines could both push and pull other cars. It was common to have an armed car or two in front of the engine. Troop cars had quarters for an infantry unit to help defend the train. There is a turret with a light gun. It is currently set for anti-aircraft, but you can change the data file to target ground objects. Transport cars were used to move troops, munitions, or other supplies into a battle zone or recently conquered territory. Gun cars were used as mobile light artillery. They can be included in a train or parked on a siding to defend a train station, supply depot, or other strategic location. If you change the target type to ground, they can be used as field guns. I have included two versions of a heavy, rail mounted artillery gun. In transport mode, the gun is lowered and the car can be included in a train. In deployed mode, there is gun data assigned so the gun will shoot at ground targets. If you place an observation balloon about 2 kilometers down range, the gun will be elevated when it shoots, as if it were shooting at a distant target. There is very little side to side motion, so you have to be pretty accurate when you place the target balloon. All the cars are the same length for easy placement. Put them 17.25 meters apart and they will line up nicely on the tracks. There are three complete trains with different skins so you can use them in different terrains or for different forces. I have arbitrarily assigned the grey skin to Germany, the green skin to Russia, and the tan skin to the Ottoman Empire. With a little typing, you can reassign them to whatever forces you want. These cars are designed to be used with the train tracks from Gepard's Railway Station (available in the Strike Fighter 1 Terrain downloads). Gepard has given me permission to include the tracks with my train. I have made a new skin with the ties farther apart, which I think looks better from the air. If you already have the tracks in your terrain, you don't need this. All of these need to be included in the targets.ini in order to use them. I have included the data for the types.ini in the folders for each train.- 1 review
-
- 1
-
-
My ships in the North Sea Terrain had a wake effect and a smoke effect to make them look like they are moving when they're standing still. Installation instructions are in the ReadMe. Also, in the data file for each ship, make sure the GroundObjectRole is NOT set to Transport, Shipping, or Tank. Otherwise the game will use them in the Movements. If you set it to something like Bridge, Factory, or Warehouse, the ship should still show up as a target in the single missions.
-
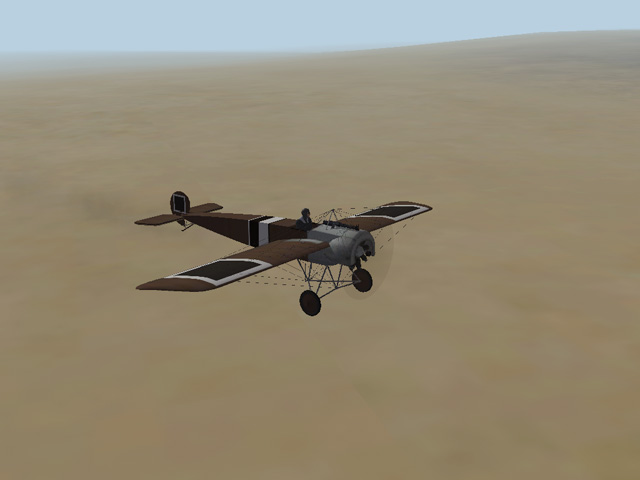
Yes, the BE2c was uploaded late last night. It includes two skins and a complete set of number decals for each skin. The gunner's motion is limited to a pretty narrow range, but I've included instructions for changing the data.ini to widen his range of motion. My thanks to ojcar for the FM. And thanks to ojcar, 33Lima, and Hansa for resources and other help with the details. This makes the 35th plane ojcar and I have made for FE!
-
View File RAF BE2c Several variations of the BE2 were produced by the Royal Aircraft Factory from 1912 until the end of World War 1. The BE2c was introduced in 1914 and was produced in large numbers. It was designed to be a very stable plane, which was desirable in a reconnaissance plane, but not very effective for a fighter. During its service, the BE2c was used mostly for recon missions, but it sometimes served as a fighter and as a light bomber. I have included two skins, a stock linen, and a brown paint. A full set of number decals are included for each skin. My skinning templates are included in the download. The gunner in the BE2c sat in front of the pilot and either had multiple guns, or was able to move the gun between multiple mounts. The game engine does not allow this, so I set up the data file to limit the gunner's aim to the upper rear of the plane. However, I provided alternate lines in the FM which will allow you to widen the gunner's aim, but that makes the gun pass through the struts, and sometimes shoot through the wing. Instructions for changing the gunner's range of motion are included in the download. Credits Thanks to Ojcar for making the data file for the BE2c and for providing resources for the model. Thanks also to 33Lima and Hansa who provided resources for the cockpit and help with details of the model. Thanks to Mike Dora for identifying and helping me fix problems with the gunner. Thanks to Nicholas Bell for correcting the hit box coordinates for this plane. Installation Instructions For FE1 - Unzip the file and move the folder named "RAFBE2C" into the FirstEagles/Objects/Aircraft folder. For FE2 - Unzip the file and move the folder named "RAFBE2C" into the FirstEagles/Objects/Aircraft folder. Then in the FirstEagles/Objects/Decals folder, create a new folder named "RAFBE2C". Move the folder named "D" from the Aircraft/RAFBE2C folder into the Decals/RAFBE2C folder you just made. Submitter Stephen1918 Submitted 12/17/2013 Category Other Entente Aircraft
-
So that's what this is for... (Thanks Quack.)
-

Version v2
512 downloads
Several variations of the BE2 were produced by the Royal Aircraft Factory from 1912 until the end of World War 1. The BE2c was introduced in 1914 and was produced in large numbers. It was designed to be a very stable plane, which was desirable in a reconnaissance plane, but not very effective for a fighter. During its service, the BE2c was used mostly for recon missions, but it sometimes served as a fighter and as a light bomber. I have included two skins, a stock linen, and a brown paint. A full set of number decals are included for each skin. My skinning templates are included in the download. The gunner in the BE2c sat in front of the pilot and either had multiple guns, or was able to move the gun between multiple mounts. The game engine does not allow this, so I set up the data file to limit the gunner's aim to the upper rear of the plane. However, I provided alternate lines in the FM which will allow you to widen the gunner's aim, but that makes the gun pass through the struts, and sometimes shoot through the wing. Instructions for changing the gunner's range of motion are included in the download. Credits Thanks to Ojcar for making the data file for the BE2c and for providing resources for the model. Thanks also to 33Lima and Hansa who provided resources for the cockpit and help with details of the model. Thanks to Mike Dora for identifying and helping me fix problems with the gunner. Thanks to Nicholas Bell for correcting the hit box coordinates for this plane. Installation Instructions For FE1 - Unzip the file and move the folder named "RAFBE2C" into the FirstEagles/Objects/Aircraft folder. For FE2 - Unzip the file and move the folder named "RAFBE2C" into the FirstEagles/Objects/Aircraft folder. Then in the FirstEagles/Objects/Decals folder, create a new folder named "RAFBE2C". Move the folder named "D" from the Aircraft/RAFBE2C folder into the Decals/RAFBE2C folder you just made.