First Eagles by Thirdwire
Sub Category
All FE Simulation Modifications and Add-Ons
- First Eagles - General Files
- First Eagles - WWI and Early Years 1914 - 1920
- First Eagles - Golden Era 1920 to 1940
-
1930s Ground And Terrain Objects
By Geezer
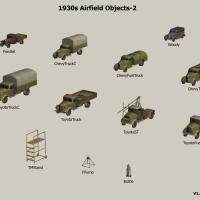
Kudos to Wrench! He massaged the basic elements I sent him, and created a complete DL ready to drop into your game folders. He set it up for SF2 but it should work OK for FE2. As usual, pay attention to the ReadMe. This pack does not include airfield figures - they are still in-work so a separate pack will be released when they are complete. The floor of the large hangar is a separate object, similar to the parking ramp. Hopefully, you can tweak the height and angle of these objects if you encounter problems with a game map that is not completely flat and level.
159 downloads
(3 reviews)0 comments
Updated
-
WW1 Airfield Objects
By Geezer
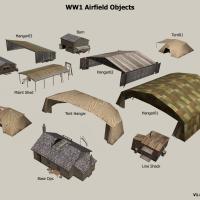
This pack contains all new airfield objects - hangars, barn, farmhouse, shed, barracks, etc. Just updated the pack to V1.1 - it now includes the missing Barracks and Base Ops files.
These objects use hi-res graphics and may not run well on older computers.
294 downloads
-
WW1 Airfield Maintenance Objects
By Geezer
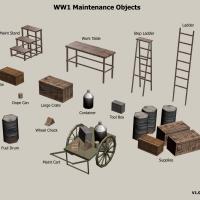
This pack contains all new WW1 maintenance objects.
4/24/2014:
revised the pack to include missing .bmp for the maintenance equipment.
247 downloads
(5 reviews)0 comments
Updated
-
dogfight 1.0.zip
By Nippy
Dogfight for Thirdwire Simulators (Series 1)
Dogfight is a quick mission generator much like Microsofts Quick Combat and
Ubisofts Quick Mission Builder.
This simple little program is an attempt to add similar facility to Thirdwire products
without editing Mission files by hand, or struggling with a complex Mission Editor.
So, using it you should be up and flying against a selected opponent within a few
seconds (once you're use to the system anyway!).
As a template for the Missions I used a standard 1v1 fighter encounter so the action
begins very close together (2 km seperation for WWI types, slightly further for faster types).
To use you:
1)Start Dogfight.
2)Setup mission.
3)Press the Red GENERATE button.
4)LEAVE Dogfight running.
5)Start the Thirdwire Simulator.
6)Go to the Single Mission page and then Load Mission Menu.
7)Click on the name of the mission that you just created in dogfight(default is "0 Dogfight").
8)When you want to change the mission click on Alt and Tab simultaneously.
9)Select Dogfight, make your changes and then press the red GENERATE button.
10)Return to the Thirdwire Simulator by clicking it on the task bar (or alt tabbing if you prefer).
11)ALWAYS RESELECT THE MISSION from the Single Mission-Load Misiion Menu to update the information.
12)Play the mission!
Repeat 8-12 as many times as you want
This sounds a bit long winded but you do soon get used to it.
Testing
DogFight has been tested with FE1 extensively (with virtually all the add on aircraft from
CombatAce, the Skunkworks and Peter01 fms), SFP1 (chiefly SCW) and WOE1 (chiefly WOR and WOA).
I've also tried it with some early Korean War era jets (SFP1).
I have only briefly tried it with more modern types (WOE) and though it works I'm not too sure
how useful regular fliers of these types will find it (it's the one period that I never really fly).
I have no access to any Thirdwire Series 2 sims so I really don't know if it will work with them.
The program was written using Microsoft Visual Studio Express 2010 C++ and FLTK.
FLTK (Fast Light Toolkit) is a great free package for constructing GUIs really quickly and easily.
Without it I doubt that I would have had time to write this program.
Thanks
Thanks to TK for creating a marvellous set of Sims. I love the way they work with TrackIR.
I would also like to take this opportunity to thank the many add on creators at Combatace and
the Skunkworks who have given me many hours of great gaming.
I hope Dogfight helps to provide some entertainment for Thirdwire Simulator Users.
Gary Ireland
118 downloads
-
HD Menu Screens for First Eagles 2
By MigBuster
HD 16:9 menu screens for First Eagles 2 (1920 x 1080) created for myself
This is a set of Images only - no ini files or changes
96 downloads
(2 reviews)0 comments
Submitted
-
Planing Maps
By gterl
Hi Everyone
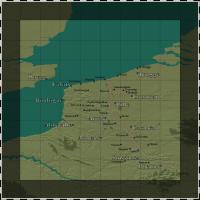
I always thought that the planing maps needed a bit of a more 'historical' (oldish) touch.
Here are three planing maps for the following terrains:
- Flanders
- Verdun
- Cambrai
Installation:
1) Make a backup copy of your existing planing maps (only overwrite if asked if you've already a backup)
2) Drop the files (*.bmp) into the respective terrain folders, like (..\First Eagles\Terrain\Flanders, ...\First Eagles\Terrain\wwiVerdun, etc.)
If you don't like....well just delete and replace with the old ones!
Cheers
gterl
159 downloads
-
Castillac SPAD XII
By gterl
Hi
and now something completely different!
Taken out of a comic strip (btw, highly recomendet ->
).
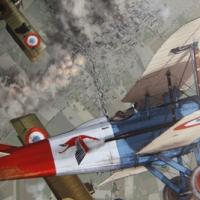
A rather special skin for the SPAD XII (the one with the cannon, which can be found here on combatace).
Installation:
- Drop whole folder 'Edelweiss' in the SPAD_XII folder (..\objects\Aircraft\SPAD_XII)
- Add the lines below into your SPAD_XII.ini at the bottom, of course change the XXX to the next number
[TextureSetXXX] <-- Change number
Directory=Edelweiss
Name=Castillac
Nation=FRANCE
Squadron=unknown
Specular=0.400000
Glossiness=0.300000
Reflection=0.100000
cheers
gterl
86 downloads
(1 review)0 comments
Submitted
-
FE Menu Sound
By gterl
Here's a bit of drama for the FE (Gold or 2) Menu.
Works best with Guitarclassic55's menu add-on.
Theme: Palladio (K. Jenkins) with a bit of WW1 drama
Installation:
- Download & unrar into temp directory
- Make copy of your existing files (sound files within 'sound' and 'flight' folders)
- Copy/overwrite with extracted files
Hope you like it
111 downloads
(2 reviews)0 comments
Submitted
-
Armored Train - Ground Level
By Stephen1918
Armored Trains were used extensively on the Eastern Front and to a lesser extent on the Palestine and Italian Fronts. On the Western Front, after 1914 they were used mostly for defense and as mobile headquarters. I have created five cars which can arranged in different configurations.
Engines could both push and pull other cars. It was common to have an armed car or two in front of the engine.
Troop cars had quarters for an infantry unit to help defend the train. There is a turret with a light gun. It is currently set for anti-aircraft, but you can change the data file to target ground objects.
Transport cars were used to move troops, munitions, or other supplies into a battle zone or recently conquered territory.
Gun cars were used as mobile light artillery. They can be included in a train or parked on a siding to defend a train station, supply depot, or other strategic location. If you change the target type to ground, they can be used as field guns.
I have included two versions of a heavy, rail mounted artillery gun. In transport mode, the gun is lowered and the car can be included in a train. In deployed mode, there is gun data assigned so the gun will shoot at ground targets. If you place an observation balloon about 2 kilometers down range, the gun will be elevated when it shoots, as if it were shooting at a distant target. There is very little side to side motion, so you have to be pretty accurate when you place the target balloon.
All the cars are the same length for easy placement. Put them 17.25 meters apart and they will line up nicely on the tracks.
There are three complete trains with different skins so you can use them in different terrains or for different forces. I have arbitrarily assigned the grey skin to Germany, the green skin to Russia, and the tan skin to the Ottoman Empire. With a little typing, you can reassign them to whatever forces you want.
These cars are designed to be used directly on the terrain, without any track lod. You will need to use them in terrains that have the tracks painted directly on the tiles.
All of these need to be included in the targets.ini in order to use them. I have included the data for the types.ini in the folders for each train.
136 downloads
(1 review)0 comments
Updated
-
Armored Train - For Tracks
By Stephen1918
Armored Trains were used extensively on the Eastern Front and to a lesser extent on the Palestine and Italian Fronts. On the Western Front, after 1914 they were used mostly for defense and as mobile headquarters. I have created five cars which can arranged in different configurations.
Engines could both push and pull other cars. It was common to have an armed car or two in front of the engine.
Troop cars had quarters for an infantry unit to help defend the train. There is a turret with a light gun. It is currently set for anti-aircraft, but you can change the data file to target ground objects.
Transport cars were used to move troops, munitions, or other supplies into a battle zone or recently conquered territory.
Gun cars were used as mobile light artillery. They can be included in a train or parked on a siding to defend a train station, supply depot, or other strategic location. If you change the target type to ground, they can be used as field guns.
I have included two versions of a heavy, rail mounted artillery gun. In transport mode, the gun is lowered and the car can be included in a train. In deployed mode, there is gun data assigned so the gun will shoot at ground targets. If you place an observation balloon about 2 kilometers down range, the gun will be elevated when it shoots, as if it were shooting at a distant target. There is very little side to side motion, so you have to be pretty accurate when you place the target balloon.
All the cars are the same length for easy placement. Put them 17.25 meters apart and they will line up nicely on the tracks.
There are three complete trains with different skins so you can use them in different terrains or for different forces. I have arbitrarily assigned the grey skin to Germany, the green skin to Russia, and the tan skin to the Ottoman Empire. With a little typing, you can reassign them to whatever forces you want.
These cars are designed to be used with the train tracks from Gepard's Railway Station (available in the Strike Fighter 1 Terrain downloads). Gepard has given me permission to include the tracks with my train. I have made a new skin with the ties farther apart, which I think looks better from the air. If you already have the tracks in your terrain, you don't need this.
All of these need to be included in the targets.ini in order to use them. I have included the data for the types.ini in the folders for each train.
123 downloads
(1 review)0 comments
Updated
-
North Sea Terrain
By Stephen1918
North Sea Terrain for First Eagles
June 2013
Terrain and ground objects by by Stephen1918
Testing, modding for FE2, and help with effects and data files by ojcar
Ojcar's AI Flyable Airships are included in the download - LODs by Stephen1918 - data, loadouts, and ini files by ojcar
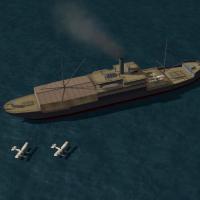
This terrain was made just so I would have a place to fly my sea planes. It's realistic, but not historical. The ships are all generic. I didn't attempt to recreate actual ships, but the types are similar to World War I era ships. All nations have the same ships, but with different flags and skins. My intention was to make it look reasonable from the cockpit.
There is no land at all in this terrain, so it will require a separate install of First Eagles. Otherwise you will find trucks and tanks driving over the water and land based aircraft taking off from the sea. I have included installation instructions.
There are no campaigns (yet), but you can fly all the mission types as single missions. Supply ships replace trucks in armed recon missions. Torpedo boats replace the tanks in army co-operation missions. Airships replace balloons in the balloon busting missions. All of the ships and airships are armed with anti-aircraft weapons. There are a few neutral country merchant ships cruising around the edges, be careful not to create a diplomatic incident by attacking a non-combatant.
I created a new kind of airfield (WWI_SeaPlaneBase.ini) which uses seaplane tenders. The tenders had hangars on the decks and planes were moved in and out of the water using cranes. WWI seaplane tenders carried small numbers of planes, usually 4 to 6, rarely more than 8. But my "airfields" have take off positions for 16 planes because First Eagles sometimes assigns large numbers of planes to missions.
I have included ojcars AI airships in this terrain. I have adjusted the formations to keep them from colliding.
This download includes all the ground objects for the North Sea terrain. I have created two new effects which make the static ships appear to be moving when they're really just sitting still. I have made new formations to spread the "trucks" "tanks" and "bombers" out more. I have made a new view list so you can use the F7 key to see all the ground objects. And I have made new icons for the in-flight map.
All the ships have a separate skin for the flags, so you should be able to quickly make Austrian, Italian, Russian, or Turkish ships for different sea terrains.
Installation Instructions:
Start by making a new install of the game. In FE1 the following changes will be made directly in the game folder. In FE2, the changes will be made in the game's mod folder.
If you haven't already done so, download the seaplanes from Combat Ace/Downloads/First Eagles Add-On Aircraft.
Open the Objects folder. Delete the entire GroundObject folder and replace it with mine.
Open the Aircraft folder. Delete all the planes, do NOT delete the pilot skins. Copy the two folders from my Aircraft folder into yours. Then install the seaplanes following the instructions in each download.
In the new game folder, open the Effects folder. Copy the three files from my Effects folder into yours.
Open the Flight folder. Copy the five files from my Flight folder into yours.
Open the terrain folder. Delete all the terrains EXCEPT "wwiVerdun." You need the Verdun cat file for my terrain to work.
Copy my wwiNorthSea folder into your Terrain folder.
If you have FE2, open my "TerrainDataForFE2" folder, copy the wwiNorthSea_Data file and use it to replace the data file in the new North Sea folder.
** A note about the water - In the download, I have included a water tile (FRLAKE.tga) which is intended to look good in Medium graphics mode. It will still work in High graphics mode, or you can delete it and the stock Verdun water will be used instead.
Ojcar has made a new data file which takes advantage of the graphics effects in FE2. This only works in FE2. If you are running FE1, use the original wwiNorthSea_Data in my terrain folder.
** Other notes - The stock campaigns and missions from the original game don't work anymore because you have deleted all the planes and terrains for them. When you run the new version of the game, it will hang if you click the "Campaign" or "Instant Action" buttons on the Main Menu Screen.
350 downloads
-
Unsung Heroes
By ojcar
Welcome to a very different WWI campaign experience! This is a semi-fictional Floatplane campaign.
This campaign start in November 1917, in North Sea. A very interesting month, because in October the German High Seas Fleet, operating in the Baltic, assisted in capturing the islands of Oesel, Dagö and Moon (Google for Operation Albion, please). Also, in November 1917 was the Second Battle of Heligoland Bight (Google for it, please).
At the same time Germans kept on sending out their submarines and merchant raiders, Entente forces continued trying to blockade shipments to the German ports. From time to time, German Fleet units ventured out to shell the British coast in an attempt to lure British ships into a trap. And, of course, fishing ships and coastal merchants continue to operate along the German coasts. The German High Seas Fleet remains in the Baltic Sea, and Zeppelins are a menace too...As I said, very interesting times!
This campaign depicts the use of Seaplane Tenders in both sides, trying to spot the enemy ships, hunting down the Zeppelins and attacking enemy ships, submarines, and of course planes.
Thank you to Stephen1918 for all the wonderful planes, ships, airships and the wonderful terrain......And of course all the texts revision and betatesting! Stephen, you rock!
195 downloads
(0 reviews)0 comments
Updated
-
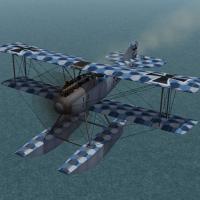
Albatros W.4 (Late)
By Stephen1918
The Albatros W.4 was a float plane version of the D.II. It used the same fuselage, engine, and armament as the D.II, but had a wider wingspan and tail. The W.4 was used for recon and spotting missions in the North Sea, the Baltic, and by Austria-Hungary in the Adriatic Sea.
This is a late version of the W.4 with the radiator mounted on the upper wing. I have included a complete set of number decals, and two skins - a blue hex camo skin for Germany and one for Austria-Hungary. I have also included my skinning templates. The skins for the late Albatros W.4 are interchangeable with the early version skins.
My version includes a loadout for a light bomb load, even though the W.4 was not used for bombing. You can delete the loadout file if you want more historical accuracy.
Since it's a float plane, the W.4 works best in the Flanders, Gibraltar or other terrain that has a lot of water. The plane will actually take off and land from a conventional airfield, but it looks strange to see the floats going under the ground. It would be best to start the missions in the air. The plane will show up occassionally parked on an airfield, but its availability is listed as "Rare" so it shouldn't happen too often.
Credits
Thanks to Ojcar for making the data file for the Albatros W.4.
Thanks to Nix for providing the sound for the Mercedes engine.
And thanks to Quack74 for giving me the idea for a float plane.
Installation Instructions
For FE1 - Unzip the file and move the folder named "AlbatrosW4Late" into the FirstEagles/Objects/Aircraft folder. You also need to move the sound file "mercedes160m2.wav" into the FirstEagles/Sounds folder.
For FE2 - Unzip the file and move the folder named "AlbatrosW4Late" into the FirstEagles/Objects/Aircraft folder. Then in the FirstEagles/Objects/Decals folder, create new folder named "AlbatrosW4Late". Move the folder named "D" from the Aircraft/AlbatrosW4Late folder into the Decals/AlbatrosW4Late folder you just made. You also need to move the sound file "mercedes160m2.wav" into the FirstEagles/Sounds folder.
240 downloads
(1 review)0 comments
Submitted
-
Albatros W.4 (Early)
By Stephen1918
The Albatros W.4 was a float plane version of the D.II. It used the same fuselage, engine, and armament as the D.II, but had a wider wingspan and tail. The W.4 was used for recon and spotting missions in the North Sea, the Baltic, and by Austria-Hungary in the Adriatic Sea.
I have made an early version of the W.4 with the radiators mounted on the sides of the fuselage. I have included a complete set of number decals, and three skins - a basic wood and linen skin for Germany, one for Austria-Hungary, and an early hex camo skin. I have also included my skinning templates. The skins for the early Albatros W.4 are interchangeable with the late version skins.
My version includes a loadout for a light bomb load, even though the W.4 was not used for bombing. You can delete the loadout file if you want more historical accuracy.
Since it's a float plane, the W.4 works best in the Flanders, Gibraltar or other terrain that has a lot of water. The plane will actually take off and land from a conventional airfield, but it looks strange to see the floats going under the ground. It would be best to start the missions in the air. The plane will show up occasionally parked on an airfield, but its availability is listed as "Rare" so it shouldn't happen too often.
Credits
Thanks to Ojcar for making the data file for the Albatros W.4.
Thanks to Nix for providing the sound for the Mercedes engine.
And thanks to Quack74 for giving me the idea for a float plane.
Installation Instructions
For FE1 - Unzip the file and move the folder named "AlbatrosW4" into the FirstEagles/Objects/Aircraft folder. You also need to move the sound file "mercedes160m2.wav" into the FirstEagles/Sounds folder.
For FE2 - Unzip the file and move the folder named "AlbatrosW4" into the FirstEagles/Objects/Aircraft folder. Then in the FirstEagles/Objects/Decals folder, create new folder named "AlbatrosW4". Move the folder named "D" from the Aircraft/AlbatrosW4 folder into the Decals/AlbatrosW4 folder you just made. You also need to move the sound file "mercedes160m2.wav" into the FirstEagles/Sounds folder.
316 downloads
(1 review)0 comments
Updated
-
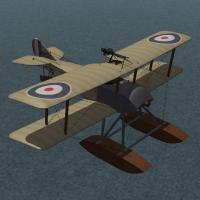
Sopwith Schneider
By Stephen1918
The Sopwith Schneider was the floatplane variant of the Tabloid, and won the Schneider racing trophy in 1914. It was quickly adopted by the British military and was used by the Royal Navy throughout the war. Early versions used wing warping instead of ailerons. Some were armed with Lewis guns on the upper wing and could carry small bomb loads. The Schneider was used mostly for recon, some were used to intercept Zeppelins over the North Sea and some were used to attack land based targets.
Since it's a float plane, the Sopwith Schneider works best in the North Sea terrain, or in Flanders, Gibraltar or other terrain that has a lot of water. The plane will actually take off and land from a conventional airfield, but it looks strange to see the floats going under the ground. Ojcar has included take off instructions in a separate text file.
I have created two skins, an early version with the British flag on the wings, and a later version with roundel markings. I have included a set of number decals. My skinning templates are included with the download.
Credits
Thanks to Ojcar for making the data file for the Sopwith Schneider and for providing instructions for taking off.
Thanks also to Nix for creating the sound file for the Gnome 100hp engine.
Installation Instructions
For FE1 - Unzip the file and move the folder named "SopwithSchneider" into the FirstEagles/Objects/Aircraft folder. You also need to move the sound file "gnome100m2.wav" into the FirstEagles/Sounds folder.
For FE2 - Unzip the file and move the folder named "SopwithSchneider" into the FirstEagles/Objects/Aircraft folder. Then in the FirstEagles/Objects/Decals folder, create new folder named "SopwithSchneider". Move the folder named "D" from the Aircraft/SopwithSchneider folder into the Decals/SopwithSchneider folder you just made. You also need to move the sound file "gnome100m2.wav" into the FirstEagles/Sounds folder.
217 downloads
(2 reviews)0 comments
Updated
-
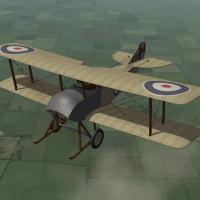
Sopwith Tabloid (Early)
By Stephen1918
The Tabloid was the land based variant of the Schneider developed in 1913. It was quickly adopted by the British military and was used both by the Royal Navy and the Royal Flying Corps. Early versions used wing warping instead of ailerons. My version has no gun, but some were armed with Lewis guns on the upper wing and could carry small bomb loads. The Tabloid was used mostly for recon and light bombing. In September 1914, Tabloids of the RNAS bombed the Zeppelin sheds at Düsseldorf.
An unlicensed copy known as the Lebed VII was built by the Russians and used for recon and later for training.
I have created two skins, a British version and a Russian. I have included a full set of number decals for each. My skinning templates are included with the download.
Credits
Thanks to Ojcar for making the data file for the Sopwith Tabloid and for providing input on the model details.
Thanks also to Nix for creating the sound file for the Gnome 100hp engine.
Installation Instructions
For FE1 - Unzip the file and move the folder named "SopwithTabloidEarly" into the FirstEagles/Objects/Aircraft folder. You also need to move the sound file "gnome100m2.wav" into the FirstEagles/Sounds folder.
For FE2 - Unzip the file and move the folder named "SopwithTabloidEarly" into the FirstEagles/Objects/Aircraft folder. Then in the FirstEagles/Objects/Decals folder, create a new folder named "SopwithTabloidEarly". Move the folder named "D" from the Aircraft/SopwithTabloidEarly folder into the Decals/SopwithTabloidEarly folder you just made. You also need to move the sound file "gnome100m2.wav" into the FirstEagles/Sounds folder.
199 downloads
(2 reviews)0 comments
Updated
-
Sopwith Tabloid (Late)
By Stephen1918
The Tabloid was the land based variant of the Schneider developed in 1913. It was quickly adopted by the British military and was used both by the Royal Navy and the Royal Flying Corps. Later versions had ailerons on both wings and a larger vertical stabilizer on the tail. Most were armed with Lewis guns on the upper wing and could carry small bomb loads. The Tabloid was used mostly for recon and light bombing missions. I have included my skinning templates and a full set of number decals.
Credits
Thanks to Ojcar for making the data file for the Sopwith Tabloid and for providing input on the model details.
Thanks also to Nix for creating the sound file for the Gnome 100hp engine.
Installation Instructions
For FE1 - Unzip the file and move the folder named "SopwithTabloidLate" into the FirstEagles/Objects/Aircraft folder. You also need to move the sound file "gnome100m2.wav" into the FirstEagles/Sounds folder.
For FE2 - Unzip the file and move the folder named "SopwithTabloidLate" into the FirstEagles/Objects/Aircraft folder. Then in the FirstEagles/Objects/Decals folder, create new folder named "SopwithTabloidLate". Move the folder named "D" from the Aircraft/SopwithTabloidLate folder into the Decals/SopwithTabloidLate folder you just made. You also need to move the sound file "gnome100m2.wav" into the FirstEagles/Sounds folder.
286 downloads
(2 reviews)0 comments
Submitted
-
First Eagles seasonal Tiles by Jan Tuma
By Jan Tuma
First Eagles seasonal Tiles by Jan Tuma
-------------------------------------------
This is a set of new seasonal textures together with environmental mod (Trees, Forests, Farms, and new city objects) to enhance the look and feel of default First Eagles "Verdun" terrain; Expansion Pack 1 "Cambrai" terrain and aditional Flanders and Vogesen terrain.
Different textures and environmental for each of 12 months.
Please note that due to things work in the series terrain engine, you cannot destroy nor collide with buildings or trees.
There may be some performance drop on older systems (drop off framerate during flight), you have been warned!
----------------------
Installation:
----------------------
First make backups of your existing terrains folders!!! In case something goes wrong during the install...
A) Installation for all terrain (Werdun, Cambrai, Flanders and Vogesen):
Extract this package to First eagles main directory (not in Terrain folder), if asked, overwrite. So will supplementeds all files in Terrain folder at a time.
B) Custom Installation:
1) Unzip this package and open "Terrain" directory
2) Copy "Seasonal_tiles" folder in Terrain directory
3) For installation new Tiles to Werdun terrain copy "wwiVerdun" directory from installation package to "Terrain" folder, if asked, overwrite
4) For installation new Tiles to Cambrai terrain copy "wwiCambrai" directory from installation package to "Terrain" folder, if asked, overwrite
5) For installation new Tiles to Flanders terrain copy "Flanders" directory from installation package to "Terrain" folder, if asked, overwrite
6) For installation new Tiles to Verdun terrain copy "Verdun" directory from installation package to "Terrain" folder, if asked, overwrite
You may want to change the Ground Objects setting from Medium or High to Unlimited for better look (above all cities tiles)
----------------------
Uninstallation:
----------------------
A) Best would be to restore the directory you BACKED UP, don't tell me you didn't!
or
B)
1) Delete "seasonal_tiles" folder in Terrain directory
2) Delete all *.TOD files in "Terrain\wwiVerdun" folder. Move or copy all files found inside of "Terrain\wwiVerdun\backup" directory to "Terrain\wwiVerdun" folder, if asked, overwrite
3) Delete all *.TOD files in "Terrain\wwiCambrai" folder. Move or copy all files found inside of "Terrain\wwiCambrai\backup" directory to "Terrain\wwiCambrai" folder, if asked, overwrite
4) Delete all *.TOD files in "Terrain\Flanders" folder. Move or copy all files found inside of "Terrain\Flanders\backup" directory to "Terrain\Flanders" folder, if asked, overwrite
5) Delete all *.TOD files in "Terrain\Vogesen" folder. Move or copy all files found inside of "Terrain\Vogesen\backup" directory to "Terrain\Vogesen" folder, if asked, overwrite
----------------------
Credits:
----------------------
This mods was created by Jan Tuma
Vesion: 1.00 13.2.2010
THIS MOD IS ONLY TO BE DISTRIBUTED AS FREEWARE AND IN NO OTHER CIRCUMSTANCE SHALL IT BE USED, EVEN IN PART OF ANYTHING THAT IS PAYWARE. IN ACCORDANCE WITH THE COMBAT ACE MODDERS AGREEMENT. Remember to give me credits and include original readme.
Have fun, again watch that Hun in the sun!
Jan Tuma
http://www.tuma.tenzor.cz
2,211 downloads
-
Air & ground counters for FE
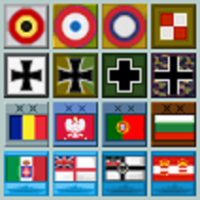
This mod provides you with a batch of colorful, reduced-size, more immersive counters, devoted to each of the nationalities that could be present in First Eagles, including possible new theaters. Besides having a more attractive map and less confused stacks, you can also find more easily the units you're after. As a rule, the counters with rectangular national flags and division device show the ground units, those with national ensigns and warships shapes the naval units, while the counters with roundels concern the air units.
This pack may seem redundant after Stephen1918's. However, I was preparing these counters since long as part of a major upgrade for my former Medals Pack for FE. As this work still needs time, I provide the counters here in a separate delivery: they won't be included any more in the new Medals Pack. My counters are also different from Stephen's in two regards, in continuity with my former various counters packs for SF1: first, I kept loyal to the smaller 24x24 size for FE1, enjoyable on large-scale maps with crowded stacks; and second, I kept on using the colors of national uniforms and usual aircraft skins as my counters' background colors, rather than generic colors by sides, thus favoring immersion over immediate readibility. This makes my pack an alternative rather than a redundancy: the choice is still yours.
Of course, this mod provides all of the counters needed for the nations present in First Eagles' campaigns on the Western Front, and also in the add-ons available at Combatace giving access to the Italian and Eastern Fronts. Some variant counters have been included, for aesthetic purpose only, for example several German air counters to reflect the changes in German markings and development of camo skins.
Ottoman counters have been added for operations on the Palestine map, Romanian counters considering a possible extension of the Eastern Front, Bulgarian, Serbian and Greek counters for a possible development of a Balkan Front. Soviet and Polish counters have been added in the case of scenarios about the Russian Civil War or the Soviet-Polish War.
Ground counters have been included for units of the British Empire present on various fronts ( Australia, Canada, India and New Zealand ); and there are even ground counters for “anecdotal” units which once served on the Western Front, such as the two Portuguese divisions decimated during Operation Georgette ( April 1918 ), or the Polish and Czech Legions wearing French blue uniforms engaged during the last offensives in Champagne. However, safe for the Australians and Poles, none of these nations is listed in the game's Nations file (FirstEagles/Flight folder). This can be remedied by small tricks explained in the ReadMe file.
Finally, naval counters have even been included for FE2 air-sea scenarios or campaigns taking place in the North Sea, or elsewhere yet to come ( Adriatic, Baltic, Dardanelles... ).
A small folder has been added to fix a problem in my former Medals Pack for FE, that prevented the counters of the Royal Naval Air Service ( a new Nation created especially for that mod ) to appear on the Planning Map. It will be fully solved in a later upgrade for that mod, yet to come.
111 downloads
-
AviatikD1 Skins and Decals pack PART 2
By quack74
This is PART 2 of Quack74's Aviatik D.I skin pack PART 1.
Multiple Skins for Stephen1918's AviatikD1 model
It contains the rest of the Aircraft files and Decals.
It was all too big to post into one download. PART 1 is needed for it all to work properly.
Follow the README files and send me a PM for any questions. Or even post in the FE forum so all can see. I'm sure there will be questions.
Thanks to Stephen1918 for the awsome Aviatik D.I model
And thanks to Ojcar for the FM's
Enjoy!
Quack74
126 downloads
(2 reviews)0 comments
Updated
-
Phönix D.II
By Stephen1918
The Austro-Hungarian Phönix D.II was an improved version of the D.I, both of which appeared in 1917. The D.II included changes to the ailerons, elevators, and engine which improved the performance over the D.I. The Phönix was a stable plane and slow to maneuver but could handle steep dives and was considered an excellent fighter.
I have included a set of letter decals so you can set flight letters in the Loadout screen, or the game will randomly assign a different letter to each plane.
I have included my skinning templates so others can make new skins if they want. I have also included my .OUT files for the benefit of future modders.
Credits
My thanks to ojcar, who created the FM to capture the power and performance of this sturdy plane.
Historical Notes
I couldn't find any photos of the D.II cockpit. The cockpit of my model is based on the D.I with a little speculation. I believe it is reasonably accurate.
Installation instructions:
For FE1: Unzip the file and move the folder named "PhoenixD2" into the FirstEagles/Objects/Airplanes folder.
For FE2: Unzip the file and move the folder named "PhoenixD2" into the FirstEagles/Objects/Airplanes folder. Then in the FirstEagles/Objects/Decals folder, create a new folder named "PhoenixD2". Move the folder named "D" from the Airplanes/PhoenixD2 folder into the Decals/PhoenixD2 folder you just made.
500 downloads
(2 reviews)0 comments
Updated
-
Phönix D.IIa
By Stephen1918
The Phönix D.IIa was the same as the D.II but with a more powerful 230 hp Hiero engine, which gave it better speed and better climbing ability.
My model of the D.IIa is based on my model of the D.II but with a different engine - which means all new .LOD files as well as a new cockpit (the engine is part of the cockpit in this model.) I have made a slightly different skin, new decals, and ojcar has made a different FM, so this is a completely new plane. (You do NOT need the D.II in order to install this plane.)
The skins and decals are interchangeable with the D.II.
I have included a set of letter decals so you can set flight letters in the Loadout screen, or the game will randomly assign a different letter to each plane.
The skinning templates are identical to the D.II, but I have included them here anyway. I have also included my .OUT files for the benefit of future modders.
Credits
My thanks to ojcar, who created the FM to capture the improved power and performance of this excellent Austro-Hungarian fighter.
Installation instructions:
For FE1: Unzip the file and move the folder named "PhoenixD2a" into the FirstEagles/Objects/Airplanes folder.
For FE2: Unzip the file and move the folder named "PhoenixD2a" into the FirstEagles/Objects/Airplanes folder. Then in the FirstEagles/Objects/Decals folder, create a new folder named "PhoenixD2a". Move the folder named "D" from the Airplanes/PhoenixD2a folder into the Decals/PhoenixD2a folder you just made.
529 downloads
(1 review)0 comments
Updated
-
Hansa-Brandenburg C.I - 3 pack
By Stephen1918
The Hansa-Brandenburg C.I was an Austro-Hungarian two seater, similar in size and configuration to the German Albatros. It was introduced in 1916 and used throughout the war, with more powerful engines in later versions. The HB C.I was used primarily for reconnaissance and light bombing, although it saw service as a fighter early in the war. Early versions of the plane carried a gun pod on the upper wing. After a better synchronization system was developed, the gun was moved down to the left side of the fuselage.
I have included three different versions of the plane with this download. Ojcar has created FM's for the 160hp, 200hp, and 230hp engines, and Nix has provided the engine sounds for all three. There are three slightly different models, with different loadouts, different serial number decals, and different skins for each plane, so there are three complete planes which can be installed individually or all together.
The skins are interchangeable, except for the serial numbers, but you may see some stretching on the nose of the 230hp version. Each skin has a "Standard" version which will allow you to change nationalities, and an "Austrian" version with the cross at mid wing. The Austrian version won't let you change the national insignia. I have included my skinning templates.
Ojcar has also provided two new guns for this plane. For FE1, we have included Peter01's GunData.ini with Ojcar's guns added. To load the new guns you will need the Gun Editor available from the Combat Ace download area, (I have provided a link at the end of this page.) For FE2, Ojcar has provided the necessary files.
Credits:
My thanks once again to Ojcar for making three excellent data.ini files and two new gun data files for this plane - and for teaching me how to add guns to First Eagles.
My thanks to Nix who created the engine sound files for the Austro-Daimler 160, 200, and 230 horse-power engines.
Thanks also to Sinbad and Quack74 who provided reference materials for the Hansa-Brandenburg C.I
Installation instructions:
For FE1: Unzip the file and move the three folders named "HBC1_160" "HBC1_200" and "HBC1_230" into the FirstEagles/Objects/Airplanes folder. Move the three sound files named "Austro-daimler160.wav" "Austro-daimler200.wav" and "Austro-daimler230.wav" into the FirstEagles/Sounds folder.
To add guns you'll need the Gun Editor program (available in the Combat Ace Downloads area.) Move the newGundata.ini file into the FirstEagles/Objects folder. Open the Gun Editor and click the Open button. Find the Gundata.ini you just installed and open it. Make sure the new guns are there (the last one in the list should be "8MM_SCHWARZLOSE_M0712" Click the Save button and close the Gun Editor. You have the new guns!
For FE2: Unzip the file and move the three folders named "HBC1_160" "HBC1_200" and "HBC1_230" into the FirstEagles/Objects/Airplanes folder. Then in the FirstEagles/Objects/Decals folder, create three new folders named "HBC1_160" "HBC1_200" and "HBC1_230". Move the folder named "D" from the Airplanes/HBC1_xxx folders into the corresponding Decals/HBC1_xxx folders you just made. Move the three sound files named "Austro-daimler160.wav" "Austro-daimler200.wav" and "Austro-daimler230.wav" into the FirstEagles/Sounds folder.
To add the guns move both gun folders ("8MM_SCHWARZLOSE_M0712" and "8MM_SCHWARZLOSE_M0712_Gunner") into your Guns folder (in your mod files folder) and you're done!
This is the URL for Gun Editor I use for FE1:
http://combatace.com/files/file/103-sf-gun-editor-for-strike-fighters/
628 downloads
(2 reviews)0 comments
Updated
-
Voisin Type V with 37mm cannon
By Stephen1918
The Voisin Type V was a slightly improved version of the Voisin III, with minor changes to the 150hp Salmson engine, a more streamlined nacelle, and staggered wings. It was first used in 1915, but was not a significant improvement over the Voisin III and served alongside it rather than replacing it. Some Type Vs were equipped with a a 37mm Hotchkiss cannon mounted in the nose and were successfully used for ground attack missions.
In my model, the 37mm cannon is rigged as an internal gun, so the pilot can fire it. The gunner would normally sit or stand directly behind the cannon, but I have placed him to the side so you can get a clear view of your target. As a result, some of the cockpit details have been altered, but are still reasonable.
Ojcar has created the data file for the plane, and spent some time tweaking the gun data to get it to perform more realistically. (You will have to reload between shots.)
I have included three skinning options for the plane, identical except for the decals. The Italian Linen uses the Italian insignia with red and green underwing panels. The Russian Linen uses the Russian insignia and includes stripes on the tail planes. The Standard Linen can be used for all the other Entente powers. This plane uses the national markings that come with First Eagles, so you can easily change nationalities (in the Standard Linen skin only.) I have included all my skinning templates. This is slightly different from the Voisin III and the skins are not interchangeable.
I have also included decals for serial numbers which will be applied randomly.
Historical Notes:
The serial numbers are fictious, but more or less in the correct range for the Voisin Type V.
The Russians used different national markings on the tail planes, If you use my Russian skin, you will have white, blue, and red stripes on the tail planes. If you use the Standard skin for the Russians, you will get roundels on the tail planes.
Details of the gunner and gunner's cockpit have been altered to make it possible for the pilot to fire the gun.
Credits:
My thanks to Ojcar for making the data file for this plane, and for massaging the data for the gun to get a more realistic effect.
Installation instructions:
For FE1: Unzip the file and move the folder named "Voisin5" into the FirstEagles/Objects/Airplanes folder.
For FE2: Unzip the file and move the folder named "Voisin5" into the FirstEagles/Objects/Airplanes folder. Then in the FirstEagles/Objects/Decals folder, create a new folder named "Voisin5". Move the folder named "D" from the Airplanes/Voisin5 folder into the Decals/Voisin5 folder you just made.
A note about Effects -
I have used the 37mm Hotchkiss 1885 cannon in my plane. In First Eagles, this is usually used as a ground object and the gun fire animation is quite large. If you have a slow computer, you may not be able to see the fire effect unless you have shadows turned off.
If you have downloaded p10ppy's SPAD XII, then you already have a nice fire effect for an aircraft mounted cannon (with smoke blowing back over the cockpit). The effect is in a file named "37mmSPAD.ini" in your Effects folder and is named "37mmFireEffectEnH". You can edit the GunData.ini for the 37MM_HOTCHKISS_1885 to use the better effect by changing the effect name to read:
GunFireEffect=37mmFireEffectEnH
514 downloads
(3 reviews)0 comments
Updated
-
Download Statistics
14,390
Files12,639
Comments27,028
Reviews

