A tachanka was a horse drawn wagon or cart with a heavy machine gun mounted on the back. This made it possible to deploy machine guns quickly, especially on the wide, rapidly changing, Eastern Front. It was used by Russian cavalry in WWI and by Bolshevik, White Russian, Ukrainian, and Polish cavalry in the Russian Civil Wars. Germany used a similar vehicle on the Eastern Front during WWI.
My tachanka is a troika (three horse carriage) with a Vickers machine gun facing the rear. It functions in First Eagles as a Truck; drop it into your Ground Objects folder and First Eagles will assign it to some of your Armed Reconnaissance missions. The machine gun is set for AA and will fire at enemy planes that come within its field of fire.
The download includes three LODs and a destroyed version.
My thanks to Gepard for suggesting this interesting vehicle.
Installation Instructions
For both FE1 and FE2
Unzip the file and open my "GroundObject" folder. Copy the folder named "Tachanka" to your FirstEagles/Objects/GroundObject folder. Then copy the file named "TachankaDestroyed.bmp" into your GroundObject folder. Note that the "TachankaDestroyed.bmp" file should not be inside any other folder.
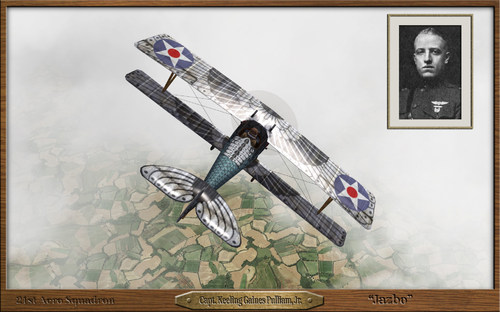
EmlD Nieuport 27 E (trainer) "Issoudun Nieuport series" for First Eagles 2
This is the last pack for the "Issoudun Nieuport series" Featuring now the Nieuport 27 E used by United States at Issoudun, France to train their pilots.
This is a full aircraft type, trying to represent the trainer Nieuport 27 used by United States.
__________________________________________________________________________________________________________
This pack features EmlD Nieuport 27 that I renamed Nieuport 27 E (trainer).
You will find several versions for some of the planes with different colors at your choice.
** What you find in this Nieuport 27 E Pack:
- Three (3) Nieuport 27 E Skins in several versions & Colors options. All used by 3rd Air Instructional Center (3rd AIC) at Issoudun France.
1- Nieuport 27 E, "Jazbo" flown by Captain Keeling Gaines Pulliam, Jr. Commanding 21st Aero Squadron From March 16, 1918 to October 15, 1918. (several versions)
2- Nieuport 27 E.1 N.8655 "Old Doc Yak" flown by Lieutenant Quentin Roosevelt (son of the former President of the United States, Theodore Roosevelt) of 36th Aero Squadron. (several versions).
3- Nieuport 27 E named "ISIS" flown by 31st Aero Squadron pilots.
4- One Nieuport 27 (N27) of Lt Jacques Michael Swaab (Nieuport 27 skin)
5- Geezer pilot figure new textures (US Pilot) that I painted to be used with Geezer's "wwiPilotNew3".
The LODs are adjusted to use JPG textures but I included a folder with the BMPs files for First Eagles 1 users.
You will find (4) four pilots layout options. The new texture has a "US UNIFORM" as standard layout.
To use the others with scarfs, you must to exchange the file names:
-To use the "DARK BLUE" scarf you must to rename
OPTIONAL-DARK BLUE-Pilot And Scarf.jpg to Pilot And Scarf.jpg
__________________________________________________________________________________________________________
-To use the "LIGHT BLUE" scarf you must to rename
OPTIONAL-LIGHT BLUE-Pilot And Scarf.jpg to Pilot And Scarf.jpg
__________________________________________________________________________________________________________
-To use the "US FLAG" scarf you must to rename
US FLAG-Pilot And Scarf.jpg to Pilot And Scarf.jpg
__________________________________________________________________________________________________________
-To use the "US UNIFORM" you must to rename
US UNIFORM-Pilot And Scarf.jpg to Pilot And Scarf.jpg
__________________________________________________________________________________________________________
6- A new cockpit textures in two options (1024x1024 JPG & TGA) & (2048x2048 JPG & TGA).(Included BMP files) for First Eagles 1 users.
7- New hangar screens (several versions).
__________________________________________________________________________________________________________
- The LODs are adjusted to use JPG textures this is only for FE2 users.
- I painted new textures for the cockpit. I drew a new "GLASS.tga" to complement all of them. The gauges & needles were made as close as possible to the real instruments.
- I'm releasing two versions: One in 1024x1024(JPG & TGA) and other in 2048x2048(JPG & TGA).
- I set the 1024x1024(JPG & TGA) as standard for the planes.
- I painted as well, new hangars screens for these planes. The screens are in 1920x1200 size with some options for your choice.
*OBS: If you are running a low-end computer I do not recommend the use of 2048x2048 cockpit textures.
__________________________________________________________________________________________________________
The aircraft will fly only reconnaissance "RECON" missions.
There is two options of flight model one by peter01 and other by VonS.
__________________________________________________________________________________________________________
-INSTALLATION INSTRUCTIONS:
*FE2 INSTALLATION
- Drop or copy the folder "Nieuport 27 E" from mine "Aircraft" folder to your "Aircraft" folder.
- Drop or copy the folder "US Pilot" from mine "pilots" folder to your "Pilots" folder.
- Drop or copy the folder "Nieuport 27 E" from mine "decals" folder to your "decals" folder.
That's all.
__________________________________________________________________________________________________________
*FE2 INSTALLATION for N27 of "Lt Jacques Michael Swaab"
- To use the Lt Jacques Michael Swaab (Nieuport 27 skin)
Drop or copy the folder "Swaab" from mine "N27" Aircraft folder to your "N27" Aircraft folder.
Drop or copy the folder "Swaab", from mine "N27" Decals folder to your N27 "Decals" folder.
*ATTENTION*
In order to work properly on your loadout menu option, this following lines, must to be COPIED into your "N27.ini" file.
[TextureSetXXX]
Directory=Swaab
Name=Lt.Jacques Michael Swaab
Nation=USAS
Squadron=
Specular=1.800000
Glossiness=1.800000
Reflection=0.000000
Replace the (XXX) in the [TextureSetXXX] top line, with the appropriate number following your "N27.ini" file order for others skins that you have already installed before.
That's all.
__________________________________________________________________________________________________________
Credits:
- Julio Junqueira texture skins for aircraft, pilot, cockpit and hangars.
- EmlD for the excellent Nieuport 3d models.
- Geezer for the excellent pilot 3d model (wwiPilotNew3)
- peter01 for the excellent flight model ini file.
- vonS for the excellent flight model ini file.
- Panama Red for the excellent Nieuport 24 cockpit 3d LOD edition.
__________________________________________________________________________________________________________
- Thanks EmlD, Geezer, peter01, vonS and Panama Red for their fantastic work.
- Thanks to Stephen1918 and Crawford for help with information on the Nieuport's fuel gauge.
- special thanks to CombatAce.com hosting the files.
__________________________________________________________________________________________________________
These textures are freeware; you are allowed to use it as you wish, but The names of all contributors listed here, must be added in any new released readmes. These textures may not in any way, be used in any payware additions.
__________________________________________________________________________________________________________
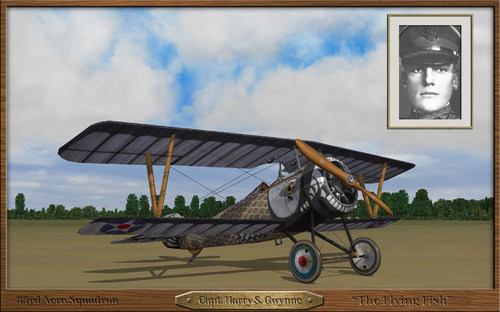
EmlD Nieuport 24Bis E (trainer) "Issoudun Nieuport series" for First Eagles 2
This is the second pack for the "Issoudun Nieuport series", featuring now the Nieuport 24 Bis used by United States at Issoudun, France to train their pilots.
It's a full aircraft type, trying to represent the trainer Nieuport 24Bis used by United States.
__________________________________________________________________________________________________________
This pack features EmlD Nieuport 24Bis that I renamed Nieuport 24Bis E (trainer).
You will find several versions for some of the planes with different colors at your choice.
** What you find in this Nieuport 24Bis Pack:
- Five (5) Nieuport 24Bis E Skins in several versions & Colors options. All used by 3rd Air Instructional Center (3rd AIC) at Issoudun France.
1- Nieuport 24Bis "Flying Fish" flown by Captain Harry S. Gwynne, commander of 33rd Aero Squadron.
Captain Gwynne Died in airplane accident in 9 june 1918 at Issoudun, France. (Nieuport 24Bis in several versions)
2- Nieuport 24Bis named "HELEN" flown by pilots of 101st Aero Squadron at Issoudun. (Two rudder versions)
3- One (1) Nieuport 24Bis flown by pilots of 31st Aero Squadron.
4- Two (2) Nieuport 24Bis of unknown squadrons used by "3rd AIC" at Issoudun.
5- Geezer pilot figure new textures (US Pilot) that I painted to be used with Geezer's "wwiPilotNew3".
The LODs are adjusted to use JPG textures but I included a folder with the BMPs files for First Eagles 1 users.
You will find (4) four pilots layout options. The new texture has a "US UNIFORM" as standard layout.
To use the others with scarfs, you must to exchange the file names:
-To use the "DARK BLUE" scarf you must to rename
OPTIONAL-DARK BLUE-Pilot And Scarf.jpg to Pilot And Scarf.jpg
__________________________________________________________________________________________________________
-To use the "LIGHT BLUE" scarf you must to rename
OPTIONAL-LIGHT BLUE-Pilot And Scarf.jpg to Pilot And Scarf.jpg
__________________________________________________________________________________________________________
-To use the "US FLAG" scarf you must to rename
US FLAG-Pilot And Scarf.jpg to Pilot And Scarf.jpg
__________________________________________________________________________________________________________
-To use the "US UNIFORM" you must to rename
US UNIFORM-Pilot And Scarf.jpg to Pilot And Scarf.jpg
__________________________________________________________________________________________________________
6- A new cockpit textures in two options (1024x1024 JPG & TGA) & (2048x2048 JPG & TGA).(Included BMP files) for First Eagles 1 users.
7- New hangar screens (several versions).
__________________________________________________________________________________________________________
- The LODs are adjusted to use JPG textures this is only for FE2 users.
- I painted new textures for the cockpit. I drew a new "GLASS.tga" to complement all of them. The gauges & needles were made as close as possible to the real instruments.
- I'm releasing two versions: One in 1024x1024(JPG & TGA) and other in 2048x2048(JPG & TGA).
- I set the 1024x1024(JPG & TGA) as standard for the planes.
- I painted as well, new hangars screens for these planes. The screens are in 1920x1200 size with some options for your choice.
*OBS: If you are running a low-end computer I do not recommend the use of 2048x2048 cockpit textures.
__________________________________________________________________________________________________________
- The aircraft will fly only reconnaissance "RECON" missions.
- This pack has two options of flight model one by peter01 and other by VonS.
__________________________________________________________________________________________________________
INSTALLATION INSTRUCTIONS:
FE2 INSTALLATION
- Drop or copy the folder "Nieuport 24Bis E" from mine "Aircraft" folder to your "Aircraft" folder.
- Drop or copy the folder "US Pilot" from mine "pilots" folder to your "Pilots" folder.
- Drop or copy the folder "Nieuport 24Bis E" from mine "decals" folder to your "decals" folder.
That's all, you are ready to train at Issoudun.
__________________________________________________________________________________________________________
Credits:
- Julio Junqueira texture skins for aircraft, pilot, cockpit and hangars.
- EmlD for the excellent Nieuport 3d models.
- Geezer for the excellent pilot 3d model (wwiPilotNew3)
- peter01 for the excellent flight model ini file.
- vonS for the excellent flight model ini file.
- Panama Red for the excellent Nieuport 24 cockpit 3d LOD edition.
__________________________________________________________________________________________________________
- Thanks EmlD, Geezer, peter01, vonS and Panama Red for their fantastic work.
- Thanks to Stephen1918 and Crawford for help with information on the Nieuport's fuel gauge.
- special thanks to CombatAce.com hosting the files.
__________________________________________________________________________________________________________
These textures are freeware; you are allowed to use it as you wish, but The names of all contributors listed here, must be added in any new released readmes. These textures may not in any way, be used in any payware additions.
__________________________________________________________________________________________________________
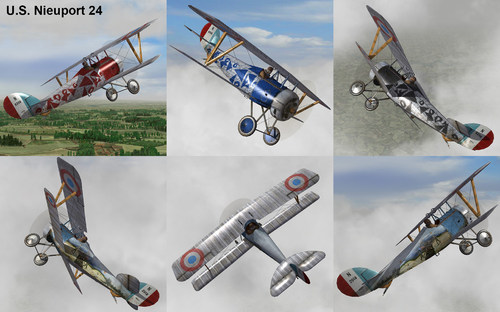
EmlD Nieuport 24E (trainer) "Issoudun Nieuport series" for First Eagles 2
This is a full aircraft type, trying to represent the trainer Nieuports used by United States at Issoudun.
"Issoudun Nieuport series" a set of several Nieuports used by the United States to train pilots during WW1 in France at Issoudun airdrome. Many of these Nieuports had very atypical painting schemes, between them, two with fish scales were "The Jazbo" And the "Flying Fish" (also called the "Dragon ship" or "Gwynne's Goldfish") and several others. Also these were considered "special ships" and representative of their unit. Often they were just for formation flying. Each crew tried to keep these bird primed for inspection. At Field eight there were multiple single coloured Nieuport 24 types used as aggressors for camera armed dogfights so a student could prove he had gotten his opponent. I gathered most of them in this series of skins.
This first pack features EmlD Nieuports 24 that I renamed Nieuport 24E (trainer).
You will find several versions for some of the planes with different colors at your choice.
** What you will find in this Nieuport 24 Pack:
- Eight (8) Nieuport 24 Skins in several versions & Colors options. All used by 3rd Air Instructional Center (3rd AIC) at Issoudun France.
1- Two (2) Nieuport 24 flown by pilots 0f 31st Aero Squadron.
2- Four (4) Nieuport 24 of unknown squadrons used by "3rd AIC" at Issoudun. (several versions)
3- Two (2) Nieuport 24 of of unknown squadrons photographed at Pruniers airfield, Romorantin, France.
4- Geezer pilot figure new textures (US Pilot) that I painted to be used with Geezer's "wwiPilotNew3".
The LODs are adjusted to use JPG textures but I included a folder with the BMPs files for First Eagles 1 users.
You will find (4) four layout options. The new texture has a "US UNIFORM" as standard layout.
To use the others with scarfs, you must to exchange the file names:
-To use the "DARK BLUE" scarf you must to rename
OPTIONAL-DARK BLUE-Pilot And Scarf.jpg to Pilot And Scarf.jpg
__________________________________________________________________________________________________________
-To use the "LIGHT BLUE" scarf you must to rename
OPTIONAL-LIGHT BLUE-Pilot And Scarf.jpg to Pilot And Scarf.jpg
__________________________________________________________________________________________________________
-To use the "US FLAG" scarf you must to rename
US FLAG-Pilot And Scarf.jpg to Pilot And Scarf.jpg
__________________________________________________________________________________________________________
-To use the "US UNIFORM" you must to rename
US UNIFORM-Pilot And Scarf.jpg to Pilot And Scarf.jpg
__________________________________________________________________________________________________________
5- A new cockpit textures in two options (1024x1024 JPG & TGA) & (2048x2048 JPG & TGA).(Included BMP files) for First Eagles 1 users.
6- New hangar screens (several versions).
__________________________________________________________________________________________________________
- The LODs are adjusted to use JPG textures this is only for FE2 users.
- I painted new textures for the cockpit. I drew a new "GLASS.tga" to complement all of them. The gauges & needles were made as close as possible to the real instruments.
- I'm releasing two versions: One in 1024x1024(JPG & TGA) and other in 2048x2048(JPG & TGA).
- I set the 1024x1024(JPG & TGA) as standard for the planes.
- I painted as well, new hangars screens for these planes. The screens are in 1920x1200 size with some options for your choice.
*OBS: If you are running a low-end computer I do not recommend the use of 2048x2048 cockpit textures.
__________________________________________________________________________________________________________
The aircraft will fly only reconnaissance "RECON" missions.
Flight model in this pack by peter01
__________________________________________________________________________________________________________
INSTALLATION INSTRUCTIONS:
FE2 INSTALLATION
- Drop or copy the folder "Nieuport 24 E" from mine "Aircraft" folder to your "Aircraft" folder.
- Drop or copy the folder "US Pilot" from mine "pilots" folder to your "Pilots" folder.
- Drop or copy the folder "Nieuport 24 E" from mine "decals" folder to your "decals" folder.
That's all, you are ready to train at Issoudun.
__________________________________________________________________________________________________________
Credits:
- Julio Junqueira texture skins for aircraft, pilot, cockpit and hangars.
- EmlD for the excellent Nieuport 3d models.
- Geezer for the excellent pilot 3d model (wwiPilotNew3)
- peter01 for the excellent flight model ini file.
- Panama Red for the excellent Nieuport 24 cockpit 3d LOD edition.
__________________________________________________________________________________________________________
- Thanks EmlD, Geezer, peter01 and Panama Red for their fantastic work.
- Thanks to Stephen1918 and Crawford for help with information on the Nieuport's fuel gauge.
- special thanks to CombatAce.com hosting the files.
__________________________________________________________________________________________________________
These textures are freeware; you are allowed to use it as you wish, but The names of all contributors listed here, must be added in any new released readmes. These textures may not in any way, be used in any payware additions.
__________________________________________________________________________________________________________

The Ford FT-B (also know as the Ford Tf-c) was a Polish armored car built in Warsaw in 1920. It was built on a Model-T chassis using steel plate left by the Germans. The FT-B had a crew of two and was armed with a single Maxim machine gun in a rotating turret. It had a relatively high speed and a long range. Because it was light weight and easy to maneuver it was an effective fighter, and the Ford's small profile made it difficult to hit.
My Ford FT-B has a four color camo skin. I've made high and low poly LODs as well as a destroyed version. I backdated the data file to before the Polish-Russian War so the car can be used throughout; you can change the Service Start Date to June of 1920 if you want greater accuracy.
In First Eagles, the the Ford FT-B takes the role of a tank. Drop it into your ground object folder and First Eagles will randomly assign it to some of your Army Co-operation missions.
Installation Instructions
For both FE and FE2 - Unzip the file and open my "GroundObject" folder. Copy the folder named "FordFTB" and the file named "FTBDest.bmp" into your FirstEagles/Objects/GroundObject folder. Note that the "FTBDest.bmp" file should not be inside any other folder.
Four vehicles and other objects that modders can add to airfields using the target.ini. I have made them rather generic so they should be usable for either side, on any front. I have included the data for the types.ini for each object in the download.
Vehicles include a Starter Truck, a Fuel Truck, a Utility Truck, and a Staff Car. I have also included an Oil Cart and a grouping of miscellaneous Tools used by the ground crews.
Each vehicle has a high and low poly LOD as well as a destroyed version. I have organized everything into folders for convenience, but you'll need to take them out of the folders when you install them.

SPAD VII Skin pack of Escadrille 561 for First Eagles 2, Gold & 1.
Just adding small complements and personal markings to the original stock game skins, to represent the SPADs VII used by ESC 561 in Italy. (I'm adding two versions
one for SPAD7_150 and other for SPAD7_180).
This skin pack depict all known SPAD VII as was Flown by Ltt Frédéric Loiseau, Ltt Jean De Limur, Slt Pierre de Jumilhac of Escadrille 561 at Venice, Italy during
late 1917 early 1918.
Historical notes:
- Ltt Frédéric Loiseau after the war, become famous, crossing in 1929 the Sahara desert with a Bugatti Type 40: 11,500 kilometers of unpaved roads and desert. In
1930 Loiseau wrote a book about his adventure “A cent a l’heure a travers le Sahara”.
- Ltt Jean De Limur after the war, become actor in Hollywood and a renowned film director.
__________________________________________________________________________________________________________
Historical Sources:
- Aéro-Journal n°39, L'Escadrille de Venise, entre guerre et dolce vita, David Méchin.
- Albin Denis website: http://albindenis.free.fr/Site_escadrille/page_centaine.htm
__________________________________________________________________________________________________________
INSTALLATION INSTRUCTIONS :
To install this skins pack and ini files, copy or drop the folders named "SPAD7_150" and "SPAD7_180" in your "SPAD7_150" and "SPAD7_180" aircraft folders.
To install the decals, copy or drop the folder named "SPAD7_150" and "SPAD7_180" in your "SPAD7_150" and "SPAD7_180" Decals folders.
*ATTENTION*
In order to work properly on your loadout menu option, this following lines, must to be COPIED into your "SPAD7_150.ini" file.
[TextureSetXXX]
Directory=ESC561
Name=ESC561 Frédéric Loiseau
Nation=FRANCE
Squadron=561ESC
Specular=1.800000
Glossiness=1.800000
Reflection=0.000000
[TextureSetXXX]
Directory=ESC561a
Name=ESC561 Ltt Jean De Limur
Nation=FRANCE
Squadron=561ESC
Specular=1.800000
Glossiness=1.800000
Reflection=0.000000
[TextureSetXXX]
Directory=ESC561b
Name=ESC561 Slt Pierre de Jumilhac
Nation=FRANCE
Squadron=561ESC
Specular=1.800000
Glossiness=1.800000
Reflection=0.000000
Replace the (XXX) in the [TextureSetXXX] top line, with the appropriate number following your "SPAD7_150.ini" file order for others skins that you have already
installed before.
__________________________________________________________________________________________________________
For you to get better profit of these skins I recommend the use of Stephen1918's SPAD VII cockpit, that you are able to download here at CombatAce.com.
NOTE:
I'm adding 2 optional "INSIGNIA002.tga" that I painted to replace the French original game INSIGNIA002. To use it just drop or copy to your main folder "Decals".
Remember to backup your INSIGNIA002.tga if you have already installed one in the main decals folder.
__________________________________________________________________________________________________________
Credits:
- Julio Junqueira skin
- Third Wire Productions for the original files that I used as base to my work.
- special thanks to CombatAce.com hosting the files.
__________________________________________________________________________________________________________
This is freeware; you are allowed to use it as you wish, but The names of all contributors listed here, must be added in any new released readmes. This skin may
not in any way, be used in any payware additions.
__________________________________________________________________________________________________________

SPAD XIII Skin pack of Escadrille 561 for First Eagles 2, Gold & 1.
Just adding small complements and personal markings to the original stock game skins, to represent the SPADs XIII used by ESC 561 in Italy.
This skin pack depict all known SPAD XIII as was Flown by Sgt André Lévy, Lt Xavier Garros and an Unknown pilot, of Escadrille 561 at Venice, Italy during 1918.
Historical notes:
- Sgt Andre Lévy was the sole ace of Escadrille 561, claiming one Austrian seaplane on November 17th, 1917, and as much as five balloons from June to September 1918, before being shot down by the Flak, just after his last kill (and the last of ESC 561 in WW1), over another balloon. Made prisoner, at Mulbach prision camp on November 2. After two attemts he escaped, climbed an 8,000 ft. mountain to return to Lido airbase on November 6th. He was made Chévalier de La Légion d'Honneur, the Médaille Militaire and Croix de Guerre with two Étoiles de bronze. He was also awarded the Italian Croce di Guerra, two Medaglie d'Oro and two Medaglie da Bronzo al Valore Militare. He passed away on March 12, 1973.
- Lt Xavier Garros claimed two Austrian seaplanes (One Lohner T and one W.13) while flying in ESC 561.
__________________________________________________________________________________________________________
Historical Sources:
- Aéro-Journal n°39, L'Escadrille de Venise, entre guerre et dolce vita, David Méchin, octobre-novembre 2004
- Albin Denis website: http://albindenis.free.fr/Site_escadrille/page_centaine.htm
__________________________________________________________________________________________________________
INSTALLATION INSTRUCTIONS :
To install this skin pack and ini files, copy or drop the folder named "SPAD13_220" in your "SPAD13_220" aircraft folder.
To install the decals, copy or drop the folder named "SPAD13_220" in your "SPAD13_220" Decals folder.
*ATTENTION*
In order to work properly on your loadout menu option, this following lines, must to be COPIED into your "SPAD13_220.ini" file.
[TextureSetXXX]
Directory=ESC561
Name=ESC561 Sgt Andre Lévy
Nation=FRANCE
Squadron=561ESC
Specular=1.800000
Glossiness=1.800000
Reflection=0.000000
[TextureSetXXX]
Directory=ESC561a
Name=ESC561 Lt Xavier Garros
Nation=FRANCE
Squadron=561ESC
Specular=1.800000
Glossiness=1.800000
Reflection=0.000000
[TextureSetXXX]
Directory=ESC561b
Name=ESC561 Unknown pilot
Nation=FRANCE
Squadron=561ESC
Specular=1.800000
Glossiness=1.800000
Reflection=0.000000
Replace the (XXX) in the [TextureSetXXX] top line, with the appropriate number following your "SPAD13_220.ini" file order for others skins that you have already installed before.
NOTE:
I'm adding an optional "INSIGNIA002.tga" that I painted to replace the French original game INSIGNIA002. To use it, just drop or copy to your main folder "Decals".
Remember to backup your INSIGNIA002.tga if you have already installed one in the main decals folder.
__________________________________________________________________________________________________________
Credits:
- Julio Junqueira skins
- Third Wire Productions for the original files that I used as base to my work.
- special thanks to CombatAce.com hosting the files.
__________________________________________________________________________________________________________
This is freeware; you are allowed to use it as you wish, but The names of all contributors listed here, must be added in any new released readmes. This skin may not in any way, be used in any payware additions.
__________________________________________________________________________________________________________
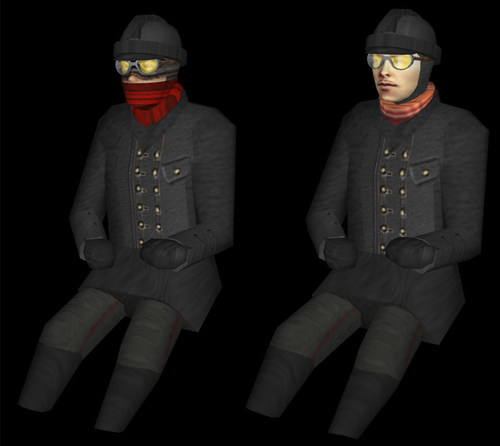
German pilot Skin pack textures (GerHelmetPilot) & (GerScarfPilot) for FE2, Gold and FE1.
This is a pack with new textures (Max Immelmann face), for Stephen1918's "GerHelmetPilot" and "GerScarfPilot", to be used in First Eagles 2, First Eagles Gold edition and First Eagles 1.
-There is two (2) options for "GerHelmetPilot" texture bmp just with different scarfs at your choice. To use the other, you must to rename it to "GerHelmetPilot".
-There is four (4) options "GerScarfPilot" texture bmp just with different scarfs at your choice. To use those, you must to rename anyone that you select to "GerHelmetPilot".
I'm Including as well JPG files for players that are using Hexaedited .LODs pointing to JPG format (This is only to FE2 users).
_________________________________________________________________________________________________________
INSTALLATION INSTRUCTIONS FOR GerHelmetPilot:
*First make a back-up of your "GerHelmetPilot" Folder, just in case.
Copy or drop the "GerHelmetPilot.bmp" file in your game "GerHelmetPilot" folder.
_________________________________________________________________________________________________________
INSTALLATION INSTRUCTIONS FOR GerScarfPilot:
*First make a back-up of your "GerScarfPilot" Folder, just in case.
Copy or drop the "GerHelmetPilot.bmp" file in your game "GerScarfPilot" folder.
__________________________________________________________________________________________________________
Credits:
- Julio Junqueira pilot texture.
- Thanks to Stephen1918 for the great GerHelmetPilot & GerScarfPilot 3D.
- Special thanks to CombatAce.com hosting the files.
__________________________________________________________________________________________________________
This is freeware; you are allowed to use it as you wish, but The names of all contributors listed here, must be added in any new released readmes. These textures may not in any way, be used in any payware additions.
__________________________________________________________________________________________________________
It's the time of default skin for the most popular stock aircraft of all flight sims about WW1 - SPAD 13.
I tried to add some "photorealistic" textures for more impressive image of this aircraft.
I removed wing cockardes and rudder's tricolor from "Decals.ini" because they were integrated in my skin.
Put folder "D' into "Objects/Decals/SPAD13".
Eugene

