
Leaderboard

Popular Content
Showing most liked content on 03/01/2022 in all areas
-
16 points
Version 0.1.2
430 downloads
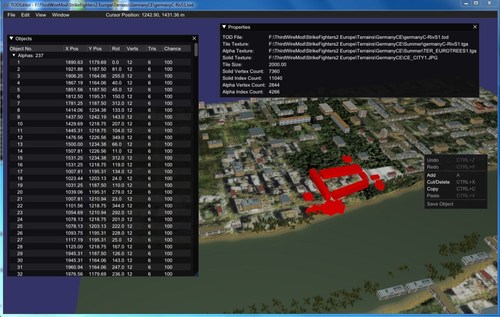
After nearly 6 years since my proof of concept experiments with the TOD files I'm ready to release a first version of the TODEditor (could almost be a nominee for the Duke Nukem Forever Award ). Main Features: Easy editing of TOD files: cut/copy/paste, moving and rotating of objects Import of object models files: *.lod, *.obj or *.3ds Warning: Use at your own risk. The TODEditor is currently in an early beta stage and can contain serious bugs. So, please backup your terrain files before you work with the TODEditor. I have warned you! The program is free for whatever use (commercial or personal). Installation: Extract the content of the zip package to a convenient location. The TODEditor depends on the Microsoft Visual Studio 2019 C++ libraries. If not already installed on the computer (e.g. by other applications) they have to be installed by running vcredist_x64.exe (you can find it in the redist subfolder of this package). Start the program by double click the todeditor.exe. For further information see TODEditor_readme.txt. Update 29.03.2025: I think it's best for the community if my tools are freely downloadable for everyone. External download link: https://www.dropbox.com/scl/fi/5m8zr6odggwn5aivevv4v/TODEditor_V0.1.2.zip?rlkey=0togau4znjxrjyw4arvn19itg&st=87b65uok&dl=0 Mue -
7 pointsView File TODEditor After nearly 6 years since my proof of concept experiments with the TOD files I'm ready to release a first version of the TODEditor (could almost be a nominee for the Duke Nukem Forever Award ). Main Features: Easy editing of TOD files: cut/copy/paste, moving and rotating of objects Import of object models files: *.lod, *.obj or *.3ds Warning: Use at your own risk. The TODEditor is currently in an early beta stage and can contain serious bugs. So, please backup your terrain files before you work with the TODEditor. I have warned you! The program is free for whatever use (commercial or personal). Installation: Extract the content of the zip package to a convenient location. The TODEditor depends on the Microsoft Visual Studio 2019 C++ libraries. If not already installed on the computer (e.g. by other applications) they have to be installed by running vcredist_x64.exe (you can find it in the redist subfolder of this package). Start the program by double click the todeditor.exe. For further information see TODEditor_readme.txt. Mue Submitter mue Submitted 03/01/2022 Category Utilities / Editors
-
7 pointsStill Voodoo time :) 2 scheme from Maple Flag '83 (the camo one need to be worked on as it was done with water paint and a mop and did not lasted long :)
-
2 points
-
2 points
-
2 pointsgive russian air forces some money so that they can catch up with their avionics technology for real
-
2 points
-
2 pointsThis week I promised to launch this plane in beta, it will come out as it is in the screenshot, only a skin with decals (the one of the operational plane apparently), this 3d model as you will know is from Aleducat. flying it is complicated since it uses false vectors to be able to create super maneuverability, this acts as in the harrier when activating it the super maneuverability would be turned off and the refueling probe would be displayed visually, possibly some textures are missing in the radar and cockpit and the features of it are not like those of the real model. Neither appropriate weapons nor disposable tanks were created. the model is the prototype, the pitot and some antennas were removed from the data. I don't think I can update it in the future due to the load I have with my own models, but I don't rule out that Aleducat improves it either. this is translated by google, excuse my bad english
-
2 points
-
1 pointI played a little bit with the Flightmodel an i was able to reduce the wobbling of the Tejas. Open file: Tejas_data.ini. Look for line: ReferenceArea=38.4 and change it into ReferenceArea=35.5 Then look for the entries of the [Left_Flaperon], [Left_Flap], [Right_Flap] and [Right_Flaperon] chapters in each of this chapters you find a line: ControlRate=1.0 change it into ControlRate=2.0 This changes help to reduce the wobbling effect. They will not eliminate it.
-
1 pointAnd what is wrong with it? perhaps you are playing the wrong side then... I think many noticed (over the years) that the red side is generally downgraded...
-
1 point
Most still wait for Half Life 3, while I was waiting for this, and Mue delivered! This is what I consider the last remaining tool we terrain modders needed to complement gerwin's TFDtool and Mue's Target Area Editor. You have my gratitude for this one!
-
1 point
Outstretched thank you so much for your TODEditor.
-
1 point
-
1 point
-
1 point
-
1 pointGhost in the machine..... Good hunting !
-
1 pointDo you believe in Ghosts ?
-
1 pointLook, I can be lazy and not make one either... I mean sure somebody is going to but not me, no I would never do that...
-
1 pointTK posted this a long time ago, I think it covers just about everything: Strike Fighters: Project 1 Decals Tutorial v11-12-02 Strike Fighters: Project 1 allows you to place high-res textures on top of the basic skin texture. These high-res textures are called decals, and they can even be made to use different textures in response to the aircraft’s Nation ID, Squadron ID, Aircraft Number, and Kill Number. So you can use decals to dynamically add squadron patches, squadron code, aircraft serial number, kill markings, and just about anything else you want to add. This tutorial will cover the basics of how the Strike Fighters’ decal system works, and it included some hands on examples at the end. Keep in mind that because the decal system is fairly powerful and flexible, placing decals can be tricky and frustrating at times. So be prepared to do a lot of trial-and-errors as you play with the decals. Decal Textures All decal textures are normal 32-bit .tga format, using the 8-bit alpha channel to control the transparency. Textures can be created and edited using any of your favorite paint programs that support 32-bit .tga format. (This tutorial assumes you know how to manipulate alpha channel, for more information on how to do this, please consult your paint program’s manual). Decal textures can be any size you want, but they must be square in shape. Typical texture sizes used are 64x64, 128x128, and 256x256. Of course, bigger texture uses more memory, so having too many high-res decal textures may affect the game’s performance. The decal textures are applied so the edge of the texture is stretched out to the area not covered by the texture itself. So to avoid “bleeding” outside the texture, you must have a buffer of transparent pixels (usually 3 pixels will do) on each edges of the texture. If you see a streak or “bleeding” decal, check your alpha channel and keep it at least 3 pixels away from the edge of the file. All decal textures should be placed in the Objects/Aircraft folder. The default decals are not visible to the end user, but any new user created decals placed in this folder will override the default decals of the game. So to replace existing default decal, all you have to do is simply save the new texture with the same name as the default texture. (A list of the name of decal textures shipped with the game is included later in this tutorial) Decals.ini The placements of the decals are specified in decals.ini file in each texture directory. This allows you to have different settings for each texture set. (USAF, Navy, German, etc, etc). If you open the decals.ini file you’ll see a long listing of decals entries, which might look something like this: [Decal001] MeshName=Nose DecalLevel=0 FilenameFormat=Insignia DecalFacing=RIGHT Position=4.707,-0.113 Rotation=0.0 Scale=1.7 DecalMaxLOD=4 Reverse=TRUE [Decal002] ... etc. Breaking these entries apart: [Decal___] This is the section header of the decal entry, and it must be named [DecalXXX] where XXX is a three digit number 001, 002, 003, etc. The numbers have to be consecutive, and any missing number will cause the rest of the decal entries to be skipped. MeshName= Mesh name refers to the name of the mesh object that the decal is to be applied on. The 3d aircraft models in the game are made up of many smaller components called “meshes”. The number and the name of the meshes vary from model to model, and are specified by the 3d model builder. When applying a decal, you must specify the name of the mesh it is applied to. For example, insignia decals are typically applied to left wing mesh, right wing mesh, and fuselage mesh. There is a max limit of 4 decals that you can apply to any single mesh. (ie, 4 decals max per fuselage, 4 per nose, etc, etc). To get some of the basic mesh names, you can browse the existing decals.ini files for the aircraft you are interested and look at the mesh names listed in the file. Generally, the fuselage, nose, vertical tail, right/left outer/inner wings have decals already on them. A complete list of mesh names for each of the objects in the game should be included in the zip file. DecalLevel= Decals can made to use different textures based on one of the four dynamic variables: aircraft’s Nation ID, Squadron ID, Aircraft Number, and Kill Number. You select which variable the decal should use by setting the DecalLevel, as follow: DecalLevel=0 –> Nation ID DecalLevel=1 –> Squadron ID DecalLevel=2 –> Aircraft Number DecalLevel=3 –> Kill Number Every nation and squadron in the game has an ID number assigned to it. Each aircraft is also assigned a different aircraft number, and Kill Number uses the player’s current kill scores. These numbers are passed into the decal system. The game engine changes the texture name by attaching a three-digit number (001, 002, 003, etc) to the name of the texture. So if the texture name specified is Insignia.tga, and the aircraft’s Nation ID is 1 (and DecalLevel=0), the actual texture name used is Insigna001.tga. FilenameFormat= This is the file name of the decal texture (32-bit .tga file). It will first look for the file that has the name plus the three-digit number set by the DecalLevel as above. If no such texture is found, it will then look for a texture without any number added. For example, DecalLevel=1 FilenameFormat=SqPatch The game will look for texture named SqPatch001.tga if the aircraft belongs to Squadron ID = 1, SqPatch002.tga if Squadron ID = 2, etc. If numbered texture is not found, it’ll then look for just SqPatch.tga. DecalFacing= DecalFacing specifies which side of the mesh the decal should appear. It can be LEFT, RIGHT, TOP, BOTTOM, FRONT, or BACK. Position= This controls the position of the decal on the airplane. The coordinate is given relative to the whole airplane, not to the individual mesh. The coordinates are measured in meters. For DecalFacing=LEFT or RIGHT, the coordinate x,y refers to coordinate as you’re looking from the right side of the aircraft. +x toward the nose -x toward the tail +y up -y down For DecalFacing=TOP or BOTTOM the coordinate x,y refers to coordinate as you’re looking down from the top of the aircraft. +x toward the right wing -x toward the left wing +y toward the nose -y toward the tail The coordinate must lie on top of the mesh specified or the decal will not show up in the game, so you must enter coordinates that the mesh actually covers. If you are trying to add nose art to one of the default aircraft, and it isn’t showing up, you may want to check your coordinates and make sure they are in the bounds of the nose mesh. (Granted, this might be difficult without having the model in front of you in 3d studio max - but you should be able to get close by looking at the default decal settings and finding coordinates that are on the nose mesh, and tweak it from there.) Rotation= This sets the rotation angle, in degrees. This is optional, and if entry is not present, it’ll default to no rotation. Scale= This controls the size of the decal on the mesh. DecalMaxLOD= This controls how far out the decal show up on the mesh. Reverse= This is optional, and if entry is set to TRUE, the decal will be applied reversed in x direction. Mainly used for decals that are mirrored on left and right (such as FinFlash and “slanted” type decals). Nations List List of nations included with the Strike Fighters and their corresponding ID numbers are listed at the end of the Skin Tutorial. Squadrons List The squadrons are listed in SquadronList.ini file located in PilotData folder. To add a new squadron, you just have to add a new squadron entry on this file. If you open the .ini file, you see that it contains the following Squadron entries: [Squadron001] Name=10TFS DisplayName=10th TFS, 50th TFW Nation=USAF [Squadron002] … etc. Breaking these entries apart: [Squadronl___] This is the section header of the squadron entry, and it must be named [SquadronXXX] where XXX is the three-digit number 001, 002, 003, etc. of the squadron. The numbers have to be consecutive, and any missing number will cause the rest of the squadron entries to be skipped. This number is the Squadron ID that gets passed into the decal system. Name= Short unique identifier name used to reference the squadron. DisplayName= This is the text description that is displayed in the squadron drop down list. Nation= This is the name of the default nation Examples So, there are basically 2 ways to do decals. The first is the ‘stand-alone’ type decal that you can use to add high-res texture that always appears with a particular skin. (Remember, that each skin has it’s own decals.ini file in its directory, and thus when you chose to fly with this skin, you are using that particular decals.ini file). To add this type of decal, you just follow the following four steps: 1. Create your decal texture using your favorite paint program. 2. Save the decal file as a 32-bit .tga file into the Objects/Aircraft folder. 3. Add a new decal entry in the decals.ini with the line FilenameFormat= set to the name of the decal. 4. Find the name of the mesh you wish to apply the decal to, and determine the facing, position, and size of the decal. And enter them in the decal entry you just created above. Example 1: MyDecal.tga For example, to add MyDecal.tga to the nose of the F-4E Phantom with USAF camo skin (located in Objects\Aircraft\F-4E\USAFtng1 folder), you can add the following new entry to the end of its decals.ini file: [Decal012] MeshName=fuselage_front DecalFacing=LEFT FilenameFormat=MyDecal Position=8.15,-0.25 Scale=0.8 DecalMaxLOD=4 Note that the original decals.ini for F-4E USAF camo has 11 decals, so [Decal012] is the next decal number. With the above decals.ini saved, and MyDecal.tga copied into Objects\Aircraft folder, the new decal should appear on the nose of your F-4E Phantom with USAF camo skin. The second and more useful way of adding decals involves use of the DecalLevel. This requires a series of decal textures that the game can select from based on Nation ID, Squadron ID, Aircraft Number, or Kill Number. You can create a whole new series, or add or change the existing series. You can name the series anything you want, but the textures must be saved with names ending with a three-digit number 001, 002, 003, etc. For example, if you’re planning to use the series with Nation ID (DecalLevel=0), you should save Mercenary (Nation ID = 1) texture with name ending in 001, USAF (Nation ID = 2) texture 002, USN (Nation ID = 3) texture 003, etc. 1. Create a series of decal textures using your favorite paint program. 2. Save them with names ending in three-digit number 001, 002, 003, etc. 3. Add a new decal entry in the decals.ini with DecalLevel set to the variable you want to use to generate the three-digit number (0 = Nation ID, 1 = Squadron ID, 2 = Aircraft Number, 3 = Kill Number) 4. Add the line FilenameFormat= set to the name of the decal, without the three-digit number. 5. Find the name of the mesh you wish to apply the decal to, and determine the facing, position, and size of the decal. And enter them in the decal entry you just created above. Example 2: NationNameWhite003.tga and NationNameWhite004.tga For example, say you’re creating a darker camo skin and would like the letters “NAVY” and “MARINES” to appear in white lettering (instead of default black letters). You can do this by using decals with DecalLevel set to 0 (Nation ID). USN has Nation ID of 3 and USMC has Nation ID of 4, so you can use two decal textures – one with white NAVY letters and another with white MARINES letters. And save them both in the Aircraft folder as NationNameWhite003.tga (Navy texture) and NationNameWhite004.tga (Marines texture). Then, in the decals.ini, add the following entry (these are from F-4B decal.ini) [Decal010] MeshName=fuselage_P DecalLevel=0 DecalFacing=LEFT FilenameFormat=NationNameWhite Position=-1.450,-0.335 Scale=2.2 DecalMaxLOD=3 [Decal011] MeshName=fuselage_P DecalLevel=0 DecalFacing=RIGHT FilenameFormat= NationNameWhite Position=-1.450,-0.335 Scale=2.2 DecalMaxLOD=3 That will apply the decal texture NationNameWhite003.tga when the user selects USN, NationNameWhite004.tga for USMC, and nothing for other service (unless you create other NationNameWhiteXXX.tga textures or default NationNameWhite.tga). Example 3: F4_SqTailL014.tga and F4_SqTailR014.tga Here’s another example. This time, we’re using existing decal series, and adding a new F-4 squadron instead. According to the list of default decals included at the end of this tutorial, F4_SqTailL.tga and F4_SqTailR.tga are the decals used for the tail marking on all F-4s, so we’ll use this series. Open SquadronList.ini in PilotData folder. And add the following new squadron entry: [Squadron014] Name=MYSQUAD DisplayName=MySquadron Nation=USAF Note that the last squadron (assuming you have your default SquadronList.ini) has 13 squadrons, so [Squadron014] is the next squadron. To add more squadron, you just have to increase the number to make it the next squadron ID. (also, it is a good idea to make a backup of the original SquadronList.ini, just in case…) Then, create the F4_SqTailL and F4_SqTailR decals. To make these decals to appear only when you’ve selected your new squadron, you have to save the decal textures with three-digit number 014 (Squadron ID of your new squadron). So for this example, we’ll save them as F4_SqTailL014.tga and F4_SqTailR014.tga, and copy them into the Objects/Aircraft folder. That’s it! Now, whenever you select any aircraft and skin combo that uses F4_SqTailL and F4_SqTailR decal series, your new decals will show up on the tail of your aircraft when you select your squadron from the drop down list. Note that you didn’t have to edit any decals.ini for this example. This is because you’re using already existing decal series (F4_SqTailL and F4_SqTailR). Also, note that when you fly A-4 or F-104, your squadron marking does not show up (yet). In order to make them show up, you’ll need to create similar decals for A4_SqTailL014.tga and A4_SqTailR014.tga. Default Decals Here is a list of filenames for the default Strike Fighters decals: FinFlashXXX.tga – national marking applied on the vertical tail fin. For most nations, this is their national flag. For USAF, this is the TAC symbol, and for some others (such as Soviet), this is the same as regular insignia. InsigniaXXX.tga – insignia marking that appears on wings and fuselages. NationNameXXX.tga – currently, these are just the “USAF” (002), “NAVY” (003) and “MARINES” (004) lettering. USAir002.tga/USForce002.tga – the lettering “US AIR FORCE,” split into two textures for better texture usage. killXXX.tga – default kill markings for the jets showing red stars. F4TailNumXXX.tga – black and white AF serial numbers found on the camouflaged F-4 C/D/E. There are 100 textures containing a small sample of real life F-4 serial numbers. F100NumFuseXXX.tga – 3-digit FW-XXX numbers found on the side of the F-100 fuselage. There are 100 textures that contain some of the real F-100 serial numbers. F100NumTailXXX.tga – 5 digit serial numbers found on the tail of the F-100. These numbers correspond to the numbers in the F100NumFuse files, so if you edit one series, you should also edit the other to make them match. F104FuseNumXXX.tga – 3-digit FG-XXX numbers found on the side of the F-104 fuselage. There are 100 textures that contain some of the real F-104 serial numbers. F104TailNumXXX.tga – 5 digit serial numbers found on the tail of the F-104 also matching the numbers on the fuselage. SovietNumXXX.tga – 2 digit numbers found on all Soviet aircraft. 100 textures (000-099) indicate numbers 00-99 in the color red. USMCNumXXX.tga – 2 digit numbers found on the USMC skins. 100 textures (000-099) indicate numbers 00-99. USNAttackNumXXX.tga – 3 digit numbers found on Navy Skyhawks. 100 textures (000-099) indicate numbers 300-324, 400-424, 500-524 and 600-624. USNFighterNumXXX.tga – 3 digit numbers found on Navy Phantoms. 100 textures (000-099) indicate numbers 100-124, 200-224, 300-324 and 400-424. GermanNumXXX.tga – 2 digit numbers found on the German aircraft. 100 textures (000-099) indicate 00-99. ItalianNumXXX.tga – 2 digit numbers found on the Italian aircraft. 100 textures (000-099) indicate numbers 00-99. SqPatchXXX.tga – squadron badges that are used on certain aircraft and skins. SqNameXXX.tga – squadron names that are used by US Navy and US Marine squadrons. SqNumXXX.tga – squadron “number” that are used by some non-US aircraft and skins. Italian 154/6 (010) has the number “6-”, Italian 155/50 (011) has “50-”, German JBG31 (012) has letter “DA”, and French EC 2/11 (013) has “11-RH” A4_SqTailLXXX.tga and A4_SqTailRXXX.tga – squadron tail markings for A-4 Skyhawks. These have a left and right side, and cannot be flipped in the decals.ini files for various reasons. Each squadron in the game has a decal set for each plane, so although it would not be historically correct for VF-84 Jolly Rogers to fly on A-4, it is still possible in the game. F4_SqTailLXXX.tga and F4_SqTailRXXX.tga – as above, except for F-4 tail. F104_SqTaiilLXXX.tga and F104SqTailRXXX.tga – as above, except for F-104 tail. Troubleshooting tips If your decal isn’t showing up, here are some things you might want to look into… * Remember, the maximum number of these is 4 per mesh piece (fuselage, nose, vertical tail...etc, etc). If you’re applying a lot of decals and some of them are not showing up, check to make sure you didn’t exceed this limit. * Make sure you have the correct name for the mesh you’re trying to apply the decal to. Mesh names are not the same from aircraft to aircraft. * Make sure the position specified is within the mesh. For example, each wings are usually broken up into two meshes – inner wing and outer wing, so make sure you have the right mesh and right position. * If your decal is not responding to the dynamic variable you’ve selected, check the DecalLevel. Set it to 0 to make it use Nation ID, 1 for Squadron ID, 2 for Aircraft Number, and 3 for Kill Number. * Double check your filenames and naming convention. Make sure you’ve saved the file with the correct three-digit number at the end. * Make sure the decal texture is in the right directory. The texture must be placed in Objects/Aircraft, not in the individual aircraft folder. ****
-
1 pointFollowing initial trials in the early 1960's the US Army purchased 10 Fiat G-91R1's for evaluation in Vietnam, much to the annoyance of the USAF ...After completion of the trials the US Army requested delivery of a new planned G-91YS variant in the planning stages at that time. The USAF strongly objected fearing a rival to the F-5A and intrusion on their own missions sets. This was further exacerbated when the small, powerful, nimble, gun and missile-armed jets achieved some air-to-air kills. South Vietnam also trialed the aircraft but took the F-5 instead after pressure from the USAF and US politicians. The remaining airframes were shipped back to the states for disposal.
-
1 pointWe may need to talk my friend... I am making the whole series in the shadows...
-
1 pointView File M109A1 howitzer Hello and thank you for downloading my work. https://gkabs.net What's included: M109A1 howitzer models. All my files should include the Strike Fighters 2 Series game file (.LOD) and the texture required. (tested and work only for SF2) Installation: Copy files to their proper folder //Please change the XXX with the correct number from your //Soundlist: [SoundList] SoundFileXXX=155MM_M126 SoundFileXXX=TankEngine SoundFileXXX=GKTankTrack SoundFileXXX=50caliber [TankEngine] Priority=LOW 3DSound=TRUE DopplerEffect=TRUE Looped=TRUE NumBuffers=2 MaxDist=250.000000 MinDist=10.000000 InsideConeAngle=360 OutsideConeAngle=360 ConeOutsideVolume=100 [GKTankTrack] Priority=NORMAL 3DSound=TRUE DopplerEffect=FALSE Looped=TRUE NumBuffers=4 MaxDist=500.000000 MinDist=50.000000 InsideConeAngle=360 OutsideConeAngle=360 ConeOutsideVolume=100 [155MM_M126] Priority=NORMAL Looped=FALSE NumBuffers=2 3DSound=TRUE DopplerEffect=FALSE MaxDist=1500.000000 MinDist=400.000000 InsideConeAngle=360 OutsideConeAngle=360 ConeOutsideVolume=100 [50caliber] Priority=NORMAL Looped=TRUE NumBuffers=4 3DSound=TRUE DopplerEffect=FALSE MaxDist=1000.000000 MinDist=50.000000 InsideConeAngle=360 OutsideConeAngle=360 ConeOutsideVolume=100 If you need any further help please read the Knowledge Base at: https://combatace.com/forums/forum/268-thirdwire-strike-fighters-2-series-knowledge-base/ 1.0.0 LICENSE: You are allowed to use this model and everything included with it for personal non-profit use for Strike fighters 1 and 2. For use outside of this scope, you need to contact me for permission. gkabs@gkabs.net Credit goes to the following: Third Wire for making this outstanding game. compufat for helping me with the textures big thank you. Credit goes to https://www.textures.com as I use a lot of their photos to create the skins. Google for some photos and information. And finally not forget the wonderful site of https://combatace.com and all the nice members and their dedicated support for this game. Software used: 3d Max 2009 UVLayout v2 Pro Substance Painter Adobe Photoshop If you need any assistance please contact me at gkabs@gkabs.net Site gkabs.net gulfknights.net Submitter GKABS Submitted 02/25/2022 Category Ground Object Mods
-
1 pointto the best of my knowledge, the LOD is NOT here. Unfortuntately (as recently seen) we really can't stop people from doing things. We can only warn them, advise them and hope they understand and follow site policy. Why did the OP post here in The Pub, instead of the right SF forum? Obviously, not paying attention to location. It's happened before, and it'll happen again You'll also notice the OP never said what game it's for. While I'm quite sure it for the SF series, without knowing WHICH one, I can't move the thread to where it belongs


-
Popular Contributors
-
1

-
2
-
3
-
4
-
5
-
6

-
7

-
8
-
9

-
10

-

Important Information
By using this site, you agree to our Terms of Use, Privacy Policy, and We have placed cookies on your device to help make this website better. You can adjust your cookie settings, otherwise we'll assume you're okay to continue..